And the point is not even that it is very convenient and functional, but that a garden bench has always been almost the main element of decorating a personal plot. In order for the bench to fit perfectly into the overall appearance of the garden and at the same time retain its functionality, it would not be amiss to take a closer look at this piece of “garden interior”.
Garden bench materials
Modern benches are made from both classic materials - wood, stone, wrought iron, marble, and more modern ones - plastic, synthetic fiber. Often benches can be made simultaneously from two or more materials - stone and iron, wood and glass, forged steel and wood. The style in which this item is made depends on this. This means that it is necessary to select a bench for the garden taking into account its stylistic features. For example, a bench made of stone or forged steel and wood will fit perfectly into a garden designed in a classic style, and a bench made of plastic will look great on the lawn in front of a cottage in a modern style.

But still, the most popular material used to make a garden bench is wood. In particular, teak is most often used. Teak wood has always been used in shipbuilding because it is very resistant to moisture. In the fresh air, a gray coating appears on teak furniture, which can be easily removed with a soft brush. In addition, teak furniture must be treated with teak oil, which comes with the furniture - this way the furniture will last for many years.

Manufacturers of garden furniture often do not limit themselves to the production of just benches, but produce entire ensembles of garden furniture. In addition to benches, it includes a table, chairs, swings, chests for storing pillows - and all this, made in the same style, will be an amazing decoration for any garden.
Where to put a garden bench
If you plan to place only single benches in the garden, then you should definitely place one bench at the porch - this will be a wonderful sign of hospitality, and if you place another bench somewhere in the depths of the garden, under a spreading tree, then this place will become a wonderful corner for solitude and rest in silence.

Of course, the bench primarily plays a functional role. Therefore, you should pay special attention to its dimensions. For example, if a bench is installed in a part of the garden where family barbecue gatherings take place, then the bench there should be long, or several small benches, so that all family members and guests can sit comfortably. But if we reject the truly functional purpose of the bench, then it is worth paying attention to the psychological aspects of its use.

According to psychologists, sitting together on a bench can reconcile quarreling spouses and establish friendship with a pleasant interlocutor. And the secret of this is that when people sit on a bench, their gaze covers the same landscape, they breathe the same air, their thoughts and feelings gradually begin to flow in the same direction.

Garden benches - photo
But as for the shape of the bench, now there are many of them and you can choose any one to suit your taste. Let's say there is a huge spreading tree with a wide trunk growing in the garden. You can install a round bench around it so that those sitting have their backs to the tree trunk. But if you build a beautiful round flower bed or a small fountain, then a round bench will fit perfectly there, only those sitting will already be facing the center of the composition. Round benches are very convenient because they can accommodate many people without taking up much space.

Anyone who has installed a bench, or even several, in their garden can say with confidence that they have received another unique room, a cozy corner of their home, in which it is always pleasant to relax and spend time with loved ones. The only difference is that this corner is open air.
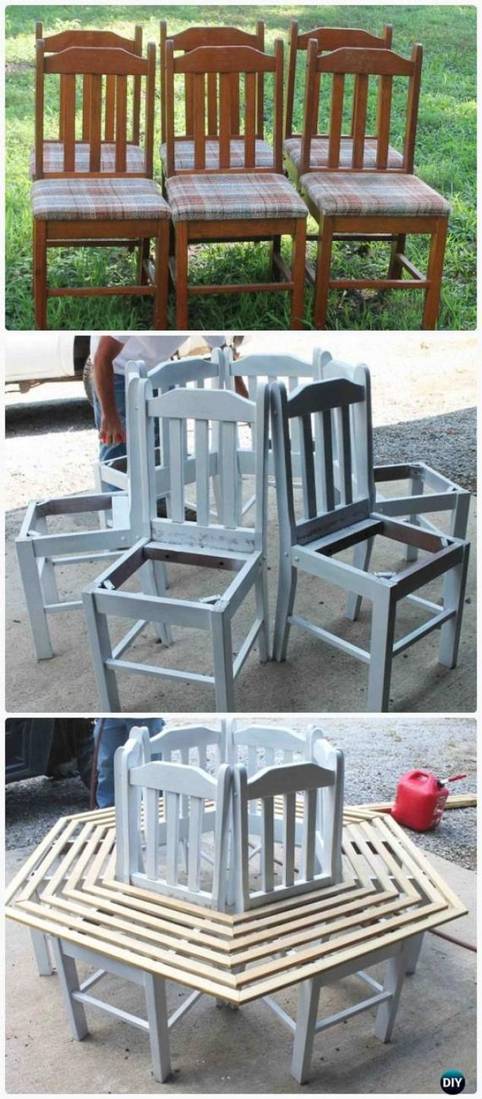
DIY bench around a tree

A bench with several seats can be a logical end to a flower bed or surround a tree in the garden. A couple of days of work - and the new vacation spot is ready!
To work, you will need patterns for decorative parts; you can use our option or develop the form yourself. The presented bench is suitable for trees with a trunk up to 45-50 cm thick!
The template for the decorative strips is based on a 5 x 5 cm grid. Draw the cells on the wood, and then transfer a smooth line.

- The shortest seat board is made with a special recess so that the inclined backrests fit exactly against it. To do this, attach two slats to the part, which has already been sawn off at both ends with a 60° bevel, as a guide for marking. The rail placed on top should be the size of the back, the second rail serves only as a support.
- Starting from the back corner, mark the thickness of the back (3.5 cm).
- Since the angle of the backrest is 100°, it is necessary to check the notch with the angle of the part.
- Using a carpenter's square, mark a 100° angle as shown in the photo. Then use a hacksaw to cut out a complex “wedge”.
- A board with two slats will serve as a template for mounting the seats.
- To ensure that all six seats are the same, refer to the template.
- For decorative strips, you will need a grid template that can be used to process all six boards.
- Make the holes with a Forstner drill.
- Round the edges with the top bit.
- Mount the backrest.
- Coat the parts with a protective wood primer and paint them with enamel.

Garden bench - photo ideas


Among small architectural forms, benches and benches are the most common. Can be made from any materials or combinations thereof: wood, metal, stone, concrete, plastic, glass.
They are everywhere: city streets and squares, parks and squares, sports and educational institutions, public institutions and residential premises. An almost obligatory element of landscape design, a plot of a private house or cottage.
The easiest material to process and affordable is wood. Do-it-yourself wooden benches provide an opportunity to save money, demonstrate your craftsmanship at home and be a creator.
Wooden benches: economy option
Make wooden benches using existing “blanks”. It is enough to process it a little and assemble a strong and functional structure - with a seat, back and legs.
Moreover, such “modules” are inexpensive, sometimes purchased for “pennies.” We are talking about pallets, or pallets.
But not everyone is suitable for arranging garden furniture. You should not use products made from off-grade or unedged boards. In the first case, large knots may fall out, in the second, the “aesthetic” qualities suffer.
There are cases where the board fastening step is clearly not suitable for a bench.
The pallet is a wonderful donor for a bench
A pallet, as in the photo, would be better. With a corner chamfer removed along the contour.

The width of the pallet is large for bench seating. It needs to be trimmed, the remainder can be used to construct the backrest.

If the width of the backrest is not enough, then the bench will have to be made from two pallets.
The seats and backrest are part of the structure. Need legs. Let's make pallets from the board itself.

- the bench may not be stable
Rigidity is ensured by the seat, and the mounting area of the legs is quite small. Usually a lower ligament is added so that they do not “spread apart”. A simpler option is to use another pallet (or rather part of it) as a base.

or two. Do-it-yourself benches and benches made of wood in detail and clearly.

Fixing the backrest, as can be seen from the examples, can be done using a pair of slats, a board, a rope or rope. The assembled bench, its surface is cleaned, sanded, varnished or painted.
You can not cut the pallets to width and make a garden sofa.

There are examples of using pallet boards for the manufacture of other products from the class of small architectural forms. Flowerpots are also taken in the photo.

It is not necessary to waste time disassembling pallets, but it is better to buy standard lumber.
Simple bench shapes: board and timber
There are designs and execution options - from the simplest to specimens with wood carvings, worthy of being called real works of applied art.
The easiest option for making is a wooden bench without a back.
The drawing shows a do-it-yourself wooden bench, made entirely of boards with a thickness of 75 mm.

Bench made of boards and timber
Each element consists of two parts.
The seat with beveled ends is assembled from two boards. If the bench will be in an open area or outside a heated room, then it is better to provide a gap. It will allow water to drain and compensate for wood swelling.
The leg consists of two glued elements. To ensure reliability of the end connection, a pin (dowel) is inserted. Two short support beams and seat fastenings are attached to the leg. The legs and beams are connected with grooves, fixed with glue and self-tapping screws. Once assembled, the leg and beam are attached to the seat board with two pairs of screws and dowels, and holes are pre-drilled for them.
Assembly order
1. Cut out the workpiece;
2. Process the ends and clean the surfaces for gluing;
3. Glue the legs together;
4. Beams are attached to them;
5. Assembling the shop;
6. Sanded and coated with varnish (or paint).
Images and drawings of a bench made of 30 mm boards with a support beam.

Bench made of 30 mm boards with a support beam
There are already shaped elements in the form of legs with radius cutouts. You can make the work easier and make them rectangular. The drawing is not a dogma - it can be taken as a basis and changed in the direction of simplification or in the direction of complication. They do the same with sizes - make the bench wider, shorter, etc.
What is the difference between this option and the previous one?
One long support beam is used instead of four short ones; it also serves as a stiffening rib for the base - the legs and the entire structure are more stable. The connection between the legs and the beam goes through a tongue and groove, and the tenon is much easier to cut out. That is, this form is a little easier to manufacture, more stable and provides more opportunities for experimentation.
Below are several options for a similar design, but in a different design.
For example, in the minimalist style - there are not even protruding edges. Splicing according to the tongue-and-groove principle is used to connect the legs and the seat.

In this model, they simplified the task as much as possible - they even abandoned cutting out grooves and tenons. In this case, it is better to make the connection between the legs and the beam using confirmats rather than self-tapping screws (they have a larger contact area). For strength, they usually add a pair of dowels on each side, set with glue. The hidden fastening of the seat is done with a dowel, the open fastening with a self-tapping screw.

If the bench is not very long, then the beam can be placed at the bottom. In this design, it serves solely as a stiffener.
In the photo below you can see an unusual case of using a dowel - it attaches the beam to the legs not with a hidden installation, but with an open one.

In this bench, a block was used to “help” the board.
Legs with crossbars and two oblique supports for sitting are made from it. All fastenings are made on confirmations, and the bars of the legs are connected to each other using grooves.

Here also a block is used for the base. Due to the large thickness of the seat board, it does not require additional support. The lower beam serves as a stiffener.

Making a small bench with a back is not much more difficult. The principle of installation and fastening is similar to simple benches: grooves, tenons, dowels, glue, screws and confirmations.
You can take a design with “solid” board legs as a basis. Move them a little from the center to the edge so that the ends of the seat and legs are in the same plane. Attach vertical beams to the legs and screw the backrest to them.

Bench with carved back
For a model whose base is made of a block, making the back is even easier. Two pairs of legs: front - for supporting the seat, rear (high) - for attaching the supporting beam, seat and back.

These were lightweight and “mobile” designs of benches and benches made of wood, which could be used with equal success in an open area, under a canopy or indoors. There are more massive forms aimed at “stationary” placement.
Benches: large format
Making a wooden bench with your own hands for a summer residence involves using any form of material. Including those that are used in the construction of wooden houses.
For example, timber. For reference: timber is classified as such if the aspect ratio is no more than 1:2, and the smaller side has a size of 100 mm or more. Reducing the size transfers such lumber to the “block” category.
It’s not easy to assemble a bench like the one in this photo with your own hands, but it’s possible.

Assembling the legs is not difficult at all. The only difference from a board and a block is that more powerful fasteners will be required. For example, such self-tapping bolts for wood.

You will have to widen the hole under their head (but confirmations also require this) and place a washer.
Installation and installation of the seat is much more difficult.
To “bundle” the beams together, three metal pins are needed, with a length almost the width of the seat, and two - the width of the bench, taking into account the legs. It’s difficult to find these on sale - you’ll have to make them from round reinforcement (stainless steel). The gap between the beams can be maintained using wooden plates from boards strung on studs. The thickness of the plates should be the same as the three supporting vertical beams that support the seat in the center of the bench.
And this specimen is made of even more powerful timber (150×100). Its assembly is much simpler. Two seat beams are attached from below through short cross beams, which are then mounted to the T-shaped legs.

Another easy-to-follow example using a large-format board. The load-bearing capacity of the material is such that the use of reinforcing beams is not required - the seat is attached to the ends of the short legs. The author of the project knows well that the most rigid geometric figure is a triangle. Therefore, both the configuration of the lower part of the supports and their connection with each other with bolts has the shape of an equilateral triangle.

If it is possible to order two non-standard wooden beams, then making such a bench with your own hands will not be difficult: you will need to “add” four short beams (100×100) for the legs and two beams (100×50) for the back.

Timber bench
But if this is not possible, then instead of a non-standard beam you can use a couple of standard ones.
This DIY wooden garden bench uses logs.

The most difficult thing in this option is to use an ax (or adze) to make a longitudinal groove and tenon for connecting the logs. For reliable fixation, you will need a couple more dowels on each side (this is the same dowel, but only thicker and longer). The seat and back can be made of boards (as in the photo) or timber. Do-it-yourself benches and benches made of wood - ideas and solutions.
And this version of the bench is already more complicated.
But not really. The main difficulty is making the back, or rather the notch on it. All fastenings of parts of the structure to each other are carried out using dowels.

In principle, such wooden fasteners are quite durable - log houses of a couple of floors (including wooden churches) were previously built without a single nail.
And a very simple option: two logs with a groove and half a log sawn lengthwise.

Bench simplicity perfection
Wooden bench
In conclusion, here are a couple of examples of how you can make a bench from wood, not purchased wood, but found in a nearby planting or forest. Benches and benches made of wood with your own hands from auxiliary materials.
In this example, only the seat is made of boards, everything else is made of natural material, which had to be selected in thickness and adjusted to size.

To make the seat of such a bench, you need a professional tool, so you will have to either order longitudinal sawing of a log, or (which is easier) take an unedged board as a blank.

Information to note : , .
A light and comfortable garden bench can be placed on a cozy veranda or placed in the shade of trees so that you can hide from the heat and enjoy reading a book or a pleasant conversation. So, let's describe the main stages of its manufacture.
Whatever material you decide to make a bench from, to make it as comfortable as possible, certain proportions should be observed when constructing it:
- height: the seat is always located at a level of 0.5 m from the ground;
- width: at least half a meter;
- back height: 0.45 m;
- its tilt angle: ideal 45°;
- Armrest height: calculated from the seat level and should be 20 cm.
If the bench is dug into the ground, the length of the legs increases by at least 70 cm. In this case, its legs are lowered into the prepared holes, covered with stones and filled with concrete. Do not forget to pre-treat the wood with a solution that protects against rot and mold.

DIY bench step by step
It is better to make the back and seat of a garden bench not a solid canvas, but to make a small distance between the planks. In this case, rainwater will drain from them completely, the boards will be better ventilated, and the product will be less susceptible to rotting:

You can replace the stain with a strong solution of potassium permanganate. Wood treated with a similar composition acquires a dark and rich color. Depending on the amount of manganese, you can get a walnut shade or a rich mahogany color.
Bench made of wide boards

Bench made of flexible vine or willow twigs
Eco-friendly garden furniture, not only a bench, but also chairs and even a table, can be made from pre-soaked willow or vine twigs. You can also use branches of hazel, willow, aspen or even birch, but in the latter cases the product will last much less and will look rougher. 
To collect raw materials, it will be necessary to wait until the shoots “ripen”. The optimal season for harvesting branches is from September to March. It is at this time that the rods acquire the required flexibility:

Types of benches
We have described only the simplest options for making a garden bench. It can be made from practically any materials:


If you are planning to make a wooden outdoor bench, it is better to use coniferous or larch, which is difficult to rot. Old oak or hickory furniture that has been inherited can also be used as material to create a durable and very original garden product.
Should I buy a bench or make it myself?
Buying a bench for the garden is, of course, much easier. Moreover, the simplest of them are quite cheap.
But still, work done with your own hands will bring more satisfaction. And with a certain patience and dexterity, even made from improvised materials, it can become an exclusive work that you won’t be ashamed to show off to your friends and neighbors. For example, in the next photo the bench is made of ordinary pallets, painted with bright paint and decorated with decorative pillows. 
You can relax calmly in the shade of trees in the summer or bask in the sun on a cool autumn day on a wooden bench that you installed in the garden yourself. In modern design, garden furniture is one of the full-fledged elements of landscape design.
Taking into account the decorative value of garden benches made of wood, you should try to choose a model that will harmoniously fit into the environment. For a young garden or summer cottage without large trees, it is better to choose light furniture options with decorative thin metal legs, simple benches and benches that are laconic in shape. If the garden is old and well-groomed, then seats in the Provence style are suitable - stylized as antique furniture with wooden decor.
I can decorate an overgrown summer cottage with an imitation of a wild natural thicket with benches assembled with my own hands from natural materials - driftwood, driftwood, lightly processed branches. A bench made of logs hewn with an ax would look very good in such a garden. Such seats should be installed in places hidden from view: among flowering bushes or around a bend in a path.
When choosing a place to install a bench for a summer house, you need to pay attention to the views that will open to the eyes of those sitting on it.
It is undesirable to place the bench in such a way as to contemplate an unsightly fence or compost heap. Place it near a pond or flower bed, under a branchy old tree.
Then your relaxation will be complemented by the pleasure of the smell of flowers and the play of light on the water, the rustle of leaves and coolness in the shade.
Various types of benches can be installed on the veranda near the house, in the relaxation area by the pool or outdoor fireplace. They will also find use under a canopy in the garden. In each case, you need to adhere to the general rules of compatibility of a wooden product with the general style of the site. How to make original benches from pallets, watch this video:
Wood is traditionally chosen as a material for garden furniture - an easy-to-process material that allows you to bring almost any idea to life. Currently, along with ordinary boards and bars, you can use moisture-resistant varieties of thick plywood. From durable and aesthetic sheet material, you can assemble structures that are suitable for modern designer landscapes and for an ordinary courtyard that does not have certain style characteristics.
If wooden benches are made in a stationary version, then care should be taken to protect them from moisture. A variety of impregnations and paints and varnishes can serve this purpose. Outdoor furniture will have to be coated with paint or varnish every 1 to 2 years as the protective layer wears out. Such measures can significantly extend the life of a wooden structure.
How to build benches yourself?
In order to build a comfortable bench with your own hands, you need to make a sketch of it. There are optimal sizes of garden furniture that must be observed:
- seat height above the floor - 40 - 50 cm;
- width (depth) of the bench - 50 - 55 cm;
- The height of the backrest above the bench is 35 - 50 cm.
These dimensions allow a person of average height to sit comfortably, lean on the back, and stand up easily. If the owner’s build differs greatly from the average, then the dimensions of the bench will have to be selected individually. The backrest is usually made with a slight tilt back. For more information about wooden benches, watch this video:
To work with wood you will need the following tools:
- hacksaw or jigsaw;
- drill and screws, or hammer and nails;
- roulette;
- pencil.
To assemble products of complex shapes, wood glue can be useful. It is used to fasten parts that are connected using the tongue-and-groove method or with a furniture dowel. For plywood products, long metal threaded studs and nuts are useful.
A simple bench for a vegetable garden or bathhouse
Even a novice craftsman can make a simple wooden bench with his own hands. Such benches can be seen in abundance at the gates of village courtyards; they can be placed near the beds, in a bathhouse or utility room. They are not distinguished by their sophistication and decorativeness, but they can perform the functions of garden furniture quite successfully. To make a bench you will need a board 2 - 2.5 cm thick and about 20 cm wide.

Benches for a bathhouse or vegetable garden are easy to make
According to the drawing in Fig. 1. you need to cut out the following parts:
- seat - 1 piece;
- apron - 2 parts, the length of each is 10 cm shorter than the seat;
- legs - 2 parts.
File off the corners on one side of each apron piece as shown in the diagram. Measure 2 - 2.5 cm from the edges of the element for the legs on each side in the upper part, cut a groove 10 cm long. If desired, cut out holes for the handles on the bench seat. To learn how to make a bench with your own hands, watch this useful video:
Assemble the product in the following sequence:
- Drill holes for self-tapping screws in the plane of the apron board at a distance of 10 cm from each end. Place the board in the groove on the leg parts and screw the screws through the holes into the edge of the board. Attach the 2nd leg pattern to the other side of the apron.
- Repeat all steps and attach the apron to the other side of the bench base.
- At a distance of 15 cm from each end of the seat, make several holes in the plane of the board. Place the part on top of the base and attach it with self-tapping screws, screwing them into the end of the leg part. For strength, you can make additional holes along the length of each side of the seat and attach it to the apron boards.
Sand the surface of the product with coarse sandpaper to remove burrs. If necessary, paint the bench to your taste.
Simple bench with backrest
Another simple project is shown in Fig. 2. To make a bench with a backrest with your own hands, you will need 2 pieces of logs about 25 cm long, boards for the back and seat, and 5x5 cm bars for the backrest posts. If you want the seat to be a little higher, you can take 4 pieces of logs or timber and lay them on top of each other, fastening them with dowels.

The back is screwed on with self-tapping screws on the reverse side
Making the bench is very simple. To ensure that there are no nuts or nail heads on the surface of the product, fasten the parts using dowels and glue. The back can be screwed with self-tapping screws from the wrong side so that they do not drill through the board.
To make dowels, you need wooden rounded rods (a thin handle for a garden tool will do). Drill 2 holes in the log with a diameter equal to the thickness of the dowel. Based on their location, make corresponding recesses in the underside of the seat. The work must be done very carefully so that during assembly you do not have to adjust parts of the bench. For more information on making a bench with a back, watch this video:
Lubricate a piece of wood for the dowel with glue and insert it into the hole on the log so that a small fragment remains outside. Its length should be equal to the depth of the recess drilled in the seat (Fig. 3). Lubricate the dowels with wood glue and place the board on them. Do the same with another piece of log.
Cut the bars to the required length to make the backrest posts. Screw it to the ends of the logs with self-tapping screws. Drill 2 holes in the upper part for attaching the backrest. The distance between the holes should be less than the width of the board. Screw the screws through the holes into the board. The finished bench can be painted or coated with clear varnish.
Stylish bench with backrest
Making garden furniture according to the proposed project is not difficult at all. The basis of the structure is slabs of porcelain stoneware or concrete and boards 2 - 2.5 cm thick. If desired, heavy materials can be replaced with light plywood of the same thickness. A wooden bench with a back will be mobile.

Stylish bench has an interesting backrest
The following parts will be required:
- squares 50x50 cm for legs (plywood or board) - 12 pcs.;
- boards or plywood rectangles 15x200 cm - 5 pcs.;
- backrest supports 15x65 cm - 4 pcs.;
- crossbars 15x17.5 cm - 2 pcs.;
- threaded rod M16 55 cm - 4 pcs.;
- nuts and washers M16 - 8 pcs.;
- self-tapping screws
The plywood will first have to be cut into fragments of the required shape and size. If boards and slabs are used, this step can be skipped. To learn how to make an original bench with your own hands, watch this video:
Drill 2 holes at an equal distance from the edges in the upper part of the square parts of the legs. Adjusting the long parts of the seat as in the diagram (Fig. 4), make 2 holes in them on each side. Screw a nut onto one end of each rod and put on a washer. Alternating long and square elements, assemble the bench. Tighten the nuts on the other side of the studs.
This bench can be used without a backrest.
But for convenience, you can do it too. To do this, fix 4 boards 15 x 65 cm with self-tapping screws from the inside of the back of the bench. Glue crossbars between them or place them on dowels.
Decorative benches made from natural materials
Untreated wood is an excellent material for garden furniture. The bench, similar to the throne of a forest king, fits perfectly into the landscape, imitating wild nature. Such seats are very appropriate near rockeries or old trees with a spreading crown in an overgrown corner of the garden. Rustic benches go well with picnic areas trimmed with wild stones or barbecues made of sandstone and boulders. Original shop in this video:
The simplest option for sitting from logs is a monastery bench. To make it, a raw log needs to be sawn in half lengthwise. Legs are made from short sections, laying them cut down on the ground. Long halves of logs are secured to dowels from above, cut side up. To prevent the bench from staining your clothes, it is better to choose hardwood logs and dry them well before assembling the furniture.
To remove splinters and burrs, the cut plane must be planed smoothly with a plane and treated with emery cloth.
A complicated version of such furniture is a bench made of logs, supplemented with a backrest with your own hands (Fig. 5). To attach the backrest, you need wooden or metal supports and a crossbar. These parts can be made from thick wood branches, timber, or steel strips. Fastening is carried out using self-tapping screws of sufficient length or nails.

Examples of original wooden benches
A log bench can be made in another way (Fig. 6). The photo clearly shows the grooves in the upper part of a thick log sawn in half. You need to insert a board at least 4 cm thick or a beautiful cut of a tree trunk into the grooves. If desired, an exclusive piece of furniture made by yourself can be supplemented with a backrest. The supports for it need to be attached to the inside of the legs on a flat surface. The crossbar can be a thick branch or the same cut of wood as for the seat.
Chopped table with benches
A set of table and benches will be convenient at the dacha in the dining area or near the barbecue (Fig. 7). It’s not difficult to make one if you know the basic techniques for making wooden log houses. To begin with, 2 logs of approximately equal thickness are placed on the ground. With an ax you need to cut out semicircular recesses (bowls) at the ends of the logs. The size of the bowls will depend on the diameter of the log that is chosen for the seats. This trunk needs to be sawn lengthwise. An example of chopped furniture in this video:
In the middle of the 2 lower logs, you need to cut out 1 more cup to install the transverse support. It may not be a very thick log. Its length should be such that the ends protrude beyond the side surfaces of the trunks.
For the table base you need shorter logs. Their length is approximately equal to the desired width of the tabletop.
In the middle of each trunk, you need to cut out recesses that are suitable in size to the thickness of the crossbar. Lay the parts of the log house with the cups down, covering the transverse log with them. Make a tabletop from the boards and secure it with nails. Place the halves of logs in the places designated for them.
How to make benches from branches or driftwood?
This is the most creative activity. Having found beautiful driftwood and polished driftwood trunks in the forest or on the shore of a reservoir, you can make furniture of amazing beauty (Fig. 8). Each such bench is unique, because it is difficult to find 2 identical branches. Therefore, there can be many solutions for how to make a bench from driftwood.
The main thing for all such products is one thing - the parts are adjusted directly on the spot to fit the already finished legs, seats, and backs. The branches should intertwine harmoniously, forming a structure that will support the weight of an adult. To connect non-standard parts, you can use both self-tapping screws and nails. The most reliable connection is with dowels and glue. Where a tight fit of the pieces of the structure is desired, driftwood can be trimmed with an ax.

The most original benches can be made from branches and driftwood
Such decorative benches can even be used to decorate rooms in a chalet or rustic style. They go well with wild stone trim. They will look harmonious in the garden among flowering bushes or near a pond.
The variety of models of benches that you can make with your own hands from wood is limitless.
The main thing in making furniture from wood is the careful fit of parts.
Then the finished product will be neat, without distortions. Treated with moisture-proof impregnations and coated with varnish or paint, any garden seat will last for many years.
A garden bench is a beautiful element of landscape architecture. With its help, you can create a recreation area in the local area. Such structures are built both in production and with your own hands at home. Different materials are used in production, even in some cases they can be constructed from chairs, logs, and other materials that are found in every summer cottage.
Design Features
Benches, unlike other small architectural forms, must correspond not only to style, but also to ergonomics. Therefore, when choosing them, the level of comfort and a unified concept of landscape design are taken into account.
Since their first appearance in Ancient Egypt, many different types of benches have been invented - from garden decorations to ordinary ergonomic designs. Their variety is just as wide, and in order to organize this assortment, we will divide the designs into three main types:
- Street benches– a functional design, which is built from practical, reliable materials. They rarely differ in the beauty of their forms and variety of style.
- Garden designs– openwork benches with forged elements. They perfectly complement the overall landscape design and create a functional space.
- Designs for a summer residence- differ in variety of species. They are a bright accent when creating a suburban area.
All designs can be divided into:
- stationary - a static element of landscape design;
- mobile - you can move and install structures in any part of your garden plot, creating a comfortable recreation area.
Based on their location, they can be divided into:
- front doors - beautiful structures made of forged elements, wood, stone;
- dining models are comfortable, placed on terraces, not far from the barbecue. They are built from different types of wood;
- structures that are located near water: a stream, a pond, a fountain. They are built from moisture-resistant materials. Concrete and stone are used;
- seasonal - mobile structures. Durable, reliable materials are used.
Material of manufacture
The material from which they are built determines not only their location, but also the characteristics of their operation. Depending on the material they are divided:
Wooden- differ in their special aesthetics. They fit well into almost any style of landscape design. Only rot-resistant wood species are used for production. Walnut, cherry, oak, and coniferous species are used. The wood goes through a number of treatments: the material is impregnated with a composition that increases resistance to moisture, and covered with varnish or special moisture-resistant paint.
Stone structures- These are strong, durable models. They will highlight the beauty of garden crops. Granite, quartz or marble are used in construction. Such models are resistant to moisture, frost, and sunlight. They are stationary, massive and mounted in places with high humidity.
Metal– resistant to various damages, they are reliable. For a garden in a vintage style, forged models decorated with various decorative elements are chosen. Modernism is emphasized by cast iron structures. A beautiful, elegant wrought-iron chair will fit well into the country style.
Plastic– often used in the production of mobile structures and those installed near bodies of water. Such models can have different colors and decor.
Combined models– a successful combination of several materials, such as stone and wood, metal and wood.
Each model is installed depending on the style of the plot and the special preferences of the owner.
Garden benches: types and features
Each country house has an adjacent territory. It can be functional - even beds, bushes, greenhouses, and other garden attributes. Some people prefer an English lawn with flower beds. But there are people who prefer shady gardens.
Regardless of this, in the summer this area turns into a vacation spot. What makes it comfortable is a garden bench that will look harmonious in the landscape design.
How to choose a bench for the garden?
Designers divide the garden area into three main types according to style:
- regular gardens - created according to geometric laws: smooth paths, strict forms, every bush and flower bed is in its place;
- rustic or country style - bright flower beds, wooden fence, trees and beds;
- landscape areas. When creating a style on the site, the natural beauty of the greenery is preserved. Each element, for example, a snag or a fallen branch, is not removed, but is played up with the help of various decorative elements, including benches.
For each garden, several options for garden benches are suitable.
They are selected depending on:
- garden size;
- design mobility;
- the material from which it is made.
For example, for a small garden in a rustic style, structures made of wood will look beautiful. In some cases, you can use benches that combine metal and wood. They will emphasize the refined style and become its pleasant additions. Stone models cannot be installed. They will stand out against the backdrop of beautiful greenery and well-kept beds.
In landscaped areas, for example, near blocks of stones that will be beautifully laid out harmoniously, a stone bench will fit in. This can be a model with or without a backrest. Under a hanging willow branch, you can place a small wooden bench, in which there will be no metal parts.
In formal gardens, stone furniture can be installed near a fountain or stone statue. It will complement a single style and add zest to it. . Wooden elements will look out of place.
Combined: metal and wood
These designs are universal. They are installed not only on a personal plot, if the style allows it, but also on summer terraces, in the barbecue area. Such models are distinguished by a high aesthetic component.
Choose the shape and appearance of the model depending on the purpose. For some cases, simple benches without a back are ideal; for others, it is better to choose a bench with a back and armrests.
Manufacturing methods and options
Such structures are built in factories. The difficulty is that you need to have the tools to create the desired shapes from metal. It is built as a support. The armrests and legs of the structure are made from it. Wood is used for the seat and backrest. It should be a dense type of wood, which is pre-treated with impregnations that protect against rotting:
- pine– light wood with beautiful texture and color. She only becomes more attractive with age. Disadvantage - easily damaged mechanically;
- acacia– dense hardwood. It is reliable and can be used as the main material when building a bench, however, with prolonged contact with a wet surface, the color of the wood may change. Therefore, it is better to use it only for arranging the seat and backrest;
- cedar- expensive material that absorbs moisture. It is the best for street construction. Since after drying it does not crack or deform;
- teak– the high price of timber does not allow many to use it in the construction of outdoor furniture. However, it has many properties: it does not absorb moisture, does not dry out and is damaged. Over time it gains even greater strength.
Depending on these parameters, the wood for the benches is selected. However, they also consist of metal. His choice is just as important for creating a high-quality and reliable design. All metal parts of the street structure are treated with anti-corrosion agents. The properties of this material and the methods of its finishing affect the aesthetic component of outdoor furniture.
Therefore, the choice of this material is as important as wood:
- aluminum– a common option for creating the frame of outdoor furniture. It is easy to process, can be cleaned, and is resistant to corrosion;
- steel– pipes, angles, channels. It is quite flexible compared to other iron alloys, so furniture made from it is very popular. Stainless steel is a durable and reliable material. It is resistant to corrosion and has low weight;
- cast iron– high-quality, reliable material. It is used to create stationary structures that must have a lot of weight.
Each outdoor furniture can have a unique design, which depends not only on the choice of materials, but also on the way it is finished:
- casting- the most common method of metal processing. When using it, you can create a variety of shapes and patterns. This method is used only in production;
- powder finish– gives the metal strength and attractiveness. It is more reliable and beautiful than regular paint and protects surfaces from damage. It is impossible to make such a coating at home;
- forging- a method through which you can create completely unique drawings and patterns. Forged furniture is considered the most beautiful and reliable.
However, to create outdoor furniture for the garden, you can also use old metal objects, for example, a bed. To build such a piece of furniture, you need to leave the bed frame and use wood to make a backrest and seat. Such models will add comfort and uniqueness to your style.
Transformable benches
Transformer benches are functional structures that are used not only to decorate a personal plot, but also to create a comfortable recreation area in it. These models are distinguished by their mobility, they are practical, easy to use - in just a few seconds, by transforming the bench, it turns into a comfortable table with two benches. It is comfortable to sit at it and enjoy the pleasant atmosphere.
What designs exist:
- built from natural wood;
- made of metal and wood - combined models;
- assembled from metal.
On personal plots, structures made of wood or combined models are used. They are ordinary without decoration, but very practical. You can make such a table and benches with your own hands.
DIY making
Before you start building a transforming bench, you need to prepare the material and tools, and draw up a drawing. It can be done using design and calculation programs. You can find them on the Internet or do the calculation yourself.
Choosing material
For manufacturing you will need timber, boards, the choice of species depends on you. This article describes the pros and cons of wood used for benches. The board must be sanded; it is better to check its moisture content using a moisture meter.
Material calculation according to standard drawing
For assembly you need:
- 4 beams with a section of 90*45*1445 mm;
- 5 bars 90*32*1480 mm.
To work, you need to prepare the tools you need. And you will need:
- screwdriver;
- drill;
- level;
- corner;
- sandpaper for sanding surfaces.
A sanding machine will do the job better, but if you don’t have one, you can use paper (320). You will also need screws, bolts, and a saw. You also need to purchase paint and varnish materials.
Manufacturing stages
- We make the legs of the structure. To do this, you need to take the bars and cut them 70 cm long. You need to make 8 identical legs. You need to make oblique cuts on them on both sides in order to obtain the balance of the structure during further installation.
- A frame for the structure is made. To do this, you will need boards that need to be cut into four sections of 40 cm and the same number of sections of 170 cm. The corners must be made the same.
- It is necessary to strengthen the frame, for this you will need to nail a wooden beam in increments of 50 cm. This way, the structure will be separated and the bench will be protected from deformation.
- The legs are attached to the seats at a distance of 10 cm from the corners. It is important to make connections of high quality and reliable. This is done using bolts.
- A rectangle of 70*170 cm is created from the timber, which will be connected inside with additional material to ensure reliability.
- All made elements of the transformer are collected. The work is complex and responsible.
- You need to cut two bars 40 cm long. They are needed for fastening between the bench and the shield.
- We cut two more beams, 110 cm long. They are used for the back. They are connected with self-tapping screws.
- The frame is assembled, only then it is sheathed on the outside with wood.
To protect the material from moisture, you need to cover it with stain and then with a water-repellent varnish. It dries in 36 hours, so after work the bench cannot be used for several days. With proper care, such structures last about 20 years. Over time, the frame can be replaced with metal, which will increase its service life.
Custom benches
These structures are installed not only on personal plots, but also inside the house, in gazebos. Not only the design, but also the materials used in assembling the structure depend on the location.
Bench in the bathhouse: features
During the construction of baths, only reliable materials are washed. This is a tree that, under the influence of high temperature and humidity, will not undergo deformation and will not change its color. For such models take:
- linden. It is easy to process, does not crack over time, dries quickly and heats up slowly. Minus - over time the board darkens;
- aspen- has medicinal properties, but with prolonged use it loses its beauty;
- abashi. This wood has a porous structure, it does not heat up quickly, and retains its original appearance for a long time.
Benches in the bathhouse are stationary structures. Their location is thought out at the sauna design stage. They must have a certain height and width so that a person can comfortably fit on them.
They are built in several types:
- L-shaped - for medium-sized steam rooms;
- straight – mounted in small steam rooms;
- U-shaped for large rooms.
- benches are built in the same style. If, for example, it is country, then the benches can be built in combination with metal or exclusively from wood. Designs made from old furniture or objects will look beautiful. As a support, you can use wheels from a wheelbarrow or ordinary hemp, beautifully carved. Models with carved elements, decorated with soft pillows in bright colors, look attractive. Artificially aged bars, which are used as seats, will add charm and comfort;
- rustic style - only wood is used, and it can be aged or use bars that have been standing in the yard for a long time. They will be the best base for benches. Metal and plastic are not welcome in this style. The furniture should be massive and of good quality. You can use decorative ornaments as capes;
- Scandinavian style involves the use of many warm and soft objects. The benches built for the gazebo are large, they are stationary with wide seats and high backs. To make such furniture attractive, soft pillows are added, which are sewn to order to fit the size of the furniture.
Furniture made of stone or iron is rarely installed in gazebos.
In the hallway: a home with a soul
Arranging a hallway is just as important as choosing furniture for other rooms in the house. After all, this room is the calling card of any home.
What to pay attention to:
For this room, models made from different materials are purchased:
- plastic- models are combined with other materials: wood, chipboard or fiberboard. They are rarely used to build furniture for hallways, only if the interior allows it to fit into it. Plastic can have different colors and shapes. Plastic benches are easy to clean and transport;
- tree– durable, reliable designs. Due to its dense structure, wood does not absorb moisture and does not dry out under the influence of solar radiation. Coniferous wood, aspen, alder, and oak are used to make furniture. Such models may have a carved pattern on the legs, armrests or headboard. The wood is painted with tinting varnish to preserve the texture of the material;
- MDF and chipboard– used in the construction of furniture. Such designs are equipped with drawers or they can occupy the entire space under the product. This material is used for the construction of furniture for the living room and bedroom. It can have different colors and is covered with a laminated film, which increases moisture resistance;
- forged– not suitable for all hallways. So that it does not overload this room, such structures are built small. They perform only their main function - you can sit on it comfortably. Furniture can have a backrest or be built with beautiful patterned armrests;
- wicker- beautiful models. They are inferior in strength to their counterparts, but their beauty minimizes this drawback. Such structures are built both with and without a box for small items;
- combined– wood and metal are used. Such designs are practical and reliable. The frame of the structure is built from metal, and the parts on which people sit or support their back are made of wood.
When choosing benches for a room, you don’t have to be so strict about the material and its ability to withstand sudden temperature changes.
Children's
Children's furniture is built taking into account the standards set by our government. Therefore, the choice of material and paint is subject to high requirements, prescribed in SPIPs. For the construction of benches, natural materials or plastic are used, which do not contain harmful impurities.
Types of children's benches depending on their location:
for the street - wood and metal are used. The legs are made of steel, which is processed to improve its properties and resistance to moisture. Such designs do not have a back; rare models may have armrests. The upper part is made of wood, and all parts of the metal frame are covered with it to cover all sharp corners. Such models are decorated with multi-colored paint, which covers all components of the product;
benches made of wood are installed for kindergartens and playgrounds. Such designs are most suitable for children. They do not contain harmful substances, there are no sharp corners or joints that could injure a child. Benches may be installed in locker rooms, the height of which does not reach half a meter. They are mobile and easily move around the room;
plastic structures are installed for private playgrounds. They are distinguished by a variety of patterns and colors. They can be made in the shape of your favorite animals or cartoon characters. The benches are light and reliable. The back can be made in the shape of the sun, caterpillar, butterfly. An integral component is the variety of colors.
Often such structures can be combined with a table or canopy. If a bench is being made for a children's public playground, you need to take into account all the rules established by the government. To build a children's structure in a private house, you can use plastic models.
Corner bench for garden, home, kitchen
Benches are built from different materials: stone, metal, plastic, wood. Among the variety of shapes and types of benches, corner models look especially interesting. They are compact, but more spacious and beautiful. You can design many types of corner benches:
- corner transforming bench - this model consists of straight sections of small size, which, if necessary, can be rearranged, while adjusting the structure to the conditions of another space;
- In your garden plot you can find many places that can be used to create a comfortable place to relax. A simple corner bench placed against the wall is easy to install and does not require the use of calculation programs. To assemble it, you need to prepare a frame, a tree that will serve as a seat. It is installed near a free wall, which is lined with clapboard;
- corner benches made of natural stone. Such structures are installed on personal plots. They are reliable, distinguished by the absence of a back and decor. Such models are manufactured in factories;
- corner bench with table. The design has benches located between the table. It may be a little larger and taller, or have a different color. This will only give the composition a unique look.
Such models are built from wood, rarely when steel can be used as a frame. For beauty, they are decorated with various decorative elements. If these are wooden structures, then the decor can be carved elements made on the legs of the models and the headboard. If the design is combined, then beautiful forging is done; it can be done on the back or armrests.
