The dream of many housewives is new kitchen furniture. Unfortunately, not everyone has the opportunity to often replace a worn-out headset with a new one. But with a creative approach, it is quite possible to update old kitchen furniture with your own hands.
Maximum renovation of the kitchen at minimal cost is carried out using various techniques. To do this, you can refresh individual interior details:
- make a new front for the kitchen cabinet;
- decorate the wall with new fittings;
- use decorative elements.

For work you Tools and materials needed:
- acrylic lacquer;
- primer and paint for wood;
- brush or roller;
- wood glue;
- metal ruler, tape measure;
- sandpaper;
- scissors;
- decorative overhead elements, furniture fittings;
- ceramic tiles, rattan;
- molding or decorative strips made of wood.
Restoration of a damaged tabletop (video)
Changing the color of the facade
Painting the facade in a different color will help radically change the appearance of your kitchen unit. Before this, the cabinet must be disassembled, fasteners and fittings removed. The wall is cleaned of old varnish and paint. They are removed with a solvent or sanded with sandpaper.
When the surfaces are cleaned, a primer is applied to the cabinet. After 1.5-2 hours the painting itself takes place. Choose waterproof paint. Automotive is also suitable for these purposes.
If you don't like using brushes, try using spray bottles. This is very convenient if you want to decorate your closet by applying an intricate pattern using a stencil.

We use decor
If updating furniture solely by painting seems boring to you, you can decorate the wall with additional decorative elements. When the main painting is done, The following is attached to the façade parts:
- stucco;
- overlays;
- molding.


They are used both separately and in combination with each other. Such elements add texture to the appearance of the furniture. Let's consider technology for decorating a set using wooden molding:
- Choose thin strips of convex semicircular or carved shape.
- Markings of the future pattern are applied to the surface of the facade.
- If the molding will be attached along the perimeter of rectangular surfaces, the edges are cut at an angle of 45 degrees.
- The planks are attached to furniture using glue to fix wood products.
- The façade is being finished painted.
Stucco molding looks beautiful as decorative inserts in the corners between the molding strips.
If there are unused ceramic tiles left after renovation, they are also perfect as a finishing material. It can be used to cover both a wall and a kitchen table.
Decoupage of old kitchen furniture (video)
Porcelain mosaic
If the prejudice that you cannot store broken dishes in the house is not about you, then it may well become an original finishing material for furniture decor. Porcelain mosaic tiles on doors or table surfaces are not only very beautiful, but also functional. Such materials are resistant to temperature changes, high humidity and other harmful factors.
To decorate furniture with broken porcelain:
- Select a pattern and draw a sketch.
- Transfer it to your work surface.
- Apply adhesive.
- Lay out the fragments according to the pattern.
- Fill gaps between porcelain with matching ceramic tile grout.


Updating facades with rattan
Rattan is a very multifunctional material. It is used for the production of furniture and for finishing various surfaces. It is very flexible and at the same time very durable.
They work with rattan using the following technology:
- Measure the wall to calculate the required rattan length.
- Soak the roll of material in cold water before use for 20-30 minutes.
- Smooth wooden strips are prepared, with the help of which the rattan will be pressed to the surface during the gluing process.
- Rattan is cut according to measurements.
- Glue is applied to the cabinet, to which the finishing material is pressed.
When the elements are firmly glued, the final painting of the surfaces is carried out.
Techniques for working with rattan rods (video)
Covering a cabinet with photo wallpaper

To update the kitchen wall, you can use a very interesting technique - pasting with photo wallpaper. The images on them can only be limited by your imagination. After all, today it is possible not only to choose a color and pattern in a store, but also to order any other one from a printing house. For this you can also use photographs from your personal archive.


To wallpaper a closet:
- Furniture surfaces are cleaned of old varnish and paint using a sanding machine or sandpaper.
- Wipe off dust and cover with a layer of primer. If separate photographs are used, after priming the furniture is painted in a single color.
- Paste them with wallpaper or directly with your own photographs.
- There is no need to fill all the available space with personal photos. It is enough to decorate the doors with them.
- After the glue has dried, the furniture is coated with colorless varnish.

Complete facade replacement
If the furniture is so worn out that painting will not significantly affect its appearance, a complete replacement of the facade will help update the cabinet. This method is more expensive than all of the above, but it is still more economical than buying a new headset.
For modern models of modular furniture, facade parts can be ordered directly from the manufacturer. All you have to do is screw new doors into the old place and, if necessary, replace the drawers. For more ancient, rare furniture, the facades will have to be made according to individual measurements.
To install facades yourself, you will need:
- Remove old doors.
- Paint and varnish new untreated pieces to match the furniture.
- Assemble the parts by screwing them into the old place.
Adjusting fittings on kitchen facades (video)
Conclusion
Now that you know how to update furniture with your own hands, all that remains is to choose the option that suits you and get to work. As you can see, this does not require significant material costs or special skills. Just a set of standard tools, a creative approach and the desire to breathe new life into your old furniture.
Examples of updating old furniture (photos)


Any, even the highest quality and reliable kitchen furniture wears out over time and loses its attractiveness.
And in order to reduce the cost of a new kitchen set, owners have to think about how to update the furniture in the kitchen with their own hands.
In fact, this task is not at all as difficult as it might seem at first glance. If you have really high-quality kitchen furniture installed, then you can extend its “life” almost indefinitely.
Yes, you can cope with modern furniture models that are not designed to last for a long time - the main thing is not to give up and show a creative approach.
Updating kitchen furniture
Approaches to updating a headset
Restoring a kitchen set is a fairly multifaceted task.
Approaches to its implementation depend on many parameters:
- What condition is the furniture in?
- What damage is there on it?
- What do we want to get as a result?
- What means, materials, and most importantly, what skills do we have?
Without answers to these questions, there is no point in starting repairs.

- Kitchen furniture made from natural wood is the easiest to restore. In general, the better quality the kitchen set was originally, the easier it is to restore it.
- The more damaged the furniture, the more money will have to be invested in its restoration. In some cases - especially when it comes to inexpensive sets based on MDF or chipboard - it is more rational to simply replace the furniture, since the cost of repairs will be close to the price of a new kitchen.
- It is often easier to radically change the appearance of kitchen furniture than to return it to its original state. Therefore, even if it seems to you that the kitchen cabinet or countertop is damaged beyond repair, do not despair - show your imagination and make yourself a completely new kitchen.
Decor instead of renovation
Before you start repairing kitchen furniture that has lost its original beauty, we advise you to think - maybe the repair can wait for now?
Indeed, today there are several ways to decorate kitchen furniture without radical alterations, while simply hiding the damage caused.
Therefore, if your kitchen set has lost its presentable appearance not as a result of wear and tear from old age, but simply due to pinpoint damage (scratches, chips, stains, etc.), you can use methods to disguise defects.

- The first method is to use vinyl stickers. Modern industry offers a fairly wide selection of stickers made from adhesive-based polyvinyl chloride that is resistant to any impact. Such a sticker is simply applied to the damaged area on the kitchen facade or the back of a chair - and serves not only as a disguise, but also as an interior decoration.
Advice! It is necessary to carefully select stickers in appearance and color scheme so that they look like a natural addition to the kitchen design.
- The second method is decoupage (pasting furniture with decorative napkins). A special decoupage glue is applied to the damaged area, a thin napkin is placed on top of it, and on top - after the glue has dried - a layer of transparent acrylic varnish is applied. Decoupage is one of the most popular methods of decorating furniture, and allows you to create a unique, unlike anything else interior.
You can see examples of kitchen furniture updated using decoupage technology in the photo in this article.

Both of these methods will not only hide minor damage, but also save time and money spent on repairs.
Well, if the damage to the furniture is serious enough, well, you’ll have to start a full-fledged repair.
Kitchen furniture repair
Restoring kitchen furniture using self-adhesive film
The easiest way to update kitchen furniture is to cover it with self-adhesive vinyl film.
Most often, kitchen facades are updated in this way, but other pieces of furniture can also be covered with film - the main thing is that they do not experience serious operational load.

Advice! To update furniture, choose high-quality film, since cheap varieties of this material peel off from the base very quickly.
Below are instructions for updating kitchen facades using film:
- We remove handles, decorative trims and other fittings from kitchen furniture that may interfere with gluing. We measure the surfaces that we will cover with film - the façade, sides, shelves, etc.
- We cut out the film according to the dimensions obtained - to make the work easier, you can use the centimeter grid applied on the back surface of the roll as a guide. In places where the film is folded, leave an allowance of about 20 mm.
- Before gluing the film, prepare the surfaces by thoroughly washing them with a damp sponge and a degreaser. The better we clean the surface, the more securely the decorative film will be applied.

- Then we proceed to the actual pasting. Having peeled off a few centimeters of the protective film, we apply the decorative film to the surface and begin to smooth it, gradually removing the protective layer. For smoothing, you can use a special plastic squeegee, or you can simply use your palm - whatever is convenient for you.
- If there is a small bubble under the film, you can try to “drive” it to the edge, or you can pierce it or carefully cut it.

Note! If the film is glued unevenly, it must be peeled off immediately (with a sharp movement), since after a few hours this will be much more difficult to do.
You can’t re-stick the peeled off film - it still won’t stick strong enough.
This method is one of the simplest and most accessible, since the price of the film used is low.
But the appearance of a kitchen updated in this way will not be the most attractive - that’s why other renovation methods are often used.
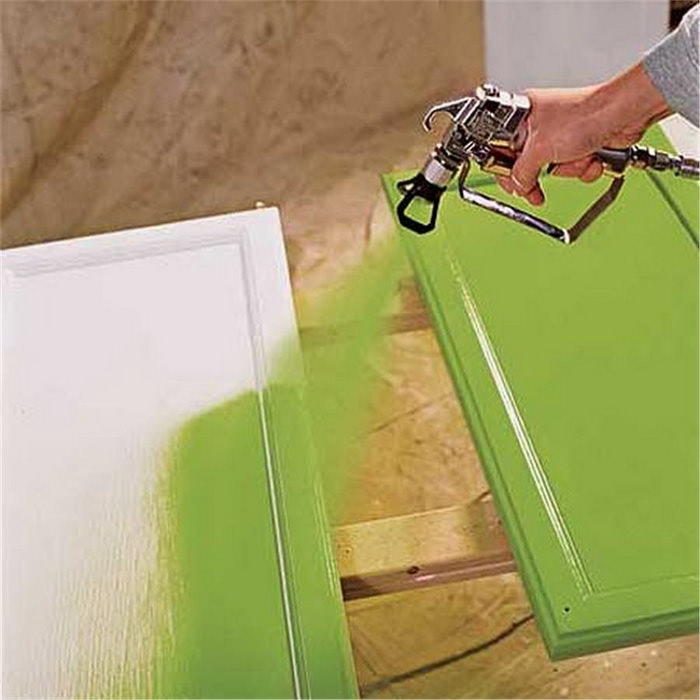
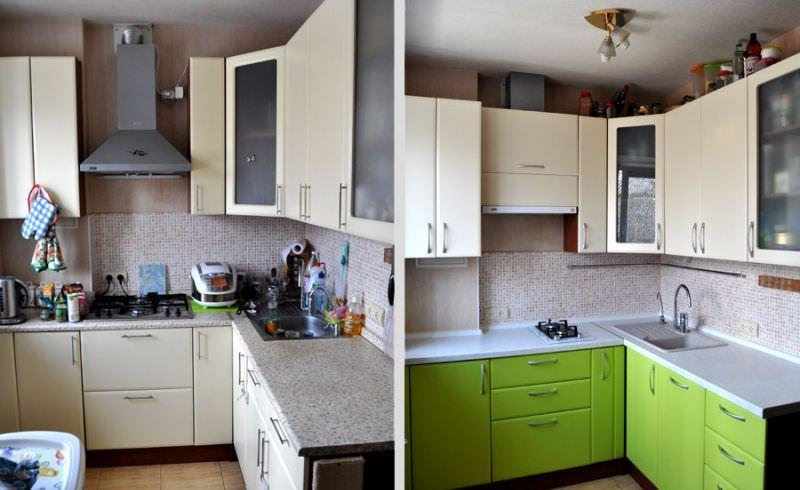
Painting kitchen facades
A more radical way is to paint facades and other elements of kitchen furniture.
This restoration method makes it possible to completely transform the kitchen - therefore it can be recommended not only when repairing furniture, but also when changing the style of the room as a whole.
Painting is quite simple:
- We remove the facades from their hinges and dismantle the fittings. We disassemble the remaining pieces of furniture intended for painting to facilitate the painting work.
- We thoroughly wipe all painted parts with a damp sponge, removing dust and dirt, and then degrease them.
- Place the prepared parts on a work surface previously covered with plastic wrap.
Advice! All work related to painting and varnishing kitchen furniture should be carried out outdoors or in a well-ventilated area.
- Using a spray gun, apply a layer of primer to the furniture. Leave the primer to dry completely - this will take about an hour and a half.

- When the primer has dried, we begin to apply the paint of the shade we have chosen (the painting procedure is shown in detail in the video). For painting, you can use a fairly wide brush, but it will be much easier and faster if we use a spray gun. Apply the paint in several thin layers, after each application, allowing time to dry.
In this way, in just a few hours you can have a completely new kitchen - one that fits perfectly into your new design!
When buying furniture, we hope for its long-term use. Years fly by unnoticed, and a brand new kitchen set turns into a collection of unsightly trash. Throw it in the trash and save money for a new one? Don't rush - you can do DIY repairs for any kitchen set. This does not require special qualifications or carpentry skills. Enough of your desire for change and the information gleaned from this article.
The operating conditions of the kitchen set are difficult - it is located in an area of constant temperature fluctuations and high humidity. Also, greasy soot settles on the working surfaces, which leads to accelerated wear. There is a high probability of mechanical damage.
There may be several reasons for restoration. Let's look at the main ones:
- Obsolescence. Over the years, the kitchen loses its aesthetic and functional positions, needing a thorough modernization.
- "Disaster. The kitchen was flooded due to the fault of the neighbors. The consequences for the headset will be catastrophic.
- Repair. The kitchen space has been transformed, but the furniture “lags behind” in development. An excellent opportunity for restoration work.
- Built-in technology. You are happy with the set, but you need to install a brand new sink and modern equipment in it.
- Changing the configuration. The rectilinear design no longer suited you - you wanted a corner kitchen.
- Problems with fittings. Drawers and fronts began to get stuck, and in some places the fittings became completely loose.
- Surface wear. The working surfaces are scratched, torn and unpresentable.
If desired, the list of these items can be expanded. The main thing is that the idea of restoration has matured and the process can no longer be postponed.
Restoration options

How to update an old kitchen set? You can restore a used kitchen set with your own hands in various ways. The choice of technology is determined by the degree of wear and your vision of the final result, as well as the material from which the headset is made. In any case, you will need tools:
- screwdriver (powered or battery-powered);
- industrial hair dryer (can be replaced with an old electric iron);
- a jigsaw with a set of chipboard files (you will have to cut into the sink);
- hammer drill (you can’t do without drilling the walls);
- confirmation cutter;
- metal drills;
- clamps (2-3 pieces);
- standard tools (pliers, screwdrivers, hacksaw, hammer, awl);
- crowns (designed for drilling large holes).
Adhesive tape
A square meter of film costs about 88-2200 rubles. The price difference is quite serious - this is due to the quality of the product and additional “bells and whistles” (the most expensive options are able to phosphorescent in the dark). Vinyl film is most often used to restore kitchen facades - it is available in all furniture stores.
When restoring a facade, do not forget about quality. We recommend choosing films in the mid-price range.
Kitchen set restored using self-adhesive film (photo)

The pasting process consists of the following steps:
- Removing the facade. The fittings are dismantled, the facade parts are washed with warm water and laundry soap. The fragments also need to be degreased.
- Film opening(from the inside out, along the centimeter mesh).
- Rolling out the film. It is done from the edge of the facade, the protective layer is removed gradually.
- Leveling. Use your hand or a spatula. Movements - from the center towards the edges.
- Piercing air pockets(If you want to).
Important: if the layer lays unevenly, it should be immediately removed and replaced with another. You cannot glue the same fragment again.
Interior stickers
Stickers (interior stickers) are made of PVC, a material with increased moisture resistance. In the kitchen this quality is invaluable. Stickers are sold in sets, their average price is low - 240-580 rubles.
It is easy to paste such pictures. But some rules should be followed:
- the surface to be pasted must be clean and dry;
- the sticker is smoothed from top to bottom and from the center towards the edge;
- You shouldn’t stick the sticker on at once - do it sequentially;
- After pasting, the sticker is wiped with a soft cloth.
 Tree sticker
  Coffee themed sticker
 Interior stickers in the form of butterflies
 Stickers in the form of kitchen utensils
  Kitchen stickers
Stickers provide a wide field for experimentation with. It is not necessary to cover the entire set with them - you can highlight key fragments. The themes of stickers vary:
- psychedelic motifs;
- nature;
- relief;
- texture;
- photography (you can create the image yourself, adhering to the quality requirements).
Decoupage technique

Decoupage as a design solution is rapidly gaining popularity. This painstaking technology is based on cutting out images from various materials (fabric, paper, leather, napkins) and then gluing these elements onto the restored surface. For this you will need this:
- foam filler (for cracked furniture);
- decoupage glue;
- fine sandpaper;
- flat brush (medium hardness);
- scissors;
- a jar of acrylic varnish (glossy or matte, for plastic or wood);
- source material (newspaper clippings, pictures, napkins, photos - up to you).
Sequence of steps:
- Surface preparation. Fill small cracks with foam filler, sand larger defects, and then apply a coat of primer.
- Preparing the drawing. A painstaking cutting awaits you - images, photographs, the top napkin layer or a printed print.
- Applying glue. Glue is applied to the drawing, then to the surface itself (observe the size of the cut fragment). After applying the pattern, the surface is leveled with a roller (or brush), and air pockets are removed.
- Varnishing. Furniture is coated with acrylic varnish in 3-4 layers. The time interval between applying layers is 1 hour.
Decoupage technique (video instructions):
Photo wallpaper

People who think creatively have noticed that modern moisture-resistant photo wallpapers are great for decorating kitchen facades. To implement your plan you will need:
- photo wallpaper;
- varnish and wallpaper glue (if you purchased a non-self-adhesive version);
- scissors;
- roller;
- brushes;
- dye.
To cover a plastic (or wooden) set, you will need laminated photo wallpaper on a self-adhesive basis - they successfully resist wear and moisture. The gluing algorithm is no different from applying film - the workpieces are aligned in width and air bubbles are eliminated. If paper wallpaper is used, they will have to be protected with a double varnish coating.
Photo wallpaper is applied to the front sides of the headset parts, so the side and back surfaces must be painted. The paint needs to be matched to the color scheme of the wallpaper and applied in two layers.
Replacement of facades
How to update the facade of a kitchen unit? Usually, teams of specialist furniture makers are responsible for replacing kitchen facades. Doing this yourself without proper preparation is not recommended. Your task is to choose a color scheme and material; let the professionals deal with the rest of the issues.
Replacing facades can radically reshape the appearance of the kitchen. When choosing a material, you need to understand its characteristics, the most important of which are durability, aesthetics, and strength. Let's consider four types of materials for the kitchen facade:
- Chipboard. The most budget-friendly and capricious material consists of resins and wood shavings. It will last about ten years (with proper use), but the likelihood of running into a low-quality product is quite high. If this happens, get ready for peeling, swelling, and peeling.
- MDF. This material is cheaper and lighter than wood, and can last about 6-7 years. MDF holds fittings better than chipboard. This material is also resistant to various deformations (mechanical stress, temperature changes, ultraviolet radiation, moisture).
- Metal. Aluminum profiles have firmly entered the production of kitchen sets. It avoids deformation and holds hinges perfectly. Aluminum can be used in combination with glass, chipboard and MDF.
- Glass. Nobody makes facades completely glass - this material is more suitable for inserts. Steam and greasy drops are not harmful to the glass surface. If there are children in the house, you can use plexiglass for decoration.


Wooden and MDF countertops are considered the easiest to install. Installing a concrete countertop yourself is much more difficult. Before final installation of this fragment on the kitchen cabinets, it is necessary to trim - this is where a jigsaw comes in handy.
Now you need to cut a hole for the future sink. Having taken the necessary measurements, drill holes in the four corners, and then carefully begin cutting with a jigsaw. Further installation looks like this:
- The tabletop is placed on the cabinets and secured (this is done using pre-made tires or special fasteners).
- Maintain clearances between the countertop, nearby furniture and the wall.
- The ends of the table top are protected with special pads that must be secured with self-tapping screws.
- The joint between the countertop and the sink is sealed. It is also necessary to cover the edges of the hole cut for washing with sealant.
- The final stage is connecting the mixer and siphon.
Restoration of natural wood furniture

Natural wood forms the kitchen facade of a classic style - it looks expensive, respectable and impressive. But the tree also requires proper care. Wooden slats involved in restoration must be dried and impregnated with an antiseptic.
To cover the elements, you can use paint or wood varnish. Let's take a closer look at the second option. Here are the main restoration steps:
- The door is removed, freed from the fittings, then sanded with sandpaper (medium-grain, then fine-grain).
- The crumbling and cracked doors are puttied and then sanded clean.
- The facade is degreased and coated with primer.
- After the primer has dried, varnishing of the surface begins. The varnish is applied in several layers, the deepest of which contain a tinting component. The concentration of the component decreases gradually.
- The last layer is always transparent.
As you can see, there is no particular difficulty in restoring kitchen sets. The price of repairing a kitchen set can also be very attractive. The main thing is to follow the technology of the processes and understand their sequence. In this article we have described the simplest procedures for updating a kitchen set with your own hands, but if you wish, you can tackle this issue at an in-depth level.
10, 15, or even more years have passed since the purchase of kitchen furniture. Now she doesn’t look as elegant, neat and pretty as she did at the very beginning. And ordering a brand new headset, alas, is still only a dream. There is nothing left but to slightly refresh the old, but so familiar furniture. Therefore, we decided to give you some interesting ideas by giving a master class on the topic “how to transform an old kitchen set.”
Adhesive tape
Perhaps the easiest and cheapest way to give your headset a fresh look is to cover it with self-adhesive film. Fortunately, the range of high-quality films today is very, very pleasing: imitation stone, wood, marble, tile, leather, all kinds of rustic and more modern motifs - there is plenty to choose from! Thus, you can make your kitchen, although not exclusive, very attractive.

Vinyl self-adhesive film is waterproof, has good resistance to fading, temperature changes and mechanical stress. So you don’t have to worry about the durability of this coating. Therefore, if you know how to handle a centimeter and scissors, then you will not have any difficulties in decorating.
The main thing you need is accuracy, patience and these instructions:
- Using a centimeter, we measure the kitchen unit (sidewalls, fronts, drawers).
Advice! For more convenient and accurate measurements, it is better to remove the facades and place them on a flat surface.
- All fittings must be removed, and the set itself must be thoroughly washed with a damp sponge. Pay special attention to removing fatty spots. The surface for pasting the film must be free of dirt, dry, even and smooth. Otherwise, over time, the film will begin to bubble and peel off in problem areas.
- As a rule, on the back side of the film, a convenient centimeter grid is applied to the protective paper layer. Mark on it all the necessary dimensions of each part.
Important! Even if you are sure that you took all the measurements accurately, it is still advisable to leave 1-2 centimeters in reserve. Therefore, in those places where bends are planned, add another 2 cm.

- All parts are cut out using a stationery knife along a ruler. It is better to cut curved patterns with scissors according to the markings made in advance with a pencil.
- Now, having peeled off a few centimeters of the protective paper, we apply the film to any part of the headset. The glued area must be carefully smoothed with a plastic scraper in order to remove air bubbles and folds from under the film.
Note! The film does not need to be glued to the entire layer at once. Gradually remove the protective paper by 5 cm and smooth each glued area with a scraper.
Small air bubbles can be pierced with a sewing needle, and large ones can be cut with a sharp knife and the film smoothed. If the decorative coating is uneven, do not worry, this is a fixable matter. The self-adhesive film sticks completely only after a couple of hours, so you have enough time to peel off the film from the badly turned out area and stick it again.
- We repeat all of the above steps with the remaining parts of the kitchen set. To further transform it, you can add one more touch - change all the fittings.
Replacement of facades

Want something more than just self-adhesive film? Replace old facades with new ones! Of course, the price of the issue will increase in this case, but you can not only decorate the old kitchen set, but also partially update it.
If you have a set of standard sizes, then purchasing luxurious ready-made facades will not be difficult. For atypical and out-of-fashion models, you will have to buy custom-made facades. Fortunately, today there are plenty of furniture companies that are ready to provide such a service.

When deciding on new kitchen fronts, you open up a unique opportunity - to choose not only a fresh design, but also the optimal material in terms of cost and quality. Economical options include plastic, chipboard and inexpensive wood (for example, pine). But facades made of MDF and solid wood - this is real prestige!

You can entrust the installation of brand new facades to specialists or do it yourself (on our website you will find a thematic video specially selected for you).
Decoupage

How to restore an old kitchen set? We have completely forgotten about such a fast, inexpensive, but very effective technique as decoupage! Its essence lies in cutting out beautiful compositions from various materials (paper, leather, fabric) and then gluing them onto the surface to be decorated. Let's try together to create such beauty as in the photo!

Materials and tools
- We will need clippings from magazines, newspapers or paper with a pattern printed on a printer (it can be anything - it all depends on the style of the kitchen and personal preferences);
- Special glue for decoupage or regular PVA glue;
- Medium hard brush;
- Acrylic varnish on wood or plastic.
Step-by-step decoupage
- If your kitchen cabinets have scratches, cracks or other defects, fill them with foam filler and let them dry.
- Carefully sand the entire surface to be decorated with fine sandpaper until the end result is a slightly rough surface. The areas to be decorated can also be coated with a primer or acrylic varnish of a suitable color.
- It’s good if the size of the sheet of paper with the image is large enough - then there will be no ugly joints. Don't have a large format printer at home? Don’t be sad, because you can always order a print of the required size in the salon.
- Apply glue to the surface to be decorated and the paper. The latter should be thoroughly saturated with glue.
- Now you can apply the image to the surface and carefully smooth it with a brush or roller.
Important! Under no circumstances do this with your hand. Otherwise, wrinkles or tears may appear.
- When the paper is completely dry, cover it with acrylic varnish in 3-4 layers - this will protect your work from moisture and damage. Maintain an interval of 1 hour between each coat. By the way, acrylic varnish can be glossy or matte, so you can achieve any desired effect.


Finally
Well, now you know how to restore a kitchen set! We considered just a few decoration options. But, it should be noted that self-adhesive film, facade replacement and decoupage are a real find for every housewife! After all, you can achieve truly unusual decor only by combining existing techniques and imagination. Happy creativity!
Furniture in the kitchen is constantly exposed to various influences related to the peculiarities of the operation of this room. Drops of water, heated oil, detergents fall on its surface, and condensation settles due to the change in temperature in the room. These factors lead over time to objects losing their original appearance. In such a situation, the owners can solve the issue radically by buying a new set, sigh and lament looking at the peeling products, and carry out restoration of the kitchen facades.
Restoring the coating and carrying out simple repair work can be done independently at home. If you spend a little of your own time and show your imagination, then even with minimal investment you will be able to update a damaged, unpresentable, outdated item that will serve for many more years. These actions will save the family budget, gain invaluable experience, and study various methods and methods of restoration activities.
Types of kitchen facades and their features
The façade design is a base covered with a decorative coating. The performance characteristics depend on the base part; the finishing protects the base and decorates the product. The front side of the kitchen unit is responsible for the overall appearance of the interior of the room. There are many varieties of these elements, which according to their structure are divided into two basic types:
- Frame. They are a combination of two materials, one of them fills the middle of the canvas, the second serves as a frame.
- Solid. The cabinet doors are a solid plate without seams or joints.
According to the method of opening doors, they are divided into:
- swing;
- folding;
- with lifting mechanism;
- sliding
Base material:
- Chipboard. The most budget option. It has good resistance to mechanical stress, but is inferior in appearance to other building materials.
- MDF. It has good strength characteristics, is used in the manufacture of curved structures, and has a smooth surface.
- Natural wood. Traditional raw materials used in the production of most models previously had no alternatives. This is the most expensive and high-quality product with a beautiful natural pattern.
- Glass. Mostly triplex or hardened versions are used in production. Can be transparent or matte. The ends are edged with an aluminum frame.
- Metal. There are models made of stainless steel and aluminum. They are characterized by durability and resistance to moisture.
Cover type:
- Enamel. Products are coated with special varnishes and paints.
- Plastic. Used for chipboard and MDF panels. Does not scratch, does not fade, is not afraid of moisture or chemicals.
- PVC films. They increase characteristics such as resistance to mechanical damage, high temperatures, and sunlight.
- Veneer. It is durable and enhances furniture.
Methods for updating and restoring kitchen facades
It is advisable to carry out restoration work if the furniture is well preserved, has a strong frame, and the cost of repair measures does not exceed the cost of new products. By getting rid of old stains, removing and masking cracks and chips, and replacing the cladding, you can transform the kitchen façade, which will be visually in no way inferior to the new models.
You can restore an attractive appearance in different ways. For example, scratches can be easily painted over with a furniture pencil or hidden under decorative stickers; the damaged coating can be repainted or varnished. In some cases it will be appropriate to combine different methods to obtain the best effect. Let us dwell in more detail on the most popular restoration options.
Decorating with interior stickers
Interior stickers will help disguise minor local scratches, cracks, chips, and indelible stains. They can be used to decorate not only the facade, but also the walls of the kitchen room. They tolerate moisture, steam, temperature changes well and are easy to care for. The elements adhere well to plastic, wood, veneer, MDF, chipboard, glass, and metal.
The gluing process itself takes very little time; you just need to clean the surface from dust and dirt and degrease it. At the same time, stickers will help hide minor defects, and will also become an excellent addition to the interior of the room, giving the home atmosphere a feeling of comfort and warmth.
If the wood or veneer is not painted, not varnished, or has a very cracked finish, then problems may arise with gluing the elements. They simply will not stick to such a surface. You can do a preliminary test using regular adhesive tape by sticking it on the furniture to be restored.
Pasting with self-adhesive film
Along with interior stickers, vinyl films allow you to carry out inexpensive repairs, for example, in a small area of a Khrushchev-era building. They are resistant to moisture, do not fade under the influence of sunlight, and do not lose their color over time. The average service life is 3 years. When caring for them, it is recommended to use a soft cloth and soap solution, since abrasive substances and mechanical friction will damage the material and will have to be restored.
It is easy to glue the product to the facade. The fittings are removed from the surface selected for restoration, it is thoroughly washed, cleared of grease and plaque, degreased, and dried. At this time, the film is prepared. It is cut out with a margin of 2 cm on each side, taking into account the bends. Afterwards, part of the protective layer is removed from the sticker, its reverse side is pressed and glued to the door, straightening and smoothing with a spatula. Places where air bubbles have formed can be pierced with a needle.
If something goes wrong during the work, a bevel occurs, the material can be immediately detached from the surface and re-glued, but no more than 2 times. Complete setting occurs after 5 hours.
Painting with chalk paint with a detailed master class
Updating the kitchen facade can be done by painting. This is one of the best ways to restore and completely change the color of a product. Restoration should begin with preparatory work: doors are removed from the cabinet, shelves and drawers are removed, fasteners are checked, broken elements are replaced with new ones.
- kitchen set;
- film, masking tape;
- screwdriver;
- sandpaper;
- chalk paint, primer, varnish, degreaser;
- brushes for applying paint, rubber gloves.
Surface preparation
The first step is to remove the fittings and decorative elements. After which all parts are thoroughly washed and degreased. There should be no dirty spots left on the surface. If there is glass on the door, they must be protected from paint using masking tape.
Usually there is no need to sand the facade or remove the old coating from it. In some cases, when the paint is peeled off or applied in a thick layer, it is better to scrape it off with a knife, or use special removal products. Afterwards, rub the top with sandpaper until rough and remove dust.
Sand or prime
Manufacturers of chalk paint write on the packaging that before applying it there is no need to putty the surface or remove the old layer of paint from it. But in practice, especially in the presence of defects, these actions cannot be avoided, otherwise the defects will be visible on the painted facade.
It is better to apply alkyd primer in two layers. Before covering the next layer, the first one must be completely dry. This process takes up to 12 hours. On top of each layer, after it has completely set, you should walk with fine sandpaper, which will ensure the best adhesion of the material.
Coloring
Chalk paint developed by Annie Sloan is great for upgrading furniture. It is chalk dissolved in water, mixed with various additives, but the original recipe is kept secret. When applied, a patina is formed, which gives the item a unique look. This is the best choice for a shabby chic interior.
Using a brush, roller or sponge, apply the first layer. It must be remembered that, unlike other painting analogues, if stripes remain during painting, then the facade will eventually have a striped appearance. The paint dries within one hour. Experts do not recommend speeding up the drying process yourself, for example, using a hair dryer. Before applying the second layer, you should sand the previous one a little.
Treat with varnish
After drying, the painted surface is covered with a layer of varnish. For these purposes, you can use polished or acrylic options. It is also applied in several layers with sanding of the first. The second one is not rubbed, otherwise the product will not be smooth.
Instead of varnish coating, the attractiveness of facades can be restored with wax. It is applied to a dry surface using a soft brush, sponge, or textile. After 15 minutes, it must be rubbed into the surface with a cotton cloth without pressing on it. After the facade dries, it will become smooth and a satin shine will appear.
Returning fittings and facades to their places
After the facade has completely dried, it is inspected for the presence of thick spots of paint and minor defects. When they are discovered, they are cleaned up or eliminated. Next, the masking tape is removed from the glass, and decorative elements and fittings are installed in their places.
After making sure that the frame is strong, the prepared doors are attached to it. Using a screwdriver, adjust the position of the element and level it. At the final stage, the functionality of the fastening mechanisms is checked.
Decoupage
An old kitchen set that has already served its purpose does not necessarily need to be replaced with a new one. It is enough to revive its facades with the help of decoupage. If the internal hinges and fittings are in working order, they do not need to be changed. The work will not take much time, in just a day, the doors will be updated with all kinds of pictures and will delight the owners.
First of all, you need to remove the facades and wash them well. It is necessary to get rid of stains and dried drops of fat. Now we wipe the surfaces with alcohol for better adhesion to adhesives. All cracks and chips must be treated with sealant.
At the next stage, we measure all the details and transfer the numbers onto paper and cut out the pattern. You can transfer the drawing to the sheet yourself or choose a suitable one and reprint it in a printing house or photo studio. We cut out the finished picture and proceed to decoupage the surfaces.
Place the workpiece in warm water for a few minutes. While the paper is softening, apply glue to the surface. We transfer the decor to the door and smooth it with a roller, carefully removing air bubbles. After 12 hours, the parts can be mounted in place.
Varnishing
An excellent option for restoring facades made of solid wood, wood materials, and MDF is varnishing. As with other materials, when remodeling, work should begin with preparing the surfaces. If there are shallow chips or cracks, they should be filled with putty with a special compound for natural materials and cleaned well. For ease of operation, the door of the headset should be removed.
Before applying the finishing coat, the surface should be degreased and treated with a primer and stain. This will help protect the wood from moisture and other negative influences in the kitchen. After drying, varnish compositions can be applied to the surface. For reliability and greater shine, you can paint in several layers, reducing the volume of each subsequent one. After drying, we collect all the elements and place them in place.
Use of moldings and decorative overlays
You can give your furniture a completely new design using moldings and other decorative inserts. Facades can be restored using plastic and wooden overlays. If the furniture has lost its beautiful appearance, it should be refreshed with paint before decorating. Do-it-yourself restoration takes place in several stages:
- Preparation - removing doors, protruding elements, fittings. Cleaning from dirt, removing old coating if necessary;
- Priming – treatment with special mixtures, depending on the material of the set and the type of finishing coating;
- Preparation of overlays, moldings - the decorative material must correspond to the type of surface. For plastic doors, plastic elements are chosen, wooden facades are decorated with appropriate details;
- Decoration – surfaces can be updated with rectangular strips, smooth or carved, with imitation stucco. They can simply be glued according to the intended pattern or using clapboard nails;
- Painting - the mixture is selected based on the door material (natural wood, MDF, plastic). Apply paint with a roller or brush in several layers.
Restoration of the ends of chipboard facades
The front surface of a chipboard set is often subject to various damages. This may be abrasion of paint, chips and scratches, defects in parts in places of fittings and fastenings. Such damage can be easily eliminated without disassembling the hanging cabinet using wax crayons, retouching agents, and fixing varnishes.
Most often the problem occurs with chips at the ends. Melamine edging is used to restore these areas. Repair work takes place in several stages:
- Selecting a new edge of the appropriate size and color. It is necessary to measure the length and width of the end of the door, add a few centimeters for reserve;
- Removing old edge. Heat the iron and apply it to the element;
- Cleaning up irregularities. To do this, you can use a chisel, fine sandpaper;
- Installation of new covering. Apply a self-adhesive edge and iron it with an iron. When the glue hardens, trim off the excess with a knife and sand the joints.
Restoration of natural wood facades
You can update natural wood facades using self-adhesive film or varnish mixtures. Since it is not advisable to hide the beauty and naturalness of solid wood furniture in an apartment, most restorers prefer transparent compositions.
Surface repair includes sealing areas with cracks with a special wood putty and sanding. If there are stains on the facade, they are cleaned with fine sandpaper. Particular care should be taken when working with carved items that have many indentations. The resulting sawdust should be swept away with a brush and the door wiped with a damp cloth. Now the part needs to be degreased and treated with a primer. The varnish is applied in several layers.
If the wood is swollen, jointing should be done, manually or on a special machine. Doors that are deformed from excess moisture are trimmed by removing excess. Special seals are glued onto shriveled doors, between which gaps have appeared.
Methods for restoring countertops
Even the oldest kitchen countertop can be transformed and improved. Simple improvised materials are suitable for repairs. When choosing them, you should take into account the style of the room. For example, decoupage will look great in a Provence kitchen, especially if it is applied to the facades. Repair work should begin after full familiarization with the technological process. You can remake the tabletop as follows:
- Using glass surfaces. The old coating is removed, the surface is cleaned and painted with several layers of paint. Then the tabletop is covered with prepared glass. By placing various photos and paintings under a transparent layer, you can create a three-dimensional effect.
- Decorating with tiles. Material of any shapes and sizes is suitable. It is better if the tiles are not heavy, so as not to overload the structure. For decoration, you can use mosaics and broken remains of ceramic products. The main thing is to arrange the parts with minimal clearance.
- Decoupage. This method is suitable for laminated chipboard surfaces, but only if they are not subject to frequent washing. Suitable designs are soaked in water and glued to the tabletop, and the top is coated with varnish. You can transform your apron in the same style.
- Stencil painting. The sanded tabletop is covered with paint of any color for the background, then the design is applied through a stencil. To prevent the tabletop from quickly becoming worn out, it is coated with varnish.
How to fix a burnt spot on a table or countertop
The most common problem encountered with countertops is burns due to carelessness from hot dishes. Since the surface is affected quite deeply and extensively, such a defect cannot be masked using retouching agents.
First, you need to prepare the affected area for restoration. It is necessary to remove as much as possible the blackened layer of varnish. Cover the hole around the perimeter with masking tape and moisten the burnt area with solvent. After 10 minutes, the coating will soften and can be removed with a spatula. You can also clean the area with a router.
We fill the resulting recess with softened putty in small portions, gradually compacting it. We remove excess material with a knife and grind it. The treated area must be varnished in the most suitable color, trying to reproduce the texture of the rest of the table.
Conclusion
Restoration is the fastest and most affordable way to improve the appearance of kitchen facades. Any part of the headset can be repaired in various ways. Updating your furniture yourself has a lot of positive aspects. The main advantage is the opportunity to create a unique interior and bring the most daring ideas to life.