
Rustic hand-made
Let me delve into the domain of our beauty expert - - and talk about the features of rustic design. Recently I was visiting relatives in the village of Yarkovo, Tyumen region, and was shocked by the creative creations of a local resident, Uncle Misha: a former prosecutor, and now a pensioner, creates paintings from plastic bottle caps.
Why not hand-made?
Any waste can be put to good use. People make bags out of old newspapers and dresses out of tax returns, so why not make a painting out of corks?
The rural artist has them everywhere: on the doors of the bathhouse, barn, toilet, on the inside of the fence and gates.
He would decorate the house and the street gate, but his wife is categorically against it.
Having learned about the pensioner’s hobby, they bring him new corks, throw them under the fence, send them by mail, and on holidays he receives packages with corks from relatives in Moscow.
It is clear that the pensioner’s drawings are unlikely to appear in museums around the world. Creating masterpieces requires practice, even more corks and nails; it is advisable to come up with a concept in advance.
But the idea of using traffic jams for peaceful purposes seems promising to me: waste disposal plus the realization of creative potential. I wouldn't mind if a similar pattern appeared on my country house. And you?
Photo: Galya Wood
http://f5.ru/galyavud/post/77883
Panel made of corks
http://stranamasterov.ru/node/134240
![]()
http://stranamasterov.ru/node/195172
Rugs.
Http://stranamasterov.ru/node/147044 ![]()

It is not education, but talent that makes an artist real. Bratsk resident Nikolai Petryakov creates paintings from plastic corks. 
Cork mosaic is a troublesome task. Just preparing the material for unusual paintings takes several hours, says master Nikolai Petryakov. First remove all excess, first rinse, then select by color. It's like embroidery. Only instead of canvas there is a bathhouse wall, and instead of threads there are colored plastic plugs. 
I draw 30 mm into squares. Where are the black dots I mark. Where the brown ones are, I put crosses. First you prepare the plugs, then you hammer them in,” says Nikolai Petryakov, a resident of Bratsk. 
This summer the summer resident has a creative anniversary. Five years since he mastered the art of cork. During this time, not only neighbors learned about Nikolai Petryakov’s unusual hobby. People from other cities come to take pictures with traffic jam paintings. Everyone is sure: the author of the works is a professional artist. But Nikolai Pavlovich has no special education. And recently he calculated how many traffic jams he collected over 5 years of creativity. It turned out to be almost 40 thousand pieces.
Sometimes bottles of expired mineral water were thrown away at a landfill, so my family and I collected a whole bucket,” says Nikolai Petryakov, a resident of Bratsk. 

There is creative potential, but there is not enough material. Because of this, work on the painting he is currently finishing is delayed. Black, green and brown corks are in short supply. But, despite everything, the summer resident has grandiose plans - after all, there is one more free wall of the house.
http://ideidetsploshad.info/publ/stati_o_dploshhadkakh/plastikovye_butylki/nikolaj_petrjakov_sozdaet_kartiny_iz_plastikovykh_probok_bratsk_irkutskaja_oblast/25-1-0-475
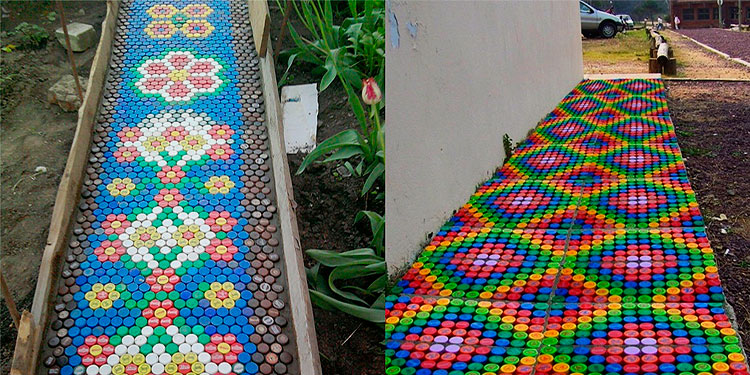
A path made from plastic bottle caps.


Bottle caps are an excellent material for crafts and decoration. In the countryside they can be used in a variety of ways. You can decorate an old basin, a bucket, a fence, a flower container or structure for mulch, an unsightly corner of the house, a tabletop, a rug for a summer shower, and instead of the usual sign with the house number, make an inscription from corks.
The most painstaking and difficult part, although it may not seem so at first glance, is the garden path. Definitely, such a decorative element in a summer cottage will be original and exclusive.  The main problem will be the number of lids; it will take a lot of time to collect them, even if all relatives, friends and neighbors help with this. Let’s leave the idea of making a garden path out of lids a “snack”, but for now you need to learn how to make simple patterns from them.
Yes, you can attach plastic bottle caps in different ways, the main thing is to learn how to work with them and you need to start with soaking to wash off all the inscriptions or use a solvent.
How to create simple patterns from plastic bottle caps
Before starting work, all the caps need to be sorted by color and a pattern drawn on the selected surface with chalk. If you don’t have success with drawing, then print out the drawing in full scale; it’s more convenient to compose it from several sheets, glue it together, cut it out along the contour of the drawing and trace it with chalk on the area.
Plastic plugs are laid out in rows, gluing to the surface or nailed, 1 nail per cap is enough.


 How to make a garden path from lids
To make it, select high-density lids, given that the load here will be considerable. The display can be done with an ornament, a picture, or randomly scattered; any method looks impressive, bright and fun, especially if the lids are multi-colored. 
If you do not plan to make a path from the covers for a long time, then it is enough to level the soil and press the covers. Keep in mind that such a quick “carpet” is very short-lived, grass will begin to grow in the space between the lids and the lids themselves will gradually fly out or be pressed deep into the ground.
For a good-quality garden path from plastic bottle caps, you first need to make a base: remove the top layer of soil, dig a trench 10 cm deep, drive stakes along the edges and make formwork. Place a drainage layer of broken brick, crushed stone or gravel on the bottom, then mix cement mortar (4 parts cement, 1 part sand, 1 part glue), pour it onto the drainage layer, place the lids, pressing them into the mortar almost to the edge of the surface. When the cement dries and you see excess on the surface, take a stiff brush and clean it off. In summer, cement sets quickly, so do not do a large batch at once, do the work in parts.


Advantages and disadvantages of lids
The advantage of a track made from covers will be durability, brightness, resistance to temperature changes, ease of repair and cost-effectiveness.
The disadvantage of a continuous garden path or area in front of a house made of roofs is that they are slippery after rain or snow. But this can be compensated by partially laying out mosaics in the central part.
For a rough calculation: per 1 sq.m there are about 1100-1200 caps from 1-2 liter bottles.
Caps from plastic bottles can be combined with metal ones, as well as with broken ceramic tiles or paving tiles. Along with plastic, wine corks are also popular.


I am glad that humanity is gradually learning to reuse waste.
If earlier these were only modest attempts, now people will think several times before throwing them into the trash container.
You can reuse not only the transparent one, but also the lid. We will talk about them today. Or more precisely about how you can use different colored caps in everyday life, how to make them:
- garden paths;
- fence;
- furniture;
- massage Mat;
- other crafts for home and garden.
Recycling plastic caps- a relatively young direction that is only gaining momentum. In large shopping centers you can see special containers for collecting multi-colored plastic.
It is clear that a resident of a small town is unlikely to take a bag of lids to the capital to throw them away in a specially designated place. But you shouldn’t send them to a landfill either - you can give them as a gift second life.
 Colored, white, large and small - almost all bottle caps are suitable for creating country crafts.
The main thing is to give free rein to your imagination.
Can connect to collection their covers loved ones and friends.
This material can be used in a wide variety of ways, and for this you need quite a lot of it.
Coasters for glasses and hot dishes, children's toys and rattles, country rugs and seats, lampshades and curtains, garden furniture - and this is only a small part of what can be made from plastic bottle caps. Next we Let's look at a few master classes, which can become a source of your inspiration.
Garden paths and paths
The garden path in your garden will become brighter and more cheerful if you line it with multi-colored corks. Why buy crushed stone and gravel when you can use waste completely free? Moreover, this way you can protect the environment from pollution.
First you need mark the area, install edges and fill the base with solid material so that the plugs do not fall into the ground. Now all that remains is post path - you can do it in a chaotic order, or you can gradient or pattern, as in the photo below, the result will be an unusual solution for landscape design.
A garden path made from lids looks good in the form of a rainbow, this is also a great option for imitation stream.
let's consider step by step process creating a garden path:
- First of all, it is necessary decide on the sizes path and its location. At this stage, you just need to outline the boundaries of the garden path.
- In the future it should remove the top layer of soil and dig a trench at least 10 cm deep.
- Now follows set up the formwork wooden products and fill the trench with fine sand or gravel.
- Prepare concrete solution in order to fill the future path.
- Flood the path follows in small portions with the addition of glue.
Now you can lay out colorful corks. In order for the path to have a finished look, it is necessary to install a curb. Plastic covers can be laid on top of green spaces.
We talked about how to make a garden path from tires.
Instructions for creating a rug
Here we will talk about a massage mat that will be useful for all family members. One evening is enough for you to create an unusual decoration for your home that will also be good for your health. A little patience and attentiveness - and your unusual massager is ready.
It can be use for foot massage at the end of the working day, as a massager for a tired back, and for rehabilitation after operations.
You can make it in any shape, or you can think over the shape, size and even design of the product in advance.
Here's what you'll need:
- a large number of plastic covers;
- awl for making holes;
- strong fishing line.
 First of all it is necessary make holes in lids On the sides- It is best to do this according to the principle of the cross.
Now imagine what your rug will look like.
Lay out a pattern on the floor and fix it in any way (sketch or photograph).
Laid out install the plugs with a snake onto the fishing line according to the pattern, row by row.
The result should be a long “snake”. Then select the covers of the first row and place them on the fishing line in the others - located oppositely.
So, Having collected the first row, proceed to collecting the second, and then the third. All that remains is to tighten the ends and secure them securely. You can use the diagram provided, or you can try to create an original drawing yourself.
How to make a fence?
It should be said right away that for the lids of this material you need not just a lot, but a lot. It is almost impossible to collect such a quantity on your own, given that parts must be the same size.
It is also worth deciding on the color in advance - you can collect caps of the same shade, or you can cover them with the required color.
And here too lots of options:
- cover the fence exclusively with one color;
- make it in the manner of colored pencils;
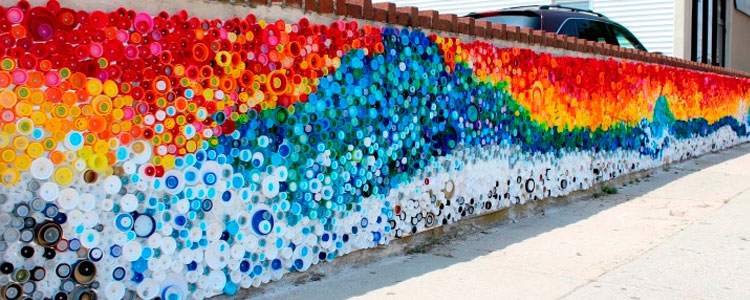
- Place an unusual pattern and a whole picture on the fence with plastic covers, as in the photo.
As soon as there are a sufficient number of caps, it is necessary to sort and drill holes in each of them with a thickness corresponding to the size of the fishing line. The same holes are made in the fence frame.
Once you have decided on a pattern or ornament, you need to weave a fence section. For these purposes, suitable wire is made from. And for fence frames you can use steel strips, corners and pipes.
Now you should position the covers in accordance with the pattern on the plywood or cardboard, after which transfer the image to the frame fence Then all that remains is string covers and secure them.
In any case, such a fence will definitely not go unnoticed. fasten caps should be using wire or fishing line. Nails are not the best option because they will not allow the lids to fit together.
Other decorations for garden and home
In a private house or gazebo on a personal plot, you can make unusual curtains from multi-colored corks. They will perfectly highlight the Provence style interior and also create a cheerful mood.
 Making such curtains is very easy. The main thing is to choose the right palette in accordance with your interior.
Or how about some new light, comfortable, compact and mobile garden furniture? Craftsmen make from lids original and creative chairs, and also decorate tables in unusual ways.
Also, don't be so quick to throw away corks if you have small children. This is great fun for kids that develops fine motor skills, and also shapes color perception.
Invite your little one to sort the corks by color - you will be surprised how much this activity will captivate your child.
You can also assemble a frame from wooden slats in the shape of a flower or a funny animal and fill it with colored caps from PET bottles - you will get an unusual decoration for your garden plot, which will certainly attract the attention of everyone around you.
If you prefer bright colors and unusual design solutions, please note that the lids make unusual and original lampshades.
Making such an element with your own hands is quite simple. The main thing is to design the frame and select the lids of the required shade.
Practicality, convenience and functionality are the main criteria that the design of a country house must meet. Surely, somewhere in your barn you have an old kitchen sofa collecting dust, which is a shame to throw away, and difficult to turn into something worthwhile. Try making a fun one out of plastic caps a rug that will bring life back to old furniture.
You can also make from bright plastic lids unusual pots or . Simply cover the base with colored corks.
Video on the topic
The video shows many ideas brought to life for creating a variety of beautiful and useful crafts from plastic lids for your home, cottage, or garden plot:
Conclusion
To all that has been said, all that remains to be added is that lids are not waste or waste. This is a universal material that can be reuse, creating unusual and useful things while protecting nature from pollution. These colorful caps can be used to create baby toys and rattles, garden furniture and interior decoration.
After reading this article, you learned how to use caps from PET bottles for the garden and cottage, making a variety of crafts and decorations with your own hands.
In contact with
Usually there is no time to bring beauty to the site - energy goes into planning the garden and vegetable garden. But the owners spare no time in making their site beautiful and comfortable. A decorative option could be paths made from plastic bottles, because when you go to the dacha, you take a lot of containers with water and juice, and a lot of it accumulates over the summer. You shouldn’t collect everything in a coolie and take it to a landfill - this is an excellent material with which you decorate your site and create unusual and beautiful things.
An example of an original path to a house made from plastic bottle caps
To make paths with your own hands, just use your imagination and creativity. Below we provide step-by-step instructions, using which you can easily create an unusual art object on your site. You will need a little:
- free time;
- hard work;
- patience.
Some people believe that there is nothing complicated in arranging a path from corks from plastic containers, since it is easy to work with waste material - this is not so. If you want to surprise your neighbors and please your loved ones with the beauty of your work, you need to adhere to the basic rules in arrangement. And in most cases they concern the collection of available material for the path and preparation for work.
 Option for a garden path made from bottle capsReturn to contents
How to choose material
It is worth noting that plastic is an ideal material for arranging country house decor, including paths, since its decomposition time is 100 years. The color range of corks is very large. In addition, they do not lose their appearance for a long time, but even if the corks fade in the sun, it is enough to simply paint them in the desired color.
Required material to create a track:
- Multi-colored, different-sized bottle caps.
- Juice carton lids.
- Metal bottle caps.
- Lids from jars and eggplants.
- Wine corks.
The requirement for material when arranging a path is that there must be a lot of it, it must be laid tightly. The heaviest load falls on the tracks. Without laying the material tightly, the garden path will quickly fail, and you will be sorry for the wasted effort.
 Option to design a walkway made of concrete plugs
- measure the diameter of the cork - for two-liter bottles this value is three centimeters;
- per 1 meter, there are 33.5 pieces. traffic jams;
- per square meter you need to stock 1122.5 corks;
- We multiply the area of the track by this figure and get the amount of material.
This turns out to be a very large figure, which no family will be able to collect, even if they drink a lot of liquid. Where to get the material:
- tell your neighbors, relatives, and acquaintances about the idea of creating beauty on your site;
- advertise on the Internet;
- go through cafes and canteens, agree with the staff to collect the corks in a separate bag.
There are inscriptions on the corks; they are completely unnecessary - the corks are soaked and washed thoroughly. Inscriptions that cannot be washed off with water must be removed with a solvent.
 Path of traffic jams on the playgroundReturn to contents
How to do
There are several options for laying plugs:
- To obtain a flat and smooth surface, use the plugs facing up.
- For a ribbed massage track - ribs up.
- For good texture, the inside side up.
The latter option is applicable in enclosed areas; when precipitation occurs, water and dirt accumulate in traffic jams. And it is very difficult to care for such a coating.
Return to contents
What pattern should I use to lay the plugs?
From this moment creativity begins. Before paving the path, you need to decide on the pattern that you will lay out on it. You can create a scattering of colors by laying out corks in rows, the result will be a colorful spotted path of plastic corks - which will attract attention with its multi-colored highlights. If you are an extraordinary person, you can create your own ornament. You can use any embroidery patterns.
 Laying a path from plastic corks
A path made of traffic jams with even geometric shapes will look good - this option is easy to implement, just make the markings correctly. There are areas where summer residents have created real works of art with their own hands. You can safely experiment, and with the involvement of all family members. You will do several useful things:
- create a beautiful and unusual path;
- get incredible pleasure from the process;
- Establish creative communication with children.
Often, during such a fun game with children, real masterpieces are created.
Return to contents
Materials and tools
This stage must be approached with all responsibility, despite the fact that the material is inexpensive. The process requires a lot of patience, so you need to make sure that the path of traffic jams serves you for many years. Plastic corks as a garden path
Important! It is worth thinking about making a garden path at your dacha, as it will decorate the area.
Many people prefer to make garden paths out of plastic corks, but it is worth noting that these paths become slippery in winter. I would like to give advice, do not use this material for paths you walk on in winter. Use them only for paths between beds where you do not walk in winter.
 Option for a path made from lids in the garden
For paving you will need:
- a lot of corks of various shades;
- cement;
- sand;
- adhesive for exterior use;
- formwork material.
It is worth noting that you cannot do without care in creating a country path from this material, be patient and get started:

It is worth noting that it is better to install concrete curbs to complete the composition.
 An example of constructing concrete curbs for a traffic jam road
If there are none, then you can use old tires to install the track, cut in half and dug in around the perimeter of the track. Additionally, the border can be painted in different colors.
As you can see, there is nothing complicated in creating crafts from plastic corks and, if desired, you can create not only interior decoration, but also decorate the landscape of your summer cottage. Video supporting various paths from plastic bottle caps.
Return to contents
Advantages
- This coating is very practical and aesthetically pleasing.
- Minimum material costs.
- Not afraid of temperature changes.
- Lasts a long time with proper paving.
- Easy to repair; if the cover bursts, it is enough to replace it without dismantling the entire covering.
- They do not lose color for a long time, as they contain a permanent dye.
So it is much more profitable to equip paths with this plastic than with paving slabs or other paving materials.
project-sam.ru
How to make a garden path from plastic bottle caps | Country house
 Bottle caps are an excellent material for crafts and decoration. In the countryside they can be used in a variety of ways. You can decorate an old basin, a bucket, a fence, a flower container or structure for mulch, an unsightly corner of the house, a tabletop, a rug for a summer shower, and instead of the usual sign with the house number, make an inscription from corks.
The most painstaking and difficult part, although it may not seem so at first glance, is the garden path. Definitely, such a decorative element in a summer cottage will be original and exclusive.  The main problem will be the number of lids; it will take a lot of time to collect them, even if all relatives, friends and neighbors help with this. Let’s leave the idea of making a garden path out of lids a “snack”, but for now you need to learn how to make simple patterns from them.
Yes, you can attach plastic bottle caps in different ways, the main thing is to learn how to work with them and you need to start with soaking to wash off all the inscriptions or use a solvent.
How to create simple patterns from plastic bottle caps
Before starting work, all the caps need to be sorted by color and a pattern drawn on the selected surface with chalk. If you don’t have success with drawing, then print out the drawing in full scale; it’s more convenient to compose it from several sheets, glue it together, cut it out along the contour of the drawing and trace it with chalk on the area.
Plastic plugs are laid out in rows, gluing to the surface or nailed, 1 nail per cap is enough.

 How to make a garden path from lids
To make it, select high-density lids, given that the load here will be considerable. The display can be done with an ornament, a picture, or randomly scattered; any method looks impressive, bright and fun, especially if the lids are multi-colored. 
If you do not plan to make a path from the covers for a long time, then it is enough to level the soil and press the covers. Keep in mind that such a quick “carpet” is very short-lived, grass will begin to grow in the space between the lids and the lids themselves will gradually fly out or be pressed deep into the ground.
For a good-quality garden path from plastic bottle caps, you first need to make a base: remove the top layer of soil, dig a trench 10 cm deep, drive stakes along the edges and make formwork. Place a drainage layer of broken brick, crushed stone or gravel on the bottom, then mix cement mortar (4 parts cement, 1 part sand, 1 part glue), pour it onto the drainage layer, place the lids, pressing them into the mortar almost to the edge of the surface. When the cement dries and you see excess on the surface, take a stiff brush and clean it off. In summer, cement sets quickly, so do not do a large batch at once, do the work in parts.


Advantages and disadvantages of lids
The advantage of a track made from covers will be durability, brightness, resistance to temperature changes, ease of repair and cost-effectiveness.
The disadvantage of a continuous garden path or area in front of a house made of roofs is that they are slippery after rain or snow. But this can be compensated by partially laying out mosaics in the central part.
For a rough calculation: per 1 sq.m there are about 1100-1200 caps from 1-2 liter bottles.
Caps from plastic bottles can be combined with metal ones, as well as with broken ceramic tiles or paving tiles. Along with plastic, wine corks are also popular.


dacha-vprok.ru
device, material selection and installation
Paths made from plastic bottles are a budget and original option. It is perfect for garden decoration. It has gained particular popularity among those who like to buy drinks in such containers. At the same time, not only the bottles themselves, but also the caps can be used for landscape design.
 An example of a garden path made from plastic bottles
Return to contents
Making a path from plastic bottles
A garden path made from plastic bottles is quite easy to make. This process can be carried out with the involvement of children. They will be interested in participating in the development of the design and its execution. What will serve as a wonderful alternative to TV and computer games. And this is active recreation in the fresh air and the development of creativity in the child.
Material selection
To make an original garden path, the material should be selected according to the following criteria:

Having selected the material, it is washed and dried before use. This event will give a neat look to the future decorative graceful path.
 An original, neat path in a summer cottage
Preparatory work
A path made of bottles will be made with high quality if you first prepare the base for it:

At this stage, the preparatory work can be considered completed.
Track installation
Bottles are installed vertically in the trench, and the protruding ones are deepened. The resulting path should be compacted. How can you do this:
At the end of the installation, the formwork is removed and the voids are filled with cement. After hardening, the path made from plastic bottles with your own hands is ready for use. There is another option for mounting bottles - horizontally. To level the surface after laying, install boards on the containers and walk on them. Thus, they compact and achieve a flat plane.
You can also make a designer path in your dacha using cut bottles, using their bottoms. The installation technology is similar to the first option, but there is some difficulty with installation.
The bottoms should be turned over quickly so that the sand does not spill out of them. Some craftsmen recommend pre-wetting it, this will make it easier to turn over and install the element. The video shows the process of installing a path made from plastic bottles.
Return to contents
Bottle cap path
Plastic lids for containers are especially popular among summer residents. This is due to several of its advantages:
- The small size allows you to easily collect the required amount. If you remember the dimensions of the bottle and how much space is required for storing it, then this is a significant plus.
- Variety of colors and sizes. Plastic bottle caps are used everywhere not only for carbonated drinks, but also for milk, yogurt, kefir, and juices. Therefore, it is easy to gain the required volume for the season.
- Thanks to the variety of colors and shapes, unique mosaic paths are laid out.
- Light weight allows for easy transportation to the garden plot.
 Design and appearance of a path made from bottle caps
Using ingenuity and design skills, summer residents use plastic covers not only for garden paths, but also for finishing fences, walls and decorating gazebos.
Preparatory work
In preparation for the summer season, you can lay out plastic material on winter evenings, choosing an ornament or design for the future path. Having decided, it’s worth sketching it on a piece of paper. During the summer season, they begin to arrange the path. To do this, the following preparatory work is carried out:
Installation of a traffic jam track
The work of gluing lids requires skill and speed:

Thus, a path of plastic bottle caps is gradually filled and arranged. Plastic bottles can be used as a plastic fence or border. They are installed vertically, buried at half or 2/3 of the height.
An interesting solution is to combine different materials. Garden paths made from corks and bottoms from plastic bottles will look original. When starting renovations in the bathroom and toilet, you should not throw away the old tiles. It will also look unusual in combination with plastic lids.
When purchasing and designing your own summer cottage, you want to not only grow fruits and vegetables on it, but also spend a good rest among the beauties of nature and buildings. Do-it-yourself decorating using available materials allows you to create unique landscapes. And mosaic paths, decorations and crafts for cottages and gardens made from plastic bottles have long received a worthy place among summer residents. Because the versatility of the material allows you to create masterpieces that do not in any way affect the family budget, but provide an opportunity to decorate the landscape in an interesting way.
project-sam.ru
a guide on how to use them to make a fence, rug, garden path and other decorations for the garden and home with your own hands

I am glad that humanity is gradually learning to reuse waste.
If earlier these were only modest attempts, now people will think several times before throwing a plastic bottle into the trash container.
Not only can the clear plastic be reused, but so can the lid. We will talk about them today. Or more precisely about how you can use different colored caps in everyday life, how to make them:
- garden paths;
- fence;
- furniture;
- massage Mat;
- other crafts for home and garden.
Recycling plastic caps is a relatively young area that is only gaining momentum. In large shopping centers you can see special containers for collecting multi-colored plastic.
It is clear that a resident of a small town is unlikely to take a bag of lids to the capital to throw them away in a specially designated place. But you shouldn’t send them to a landfill either - you can give them as a gift second life.
What kind of caps can I use?
 Colored, white, large and small - almost all bottle caps are suitable for creating country crafts.
The main thing is to give free rein to your imagination.
Can connect to collection their covers loved ones and friends.
This material can be used in a wide variety of ways, and for this you need quite a lot of it.
Coasters for glasses and hot dishes, children's toys and rattles, country rugs and seats, lampshades and curtains, garden furniture - and this is only a small part of what can be made from plastic bottle caps. Next we Let's look at a few master classes, which can become a source of your inspiration.
Garden paths and paths
The garden path in your garden will become brighter and more cheerful if you line it with multi-colored corks. Why buy crushed stone and gravel when you can use waste completely free? Moreover, this way you can protect the environment from pollution.
First you need mark the area, install edges and fill the base with solid material so that the plugs do not fall into the ground. Now all that remains is post path - you can do it in a chaotic order, or you can gradient or pattern, as in the photo below, the result will be an unusual solution for landscape design.
A garden path made from lids looks good in the form of a rainbow, this is also a great option for imitation stream.
let's consider step by step process creating a garden path:
- First of all, it is necessary decide on the sizes path and its location. At this stage, you just need to outline the boundaries of the garden path.
- In the future it should remove the top layer of soil and dig a trench at least 10 cm deep.
- Now follows set up the formwork wooden products and fill the trench with fine sand or gravel.
- Prepare concrete solution in order to fill the future path.
- Flood the path follows in small portions with the addition of glue.

Now you can lay out colorful corks. In order for the path to have a finished look, it is necessary to install a curb. Plastic covers can be laid on top of green spaces.
Here we talked about how to make a garden path from tires.
Instructions for creating a rug
Here we will talk about a massage mat that will be useful for all family members. One evening is enough for you to create an unusual decoration for your home that will also be good for your health. A little patience and attentiveness - and the unusual massager is ready.
It can be use for foot massage at the end of the working day, as a massager for a tired back, and for rehabilitation after operations.
You can make it in any shape, or you can think over the shape, size and even design of the product in advance.
Here's what you'll need:
- a large number of plastic covers;
- awl for making holes;
- strong fishing line.
 First of all it is necessary make holes in lids On the sides- It is best to do this according to the principle of the cross.
Now imagine what your rug will look like.
Lay out a pattern on the floor and fix it in any way (sketch or photograph).
Laid out install the plugs with a snake onto the fishing line according to the pattern, row by row.
The result should be a long “snake”. Then select the covers of the first row and place them on the fishing line in the others - located oppositely.
So, Having collected the first row, proceed to collecting the second, and then the third. All that remains is to tighten the ends and secure them securely. You can use the diagram provided, or you can try to create an original drawing yourself.
How to make a fence?
It should be said right away that to collect this material from the lids you need not just a lot, but a lot. It is almost impossible to collect such a quantity on your own, given that parts must be the same size.
It is also worth deciding on the color in advance - you can collect caps of the same shade, or you can cover them with the required color.
And here too lots of options:
- cover the fence exclusively with one color;
- make it in the manner of colored pencils;
- Place an unusual pattern and a whole picture on the fence with plastic covers, as in the photo.

As soon as there are a sufficient number of caps, it is necessary to sort and drill holes in each of them with a thickness corresponding to the size of the fishing line. The same holes are made in the fence frame.
Once you have decided on a pattern or ornament, you need to weave a fence section. Non-ferrous metal wire is suitable for these purposes. And for fence frames you can use steel strips, corners and pipes.
Now you should position the covers in accordance with the pattern on the plywood or cardboard, after which transfer the image to the frame fence Then all that remains is string covers and secure them.
In any case, such a fence will definitely not go unnoticed. fasten caps should be using wire or fishing line. Nails are not the best option because they will not allow the lids to fit together.
Other decorations for garden and home
In a private house or gazebo on a personal plot, you can make unusual curtains from multi-colored corks. They will perfectly highlight the Provence style interior and also create a cheerful mood.
 Making such curtains is very easy. The main thing is to choose the right palette in accordance with your interior.
Or how about some new light, comfortable, compact and mobile garden furniture? Craftsmen make from lids original and creative chairs, and also decorate tables in unusual ways.
Also, don't be so quick to throw away corks if you have small children. This is great fun for kids that develops fine motor skills, and also shapes color perception.
Invite your little one to sort the corks by color - you will be surprised how much this activity will captivate your child.
You can also assemble a frame from wooden slats in the shape of a flower or a funny animal and fill it with colored caps from PET bottles - you will get an unusual decoration for your garden plot, which will certainly attract the attention of everyone around you.
If you prefer bright colors and unusual design solutions, please note that the lids make unusual and original lampshades.
Making such an element with your own hands is quite simple. The main thing is to design the frame and select the lids of the required shade.
Practicality, convenience and functionality are the main criteria that the design of a country house must meet. Surely, somewhere in your barn you have an old kitchen sofa collecting dust, which is a shame to throw away, and difficult to turn into something worthwhile. Try making a fun one out of plastic caps a rug that will bring life back to old furniture.
You can also make from bright plastic lids unusual pots or plant pots. Simply cover the base with colored corks.
Video on the topic
The video shows many ideas brought to life for creating a variety of beautiful and useful crafts from plastic lids for your home, cottage, or garden plot:
Conclusion
To all that has been said, all that remains to be added is that lids are not waste or garbage. This is a universal material that can be reuse, creating unusual and useful things while protecting nature from pollution. These colorful caps can be used to create baby toys and rattles, garden furniture and interior decoration.
After reading this article, you learned how to use caps from PET bottles for the garden and cottage, making a variety of crafts and decorations with your own hands.
In contact with
Classmates
rcycle.net
DIY path made from plastic bottles. How to make paths from plastic bottle caps
The autumn season is not only the time for harvesting a rich harvest, but also the optimal time for preparing a summer cottage for winter, namely, for cleaning up garbage. Plastic bottles left over from summer picnics are exactly the situation when it’s a pity to get rid of them, and there seems to be no benefit from them. However, resourceful owners with a rich imagination and great aesthetic potential will find the best way out of this situation. Creating garden paths from plastic bottles, in our opinion, is the best way to use a plastic “treasure” that can give the site additional originality. Interested? Then this article is for you.
Garden paths made from plastic bottles. Preparatory activities
It would seem that paths made of plastic containers, what could be lighter? But this event also requires careful preparation. First, you need to decide on the type of garden path that you want to recreate in your garden.
There are several options:
1. Paths made from whole plastic bottles;
2. Paths from cut bottoms;
3. And finally, paths made from plastic bottle caps.
We stock up on the necessary tools, in this situation it’s a shovel, bucket and scissors, and get to work. Depending on the typical characteristics of the garden path, preparatory activities will vary. But let's start in order.
Paths made from whole plastic bottles. Manufacturing technique
In order to make a path from whole plastic bottles, dig a trench the depth of which is 1.5 shovels and install wooden formwork. The trench is filled with broken bricks, glass, crushed stone and stones of various sizes, as well as other construction debris, covered with a 3-centimeter layer of sand on top and thoroughly compacted. In accordance with the size of the future path, select an approximate number of containers and fill them with fine crushed stone, sand or dry soil and shake thoroughly until the contents are compacted. Filled containers are placed horizontally in the prepared trench, with the necks located towards the edges of the path.
To compact the laid out bottles, place a board on them and, after walking on it several times, compact them evenly. The gaps between the bottles are filled with sand and dry cement and compacted again in the same way. After walking along the boards, remove excess dry filler and, pouring water, leave until the cement sets. After waiting for the cement to completely harden, the formwork must be removed.
How to diversify a homemade path? Basic Techniques
That's it, the track is ready. But sometimes the soul requires aesthetics, and there are many ways to ensure that the path is not only functional, but also a decorative element of the site. Here are some of them:
1. The first and easiest option is to use multi-colored yogurt containers, the varied colors of which will invariably please the eye;
2. Or you can not look for easy ways and take ordinary transparent plastic bottles and, before pouring crushed stone and sand into them, place pieces of foil, multi-colored paper and shiny candy wrappers in them. This way you will get rid of excess debris and give the path additional decor.
But you don’t have to limit yourself to this. After removing the formwork, you will notice that the necks located at the edges slightly spoil the overall appearance of the decorative path, and you may be a little disappointed. But this problem also has a simple solution - a border made from the same plastic containers.
For these purposes, the bottles are also filled with sand and placed in a pre-prepared trench with their necks down. This will not only protect the track from destruction, but will also give it additional originality. If you show your imagination, you can organize such a border not only as an addition to a garden path made of plastic bottles, but as an independent decorative element that can be used as a fence for a flower bed or other elements of landscape design.
And at the same time, you can use a self-made border made of bricks or flowers to decorate a path made of bottles.
A path made from the bottoms of plastic bottles. How to do it yourself?
To recreate a path on your site from the bottoms of plastic bottles, you need to carry out the same preparatory measures as when making a path from whole plastic containers:
chaosspace.ru
Country paths made of traffic jams: do it yourself
One of the indicators of the livability of any dacha is the presence of paths. They connect garden buildings, lead to a recreation area, and separate the beds.

To make such a path you will need plastic bottle caps, cement, sand, boards and tile adhesive.
Country paths, in addition to their direct purpose, ease of movement in any weather, play a very important decorative role.
Such paths become the main element of the surrounding landscape.
Absolutely any material can be chosen for their manufacture, but to make the path at your dacha truly unique and original, you can make it from the most ordinary corks. This is an easy and very interesting task that even a child can cope with. But before you make your own country paths from traffic jams, you need to draw rough sketches on paper. The house, the fence, the flower garden, the rest of the decor - everything should be in harmony with each other. The dacha should become a single whole. Next, you need to decide whether the paths will be one color or not, whether to make a pattern or ornament on them, and whether they need a small fence. If you decide to make an image or post an inscription, then you must first depict it on paper, calculating how many traffic jams there will be in each row. You also need to collect a sufficient amount of the material used and only then get to work.
Construction of paths from traffic jams in the country
Before you start laying the plugs, you need to level the area and fill it with weed control liquid, and after laying it, compact it with a mallet.
Required tools:
- Shovel.
- Cord.
- Roulette.
- Hammer.
- Watering can.
Step by step work:
- Wash and dry the corks well.
- Make markings. To do this, you need to decide on the location of the path, drive pegs around the perimeter and pull the cord along them. If the path at the dacha has a bend, then at the turns the stakes are driven in at a short distance from each other so as not to disturb the smoothness of the line. Measure the width of the tracks with a tape measure. If the path is intended simply for walking, then its minimum width is 50 cm; if a wheelbarrow will drive along it or it will be used for other household needs, then 80 cm.
- The turf is removed from the marked area, stones and plant roots are removed. Use a shovel to dig a small trench and compact the soil.
- If the path has a fence, then it can be made using plastic bottles. Their necks down should be placed next to each other at the edges. A decorative fence can be made from any other available materials.
- Fill the trench with crushed stone. Level it out.
- Pour sand on top, compact it and lightly water it.
- The lids, bottoms up, need to be pressed into the sand. As the sand dries, it must be moistened.
Thus, you can lay out an ordinary straight path in your dacha, fence a flowerbed, make a labyrinth, or simply lay out a small area on which potted flowers will then stand.
If it is necessary to make a more durable coating, then it is better to lay the plugs on a concrete solution. The technology is the same, but sand is replaced with cement. You need to make a path like this quickly, and it’s better to lay out the cement in small portions. When mixing the solution, you can add special dyes to it, then bright colors will be visible between the lids, and not a dull gray color. In addition to plastic plugs, you can also use metal ones. They are also well suited for laying and decorating a summer cottage.
1landscapedesign.ru
DIY path made from plastic bottles
Garden paths paved with your own hands help solve the issue of zoning space on the site. Walking through them, the summer resident will be able to assess the condition of the plants in the beds, determine which trees need pruning and shaping, and simply enjoy the beautiful landscape of his garden. There are a huge variety of materials for paving paths, but the most creative and budget-friendly is the use of used plastic bottles.

Preparatory work: selection of material and working conditions with it
Plastic is a very flexible material suitable for exclusive garden projects. With its help, craftsmen make vertical beds, borders for flower beds, garden decor and, of course, bright and spectacular garden paths. Their construction requires a small amount of time and effort, which, if put to good use, the summer resident will be able to enjoy the result of his work for many years to come, because plastic takes a very long time to decompose. But before you take action, you need to choose the material wisely.

Not only plastic bottles can be used, but also other alternative materials:
Traffic jams from them;
Cut out bottoms from eggplants;
Caps for yoghurts, jars, medicines, beer, tetra bags;
Wine corks, etc.
In order for a path made of plastic bottles to become a decoration of the area, attracting the attention of all guests and neighbors in the country, you need to collect materials for a very long time. An even larger amount of raw materials will be required if the hacienda owners are interested in a path made from plastic bottle caps - they will need more than 1000 corks per square meter. Therefore, you can involve all your friends and acquaintances in collecting materials.

When the required amount of containers has been collected, you can begin preparatory activities. They consist of several stages:
Cleaning bottles from dirt and drink residues;
Removing labels;
Drying containers in the sun.
What advantages do plastic bottles have over other materials?
Owners of summer cottages may react negatively to the proposal to build paths in the garden from plastic bottles, because many private developers are accustomed to giving preference to traditional materials - stone, ceramic tiles, crushed stone or asphalt. However, compared to them, plastic has a number of advantages. Among them:
Affordable price and prevalence;
Preserving the environment on the planet by using recyclable materials in the garden;
Easy installation;
Bottle durability;
The ability to create paths with an unusual original texture.

Disadvantages of the material
While paying attention to the advantages, one cannot ignore some of the negative aspects of using bottles in garden construction. Plastic is a slippery material, so in winter there is a risk of slipping on the path while walking in the garden. In addition, under the influence of high temperatures it can become deformed, and under the scorching rays of the sun, it can lose its original color and shine.
Tools for project implementation
Before starting work, summer residents should prepare the necessary set of tools so that in the future all manipulations will be quick and accurate. To build paths they will need:
Building level;
Materials for the construction of formwork - boards, slats;
Bars for leveling paths;
Garden scissors for cutting bottles;
Sand or turf soil for filling empty bottles and changing the landscape topography on the site in accordance with the requirements of the project;
Cement mixture;
Slag, gravel, small construction waste.

Technology for building paths from whole bottles
Having decided to use whole bottles for paving paths, you need to consider the issue of their sustainability and durability. To do this, home craftsmen fill bottles with sand, and then compact it tightly in pre-prepared plastic containers and tighten the caps.

The next stage of work is the construction of a shallow trench, which will become the basis for the path. To prevent the trench from crumbling, work must be carried out carefully, removing excess soil with a shovel, and then compacting the soil with boards or feet. The optimal trench depth is one and a half bayonets of a shovel. However, this value can be adjusted depending on the height of the bottles used for garden construction.
When the trench is ready, craftsmen use boards of durable wood to construct the formwork. The installed boards are secured with pegs, and then small construction debris, slag, and tree branches are poured into the resulting recess, and a sand cushion is built on top of them. This is necessary so that the ground does not sag, and the constructed path does not disappear from under your feet several years after completion of construction in the garden.

Then the bottles are laid horizontally in the trench and compacted tightly, and the voids are filled with a mixture of cement and sand. When the solution dries, the path is ready. It will look more impressive if, before starting work, the bottles are sorted by color and laid out in the form of an ornament or painted with bright paint that is in harmony with the small architectural forms in the garden.
Using large containers
Five- and six-liter eggplants, in which manufacturers mainly package purified drinking water, can also be used in summer cottage construction. They are larger in size, so building a path from them will go a little faster. To begin work, the eggplants are washed and dried, and then the bottoms of large-volume bottles are cut off.
Summer residents insert eggplants without the bottom into one another, and fill the resulting voids with sand. Bottles arranged in this way can be laid in two or three rows, depending on how wide the garden path being built should be.
After laying the eggplants in the trench, they are poured on top with a solution and sprayed with water from a spray bottle. Next, summer residents just have to wait for the solution to harden.

Lids - as the main raw material for paving garden paths
To build a path from caps, the master must be sure not only that the prepared raw materials are sufficient to implement the chosen project, but also that he has enough enthusiasm and inspiration to carry out all the work. The lids need to be laid painstakingly and for a long time, so you should not count on a quick completion of the project.
You need to start work by preparing the construction site. The ground where mosaic garden paths made of plastic caps will be located in the future is cleared of plants and the soil is leveled on it. Then they mark out the boundaries of the path, remove the top layer of soil and compact the earth thoroughly.
After installing the wooden formwork, they begin laying out the lids. They look more attractive if arranged in intricate patterns, interesting patterns or colorful mosaics. To level the laid plugs and caps, boards are placed on top. For a more aesthetic appearance, the paths are filled with sand.
Video: garden paths made from lids
Ideas for decorating homemade paths from scrap materials
In the garden plot there is always the opportunity to express your creative ideas. Therefore, if a summer resident wants to make the paths constructed from plastic bottles, eggplants or caps even more beautiful and stylish, then he can use additional decor.
He can use multi-colored glass containers, displayed vertically, as borders for the paths, or he can build a border out of wood and paint it in a bright color. To make the paths look spectacular in the dark, small garden lanterns are installed near them, which with their soft light give the area an unusual cozy atmosphere.
Separately, it is worth mentioning the unlimited number of design options for the area near the paths. A summer resident can set up flower beds next to them, pave dry streams with stone, or plant fragrant coniferous plants.
Knowing how to put into practice the technology of laying a garden path from plastic bottles, you will not only transform the garden landscape, but also make it more functional. Therefore, once again, when bringing a used plastic bottle of soda water or lemonade to the trash bin, think carefully. This container made of artificial materials can be a practical material for building paths on your estate.
housedb.ru
Lids from soft drinks - this is an excellent raw material for the production paths in the garden plot. The variety of colors allows you to create various ornaments and designs from them.
Of course, creating such a coating is a long and painstaking process. The diameter of one plug is three centimeters. In order to pave one square meter of path, you will need a little more than a thousand plastic bottle caps.
But such a coating has undeniable advantages. Cheap raw materials allow you to significantly save on the decorative design of your site. A simple and convenient method of installing individual fragments does not require labor-intensive excavation work. To lay individual elements you do not need to have special construction skills.
Where can I get bottle caps in such quantities and how can I find enough time to make them? These are the two main problems that summer residents will face if they choose this design method to improve their paths.
There are several methods for collecting the necessary materials. Firstly, there is no need to wait until the required volume of plugs has been collected. Caps can be found in large quantities on the banks of nearby rivers and lakes. You can also ask close family and friends not to throw away caps from empty plastic bottles.

In the interval between summer cottage seasons there is enough free time to assemble fragments of the future path.
Making fragments and laying

First of all, it is necessary to mark future paths and calculate the area that needs to be paved. Then you need to roughly come up with the general composition of the future design of the paths and sketch out a diagram of the arrangement of the ornamental elements.
Options for the parts that make up the composition can be simple geometric shapes made from old lids, such as circles, squares, rhombuses and triangles. More complex designs are concentric circles and various versions of crosses. Animal figures cut out of cardboard will also serve as good templates for the future design of paths.

Tools and materials needed to make fragments.
1. An awl with a wooden handle or an electric drill.
3. Fishing line with a diameter of three to four millimeters.
4. A great desire to create something with your own hands.

Lay out the pre-selected shape from the lids. It is better to divide complex drawings into several component elements. Where the sides of the plugs touch, make marks with a felt-tip pen for the holes.
Using an electric drill or an awl (the tip of the awl needs to be heated to pierce the material more easily), make the holes marked in the side walls. Connect the covers together using a needle and fishing line. There is no need to try to connect a large number of caps at once. It is better to collect individual elements and then combine them into the desired shape.

The finished coating can be laid as new fragments are made. Having one or two square meters of finished ornament available, installation can begin.