Shoes are the passion of many women. How many pairs of shoes are needed for different occasions? Shoes for a business meeting, comfortable boots for walking, soft slippers. What then can we say when we are talking about a family where everyone needs boots or sneakers. Therefore, everyone faces the problem of storing it.
It is often difficult to install a spacious shelf in a small hallway. Shelves and cabinets simply do not fit into the dimensions of your narrow hallway.
In this case, you need to contact a custom-made furniture workshop. However, such services are more expensive than standard factory-produced solutions.
But the issue can be resolved differently. Make your own cabinet.
Shelves
 The materials for making the cabinet can be chipboard and MDF, as well as plywood and natural wood.
It is necessary to take into account that plywood and wood are much more expensive than chipboards. But furniture made from these materials is more durable and, compared to chipboard, can withstand a humid environment better.
Chipboard and MDF boards, unlike wood, do not require additional processing.
The compressed structure of MDF makes the material quite durable. Working with this material is quite easy. Also consider its weight. We recommend using MDF only as a facade.
Chipboards have a wide color range. Therefore, it will be quite easy to fit the cabinet into the interior of the hallway.
As an additional decoration, you can order milling on the slab. This will make it unique.
DIY cabinet

A box for sneakers, sandals and boots and folding drawers.
In this article we will look at the manufacturing process of a cabinet, the frame of which is made of 16 mm chipboard. Partitions are completed from chipboard 10 mm.
Let's play on the arrangement of two colors. We will make the sidewalls, roof, internal pillars and bottom from dark alder, and the facades from light alder.
You can give your drawings and they will cut the chipboard boards for you in a store that has special equipment. You can also include edging tape in your order.
But if you are limited in funds or want to train your skills, then you can do it yourself at home. But it is necessary to take into account that without specialized tools and certain skills it will not be easy to avoid chipping.
How to glue the edge yourself?
The edge happens paper and plastic.
To glue the edge at home, you need:
- Apply special glue to the edge.
- Heat the iron to maximum temperature.
- Press the edge using light pressure through the thick fabric.
- Remove any remaining glue.
Cabinet details
Parts made from 16 mm wood-laminated plates, dark alder color:
- roof - 1100×250−1 piece;
- bottom - 1100×250−1 piece;
- sidewall - 668×250−2 pieces;
- internal stand - 668×250−1 piece;
- internal horizontal flat piece of wood - 526×250−3 pieces.
Parts made of 16 mm wood-laminated plates, light alder color:
- facade - 311×51 -4 pcs.
Parts made from 10 mm wood-laminated plates, light alder color:
- internal partition of the shoe shoe - 510×140−4 pcs.;
- internal partition of the shoe shoe - 510×135−4 pcs.;
- internal partition of the shoe shoe - 510×85140−4 pcs.
Fibreboard part 3 mm, beige color:
- back wall - 696×1096−1 pc.
Accessories:
- shoe shoe - 192×287×85×16−4 sets;
- handle - 4 pcs.;
- thrust bearing - 6 pcs.;
- confirmations - 1 pack;
- self-tapping screws - 1 pack.
How to assemble?
To assemble the frame we will need:
- sidewall - 2 pcs.;
- roof.
We tighten the frame using comfirmats. To do this, you will need a screwdriver and a commercial bit.
The final step will be installing the fiberboard back wall.
Installing the galosh

Dimensions and measurements should always be made in advance. So that you can know in advance what size the final product will be.
We mark the places where the rotation axis and the stop pin are attached. We screw the mechanisms to the sidewalls. Mounting dimensions and drawings are given below.
Each shoe shoe comes complete with a drawing and installation diagram. According to the drawings, we make markings for fastening.
We fasten the overshoes to the sidewalls using self-tapping screws. The shoe shoe must have free movement.
We connect parts made of 10 mm chipboard with plastic parts. We insert the elements of the shoe shoe into the grooves and place them on the screws to the left side panel. Next, we screw it to the vertical partition. Let's do the same on the reverse side.
The final stage is the installation of facades. We use double-sided tape for this.
Then we attach the handles to the facades and installing thrust bearings.
A cabinet made with your own hands will please the eye and delight with its functionality, making movement around the hallway more comfortable. Your slippers will always be in their place.
Organizer made of fabric or cardboard

Quite a convenient and easy to carry thing.
Let's consider the case when the corridor is so small that there is no room for a bedside table at all. In this case, the organizer will come to our aid. It can be purchased at the store, or you can also make it yourself. The material for making the organizer can be fabric or a cardboard box.
If the hallway has a closet with a suitable niche, then you can place organizers in it. We stack them on top of each other and set by surprise. During the manufacturing process, we impregnate it 3 times with a water-repellent spray or a solution of water and PVA glue. Thus, our product will have greater rigidity.
DIY cardboard shelf
This is the most budget option for a shelf. And everything you need to make it can be found at home.
You will need:
- cardboard;
- ruler;
- pencil;
- PVA glue;
- scissors or carpenter's knife;
- stapler;
- scotch.

The most budget option when there are no necessary materials or money.
Lay a sheet of cardboard on the floor. We cut out rectangles measuring 45 by 30 cm from it. We form triangles 30 cm high from cardboard. This is one cell of our shoe rack. Let's connect them in a row. The edges must be sealed with tape to prevent the cardboard from tearing.
This is an excellent solution for country houses. The disadvantages of such a shelf are instability and low reliability. Therefore, it is better to put it in a niche.
You can also construct an organizer from thick paper or wood directly on the cabinet door.
Shoe rack on a cabinet door made of cardboard:
- cut out rectangles,
- roll them into a pocket,
- insert them into each other,
- attach to the cabinet door.
Shelf made of wooden planks:
- Attach a wooden strip to the cabinet door.
- Insert your sneakers, sandals or sneakers into the gap between the cabinet and the plank.

Open option. Quite convenient to use.
You can also make an open version of the product from wooden planks or boxes. In such a shelf the item will dry well. But it will also collect dust.
You can combine items and create a completely unique shoe rack that will not only collect all your shoes, but will also decorate your hallway. You can use the most ordinary objects for your own ideas: pipes, glass bottles.
So, you see that there are many solutions for how to organize and store shoes even in the narrowest hallway. Decide what suits you best. Choose a shoe rack design with moving or static shelves.
Any shoes require careful handling, and proper storage increases their service life. Shoes for daily wear are stored in a shoe rack in the hallway near the exit from the apartment or house. Seasonal boots are placed in separate storage, usually in boxes or special containers.
I have been planning to make a shoe cabinet with my own hands for a long time. An analysis of the cost of such products led me to this idea. I came to the conclusion that assembling a galosh with your own hands from scrap materials would be much cheaper than buying it at a furniture store.
If you’re too lazy to fuss around for a long time, the picture shows an original solution for storing everyday shoes
Types of shoe racks
Before I began executing my plan, I looked at various ones in furniture stores and online catalogs. The models can be represented by the following list:
- shelves;
- rack, a la wine cabinet;
- cabinet with shelves-nests;
- chest of drawers;
- carousel;
- slim chest of drawers;
- cabinet with a rotating mechanism;
- drying cabinet.
Shelves
The simplest shoe design for a hallway is floor shelves. They are usually made of wood or metal profile (duralumin or steel). There are homemade structures made from plastic pipes. Using wood at home is preferable to metal or plastic. You can use old louvered doors or make lattice shelves yourself.
Installing such shoe shelves in a closet will not be difficult, as long as the dimensions of the home-made shelves match the internal space of the wardrobe. The disadvantages of open platforms include quickly covering items on shelves with dust, and only a small structure can be placed under clothes in a closet.
The assembly diagram and drawings of furniture parts are subject to the control of a professional furniture maker, armed with the appropriate tools and equipment.
Slim chest of drawers
The English word "slim" means "narrow". The small depth of the furniture is achieved by placing the platforms inside the chest of drawers at an acute angle to the vertical. Due to this, a small number of pairs of shoes can be placed in a closet of small thickness.

Slim chest of drawers
A narrow closet occupies a small area of the hallway, which is the special attractiveness of slim furniture models. Narrow shoe racks with beautiful facades are often placed in living rooms. Making such a cabinet with your own hands is cumbersome. The fact is that tall furniture catches the eye. Therefore, it is better to order figured door facades from a furniture workshop. And this may turn out to be more expensive than finished products.
Carousel
This cheerful word is used to describe rotating shoe platforms. Making such a shoe is not difficult. The basis of the structure is a metal pipe fixed to a base (cast iron plate or other heavy material). A shelf with two bearings is placed on the pipe. The bookcase consists of several circles with partition ribs, cut from laminated chipboard or MDF.
Rotating shelves are installed both in hallways and placed inside large cabinets. For a person with minimal experience in furniture making, creating such a design will not be difficult at all.
Cabinet with swivel mechanism
The petal turning mechanism consists of semicircular plates (petals) to which the front panel of the chest of drawers and shoe racks are attached. The plates can be purchased at retail chains with grooves for 1st, 2nd and 3rd shelves.

Chest of drawers with turntables
It was this design of the shoe that I liked the most. The convenient system of tilting shelf fronts allows you to freely operate the contents of the cabinet.
Drying cabinet
Coming from the street where it is raining or snowing, you will need to dry your wet boots or shoes. Many people make the mistake of placing shoes near radiators or electric heaters. Sudden heating can cause deformation, delamination or unsticking of shoe parts.
Expert opinion
Bashir Rabadanov
Technologist at the furniture company Woodband
To properly dry your shoes, you need to create a gradual moisture removal regime. To do this, arrange a drying chamber in the form of a small cabinet with a tray. Special absorbent stone chips, dolomite crushed stone, sea pebbles, shells or silica gel are poured onto the pallet. Clean shoes, wiped on the outside, are placed on top. It is best if the cabinet is closed with a louvered door. Shoes and boots will dry quickly and will not lose their original appearance.
Making a shoe cabinet with your own hands
I had no difficulties choosing the material. A neighbor bought new furniture and gave me an old wardrobe in good condition to “tear to pieces.” As a result of disassembly, I found myself with MDF boards and two sheets of plywood.
I took one of the drawings of the cabinet from the Internet and took it as the basis for my own design.

A sample of a shoe rack, taken as a basis
In order not to reinvent the wheel, in a furniture showroom I measured all the details of the shoe cabinet model I liked. I also bought a mechanism made from rotary petals there.

I picked up hardware from my supplies (confirmations, screws and washers). I prepared everything I needed.
Here is a list of tools and materials that I selected to make a shoe cabinet with a double turntable:
Tools
The extended assembly kit looks like this:
| drill-driver
| tape measure and ruler
|
| jigsaw
| construction stapler
|
| confirmed drill with collar
| screwdrivers
|
| scans
Feather drill for wood | cutter
Construction knife |


Materials
- Furniture boards 16 mm thick.
- MDF shelves from an old cabinet, 10 mm thick.
- Sheet of plywood.
- PVA glue.
- Stapler staples.
- Furniture handle.
- Self-tapping screws 6 x 20 mm.
- Plastic plugs – 8 pcs.
- Plastic self-adhesive legs – 4 pcs.
- Confirm screws – 8 pcs.
- Wood dowels 30 x 4 mm – 8 pcs.
- Rotating device for shoe shelves – 1 set.
Step-by-step instructions for making a shoe cabinet
Briefly step by step:
- Cut out the details.
- We end them with tape.
- We insert the sides into the platform.
- We fix the facade.
- We put hinges in the side walls.
- We assemble the cabinet using wooden dowels.
- Cover the back with plywood or hardboard.
- We attach the legs and arms.
Now I’ll tell you more:
Step #1. I cut out the following parts from MDF panels with a jigsaw:
- top plate 800 x 380 x 16 mm;
- bottom panel 800 x 380 x 16 mm;
- 2 side walls 470 x 380 x 16 mm;
- door 800 x 438 x 16 mm;
- the average side of the petals is 762 x 140 x 10 mm;
- rear side 762 x 135 x 10 mm;
- front side 762 x 85 x 10 mm.
The MDF was cut in such a way as to preserve the edges of the ends as much as possible.
Step #2. The open ends of the cutting parts were covered with trimming tape, pressing it through a sheet of paper with a hot iron.

Step #3. I inserted the sides into the plastic petals, screwing them with screws.
Step #4. I secured the front plate with self-tapping screws using a screwdriver in the rotary blades.

Step #5. I used a reamer to select recesses in the side walls and install hinges in them.
Step #6. I secured the petals in the hinges with plastic plugs.
Step #7. In the side slabs and at the ends of the top and bottom panels, I marked the places for inserting wooden dowels. I also drilled holes 8 mm deep there.
Step #8. After filling the holes with glue, I inserted the dowels.

Step #9. I folded the parts into a single body of the cabinet.
Step #10. I drilled mounting holes with a confirmation drill in the side walls and ends of the horizontal slabs. He tied the confirmations with his collar.
Step #11. At the back of the cabinet, the opening was covered with a sheet of plywood, securing it with a stapler. The staples were driven in at intervals of 60 mm.
Step #12. Laying the shoe rack on its side, I attached the footrests (you can use self-adhesive legs).

Step #13. Stepping back 50 mm from the center of the front panel, I drilled two holes and screwed on the handle.
Step #14. I inserted plastic plugs into the confirmation sockets.

Step #15. I placed new furniture for shoes in the hallway next to the front door.

You will get this result if you do everything according to the instructions.
By making the shoe shoe with my own hands, I saved 4 – 5 thousand rubles. Guests, having seen my “work,” pester me with requests to make such a cabinet for them. We'll have to meet them halfway.
For residents of small apartments, the issue of placing shoes in the hallway is a very pressing issue. Families with children know what it means to have shoes scattered throughout the apartment. The problem is no less pressing for those who like to select a variety of accessories to complement their look. To maintain order in your home and conveniently arrange each pair, it is not at all necessary to buy expensive shelves from the assortment of furniture stores. You can make convenient devices for storing shoes from available materials, if you use your imagination. Here are some examples for inspiration.
Simple wooden cabinet
Making such an interior item is quite simple. The four boards are connected to each other using furniture screws. Thin wooden planks are attached to the cabinet fronts. Water-based paint is best for painting. If desired, the upper part can be made contrasting and adapted for sitting.
You can simply hang your shoes on the shelf!
The idea is brilliant in its simplicity. To avoid dirtying the floor with dirty soles of boots and sneakers, you just need to keep them suspended. 
Wooden pallet shelf
They make a lot of things out of such an affordable and practical thing as pallets. They are also suitable for making shoe racks. Building such a piece of furniture is quite simple, since parts of the pallets for the hallway can be left untreated.

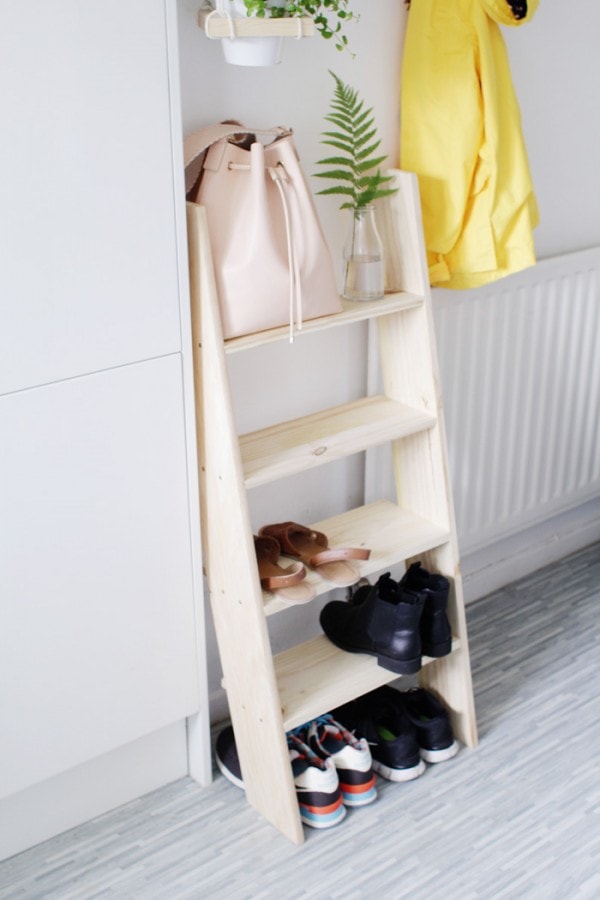
Ladder instead of a shoe cabinet
For this idea, both a ready-made wooden staircase and one made independently from planed boards are suitable. The main thing is that the steps are located at an angle so that shoes do not stain the wall.
Rack of boxes
Wooden boxes are another universal solution for lovers of original furniture. If you place the drawers vertically, they are suitable for storing tall autumn and winter shoes. The side surface can be adapted to store keys, hoopoe accessories behind shoes and other useful little things.

Rack for shoes of different heights
In spring and autumn, the weather is very changeable, and shoes of almost all seasons can be relevant. This simple design with shelves of different heights allows you to store autumn boots next to sandals and sneakers.

Bee hive
A very original design can be created by combining several wooden hexagons, each of which is suitable for storing one or even several pairs of shoes, depending on its size.

Shelf with French chic
An ordinary piece of furniture can become a real hallway decoration if you glue a special film or paper with text printed on the back of the shelf. With this design, it is better to choose a neutral color for the shelf itself.

Skateboard shelves
True skateboarding fans always have a few old boards that have fallen into disrepair. As a last resort, you can turn to fellow hobbyists for help. Multi-colored shelves are great for storing sports shoes.

Shoe organizer
The design of shelves of different heights allows you to store shoes for different weather conditions. A small mirror in the hallway will allow you to evaluate your image before leaving the apartment.

Farmhouse style bench
It is very convenient to store shoes in closed drawers located on the shelves of a rustic bench. This storage method gives the hallway a neater look, since shoes are hidden from view.

Full wall shoe cabinet
To prevent the structure from seeming cumbersome, it is better to choose boxes made of thin plywood and arrange them in the form of brickwork. The strength of such a cabinet is ensured by a wide board to which individual shelves are attached.

Diagonal shelves
By placing regular wide shelves diagonally, you can significantly save space in the hallway.

Copper pipes
An original piece of furniture can easily be made from pipes left over after a bathroom renovation. To attach the shelf parts together, special adapters from a plumbing store are suitable.

Dynamic design
Bars of the same size are attached to the wall using special movable corners. When folded, the structure is a decorative panel, and, if necessary, turns into space for storing shoes and accessories.
Shoe cabinet, perhaps the most necessary thing in every house, apartment and even vestibule. It can be bought at any furniture store. But if you want to save money and at the same time have free time, then you can mount the bedside table yourself.
First of all, you need to find out if there is a workshop for cutting particleboard (chipboard) in your or a nearby city. If there is one, then the bedside table for shoes can be made to individual sizes.
Using a tape measure you need to measure the place where it will be a shoe cabinet installed. Then, using the measurements taken, draw all the parts that it will consist of. If you can’t do this manually, you can use a free online furniture designer on the Internet. Having selected a program that is convenient for you, you need to design a bedside table for shoes in it. The program should provide the exact dimensions of all parts. These dimensions must be written down on a sheet of paper or printed on a printer. After which you can go to the workshop for cutting chipboard.
Already in the workshop, select the desired color of chipboard and place an order for cutting. If the production is not very busy, the parts for the bedside table will be ready on the same day. While the order is being processed, you can purchase the necessary accessories.
And to assemble the bedside table you will need:
Awnings (4 pcs.);
Handles for facades (2 pcs.);
Confirmations (8 pcs., can be taken with a reserve);
Furniture mounting bracket (4 pcs.);
Self-tapping screws with a press washer (32 pcs., you can take extra).
When the chipboard has been cut and the fittings have been purchased, you can begin assembling the bedside table. To do this you need to prepare the following tools:
Screwdriver;
Cross attachment for a screwdriver;
Drills (4.5 mm and 1.5 mm);
Allen key for confirmations;
Square;
Screwdrivers;
A simple pencil.
You need to start assembling the bedside table by marking out the future shelves. To do this, divide the side walls into three equal parts, mark the center of the shelves and use a 4.5 mm drill. make holes for their fastening. Then attach the bottom shelf to the confirmations. Then connect the side walls and the top cover of the bedside table with furniture corners. To do this, mark the attachment points of the corners with a simple pencil and a 1.5 mm drill. make shallow holes. Fasten everything with self-tapping screws and a press washer. Then attach the middle shelf to the confirmations. The “skeleton” of the shoe cabinet is ready.
DIY shoe cabinet. Step-by-step master class with photos


The next step is to assemble and install the doors on the bedside table. To do this, you need to insert the canopy into a special hole on the door. Using a square, level it and mark the attachment points with a pencil. Drill 1.5 mm. Make shallow holes and attach the canopy to the door with self-tapping screws. Attach the remaining three canopies to the doors in the same way. After this, attach the door to the bedside table. Align it with the top cover so that they are on the same level. Mark and attach the awnings to the side walls in the same way as you attached them to the doors. After the doors are installed on the bedside table, they need to be adjusted in level with special bolts on the awnings.


How to do DIY shoe cabinet? In this article we will look at the manufacturing stages.
Slush spring and autumn, dusty summer, winter, which places special demands on clothing - and now several pairs of shoes do not have enough space in the corner of the corridor.
In contact with
Classmates
Why is it more practical to do it yourself?
It is always easier for a non-professional to buy a shoe cabinet rather than make one. However, there are a number of nuances:
- Firstly, the range of inexpensive shelves is often meager.
- Secondly, the sizes of shelves in stores do not correspond to rational calculations. The foot of the average CIS resident is still much larger than the Chinese, who supply most inexpensive furniture, assume.
- In addition, the height of the shelves is almost always the same. This is not entirely logical, since in winter people wear boots with high tops.
It is better to have one shelf with a higher height or hooks on the sides of the shelf to adjust the height yourself depending on the season.
What to consider when choosing materials and components

Is it difficult to make a standard shoe cabinet? The obvious answer is no, it's not difficult. It is necessary to take into account a number of nuances before completing the drawings, purchasing materials and starting assembly.
Let's look at the most important details of your future shoe cabinet:
Note: Buying one standard sheet of chipboard and sawing it ultimately turns out to be more expensive than ordering from a furniture store/manufacturer exactly the number of parts and the dimensions that you envision in the drawings.
- The shelves do not have to be made of wood. Take a closer look at the type of shelves on the dish drainer. Lattice metal shelves are the best option;
- Chipboard is a material that combines low cost and functionality. Laminated sheets are sold in many furniture stores and small industries;
- The back wall of the cabinet can be made of hardboard - pressed cardboard, which is often used in furniture production.
Designer's notes

To make the design of the cabinet practical, you need to take into account the features of storing shoes and correctly calculate the dimensions of the shelves:
- the bottom of the cabinet should not be covered with anything, otherwise water will collect inside;
- shoes need ventilation. This may include several holes in the sides if the cabinet is planned to be closed (with doors);
- The depth of the shelves should correspond to the length of the box of the largest pair of shoes in the house.
How to calculate cabinet dimensions
Sketch of a shoe cabinet
Provided that the largest pair of shoes in the house is size 42, i.e. 27 cm long, the shelf should have “depth” with a margin - say, 28 cm.
Depending on the size of the shoe, the size needs to be varied. The larger side of the shelf depends on the number of pairs of shoes you need to put:
- collect all the shoes that you plan to put in the locker and measure how much space they take up in a row;
- take into account the designed number of shelves (3 or 4);
- put a small margin in the width of the shelf.
Chipboard thickness - 16 mm. Accordingly, the external width of the cabinet will be 32 mm greater than the width of the shelf.
What you will need

It is worth noting that the sizes below are calculated based on the fact that the maximum shoe size is 42.
External dimensions of the cabinet: height - 1,200 mm, length (depth) - 320 mm, and width - 900 mm. You need to choose sizes so that they are close to the dimensions of standard parts that are available in every furniture store.
In this case, the set of necessary parts is as follows:
- 4 lattice or chipboard (to your taste) shelves with a width of 864 mm and a “depth” of 280 mm;
- top cover standard size 900 by 320 mm;
- side walls with a height of 1184 (taking into account the thickness of the top cover, the height of the cabinet will be 16 mm) and a length (“depth”) of 320 mm;
frames (small parts made of chipboard) 100 mm high and 868 mm wide for fastening the structure at the back and front, called drawers;
Helpful advice: You can stretch a rope over the last shelf to use small clothespins to secure the tops of your boots: this way they will not break.
- figured facades (improvised doors) made of MDF with a height of 1195 mm and a width of 447 mm (2 doors plus a margin of 4 mm for ease of opening);
- fiberboard sheet with a height of 1195 mm and a width of 895 mm for the manufacture of the back wall;
- 4 furniture hinges;
- 2 door handles;
- 8 confirmations (5 by 70 mm). Confirmat - a special furniture screw for fastening cabinet elements;
- self-tapping screws 16 by 4 mm - it’s better to take a few dozen in reserve;
- Adjustable shelf holders: 4 per shelf.
Connection technology
Assembling the shoe cabinet is carried out in the following order:
- The holes in the side walls for inserting confirmations must be made with a diameter of about 8 mm, and at the ends of the drawer frames - with a diameter of 5 mm. The drilling depth is half the length of the furniture screw.
- Metal corners will add rigidity to the cabinet. They will also be needed if you are attaching the finished structure to the wall.
- Hinges for facades, corners, and the back wall must be secured with self-tapping screws.
- Attach shelf supports, handles for fronts and hang shelves.
- You can place the cabinet on the floor so you can sit on it when you put on your shoes, but it would be better to hang it and find another use for the countertop.
Helpful advice: if everything is in order with the ventilation, then the cabinet will be dry enough and you can also hide the Internet connection in it. Then there will be a Wi-Fi router on top of the tabletop.
If you spend some time designing and creating drawings, your cabinet will turn out to be much more practical and cheaper than the products of Chinese craftsmen.
We invite you to watch a detailed video on how to make a shoe cabinet yourself:
In contact with
See inaccuracies, incomplete or incorrect information? Do you know how to make an article better?
Would you like to suggest photos on the topic for publication?
Please help us make the site better! Leave a message and your contacts in the comments - we will contact you and together we will make the publication better!