An apple is a healthy and dietary fruit, which requires removal of the core to prepare some dishes. This takes quite a long time. But housewives have found a way out of this situation and use a number of devices to remove the core of apples with their own hands.
Apples are used in any national cuisine. These fruits are included in a variety of sections of cooking - from preparations to meat dishes.
It is necessary to take into account that these fruits are quite difficult to prepare - you should carefully remove the petiole, stalk, remove the peel in a thin spiral, and then cut out the central part. To simplify this time-consuming task, you can acquire special devices for removing the core from apples. They will help make the procedure easy and quickly prepare the fruit for the table or for drying.
Remove the core with a ski pole
To prepare apple preserves, you need to remove the seed chamber. This can be done even without cutting the fruit into pieces, leaving it whole.
To do this you will need an aluminum ski pole with a diameter of 15 mm. Cut off a part of the pipe 15 cm long. One of the ends is filed with a triangular file to make six sharp teeth. On the other side of the stick, insert a plastic champagne cork and use a knife to make a hole in the end of its upper part into which a rod is inserted to remove the seed box.
During the process, the fetus is placed on kitchen board, a device is placed on top of the stalk and pressed by hand. When the fruit has an uneven surface, cut it while holding it in your hand.
After processing 2-3 fruits with a rod made of metal or wood, the waste is pushed out of the device, which allows you to keep the fruit intact. This is how you can quickly remove the core.
Cutting out the core using a syringe with your own hands
The simplest device for removing the core from apples can be made with your own hands from a medical syringe. It can be used to peel fruits for both drying and canning.
To do this, use a 20 ml syringe with a piston, as well as a sharp knife and good scissors.

We take the syringe and cut off the bottom with the tip on which the needle is placed. We trim the cut with scissors and remove all the graduated paint from the surface of the syringe. Then, using a knife, carefully cut small teeth at the end of the cylindrical wall of the syringe. They need to be made so that during the working process, the movement coincides with the scrolling of the homemade product clockwise. That's it, the core cutting device is ready!

To remove the core of an apple with this device, press the serrated side of the syringe onto the fruit from one side along the longitudinal axis around which the seeds are located in the fruit, rotating the syringe clockwise. While scrolling, you need to deepen the device into the fruit to its middle. Repeat the same action on the other side of the fetus. After the process is completed, the core is pushed out of the syringe with a piston.

This device, made with your own hands from available materials, is quite effective and convenient to use.
For smooth and easy removal of the seed box, it is better to make the cloves as small as possible.
Using a special knife
Simple but useful device- a device for removing the seed box of apples. Essentially a puncher. They drive it into the apple and take it out along with the seed box. Perfect for feeding children and sick people.

Such a device easily fits into fruit of any size and, if necessary, can be rotated around the longitudinal axis. The seed box comes off easily and is pulled out along with the blade. After this device, the walls of the fruit remain smooth and without rags.

Peeling and slicing device
The process of peeling and slicing can be simplified with a special machine. This device quickly peels and cores the fruit and cuts it into neat pieces. And this is not the only thing

This device will help save the housewife’s time. To remove the core, simply place the fruit on the special blades and then turn the handle. The seed box will remain on the blade of the device, and the seedless fruit with a neat hole will remain in your hands.
Application of apple slicer
This device is very practical. With its help, you can divide the fruit into 8 equal parts, immediately removing the core.
Take an apple and a device. On a cutting board, apply the apple slicer to the fruit so that the tail is in the center of the apple slicer and press all the way. The result is a separated core and identical slices of apples.

Now you know all the ways to remove the core from an apple. To prepare apples, each housewife selects a device for herself. This device can be made at home, or purchased in a store. The main thing is that they perform the same function.
And finally, a short video in which an apple slicer and a knife are used:
Very easy-to-make devices for peeling apples and gooseberries (for compotes, jams and other similar homemade preparations), from medical disposable syringes.
Hello to all home-made people, as well as those who make preparations for the winter!
Right now, it’s the hottest time for preparing various pickles, jams, compotes and other similar homemade preparations for the winter.
At the same time, quite often there is a need for some tools for peeling fruits or berries, which are often not at hand at the right time.
For example, we recently had a need to peel several dozen apples for compote, which we prepare for the winter in three-liter jars. Since these apples were of a summer variety and quite small, it was decided not to cut them into pieces, but simply remove the core from them.
In general, they are sold for these purposes special tools, however, we didn’t have them at hand at that moment, and we no longer had time to travel and shop.
So I decided to a quick fix make a similar tool from a regular disposable medical syringe.
To do this, I needed a syringe with a capacity of 20 ml, with a piston, as well as sharp knife and powerful scissors.

Making a device for peeling apples
First, I cut off the bottom of the syringe with the tip on which the needle fits.

Then the resulting cut was trimmed with scissors.

After that, I scraped off the paint from the syringe, which was applied to the graduation of the measuring scale.

And then, with a knife, I carefully cut small teeth on the end of the cylindrical wall of the syringe.

Moreover, my teeth are oriented in such a way that the working cutting movement coincides with the clockwise rotation of the syringe.

Testing the device on apples
After this, I thoroughly washed the syringe and plunger with soap and water and began testing.
In order to cut out the core of an apple with such a device, you need to press the toothed rim of the syringe against the apple on one side, along the longitudinal axis around which the seeds are located in the apple, and rotate the syringe several times, while simultaneously deepening it into the apple approximately to the middle.

Then the same thing needs to be repeated on the opposite side of the apple.

Once the core is cut out, it can be pushed out of the syringe with a plunger.

So I cored a few apples pretty quickly.

In the end, it turned out that such a syringe device, made in haste, is quite effective and convenient, so it can be used for peeling apples.
The only thing I missed a little with was the size of the teeth on the syringe, since it would have been better to make them a little smaller, as this would have made cutting out the apple core smoother and easier. So if anyone wants to do similar device– be sure to take this point into account!
However, later, with my device, I easily peeled several dozen more apples for compote.
Making a device for cleaning gooseberries
However, I didn’t stop there and decided to make a similar device for cleaning gooseberries.
The fact is that when preparing some gooseberry preparations, for example, when cooking the very tasty and beloved “royal” jam, the gooseberries have to be peeled, removing the grains from it. However, this is a very tedious, long and painstaking task. Also, as far as I know, there is no special device for this process. As a result, everyone peels the grains from gooseberries differently, some with a knife, and some with a small dessert spoon or other tool. However, all this is very inconvenient and time-consuming.
That is why, especially for cleaning gooseberries, I made exactly the same device as described above, but only from a smaller medical syringe.

I took a syringe with a capacity of 3.5 ml, also cut small teeth on its front part and, in addition, installed a limiter on the piston from a piece of silicone tube so that the piston would not jump out of the front part of the syringe.

Testing the device on gooseberries
Well, then, I also tested this device, removing grains from large berries gooseberries.


These tests also went very well, and I am very a short time I easily peeled a dozen gooseberries.

It turned out that the grains are not completely removed and some of them still remain in the gooseberries. But this is not scary in principle, since it is almost never possible to peel gooseberries completely clean using other methods. But with the help of such a device, the work is greatly facilitated and accelerated many times!
So, in general, the devices I made for peeling apples and gooseberries showed their effectiveness, and I was quite satisfied with their work.

However, in conclusion, I would like to note that since disposable medical syringes are made of plastic, it is quite soft material, then most likely the teeth cut on the syringes will wear out over time. This will of course largely depend on the amount of work performed by these devices.
However, this is not at all scary, since you can always cut off the old dull cloves with a knife or scissors and cut new ones, especially since this will take very little time. Moreover, such updating of the teeth can be done three or four times on one syringe.
Well, when the syringe becomes very short, you can just take a new one. Although I think that one syringe may well be enough for several years. Well, that’s all for me! Goodbye everyone and plenty of preparations for the winter!
Apples are used in any national cuisine. These fruits are included in a variety of sections of cooking - from preparations to meat dishes.
It is necessary to take into account that these fruits are quite difficult to prepare - you should carefully remove the petiole, stalk, remove the peel in a thin spiral, and then cut out the central part. To simplify this time-consuming task, you can acquire special devices for removing the core from apples. They will help make the procedure easy and quickly prepare the fruit for the table or for drying.
Remove the core with a ski pole
To prepare apple preserves, you need to remove the seed chamber. This can be done even without cutting the fruit into pieces, leaving it whole.
Ski pole for apple coring
To do this you will need an aluminum ski pole with a diameter of 15 mm. Cut off a part of the pipe 15 cm long. One of the ends is filed with a triangular file to make six sharp teeth. On the other side of the stick, insert a plastic champagne cork and use a knife to make a hole in the end of its upper part into which a rod is inserted to remove the seed box.
 Sharpening one side of a syringe to core an apple
 To remove the core of an apple with this device, press the serrated side of the syringe onto the fruit from one side along the longitudinal axis around which the seeds are located in the fruit, rotating the syringe clockwise. While scrolling, you need to deepen the device into the fruit to its middle. Repeat the same action on the other side of the fetus. After the process is completed, the core is pushed out of the syringe with a piston.
 Using a syringe to remove the core
 This device, made with your own hands from available materials, is quite effective and convenient to use.
Take an apple and a device. On a cutting board, apply the apple slicer to the fruit so that the tail is in the center of the apple slicer and press all the way. The result is a separated core and identical slices of apples.
 Using a special apple slicer
 Now you know all the ways to remove the core from an apple. To prepare apples, each housewife selects a device for herself. This device can be made at home, or purchased in a store. The main thing is that they perform the same function.
And finally, a short video in which an apple slicer and a knife are used:
The presented wood carving lessons will introduce beginners to this craft so that you can create objects from natural materials with your own hands.
History of the craft and types
Wood carving is a type of decorative and applied art that originated in ancient times. In Rus', wood carving was called carving, and the drawing performed using this technique was called marking, patterning, or vyzoroche. In this technique flat surface craftsmen made braids, cloves, grooves, crowns, mushrooms, etc. You can see such examples in the Assumption Cathedral, visiting the royal place.
Russia owes the development of wood carving to the monk Ambrose, a novice of the Trinity-Sergius Lavra, who at the end of the 15th century in his works combined Russian ornaments with Western and Eastern ones.
In 1660, craftsmen decorated the royal dining room with German carvings, which were figured, with Gothic motifs. Thus, elements of German appeared in Russian carving, including new tools and terms.
Thread types are conventionally divided into:
- end-to-end;
- deaf;
- brownie;
- sculptural;
- carving with a chainsaw.

Here's how they differ:
- Through threads are divided into overhead and through threads. This includes slotted thread when through sections are cut with cutters and chisels; and profile threads, where such areas are cut out with a jigsaw or saw. If these types of carvings are made using relief patterns, then they are called openwork.
- If the treated tree does not have a single through hole, such a thread is called blind.
- The facades of the buildings are decorated with house carvings.
- Sculptural - one of the most complex species carving requires great skill. Animal figures and human sculptures are made using this technique.
- Using carving with a chainsaw, they perform global work. This requires strength, so it is more suitable for men, while other types of carving can be successfully mastered by women.
Tools for woodworking, cutting blanks
Beginners can use only 2 tools - a well-sharpened penknife and a blunt knife.
When you learn how to perform simple elements with them and want to improve, then you can buy woodworking tools, for example, such a set.

There may be even more tools, but such a quantity is needed only by professional carvers performing complex work.

See what types of notches you can make with semicircular cutters different sizes, acute-angled.

But what set of tools should a cabinetmaker have in order to produce the following types woodwork:
- carving;
- sawing off;
- splitting and trimming;
- planing;
- turning;
- chiselling.

- Pay attention to the cutters that are used for manual turning of wood. In addition to the semicircular, there are also flat oblique, angular, cut-off, beveled, corner, etc.
- Saws are used to saw off the workpiece. They can be transverse, longitudinal, universal. The teeth of rip saws are chisel-shaped; at the transverse ones they are triangular and sharp. Universal ones are equipped with teeth that have a right angle. Such a tool can cut fibers both lengthwise and crosswise and at an angle. Each of these saws can be hacksaws, simple, one-handed.
- If the workpiece is made from a ridge, timber or trunk, then axes or cleavers are used. An adze is a type of axe, the blade here is located perpendicular to the ax handle, and is used to create shaped and concave products.
- To remove chips from the workpiece, turning or hand cutters, planes can be used.

The most popular carving tools are chisels. Typically they consist of:
- steel rods;
- cutting blades;
- shank.
- Wide and straight are used for cutting or cleaning smooth or convex workpieces.
- With round blades - for working with horny knots or hardwood.
- With the help of narrow saws, the workpiece is processed in narrow places.
- A chisel with a thick steel rod is used to clean a deep cavity or workpiece with a hollow. Deepen the chisel into the wood using a mallet.
- Cranberries are used to make gutters of various depths and radii.
- Using corner chisels, grooves and triangular recesses are made.
Wood carving: sketches and master classes
After you have learned a lot of useful things and acquired what you need, let's try to cut out a flower. To make it you need the following:
- flat wooden blank;
- pencil;
- transparent paper;
- v-shaped corner chisel;
- narrow and wide semicircular chisels.
If you don't yet have a v-shaped chisel, you can use a sharp knife for this pattern.
Place a piece of paper on the screen and redraw the diagram.

Then transfer it to a piece of wood. Start by trimming along the outline of the center circle, then cut toward the center of the outer circle using a large half-circle chisel.

Mark the flower petals.

Using a v-shaped chisel, cut along the outline of the petals.

Using the same tool, remove excess wood between the petals (“triangles”).

Take the next woodworking tool in your hand - a semicircular chisel - to cut out the outer contour of the petal. At the same time, it will look like the top part of a heart.

Using a large semicircular chisel, make cuts inside the outline of the petal.

Using a small semicircular chisel, make two cuts on this outline from the center of the flower.

To increase the cutting area, cut again.

Unfold the chisel and round the center of the flower.

Now you need to take the next carving tool - a v-shaped chisel and make these cuts in the center of the flower.

That's it, you can admire the result of the work.

If you want to carve a fox, the following sketches will come in handy.

If you want to make butterflies, the wood carving sketches included will also help you.

If you want to make a mold for printed cookies with the image of the Snow Maiden, then prepare:
- beech board;
- ruler;
- jigsaw;
- a simple pencil;
- ruler;
- sandpaper;
- eraser;
- linseed oil.
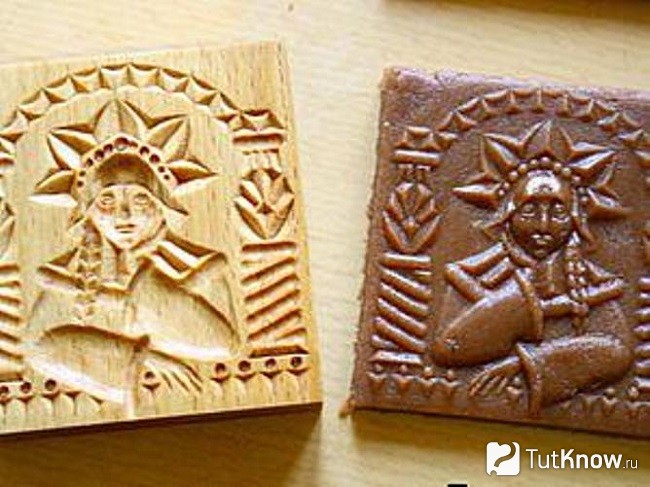
Draw a rectangle on the board. Cut it out.

If you don't have electric jigsaw, then you can cut the workpiece with a saw or an ordinary hand jigsaw.
Make the cut surface smooth using sandpaper. If the farm has Grinder, use it for this procedure. Transfer the drawing to the workpiece using a simple pencil.

With help semicircular chisel We make a depression in place of the face, then again apply its contours here.

Continued wood carving sketches will help you carve facial features correctly. At this stage we also make a cape on the Snow Maiden’s head. Please note that it is located at a level above the face.

Based on the sketch, we cut out other elements of the workpiece.

Now you need to erase the pencil with an eraser, then with the finest sandpaper. If you do this right away with sandpaper, then part of the lead will be rubbed into the wood.
Pour linseed oil into a container, immerse our wooden mold for an hour. If you are doing great job, then saturate it with oil using a swab or squirrel brush and leave to dry for 3-4 days.

That's it, you can roll out the dough, cut it into rectangles, apply a design using wooden blank and bake.

To prevent the cookies from burning in some places, you need to cut out a stamp from wood so that there are no too prominent elements on it.
How to cut a sign for a bathhouse?
For her, take:
- board (in in this case a coniferous wood block was used);
- triangular ruler;
- a simple pencil;
- saw;
- furniture varnish in a can;
- stain;
- brush;
- sandpaper.

To draw the letters, download the ones you like from the Internet, then redraw them on the wood. You can use this sample.

Draw oak leaves on the sign on the right and left.

Next comes the carving itself. Such tasks are perfect for beginners, because they do not require long training and many tools. Three types of cutters were used here: a jamb-cutter and Tatyanka chisels. Using a chisel, make cuts along the outlined contours according to the design, and with a chisel, cut under the outline to highlight the design above the background.

Next, the carved surface is sanded sandpaper No. 180 and No. 220. Draw clouds at the top and bottom of the plate, cut them out with a chisel and a chisel, and then sand them.
This soap will be a pleasant gift for friends. After all handmade much appreciated. In order to make a rose from soap, you will need a little, namely:
- a piece of soap;
- cutter;
- brush.

Then you need to cut out the second and subsequent petals. At the same time, move from left to right in a circle.

This is what the work should look like after you make the first circle.

Perform the second and subsequent ones in a checkerboard pattern in relation to the previous ones.

Here's how to decorate soap with your own hands, combining carving and wood carving.
In conclusion, you are offered 3 plots. From the first you will learn in detail about wood carving and tools for beginners.
After watching the second one, you will be able to carve a spoon with a beautiful carved handle.
From the third you will learn how to carve a charming rose from wood.
![]()
Cut out the core
Cut the core - remove the core, leaving only the pulp of the apple, pear, or pumpkin for cooking. The seeds and hard core (for example, pineapple) are also removed.
-
Dictionary Efremova
- - cut out I ness. trans. 1. Delete, extract something using cutting tool. 2. To make a recess, hole, etc. in something. using a cutting tool. 3...
Explanatory Dictionary by Efremova
- - 1. cut, -cut, -cut; cut out and cut out, owl. 2...
Russian word stress
-
Ozhegov's Explanatory Dictionary
- - CUT, -eat, -eat; -anny; Sovereign 1. what. Cutting, taking out, removing, and also doing something. cutting. B. tumor. B. sheet from a notebook. B. paper figurine. 2. what. To make, to draw something. cutting, sharp...
Ozhegov's Explanatory Dictionary
-
Ushakov's Explanatory Dictionary
- - 1. CUT, cut, cut. imperfect to v’cut. 2. CUT, I’ll cut, you’ll cut, led. cut-cut, absolutely. . 1. what. When cutting, remove, separate from something. Cut out pictures from a book...
Ushakov's Explanatory Dictionary
- - 1) cut - cut, - cut; led cut out and. cut out; sov., trans. . 1. When cutting, remove, remove from smth. Cut out the tumor. Cut a note from a newspaper...
Small academic dictionary
- - V"...
Russian spelling dictionary
- - see. There are lykoders, but there’s nothing to worry about...
IN AND. Dahl. Proverbs of the Russian people
- - Volog. About very similar people, faces. SRNG 35, 70...
- - What. Psk. Disapproved Steal, get anywhere, by any means. SPP 2001, 64...
Big dictionary Russian sayings
- - see: uterus.....
Dictionary of Russian argot
- - who should be punished, beaten, put in place...
Dictionary of Russian argot
- - ...
Word forms
- - tear, tear...
Synonym dictionary
"Cut the Core" in books
author Mechnikov Ilya IlyichCut and paste
by Karl ZimmerThe most radical and most controversial way to achieve immortality is to cut out your colon.
From the book Human Nature (collection) author Mechnikov Ilya IlyichThe most radical and most controversial way to achieve immortality is to cut out the large intestines. Since surgery has made such amazing advances, it is quite common to dare to remove some parts of the intestines, especially the colon. So, in one case, Dr. Kerte, together with
Cut and paste
From the book Microcosm by Karl ZimmerCut and Paste Before 1970, E. coli played no role in biotechnology. In nature, it did not produce penicillin or any other valuable substance. She didn't turn barley into beer. The goal of most scientists researching E. coli at that time was not profit, but knowledge about
From the book Golden Rules of Garden Pruning. Guide to Increasing Yield fruit trees and bushes author Okuneva Irina BorisovnaWhat and why it is necessary to cut Trees in the process of development often develop situations that require the intervention of a pruner. An adult tree is dangerously forked due to the fact that a branch growing at an acute angle was not removed in time. Here we will describe the most common
Do I need to cut out the root shoots of grafted roses?
From the book 1001 answers to important questions for gardeners and gardeners author Kizima Galina AlexandrovnaDo I need to cut out the root shoots of grafted roses? It is necessary, because roses are grafted onto rose hips, and if the rose hips are not cut out, the roses will die, and you will only have
What and why needs to be cut
From the book Garden Pruning Express Course author Okuneva Irina BorisovnaWhat and why it is necessary to cut Trees in the process of development often develop situations that require the intervention of a pruner. Here we will describe the most common cases, characteristic of almost all trees and many shrubs. A mature tree is dangerous
How people learned to carve wood
From the book Maori Tales and Legends author Kondratov Alexander MikhailovichHow people learned to carve wood. Boys came running to Rua-pupuka, water flowing from them in streams. “Your son!” - they shouted, barely catching their breath. Rua-pupuke raised his head in alarm: “Son?” What happened to my son? “We were swimming,” one of the boys began, “and he suddenly
From the book UberSleep (Super-Sleep) [Polyphasic sleep mode - reduce sleep time by half and have time to do all the most interesting things in life] by Doxyk PureIX. Cheat sheet: cut and link
6.4.1. Cut and paste
From the book Interface: New Directions in Design computer systems by Ruskin Jeff6.4.1. Cut and Paste Another problem with conventional interfaces is the cut-and-paste method. When using this feature, many users encountered a situation where some part of the work was lost after an accidental