Today, some people can find such a lamp at home, perhaps it is no longer working, but it can still serve for other purposes. A self-made collector can be used to heat a house, garage, barn and any other room.
Materials and tools for the manufacture of the collector:
- an old lamp;
- aluminum tape;
- black matte paint;
- scissors for metal;
- silicone;
- glass;
- computer fan, solar battery (optional).
Collector manufacturing process:
Step one. We remove all unnecessary
First of all, you need to take the lamp and disassemble it. Everything needs to be removed from it, including wiring and connectors. For the collector, only the lamp housing will be needed. After that, holes will remain in the case, they must be carefully sealed. For these purposes, it is easiest to use aluminum tape. Even under the holes, you can cut patches and then glue them with silicone or liquid nails.


Step two. Preparing and painting the hull
At the next stage, the body needs to be prepared for painting. To do this, it must be thoroughly cleaned of dirt and old paint. This can be done with sandpaper or a grinder with the appropriate attachment. After that, the collector housing can be painted.
The paint must be heat resistant. Otherwise, bubbles form on it when heated, and it will fall off, since in sunny weather the collector will heat up quite strongly.

Step three. Making holes
In order for air to circulate in the collector, two holes must be made in it. Through one, cold air will enter the device, and through the second, already hot air will come out. The smaller the hole, the hotter the outgoing air will be, as it will linger longer in the manifold. But if the air is hotter, its volume will be less, as a result, the heating efficiency does not increase from this.
Holes are best done before painting, but the author did it after. You can use metal shears to create holes. However, they can also be made with the help of a grinder, there will be nothing to worry about if the holes are square and not round.

Step four. Installing glass
In order for the collector to be sealed and able to work, glass must be installed on it. It is not necessary to use solid glass for these purposes, several pieces can be used, although there will be more joints. The glass is mounted on silicone, which ensures excellent tightness. All joints must be carefully worked out with silicone, otherwise the efficiency of the collector will be low.

That's all, now the collector is ready. A pipe can be connected to the outlet and led into the room to be heated. To increase the efficiency of the collector, you can install a small computer fan on one of the holes. In order for such a fan to work autonomously, it can be connected to a solar battery. As a result, the propeller itself will turn off in the evening, since the sun will no longer power the solar panel.
In addition, it is desirable to insulate the metal housing of the collector from the outside, since the metal will cool, and the efficiency of the collector will fall.


Collector testing showed the following results:
10:00 hours - 46 °C
- 11:00 hours - 58.5 °С
- 12:00 hours - 63.1 °С
- 13:00 hours - 65.9 °С
- 14:00 hours - 62.4 °С
- 15:00 hours - 54.3 °С
- 16:00 hours - 35.0 °С
Such figures were achieved despite the fact that outside the temperature did not rise above +15 degrees. And all this without the use of a fan, that is, the air circulated naturally. Of course, if the fan runs too fast, then the collector may not have time to warm up to such a temperature, but this problem can be solved by making several such devices and connecting them together. Such devices can be installed on the roof or any other place where there is sun, and then bring heat into the room using pipes.
By the way, if the lamp is not available, then you can use the old trough, it is perfect both in shape and in size.
Manufacturers are starting to produce an increasing number of household appliances with the ability to work offline, when alternative, renewable energy sources are used to power the devices.
One such device is solar powered fans.
Operating principle
The main elements included in the fan kit are no different from a conventional device, the only difference is in the energy source used by the solar battery and the fact that, as a rule, this is a low power device, which is determined by the ability of the solar battery to generate a certain amount of electrical energy.
The electric current used to power the apparatus is obtained by converting solar energy inside the photocells, which are the basis of the solar battery.
The transformation takes place inside the plates, which are made of silicon. The composition of the photocell includes two plates (two layers), each of which is made with the addition of various components. So, phosphorus is added to the upper plate (layer P + in the diagram), boron is added to the lower plate (layer B- in the diagram). Electrodes are connected to each of the plates, an external electrode is connected to the upper one, an internal electrode is connected to the lower one, an anti-reflective coating is applied to the surface of the photocell.
Under the influence of sunlight, an excess of negatively charged particles is formed in the upper plate, and the so-called "holes" in the lower plate. At the same time, a potential difference is formed between the layers, under the influence of which, when a load is connected, an electric current flows in the circuit, due to the fact that differently charged particles move in opposite directions.
Negatively charged ones move up, positively charged ones move down.
Electronic circuits, which are the main component of any electronic devices, operate on the generated voltage and the generated current, which makes it possible to provide power to the mechanisms of household appliances connected to them.

Structurally, depending on the purpose and technical characteristics, solar-powered fans can be very different.
The solar battery can be built into the housing or be made of a remote design. The design of the case and the material from which it is made are also chosen by the manufacturer, depending on the requirements for a particular model and its technical parameters.
For greenhouse
Every gardener knows that it is not enough just to open the doors of the greenhouse in order to create the necessary microclimate inside it. Fans are used to create forced air circulation inside such shelters, and solar-powered fans are one of the most convenient in terms of operation.
The main advantage of a solar-powered fan, when used on a personal plot, is that there is no need to install additional electrical networks, and there are no costs for the consumed electrical energy, which is also important when growing your own vegetables and fruits.
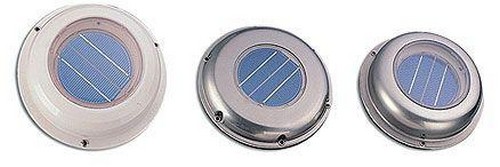
As circulation fans, in greenhouses, the devices of the TMS series made in Taiwan, listed above, can be used. The solar battery, for these models, is built into the body of the device, which works only in the daytime, in the presence of sunlight, at night - the device is turned off. The performance of the model is 0.32 m3 per minute. The cost, in retail chains - from 3500.00 rubles.
When it is necessary to move significant volumes of air masses, more powerful units are used, in which the solar panel is made of a remote design, which allows increasing its power, and, accordingly, the power and performance of the fan.
The operating mode of this device is similar to the above, in the presence of lighting - work, in the absence - standby mode. The performance of such models is higher, the cost is from 15,000.00 rubles.

For cars
For car owners, fans are also available that can run on solar power. These are low power fans that are placed under the windshield of the car and serve to create additional circulation inside the cabin air.
The appearance of such devices can vary from the classic type of a fan to the avant-garde forms inherent in the author's works of developers and designers.
The advantage of this type of fan is that it is possible to ventilate the car interior with the engine turned off, while the energy of the car battery will not be used, which will save its charge.
For a cap
An interesting invention was proposed by Chinese developers, they made a fan for a cap that runs on solar energy.
At first glance, it may seem that this development is not for permanent use, but due to the relatively low cost and the ability to create an individual microclimate and comfort for the owner, this invention is already widely used by tourists in different countries of the world.
The cap serves to protect from the sun, and the fan provides airflow in the presence of direct sunlight. The cost of such products is from 500.00 rubles.

How to DIY
In order to make a fan powered by a solar battery, it is enough to have any fan operating at a constant voltage of 12.0 V (automobile or similar), as well as a small solar battery.
By connecting the existing elements to the electrical network, you can get the desired result.
As an energy source, you can use solar panels from other devices with USB connectors, through which you can connect a fan. It can be: a camping lantern, a solar lamp or a searchlight, as well as an external battery.

Alternative "clean" energy, which is undoubtedly the future, in some cases may be a natural and practical choice now. First of all, in those cases when it is necessary to provide electricity to a low-power consumer located “in an open field”. And a private house, if everything is chosen and built taking into account energy saving requirements (and you, for example, do not plan to use electricity for heating), is just an example of such a “low-power” consumer. Yes, unlike an apartment, here, as a rule, borehole pumps for autonomous water supply and various garden equipment are added, but having set a goal, it is quite possible to power it all from a solar system, supplemented by a wind generator and for safety - some kind of gas or diesel generator. Moreover, the latter will turn on extremely rarely, if everything is calculated correctly.
And it can be cheaper than connecting to the power line individually. Therefore, in Russian conditions, probably, the lack of a “collective” power supply is the most common reason for interest in alternative power sources. But in my opinion, there is at least one more argument in favor of "green" systems, and solar systems, even in the presence of "public" 220 volts.
The fact is that food stability, even in the Moscow region, outside the cities can leave much to be desired. And in the case of my holiday village, the bottleneck is the high-voltage line winding through the neighboring forests from village to village. Trees, alas, fall from the wind, and this circumstance is unknown, it seems, only to those who consider it normal to lay overhead lines in clearings with a width of at least ten meters. However, it may be that laying a cable in the ground is more expensive than periodically replacing poles damaged by a neighboring pine tree. And it's all wisely calculated.
I would like to believe, but it doesn’t work out in any way, because here the Russian tradition is clearly visible: first do it somehow, but cheaper, and then spend time and resources on patching holes (and sincerely wonder: why is there not enough money for a new one?). Accordingly, it is much easier to make it more expensive and better “at first” in order to save “later” in private.
And since about once a season there is a “good” thunderstorm, after which it takes a week or even more to raise the line, not counting shorter outages, I really wanted to get my own margin of autonomy. Ideally - such as not to notice all this disgrace at all. The diesel or petrol version disappeared almost immediately, we even bought one. But the desire to drive this howling and stinking miracle of technology, having come to enjoy communication with nature, turned out to be lower than the actual need for electricity. It is better to do with candles or go to the city. Accordingly, this topic became relevant when one wanted to settle in a house on a more or less permanent basis.

Meanwhile, the peculiarity of the summer house is that mass activity takes place there in the summer, when solar energy, even at the latitude of Moscow, is more than enough. Actually, the trees fall mostly in the summer. This is how it used to be: the storm has passed, the sun is shining, but there is no electricity. And the interest in "solar" energy has already been reinforced by the purchase of a solar collector for heating water. In particular, a fairly compact one (12 tubes of 1.8 m each) confidently copes with the task of extending the "swimming season" in a 12-cubic pool by about a month compared to natural heating.
Therefore, about a year ago, the system that I want to talk about was assembled. I specifically paid attention to the background so as not to enter into discussions on the topic of the profitability of solar systems compared to traditional ones. Sometimes, as we see, there are arguments besides the cost of a kilowatt.
Let's move on to the selection of components for solar systems.
Solar panels

So let's start with solar panels. In order of decreasing efficiency and cost, batteries based on monocrystalline, polycrystalline and amorphous silicon follow. The vast majority of branded batteries belong to the first type, which in itself is considered the most durable, the cells degrade the slowest.
By the way, if the house is small, and you do not have some conveniently located barn with a large southern slope, then in practice it may turn out that there is not much space for batteries at all. And it makes sense to take the model with the highest efficiency per unit area if you really want to build a system with a sufficiently high energy efficiency. Since it is necessary to place the batteries on the southern slope of the roof, preferably at an angle of 45 degrees.
According to the installation method, there are batteries mounted in the roof in the manner of skylights (in fact, only Roto has a completely insane cost). And the rest of the majority are simple panels built into an aluminum frame that are attached to overhead rails. The disadvantage of the latter is that the roof has to be drilled, and not every coating can withstand such a rough intervention without leaks. However, this is the only running option that was chosen.
As for the batteries themselves, Zelenograd monocrystalline batteries turned out to be a good option in terms of price and quality. Yet they are quite willing to buy in Germany. Therefore, being in Russia, it is logical and even pleasant to have the opportunity to use at least something related to electronics, but of local production.
Three batteries (TCM-170B) with a capacity of 170 W and a size of 158 × 82 cm were purchased. The calculation in this case was simple: get enough charging current in cloudy weather, as well as in the morning and evening, so that the energy balance, at a minimum, allows you to work fridge for as long as you like. Since the consumption of the refrigerator is about 100-200 W, and it works intermittently, such a load is quite capable of the described option - of course, with buffer batteries.
In real conditions, when the sun still shines, and people live in the house, there should be enough energy to use household appliances, pump water, etc. even in the absence of external power supply for a long time. No frills, but no special economy mode. In any case, I thought so, and now I can already confirm that the calculation was justified.
solar controller

The standard voltage of solar panels and the voltage that must be maintained to charge the batteries do not match. Rather, the voltage at the output of the solar panel varies from zero to maximum depending on the illumination, and an intermediate conversion is indispensable here.
In the simplest case, you need a controller that would turn off the batteries when they reached their maximum charge, and connect them back when, firstly, recharging is required, and, secondly, the output voltage of the solar array corresponds to that required for a normal charge. But this is a very inefficient method.
Therefore, modern low-cost controllers use PWM modulation, which allows you to get an acceptable voltage and current for charging in a larger input range. The disadvantage here is that you still need to at least approximately match the output voltage of the solar array with the voltage of the battery array.

Finally, the most versatile and efficient method is offered by MPPT controllers, which are capable of converting voltage over a much larger range and monitor the maximum power point during operation, and, accordingly, allow you to remove maximum energy and provide charging in the early morning until dusk. In my case, the option with such a controller was the only adequate one, since three solar panels, no matter how you connect them, gave a non-standard voltage. Well, with such a controller - you can connect in series, which is more convenient (fewer wires), and less transmission loss, since the same power is transmitted at maximum voltage and, therefore, less current. And this is also important if the house is high, and from solar panels to the rest of the electronics and batteries there will be ten meters of cable, or even more.
Perhaps the most famous and popular MPPT controllers are from MorningStar. The selected TriStar-MPPT-45 model is designed for a charging current of 45 A, which is certainly excessive (but low-power MPPT controllers are practically impossible to find, and besides, NEC requirements imply a margin of 25% in current, that is, the actual allowable current is no higher than 36 And, and, roughly speaking, you can charge a battery with such a controller within 360 Ah). The battery voltage can be freely selected from 12, 24, 48 and 36 V. Finally, the input voltage from the solar panels must be within 150 V. Of course, with such characteristics, pairing is not the slightest problem.
inverter + charger
Having connected the batteries to the batteries, it is logical to think about the second half of the circuit, that is, we need the ability to power the external network from the batteries, as well as charge them from this very network.
In the most general case, you need an inverter, a charger and a relay that would switch the load when the input voltage fails. Fortunately, there are inverter models where all these functions are combined, which is important if we want to achieve completely autonomous and maintenance-free operation - since individual inverters often require a manual restart after they have run out of battery life and turned off, etc.

Actually, it is necessary to pay attention to the algorithm of work when choosing a universal device. It is important that it automatically starts charging the batteries after the appearance of voltage in the network. It is also important that the load shedding voltage for the inverter is set higher than the solar controller shedding voltage. In this case, the batteries will start charging immediately: either as they “give current”, or when morning comes. Even if the batteries run out in the evening.
Since high-quality inverter models usually have a 2-3 times inrush current margin, and this is not emergency, but regular operation, it is quite correct to choose the rated power in accordance with the actual maximum that you may need. To do this, it is usually enough to add the power of the well pump in the steady state of operation and the power of the refrigerator compressor and add 20-30% of the margin for "light bulbs" and other household small items that you are going to connect to the backup line.
Yes, of course, it is assumed that the backup line is laid with a separate cable, and it makes sense to mark the sockets so that no iron is accidentally turned on in them. In general, it makes sense to “work” to ensure that the simultaneous load is as small as possible, primarily for the sake of battery life. As you know, if the discharge current exceeds the optimum for the battery, its actual capacity may be significantly less than the declared one. And this is not in our interests.
In my case, it turned out 700 + 200 VA "it is necessary for sure." And taking into account the fact that the pump may need more powerful over time, it was optimal for the backup line to choose a model with a capacity within 1500 VA.
After a very short deliberation, I chose the Outback GFX1424E. This model is certainly expensive for its power of 1400 VA. But, as I have already noted, chasing power in the case of inverters for a home backup line is pointless. It is unlikely that anyone will install an appropriate battery of batteries in order to really be able to load them with 2-3 kilowatts of load. It is much more interesting in this case to pay for additional features and, of course, quality.
The latter is especially important, given that the device will have to work around the clock and in a separate room without supervision. What exactly attracted in this device:
- Made in USA. It so happened that as a synonym for the reliability of technology, the phrase "German quality" is most often used. Meanwhile, American products are often even stronger and last longer, since the technological level of the country is at least not inferior, but at the same time there is no such austerity on materials as in Europe.
- Sealed body. Accordingly, the device is protected from dust, moisture and insects. No, the house is certainly clean, but it is hardly reasonable to put a rack with electrical equipment in the rooms - a garage or basement is better suited for this. And a device of the usual layout with ventilation grilles will definitely pump dust with its fan - if not immediately, but in a year or two for sure. It is possible that some spider will arrange an emergency even earlier :)
- Low noise level. The inverter is not completely silent: there is a high-frequency squeak in some modes, and also, despite the sealed case, which plays the role of a radiator, there is also a low-speed fan inside, which sometimes turns on and distills air from more heated components to the radiator. But even at maximum load (that is, actually in the backup mode), the noise does not exceed 40 dBA, and in standby mode, when the batteries are charging, and the ambient temperature exceeds 25 degrees - no more than 35 dBA. This is very small, most desktop computers make louder noise during operation, but classic inverters with fans are obviously noisier.
- Low power consumption (18W idle, 6W standby). Here it must be borne in mind that you can use the sleep mode if there are no low-power energy consumers in the house that need constant power. The most common example of such a consumer is a security system (alarm system).
- Pure sine wave. Formally, even devices that are sensitive to the shape of the supply voltage are able, for the most part, to tolerate an approximated sinusoid. In any case, when it comes to engines, taking into account the fact that they will work in standby power mode only a small part of the time. But, of course, the correct shape of the sine is the function that is worth paying extra for. Rather, here the considerations come from the opposite: approximation inverters occupy the lowest (initial) segment on the market, and they have many drawbacks of a purely constructive property, in addition to the voltage shape itself. It is naive to count on such products seriously and for a long time.
- Well, the most curious feature that finally inclined the choice in favor of this device is the ability to export electricity. In other words, when the batteries are fully charged, the inverter turns on and the excess energy coming from the solar panels (or other alternative sources connected to the low voltage circuit, in parallel with the batteries) is sent to the external circuit. Accordingly, the internal flow is first compensated, and if it remains for the neighbors, then you can observe how the meter spins in the opposite direction. This, of course, is nice, because it’s not very interesting to assemble such a system just for the sake of redundancy (after all, most of the time the external network is working). But why not use your energy?
It should be added that even the inverters interlocked with the charger do not all have the export function. And if you assemble the system from separate components, you will have to buy an additional controller and, possibly, tinker with programming and configuration. There is already a sense in such a strapping only on the condition that you have assembled a fairly serious alternative power plant.
In this case, I was also not entirely sure that everything would work out automatically. Nevertheless, the solar controller is taken from another manufacturer, and both devices provide for programming (a separate socket is attached to the inverter, and the solar controller is connected via a COM port). And just there is a choice of threshold voltages for battery charging and export mode.

However, since the assembly of the entire system dragged on past midnight, I postponed the setup and programming until the morning. And in the morning it turned out that the battery charge had already ended, and since nothing serious was turned on in the house at that moment, the counter really turned in the opposite direction. Everything worked as it should.
About the measurements that I managed to make, I will tell you at the end; I will only add that the possibility of export was tested using an electromechanical counter, which is easily distinguished by a rotating disk. Electronic ones may not work out this moment properly, that is, you will give the current, but only for charitable purposes. In the meantime, it remains to say a few words about the choice of batteries.
Batteries
To build home autonomous power supply systems, as a rule, closed-type lead-acid batteries are used. The so-called VRLA - Valve Regulated Lead-Acid, that is, with valve regulation of the emitted gases. There are two types of such batteries: AGM (Absorbed Glass Mat), in which the electrolyte between the plates is in fiberglass capsules, and gel. In the latter case, thickeners are added to the electrolyte, and during the production of the battery, this electrolyte is smeared on the plates.
And if gel batteries are more often used in compact uninterruptible power supplies, then for high-capacity systems, AGM models are currently the most popular, which were chosen.
Since the budget was by no means rubber, two batteries from a budget manufacturer Leoch DJM12-200 with a capacity of 200 Ah each were taken.

Such a large margin is necessary so that a short-term high-power load (pump) nevertheless creates a current within the favorable mode for the batteries. As we can see in the diagram, in order for the backup time to really be hours and not minutes, it is desirable that the current in the low-voltage circuit does not exceed 0.2C (that is, a fifth of the capacity). The batteries were connected in series because the inverter was chosen to support 24V, and this is also beneficial to reduce connection losses.
We connect to the system
Everything is quite trivial here: the general rule is to minimize the length of low-voltage circuits. Therefore, the inverter, solar controller and batteries are best placed on the same rack or just side by side.

In my case it turned out like this. The wires from the solar panels connected in series are connected to the solar controller (it makes sense to take the wires thicker - from 6 mm², and preferably 10 if the house is high and you are going to place the electronics in the basement). The output of the solar controller, as well as the output of the inverter, are connected to batteries connected in turn in series. A special DC circuit breaker must also be placed in the battery circuit to protect the inverter and to conveniently shut down the system if necessary.

It turned out to be most convenient to use the outputs of the inverter as buses for the positive and negative poles. You can also pick up a wind generator and all other sources of energy here, if the hobby for alternative energy goes into the chronic stage of the disease. As already noted, no ballast is required and the batteries will not be recharged - the inverter will simply give excess electricity to the external network.
Multiple Tests
First of all, it should be noted that the goal set - not to notice short-term outages (for several hours) and not to particularly change your plans for the day due to the mentioned night thunderstorm - has been fully achieved. There was also a long shutdown (within a week) when we were away, and earlier, no doubt, upon returning, we would have found a thawed refrigerator, in the freezer of which every self-respecting summer resident stores part of the harvest. And if there were no solar panels in the circuit, then, of course, such a result could not be achieved.
Total 4.5 kW. Since only the refrigerator, laptop and lighting (energy-saving lamps, in the evening) were working in the house at that time, and the borehole pump was running for 30-40 minutes a day, the total consumption was 7.2 kW. That is, indeed, almost half of the consumption, even taking into account not the most favorable weather conditions, solar panels compensated.
Although, I emphasize, this is a “side effect”, the goal of saving on electricity in this case was not set. As for the issues of economy, if you look closely at alternative energy from this point of view, it first of all makes sense to transfer the most expensive item - heating water - from electricity to some direct source of heat. That is, if we talk about savings and tie it to the use of solar energy, it is better to start with a simple solar collector. And if you like the experience, then you will probably want to try some other source of alternative energy. Because the activity is infectious and exciting.
Addition (for discussion on the forum)
First of all, it must be added that the device in the power export mode does not pose any danger "for electricians". As you might guess, the output of power to the network stops in the absence of external voltage (or rather, even after it decreases relative to the minimum threshold programmed by the user). In this case, the inverter goes into autonomous operation and only the backup line remains energized, and accordingly, only the equipment that you connect to it. During the year of operation, there were quite a few outages, and there are no complaints about the correctness of working out this state.
Batteries themselves require no more maintenance than regular window panes. In other words, if your roof window clearly indicates the need for washing, do not forget to wipe the panels. In the case of an environmentally friendly location away from the highways, according to experience, cleaning is required no more than once a year. At the end of spring after flowering trees. But this year, for example, due to heavy rainfall, even the windows did not have to be washed. Yet, unlike vertical windows, inclined ones are well cleaned by rain. The batteries of most users, whom I managed to interview through one of the companies installing such systems, winter under the snow, there are no problems either. Although, of course, if you plan to relieve tension in the winter, then it is better to place the batteries at a large angle or on some kind of swivel bracket so that the snow does not linger.
When choosing an inverter, I strongly recommend looking at the specifications for starting currents, for good models they are several times higher than the nominal power. Accordingly, you should not trust the "feelings" or advice of those who want to sell you equipment "with a margin." The stock is necessary, but it is necessary to calculate it not by "feelings", but by measurements.
By the way, just the other day, a strong thunderstorm again "surprised" the unlucky power engineers near Moscow with the fall of pine trees. And there was no electricity for about a day. And as always, the next morning the sun shone brightly, doing its useful work.
How to cool the air in the car
A sweltering summer day... Returning to your car, you pulled up outside the sun-sheltered canopy of the local mall. You parked it in a vast hot space, as all the places under the canopy were occupied. As you open the driver's side door, you notice that the hot airflow has become so thick that it even casts a shadow on the sidewalk. Your legs and shoulders are hot, and since the car is not equipped with air conditioning, you are now forced to endure this discomfort. You are breathing heavily, feeling like you are in a sauna or oven.
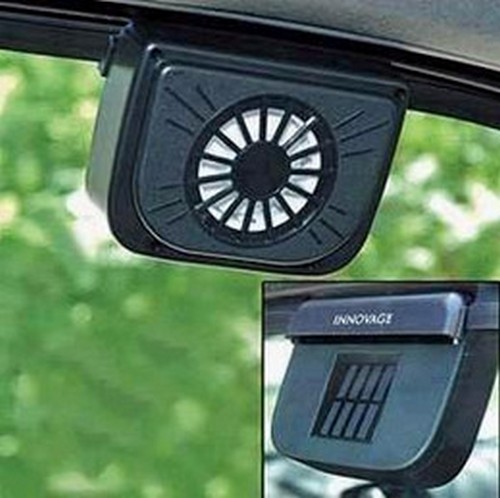
This oven analogy is by no means an exaggeration: even on a moderately warm day, the temperature inside the car can reach 70 ° C. And some surfaces are heated up to more than 90 degrees at all, and then it’s really just right to fry scrambled eggs on them. How to protect the interior of your car from the heat when you need to leave it for a long time? One way is to install an easy-to-use solar car fan.
 In fact, the name of this fan sounds even more complicated than its device itself. A solar car fan, as it is sometimes called, takes and converts it into low-voltage electricity to drive a small fan that circulates your car's stagnant, hot air and brings in fresh air. Such car gadgets can reduce the temperature in the car interior by several degrees. And although it may not seem like much, on hot days those few degrees can sometimes mean the difference between life and death: according to statistics, temperatures above 38 degrees Celsius often become fatal for children and pets left unattended in cars.
As early as the early 1990s, Mazda began a comprehensive introduction of solar, but for unknown reasons stopped offering the feature. Audi and Mercedes-Benz recently offered such systems as vehicle options. However, if an Audi Benz is too expensive for you at the moment, you can always get a portable solar fan. Designed to fit any passenger vehicle, these versatile fans typically cost between $20 and $40, leaving you free to spend your money on better things than luxury German cars. Let's take a look at how these devices work and weigh the pros and cons of purchasing solar fans for your car.
The principle of operation (mechanism) of a solar-powered car fan
The most striking aspect of solar car fans is that they use solar energy to operate. Their power supply is free and will never be exhausted.
 In typical solar car fans, the solar panels are connected to a small, low voltage fan. It forces airflow through tiny holes, expelling hot air and directing cold air into your car. As a rule, the entire ventilation device is mounted on a long strip to the upper edge of the window or door of the car. Miniature solar panels and the fan itself are in contact with the inside of the glass and are therefore well protected from bad weather and mechanical impact from the outside.
Of course, you should not expect that by installing a single gadget, you will return to a completely cool car interior with more than 30 degrees outside, but there is every reason to believe that the cabin will now not be as hot as it could be without such a device. . In addition, fans can be quite effective in removing unpleasant odors from the car, which often occur in the hot and humid environment of a closed car, such as the mixing of sweat, perfume and food taken on a trip.
Disadvantages of Solar Car Fans
Of course, this one is not perfect. Since fans of this type operate solely on solar energy, this causes several disadvantages of such a system:
- they often need direct sunlight to function, so they won't work well on hot but cloudy days;
- manufacturers warn that the device will not work when installed on tinted windows;
- The most serious drawback: solar fans require installation on your car window, which entails a certain risk of hacking.
Fortunately, some car manufacturers are already taking action in this direction: in response to frequent complaints that devices do not work away from direct sunlight, they have invented solar fans that can also be connected to a car's 12-volt outlet. So, if the solar energy is too weak to start the fan motor, the device will receive a small amount of electricity from your car battery.
 However, if you have already begun to think about what you can save on turning it on on hot days and even completely replace it, take your time. In the near future, solar fans for cars will not yet be able to compete with air conditioners, which use high pressure coolant to lower air temperature and direct a jet of cold air to where it is needed through a powerful fan. In solar fans, on the other hand, hot air is simply blown out of the machine by the exhaust method, and cooler air from outside is sucked in through the air intake holes.
Be careful while driving: you should remember that it is not advisable to keep the solar fan on while driving, as the fan can interfere with the view from the window to some extent.
Benefits of solar powered car fans
 It is unlikely that you would deliberately throw your favorite CDs, expensive electronics or sensitive car gadgets into a red-hot furnace. However, this is exactly what happens when you leave your car with your valuables in direct sunlight. Worst of all, if they remain on surfaces exposed to the sun, for example, on the dashboard or on the front seats. Excessive sun exposure causes cracks in the leather, plastics, and other materials that make up your car's interior trim.
A solar fan for a car has several advantages:
- thanks to him, the air conditioner of your car works less;
- you can be sure that your car is cooled with clean energy;
- it will increase airflow and make your return to the car on a scorching summer day more comfortable than ever before;
- helps to get rid of unpleasant odors and excessive humidity;
- most models are easy to install on almost any car or truck;
- unlike blinds or tinted windows, which also contribute to the cooling of the car interior, you do not have to worry about violating the integrity of your vehicle when installing the device;
- accessible to anyone the price of the device.
Keep in mind that the results of your solar car may vary, and this will depend on several factors, including the position of the sun and the quality of the device you choose.
Solar fan
The easiest way to cool your home is, of course, air conditioning. However, it is not cheap. It is much cheaper to use an inexpensive ventilation system, which in turn prevents overheating of the air in the room and an increase in humidity. The ventilation system must be installed in such a way as to remove air from the attic. Why from the attic? Because he is the source of all problems.
It all starts early in the morning, as soon as the sun begins to shine on the roof. I don't know if you know it or not, but roof tiles absorb solar radiation quite effectively. Roofs covered with bitumen are especially good at attracting and retaining solar heat.
The heat from the roof is then transferred to the air that fills the attic. As the day progresses, more and more heat enters the attic air space. Now another mechanism comes into play inside the attic. It is well known that warm air rises and cold air sinks. Since the air in the attic does not mix, a temperature distribution is created in the house, shown in Fig. 1. Layered temperature distribution causes heat accumulation. We have a huge reservoir of heat that needs to be used.
In many homes, it becomes too hot due to heat intrusion from the attic. When you turn on the air conditioner, you are trying to remove heat from living spaces to make the conditions more comfortable. However, at the same time, the attic continues to heat the house. Such confrontation is costly and does not lead to the desired results.
The only way to stop this influx of heat from the attic into the living space is to insulate the house from the attic. Thermal insulation with glass wool is very effective. A layer of glass wool with a thickness of not more than 15 cm, covering the ceiling, significantly affects the amount of heat penetrating down.
However, no amount of insulation can completely isolate the lower rooms from the penetration of heat from the attic. Heat will penetrate into living spaces through heat transfer and radiation.
To illustrate this, consider the following example. Suppose that the attic of your house has dimensions of 9X 12 m (area 108 m2). If the temperature in the attic averages 55°C, and you want the temperature in the living room not to exceed 27°C, then the best you can hope for is to achieve a heat transfer of no more than 2000 J / h. And this is in the case of a perfect isolation system. For a typical house with single-layer glass wool ceiling insulation, the heat penetration is about 4500 J/h.
It has been experimentally established that in order to neutralize 9000 J of heat, the air conditioner must pump 1 ton of air. Thus, to eliminate the effect of attic heating, we need to pump an extra 0.5 tons of air with an air conditioner!
Cooling mechanisms
However, the actual amount of heat penetrating down depends on the temperature difference between the attic and the house. A temperature difference of 5°C corresponds to thousands of joules. Therefore, the colder it is in the attic, the less the air conditioner works.
How can you cool your attic? You just need to ventilate it! There are very rare cases when the outside air temperature is higher than the air temperature in the attic, where it is usually hot, like in a stove; You can cool the attic by replacing the hot, stagnant air in it with colder outside air.
This is relatively easy to do by cutting a vent in the roof near its crest and installing an exhaust fan in it. A fan blows cold air through a projecting roof eaves and draws warm, stale air out of the attic through a vent.

Mixing hot and cold air and eliminates temperature differences (Fig. 2). It should be noted how it affected the temperature inside the attic. Now the temperature is more evenly distributed, and the average temperature has dropped.
I want to note that a very large fan is not required to ventilate the attic. The goal will be achieved if the air exchange in the attic is carried out approximately every 3 minutes.
The main elements of the fan
The size of the fan is determined by the size of the attic. The attic of standard dimensions (9x12 m2) has a volume of approximately 135 m3. To exchange this volume of air every 4 minutes, a fan is required that will pump out 34 m3 / min.
If the attic is smaller, a smaller fan will be required. The ratio here is simple: the attic volume in m3 is divided by the desired air change time (in minutes) and the fan performance is obtained. For example 135m3/4min~34m3/min. The fan is driven by a small DC motor, which is usually linear: the more power supplied to it, the faster it rotates.
This circulation of air inside the attic causes overflow. Changing any of these values will cause a change in power. For example, a motor with a voltage of 12 V at a current of 3A can rotate at a speed of 6000 rpm. If we reduce the electrical energy supplied to the motor by lowering the voltage to 6 V, then the rotation speed will decrease by 2 times and become equal to 3000 rpm.
On the other hand, if in the same motor at 12 V at 3 A, rotating at the same speed of 6000 rpm, we reduce the current by 2 times, keeping the voltage at the same level (12 V at 1.5 A), we get the same result: the motor speed will be 3000 rpm. Given the principle of operation of photovoltaic converters, understanding the reason for changing the speed of rotation of the motor with a change in the consumed current is especially important.
The volume of air that the fan blades will distill is directly proportional to the speed of rotation. This indicates that the air flow can be controlled by simply changing the speed of the motor.
Undoubtedly, photoelectric converters can be used to power the exhaust fan. This is the preferred choice. At the same time, it should be noted that when a photovoltaic source is connected to a fan electric motor, an interesting relationship arises.
Photovoltaic solar cells can usually be considered as current sources. In low light, the solar panel generates a small current, although the voltage remains normal. As a result, the fan (if it is rotating) rotates slowly and therefore only pumps a small amount of air.
This circumstance just meets the task of ventilating the attic. In the morning, the roof is practically not heated, and at this time of the day there is no need for ventilation or only a little ventilation is needed.
During the day, with increasing solar radiation, more and more power is supplied to the fan motor from photovoltaic converters, and the fan speed increases. With the increase in solar insolation, an increasing amount of heat enters the attic space. It should be noted that an increase in the fan speed (air exchange) is observed exactly when it is needed.
Toward evening, the intensity of solar radiation decreases again, the roof absorbs less heat and the need for ventilation decreases. This is consistent with the change in output power of photovoltaic converters, which rotate the fan at a lower speed.
As a result, we have developed a self-regulating attic ventilation system that keeps the attic temperature at a relatively constant level. Usually, the fan control, depending on the heating of the attic, is carried out by a mechanical thermal switch.
For the purposes mentioned, two commercially available commercially available fans designed specifically for these applications have been selected. Let's place our photovoltaic sources near the fans. Remember, however, that you can use any combination of motor and fan that suits you.
The first fan is an exhaust fan from Solarex Corp. Addresses of companies producing both fans can be found in the parts list. (It should be noted that we did not try to compare one fan with another.)
Solar battery
Said fan is driven by a 12V DC motor. However, Solarex recommends running the motor at 6V for longevity. m3/min.
It will not be difficult to develop a 7 W battery that satisfies the mentioned requirements. First you need to imagine the required maximum current strength. As mentioned above, it corresponds to 1.2 A.
It is common knowledge that a 7.5 cm round solar cell delivers a current of 1.2 A. In fact, you can find fairly cheap substandard 7.5 cm cells that develop "only" 1 A. These cells are suitable for the purposes mentioned.
To achieve a power of 7 W at maximum solar radiation intensity, 12 elements are required. The elements can be soldered in series, placing them in 3 rows of 4 elements each. In the manufacture of batteries follow the recommendations set out in Sec. 1. If substandard elements of 1 A are selected for use in the design, then to compensate for their defectiveness, it is necessary to increase the number of elements in the battery by 2 and bring their number to 14.
The second fan we'll look at comes from Wm. Lamb. Its diameter is 35 cm; It is equipped with a linear electric motor with ball bearings. Pressed ball bearings extend motor life. The motor is powered by any voltage: 6-48 V. For our purposes, the manufacturer recommends using a voltage of 12V.
A 30 W solar generator will spin the fan at a speed sufficient to exchange air at about 30 m3/min, while a 7 W battery will provide enough energy to exchange air at a rate of 14 m3/min. On fig. 3 shows the dependence of the air exchange rate on the power of the photoelectric converter.

In accordance with one of the options for installing a ventilation device, it will be necessary to make holes in the roof. Since any work on the roof is associated with the risk of possible water leaks, accuracy is the key to a successful job.
First, a round hole in the roof is sawn with a hacksaw. Both fans are supplied fixed in metal casings and the opening in the roof must exactly match the diameter of the casing. Make sure that the location for the hole is chosen between the roof rafters!
Then a fan is installed in the hole. Now a metal reflector is placed around the device, and all possible gaps are abundantly filled with tar to prevent leaks. To prevent rain from entering through the hole made, the fan-1 is covered with a cone-shaped or U-shaped cap.
If there is no desire to make a hole in the roof, there is another option. The fan can be mounted above one of the vents located under the roof eaves. The best way to do this is to mount the fan at a 45° angle to the attic flooring. It is recommended to make a frame from a pair of frames with an aspect ratio of 2:1 (Fig. 4), and then attach the fan to one of them (Fig. 5). After that, you can place the frame over the vent. Make sure that the opening is large enough so that all exchanged air passes through it, otherwise the Fan will not work efficiently enough.


The solar panel is fixed on the south-facing part of the roof and connected to the fan. It is better to run the wires to the edge of the roof and pass them through the vent in the eaves than to drill a special hole for them in the roof: there is less chance of breaking the roof.

When connecting a solar battery to a fan, attention is drawn to the direction of rotation of the electric motor. In one direction of rotation, the air will be drawn out, in the other direction it will be drawn into the room. If the fan does not rotate in the correct direction, the supply wires must be reversed.
Parts list
20 cm fan supplied by Energy Sciences 832 Rockville Pike Rockville, MD 20852 Contact: Larry Miller
A 30 cm fan is supplied by Wm. Lamb Co. 10615 Chandler Blvd. North Hollywood, CA 91601
Photovoltaic battery (see text)