National best reflect their image and lifestyle, which largely depends on the occupation of people and the climatic conditions of the environment. So, settled peoples live in semi-dugouts, nomads live in tents and huts. Hunters cover their dwellings with skins, and farmers with leaves, plant stems and earth. In previous articles, we told you about and, and today our story is dedicated to American Indians and their famous traditional dwellings – wigwam, tipi and hoganam.
Wigwam - home of North American Indians
The wigwam is the main type of Indians in North America. In fact, a wigwam is an ordinary hut on a frame, which is made of thin tree trunks and covered with branches, bark or mats. Such a structure has a domed, but not conical, shape. Very often a wigwam is confused with a tipi: let's take at least Sharik from the famous cartoon Prostokvashino, who was sure that he had drawn a wigwam on the stove. In fact, he drew a tipi, which has the shape of a cone.

According to the beliefs of the American Indians, the wigwam personified the body of the Great Spirit. The rounded shape of the dwelling symbolized the world, and a person leaving the wigwam into the world had to leave behind him everything bad and unclean. In the middle of the wigwam there was a stove with, which symbolized the world axis, connecting the earth with the sky and leading directly to the sun. It was believed that such a chimney provides access to heaven and opens the entrance to spiritual power.
It is also interesting that the presence of a hearth in a wigwam does not mean at all that the Indians cooked food there. The wigwam was intended solely for sleeping and relaxing, and all other things were done outside.
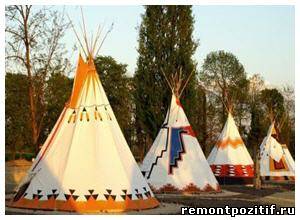
Tipi - a portable house of nomadic Indians
The tipi, which, as we have said, is often confused with the wigwam, is portable to the nomadic Indians of the Great Plains and some hill tribes of the Far West. The tipi is in the form of a pyramid or cone (slightly inclined back or straight), made in the form of a frame of poles and covered with a cloth of sewn skins of deer or bison. Depending on the size of the structure, it took from 10 to 40 animal skins to make one tipi. Later, when America established trade with Europe, tipis were often covered with lighter canvas. The slight inclination of some cone-shaped tipis made it possible to withstand the strong winds of the Great Plains.

Inside the tipi, a hearth was arranged in the center, and on top (on the “ceiling”) there was a smoke hole with two smoke valves - blades that could be adjusted using poles. The lower part of the tipi was usually equipped with an additional lining, which isolated the people inside from the flow of outside air and, thus, created quite comfortable living conditions in the cold season. However, in different Indian tribes, tipi had their own design features and were somewhat different from each other.
Surprisingly, during the pre-colonial era, tipi was transported mainly by women and dogs, and a lot of effort was spent on this due to the rather large weight of the structure. The appearance of horses not only eliminated this problem, but also made it possible to increase the dimensions of the tipi base to 5-7 m. Tipis were usually installed with the entrance to the east, but this rule was not respected if they were arranged in a circle.


Life in the Indian tipi proceeded according to its own special etiquette. So, women were supposed to live in the southern part of the dwelling, and men - in the north. It was necessary to move in the tipi in the direction of the sun (clockwise). Guests, especially those who came for the first time, were supposed to be in the women's section. It was considered the height of indecency to walk between the hearth and someone else, as this violated the connection of all those present with the fire. To get to his place, a person, if possible, had to move behind the backs of the people sitting. But there were no special rituals for leaving: if someone wanted to leave, then he could do it immediately and without unnecessary ceremonies.
In modern life, tipis are most often used by conservative Indian families, sacredly honoring the traditions of their ancestors, Indianists and historical reenactors. Also today, tourist tents are produced, called "teepee", the appearance of which is somewhat reminiscent of traditional Indian dwellings.
Hogan - home of the Navajo Indians
Hogan is another type of American Indian most common among the Navajo people. The traditional hogan has a conical shape and a round base, but square hogans can also be found today. As a rule, the door of the hogan is arranged on its eastern side, since the Indians are sure that when entering through such a door, the sun will certainly bring good luck to the house.
The Navajo believed that the first hogan for the first man and woman was built by the spirit Coyote with the help of beavers. The beavers gave Coyote logs and taught him how. Today such a hogan is called "male hogan" or "hogan with a fork pole", and its appearance resembles a pentagonal pyramid. Often outside, the five-sided shape of the house is hidden behind thick earthen walls that protect the building from winter weather. In front of such a hogan is a vestibule. "Male hogans" are used primarily for private or religious ceremonies.


Navajos were used as housing "women's" or round hogans also called "family houses". Such dwellings were somewhat larger than the "male hogans" and did not have a vestibule. Until the beginning of the 20th century, the Navajo Indians built their hogans in accordance with the described method, but then they began to build hexagonal and octagonal houses. According to one version, such changes were associated with the advent of the railway. When the wooden sleepers fell into the hands of the Indians, which had to be laid horizontally, they began to build spacious and high with additional rooms, but at the same time retained the shape of the “female” hogan.
It is also curious that the Indians had numerous beliefs associated with the Hogan. For example, one could not continue to live in a hogan on which a bear was rubbing, or near which lightning struck. And if someone died in the hogan, then the body was walled up inside and burned along with it, or they carried it out through the northern hole punched in the wall, and the hogan was left forever. Moreover, the wood of abandoned hogans has never been reused for any purpose.
In addition to hogans, underground, summer houses and Indian steam rooms were also common among the Navajo people. Currently, some old hogans are used as ceremonial structures and some as dwellings. However, new hogans are rarely built for the purpose of further habitation.
In conclusion, I would like to say that wigwams, teepees and hogans are far from all types national houses of the american indians . There were also structures such as Vikupa, Maloka, Toldo, etc., which had both common and distinctive features with the designs described above.
The Indians had two types of dwellings that distinguished them from other peoples - a tipi and a wigwam. They have features peculiar to the people who used them. They are also adapted to the typical activities of humans and the environment.
To each according to his needs
The houses of nomads and settled tribes are different. The former prefer tents and huts, while the latter prefer stationary buildings or semi-dugouts. If we talk about the dwellings of hunters, then one could often see the skins of animals on them. North American Indians - a people for whom a large number was characteristic. Each group had its own.
For example, the Navajos preferred semi-dugouts. They created an adobe roof and a corridor called "hogan" through which one could enter inside. Former residents of Florida built pile huts, and for nomadic tribes from the Subarctic, the most convenient was the wigwam. In the cold season, it was covered with skin, and in the warm season, with birch bark.
Scale and strength
The Iroquois built a frame from tree bark that could last up to 15 years. Usually during such a period the community lived near the selected fields. When the land wore out, there was a resettlement. These buildings were quite high. They could reach 8 meters in height, from 6 to 10 meters wide, and sometimes they were 60 meters or more in length. In this regard, such dwellings were nicknamed long houses. The entrance here was located in the end part. Nearby was a picture depicting the totem of the clan, the animal that patronized and protected it. The dwelling of the Indians was divided into several compartments, in each there lived a couple forming a family. Everyone had their own hearth. There were bunk beds near the walls for sleeping.
Settled and nomadic settlements
The Pueblo tribes built fortified houses from stones and bricks. The courtyard was surrounded by a semicircle or circle of buildings. The Indian people built entire terraces on which houses could be built in several tiers. The roof of one dwelling became a platform outside for another, located on top.

People who chose forests for life built wigwams. This is a portable Indian dwelling in the shape of a dome. It differed in small size. The height, as a rule, did not exceed 10 feet, however, up to thirty inhabitants were placed inside. Now such buildings are used for ritual purposes. It is very important not to confuse them with teepee. For nomads, such a design was quite convenient, since they did not have to put much effort into construction. And it was always possible to move the house to a new territory.
Design features
During the construction, trunks were used, which bent well and were quite thin. To bind them, they used elm or birch bark, mats made from reeds or reeds. Corn leaves and grass were also suitable. The nomad's wigwam was covered with cloth or skin. To prevent them from slipping, they used a frame on the outside, trunks or poles. The entrance was covered with a curtain. The walls were inclined and vertical. Layout - round or rectangular. To expand the building, it was pulled into an oval, making several holes for smoke to escape. The pyramidal form is characterized by the installation of even poles that are tied at the top.

The dwelling of the Indians, similar to a tent, was called a tipi. He had poles, from which the skeleton of a conical shape was obtained. The skins of bison were used to form the tire. The hole at the top was designed specifically for the smoke from the fire to go out into the street. During the rain it was covered with a blade. The walls were decorated with drawings and signs that meant belonging to one or another owner. Tipi really resembles a wigwam in many ways, which is why they are often confused. This type of building was also used by the Indian people quite often both in the North and in the Southwest and the Far West traditionally for the purposes of nomadism.
Dimensions
They were also constructed in a pyramidal or cone shape. The diameter of the base was up to 6 meters. Forming poles reached a length of 25 feet. The tire was made from On average, from 10 to 40 animals had to be killed to create the cover. When the North American Indians began to interact with the Europeans, a trade exchange began. They had canvas, which was more light. Both leather and fabric have their drawbacks, so combined products were often created. Wooden pins were used as fasteners; from below, the coating was tied with ropes to pegs sticking out of the ground. A gap was left especially for the movement of air. As in the wigwam, there was a hole for smoke to escape.

Useful Devices
A distinctive feature is that there were valves that regulate the air draft. To stretch them to the lower corners, leather straps were used. This dwelling of the Indians was quite comfortable. It was possible to attach a tent or another similar building to it, which significantly expanded the internal area. From a strong wind, a belt descending from above, which served as an anchor, protected. A lining was laid out at the bottom of the walls, which had a width of up to 1.7 m. It retained internal heat, protecting people from external cold. During the rain, a semicircular ceiling was stretched, which was called "ozan".
Examining the buildings of different tribes, you can see that each of them is distinguished by some of its own, inherent only feature. The number of poles is not the same. They connect differently. The pyramid formed by them can be both inclined and straight. At the base there is an ovoid, round or oval shape. The tire is cut in a variety of options.

Other popular types of buildings
Another interesting dwelling of the Indians is the wikiap, which is also often identified with the wigwam. The building in the form of a dome is a hut in which mainly Apaches lived. It was covered with pieces of cloth and grass. They were often used for temporary purposes to hide. They covered with branches, mats, put on the outskirts of the steppe. The Athabaskans, who inhabited Canada, preferred this type of construction. She was perfect when the army advanced to battle and needed a temporary place of residence in order to hide themselves and hide the fire.
The Navajo settled in hogans. And also in summer-type houses and dugouts. Hogan has a round section, the walls form a cone. Often there are square designs of this type. The door was located in the eastern part: it was believed that the sun brings good luck into the house through it. The building also has a great cult significance. There is a legend that tells that the hogan was first built by a spirit in the form of a coyote. The beavers helped him. They were engaged in construction in order to provide housing for the first people. In the middle of the five-pointed pyramid was a fork pole. The faces had three corners. The space between the beams was filled with earth. The walls were so dense and strong that they could effectively protect people from the winter weather.

At the front was a vestibule where religious ceremonies were held. Residential buildings were large. In the 20th century, the Navajo began to build buildings with 6 and 8 corners. This is due to the fact that at that time the railway functioned not far from them. It was possible to get sleepers and use them in construction. There was more space and space, despite the fact that the house stood quite firmly. In a word, the habitats of the Indians are quite diverse, but each of them performed the functions assigned to it.
And today we will acquaint our readers with the meaning of the word "wigwam" and its differences from the "teepee" of nomadic tribes.
Traditionally, a wigwam is called the place of residence of the forest Indians, who lived in the northern and northeastern parts of the continent of North America. As a rule, a wigwam is a small hut,the total height of which is 3-4 meters. It has a domed shape, and in the largest wigwams, about 30 people can live at the same time. Also small in size huts, having a conical shape and similar to tipi, can also be attributed to wigwams. Now wigwams are often used as a place for traditional ceremonies.
Analogues of wigwams can also be found among some African peoples, the Chukchi, Evengs and Soits.
As a rule, the frame of the hut is made of thin and flexible tree trunks. They are bound and covered with tree bark or plant mats, corn leaves, hides and pieces of cloth. There is also a combined version of the coating, which is also additionally strengthened from above with a special outer frame, and in case of its absence, with trunks or special poles. The entrance to the wigwam is closed with a curtain, and its height can be either small or the full height of the wigwam.

There is a chimney at the top of the wigwam, which is often covered with a piece of bark. Raise it to remove smoke with a pole. Domed wigwam options can have both vertical and sloping walls. Most often there are round wigwams, but sometimes you can see a rectangular design. The wigwam can be stretched out into a fairly long oval and also have a number of chimneys instead of one. As a rule, oval wigwams are called long houses.
Cone-shaped wigwams have frames made of straight poles that are tied together at the top.

The word "wigwam" originates in the Proto-Algonquian dialect, and it is translated as "their house". However, there is also an opinion that this word came to the Indians from the language of the eastern Abenaki. Different peoples have their own version of the pronunciation of this word, but in general they are quite close.
There is also another term - wetu. Although widely used by Massachusetts Indians, the term has not caught on in the rest of the world.
 Nowadays, wigwams are most often called domed dwellings, as well as simpler huts in their design, in which Indians from other regions live. Each tribe gives its wigwam its own name.
In the literature, this term is most often found as a designation of the domed residence of the Indians from Tierra del Fuego. They are quite similar to the traditional Native American wigwams from North America, but they are distinguished by the absence of horizontal ligaments on the frame.
Also, a wigwam is often called the dwelling of the Indians from the High Plains, which is correctly called the word.

Tents of various sizes, similar in shape to wigwams, are quite often used in various rituals of rebirth and purification in the tribes of the Great Plains, as well as from a number of other regions. In this case, a special steam room is made and the wigwam itself in this case is the body of the Great Spirit himself. The round shape denotes the world as a whole, and the steam in this case is the prototype of the Great Spirit itself, which performs spiritual and cleansing regeneration and transformation.
What is a wigwam? This is a typical structure made of twigs and birch bark, used as a home or shelter by Native American tribes of the northeastern cultural group, among others.
What is a wigwam?
The concept itself comes from the word used by the Abenaki tribe, and means home. It was a form of shelter used by various Indian tribes, especially those who lived in the northeast forest. What is a wigwam? This is a house, which was usually a domed building.

It reached, as a rule, 2.5-3 meters in height and about 12 meters in diameter. First, a wooden frame was made, which was then covered with other available materials, such as animal skins. The joints of the structure were firmly fastened with ropes. From the late 1700s, cloth was sometimes used to cover wigwams.

native american houses
What is a wigwam? The word was once used to describe everyone regardless of structure, location, or cultural group. In fact, the term is used to describe the semi-permanent types of shelter used by the Northeast Woodland cultural group. The word Wetu is translated as "home" in the Wampanoag tribe. The term "birch house" is also used as an alternative name for a wigwam. The word wikip is used to describe these primitive dwellings, but is common among tribes in the southwestern United States.

What is the difference between a wigwam and a tipi?
The difference between a wigwam and a teepee is that the wigwam was used by the tribes of the northeastern forest culture group, while the teepee was used by the nomadic tribes of the Great Plains. The first was a semi-permanent design, the second was completely portable. The forest tribes had access to forests and used birch bark as coverings for their shelters.

The tribes hunted buffalo and used buffalo skins as coverings for their dwellings. The wigwam took longer to build, while the teepees were easy and quick to build. Some were domed, while others were shaped like pyramid-shaped tents.

Who lived in the wigwam?
The lodge was commonly used as a dwelling by Native American Indian tribes (Wampanoag, Shawnee, Abenaki, Sauk, Fox, Pequot, Narragansett, Kickapoo, Ojibwe, and Otoe) who lived around the Great Lakes and East Coast and had access to birch bark from the forests in their territories. These designs were convenient for the tribes that were in one place for several months. The Algonquian tribes of the Northeast Indians who used wigwams lived in villages during the growing season, growing corn, squash, squash, beans, and tobacco.

During the hunting season, small family groups moved to hunting camps. When the family moved to a new place, the Indian wigwam was dismantled in such a way that the frame of the rods remained intact, and the Indians took all the covering with them. Upon returning, the house was again covered with the necessary materials. And if the frame was no longer available, it was erected again.

Indian lifestyle
Each tribe chooses the type of housing according to their lifestyle, climate, environment and natural resources that are available to them. The wigwam (there is a photo of similar structures in the article) was chosen as the most suitable type of housing and house style, since it corresponded to the lifestyle of the tribes inhabiting the forest areas.

Is it possible to build a wigwam on your own?
How to make a wigwam? In fact, it is not so difficult, you will need a minimum of equipment. The main materials used to create an authentic wigwam are flexible tree branches or seedlings. To begin with, a circle is drawn on the ground, which is about 12 meters in diameter. Then, 16 holes are made evenly around the circumference to a depth of about 20-30 cm. The trunks bent into an impromptu arch are firmly fixed in the holes, thus forming a dome-shaped wigwam.

Horizontal hoops are attached to the rest of the frame with the help of hard fibers of the tree bark. Then the whole structure is covered with sheets of birch bark, forming a roof and walls. Sometimes, for additional protection of the dwelling, a layer of straw or dried grass is placed on the birch bark. Woven mats, skins, canvases and blankets were also used to cover the wigwam, if these things were available to the owners. They were held in place with ropes. The space left for the doorway is an inlet valve that allows people to enter the wigwam. And the smoke hole made from above serves as a kind of chimney for removing smoke from the fire and circulating air.

The sizes of wigwams were very different, up to 30 tribesmen could live in the largest structures at the same time. Currently, these structures are often used as a venue for traditional ceremonies. Analogues of wigwams can be found among some African peoples, the Chukchi, Evenki and Soyts.
Contrary to popular belief, a wigwam is not a pointed scarf on poles with a fire in the middle. Nevertheless, if the idea of \u200b\u200bbuilding such a one, on a hike, or even at your summer cottage, for fun, comes to mind, just such an image of an Indian dwelling comes to mind. And it is called correctly not “wigwam”, but “teepee”.

Let's start by seeing what a real wigwam is. And this dwelling was used by the forest tribes of North American Indians and was a small hut, 8-10 feet high, domed. But up to 25-30 people could live in large wigwams.


The frame of the wigwam is made of curved thin flexible trunks. It is bound and covered with birch or elm bark; mats made of reeds, reeds, grass or corn wrap leaves; skins or unsewn pieces of cloth. Coverage can be combined. From above, it is additionally pressed by an outer frame, poles or tree trunks. The entrance, which is only three feet high or high enough, is covered with a curtain. On top there is a hole for the exit of smoke, covered, for example, with a piece of bark, which can be lifted with a pole. The walls of domed wigwams can be both inclined and vertical. In terms of wigwams, they are often round, but there are oval and rectangular ones. Such dwellings can be extended into a rather long oval and have several smoke holes.

Teepees were used by the following tribes of North American Forest Indians: Abenaki and Massachusetts, Algonquins, Delawares, Miamis, Illinois, Mikmaks, Ojibwes, Blackfoots, Cheyennes, Crees, Menominees, Sauks.

However, when they say "wigwam" they mean exactly "teepee". The tipi is not the dwelling of the forest Indians, but the Indians of the Great Plains, that is, the foothill plateau in the USA and Canada, east of the Rocky Mountains.


Also, this type of temporary dwelling was used by the mountain Indian tribes, apparently due to the higher “aerodynamic” than that of the wigwam. Indeed, in the mountains and on the plains, there are much more chances that the tent will be torn off and blown away by the wind.

Tipi has the shape of a straight or slightly inclined back cone or pyramid 4-8 m high (usually 6-7 m), with a base diameter of 3-6 m. plains and from juniper - in the south. The tire was traditionally sewn from the rawhide of bison and, more rarely, deer. Depending on the size, 10 to 40 skins were required to make a tipi. Later, with the development of trade with Europeans, lighter canvas was more often used. Since the fabric is flammable, and the skin is gnawed by dogs, there may be combined tires: in the upper part - deerskin, and below - canvas.

The sides of the tire are fastened with wooden sticks-pins, and the bottom is tied to pegs driven into the ground, but in such a way that a gap remains for the passage of air. Above is a smoke hole, with two blades - smoke valves, which regulate the smoke draft of the hearth with the help of special poles attached to their upper corners. Often, for this, there were also belts that stretched the valves at the lower corners. Canadian chippew tipis have a single moon-shaped panel of flaps that is not attached to the tire, and therefore can be rotated by two poles 360 ° around the smoke hole. Rawhide belts were traditionally used as ropes.
Tipi can be connected to a regular tent and even connected two or more together, which gives additional floor space.

Inside the tipi, from the junction of the poles, a belt descends to the ground, which is tied to special pegs and serves as an anchor in case of strong wind. In the lower part of the room, along the walls, there is usually an additional lining 1.4-1.7 m wide, which creates greater comfort, isolating those inside from the flow of outside air that comes from under the bottom of the tire. Sometimes they stretch, connected to the lining, a semicircular ceiling “ozan”, which saves from raindrops. The tribes living near the Missouri, for protection from rain, put on round leather boats (“storm cap”, “bull-boat”) like an umbrella on the upper ends of the poles (they should be short enough).

Different tribes have their own design features of this dwelling. They differ in the number of main support poles (3 or 4), the order of connection of the poles, the shape of the pyramid of poles (straight or inclined), the shape of the base (round, oval, ovoid), the way the tire is cut and the shape of the smoke valves, the way the valves and poles are connected ( using holes in the corners or special pockets).

A lot has already been written about installing a tipi, but all the methods differ, depending on which of the Indian tribes the author relied on when writing the manual. Learn - nothing is impossible!


(in the Sioux language - thipi, means any dwelling) - the commonly accepted name for the traditional portable dwelling of the nomadic Indians of the Great Plains with a hearth located inside (in the center). This type of dwelling was also used by the hill tribes of the Far West.
The tipi is in the form of a straight or slightly inclined back cone or pyramid on a frame of poles, with a cover sewn from treated skins of bison or deer. Later, with the development of trade with Europeans, lighter canvas was more often used. At the top is a smoke hole.
The entrance to the tipi is always located on the east side, which has its own poetic explanation. "This is for this," say the Blackfoot Indians, "so that when you leave the tipi in the morning, the first thing to do is to thank the sun."
RULES OF CONDUCT IN TIPI.
Men were supposed to be in the northern part of the tipi, women in the south. In tipis, it is customary to move clockwise (according to the sun). Guests, especially those who came to the dwelling for the first time, were to be accommodated in the women's section.
Passing between the central hearth and someone else was considered indecent, since it was believed that in this way a person breaks the connection between those present and the hearth. In order to get to their place, people, if possible, had to pass behind the backs of those sitting (men to the right of the entrance, women, respectively, to the left).
It was forbidden to go behind the back of the tipi, which meant passing behind the altar, in many tribes it was believed that only the owner of the tipi had the right to go behind the altar. There were no special rituals for leaving the tipi, if a person wanted to leave - he could do it right away without unnecessary ceremonies, but he could then be punished for not participating in important meetings.

WHAT WHERE IN THE TIPI
The first tips were made from buffalo skins. They were small, since the dogs could not carry large, heavy tires of tents during migrations. With the advent of the horse, the size of the tipi increased, but from the second half of the 19th century, the Indians began to use tarpaulin for tires.
The tipi device is perfect and well thought out. Inside the dwelling, a lining was tied to the poles - a wide strip sewn from leather or fabric that reached the ground, which protected against drafts on the floor and created traction in the upper part of the tent. In large tipis, they arranged an ozan - a kind of ceiling made of leather or fabric that retained heat. It did not completely block the space above the fire - there was a way for the smoke to escape through the top. Ozan was also used as a mezzanine - for storing things.

The entrance was closed from the outside with a "door" - a piece of leather, sometimes stretched over an oval frame of rods. Inside the doorway was hung with a kind of curtain. The space in a large tipi was sometimes blocked off with skins, creating a semblance of rooms, or even a small tipi was placed inside, for example, for a young family, since the spouse; according to custom, he should not talk or even see his wife's parents. The outer cover of the tipi had two flaps at the top, which closed or unfolded depending on the wind. From below, the tire was not pressed tightly to the ground, but was attached with pegs so that there were gaps for traction. In hot weather, the pegs were taken out, and the tire was lifted up for better air circulation.
The frame of the tent was 12 or more poles, depending on the size of the tipi, plus two poles for flaps. The poles were placed on a support tripod. The rope that tied the tripod was connected to an anchor peg that stuck into the center of the floor. The hearth was arranged, slightly retreating from the center - closer to the entrance, which always looked east. The most honorable place in the tipi was opposite the entrance. An altar was arranged between this place and the hearth. The floor was covered with skins or blankets, beds and chairs were made from small poles and rods, covering them with skins. Pillows were sewn from leather, stuffed with fur or fragrant grass.
Things and food were stored in rawhide boxes and in parflashes - large leather envelopes.


Plan of the Assiniboins large tipi device:
a) hearth; b) an altar; c) men; d) male guests; e) children; f) senior wife; g) grandmother; h) female relatives and guests; i) the owner's wife; j) grandfather or uncle; k) things; l) products; m) dishes; o) meat dryer; n) firewood;
For a fire, the Indians used, in addition to wood, dry bison droppings - it burned well and gave a lot of heat.
When camp was set up, the teepee was usually arranged in a circle, leaving a passage on the east side. Tipi were assembled and disassembled by women who coped with this matter very quickly and deftly. The camp could be rolled up and ready to go in less than an hour.
When migrating, the Indians built from tipi poles peculiar horse drags - travois. Two poles were attached to the sides of the horse or on the back crosswise. At the bottom, the poles were connected by crossbars made of poles or pulled together with strips of leather, and things were placed on this frame or children and the sick were planted.
The entrance to the tipi is in the east, and at the far wall of the tipi, in the west, is the owner's place. The south side is the side of the mistress and children. North - male half. Guests of honor are usually located there.
People who are unfamiliar or who have come to the tipi for the first time do not go further than the owner’s place and therefore sit down immediately at the entrance (when entering the tipi, it is customary to move in the direction of the sun (clockwise), that is, first through the female half).
This division is explained by the fact that forces live in the north - the helpers of men, and in the south - female forces. People close to the owner, having come to visit, sit down in the north. The most honorable and respected host can give up his seat.
This is related to the meaning of the altar, that is, it is undesirable for a stranger to pass between you and the altar. When you have a lot of guests, then the newcomers pass behind the backs of those who are sitting, so as not to break their connection with the hearth.
HEART AND ALTAR

The first thing you do when you set up a tipi is to make a hearth for yourself. To do this, you find, if possible, a dozen or two stones and spread them around. If you want to make yourself an altar, then you need to find one large flat stone, which is placed in a circle opposite the sleeping place (the place of the owner of the tipi).
The hearth should be as spacious as possible (as far as the size of the tipi allows), because then there will be fewer problems with crumbling coals and the stones heated from the hearth will be closer to the sleeping places, which means it will be warmer.

It is better not to throw cigarette butts, garbage and other shields at him, because he can be offended and very real, at least, he will stink for the whole tipuhu. And in general it is nice when the fire is clean for many reasons. It is always good to feed the hearth, not only with firewood, but he also loves porridge.
In general, if you want to be friends with fire, then you need to share something good with it too. A good fire sacrifice is a pinch of tobacco if you smoke, fragrant herb, sage or juniper. When you live in a tipi long enough, you begin to treat the fire with respect, after all, there are many good things from it, and warmth and food ...
The stone closest to the entrance is moved aside if necessary so that someone we usually write about in green can enter (and this is also useful when you are drowning with long poles or logs). In some Indian teepees, this stone was always removed.
The hearth is the center of life in the tipi.

ALTAR

It has many meanings. One of them is the place where your gifts to the fire are placed. You can put items on it that matter to you when you go to bed (this phrase caused everyone to laugh). A pipe is usually kept under the altar. This is a clean place, try to keep the surroundings clean too.
A simple camping altar is a flat stone that is placed in front of the host's place.
If you expect to live in the tipi for a long time, and therefore to communicate with all that lives in the tipi with you, then you can make yourself a large altar. It is done like this: a hill of sand is poured in front of a large altar stone (sand is cleaner than the earth, it can reflect the sun, so it suits best). Two small wooden horns are stuck along the edges, a thin stick is placed across. It can be decorated with patches of fabric, braid, the Indians preferred red and hung bird feathers and porcupine needles on it.
The altar is the gate.
Through them passes the road that connects you with invisible forces. They say there are a lot of them around.
The hill of sand symbolizes the earth.
The horns are two world trees, and the crossbar above them is the vault of heaven.
The altar stores everything that connects you with invisible forces, so talismans and objects of power are hung on it. Sage, wormwood, sweetgrass (sacred herbs of the Indians) are burned on it from time to time.
The figure below shows the arrangement of places and objects in a tipi.

This is how the places in the tips of the Indians were located. From this, the location of the rest of your decoration suggests itself. Firewood usually lies at the entrance on the male side (there was no feminism before, women were stronger and were engaged in fuel preparation, and firewood lay on the female side), and the kitchen (supplies, pots and other utensils) is located on the female half.
Things that you rarely use can be put behind the canopy. If you have a kind old woman available, and you are a real Indian, put the old woman in a wood corner (the Indians called it "old man's corner"). She will be fine there. It is believed that old people suffer from insomnia, and therefore, in cold weather, your old woman herself will throw firewood on the hearth all night. It will be warm for you and the old woman.

Cellophane in a tipuha is uncomfortable. To store food, it is better to use cloth bags hung on wooden hooks and crossbars tied between the poles on which your tipi stands, so that they hang higher above the ground and do not get damp.
If you are a rich Indian, it is more convenient to hang large bags on a wooden tripod (this is if you are a gullible Indian and are not afraid of the invasion of the Iroquois or other hungry tribes (see photo)). In the event that the mohawk is you, use other people's large bags to hang them on your tripod.
To boil water you need to hang it over the fire. To do this, you can do (or borrow a wooden tripod with a hook from a neighbor.
An option for small teepees where a tripod is inconvenient is a transverse pole tied over the hearth, as shown in the picture below. Try to make the hook hanging from this pole longer so that the rope does not burn out. Choose a rope made from natural materials, otherwise it will smoothly drain into your soup. In a large tipi, it is convenient to use such crossbars as dryers for blankets, clothes, herbs, berries and mushrooms. By the way, blankets in the morning would also be good to dry. Regardless of the weather, inside the tipi you will sweat while you sleep, the blankets will be damp, and you will find the smell of a Mongol warrior.
Beds. Living in a tipi, sometimes you have to lie down. To protect yourself, your things and your children from dampness and rheumatism, you can build beds-beds from dry thin poles. The poles are covered with grass. Some use spruce branches for this, but they probably do not feel sorry for the trees at all. It is better to use dry last year's herbs. You can take the grass that grew on the place of the tipi, it will be trampled anyway. In cold and rainy weather, it is very pleasant to put a stone wrapped in a rag and heated in the hearth at your feet, and a thick warm squaw on the side (therapeutic set "stone + squaw"). It is inconvenient to make beds in a small tipi - you can separate the bed with a long pole, fixed to the ground with pegs and laid along the bed closer to the hearth. Then you will not stomp on blankets and sleeping bags.
The bedding used by the Indians is actually difficult to make, but something can be explained. They made it from thin willow twigs, tying them as shown in the figure below. Its thin end was hung on a tripod at a convenient height. If necessary, they took it out into the street and used it as an armchair (they admired the sunset). There is an English name "backrest". This device is very convenient to roll up and weighs little.
What is around the tipi
It is better if around your tipi there are: a forest, a river, a blue sky, green grass and good neighbors, and not tin cans, bottles and cigarette butts; and certainly not scraps and emissions of the human body or sick minds. In short, it's clean where they don't litter.
In the forest not far from the parking lot and closer to the animal trails, they chose a place where scraps and leftovers of food were taken down. Such places were called "veikan". They didn’t dig a hole under the weikan, but on the contrary, they made it on a hill so that animals and birds were not afraid to approach it.

Commercial buildings.
From long poles (you can use the valve poles of a neighbor's tipi) make yourself a dryer for blankets. It's just a big tripod with crossbars between the poles.
Protective structures.
If you don't want to lose something, do this:
From two thin poles (a neighbor's tripod is suitable for a bowler hat), tie a cross and "close" the door with it from the outside. But do not forget to go inside, otherwise your squaw will eat your condensed milk. This kind of "lock" is often used when you leave the tipi for a while. A cross at the door means that the tenants of the tipi should not be disturbed. Such a sign is widely used by those who live in a tipi (not only by the Indians who invented it).
According to tradition, the trees growing near the tipi are decorated with colorful motley patches. The Indians often hung all sorts of gifts on them to appease the forces that kept the place. As long as you live near trees, you share the land with them. You will be pleased to return to them and see them.
HOW THE TIPI IS SEW.
The basis is a rectangle of fabric measuring, for example, 4.5 x 9 meters. You can make larger tipis as long as you keep the proportions.
tipi fabric
It is desirable to choose a fabric that is not loose, waterproof, light and fireproof. It can be all types of tarpaulin, double thread, glued calico, or tent fabric. The best option is of course the traditional canvas. Can use tent fabric
There is a suspicion that if all this does not burn, then it would be nice. It is better if the fabric does not stretch and does not react to heat and moisture. 
It is better to sew with a thread with a harsh thread, with elements of synthetics.
If the fabric is narrow, then the rectangle is sewn from stripes. At the same time, it is desirable to overlap the seams on one side so that during rain water can flow along them. For thin fabrics, it is good to use a sail stitch. The seams can be waxed (grease with melted wax).
When the rectangle is already sewn, you can start cutting. It is most convenient to first draw a contour with chalk on a string 4.5 meters long. The end of the rope is fixed in the center of the larger side of the rectangle and a semicircle is drawn in small, like a compass (Figure A). If you do not have enough fabric, then you can immediately sew the strips not with a rectangle, but with a semicircle with steps (Figure B).
************
The ratio of the sizes of the valve, fastener and entrance:
This ratio is different for different tribes, but on average it is 1:1:1 if the tipi is not too big (4-4.5 meters)
There are various options. On the pattern tipi Sioux (Sioux), and on - tipi Blackfoot (Blackfoot)
valve
To regulate the draft (to cover the chimney on the leeward side), the tipi has a valve.
In the forest and steppe, tipi valves are fastened in different ways - in a forest where there is no wind, the lower edges of the valves can hang freely or be fastened with a rope to the tire, as shown in but in the steppe, so that the wind does not tear the valve, their lower ends are usually tied rope on a free-standing pole
The shape of the tipi as a whole depends on the shape of the valves.
Wu siu valve whole cut (cut as a whole, together with the tire) in the Blackfoot are sewn to the tipi separately (sewn valve). Tipi with whole-cut flaps have a shorter back wall and therefore it is slightly tilted back and stretched upwards. Tipi with sewn-on flaps looks like a smooth cone and has more space.
Here are examples of possible flap and flap pocket patterns:
One-piece valves were usually made 20 centimeters longer and narrower. In order to expand the one-piece valve, it is necessary to sew a wedge into it, cutting the valve from the top to about half (Figure 5)
A little about the ratio of valve sizes. You should try to avoid making valves too long - when the tipi is standing, then rain will drip into the hole between them and blow out heat. A freely dangling piece of fabric should be sewn onto the bottom of the valve and the articulation of the lower end of the valve with the canvas should be strengthened with a square (Fig. 6). Again, the width of the top of the valve should be related to the size of the tipi itself. For a tipi 4.5 x 9, an elbow width with a small one is suitable. The lower part of the valve (hemmed piece) two palms wide suits many. The distance between the valves (including the tongue) is approximately 70 centimeters.
The saddle between the flaps should cover the entire strapping of the poles, but not increase the width of the flap with its size. A tongue is sewn into its middle for tying a tire. The saddle can be of various shapes, but it is in this place that the strongest stress occurs, the tongue is sewn as firmly as possible so that it can withstand the weight of the entire tire. A rope is attached to it, which tipi is tied to a pole (attachment options in figure 7). The pockets on the upper corners of the flaps, on their outer side, are sewn no less firmly. You will insert poles into them for adjustment. Attach long ropes to the bottom corners of the flaps to pull the flaps. Instead of pockets, large holes can be made (as the Blackfoot and Crow did). Then, to the pole, retreating some distance from its end, the crossbar is tied and so it is inserted into the hole. The Indians hung scalps on the free end of the pole, and we, on mature reflection, decided that we were law-abiding Indians, and we would not do that.
entrance
The entry height should be approximately at shoulder level, starting from the edge of the tire. And you need to cut it back 20 centimeters, which fall on the threshold. The depth of the cut is about 2 palms. Both halves are turned off with a strip of strong fabric under which a rope is inserted (see figure 8). When installing the tipi, the ends of the rope are tied so that the entrance is not too stretched. If the tire is made of coarse fabric, such as canvas, one rim is enough, without a rope.
The door can be made simple, or more confusing.
An example of a confusing door is Figure 10. It can be made either from a large hide or from a piece of cloth cut roughly to the shape of the hide. This is a trapezoidal door with a long tongue on the top, which is pinned to the cover of one of the wooden "fasteners" sticks. It is better to make the tongue as long as possible in order to hang the door higher - so it will be more convenient to recline. Another example of a tangled door is the oval willow-framed door you see on the right side of Figure 10.
On some tipis, no doors were made at all and the edges of the tire were simply wrapped one after the other.
Clasps.
Usually the holes for the fasteners are made two on each side of the tire so that the holes match up, otherwise the fabric will wrinkle. Sometimes they also make two holes on one side and one on the other. This makes it easier to pull off the tire, but the tension is weakened. The edge of the fabric with two holes is superimposed on top (no brainer).
Canopy.
The canopy is a very important thing in a tipuha. It basically keeps the heat in, the tire serves only to protect against rain and wind. It is better to make it from a dense fabric (if you are not too lazy to carry such a weight). Sometimes the canopy weighs as much as the entire tire. The space between the canopy and the tire is used for storage.
canopy straight . (Figure 12) Its height is about 150 cm. For reference, on a tipi with a diameter of 4.5 meters, about 12 meters of fabric is required per canopy. It is easy to make, but it eats up a lot of space inside the tipi. Along the upper edge, at an equal distance (about a meter), laces are tied for hanging on a rope stretched along the perimeter between the poles.
The canopy is trapezoidal. (Figure 13) Sewn from wide trapezoids. Therefore, unlike a straight canopy, it can be stretched strictly along the poles. Usually it is made of three sectors (as seen in figure 14) and in such a way that the middle sector overlaps the two extreme ones. For reference, a 5-meter tipi requires about 20 meters, and a 4.5-meter tipi requires about 18..
In any of these cases, the length of the canopy should be enough for you to wrap it at the entrance, and the more margin, the better. Try to find a light-colored fabric for the canopy so that the tipi is not dark.
Additional details
Azan - something like a visor, which is suspended above the bed so that warm air accumulates under it. Usually this is a piece of fabric in the shape of a semicircle, which, with its rounded part, is tied to a cord on which the canopy hangs. The fabric of the azan is tied with a margin so that you can plug it behind the curtain and close the gap - it will be warmer! The radius of the azan should be equal to the radius standing tipi.
Rain triangle.
A small but very useful detail. During heavy rain, the draft deteriorates, so the valves need to be opened wider, but then rain will pour in. In order for the head, however, to be completely dry (sorry, the boom-shankar confused), cut out an isosceles triangle from a dense waterproof fabric, of such a size that it could cover the hearth. The triangle is tied at the top, under the chimney, to three poles.
Tipi setting.
Tipi is placed on poles. You need from 9 to 20 poles, depending on the size of the tipi. The most common number of tipi poles with a diameter of 4.5-5 meters is twelve.
When choosing a place for a tipi, make sure that there are fewer trees nearby (after rain, water drips from them for a long time on the tire), so that the place is even, so that the tipi does not stand in a hollow. Grass can not be pulled out, because it will be quickly trampled anyway.
So, you found all the poles and dragged them to the parking lot. Do not forget to clean them from the bark (so that the head does not fall) and knots (so that the tire does not tear, however).
First you need to tie a tripod - that's how the Indians did it
|
To do this, spread the tire on level ground, put three poles on it. The poles are sneaking (this is a typo, but if you are too lazy to go into the forest, then this is not a typo) ... So, the poles are placed with thick ends flush with the edge of the tire, and the thin ends are tied together at the level of the tongue ( uvula- see department valve, figure 7). Keep in mind that if the tipi is of Siuk cut (that is, the back wall is shorter), then two poles are connected along the height of the back wall and one along the height of the front (Figure 17). Make notches on the poles so that the knot does not move out. By the way, if you are going to tie the entire frame, the free end of the rope should be very long. Now solemnly hoist the connected tripod (thin ends up)! |
Further, at regular intervals, one after another, three poles are placed, starting from the eastern (door) pole, moving against the sun (counterclockwise). Then the next three poles on the other side of him, moving towards the sun. And the next two are also in the sun in the remaining gap, they are placed side by side, leaving room for the last pole with a tire (it will stand behind them).
All this time, the poles are tied in parallel for strength. This is done as follows: take the tail of the rope with which the tripod is tied, and one of your assistants, running in a circle, grabs the installed poles with a rope. In this case, a full turn is made for every three poles (and for the last two). It is more convenient to do this by twitching the rope a little when it covers the socket of the poles, then it slides to the knot with each jerk and fits closer to it.
Then the tire is tied to the last pole tightly and firmly and, moreover, so that the lower end of the pole protrudes beyond the edge of the tire by about a palm. All this economy rises and the pole is put in its place. If you have a heavy tire, it's best not to do it alone. To do this, it is better to assemble the tire with an accordion to it before raising the pole and then, when the pole is raised, two people take hold of the edges of the tire and begin to diverge, wrapping the frame around it so that the entrance is between the eastern tripod and pole number 4 in Figure 18. The tire is fastened with fasteners top down. After that, you can move the poles apart so that the fabric stretches and fits snugly around the frame.
Further along the perimeter of the tipi, ropes are tied, in the middle between each pair of poles (see figure 19). A small pebble, cone or something else round is taken, wrapped in a tire fabric, stepping back from its edge to the width of the palm and tied tightly with a rope as shown in fig. nineteen . Additionally, two ties are tied on both sides of the entrance, near the poles. Now the tire is stuck to the ground with pegs.
Insert two short and light poles into the valve pockets to control them. Drive in three steps opposite the entrance a pole for pulling the valves and tie the ropes from the valves to it.
Canopy.
To begin with, a very long rope is taken. She is knitted to the poles inside the tipi (I wrote this just in case, you never know ...) at a height just below the height of the canopy.
It is better to start from a pole with a tire. A couple of sticks are slipped under each turn of the rope, these are small, but very sacred sticks, and if you do not attach any importance to them, then during the rain, booming streams of water will flow down the poles, falling with an eerie roar right onto your bed. See figure 20 for the tying method.
Then the canopy is hung, starting from the entrance and closing it with its first sector, so that the edges twitch like curtains. The bottom of the canopy is pressed down from the inside with heavy objects (stones, backpacks, tomahawks, guests, etc.)
hearth
Do not dig a hole under the hearth, otherwise you will have a pool. Surround it with large or small stones. It is best to place the hearth slightly off the center of the tipi towards the entrance. Now light the fire, if it smokes, then go back to page 1 and see how to sew a tipi correctly.
Reginald and Gladys Laubin

tipi coloring page

And here is the tipi, you live in it and you, apparently, feel good in it. And one day, going out into the street and looking around, you are seized by a vague longing - you want to do something.
Probably, nothing can be done with the environment, but the tipi tire can become completely different. This thing is quite difficult - keep in mind that most drawings sooner or later become boring if they are made ill-conceived and without any special meaning.
It seems to us that the theme of the picture on the tire should mean something for you in the first place, it's okay if others don't understand it. But in general, of course, this is a personal matter for everyone and his artistic and any other taste. Therefore, we will not particularly burden you with our thoughts on this topic (perhaps a little), but we will try to give as many drawings as possible - samples of how others did it.
And yet there is traditional symbolism, many details of the painting meant something else, and if you are interested in learning about this, then we can tell you something. Otherwise, all this can be easily skipped.
On the lower edge of the tire, the inhabitant of the tipi drew something symbolizing the earth, say, a strip of mountains, a prairie, stones, in general, what he sees around him. Usually it was drawn in red, the color of the earth.
The top, respectively, meant the sky, often black, bottomless color. Sitting in such a teepee, you feel yourself in the center of the painted universe, and in most cases this was enough, and the painting of the teepee stopped (such a drawing can hardly get bored, right?). However, some other pattern was sometimes applied to the tipi tire, which was an image of something unusual that happened in a person’s life or appeared to him in a dream (which is the same thing from the point of view of an Indian).
The Indians generally attached great importance to dreams, sometimes a dream that a person had could change the course of his life, and therefore it was natural for him to depict such an important event in his house. So if someone painted on his tipi anyhow, just like that, then somehow they would not understand him.
In the mind, undistorted by various plastic bells and whistles, there is a very strong connection between the object and its image (it was the same with pagan idols and, later, Russian icons), therefore, depicting something tipi, you are something attract. It is not for nothing that the symbolic images of guardians and helpers who appeared in a dream, usually in the form of animals with which a person had a close connection, were a frequent subject of drawings on tips.

Painted Cheyenne Tipi Cover
It is better to start painting the tipi even before setting it up, so it will be more convenient to get to its upper part. The bottom can be painted when the tipi is already standing. Natural colors look more natural, from which the eyes do not get tired (unless, of course, you are a fan of techno music, then your eyes have not seen such horror ...).
The Indians painted tips