Design by Patons Design Studio
Gorgeous, delicate and colorful knitted blanket. The blanket consists of individual motifs knitted in different colors. Each motif is knitted from the center.

Dimensions
square with side 148 cm
Materials
Patons® Decor™ yarn (75% acrylic, 25% wool, 100 g/190 m)
Color A (white) - 3 skeins
Color B (light brown) - 2 skeins
Color C (blue) - 3 skeins
Color D (green) - 3 skeins
Color E (mustard) - 2 skeins
Color F (gray) - 2 skeins
Color G (pink) - 2 skeins
Circular and double knitting needles 5 mm
Knitting density
19 stitches and 25 rows = 10x10 in stockinette stitch
Description
Instructions for knitting the motif: starting from the center with color 1, cast on 4 loops on stocking needles.
1 round: add 1 loop from each loop, 8 loops on the needles. Distribute the stitches onto 4 knitting needles, join into a circle and place a marker for the beginning of the circle.
Round 2: knit. P.
Round 3: *K1. p., 1 p. from broach. Repeat from * to the end of the circle. There are 16 loops on the needles.
Round 4: Knit. P.
Round 5: *K1. p. (put a marker near the last loop - loop marker), 1 p. from the broach, k3. p., 1 p. from broach. Repeat from * to the end of the circle. There are 24 loops on the needles.
Round 6: knit faces. P.
Round 7: K1. p., 1 p. from broach, *knit. p. to next marker loops, 1 p. from broach, 1 knit. p. (loop marker), 1 p. from broach. Repeat from * to the end of the circle, finish the circle with 1 stitch from the broach. There are 32 loops on the needles. Cut thread color 1.
Round 8: join a thread of color 2 and knit *1 knit. p., 1 p. p. Repeat from * to the end of the circle.
Round 9: K1. p., 1 p. from broach, *knit to next. marker loops, 1 stitch from knit 1 stitch. p. (marker loop), 1 p. from broach. Repeat from * to the end of the circle, finish the circle with 1 stitch from the broach. There are 40 loops on the needles.
Round 10: knit. P.
11-14 circle: knit as 9 and 10 circles 2 times. There are 56 loops on the needles.
15 round: knit as round 9, cut off thread of color 2. There are 64 loops on the knitting needles.
16th round: attach a thread of color 3 and knit as 8th round.
17-23 round: with color 3 thread, knit as rows 9-15. Cut the thread of color 3 at the end of the 23rd circle. There are 96 loops on the needles.
24th round: with a thread of color 4, knit as the 8th round.
Rounds 25-31: With color 4, knit as rounds 9-15, cut color 4 at the end of round 31. There are 128 stitches on the needles.
32-34 circle: with a thread of color A, knit as 8-10 circles. Close all loops.
Motif 1 (make 6 pieces): knit according to the instructions for knitting the motif where color 1 is A, color 2 is G, color 3 is E, color 4 is c.
Motif 2 (make 6 pieces): color 1 - C, color 2 - D, color 3 - A, color 4 - F.
Motif 3 (make 6 pieces): color 1 - D, color 2 - C, color 3 - B, color 4 - E.
Motif 4 (make 6 pieces): color 1 - F, color 2 - E, color 3 - C, color 4 - D.
Motif 5 (make 6 pieces): color 1 - B, color 2 - G, color 3 - F, color 4 - C.
Motif 6 (make 6 pieces): color 1 - G, color 2 - F, color 3 - C, color 4 - B.
Sew the motifs according to the location on the diagram. On circular knitting needles with thread A, starting from the upper right corner in and then down to the lower right corner, cast on 260 stitches and knit 6 rows in stockinette stitch. Close all loops. Repeat the same for the left side. With thread A, starting from the upper left corner and then to the right upper corner, cast on 270 stitches and knit 6 rows in stockinette stitch. Close all loops. Repeat the same along the bottom edge.
http://knitweek.ru/modeli/odeyalo-v-stile-pechvork.html#pp/0/

Design by Caron Design Studio
This colorful geometric blanket is crocheted from square motifs, each in a different color scheme.

Dimensions
122 x 152 cm
Materials
Caron® Simply Soft® yarn (170 g/288 m, 100% acrylic)
Color A (red) - 2 skeins
Color B (orange) - 3 skeins
Color C (blue) - 1 skein
Color D (beige) - 3 skeins
Color E (chocolate) - 3 skeins
Circular knitting needles 5 mm
Knitting density
1 motif (square) = 15x15 cm
Description
Note: knitting a blanket begins with the lower left square, the following ones are knitted with a set of loops along one of the sides of the already knitted square.
Instructions for knitting a square:
Cast on 55 stitches and knit as follows:
Row 1 (purl): K27. p., 1 p. p., 27 persons. P.
2nd row: 26 persons. p., decrease (slip 2 loops on the right needle without knitting, knit 1 stitch and pull through 2 removed loops), k26. P.
3rd row: 26 persons. p., 1 p. p., 26 persons. P.
4th row: 25 persons. p., decrease, 25 persons. P.
5th row: 25 persons. p., 1 p. p., 25 persons. P.
...
11th row: 22 persons. p., 1 p. p., 22 persons. n. Continue knitting according to the same principle until 1 loop remains on each side and 1 central loop. Knit in 3 loops together.
Square 1: with thread A, cast on 55 loops and knit according to the instructions for rows 1-9 in color A, in color B for rows 10-39, in color D from the 40th row to the end.
Square 2: with thread D, cast on 28 stitches along the top edge of the first square, then cast on 27 stitches and knit according to the instructions: *1-5 rows in color D, 6-7 rows in color C, 8-9 rows in color D, 10-15 rows in color E. Repeat from * to the end of knitting the square.
Square 3: With thread A, cast on 28 stitches along the top edge of the second square, then cast on another 27 stitches and knit: *1-3 rows with color A, 4-5 rows with color D, 6-9 rows with color E. Repeat from * to the end of knitting square.
Square 4: with thread B, pick up 28 stitches along the top edge of the third square, then another 27 stitches and knit: 1-5 rows with color B, 6-7 rows with color A, 8-15 rows with color D, 16-17 rows with color C. Repeat from * to the end of the square.
Square 5: Cast on stitches with color A and knit from rows 1-25 with color B, from row 26 to the end with color D.
Square 6: with thread E, pick up loops and *knit rows 1-3, then with color A rows 4-5, with color B knit rows 6-9. Repeat from * to the end.
Square 7: With thread D, cast on the required number of loops and knit 1 row with thread A, *rows 2-3 with color A, rows 4-5 with color D. Repeat from * to the end.
Square 8: with thread E, pick up stitches and knit with color E 1-19 rows, with color D 20-39 rows, with thread C knit to the end.
Square 9: with thread A, pick up loops and knit rows 1-9, with thread B 10-39 rows, with thread D from the 40th row to the end.
Square 10: knit like square 2.
Next, on the right side of square 1, cast on 27 loops, then cast on another 28 loops and knit as square 7. With thread A, cast on 27 loops along the top edge of the just knitted square and another 28 loops along the right edge of square 2 and knit as square 1. Continue knitting in the same way according to the arrangement of squares.
http://knitweek.ru/modeli/odeyalo-s-geometricheskim-uzorom.html#pp/1/
Colored sofa cushionSquare with side 36 cm
Materials
2 skeins of BernatMosaic yarn (100 g/191 m, 100% acrylic), 5 mm circular knitting needles, length 51 cm
Knitting density
18 p. and 24 r. = 10 x 10 cm in stockinette stitch
Description
Knit 2 parts the same way. 1 square: cast on 45 loops. **1st row: knit. P.
2nd row: 21 persons. p., * 1 decrease (slip 1 p. without knitting, 2 p. together and pull the resulting loop through the removed one), put a marker, k21. P.
Row 3: purl. P.
4th row: knit faces. p. to marker, 1 decrease, knit. p. to the end of the row.
Row 5: knits. P.
6th row: knit as 3rd row. Repeat from rows 3 to 6 until 3 stitches remain on the needles. In the next row, make 1 more decrease and secure the thread**.
Second square: from the front side of the square, cast on 22 sts to the corner and then cast on another 23 sts - 45 sts. Knit from ** to ** as for the first square.
3 square: cast on 22 sts along the edge of the second square to the corner and then cast on another 23 sts. Knit from ** to **.
4 square: cast on 22 sts along the edge of the third square to the corner and then cast on another 23 sts along the edge of the first square. Knit from ** to **. *Cast on the edges of all squares, 45 stitches for each - 180 stitches, place markers in each corner and then knit in the round:
1 round: 1 stitch from broach, *knit. p. to marker, 1 p. from broach, k1. p. (marker), 1 p. from broach. Repeat from *, finish 1 stitch from stretch, k1. P.
Round 2: purl. p. Repeat the last 2 rows to a height of 5 cm and finish with the 1st round. Close all loops.
Finish: sew 3 sides of the squares, stuff the pillow with filling and sew up the 4th side. Or you can sew in a zipper.
http://knitweek.ru/modeli/tsvetnaya-divannaya-podushka.html#pp/1/
I kept a homemade pillow without a pillowcase for quite a long time. And it’s a shame to throw it away and have nowhere to adapt it. The thought came to mind that I could knit a cover for her and give the pillow to the cat! 🙂 She loves all kinds of soft beds! I chose the most simple pattern. So, let's see step-by-step photos of how to knit a pillowcase with knitting needles!
We will need:
- Pillow
- Yarn
- Spokes
- Hook
- Decorative beads
This pillow just couldn’t find its purpose! Inside it is stuffed with foam rubber and synthetic padding. In general, knitting a pillowcase with knitting needles is much easier than it seems!
The size of my pillow is 40*45 cm. In order to save yarn, I purchased the cheapest skeins for 19 rubles/piece. I needed 12 skeins of dark green thread and 1 skein of light green thread for the binding and buttons. I decided to knit it in 2 parts from bottom to top along the width.
Cast on 95 loops
Front side
- Slip the first stitch and knit 18 stitches in stockinette stitch.
- Next we knit 19 purl loops
- We continue to alternate 19 knit/purl stitches. We knit the last loop purl-wise, regardless of the pattern.
Purl
- We knit according to the pattern. Do not forget that the first loop is always removed, and the last one is knitted purl-wise.
We should have 5 “blanks” for squares. We knit such a number of rows that we get an even square and change the pattern, starting from the front side.

Continue knitting until the end of the pillow length.

Closing the loops! We knit 2 loops together and slip the resulting loop onto a working knitting needle. We knit 2 loops together again. We continue until the end.

We tie our half. We will need a skein of the required color and a hook. We knit the work with a single crochet.

This is what we get! 🙂

Using the same principle, we knit part 2. We finish the square with an elastic band 2 through 2. Don't forget about the button holes! I knitted 6 loops according to the elastic pattern, then cast off 6 loops and continued knitting according to the pattern (7 loops). Then close 6 loops again and so on. In the purl row we place our closed 6 loops on the knitting needle. The front row must be knitted according to the elastic pattern. Do not forget that the length of the second part should be approximately 1 full square longer than the first. In general, it’s better to look at work. We should have a full overlap on the first part of the button cushion. We close the loops and tie the work.

These are the holes we should get for buttons.

Don't forget to tie the buttonholes. Next, we knit the two parts from the wrong side with a light green thread using a single crochet.

We should get a little case like this.


Knitting buttons
Take a hook and the necessary yarn. We collect 6 air loops.

Let's make a ring. To do this, we need to knit a working loop through the first loop with a single crochet.


You should end up with a column like this.

We begin to knit our ring with single crochets.

Insert the hook into the center of the ring and pull out the thread. We get 2 loops. We pull the working thread through them.

We got this ring.

We make a lift for the second row.


We knit another circle, only this time with a double crochet!


Here we knit 3 loops at a time.

Crocheted pillows are not only attractive and individual, but also a lifesaver for already outdated and somewhat worn sofa pillows. If you are new to crochet, pillows are the best way to learn the technique. There is no need to make complex calculations here, since with a correctly selected knitting pattern there will be no problems with knitting. To show your imagination, you should present several options for pillows, each of which will appeal to both beginners and experienced knitters. The article will present in detail photos, diagrams and descriptions of several models.
We knit and care correctly
Since a crocheted pillow requires some care, points for further use should be discussed.
- Firstly, yarn for pillows should be chosen according to the concept of their purpose. For children's options, it is better to choose cotton or special children's yarn, which often includes bamboo. For sofa cushions in the living room, it is better to take acrylic - it is easier to wash. If pillows are knitted for comfort and to warm the lower back, of course, the choice is in favor of a mixture of wool.
- Secondly, knitted pillows, due to their “naturalness,” will have to be washed more often, so it is recommended to knit products with a zipper along the seam. It turns out that for such a knitted pillow you will have to additionally sew a cover or pillowcase where the filling will be placed.
- Thirdly, crocheted sofa cushions should become a decorative element, so the color and shape are selected accordingly.
 Craftswomen prefer knitted cushion covers, which can be used to “update” previous sofa elements. This can happen when changing the interior design, when the sofa does not change to a new one, but the color already “falls out” from the overall picture. This crocheted pillowcase can be easily removed and washed when dirty. To do this, just sew a zipper along the seam. Wash the covers by hand or in the washing machine on a delicate wash program. Dry by spreading on a towel.
Napkin pillows
 If you have round-shaped sofa cushions, you can use the patterns of standard round-shaped napkins. Here, two napkins are also knitted, and when sewing, an additional zipper is used. You can resort to a complete transformation and additionally sew a “lining” onto the pillow, which will be in a contrasting color, which will give the product individuality, because the openwork will stand out against a plain background.
Some particularly enterprising craftswomen completely replace outdated products with new ones. They simply rip out old sofa cushions and use the filling further. They also knit pillows in the form of a napkin, combine them with a plain background and shape them using the same filler.
Below is a selection of such products with detailed patterns for knitting yourself. 


Curvy pillows


 When standard shapes get boring, it is recommended to knit curvy analogues. In order not to waste a lot of time on complex variations, it is enough to simply resort to simple geometric shapes. For example, you can knit a star or a hexagon. If you want and need to knit the cover along the seams, it is better to make fasteners with buttons - this will greatly simplify the process of sewing a zipper into the figured edge.
Next, we also offer a selection of figured pillows with knitting patterns. Some of them will allow you to knit a denser fabric, through which the background lining will not be visible. Others, on the contrary, offer an openwork figure, which is advantageous and softly suitable for a certain interior.
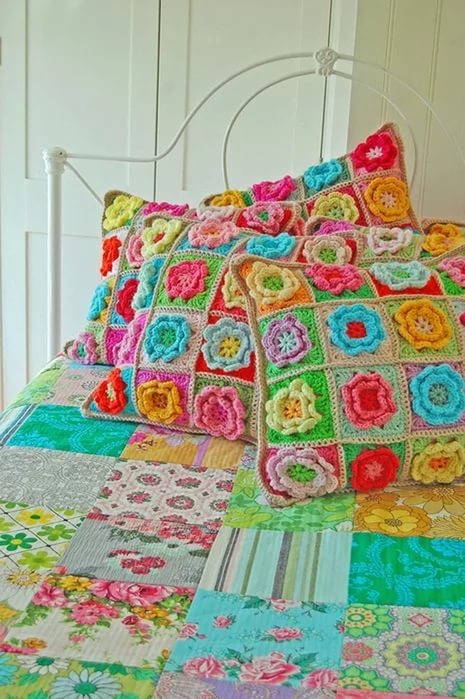
Motif pillows
Pillows made from motifs and the use of different colors are attractive and very interesting. They reflect the brightness of the character of the owners of the house, as well as their positive attitude. This combination can be used for knitting children's items. Pillows made from motifs in the same range or color look no less attractive - they will complement the existing interior style.
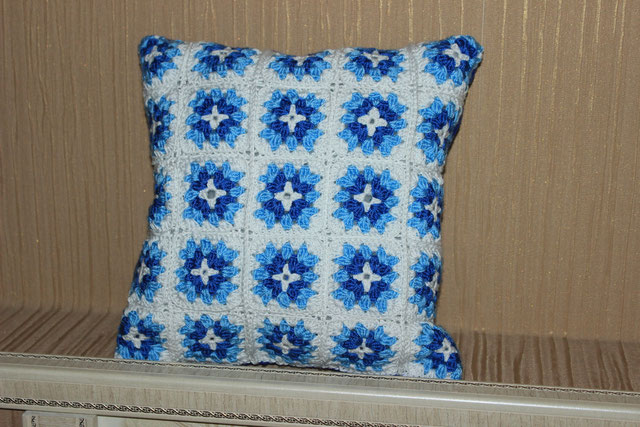
Granny square in pillows
 Crocheted pillows from “Grandma’s Square” are an excellent alternative to the famous blankets or carpets. There is nothing complicated about knitting here, and the advantage is the ability to get rid of numerous remnants of yarn. To knit a square, a standard pattern is used, and colors can be combined as desired. The following is a selection of similar pillows, based on which you can come up with your own option, taking into account the existing interior.


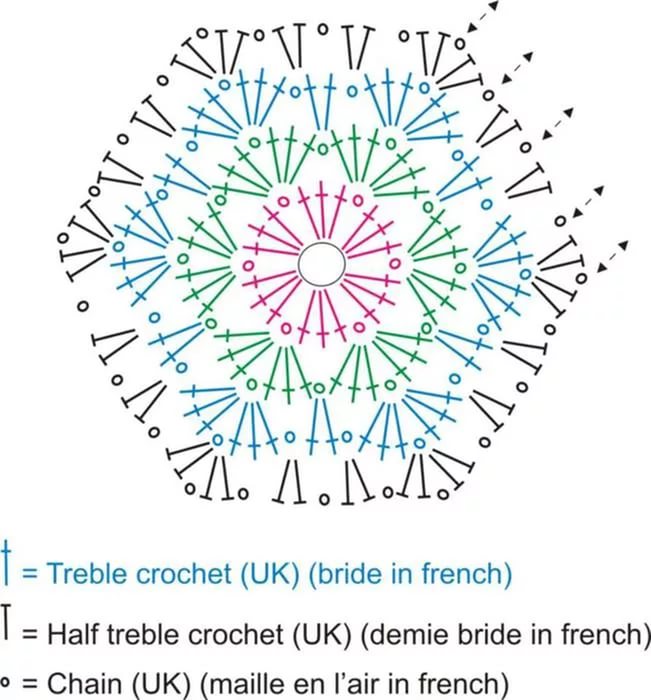
African flowers in pillows
 Similar to the granny square, there is an interesting African flower pattern. This motif also allows you to quickly get rid of leftover yarn and knit a colorful cover for an existing outdated pillow. Below is a selection of crocheted items, as well as a diagram for making your own masterpiece of motifs.
If you do not want to crochet colorful pillows with all the leftover yarn, you can use models where the products are crocheted using only certain colors that match the existing interior design in the room. Often these are sofa cushions in minimalist or high-tech styles, where only a contrasting combination of several colors is used, but comfort is created by adding textiles to the interior.


Lovers pillows
Craftswomen who love to crochet love to present their loved ones with interesting souvenirs for anniversaries and just a Valentine's Day. A useful gift is a pillow that is not only beautiful and soft, but also themed. There are two options here - a heart and the sensational female breast.
Pillows for the sofa in the shape of hearts

Sofa pillows in the shape of hearts are a simple, but very warm and important gift for your lover. Hearts can also be different - in this case you will show that you put all the love and warmth from your heart into knitting a gift. In addition, knitted hearts are perfect for the interior of a children's room for girls. You can add various ribbons, rhinestones, beads and other girly charms to your work.


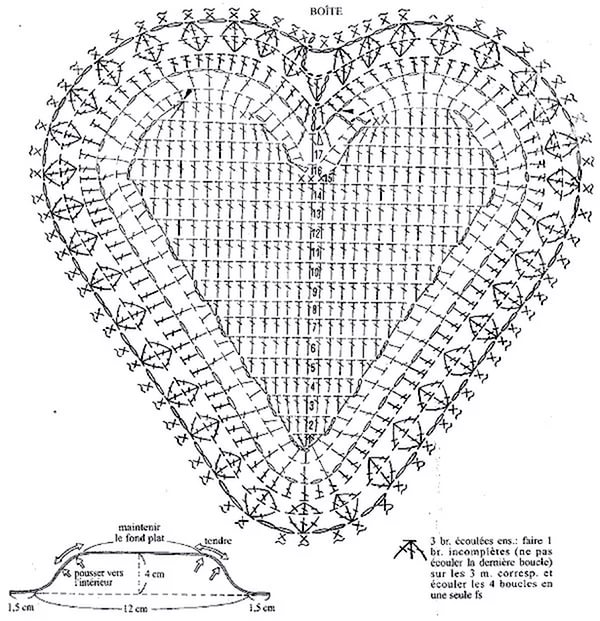


Crochet chest


As a gift for a man or best friend, you can crochet a chest, for which a detailed master class is offered.
- To begin, knit two pieces of light yarn in single crochets - this is the base of the pillow. The breasts will be knitted with the same yarn. Having knitted a base of a suitable size, sew it on three sides from the wrong side - you can use a needle or hook.


- Start knitting the chest. To begin, use a pink thread to pick up 3 air loops and close them into a ring.

- Knit the first row - knit 10 single crochets. Knit 2 more rows without increasing.
- Next, knit 3 more rows with single crochets, making increases in each previous stitch. Switch to a light thread.

- Using a light thread, continue knitting without increasing for the next 2 rows. Next, knit 5 rows, making increases in them through each single crochet.

- Knit another 7 rows without any additions. Cut the thread so that it is long enough to sew the chest to the base. Tie the other breast in the same way.

Sew the breasts to the base, having previously filled them with cotton wool or padding polyester. For originality, you can knit a bra - this way the pillow looks less provocative, but at the same time very cute.


 It sounds surprising, but such pillows are in demand not only because of their originality. The pillows are comfortable - your head fits neatly and firmly between your breasts. And what? – Not a bad alternative for men!
Pillow toys 
From crocheted chest pillows you can smoothly move on to toy shapes. Crochet toy pillows attract children and adults like them because of their convenience - they are both a comfortable thing on which you can simply relax, and at the same time an interesting toy. The choice of knitting of a certain shape should be based on the age and preferences of the child. If you want to knit a pillow for the interior, be guided by the general design concept and color inclusions.
Simple toys


 If you look at crocheted toys, you will find a very interesting detail - most of them are presented in the form of simple circles and oblong legs, the combination of which gives the finished result a toy embodiment. The following is a similar selection, based on which you can use simple knitting patterns and please your child with a new “acquisition”.
Turtle toy

Since crocheted toys are popular, we should present the simplest version of knitting, which is offered with a description and patterns - this is turtle knitting. Knitting a turtle yourself is carried out in the following sequence:

The following is a selection of crocheted turtles. Such products are convenient for further use for their intended purpose, so they are suitable for both children's rooms and sofa additions. 


snake pillow 
There is nothing better for children than a 2-in-1 product - both a toy and a pillow. One such innovative idea is a crocheted snake pillow - it is easy to knit from leftover yarn. Also, a snake toy is suitable for expressing your own imagination, because the use of shades of threads or patterns allows you to complement the children's room favorably. Knitting such a pillow occurs in the following sequence:
- Close the ring with 5 air loops.
- Knit the first row with single crochets in the amount of 10 pieces.
- Then, in the next 10-20 rows, make equal additions of columns - this depends on the size of the future snake, so adjust the work yourself. The additions are made evenly - in each row you should add from 7 to 13 columns.
- Having reached the desired head size, knit from 2 to 5 rows without increments.
- Next, make decreases, similar to the additions made earlier. Subtract only half of the added loops.
- Continue knitting to the required length of the snake without a tail.
- Having reached the desired length of the snake without a tail, start decreasing - in each row, decrease 3-6 loops.
- Having knitted up to 4-5 single crochets, finish knitting.
Thus, you have a complete selection of knitted pillows with patterns and descriptions. Now you can choose a more interesting option for yourself, as well as come up with something original of your own. Don’t be shy to show your imagination, because knitting is the best way to express your “I”.
/ 02/20/2016 at 22:51
Good day, friends!
If you have time and patience, and you can’t imagine yourself without needlework, then you’ve probably thought about how to decorate your home. After all, home comfort cannot be imagined without cute little things created for the interior with your own hands. It is from such things that a special energy comes, which creates a warm homely atmosphere.
It somehow happens to me that I don’t often make things for home decor. I prefer making clothes. But then the desire arose to create something from this series and start with pillows. For some reason, they are the ones most associated with home comfort, relaxation and some special warmth, the feeling of which only a home environment can give.
And so, before coming up with something of my own, using existing materials, I decided to look for ideas on the vast expanses of the Internet.
And having seen enough of it, I wanted to systematize these ideas a little and make an article in which I would consider various knitted pillows with diagrams and descriptions. More precisely, we will talk about knitted pillow covers.
So, let's start the review by describing the general principles of working on creating pillow covers, and then consider their various possible options.
It is noteworthy that knitting pillow covers does not require special patterns or descriptions (except for rare, very difficult to make items). You just need to look carefully at the chosen model, and it immediately becomes clear how it needs to be knitted using the patterns already in your arsenal.
 Any beginning knitter can master knitting such things. It’s easy to learn and hone your knitting skills on pillows. After all, in fact, you don’t need to knit any complex details - we just knit an even rectangle or square, and that’s all.
So, before we start work, we select the pillow on which we will knit a cover and measure it.
We knit a small sample from the yarn, with the knitting needles and the pattern that we chose for work. We calculate the knitting density. Then we estimate the dimensions of the cover parts. They must be at least 1 cm larger than the size of the pillow so that it fits properly in it. Moreover, we take into account that some part will get on the seams.
We cast on loops and knit a rectangle or square of the desired size. Moreover, you can knit only one, the upper part of the cover, and the lower part can be cut out of some dense fabric that matches the color of the knitted fabric.
Or you can spend more time and knit both halves of the cover. What if you have to turn the pillow on all sides? Everywhere needs to be beautiful.
After the parts are knitted, we sew along the edges on three sides, placing the parts face to face. Then we turn it inside out. For fastening, we sew a zipper along the edges of the open part of the cover.

Note. You can “sew” the parts together using a crochet stitch along the face. At the same time, in addition to connecting the parts, you can also additionally make a beautiful crochet binding - even with cloves, even with lace, even with ruffles - a matter of taste and imagination.
Depending on the type of pattern used to knit the cover, you can knit a continuous long piece at once. Then simply fold it in half, face inward, and sew the sides together.

You can make a pillow cover in the form of an envelope with a patch flap and fasten it with buttons. But in my opinion, this option is not very practical for use: the welt loops often stretch and the buttons come undone. But that’s just how you like it.
Now let's look at the options.
The simplest pillows
Such pieces are suitable for beginner knitters, as well as those who prefer a minimalist style in the interior. They are carried out by the most simple patterns, but you must admit, there is something in this too. Moreover, as you can see, the yarn and knitting needle can be taken quite thick, which will allow you to knit the cover very quickly.

The blue pillow is made in the most ordinary way garter stitch, and the gray one has a pattern reminiscent of a wicker basket for berries. At the request of readers, I provide a diagram and description of this pattern:


Pillows with openwork patterns
Here you just need to choose the openwork pattern you like and knit the details of the case with it. You can knit the upper half of the cover with an openwork pattern, and the lower half, for example, stockinette stitch.

If desired, you can sew beads on the openwork fabric and thread a satin ribbon somewhere into the holes. Only under such a cover you need to additionally hem some fabric of a contrasting color so that the openwork looks more expressive.
You can crochet additional decorations and sew them on top, decorating them with beads. Like, for example, this pillow with a heart and crocheted flowers.

Cushions with jacquard patterns
It’s the same here - choose the jacquard pattern you like, select the yarn - and go!


An interesting solution is obtained using different colors in openwork wavy patterns. Knitting is not difficult, but it turns out beautifully. We select the colors and width of the stripes to suit your taste.

Cushion covers assembled from individual elements
Such covers can be made either plain or multi-colored. The idea is that different pieces are knitted and then joined into a single whole. Moreover, the direction of knitting when assembling these “spare parts” can be different, which, in fact, gives the product a special charm.
In this photo, the pillow on the right is made using this technique: individual rectangles are knitted with a pattern of stripes with offset loops, which are connected in different directions of the knitting stroke.

For variants of covers assembled from individual elements, you can profitably use leftover yarn. Here are the pillows assembled from multi-colored elements:

The cover for the first pillow is sewn from separate strips made with the pattern “ Braids» from yarn of different colors. And for the second pillow, scraps are simply knitted in different patterns and from different yarns.
So if you knit a lot of sample patterns, you can not unravel them, but close the loops on them and fold them. And then just once! - connect, arrange by color and size, and get an original case.

But these examples are made in simple garter stitch. But how can you play with it in an original way, using yarn of different colors and different directions of parts when assembling!

This is my “small” review. I would be glad if these ideas are useful to someone and inspire creative work. Good luck and smooth stitches!
To avoid missing new articles, subscribe to blog updates.
Arinika was with you. See you again!
P.S. Friends, I invite you to join our VKontakte group. You can subscribe to group news HERE .
Now we are on Facebook. Our page is located HERE . Join us!
Things made with your own hands help create comfort and coziness in your home; they exude warmth. For example, knitted cushions for a sofa can not only highlight the advantages of the interior, but also become functional and practical elements to use. Even a novice needlewoman can choose a beautiful pattern for herself among the variety of options, the main thing is a little desire and perseverance.
The appearance of the product, its thickness, pattern density and ease of use depend on the selected yarn. Craftswomen advise choosing yarn with acrylic and wool for pillows so that the fabric is moderately soft and elastic. This will help maintain the desired shape of the product during its use.
For decorative items, you can use fancy threads decorated with beads of different sizes. Mercerized cotton in the composition will also add originality to the finished pillow. For openwork interior accessories, it is better to choose thin iris yarn, with which it is convenient to create light and weightless lace motifs and neat motifs.
 The size of the loops depends on the choice of knitting needles: the thicker the tool, the larger the knitting will be. But we must remember that the material and knitting needles match, because, for example, a thin thread will not be suitable for a large instrument. Thick yarn and large knitting needles will make a beautiful pattern, and the work process will be quick.
You can knit covers for a ready-made pillow or create everything yourself. For the base, choose a filler that does not allow the product to deform. The ideal option would be a synthetic padding polyester of medium hardness, you can take it in balls, then the pillow will look plump and stuffed, but at the same time it will be soft and comfortable.
It is not recommended to use natural down fillings, since feathers will easily come out through the pillowcase and knitted fabric. As for color combinations and shades, there are no restrictions. The main thing is that the chosen design fits the overall style of the room and matches the furniture and textiles.

Knitting methods can also be different. Experienced needlewomen create a long fabric that is twice the size of a standard pillow, then connect its edges with a crochet hook. This is a practical method, because the result is a symmetrical, even pattern. Beginning craftswomen can practice on small motifs or creating two elements that, after completing the process, will need to be sewn together.
Simple pillows
You can knit a pillow with knitting needles for beginners using a simple technique. Garter stitch, knit stitch, and the technique of alternating purl and knit stitches are suitable for this. To decorate the surface, you can use decorative buttons, sewn elements or motifs from applied embroidery. The stitching technique also goes well with a knitted surface.
A pattern reminiscent of a wicker basket will look interesting. It is easy to perform, because it consists of two motives. For the pattern, the number of elements is a multiple of 10, and an additional pair of loops for the edge:

Having knitted the eighth row, the pattern is duplicated from the very beginning.
If you look at the ornament from the front side, you can clearly see the “checkerboard” pattern. The pillow can decorate both classic style and modern design.
Dumka “donut” made of knitwear
Knitted sofa pillows can be not only practical, but also beautiful. It is not necessary to create a standard square item; you can experiment with the shape by knitting an original round item. To work you will need knitted spaghetti yarn. You can replace it with lush woolen threads.
The process will require:
- Yarn of several shades, preferably from the same range.
- Circular knitting needles, scissors for cutting threads.
 First, twenty loops are cast on, but you can add a few more if you want to create a voluminous pillow. But the quantity must be even so that the canvas does not move. Also be sure to take into account a couple of edge loops.
The first row is made by alternating knit and purl stitches 1 x 1. In the second row, increases are made to widen the fabric. To do this, after each pair of loops, one yarn over is made. Work like this until the end of the row. As a result, thirty loops should remain on the knitting needles.
Knit the next row with yarn overs through three loops, then return to the second row with frequent yarn overs. Knit the fabric in 20 rows, changing shades of yarn depending on color combinations. After this, close all the loops.

Knit a second similar element, connect both finished ones using a sewing needle and thread, leaving a small hole for the filler, then sew together. You will get a beautiful sofa with an interesting shape. You can attach some buttons or beads to the surface to make the product look more elegant.
Floor models
You can knit a round pillow with knitting needles in the form of a beautiful pouf. This will require approximately 160 g of knitting yarn and number 15 knitting needles. You also need to buy filling and thick fabric for the pillowcase. so that the padding polyester does not break out through the holes between the loops.
The work is based on the shawl technique, the execution scheme is simple. You need to work with thread in several layers to make the process move faster..

The knitted pillow cover is ready, now we need to assemble it. Pull the yarn folded in several rows through the arcs of the edges of the fabric, tighten them as much as possible, securely fixing the rest of the thread.
Repeat a similar action for the other side, but do not tighten it too much so that you can insert the pillowcase and fill it with padding polyester. After this, sew two rows of the base to hide the points of contraction. A product made from knitted yarn will not only be beautiful, but also practical, elastic and quite durable for reusable use. In addition, the pouffe pillow is suitable for any type of interior.
Application options
 Hand-made pillows can complement the style, decorate the room, and emphasize the design. But in most cases they combine not only beauty and decorativeness, but also practicality. It is convenient to relax on such products; they can be used to decorate a sofa or add brightness with contrasting colors in the design.
Recently, making pillows as gifts has become popular. Funny images, cartoon characters, knitted items, products in the shape of female breasts can lift everyone's spirits.
In the process of choosing a scheme and a future pattern, you need to decide on the functionality of the thing - how it will be used, whether it can be combined with the overall style. Thanks to the many possible uses, knitted pillows occupy a leading position among other handicraft items.
Features of care
 Even if the yarn is strong and elastic and holds its shape well, during use the pillow can change its appearance, become deformed, and the loops will become filled with dust. To avoid rapid wear of knitted products, you need to use high-quality care products.
Covers should be washed separately from other items so that various particles and threads from fabrics do not stick to the wool; choose a delicate cycle with a water temperature of no more than 30 degrees. For washing, use powder intended for woolen products.
It is best to wash by hand, without squeezing the yarn too much, so that the pattern does not become deformed. If this is not possible, then the washing processes must be reduced several times so that the threads do not become frayed and covered with pellets.
The product must be dried in a horizontal position., laying it on a cloth folded several times. This will allow the item to dry evenly without stretching. The mistake is to dry the pillowcase with the filling. It is advisable to sew the parts together during the assembly process so that you can remove the contents and wash all the parts separately.
 You cannot use an iron to iron and straighten a knitted product, as this will negatively affect the thickness of the yarn and lead to hardening of the threads. The option of using a steam iron is allowed, but at low power and without adding salt.
There is no need to starch the pillows; they should be as soft and pleasant to the touch as possible. Otherwise, the item will be used only as an element of the interior, nothing more. Using things made with your own hands allows you to decorate your home with rich shades, as well as add bright colors to your everyday routine.