Architraves on windows, despite their simplicity, are of great importance in the decorative design of the facade of the house. They not only create a neat look and add an element of personality to the structure, but also perform the more prosaic task of eliminating the gap between the wall and the window frame. In addition, platbands must withstand the influence of weather factors without losing their qualities.
Window frame function and a bit of history
The platband was first mentioned as an element of the house as early as the 15th century. Now the architraves have somewhat lost their relevance, but their function is still the same, regardless of the material of the building and its decoration. Due to the design features of the windows of high-rise buildings and in cases where glazing is used, their presence is inappropriate.
Platbands appeared many years ago
Simplified, the platband is a wooden frame with a width of 30-40 mm, which frames the window.
The aesthetic function of this detail is important, but the main task is to bridge the gap formed by the window frame and the wall, which increases thermal insulation and prevents the penetration of dust and moisture from the outside atmosphere, as well as reduces the noise level. In some cases, in the presence of shutters, it performs the function of a frame.
Types and types of platbands for windows
Their form may be:
- curly;
- flat;
- rounded;
- convex.
Flat platbands are characterized by ease of production and low cost. Convex platbands are made using special machines and, in connection with this, the price of products increases significantly. Carved platbands are of great aesthetic value and significant cost.
According to the method of installation, platbands are classified:
- telescopic. They have special protrusions that go into the corresponding cavities of the box;
- overhead.
An important factor in choosing the profile of this window element is the slope that is performed at the top of the casing. Its purpose is to remove sediment.
Modern materials and requirements for the elements of houses have determined the trends in the requests of homeowners. The leaders in popularity are carved platbands made of plastic.
Requirements for the material of platbands
In addition to high aesthetic qualities, the casing must meet practical requirements. Its important qualities are the ability to withstand temperature fluctuations and high humidity. In addition, the material must withstand wind loads.
It is important that the material has sufficient strength and is not subject to chipping and cracking. The use of MDF or plywood is out of the question. The properties of these materials are such that they are able to absorb moisture, are prone to cracking, and the paint on them peels off over time. All this is a sign of the fragility of products made from these materials.
In this regard, MDF as a material for platbands can only be used inside the dwelling. The manufacturability of the material determines the simplicity and relatively low cost. In addition, it does not take much time to get ready-made platbands. Such platbands on the facade will require constant care and additional processing.
Our ancestors have been making platbands from wood for many centuries. Oak and beech are the most common types of wood used for this. Pine and birch have found less use for the production of architraves. Wood tends to absorb moisture, therefore, to increase the service life of the product and its appearance, it is necessary to use protective coatings. In addition, over time, the tree tends to darken, so the restoration of the original shade of the material is required.
When using gypsum as a decorative facade element, the problem of interaction of the material with moisture is also encountered. When the water that has penetrated into the gypsum freezes and thaws in the process of temperature fluctuations, such architectural details are destroyed.
 Materials are subject to certain requirements.
 The use of glass fiber reinforced concrete and polymer concrete makes it possible to avoid the negative effects of temperature and moisture. Their use is limited by a significant mass of products. In some cases, when installing such platbands, the increased loads on the wall are taken into account and make it more powerful.
Polyurethane compares favorably with other trim materials. This is due to the fact that its use does not allow the problems described above, and its characteristics make it possible to create additional thermal insulation. In addition, its mass is comparable to the weight of wood, which facilitates the installation of these facade parts.
How to make stencils for platbands on windows?
Choice of wood
Wood for the production of platbands can be used in various ways. It can be certain types of it, a combination of rocks by gluing or otherwise connecting.
Simple and shaped stencils for window frames are best made from pine.
The production of carved architraves requires that the material be soft. Linden has this quality. Material requirements are due to the manual processing of wood.
 The choice of wood must be made carefully
 Climatic conditions associated with high humidity or significant dryness, as well as significant temperature fluctuations during the day, determine the use of wood with a dense and solid structure. These include oak and birch. Their manual processing is difficult, so the use of milling machines is necessary. Such products have a long service life.
Required Tools
Before solving the problem of how to make carved platbands, it is necessary to decide on the tool used for these works. The main tools for this are knives and chisels, various in shape and size.
 Tools for the job
 For independent production of platbands, devices for manual milling, an electric jigsaw, and a drill are used. A jigsaw is almost indispensable when performing such work, since with its help you can create almost any pattern. In some cases, a home-made device can be used, which includes a step-down transformer and nichrome wire.
In addition, it may be necessary to make a tool for filing corners. To make such a device, it is necessary to fix two hacksaw blades with a fine tooth between three wooden rails. When working with this device, spikes are sawn with one canvas, and the eyelets of the product are filed with the other.
How to choose patterns for platband?
Using the slotted carving technique suggests that aspen, alder, linden or softwood are best suited. The thickness of the board should be in the range from 5 to 50 mm. It is necessary that the chosen design of the pattern for the casing should be well distinguished at a distance, and act as a single whole of the architectural ensemble. Therefore, it is not desirable to create an image with a large number of small elements.
 Trim options
 For a long time at the top of the casing there is a kokoshnik with the image of the Sun. If desired, the top of the casing can be built up using spikes as a connection. Towels - this is the name given to the bottom of the casing. The design must necessarily include the presence of a water-cutting bevel. The bottom plank should be 10mm thicker than the plank at the top of the plank. It is important to observe the unity of the style of both parts.
To avoid the occurrence of cracks in the thread, the parts should be placed along the grain of the wood. As a rule, the endings and openwork bends, which have a small thickness, have significant fragility.
 Structural diagrams
 The simplest cut can be obtained by drilling a round hole with a drill. That is why it is desirable to make a choice on a pattern with a predominance of round holes. In most cases, the ornament is made up of repeating elements, each of which is made up of holes and cutouts that have a more complex configuration.
Drawings of platbands on windows contain the following elements:
- bottom bar or profiled belt;
- vertical slats or frame;
- top bar.
 Part Names
 To get a stencil, you need to stretch the pattern along the length. For this purpose, a life-size image is applied to paper. Places suggesting the presence of slots should be highlighted in color. Then, the resulting pattern is glued to the workpiece. Using a drill, drill holes of the appropriate diameter. If it is necessary to work with a jigsaw, small holes are made where necessary.
Production of platbands for windows
 platband
 The opening direction of the window must be taken into account. In the case when it opens outward, the casing should be installed at a distance of 30 mm from the window sashes. In addition, platbands should not become an obstacle to opening the window frame. Other parameters depend on the geometric dimensions of the windows.
At the initial stage of the production of platbands, it is necessary to plan a dry board, the dimensions of which are within: thickness up to 30 mm and width 75-150 mm. In this case, the width of the platbands should exceed the corresponding size of the window frame by 25-50 mm. For a better fit of the platbands to the wall surface, a groove is selected or a gap of no more than 2 mm is made so that it is at a distance of 10-15 mm from the edge.
When working with a power tool, you should not make excessive efforts, as if helping him. This may lead to its failure. If there are difficulties with cutting wood, you should pay attention to sharpening the blade. Long cuts are recommended to be made with a wide blade.
How to mount carved platbands
The fastening of the details of the platbands is carried out by means of deaf or through spikes. Moreover, it is believed that the use of the first of them is preferable, since there is no need to decorate the places where the connection takes place.
The grooves for the spikes are made by drilling several holes, the depth of which is slightly greater than the spike. The removal of partitions between the holes is done with a drill designed for metal. The entry of the spike should be tight, however, without the use of force.
The spikes are fixed with pins made of solid wood. The use of glue is not recommended. This is due to the fact that adhesives are not able to work for a long time under the influence of an aggressive atmosphere.
Platband installation: features
Installation of platbands is carried out without the use of glue using nails. They are driven in in increments of 400-500 mm so that the hat is recessed into the wood. Most often, platbands are attached tightly to the box. In some cases, an indent of 5-20 mm is made to the side, which depends on the direction of opening of the valves.
 Architraves drawing
 The window sill at the window opening and the platband are installed closely. This design allows you to install bedside tables that protect the lower part of the platbands.
Upon completion of the installation work, it is imperative to carry out a protective treatment of the platbands. You should also apply paint or varnish, which needs to be updated from time to time.
Photo of platbands of an interesting design
 Beautiful rose trims
  platbands
  Platbands are an important part of the architecture of the house
  Beautiful platbands
  original platbands
 The tradition of decorating windows with carved platbands has come from ancient times. It was believed that window decoration with fancy patterns not only protects the room from drafts and cold, but also serves as a kind of protective amulet from evil spirits or the evil eye.
A selection of templates for carved window frames
How to make a stencil for a platband
A stencil is a device for applying the same patterns and symbols to the desired surface. Before starting work on the manufacture of platbands, you will need to get stencils and templates. Finding a sketch for a carved platband is not difficult - they can be downloaded for free and in a wide variety on the Internet, purchased in specialized stores or found in magazines.
In finished form, stencils and templates can be made on paper, cardboard or wood fiber. They only need to be attached to the surface of the future casing and circled. There are several ways to make a stencil yourself:

Stencils and templates are the main assistants in creating carved platbands. In the drawing, you need to take into account which pattern will be chosen for the various components of the casing.
Carved platbands include the following main details:
- top trim;
- vertical slats of the casing or frame;
- bottom bar or profiled window sill.
These are just the main elements, carved platbands can include many more decorative details: a diadem, coat hangers, flowerpots, and so on.
Transferring the contour of the drawing to the workpiece
After the sketch is created, you need to make a stencil directly, onto which all the elements of the pattern for carved platbands are transferred. You can transfer a contour to a workpiece in the following ways:
 Cutting a platband according to a template
 - The most common way is when the pattern is cut out of thick paper or cardboard. The resulting templates are applied to the board and traced along the contour with a pen, felt-tip pen or pencil.
- The stencil can not be cut out, but transferred to future platbands through carbon paper.
- You can push the outline of the sketch through the paper onto the tree with a pen (leaving an inconspicuous trace). You can make the outline clearer without carbon paper by applying a layer of graphite on the back of the sheet with a soft, simple pencil.
You need to place stencils on the workpiece along the fibers of the tree: in the future, the thread of such a casing will not crack. For convenience, the places where the cuts will be made can be made colored.
Since ancient times, the main decoration of wooden architecture has been the decoration of the facade of the house with various patterns and whole drawings carved from wood. The central element of the decor of the exterior of the house has always been window casings made by hand by craftsmen and craftsmen.
This is what homemade carved platbands look like
Anyone can try to revive the ancient practice of wood carving and make trims for windows with their own hands, if they are not afraid of carpentry. The joy of the creative process and the contemplation of the result of their labors will undoubtedly bring satisfaction to the creator.
Window trim is a structural element designed to close the gap between the opening and the window frame.
Thanks to the platbands, it is provided:
- originality and originality of the facade;
- aesthetics and completeness of the exterior;
- the noise level is reduced;
- protection against penetration of precipitation, cold and wind;
- the safety of the insulation between the frame and the opening.
Ancient technology for making platbands
In the old days, it was believed that carved architraves protect the house and its owners from the evil eye and evil spirits.
 Exterior and decoration of the house with carved platbands
 Each pattern and ornament was created not only as an ornament, but also as a talisman. In the upper part of the window, the symbols of the sun or the cross were most often located. Plant motifs show the desire for unity with nature. Carved curls and waves are signs of water, giving life and fertility. Snakes, birds and other animals also had their symbolic meaning.
Significance was given not only to carved signs, but also to the properties of wood. The type of wood, the place and conditions in which it grew were also taken into account by the craftsmen. For example, from the trees that grew at the crossroads, houses were never built and no items were made. Ornaments and techniques for making carved architraves in each region and even in each village were their own and unique.
The following types of woodcarving are distinguished:
 A variant of the pattern of a homemade platband for a window
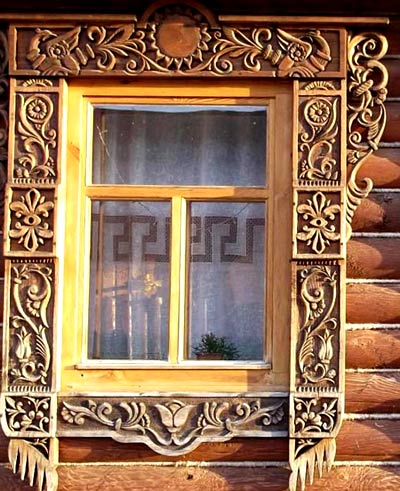
Wood species for carved architraves
For carving, different types of wood are used. Their difference lies in the density, hardness, fiber structure, color, pattern.
The most malleable and convenient for carving is hardwood - linden, aspen, alder. Do-it-yourself carved platbands for windows are easiest to make from linden. It is very easy to cut, but you need to be careful not to spoil the workpiece with an awkward movement.
 Carved aspen trim
 Linden wood is clean, light with a uniform, almost imperceptible texture. Softwoods also have disadvantages: their loose structure absorbs moisture very well, although this problem is solved by impregnating, varnishing or painting.
Of the coniferous varieties for carving, pine, cedar, fir, and spruce are used. These breeds are well processed and are great for creating street trim with slotted and.
Pine - the most common and affordable lumber, has good performance properties, a clear, beautiful wood pattern.
Due to the resin content, pine has good weather resistance. Beginners in carving can use birch - its wood is not as soft as linden, which allows you to get clearer and more accurate cuts. Birch lends itself perfectly to cutting both along and across the fibers, it is well sawn and drilled. 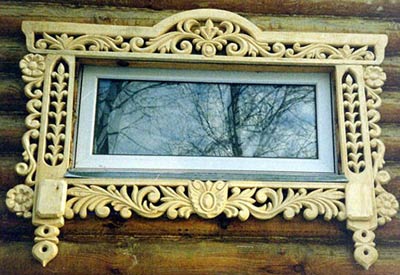
Hardwood architraves (oak, larch, beech, boxwood, walnut) are very durable, but they are expensive and require more effort and time to process. The production of such platbands will be justified in the following cases:
- the region is characterized by strong temperature fluctuations;
- in very dry air;
- for climates with high humidity.
For small elements made using the applied carving technique, you can use fruit tree varieties, such as cherry, apple, pear.
Patterns for carved platbands - creating a template
To make it symmetrical and the same on the entire windows, it is necessary. Creating a template for a decorative trim is not difficult, it is more difficult to decide on the variety of patterns and ornaments presented on specialized sites and stores.
 Patterns for carved architraves
 For those who are engaged in carving for the first time, complex patterns should not be chosen. A large ornament without too small and elaborate details is what a beginner needs. Ready-made templates can be copied completely or come up with something new based on individual details and their combination.
Templates can be made on your own in several ways:
- Processing with a graphic editor. You can create a finished image of the desired scale using Photoshop.
- Print or make a photocopy. The selected pattern is enlarged to the desired size and printed on the printer.
- Manual way. Manual transfer of the picture to the template using linear scaling.
It is best done on cardboard or thick paper.  For all elements of the ornament, a full-size template is made.
You can transfer the pattern from the template to the wooden base as follows:
- Cut out the stencil with scissors, and, attaching to a wooden board, circle the outlines with a pencil.
- Outline the drawing with carbon paper.
- If there is no carbon paper, the imprint of the pattern on the tree can be transferred by strongly pressing the pen. A faint trace will remain, which is circled in pencil for clarity.
- Drawing on a wooden board should be placed across the fibers, this will protect the carved elements from cracking.
- Slotted areas on the workpiece can be painted over with a pencil.
Making your home memorable and beautiful is the dream of any owner. If the house is no longer new, it is not so easy. One of the possibilities is carved platbands. They even turn an ordinary “box” into a masterpiece.
Trim material
Carved platbands are made mainly from coniferous wood. The best option is pine, it is normally cut, inexpensive, and durable due to the high resin content. In principle, you can use any other coniferous board, but it is better not to try with a spruce board: it is too fibrous, it cannot be cut even with the sharpest tool.
You can also make carved architraves from hardwoods - linden (the softest), poplar, maple, oak, cherry, etc. But with each breed you need to be able to work, fill your hand, and there is no guarantee that something digestible will turn out, and hardwood is expensive. Therefore, platbands are made on windows more often all the same from pine. You just need to pay attention to the quality characteristics.
Carved platbands on the windows - a way to make your home unique
If there is wood or a board that has lain for 3 years or more, you can use it: it is already dry for sure, only processing and calibration will be required. If there is no woodworking equipment at home (thickness gauge and circular saw), a cutting board will be needed. Under carved platbands, wood of the first or highest grade is suitable. This means that there should be no knots, chips, resin pockets on the board. Take wood chamber drying, with a moisture content of not more than 8-12%. This is not for sale in the markets; you need to look for it at sawmills and hardware stores.
Why chamber drying? Because it is dried in a special chamber, quickly removing moisture. At the same time, part of the boards cracks, bends - these go to rejection, the rest are sold. If you make carved architraves from chamber-dried wood, they will definitely not be warped and they will not crack.
Tools
To make carved platbands with your own hands, you will need the following minimum set:
- drill with a set of drills;
- electric jigsaw with a soft start and a bunch of different saws for wood;
- chisels;
- sandpaper with grains of different sizes;
- petal disk from sandpaper for wood on a drill.

To reduce the time it takes to create carved patterns and polishing, it is better to have a router and a grinder.
One by one or in bulk?
Carved platbands usually consist of repeating elements. At least two vertical slats on each window are made the same. And since several windows are usually designed, a lot of identical elements are required. If you are going to make platbands slotted, naturally there is a desire to cut several pieces at the same time, folding the boards in a pile and somehow fixing them.

The desire is understandable, but difficult to implement, and the benefits over time are not as great as it seems. The first difficulty is that home craftsmen usually have jigsaws of not too much power. To cut through several boards, you have to move the file more slowly along the intended pattern. On straight lines, the speed is still tolerable, on curves - low. And, the smaller the bending radius, the slower you have to move the file. If you work with one board, there are no such problems. So in terms of time, the gain, if any, is quite small.
One more moment. Even thick, good, expensive files are rejected with a large thickness of the workpiece. So, when cutting several boards at the same time, the quality of the cut on the bottom (or two) remains a big question.
The procedure for manufacturing a platband with a slotted thread
We transfer the desired drawing using a template to the board (where to get it, how to enlarge it, how to make a template, read below). If necessary, we correct, draw the details well. Next, we describe the procedure step by step.

We remove wood in the slots of the pattern

Since the carving will be looked at from afar, some inaccuracies are not fatal, but it is still worth striving for the ideal.
Making a curved edge
Some platbands have a smooth edge. Then we skip this step. If the edge is curly, you will still have to work with a jigsaw.

If the cut is difficult, not very attractive places may remain. It's not scary, then we will process them where necessary - with chisels, the same jigsaw, emery. When you are satisfied with the result, you can move on.
Finalization
Owners of wooden houses probably know everything about how to process wood. But, just in case, we repeat once again the general rules.

The choice of paints and varnishes is very wide. Suitable for any outdoor use. But keep in mind that opaque paints will have to be updated periodically - once a year for sure. And that means - to remove the old paint, primer, paint again. The situation is simpler with oils for wood - they do not leave a film on the surface of the wood, but are absorbed into the fibers. It is also necessary to update the coating, but just clean it of dust and cover with a new layer. And the processing frequency is less. Cons of oil for wood - higher price, fewer colors.

How to enlarge a template
Simple carved platbands can be made without templates. A few examples will be in the video - it shows how to draw, how to cut. But not everyone can draw more or less complex patterns on their own. It takes skill and talent. The easiest way is to find a diagram, print it in the right size, transfer it to cardboard and cut it out. You will get a template that you can circle.
The second way: draw from a photograph. Not all schemes can be found. Some, especially antique window frames, you will not find anywhere else. If there is at least some drawing ability, they can be copied.

Even such an ornament can be copied ... if you have the skill
You may have questions about how to increase the size of the found scheme or template. There are three options:
- With the help of any graphic editor. The simplest - Paint - is available on any computer running Windows (the "Image" tab, the "Resize image" line, select "centimeters" and put the desired length (height) in the box. The resulting file can be printed. If the printer is small, it may be necessary to split into several pages.They should then be glued together and, according to the resulting drawing, make a template.
- With a photocopy. Copiers have a zoom function.
- Taking graph paper, transfer the drawing to the desired scale. To do this, we divide the original image into squares with a side of 0.5 or 1 cm (you can print it on a sheet in a cage). Then we transfer the lines to graph paper, increasing them in the desired proportion.
The first two methods are faster. But when scaling, the picture may turn out to be fuzzy and blurry. It can be corrected by hand, it can be drawn in some editor, for example, CorelDRAW. See the video for how to do this. Just an example of drawing a diagram for a thread.
Related videos
Schemes, patterns, patterns


The style is completely different...
The platbands on the windows perform not only an aesthetic function, they protect the house from dust and serve as insulation, so their installation is recommended in a wooden house. We will tell you how you can make cashiers and carvings with your own hands.
A bit of history
Charming symbols were used on the platbands
So, the decoration of the platbands is amazing. They depicted symbols with wired properties. Our ancestors attached great importance to them. But, unfortunately, for a long time the art of creating platbands was forgotten. And a lot of useful information is lost. Today, many craftsmen restore this craft with great difficulty.
Manufacturing technologies
As mentioned above, the Russians attached great importance to the magical properties of wood. Moreover, these properties were different for different tree species. Even the place and conditions in which the tree grew were taken into account.
The traditional old way
Therefore, in the old days there were a great many signs. If, for example, a tree grew at a crossroads, then the objects that were made from it will not bring any benefit.
From the drawings of the ornament, one can determine from which province this or that master came. At the same time, the principles of working with wood were different everywhere. Views on wood too, for example, deaf, sculptural, invoice, slotted.
Traditional wood carving methods
Over time there was a mixture of styles. This gave the buildings a special originality and uniqueness. Many examples of ancient carpentry art can be found in museums, and in some places buildings have been preserved that have delighted with the beauty of their architraves for many centuries.
Modern methods
Today, modern craftsmen work not only with wood, but also with synthetic materials. For example, PVC, metal, plywood.
You can't argue with that. Modern technology can work wonders. Many companies offer a wide variety of trim options from a variety of materials.
You can buy budget or expensive. This is a matter of taste and financial possibilities.
But not everyone is happy with this option. Therefore, there are firms working on an individual project with each customer. At the same time, you will be offered a lot of catalogs, sketches, so that you can choose a casing to your taste, color and pattern you like.
When ordering, both the size of the window and the color of the facade of the house will be taken into account, and after that you will only have to admire the beautiful frame of your window.
But the fact is that no machine will transfer the warmth of the human soul to its product. And many people now understand this. Therefore, those who appreciate real carpentry art are happy to turn to carpentry workshops. Of course, the cost of the carpenter's work is quite expensive. Prices for these types of services start at 5000 rubles, but it's worth it.
Thread types
Carved platbands - rich window decoration
From ancient times, four main types of carvings on platbands have come down to us.
- Flat thread. When performing this type of thread, lines are cut along the contour of the pattern. As a rule, such a carving is combined with other types, the ornament is diluted with wedge-shaped cuts. There are two options for this type:
- Geometric. As the name implies, its elements have a characteristic geometric shape. It is performed as follows: with a knife - a jamb at a certain angle to the surface with pressure, an incision is made. The cut is made on the other side. Despite the seeming simplicity, and only a couple of tools are needed to do such a job, it will not be possible to acquire such a skill right away. This will take two months. Moreover, such work is very responsible, it is very difficult to correct mistakes. contour. To perform this view, the outline is drawn with a notch line. The thickness of the groove may vary depending on the ornament. In order to make this type of carving, you will need the following set of tools: chisels, cutters, the main requirement for them is that sharpening must be done strictly at different angles.
- Flat carving. This is a somewhat more complex type of carving. The edges of the pattern are processed in a special way, giving the ornament a relief look. In this case, the depth of the pattern becomes the same as the depth of the background. The main elements are plant motifs, animals. Such an ornament is considered one of the most complex. It requires more different tools. Let us dwell on three varieties of this type of thread:
- With curved lines. When performing this type of work, the contours of the pattern are rounded. On the side of the groove, there is a weaker collapse, it is stronger on the side of the background.
- With cushion background. When performing this technique, the edge of the notch, which is closest to the pattern, is made rounded, while the background is chosen sloping. The bulge becomes like a pillow, hence the name. You can perform a slight lowering of the surface to be treated.
- With selected background. The main secret of this technique is the fully selected background, at equal depth around the pattern. The master strives to create the impression that all the details of the pattern are pasted.
- Slotted thread. A very openwork is created on the surface of the tree. This is achieved due to the fact that the background is almost completely removed. Such a platband resembles a beautiful, lightest napkin. The workpiece is attached to a wooden or fabric base. In this case, contrasting colors are selected. This type of pattern is considered overhead. We can say that this type of carving is the most difficult, and only a professional can do it. Saw carving can have a very rich set of themes. It can be both simple geometric shapes and elements depicting people or animals.
For this type of equipment, a slitting brace, a mini-hacksaw, a jigsaw are useful. Perhaps a drill with a feather nozzle will come in handy. The finishing of the slots should be the thinnest, so it is done only by hand. To do this, use chisels, cutters, jambs.
The combination of different types of carving allows you to create a real work of art. Due to the high level of skill required, it is rarely tried on in practice. Although individual elements can be used to decorate facades.
Photo gallery: window trims - do-it-yourself templates (stencils)
How to make wooden carved platbands for windows with your own hands
In order to learn how to make platbands, you have to study for a long time. If you have at least basic skills with a hacksaw and a drill, then you may have a chance to do this job.
Platbands can be made independently
It may not be possible to make a trim with a slotted thread right away, but a simpler one is possible.
Necessary materials
Wood is needed to make a platband. Choose one that is famous for its long service life. However, it should not be too hard. Tree species such as oak or beech are unlikely to be useful. You will have to prepare a small supply and be patient, as the work will be long and painstaking.
The best material for a beginner joiner would be birch or pine. How good are they. The wood itself, of course, is harsh, but the cuts are beautiful and neat. If you plan to add overhead elements to your pattern, then an apple or bird cherry tree is well suited for this.
After you have finished your work, you should impregnate the casing with a special composition. To do this, you can purchase varnishes or impregnations. Stain will help emphasize the beauty of the wood texture. If you make small mistakes, it is not scary that they can be masked with paint, white or sky blue. Ordinary, usually white or sky blue.
Tools
It depends on what kind of thread you are going to make. Depending on the complexity of the pattern, you will need either only the most necessary, or a complete set of tools.
Choose the degree of difficulty based on your skills and experience in similar work. For example, in order to make the simplest openwork ornament, you do not need the skills of a professional carpenter. And if you connect fantasy, then you can turn any minor flaws into a pattern element.
If you are inexperienced, do not choose patterns that have a lot of small elements and a lot of details. The idea of the drawing should be clear to the viewer, but it will take you a lot of time to create a complex pattern, and you just need angelic patience.
One of the necessary tools for making platbands is a drill
main stage
To work, you will need a drill, drills, preferably several sizes, a jigsaw, manual or electric, sandpaper, drying oil and wood.
- At the initial stage, you need to clean the surface with sandpaper, preferably to absolute smoothness. Now blanks are being made for the side connection. This can be done in two ways. If the cut of the end part is made at an angle of 45 º, then this is called "tongue and groove" or "half-tree".
- If you do not have much experience, then take a pattern with large elements to begin with. You can apply the contour directly to the tree.
- If drawing an ornament is difficult for you, prepare a stencil with which you can transfer the elements of the ornament to the working board.
Video: we make a carved simple cashier made of wood
Work with your soul, the tree is alive, and if it feels your love, then the work will turn out amazing. And if you like this work, then you can perform real miracles of carpentry. Gained experience is always valuable.
Who knows, maybe our wise ancestors were right in protecting their homes by installing carved architraves on the windows.