How to make your site, yard or garden unique? This is the dream of many owners. Many people love to decorate their own estate, dacha, or yard, but not everyone has extra money that could be spent on decorative figures. But this is not a problem for those who at least know how to do something with their own hands.
It doesn’t even require any special expenses.
So, for example, a fairy-tale kingdom on the garden site will become a good gift both small and adult dreamers.
Even a mini-castle built at the dacha will add mystery to the area.
Mini castles for the yard or garden are quite large in volume, and building it completely is a little difficult.
You can try to make some parts of the castle separately, so that later in any part of the garden or at the dacha you can assemble it from ready-made elements, like from cubes. To reduce solution consumption, cans or bottles can be placed inside the cylinder, but the thickness of the solution around the ballast must be at least 5 cm.
The solution for pouring should be thick enough. It must be given several hours to set to such a state that the formwork does not crumble when removed. The height of the cylindrical formwork must be selected as follows: it should be approximately equal to the height of the tower; with a smaller size, the formwork will need to be disassembled and assembled slightly higher than the already set lower part.
Making a castle for your dacha is easy if you have a pair of “golden hands”.
The main material is sand and cement for the longevity of the composition. 2 parts sand and 1 part cement.
Elements of a standard design.
Let's start with the turrets.
A cylinder of the required radius is rolled up from a sheet of iron (mine is about 2-30 cm). The cylinder is fixed with wire or self-tapping screws
Anything can be placed inside the cylinder - bottles, cans - to reduce the consumption of the solution, but the thickness to the ballast should be at least 5 cm. Fill with a thick solution.
We give it several hours to set to such a state that when removing the formwork it does not crumble.
We immediately begin to cut the damp, slightly set solution.
The cutting technology is the same as that of sandboxes. For cutting, a set of tools is used that is available to everyone.
Do not forget to make windows, loopholes, using a knife to pick out the desired recess.
Fill the mold with the solution and after partial setting, carefully remove the formwork into a cylinder and make required quantity windows, battlements - as your imagination dictates.
The roof can be made from tin cones; you can also use this tin cone as a mold for pouring mortar. After complete setting, carefully knock our roof out of the mold. Don't forget that we are still preparing individual elements castle We'll put everything together later.
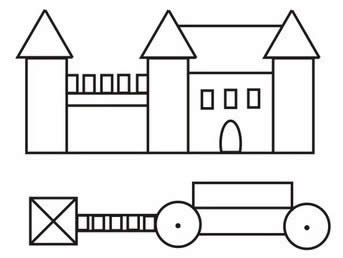
Let's start building the walls. Our walls will be either fortress walls (1) or a building element (2).
There is no difference in their production.
We assemble a rectangle of the required size from boards 5 cm wide. Place it on flat surface, having previously placed either a film or a piece of roofing material so that the solution poured later is not absorbed.
You can put it in this frame metal arch- this will be a door or gate. Pour the solution into the frame. Where no windows or doors are planned, you can add crushed stones to the bottom or broken bricks to save solution.
After the solution is poured to the desired height, you can take nice crushed stones and stick them into the base of the foundation so that their flat edges protrude above the general plane of the solution by about 5 mm.
Then loopholes and windows are made. Draw everything your imagination tells you. To remove the remaining solution, I use a soft brush (you’ve probably seen how archaeologists work in the movies). In the end, you will be left with something like the following on your desk.
Leave the finished walls on the table for about a day. When the foundation is prepared, we begin assembly.
First we install on cement mortar, previously applied to the foundation, for example tower No. 1. We attach wall No. 1 to the tower using mortar. Then we install tower No. 2.
The castle is already beginning to emerge. You are filled with excitement. Next, add wall No. 2 and finish by installing tower No. 3.
Assembly diagram:
Once this structure has set, form a gable roof over the building.
This is how you can make a complex castle from the main basic elements, changing them slightly depending on your imagination - like this, for example.
How to make your site, yard or garden unique? This is the dream of many owners. Many people love to decorate their own estate, dacha, or yard, but not everyone has extra money that could be spent on decorative figures. But this is not a problem for those who at least know how to do something with their own hands.
With help decorative castle The garden can be given a real fairytale look. You can make such beauty with your own hands from scrap materials.
From almost nothing you can make a lot of useful and beautiful things to decorate your estate and give it a unique look.
It doesn’t even require any special expenses.
What can you choose for decoration?

To make a castle you will need: 3 pieces of pipe, stones, broken tiles, 1.5 liter dark bottles and cement mortar.
Whatever people come up with to decorate their territory! From old tires thrown away by car owners, you can make a whole zoo with your own hands: swans, frogs, cats and giraffes, elephants and zebras... You can make magnificent flower beds from rotten logs or waste stones. Even from waste like polyurethane foam and plastic bottles you will get lovely lambs. What can we say about cement! With some skill, you can learn to make wonderful sculptures for gardening purposes, which can perfectly decorate any property.
For example, a fairy-tale kingdom on the garden site will be a good gift for both small and adult dreamers. Even a mini-castle built at the dacha will add mystery to the site, and in order for the structure to acquire a “residential look”, it can be a continuation or a rock garden.
What is important is that a decorative mini-castle can be successfully placed anywhere on a site, garden or yard, taking into account the geological features of the area. Moreover, during construction, any creative person can add or change elements on the fly. To make the composition long-lasting, you can use a cement-sand mixture as a material. The best composition is: 1 part cement and 2 parts sand. The better the sand is dried, the easier it will be mixed with cement, the more convenient it is to sift it in order to use it in elements with small details.
Mini castles for the yard or garden are quite large in volume, and building it completely is a little difficult. You can try to make some parts of the castle separately, so that later in any part of the garden or at the dacha you can assemble it from ready-made elements, like from cubes.
Return to contents
An example of a design for building a castle in a country house
Turrets. We roll a cylinder from an iron sheet the right size, fix with wire or self-tapping screws. The main thing is that it can be easily disassembled later. To reduce solution consumption, cans or bottles can be placed inside the cylinder, but the thickness of the solution around the ballast must be at least 5 cm. The solution for pouring must be thick enough. It must be given several hours to set to such a state that the formwork does not crumble when removed. The height of the cylindrical formwork must be selected as follows: it should be approximately equal to the height of the tower; with a smaller size, the formwork will need to be disassembled and assembled slightly higher than the already set lower part.
When the solution has already set a little, you can start cutting it. Usually, when doing work with your own hands, you use tools that are in every home:
- chisels;
- screwdrivers;
- a medical scalpel or other similar blade for processing small parts;
- blade from a hacksaw for metal;
- strips of tin to form the elements of the castle.

Making a castle from simple ones cylindrical shapes a little boring, so it’s worth imagining and using a chisel to imitate destruction or masonry, cracks and chips to “age” the lock. Using a knife we make windows and loopholes. The roof can be made from tin cones or used as a mold for pouring mortar. When the solution has set securely, knock the roof out of the mold. Later, all these individual elements will need to be put together.
In production separate walls no difference. We assemble a rectangle of suitable size from the boards and place it on a flat surface, on which we must first place a piece of film or roofing felt. This creates a frame into which we will pour the solution. If there should be a window or door in the wall, small frames are placed in their place in advance to obtain through hole. When the solution is poured to the required height, you can stick pebbles or crushed stone into the lower part so that you get an imitation of the foundation, or using sharp knife, use a scalpel to apply grooves - kind of gaps between the foundation stones. When the solution has set a little, the frame is removed and small details are completed: windows, loopholes, imitation stone, etc. The walls are then left to lie for another day.
To install a mini-lock with your own hands in your yard or dacha, it is better to choose a sunny day. It will look good on a hill - a pile of stones, for example. To reliably install the walls, you can make a foundation for the castle, on which a thin layer of cement is applied, and wall tiles will need to be placed on it. You can strengthen them in another way, for example, by filling the internal cavity with pieces of stone, rubble and mortar.
In the garden plot, people often realize their fantasies or what they saw during their travels, ideas they saw on the Internet on various sites, and then build rock gardens, garden sculpture, original flowerpots for flowers, wooden crafts, garden scarecrows and much more. This gives summer cottage uniqueness makes it special. It is useful to involve children and grandchildren in such activities; they really like to take part in creativity and decorating the garden.
One of the types of such crafts on the site is the construction of mini castles from natural materials, most often from small stones, river pebbles, coarse gravel. This is a very exciting activity. You need to start building such a castle out of stone with a choice suitable place Location on. It is convenient to place it near a children's playground, for example, or near a recreation area for the whole family. An area of 1-2 square meters is suitable for this. square meters depending on the intention.
It is advisable to draw a sketch of the future on paper to scale, determine how many towers it is planned to build, whether they will be connected by a fortress wall, an arch, and sometimes they make a small ditch around the castle through which a bridge is built. It is useful to look in books or on the Internet for photographs of real or miniature castles when developing your castle project.
Next you need to take care of building materials, prepare cement and sand or buy ready-made cement-sand mixture For street work. Then bring a sufficient number of stones for construction, and you will need a lot of them, think about what to make the roof, windows and doors in the castle from. If there is a river or sea, then you can collect medium-sized round pebbles. Large gravel made from granite, limestone, and sandstone is suitable. The main thing is that the stones are of the same type and approximately same sizes.
When everything you need is prepared, you can begin building a mini castle. The easiest way to build a castle is from three rounded towers. For this they use old metal pipes with a diameter of 10-15 cm, which are dug into the ground and filled with cement for stability. You can take sections of asbestos-cement pipes; they are also suitable for constructing towers. It is better to make towers of different heights. Then, starting from the bottom of the pipes, they make a masonry of stones based on cement mortar, attaching them sequentially one after another.

At the height at which the windows in the tower are planned, the laying of stones is stopped, plastic bottles brown or green, cut out a cylinder of a suitable size from them, paint a window with a frame on it, cut the cylinder vertically on the side opposite the window, place it on the pipe, continue laying stones to the very top of the pipe. It turns out to be a window in the castle tower.
Then you need to make a roof for the tower. For these purposes you can use various materials, which will be at hand. It is convenient to make it from thin tin, bending it in the shape of a cone, painting it oil paint. You can cut out “tiles” from linoleum and nail them to wooden frame. Another option for making a roof is to cover a cone of cement mortar with rectangular pieces ceramic tiles, it also looks like tiles.

When the castle towers are ready, they begin to build walls that will connect them, or make a fortress wall around the towers. An arch of stones is often built in front of the entrance. The entire interior of the castle is carefully covered with fine gravel, after laying non-woven material under it to prevent the growth of weeds. If desired, you can increase the territory of the castle by building new towers, walls, arches, bridges. To make the castle more authentic, they add figures of gnomes, knights, princesses, decorate the walls with images of dragons, and hang flags and pennants.

It is important to harmoniously fit such a lock into garden plot. If the castle acts as an independent ensemble, then low flowers or ornamental grasses are planted next to it, which will give it more naturalness. And such flower arrangements You can change it every year, then the mini lock will look different all the time. Low but spectacular annual flowers are suitable for this purpose, for example, pansies(violas), thin-leaved and rejected marigolds, small petals, daisies, primroses. Among the perennials used are dwarf hostas, alpine aster, and Carpathian bellflower.

Sometimes a mini castle made of stones simply serves as a frame for a small flower bed, inside of which annual flowers are planted. This original flower bed in the form of a castle will decorate the lawn or front area garden Flowers are planted inside the fortress wall of the castle, selecting not too tall compact forms of low-growing annuals.

How to make your plot or garden unique - this is the dream of many owners. Many people love to decorate their own estate, dacha, or yard, but not everyone has extra money that could be spent on decorative figures. But this is not a problem for those who at least know how to do something with their own hands.

It doesn’t even require any special expenses.

For example, a fairy-tale kingdom on the garden site will be a good gift for both small and adult dreamers.
Even a mini-castle built at the dacha will add mystery to the area.

Mini castles for the yard or garden are quite large in volume, and building it completely is a little difficult.

You can try to make some parts of the castle separately, so that later in any part of the garden or at the dacha you can assemble it from ready-made elements, like from cubes.

An example of a design for building a castle in a country house
easy to disassemble. To reduce solution consumption, cans or bottles can be placed inside the cylinder, but the thickness of the solution around the ballast must be at least 5 cm.
The solution for pouring should be thick enough. It must be given several hours to set to such a state that the formwork does not crumble when removed. The height of the cylindrical formwork must be selected as follows: it should be approximately equal to the height of the tower; with a smaller size, the formwork will need to be disassembled and assembled slightly higher than the already set lower part.


Making a castle for your dacha is easy if you have a pair of “golden hands”.

The main material is sand and cement for the longevity of the composition. 2 parts sand and 1 part cement.
Elements of a standard design.

Let's start with the turrets.
A cylinder of the required radius is rolled up from a sheet of iron (mine is about 2-30 cm). The cylinder is fixed with wire or self-tapping screws
Anything can be placed inside the cylinder - bottles, cans - to reduce the consumption of the solution, but the thickness to the ballast should be at least 5 cm. Fill with a thick solution.
We give it several hours to set to such a state that when removing the formwork it does not crumble. 
We immediately begin to cut the damp, slightly set solution.
The cutting technology is the same as that of sandboxes. For cutting, a set of tools is used that is available to everyone.

Do not forget to make windows, loopholes, using a knife to pick out the desired recess.

Fill the mold with the solution and after partial setting, carefully remove the formwork cylinder and make the required number of windows, teeth - as your imagination dictates. 
The roof can be made from tin cones; you can also use this tin cone as a mold for pouring mortar. After complete setting, carefully knock our roof out of the mold. Don't forget that we are still preparing individual elements of the castle. We'll put everything together later.

Let's start building the walls. Our walls will be either fortress walls (1) or a building element (2).

There is no difference in their production.
We assemble a rectangle of the required size from boards 5 cm wide. We place it on a flat surface, having previously placed either a film or a piece of roofing felt so that the solution poured later is not absorbed.
You can place a metal arch in this frame - this will be a door or gate. Pour the solution into the frame. Where no windows or doors are planned, you can add crushed stones or broken bricks to the bottom to save mortar.
After the solution has been poured to the desired height, you can take nice crushed stone pebbles and stick them into the base of the foundation so that their flat edges protrude above common plane solution approximately 5 mm.

Then loopholes and windows are made. Draw everything your imagination tells you. To remove the remaining solution, I use a soft brush (you’ve probably seen how archaeologists work in the movies). In the end, you will be left with something like the following on your desk.

Leave the finished walls on the table for about a day. When the foundation is prepared, we begin assembly.
First, we install it on a cement mortar previously applied to the foundation, for example tower No. 1. We attach wall No. 1 to the tower using mortar. Then we install tower No. 2.

The castle is already beginning to emerge. You are filled with excitement. Next, add wall No. 2 and finish by installing tower No. 3.
Assembly diagram:

Once this structure has set, form a gable roof over the building.
This is how you can make a complex castle from the main basic elements, changing them slightly depending on your imagination - like this, for example.


Or a very simple one:

Beautiful garden decor makes the site special - it’s pleasant for both adults and children to be here, and guests admire it with skillful hands and the imagination of the owners and take notes of ideas to implement them in their own backyard. We offer 25 crafts and decorations for the garden, which are easy to make using available materials.
Butterflies – painting on stones
You can paint any natural stones, both small and large. They look more impressive if the painting area is large - in this case, several images can be made on the stone. The butterflies in the photo above are an example of this. We first wash and dry the stone surface, then apply a primer to it. When the coating is dry, paint it with a light background paint. So - creative work. If suitable stones can't find it, let's do it
Rainbow butterflies over a flower bed

We cut out such butterflies from plywood - for this you will need a jigsaw (or better yet, a jigsaw). To turn the blanks into beautiful butterflies:
- sand the edges with sandpaper;
- We apply wood impregnation to the workpieces on both sides to protect them from moisture;
- apply primer;
- paint with wood or acrylic paints;
- after the paint has dried, apply varnish for external work;
- We fix the butterflies on long rods.
In the same way, you can make large fancy flowers - they will greatly enliven the lawn.

Decorative balls or lamps

Let's make spectacular hanging balls to decorate the garden or lamps with round lampshades. The manufacturing principle is simple:
- inflate big balloon or take a soft ball;
- wrap the ball or ball with twine (twine), secure it with PVA glue.
- You can paint the twine before treating the workpiece with glue, or when it hardens.
- We pierce the ball/ball inside and take it out.
- Cover the ball with varnish.
- If instead of twine you use thin and flexible colored wire. the work will be done even faster, and the decorative ball will last a long time - despite the wind and rain.
Figurines for the garden from pots

Garden decor from flower pots- a separate direction. How incredible interesting crafts for the garden can be made from inexpensive plastic flowerpots (although ceramic ones are also suitable)! Here, and here – You can fasten the pots into figures for the garden with rope/twine/wire, which we thread through drainage holes. Then - painting. We choose paint depending on the type of material of the pots. If the pots are plastic, use acrylic paint or paint specifically for plastic. If you are making a figurine from ceramic pots, oil paint or oil enamel will do. Acrylic paint– universal, we use it too.
Cloud on the drainpipe

This kind of rain can be made if you cut a cloud from a sheet of metal or plastic and attach it in the right place.

The first photo is almost a sculpture. It will require a panel of cellular concrete- it cuts easily.
In the second photo there is a flashlight made from a piece plastic pipe and plugs. We paint it with acrylic paints.
Flowers on pedestals

A luxurious corner in the garden can be created using tall stands for flowerpots. we make them from pillars, blocks or even just pipes - you can use round ones, but be sure to large diameter. Climbing flowers are desirable - we will plant them in wide flowerpots or sulfinia.
Fairytale castle made of pipes

We fasten several sections of pipes different heights, in which holes are made (for example, with a crown drill). Roofs for turrets can be made from watering cans.
Garden crafts made from plywood


These figures peeking out from behind the fence are very funny. But once they were ordinary plywood.
Concrete slab platform

Decorative paving, in which the slabs are made on site.
- We prepare the surface - tear off small pits in the shape of the slabs;
- We lay a tape along the edges of the recess - it can be made of polyethylene or roofing felt.
- At the bottom of each pit we pour a little crushed stone with sand;
- Fill it with concrete.
- We sow lawn grass between the slabs.
Spiral lawn

Spectacular spiral of grass and stones:
- use a shovel to mark a spiral across the grass or ground;
- tear out the spiral groove;
- we place stones in the ditch;
- sow grass between the lines (if it is not there).
Garden of sand and stones

Exotic corner. But it’s just stones and sand of two colors – yellow and white.
Flower hose

A watering hose can also serve as a garden decoration. We drive hooks into the wall of some building, onto which we wind a hose in the shape of flower petals.
Elephant from tires or from pots

We cut the old tire with a regular hacksaw, if available. circular saw cutting will be easier. We paint with oil paint or rubber/bitumen paint.
The elephant in the photo below is made from flower pots. For the head we use a ball, plastic or foam ball. The trunk is made of wire, here it is fluffy (chenille).

Sun made of tires and towers made of pipes

Tire sun – the decor is simple, but bright and pleasant. The tower complex is made from pipe sections.
Dogs made from bicycle chains
