Bas-reliefs have been used for decoration since ancient times various kinds products and structures. Today, similar decorative elements have found application in a wide variety of areas.
The use of bas-reliefs gives quite a wide scope for interior decoration. For example, you can create a separate panel in the form of a painting to decorate an empty wall.

Bas-reliefs are often used to decorate home fireplaces. The bas-relief in combination with original lighting creates a truly original picture - thanks to the lighting, all the convexities of the image will be visible even more clearly.
Bas-reliefs are great for decorating various kinds of openings.

Unlike another popular interior design option - decorative painting - bas-reliefs do not need additional highlighting with color.
In the absence of color highlighting, a three-dimensional pattern will appear due to the play of light in a well-arranged artificial lighting. Thus, the owner has the opportunity to create accents on decorative elements at the specific time he needs - just turn on the lighting.

In addition to purely decorative functions, bas-reliefs cope well with various kinds of functional tasks. For example, volumetric decoration allows you to level out uneven surfaces, decorate utility lines, visually distort the space at the owner’s discretion, and create smooth transitions between different functional areas.

A competent combination of volumetric relief and decorative painting allows you to create truly original and incredible effects.
However, despite its many advantages, bas-relief remains not such a popular option for decorating rooms. The essence of the problem is high cost arrangement of such volumetric elements.

Uninformed people often make the mistake of believing that the bas-relief is a prefabricated structure cast from plaster. In reality, such decoration is arranged manually and is inherently exclusive. Consequently, to arrange a beautiful bas-relief image you will have to put in a lot of effort, but if you really want to, you can handle all the activities yourself.

General guidelines for creating bas-relief
To create a bas-relief with your own hands, you can use a wide variety of materials: gypsum, gypsum-based plaster, alabaster, clay, etc. For beginners, it is easiest to work with gypsum and plaster based on it.

First step
Build a box with low walls from slats and plywood, more like a tray. According to their own overall dimensions the box must correspond to the dimensions of the future relief slab - this is where the bas-relief will be created.
Instead of a box, you can use other available means, for example, a candy box or a suitable-sized frame glued to the glass with adhesive tape.


Second step
Line the mold with polyethylene. Straighten the film so that there are no folds or there are as few as possible.
Third step
Prepare the solution according to the manufacturer's instructions and pour it into the mold.
If you plan to create an ornament with high relief, insert wire into the slab for additional reinforcement of the future composition.


Fourth step
Leave the poured mixture for the initial setting period. This indicator is individual for different materials, please check separately.


Fifth step
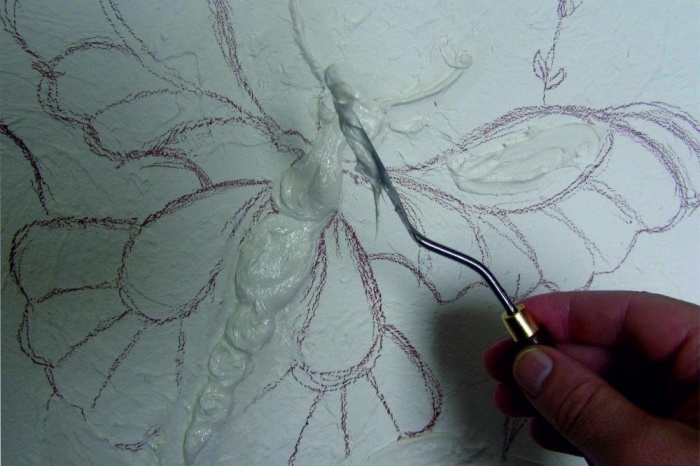
Start creating a bas-relief. First you need to mark the outline of the created decorative ornament, and then begin to increase the volume inside the formed contour from the newly prepared mixture.
Build up the volume in layers, allowing each layer to harden a little.


Working with plaster is quite convenient - while the material is wet, you can easily get rid of its excess with a knife, and correct the ornament itself with a chisel and wood cutting tools.
In addition, not completely dry material can be easily sanded. Execute necessary processing hardened surface is much more difficult.


If you plan to create an in-depth image, you can solve the problem using two methods.
- The background layer is built up around the image, as a result of which the elements of the ornament appear in some recess. Finally, the background plane is sanded.
- The images are deepened by removing some of the base material using the chisel and chisels you are already familiar with.
Bas-relief with specific examples

To make the process of creating a bas-relief more understandable, you should consider the order of arranging such decor on specific examples. We offer you the two most popular options - “lilies” and “tulips”. Having mastered the order of their arrangement, you will be able to cope with the creation of decorative bas-reliefs of almost any complexity.
"Lilies"

Bas-relief "Lily"
First step. Protect the base to be decorated by covering the required area with masking tape.
Second step. Cover the base with putty, let it dry and apply primer. It is best to use primer paint. This composition is notable for the fact that after drying, the grains of sand included in the mixture remain on the base. Thanks to the roughness created, subsequent layers of finishing are held as firmly as possible. On average, primer paint dries within 2-3 hours.
Third step. Using a trowel, apply a starting layer of Marseilles wax to the surface. This material hardens quite quickly, on average within 3-4 hours at room temperature.

Fourth step. Peel back the film and draw the details of the bas-relief. To do this you need to secure at the top work surface transparent throughout its entire length and width plastic film. The bottom edge, however, does not need to be fixed - you should still be able to bend it freely.

Fifth step. Using a marker, draw a sketch of the future “lilies” on the plastic film - stems, leaves, buds.


Sixth step. Once the sketch is completely completed, proceed to apply Marseilles wax under plastic wrap according to the sketch. First use a trowel and then a palette knife.


The Marseille wax used has White color. To created decor was more visible, cover the trim suitable composition. For example, you can use water slightly colored with poppy seed. This type of composition can only be applied to a dried surface.
After tinting, you will immediately see in which places the finishing material needs to be given the outline of stems, flowers, etc.
Your task is to make the planned bas-relief as realistic as possible and consistent with the sketch. This will take you a lot of time, so there is no need to rush to finish everything as quickly as possible. Work carefully, thoughtfully and gradually.

Bas-relief “Lilies” after final decoration
After giving the bas-relief the required shape, let the composition harden and begin applying the second layer decorative finishing– acrylic paint of the desired color.
Prepare the paint according to the manufacturer's instructions. On average similar paint and varnish compositions dry for 5-8 hours. Specify the specific time in the description of the paint used.
At the end, all you have to do is apply the final layer of finishing - ottocento or another composition with similar properties. Armed with a wide brush, apply a double layer of Totcento to the entire area of the wall to be decorated. The second layer can be applied only after the first has dried. On average, this takes 1-3 hours. You must carefully paint over each element of the composition.
To give the composition additional visual volume and expressiveness, apply to separate areas bas-relief white etched.
"Tulips"

Preparation and actual work on creating “tulips” is carried out according to a scheme already familiar to you, namely:

Creating a bas-relief with my own hands is quite complex, painstaking, time-consuming and requires tangible financial costs event. However, with the right approach, you can give the interior of your home a unique look.
Good luck!
Video - DIY bas-relief on the wall
1. Since ancient times, man has sought to decorate his home. For this, wooden or stone decorations were used, elegant elements decor, paintings by great masters of painting and sculpture.
One of the most sophisticated techniques for decorating the interior of a home is bas-relief.
You can transform even the most simple apartment if you make a bas-relief on the wall with your own hands
What is a bas-relief?

This is a three-dimensional image made of plaster, mounted on the wall or ceiling. Moreover, if the image appears
more than half - this technique is called high relief, if less - bas-relief. Of course, the bas-relief is an exclusive work,
which can transform even the most an ordinary apartment. This technique has been known since ancient times, however, nowadays it is becoming more and more
popular.

It is believed that applying a bas-relief is the destiny of professional craftsmen and artists. However, as we will see in this article,
It is not the gods who burn the pots. Mastering the technique of applying bas-relief is quite accessible to each of us. The main thing is that there is a desire and knowledge of some of the nuances, which we will discuss below.

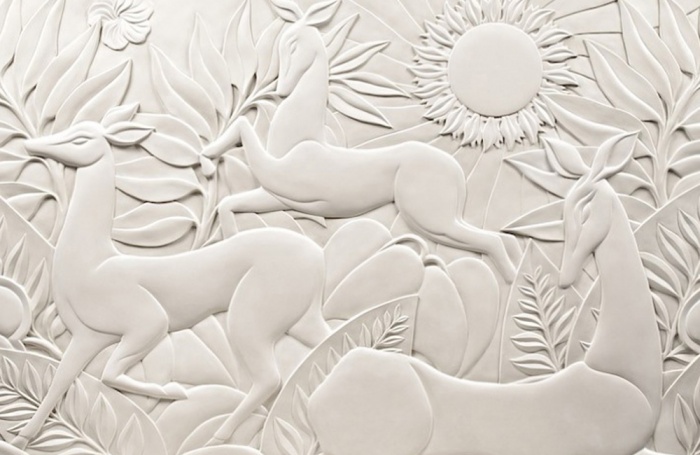
Bas-reliefs most often depict plants, flowers, animals or some kind of plot paintings. A small bas-relief can be made on a tablet, which, in its
the queue is already mounted on the wall. Larger images are made directly on the wall.
The main stages of making a bas-relief
2. So, you have firmly decided to place a bas-relief on one of your walls, and you want to do this work with your own hands. First of all, you need to choose the wall on which your bas-relief will be placed. It is very important to evaluate at this stage what kind of lighting - daylight or electric - at what angle this place on the wall will be illuminated.

Next, select an image. If you do not have experience in applying bas-reliefs, you should not take on complex subject paintings. The truth is very simple and
boring images, although simple to execute, are unlikely to be of interest to you. Take images of flowers or trees. The main thing is that already
At this stage the image was pleasant and made you happy. Also, we do not recommend that a beginning sculptor take on large images. Start with small ones on a tablet - they can be fiberboard or drywall.
Once the image is selected, we get to work.

The material from which the image is made can be clay, alabaster, or plaster. For beginners, gypsum or gypsum-containing plaster is recommended.
Now we need to make a stencil. By the way, for the first experiments it is quite possible to use already ready-made stencils, which are sold in hardware stores.
If you decide to make a stencil yourself, then you will need carbon paper and stencil material - it is best if it is plastic.
We carefully transfer the image using carbon paper and a pencil onto the plastic, and then cut out the stencil. We cut the holes carefully, without leaving burrs.
Keep in mind that the stencil can only be used once, so if you plan to apply
on the wall of an ornament - a repeating pattern, it is necessary to prepare in advance required amount stencils.

The wall on which the bas-relief will be placed must be even and smooth. The wall must be primed before applying the bas-relief.
We attach the stencil to the wall in a previously determined place using glue or masking tape.
Then we apply fine-grained putty to the stencil. In construction stores you can purchase ready-made putty, or dilute dry putty
independently - it should be a viscous mass. This consistency is most suitable for working with bas-reliefs.
The putty should be applied in such a way that the stencil holes are completely filled with putty.
Using a spatula, press the putty firmly into the stencil.

When the putty hardens, carefully remove the stencil. If necessary, sand the resulting pattern with sandpaper.

At this point, the work with the bas-relief can be considered completed.
Painting the bas-relief
3.
To make the bas-relief more interesting, it can be coated with paint.
The bas-relief is painted before removing the stencil, especially if painting is done using aerosol paints. It is important that
the stencil was intact, otherwise you will also “paint” part of the wall. A bas-relief, especially an ornamental design, is coated with gold or mother-of-pearl paint to create a greater effect.

When painting a bas-relief depicting representatives of flora and fauna, you can use an interesting technique in which dark paint is first applied, and then, leaving dark outlines,
light. This results in a richer and deeper image.
It is important to remember that you can start painting only after the putty has completely dried. As a rule, a day after applying the bas-relief.

There are many different techniques for applying bas-relief to a wall, but they all require certain knowledge and skills. Therefore, if you are new to this issue, start with the technique described above.
Video: master class do-it-yourself bas-relief on the wall
Liked? Subscribe to the blog and receive new articles!
Today it has become extremely fashionable to use bas-relief in the interior. Doing it with your own hands is not at all as difficult as it might seem at first glance. But some effort will have to be made.
Making a simple bas-relief with your own hands
If you want to turn an ordinary home into something special, you don’t have to spend money on new furnishings at all. It is enough to change the design of the room, breaking the stereotype that the wall must be flat. For a beginning craftsman, the simplest bas-relief is suitable, which you can create with your own hands using ready-made ones bought in a store. The diluted gypsum solution is carefully poured into the mold so that there are no air bubbles. The plaster hardens completely within 24 hours, then the part is removed from the mold. This simple bas-relief, made with your own hands based on purchased forms, should be pasted on the wall, resulting in a resemblance natural stone or antique stucco.
Cord bas-relief
The second is enough in a simple way You can make bas-reliefs using a regular clothesline and plaster mortar. A pattern is applied to a piece of foam plastic or fiberboard, then a rope soaked in gypsum solution is laid in accordance with the drawn lines. After drying, the convexities, along with the rest of the surface, are treated with gypsum mortar using a brush. The finished bas-relief can be used for decoration by gluing it to the wall. But it is also possible to use this method for decorating furniture, for example B in this case There is no need at all to decorate the object with tiles; it is enough to place the bench “on the butt” and first make the bas-relief on one side of it. Then, after drying, the procedure is performed on the other side. The last stage the bench will be painted “stone” or “metal”. Such an object, coated with black paint, looks luxurious at home when creating an imitation of a cast-iron ancient object.

Bas-relief from stencils
The drawing of the future bas-relief is transferred to penofol and cut out. Right size gypsum fiber sheet covered with a primer, onto which a figure cut out of foam foam is applied. Use diluted putty to smooth over any irregularities on the stencil. If you decide to make a bas-relief based on a stencil directly on the wall, use the same algorithm, only the foam foam figure (stencil) is glued directly to the wall, filling out the voids and unevenness with putty. You can stencil smaller details using, for example, salt dough - it holds its shape well, does not dry out so quickly, so there is time to correct the bas-relief and work more painstakingly on the “little things.”

We turn the master's fantasy into reality
Many amateurs are concerned with the question of how to make a bas-relief with their own hands according to their own design? Here they usually use the method of casting bas-relief parts in molds and then gluing them to the wall. But the master will make a unique form. To do this, he will need silicone sealant and a sample template from which the mold will be cast. An old engraving or figurine can be used as a template, but you can also fashion a sample from plasticine at your own discretion. It is very important to lubricate the sample with Vaseline or oil before lowering it into a mold filled with silicone sealant. After removing the sample, the master is left with a mold for casting the bas-relief. Second stage of production unique decor premises - casting of bas-relief details. To do this, place the gypsum solution in the resulting form and wait until it hardens. The third stage will be attaching the bas-relief detail to the wall and painting it. In some cases, the entire wall along with the protrusions is covered with one color, in others it is worth thinking about how to highlight volumetric image to highlight its outline. The result of his work depends on the patience, accuracy, imagination and taste of a person who decides to decorate his home with bas-relief.
You can understand the intricacies of the process, how to make a bas-relief on a wall with your own hands in free space, by combining knowledge of the basic techniques for its manufacture with practical practice in applying liquid material and installation of finished panels on the wall. Working surface dimensions do not have of great importance- artistic images can be placed in small details on areas of the wall, ceiling, niches and corners that are free for viewing. The advantage of doing this part of the interior yourself is that after detailed drawing of a standard stencil, a unique design is obtained.
Details and differences
Decorative decoration in the form of a bas-relief on the wall, made by yourself, will give the room an artistic volume and an original, sophisticated look to the interior. The location, lighting, and chosen colors will fill the simplest drawing with personality and enchant the viewer. That is why this type of registration of private property is increasingly gaining popularity in comparison with finishing coatings mass production.
 Simplicity and style
 Creating paintings that are large and complex in detail makes beginners feel unsure of their ability to complete such painstaking work. You need to start mastering the technology with simple elements, and when you get a confident result, increase the scale and fineness of the lines. At creative approach With a few simple strokes and a play of shades you can create a whole picture.
Amazing monumental paintings are painstakingly created and finished by masters by hand, even if the main components are pre-cast in molds. A novice designer can acquire skills in working with plastic material, using techniques of combining differences in the level of planes and rough processing texture, and use the separation of parts of the same technique by contrasting coloring. Using a unique counter-relief method, images on empty walls are incorporated into modern urban design styles.
 Often, improvised bas-reliefs are used to decorate individual home furnishings: a fireplace, columns, beams, niches or openings. Placing a convex pattern in unexpected place revives long-familiar walls.
The functions of such a pattern can be not only decorative. The spatial solution allows you to hide the unevenness of one or adjacent surfaces and give an attractive look to strict engineering communications, obtain specified visual effects, create a thematic transition between zones and rooms of different styles and purposes.
If you show a little imagination using available material, then even for beginners, an improvised plot based on the theme of the environment can serve interesting solution restoration of areas in need of repair.
 Combination with various materials
 In many cases of making a bas-relief on a wall, painting the resulting surface does not become the main element of decoration. Relief-forming material needs more protection from changes in air humidity, absorption of greasy vapors and dust.
The textured pattern is clearly visible from different angles and changes its appearance with changes in natural light and skillful placement of artificial lighting. By turning on or off point light sources, accentuation or smoothing of the perception of bas-relief in the interior at the right time is achieved.
 The choice of a three-dimensional image for the wall begins with assessing its location in terms of area, lighting and functional purpose of the room.
The bas-relief should not be “crowded” between adjacent corners, the distance to opposite wall should allow the viewer to see the entire drawing. IN narrow spaces it is permissible to use small parts that, by their placement on limiting structures, do not create conditions for them mechanical damage or injury to passing people.
DIY manufacturing details
Once you have a desire to decorate your interior with a unique composition in the free areas of the room, you begin to realize it by choosing a pattern. He will determine the next steps to bring the idea to life. Operations required for bas-relief:
- Drawing up sketches of artistic elements. The pattern may consist of repeating identical shapes (1 or several types). You can combine many ready-made gypsum panels of different sizes in the allotted area, arranging them in a given order. Layout general plan is divided into separate sketches of each part, drawn on a scale of 1:1 for transfer to the surface to be designed.
- Define technological features execution (panels, stencil, hand modeling). To complete the picture, in any case, it will be necessary to manually finish the seams of the glued parts, draw the features of the stucco molding, clean up the irregularities, and give the entire surface a given roughness.
- Select the main material that will be used for the work (gypsum, decorative plaster, alabaster, putty). Components for working on the installation of bas-reliefs do not belong to cheap varieties of such raw materials - putties, primers, adhesives for installing cast parts must have high quality. The strength of the product should not be compromised by the use of raw materials with questionable characteristics. Execution in color requires the selection of paint brands, additional colors, varnishes for shine and protection.
- Based on the location of the panel, the purpose of its installation and the desired effect, determine the need to install additional lighting sources, the number of points, the work and materials required for this.
- Prepare tools and equipment. They include both standard set for applying and leveling putty, preparing mortar, measuring and marking, and special tools, which create volumetric elements from thick building masses.
 Lots of templates available online
 The most difficult thing, sometimes, is to choose one thing from the whole variety. possible options future decorative component of the interior. All subsequent stages already depend on this decision. You can view samples and download a stencil to create the bas-relief you like on websites specializing in this area:
Choose genre paintings, battle scenes, complex images of people, wild animals and panoramic views Not recommended.
Repeating pattern
A suitable image for a novice master to acquire the skills to obtain a given result would be voluminous compositions of fruits, leaves, and flowers. They can be located like separate elements, and intertwining patterns, to form a fancy tree or cover the entire array.
First, you should watch a training master class from an experienced specialist, who will teach you the intricacies of professional production, application and processing of stucco relief details directly on the wall.
An example of a training video on making simple decor:
It is not advisable to reduce the simplicity of the image of an element you like to a primitive bulge on the wall - a designation of the background or similarity baguette frame will give it a complete and appropriate look.
Before starting work, the wall surface is thoroughly cleaned of old coatings, dried, treated with a primer and leveled with putty.
Castings
A separate gypsum element is made in a prepared form, and then glued in the selected location. To do this you need the following:
- make a rigid box (box) with a low side according to the dimensions of the future part;
- a three-dimensional form is placed on the bottom, which is covered with film (without folds or wrinkles);
- products with significant thickness are reinforced by placing a wire frame in a mold;
- According to the manufacturer's instructions, mix the solution and pour it into the mold;
- keep the mixture for the time specified by the manufacturer until it dries completely;
- remove the casting, grind, if necessary, the back side and ends for a tight fit to the base;
- if the bas-relief consists of tightly fitting cast panels, then the treatment of the front surface is carried out after sealing all joints with putty, so that the plastered parts look like a single whole.
Finished parts located at a certain distance from each other can be connected by sculpting using arbitrary lines depicting branches or vines.
Counter-relief
Technology of in-depth bas-relief from decorative plaster consists of using 1 of 2 execution methods:
- cutting through an array of thick mixture applied to the wall according to a pattern transferred from polyethylene film M 1:1;
- sequential build-up of layers around given areas.
The edges are leveled using a chisel, followed by general sanding.
Stencil
This method is a variant of the form that is installed directly on the base. They take dense material and cut out sections of the pattern in it that will be filled with plaster or other composition.

Can be created using a stencil method as a basis for convex images, and to build up the sides of thin sections of in-depth (counter-relief) compositions.
Modeling
The most common way to make small details in any other type of image, as well as when making bas-relief from putty and alabaster.
The drawing is drawn with a pencil directly on the wall; a large area can be divided into squares to facilitate layout and maintain scale.
It is not necessary to carefully draw the nuances of the entire picture; it is enough to indicate the outline of the object and the main lines of the fragments depicted in this area.
Upon completion of the bas-relief, its lines are brought to perfection with a sharply honed tool and covered with colored or white (ottocento) compounds.
Ordinary painted or wallpapered walls in the interior look too hackneyed. Therefore, many people tend to focus attention on the walls with paintings and other decorative techniques. One of the most unusual and complex species The decoration is considered a bas-relief. Wall reliefs are not so much a method of decoration as a full-fledged work of art. Using this technique, you can recreate plot reliefs, portraits of family members or favorite ethnic motifs on the wall.
Bas-reliefs are often used in rooms with a fireplace or stove. In this case, the volumetric element may not have a plot or ideological message; it is created as a visual frame for the hearth. Bas-reliefs also look advantageous in the area of doors and window openings. When finishing such objects, you need to choose the right type and size of the pattern. Illuminated reliefs are considered an innovation among volumetric decor. With its help, you can make patterns and finishing themes more voluminous.

Features of reliefs
Unlike mosaics and wall paintings, relief can be monochrome. Often, volumetric bas-reliefs are made using 2-4 shades of the same color. In bas-reliefs, volume is considered the main expressive unit; to emphasize it, you only need to select and install proper lighting. The light does not have to be artificial; in ancient Greek and ancient Egyptian reliefs, natural sunlight and moonlight could dramatically transform the contours of the panel. Therefore, it is recommended to place the bas-relief in a room with expressive daylight from above.
Many people believe that bas-relief is a type of decor that is inaccessible to most. If you have basic artistic skills, you can easily create a three-dimensional relief with your own hands. To create a bas-relief with your own hands, follow the instructions described below.
Creating a bas-relief with your own hands
People who have never encountered finishing works, they believe that bas-relief is a decor cast in plaster. However, in fact, three-dimensional figures are applied directly to the wall, which makes each object unique. Even if one initial sketch is used for the relief, the final work will be different. To reproduce even a simple panel on the wall, you need to have at least basic modeling skills. However, if you strictly follow the instructions, even a beginner will be able to create a simple relief.

Material selection
Before starting work, you need to select the material for the panel. Most often for similar works use:
- plaster;
- alabaster;
- gypsum;
- clay.
Experienced craftsmen create own recipes working staff. Beginners are recommended to start creating a bas-relief with clay or gypsum plaster.
Creating the Foundation
When the material is selected, they begin to create the basis on which the outline of the future work will appear. To apply the mass it is necessary to create a flat wooden box with low sides: plywood can be used for the bottom, and flat slats for the sides. The size of the box should slightly overlap the size of the future work. You can use a ready-made rigid box or plastic container as a form.

The bottom of the box is covered with plastic film so that there are no wrinkles or folds on it. When the mold is wrapped in film, begin kneading the mixture. The composition of all substances is individual, depending on the manufacturer, so when preparing, follow the instructions indicated on the package. Ready composition poured into the mold. If you want to create a large bas-relief or high relief, reinforce the composition in a box. After pouring the mixture, the box must be set aside to allow the plaster to dry initially.
Bas-relief building
After the composition has dried in the mold, you can begin making panels. It is important to remember that the outline of the future drawing is filled with fresh mixture. The bas-relief is built up gradually, adding mass to each layer. In this case, each subsequent level is applied when the previous one has dried. The contours of the pattern are applied to the mass using stack and polyethylene. The film is laid on the panel and the contour of the layer is pressed, then it is filled with mass. When the layer dries, apply the outline of a new one and so on until the entire volume is completed.

The optimal material for increasing the volume of a bas-relief is plaster. The material is very plastic in its raw state. Its pliability allows you to add layers and remove excess without compromising the overall contour. During work, you can constantly adjust the bas-relief. Another advantage of the material is that it can be sanded and ground until it dries completely.

If the creation of the bas-relief did not go according to plan, you can cut off a sector of the bas-relief and make it again. Elimination of volume defects is carried out in two ways:
- A small sector of the volume is cut off with a cutter, after which the area is expanded again. For work, metal carpentry cutters and chisels are used.
- Around the failed sector, the thickness of the material is increased so that the defect is lower.
Using the methods described above, you can not only remove excess, but also create in-depth reliefs. You can also create certain effects on the bas-relief with cutters, but making deep cuts is not recommended.

Creating a panel without a base
Very often, plant motifs, such as flowers, are used as a motif for bas-relief. The most popular are lilies and tulips (see an example of such a bas-relief in the photo). These plants look very impressive and recognizable, but at the same time they are very easy to create even for a novice craftsman.
Often simple reliefs are applied directly to the wall, without assembling the base. In this case, it is important to protect furniture and walls from getting plaster. To do this, use plastic film and masking tape.

To create a bas-relief using this technology, the outline of the sketch is applied to the wall. The base is covered with putty and allowed to dry. When the layer dries, it is primed. It is recommended to use primer paint as a primer; it promotes good adhesion of the relief to the surface. Drying of the composition takes 3-4 hours (depending on the thickness of the layer).
Topsail wax is applied to the ground with a trowel. The material hardens very quickly, which makes it optimal for creating a base. Wax is most often white. After hardening, the form can be coated with tinting or colored acrylic paints. Marseille wax is applied from 3 to 10 layers (depending on the complexity of the design). The material dries quickly, so the relief can be created within 24 hours. Palette knives and spatulas are used as working tools; they can be purchased at any art store.