Why are they needed?
Dramatically increases the vehicle's maneuverability on surfaces with a solid base. On chains, the Zhiguli is almost like a Niva, the Niva is almost like a UAZ, the UAZ is almost like a tractor. Didn't try further
Or maybe they are not needed?
If you think so, it means you either haven’t tried them or don’t know how to use them correctly. A third option is possible: You are extremely lazy to spend half an hour putting on the chains. But then you will wait half a day for a tractor that will pull you out, lazy. There is nothing further for you to read What are they?
- Bourgeois. Either it’s rubbish suitable only for tying up a dog, or the company is well-known and, accordingly, the money is not small. I haven't tried it myself.
- Domestic. They differ in design.
Instructions for putting on chains. (UAZ 31514)
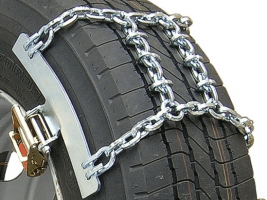
- We spread the chains in front of the wheels of the vehicle exactly along the axis of movement. Locks forward and position outwards. So the hook would be with inside. Straighten carefully" Treadmills". The procedure for the front and rear axles is identical. The sequence of the front or rear axle is not important. It must be done sequentially - first 2 wheels on the front axle, then 2 wheels on the rear axle.
- We drive the wheels on the chain, stopping 20-30cm from the end of the chain. We put most of the chain on the wheel. We hook the hook from the inside.
- Then, having straightened all the links on the wheel, we wind and engage the lock. The lock must be fastened to the link furthest from it. If you have any difficulties, you can use flat screwdriver. After all the chains are on and the lock is fastened, it is useful to drive 5-10m. After which it is possible to move the lock by one link (applies to “toothed” rubber, where by such actions it is possible to achieve uniform distribution of chain links between the rubber lamellas)
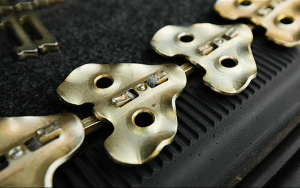
Testing of “Sota” type chains on UAZ.
More precisely, not “honeycomb”. And again, due to a mistake by the factory, the result was a truncated “honeycomb” or a mixture of “herringbone” and “ladder”.
We'll fix it soon. But this is also an indicator.
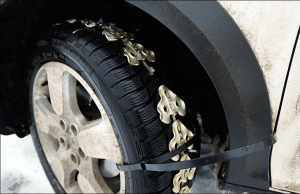
Due to the lack of people willing to try the chains on Niva, only UAZ 31514 was used. Tires Y-192 215/90R15. Chains on all wheels.
- Krylatskoye 01/31/2002
More confident movement. Those. in the absence of jerks, the chance of digging in decreases.
Yes. Undoubtedly. There is no lateral drift of any axle of the vehicle.
Significant reduction in jerks when moving (the ladder has this effect due to its design)
Yes. Undoubtedly. There are COMPLETELY no jerks in movement. There is a waddle effect. It is expressed in smooth side rolls of a not so significant amount. Approximately moving under a 45 degree speed bump.
Easier way out of ruts (due to greater engagement of the chain itself with the ground)
Failed to try. There was no track J What was available simply did not cause any difficulties. I turned the steering wheel and the car turned exactly to the angle of rotation set by the steering wheel.
Increased reliability (use of different chain material)
The material on these chains is the same as on the ladder. I couldn't tear it or unfasten it. Although I did not secure the lock additionally.
Anyone who has been to Krylatskoye knows the embankment hill. On the day of testing, the slide was rolled out to ice. I managed to get on it in 2nd lower gear, acceleration was 2-3 meters, on the second try.
On other climbs, I simply parked the car with its nose towards the top, stopped and, engaging 1st lower gear, drove up the slope. Feels like dry asphalt under the wheels.
Descents from the slopes. Even on an embankment hill, it was possible to keep the car on the slope for as long as desired using only the brakes.
General impression: Holds the surface with your teeth :). Or it was as if he had put on different, very toothy tires, or the coating under the wheels had been changed. I just couldn't get stuck anywhere. The car goes wherever the driver wants.
NEGATIVE: To my great regret, the factory made a mistake in the manufacture of the chains. As a result, the middle “treadmills”, due to the extra pair of links, dangled very loosely on the dressed wheel. We will eliminate the shortcoming in the near future. But this could not significantly influence the experiment.
It is somewhat more inconvenient to spread out more “treads” when putting the chain on the wheel.
Approximately 1.5 times the weight of the chain. But at low speeds it cannot have any effect.
- Village Vornovo. Vladim. region 120 km of Gorkovskoye highway. 03/02/2002
Similar car UAZ 31514. Same tires. Chains on all wheels. But this time each chain lock was fixed with Al wire dia. 3mm. I was afraid of losing the experimental sample in the snow. :) 
The temperature outside is about 0. Packed wet snow. The crust supported the weight of me as such. The depth may not be so significant, but I repeat, the crust is very strong. Packed snow. With such depth of freshly fallen snow, it’s not even worth wearing chains.
1st lowered, front axle naturally ON. During the 3 km trip we couldn’t sit down anywhere. The car moves slowly in a straight line, making a rut through the crust. When turning, he tries to dig with an unloaded wheel. I gave it back a couple of times. There are simply no difficulties in moving along an already broken track. It goes slower on the climbs, but it climbs. Without chains, the likelihood of driving through such snow, even on the Ya-192, is very low. Unfortunately, I didn’t have time to try to remove the chains and try without them. As a travel option, you can consider using significantly wider tires (let's say 12.5" versus 8.40" Ya-192). And drive by, trying not to fall under the crust.
Video from Uazbuki’s 11th birthday clearly showing the operation of the circuits.
Snow chains are a replaceable tread that allows motorists to improve the off-road performance of regular road tires. Increased cross-country ability allows you to overcome ice, snow and deep mud. It is important to know how you can make snow chains with your own hands, since when climbing into off-road areas in a car like a Chevrolet Niva, there is always a risk of getting stuck and you need to help yourself with the help of improvised means.
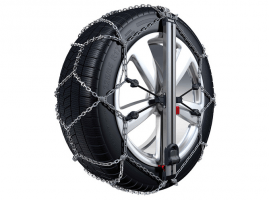
A snow chain is a fairly simple device, consisting primarily of reinforced wire, which stretches around the wheel in such a way as to almost completely braid its surface. The chain is formed by internal and external cables, which are connected to each other by transverse fastenings. They are also called lugs. They provide reliable grip on any road surface.
At the moment, several main types of chains are widely used:
- rubber - they are suitable for any type of tire. The design of this type of chain allows you to quickly and evenly install them on the wheel. the special composition retains its elasticity even at low temperatures.
- metal ones have higher strength. There are several basic weaving options.
- budget models - installed on wheels to overcome obstacles, for example, to pull out a stalled car. not suitable for long-term use.
In addition to differences depending on the materials used, there are several different options external manufacture of chains. For example, at the moment, most manufactured chains can be divided into three groups according to appearance. Each type imparts certain properties and allows you to increase certain qualities of the car:
- Ladder. It is named so because it consists of parallel straight links connected to each other by transverse bridges. Can be done with different patterns, in order to provide the greatest adhesion to the surface. The cheapest to manufacture and at the same time the most practical. But it has one drawback - while driving, due to uneven traction, the vehicle can move jerkily.
- Rhombus. Unlike a ladder, here the jumpers are positioned slightly at an angle, forming a pattern a little like a spider’s web.
- Honeycombs. More complex drawing, in which there are elements located parallel to the main lines. This weaving allows you to minimize jerks that occur during movement.

Making snow chains at home
Even a novice car enthusiast can make chains on his own. IN in this case Rather, you will need skills in working with tools. In order to do everything you need, you will need the following kit:
- it is better to stock up a chain of sufficient length in advance
- hooks and carabiners for connecting links
- tension devices
- vice and grinder for work
Stages of work
First you need to stock up on enough material. To do this, you need to know the diameter of the wheel in order to calculate the required length. Approximate results can be seen in the table

It turns out that to make a ladder-type chain you need almost 3 meters of chain only for the longitudinal sections, with a wheel radius of 16 inches. In this case, it is necessary to pay attention to the properties of the chain. All its links must be welded and not soldered. If it is necessary to secure some areas, then only reinforced wire is used. Otherwise, it may break when moving.
For those who are doing the work for the first time, it is best to stick to a simple design, such as a ladder.

The chain is cut into sections of the required length. For this it is better to use a grinder.
On longitudinal chains carabiners are attached to make it easier to install the structure on the wheel.
After this, the transverse sections are fastened. The more crossbars are used, the better cross-country ability is provided for the car.
Then the side branches are mounted, onto which tension devices are attached.
Installation of snow chains.
Before installation, the integrity of the circuits is always checked. Do not install it on the wheel if any parts are twisted or there are signs of damage.
If everything is in order with the chains, then you need to lay them out in front of the wheel so that the locks are on the outside of the body.
Then the car must drive the drive wheels over them and stop in a position in which rolling back will be guaranteed. After this, all the locks on the chain are firmly latched.

If conditions do not allow installation in this way, then you can use a jack and put shoes on each wheel separately.

It's important to remember that homemade chains Anti-slip guards are not intended for permanent use and are only worn when overcoming obstacles. It is also prohibited to travel in chains at a speed of more than 50 km/h. Otherwise, breakage and damage to vehicle parts may occur.
If it is necessary to operate the car at high speed, soft snow chains are used. But they have significantly worst performance according to the degree of cross-country ability.
Hi all! Winter operation any car brings a lot of trouble and problems to the driver, unless he lives, of course, somewhere in Thailand or Bali. And in our latitudes there is often a multi-centimeter layer of snow, plus ice, frost, and so on. In such conditions, it is necessary to provide various devices that will increase traction. How to make snow chains with your own hands, and what they even are - we’ll figure it out further.
Experienced drivers prepare for winter in advance - some simply install it, while others try to provide their car with more reliable means of withstanding slippery surfaces. Many devices are expensive or do not provide high-quality contact of the wheels with the road in icy conditions. At the same time, manufacturing such chains will not be difficult, and the necessary components can be found in stores even in small towns.
To make a simple design you will need to stock up on:
From the tool you need to prepare a grinder, a vice, a set wrenches, hammer, screwdrivers. In order to start preparing a steel body kit at home, you should know the size of your tires, or take preliminary measurements. You will need to know the diameter and width of each slope. For each car model, transverse elements, the so-called lugs, must be selected individually.
How to make chains - read the instructions
Now let's see how to make anti-slip chains that will increase the maneuverability of your car. The algorithm for performing the work will be approximately as follows:
- Using a grinder, we cut the transverse and longitudinal elements from the prepared chain.
- We find the 6th link and fix the first transverse element on it. This can be done by welding or bolts and hooks.
- Every few links we install the following transverse elements.
- To ensure good tension of the entire structure, we place a segment containing 7–8 links on one longitudinal element. It will provide additional reliability.
- At the ends of the longitudinal sections we attach carbines, the diameter of which must be at least 5 mm.
If you stock up on everything in advance necessary tool and you have some skills in using it, then the operation of creating chains for passenger cars will not take more than an hour of time. The use of welding will make it possible not to use fasteners, and this will have a positive effect on the overall structural reliability. Now all that remains is to install the assembled chains on the car wheels.
It is best to carry out this operation in a garage. You will need to jack up the vehicle in order to place a length of chain on each wheel. To make dressing easier, you need to release some of the air from the wheel. If it is not possible to use a jack, you can proceed in another way. The chains are laid out in front of the wheels so that there are no twists anywhere. The car drives its wheel onto the structure and puts on the handbrake.
After this, the chain for SUVs and other types of cars is put on in such a way that the hook with a carabiner is located on the outside of the tire. The carabiner coupling is placed externally on the tension system and fixed. Along the perimeter car stingray The transverse elements are evenly distributed and general tension can be performed. Now you can start the engine and drive a few tens of meters. After this, final fitting and adjustment is made so that the chain fits as tightly as possible to the wheel.
Some drivers simplify the design and install so-called bracelets. They have no longitudinal elements, but only transverse ones. They require a more modest set of tools and up to 5 meters of steel chain. They are convenient because they do not take up much space in the trunk, but will always be at hand in winter time of the year.
For those who still have questions about the technical part of the assembly, we recommend watching a video on the topic described. If you like to improve your car yourself, then there is a whole block of articles for you, starting with self-made and, before implementation. For today we will say goodbye to you. Don't forget to subscribe to updates and tell your colleagues and friends about the blog. Thank you for your attention!
If the car is not designed for off-road assault, but clean asphalt is required for normal movement, then it will not be possible to do without anti-skid equipment.
In observable history, there are no reliable facts of the first cases of using snow chains to increase cross-country ability. Most likely, the first analogues appeared on trucks operating in convoys in muddy mud or snow. And the experience of using snow chains for trucks There were attempts to wrap pieces of chains and cables around the wheels of tractors and light-duty tugs on the roads of the First World War. Of course, most of the first snow chains were made by hand.
Today, a considerable part of car enthusiasts makes various options making snow chains with his own hands, recording the process on video and posting it on the Internet.
Designs of chain anti-skid devices
The effect of increasing the vehicle's cross-country ability is based on increasing the adhesion of the wheel tire to the ground or snow base, making it more reliable. Chain links act as lugs with large area coverage of snow or mud mass. On the other hand, under the weight of the wheel and the car, the pressure of the chain links on the road surface - ice, snow or muddy soil - increases hundreds of times, due to which the supporting surface is compacted and adheres to the wheel. A simple anti-skid device makes the vehicle's movement controllable and doubles traction.
Work zone Anti-slip chains are a tape of interconnected fragments of 15-20 links, forming a diamond-shaped, ladder or diagonal pattern. A denser pattern may simply make the fixture too heavy to lift. Depending on the design, the belt is fastened with two cables or wire rings that tighten the ends of the fragments on both sides of the wheel, thereby ensuring fastening work surface on the tire tread. A frame lock or latch is usually used to secure the tension. The effectiveness of anti-slip patterns is assessed differently.
Most important characteristics snow chains:
- link strength, high quality metal and welding, availability protective coating, capable of making corrosion minimal;
- make the least amount of manipulations during installation; the chain must be secured by closing one or two locks;
- the absence of elements that can damage suspension components, calipers or tire tires.
Sometimes, to increase the anti-slip effect, links can be made from a rod or wire round section, but square or rectangular.
Homemade snow chains
If you look closely at the snow chain in the photo and carefully study the tension system, it becomes clear how to make snow chains with your own hands, especially if there is a video of the manufacturing process. Simply put, it is necessary to make a kind of mesh of chain sections according to the size of the tire, with a mechanism for tensioning the system. Usually, for manufacturing, the dimensions of the sidewalls and transverse sections are measured with a margin of 1 link and the length of the cable with which it is supposed to tension the chains on the wheel is determined. In the very simple version chains, you can use an ordinary household chain, with a rod diameter of at least 5-6 mm, with securely welded links.
A pair of M10 or M12 bolts is used as a tensioning device. As a side fastening, you can make a wire arch, or you can use a cable from the car’s hand brake, having previously made loops at the ends for threading the tension bolt. Sometimes homemade snow chains are made from different materials For example, belts made of Kevlar and polyamide fibers are used for fixation and tension.
Differences between industrially manufactured anti-skid devices.
Unlike home-made options with my own hands, industrial designs are forced to compete in the market, which means they need to be made more convenient and reliable through the use of:
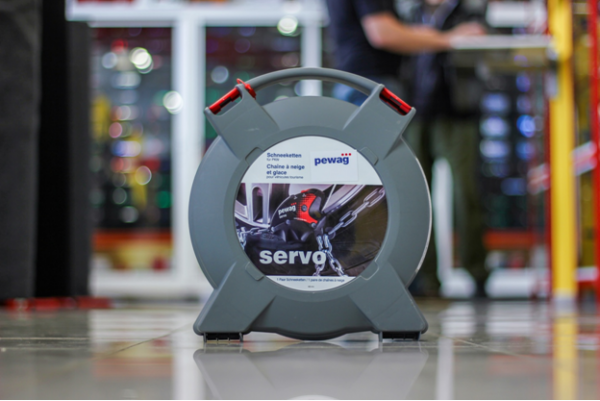
As an illustration, we can cite products - classic snow chains from Pewag, one of the oldest in Austria, or trackers - Mita snow chains. The latter are installed in the tread groove, secured individually, all operations can be done with one key. Efficiency is no worse classic version, but the cost of a set weighing 9 kg is approximately three times more expensive.
One of famous brands were classic Thule snow chains. The design uses a diamond-shaped pattern with external asymmetry, which makes it possible to effectively provide traction on ice. Mounting on the wheel is carried out using a special arched device and a central aluminum stand, which ensure automatic tension of the fragments and quick withdrawal in a few movements. To prevent possible damage to the disc, protection made of synthetic wear-resistant material is additionally installed.
What is better - chains or anti-skid bracelets?
Except unusual idea Mit trackers, among anti-skid devices, snow chain bracelets stand out. The idea of a unitary device, cheaper, more universal and easier to use, has long required its implementation. What are the advantages of a bracelet anti-slip scheme?
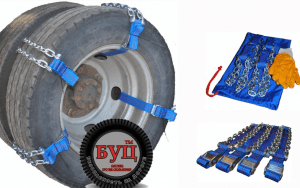
Firstly - versatility and flexibility of application. The bracelet is easier to put on the wheel, the quantity can be easily adjusted installed devices, the wheel tires suffer significantly less.
Secondly, they are made on the basis of high-strength rubber, Kevlar fibers, wear-resistant polymers and, as a result, are much lighter than steel chain devices. The bracelet is easier to repair and maintain; a rubber pad studded with high-strength metal-ceramic or carbide studs is easier to repair than if it were an all-metal structure.
Among the disadvantages of bracelets, we can note more high cost and the danger of making sharp turns at speeds of more than 20-25 km/h; in any case, after overcoming snow or mud obstacles, they must be dismantled.
Classic chain devices have a longer service life, are cheaper and are heavier to use. For classic off-road it is the best option.
DIY snow chains for trucks
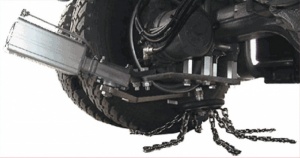
Anything that helps combat truck slippage will make its operation more reliable. Widely used as ordinary classic chain attachments anti-slip and original ideas- automatic snow chains for trucks. One of the representatives automatic devices, ONSPOT VBG, is controlled remotely, the design allows the connection to be made using a pneumatic drive controlled from a remote control in the driver's cabin. Used at speeds no higher than 50 km/h. The machine's operating efficiency and reliability are somewhat lower than conventional snow chains for trucks, but the machine will make use safer.
In order to do chain device DIY anti-slip you should:
- correctly measure the length and width of the wheel tread along the circumference of the tire;
- make two blanks of ring mounts for the wheels. They will be located on both sides of the disk. One of the fastenings is detachable with a lock - for tensioning and fixing the chains from the outside of the wheels. The second fastener is also detachable, but instead of a lock, there are hooks at the ends of the ring blank that allow you to close the fastener into a ring;
- we cut the blanks - 8-9 pieces of chain transverse chain segments and thread the wire of the ring fastenings through the last links;
- To make it easier to install a snow chain with your own hands, replace one of the chain sections with a piece of wire with a diameter of 7-8 mm, bend it in the form of an arch and weld the ends to the ring wire fasteners .
How to put on snow chains with your own hands
Dressing it is not particularly difficult, but it requires work, accuracy and attention. First of all, the chain is laid out in front of the wheel, locks on outside and the hooks of the back of the chain on the inside of the wheel. We drive over the device so that from the end of the unfolded device along the track to the point where the wheel rests on the snow or ground there is approximately 20-25 cm. We throw the rest of the chain system onto the wheel and carefully straighten all the elements. Next, the hook is engaged on the inside of the wheel and the outer lock is closed. If the chain has a tension adjuster, you should do everything you can to increase the tension and take up the slack.
Video on how to install snow chains:
In the life of a car owner, situations arise when he overcomes off-road conditions or snow drifts. There will be no problems if the car is an SUV and has studded tires. As for ordinary cars, attempts to drive through mud or snow in winter end in failure.
Anti-skid chains. Purpose, advantages and disadvantages
To improve the off-road performance of a vehicle, snow chains or traction chains are used. The purpose of these accessories is to increase the vehicle's cross-country ability. They play the role of universal lugs.
After installing them, the driver receives:
- good cross-country ability on snowy roads;
- the ability to overcome ascents and descents with less likelihood of losing control;
- improved vehicle handling on icy surfaces;
- increased rowing properties when overcoming mud.
Thanks to anti-slip chains on the wheels, the car overcomes serious off-road conditions. But we note that cross-country ability depends on ground clearance.
Disadvantages of snow chains:
- Increased load on the steering mechanism and transmission elements.
- Inability to move quickly (you won’t be able to drive at speeds over 40 km/h).
- Intensive tire wear.
- Strong noise effect.
Chains for passenger car will help in off-road conditions or snow drifts, but long-term use is not recommended.
Types of chains
Despite negative qualities, snow chains increase the vehicle's maneuverability.
These funds differ from each other in:
- material of manufacture;
- geometry of the drawing.
These differences affect the vehicle's on-road behavior and off-road performance.
Material of manufacture

Based on the material used, chains are divided into:
- Tough.
- Soft.
Initially, such means of increasing cross-country ability were made of metal - rigid chains on wheels. The manufacturing materials were steel, aluminum, titanium. At the same time, the strength of such a product is affected by the metal, size and thickness of the links. The more links, the higher the cross-country ability.
Video: ABC of off-road. Anti-skid chains
The advantages of a rigid structure are improved vehicle cross-country ability and improved anti-slip and anti-icing performance on icy surfaces. Such a chain in the form of a bracelet “scoots” out from under the wheels better. At the same time, they make a lot of noise and accelerate tire wear. These bracelets on wheels have a speed limit of 40 kph. A product with large links has a significant mass, and not all cars have arch space that allows their use.
Structurally, they can be made entirely of metal chain, without a rigid base to which the transverse elements are attached.
Soft chains are distinguished by the fact that non-metallic materials are used to create them:
- rubber;
- plastic;
- polyurethane.
For the strength of such accessories, reinforcement is used. They are smaller and smaller. For them, the speed limit is already 80 km/h, and they do not have a strong noise effect. Their disadvantages include performance when moving on ice.
For driving in urban areas in winter period It is better to choose soft anti-slip chains, for example, rubber ones. But when traveling outside the city, where there is a high probability of getting into a muddy area or ice, they use the hard type.
Geometry of the drawing

As for the geometry of the pattern, three types are available:
- "Ladder".
- "Rhombus".
- "Honeycombs".

The “ladder” consists of a base - two longitudinal branches, and it is located around the circumference of the wheel on both sides. To secure it to the wheel, locks are installed on the base. Working elements are attached to it perpendicularly. Externally, the straightened chain looks like rope ladder, hence the name.
“Ladder” is the simplest type of cross-country ability, so such products are inexpensive. But such a chain has a number of disadvantages:
- working elements are parallel to each other. Because of this, the contact with the road for such a circuit is variable, which is why the car loose soil or the snow may be “buried”;
- The “ladder”, due to the peculiarities of the arrangement of the working elements, is good only for longitudinal movement, while the lateral stability of such lugs is low;
- due to alternating contact, high load on transmission elements.
Better in operational terms are diamond-type chains. Their design uses longitudinal branches, the working elements form a diamond-shaped pattern.
In “honeycombs”, the rhombuses formed by transverse branches also have a periodic arrangement, while they are additionally connected to each other by a linear connection.
Unlike the “ladder”, with the “rhombus” and “honeycomb” the contact of the working branches with the coating occurs constantly, which reduces negative impacts for tires and transmission. They provide resistance to lateral impacts, meaning the car drifts less to the sides.
What to consider when choosing
When choosing snow chains, pay attention to the material of manufacture, the geometric pattern and the dimensions of the chain. It should fit tightly around the wheel. Therefore, when choosing, be sure to find out the diameter and width of the wheel.
Pay attention to the dimensions of the links themselves. Small constituent elements provide cross-country ability in snow or ice conditions, but cope worse with mud - it requires large links.
How to put chains on wheels?
You need to mount it on the wheels in advance, before leaving for the problem area. If the car is already stuck in mud or a snowdrift, putting them on the wheels is problematic.

To put chains on wheels you need:
- In front of the wheels of the drive axle, we lay the chains on the ground longitudinally and straighten them. Fixing elements (hooks, locks, carabiners, etc.) must face the direction of movement.
- We drive the wheels onto the chains so that 20-30 cm of the product remains in front of the wheel.
- We throw the part located behind the wheel onto the wheel.
- We first connect the internal longitudinal branch with a fixing element, and only then the external one.
- If there is a chain tensioning mechanism, use it.
- We drive the car 20-30 meters so that the product sits properly on the wheel and straightens out.
Video: How to put a chain on a wheel without running over it and without a jack
And only after that we try to overcome off-road conditions. At the same time, this must be done in low gear and at high engine speeds so that the wheels can “shove out” from under themselves. In urban conditions, we drive on chains as usual, but before that it is better to do a test drive to determine the behavior of the car, and this should be done on a road with different conditions- snow, ice. And most importantly, you must not exceed the speed limit, otherwise you will lose control or break the chain.
How to make your own wheel chains
There is a very large selection of snow chains on the market now, but it is not necessary to purchase them, since they are not difficult to manufacture and you can easily make them yourself. But at home we make only a rigid chain.
First of all, let's decide on the geometry of the drawing. The simplest would be a “ladder”, but if desired, you can also make a “rhombus”, although it is more difficult to manufacture. Materials you will need:
- a metal chain whose links are connected by welding. In this case, we immediately determine the size of the links;
- fastening;
- stretching device.
Video: Making CHAINS for wheels
As for tools, you will need:
- angle grinder a machine with a cutting wheel (“grinder”);
- welding machine;
- measuring tool;
- vice.
Having this, let's get to work:
- We take measurements. First of all, you should measure the longitudinal branches along the wheel, both of them should be the same length.
- We cut off the required sections with a grinder.
- We measure the length of the transverse elements and cut them into the right amount(the more crossbars, the better).
- In the end links of the transverse branches, in the place of the weld, we make a cut and bend it slightly. We do this with all prepared elements.
- We lay longitudinal branches on the ground and use cuts in the links of the crossbars to hook to them. We make sure that the crossbars are perpendicular to the bases and at the same distance from each other.
- With help welding machine weld the holes made.
- We attach hooks or carabiners to the front ends of the longitudinal branches in the same way.
- If necessary, install a tension device on the branch that will be located on the inside.
- We install the manufactured product on the wheel and check how it sits (if necessary, we increase or shorten the longitudinal branches).
Can be used during assembly bolted connections crossbars with longitudinal branches, but weld more reliable.