A drainage ditch in a dacha is something that exists near almost every site. And it’s not uncommon for problems to arise with it, namely, its walls crumble, as a result of which it becomes, at least, not beautiful, not to mention how it copes with its function. A function drainage ditch is to divert excess water generated during a flood or rainfall from the site and buildings on it.
Before strengthening a ditch in a dacha, you need to make sure that its design corresponds to the task assigned to it; below we will consider what options for constructing a ditch can be.
Construction of a ditch at the dacha, options
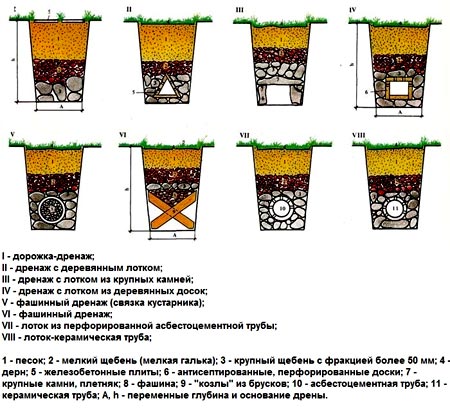
Depending on the slope of your site and the volume of water that your ditch periodically has to accept, you need to choose the type of ditch that suits your needs. In addition, you can pay attention to how your neighbor’s ditch is arranged, whether he is satisfied this decision, perhaps it would be better to make them the same and thereby ensure common system storm drainage near your sites. The picture below schematically shows the main types of ditch construction in a dacha and options for strengthening it.
An effective drainage system is not limited to just a ditch, it must consist of at least two independent networks
- One of them - linear system sewerage, described in detail in this article. Typically, such a sewer system is built when the site is constantly flooded. The top point of such a sewer system is marked, depending on the slope of the site, and a network of channels is drawn from it; the channels themselves have a slope of at least 5 mm relative to the top point for each meter of the channel. Thus, all water from the site is collected in an open drainage system
- The second is drainage around the house, described in detail here. For him, the top point will be the far corner of the building. The drainage network, arranged around the perimeter, is also made with a slope of the same 5-10 mm per meter, it is covered with turf or paving slabs
Let's consider additional requirements for trench systems. The trenches should be at least 50 centimeters wide and deep; it is advisable to make larger trenches near the foundation. In order to strengthen the bottom of the trenches of the systems, crushed stone, gravel or at least sand can be used; it is advisable to compact it. For the trenches of the above drainage systems, strengthening the walls is not required, since they are still covered with earth or inserted into them concrete trays, but for a ditch near the site this is necessary. We will look at ways to strengthen the walls of a ditch in a dacha below.
What methods exist for strengthening a ditch in a dacha?
The chosen method of strengthening the ditch depends on the slope of its walls. Depending on this angle, the following methods of strengthening are divided:

Strengthening ditch with improvised materials
The simplest and available material strengthening the walls of the ditch is slate. What it looks like finished 
To build such a structure, we will need the slate sheets themselves, metal pipes or fittings, a sledgehammer to drive them in, of course, a shovel, possibly a crowbar. And also a grinder for cutting slate sheets into the required identical pieces; it won’t hurt to wear a respirator; there will be a lot of dust when cutting. Cut slate sheets are placed directly into the ground to a depth of about 30 centimeters, and the sheets should fit tightly to each other. Pipes or fittings are needed to secure the positions of the slate sheets; they are driven in in a checkerboard pattern on both sides of the sheets.
Another material that is widely used by summer residents due to its availability is car tires. Old tires are laid in rows and fastened together with bolts or ties, the voids inside the tires are filled with soil or sand and gravel, and to give even greater strength to this structure, metal rods are hammered into the middle.
Another option with tires involves laying them not in rows, but in the form of a ladder. Each new row is laid on the previous one with a shift of half the diameter of the tire. When such a staircase is laid, it is also covered with soil or sand and gravel. 
Geomats and geogrids
First, let's figure out what geomats, biomats and geogrids are. So, geomats and biomats are polymers with a waterproof structure; they are made from polypropylene lattices superimposed on each other under high temperature. This structure allows plants to penetrate through them, but at the same time it remains waterproof. Let's look at an approximate scheme for laying geomats on a slope:

Geogrid is a polymer mesh with a square cell, usually on a polyester base. An approximate layout of its installation:

Rigid geogrid for ditch reinforcement
Geogrid is a stronger and more durable solution than all those described above; geogrid is made from polyethylene and polypropylene, this material is not subject to corrosion and can last a very long time for a long time. Geogrid is used in very deep ditches, almost ravines.
Let's consider an approximate scheme for strengthening a ditch slope with a geogrid:
1. Slope preparation, similar to geomats and geogrids
2. It is necessary to stretch the geogrid along the entire slope of the ditch and, if necessary, cut off the excess
3. The geogrid is secured to the ground with anchor rods, the thickness of which is 1.5 cm. and a length of 50 cm or more, it is necessary to install fasteners over the entire surface of the geogrid in a checkerboard pattern in increments of about 30 cm.
4. The geogrid cells are filled with either crushed stone, if the ditch is often filled with water, or sand, if it is dry most of the time. Just like the previous options, it is possible to sprinkle with soil and plant ground cover plants. 
Strengthening the ditch with gabion
This is the most durable and strong, but expensive material for strengthening the walls of ditches and not only; factory products can be of almost any shape. Essentially this metal grill filled with stones made of galvanized wire with PVC coated For additional protection from corrosion. By the way, gabion is translated from French as a basket with stones.
Using gabion as a ditch strengthening material is a very expensive pleasure, therefore in this case We will not provide a diagram of its installation. With a factory gabion, it is advisable to order its installation on site from specialists; as a rule, such companies work this way. But the result is pleasing to the eye, if aesthetics and high-quality execution are important in this matter, regardless of the relative high price then it will be best choice. In addition, manufacturers guarantee 70 years of service for such structures.
Almost every garden or summer cottage with high level groundwater is equipped with a drainage system. Such additional communications are necessary to drain excess water from the territory. Thus, they protect the site from flooding, and the buildings on it from destruction. Many drainage systems are made open method. A network of trenches is laid throughout the site, with the help of which water is drained. But in this case, a difficulty arises, because you need to know how to strengthen the drainage ditch. What methods are there? This is exactly what the article will discuss.

Strengthening the walls of drainage ditches can be done using various special products produced by manufacturers. The following devices are used for this work:
- biomats or geomats;
- geogrids;
- geogrids;
- gabions.
The first three options are used for slope slopes from 8 to 15°. If the ditch walls are steeper, then geogrids or gabions are used.
Geomats or biomats are a kind of sponge made of several layers polymer gratings. Through this roll material vegetation grows freely, thereby strengthening the walls of the drainage ditch even more reliably.

Installation of geomats is quite simple. First, the slope is cleared of debris and large plants(shrubs and tall grass). Then the surface needs to be leveled using a rake. After this, the edge of the geomat is attached to the upper part of the slope using anchors. Then the roll is rolled out to the base of the slope and the excess piece is cut off. The lower edge of the geomat is also secured with anchors. After this, the next strip of material is laid by analogy. In this case, you need to make an overlap of 15 cm.
After the entire slope is covered with geomat, it is covered with soil (3–4 cm is enough). Then it is advisable to sow the surface with the seeds of herbal plants. Yes, you will improve appearance and secure the material more securely.

The geogrid is made in the form polymer mesh with square cells. This material, like the previous one, is produced in rolls. Its installation is similar to strengthening the walls of ditches using geomat. First, the slope is cleared and leveled. After this, the surface must be compacted using a hand roller. Then the mesh is laid out and secured, using anchor rods or metal brackets (at least 15–20 cm long).
The geogrid can be covered with soil (in this case it is sown with grass seeds) or covered with small pebbles or crushed stone.

A stronger and more reliable material for strengthening the walls of a drainage ditch is geogrid. Such products are made from durable polyethylene or polypropylene. The geogrid is attached to the slopes using anchor fasteners (an L-shaped product, 50–80 cm long).
Before starting work, it is necessary to drain the ditch. Then the slopes and bottom are cleared of debris and leveled. After this, the geogrid is laid out. The fastening is done in a checkerboard pattern at a distance of 30–40 cm from each other. After this, all cells are filled with sand or gravel.
The most expensive, but also the most reliable strengthening of the slopes of drainage ditches is considered to be gabion. Such products are made in the form of a parallelepiped made of mesh. In this case, double-braided metal wire is used.
To protect against corrosion, the mesh is covered with a layer of plastic. Large stones or crushed stone are placed inside the gabion. Such protection can last more than 50 years. At the same time, the appearance of the gabion is very attractive.
We use available materials
 All of the above methods require quite a decent financial investment from the owner of the site. But you can strengthen the walls of the drainage ditch in a cheaper way. The most common option is to use slate.
To work, you need to prepare some tools and materials. You will need:
- Slate (you can use any slate, even used one, as long as there are no large holes in it).
- Metal pins or pipes 1 m long.
- Bulgarian.
- Shovel.
First of all, the slate sheets are cut into equal pieces the right size. Then, using a shovel, we install them in the ground along the edge of the ditch, to a depth of 20–30 cm. Next, we drive in rods or pipes on both sides of the slate. Such slope strengthening does not look very attractive, and its service life is not long. But as a temporary solution it may well be suitable.
In addition to slate, you can use old car tires. But this option is acceptable if there is enough space on the site. In this case, the tires are stacked on top of each other along the walls of the ditch. You can place each circle with an offset, in which case the slope will be flatter. Then soil is poured inside the tires, and grass is sown on top or small shrubs are planted.
After the vegetation has germinated, the appearance of the slope will be close to the natural landscape. Car tires do not decompose, which means that such slope strengthening will last for a very long time.

Whichever option you choose to strengthen the drainage system, it is important to do all the work efficiently. In this case, you will not have to deal with the arrangement of the ditch again. If you have any questions about this topic, write them in the comments to the article. Do you have any alternative ideas for strengthening ditch drainage? Then share them with us by writing your opinion. Your experience will be very useful!
Video
If you do not have enough funds for the arrangement drainage system, then don't despair! The video suggests a method for laying drainage from old tires, which you can repeat with your own hands without the involvement of a specialist:
Not everyone is destined to become an owner. personal plot on flat, open and at the same time dry terrain. Areas with a high level of groundwater and the threat of flooding are not very convenient for development, but this is not a reason for grief. Installing a drainage ditch or an entire groundwater drainage system will help get rid of this problem.
Construction of a drainage ditch around the house
Drainage is the process of drying the soil in marshy areas, removing excess water from the ground. This is also the name given to a system of pipes, trenches, and wells installed for these purposes. Why is it needed?
Drainage systems are smart engineering solution, which allows you to get rid of the problem of groundwater in your personal plot. Typically, the territories of gardening cooperatives and villages with individual development are protected from flooding by a drainage ditch in which a pipe is laid, with the possibility of draining collected water to a lower place.
Build protective structures at the dacha with your own hands it is quite possible, but it must be done before the improvement begins. Drainage ditch, pipe, well, drainage system - these elements create a drainage system on the site.
 Installation of a well for drainage on the site
 To strengthen them you will need a large number of excavation work both with your own hands and, possibly, with the use of special equipment.
Types of drainage in a summer cottage
The water drainage system at the dacha is a network of pipes and channels connected to each other, which are arranged in such a way as to collect and remove excess water from buildings, yards, and gardens in the most convenient way and thereby strengthen these objects. If drainage is done correctly, then surface water will not be able to harm the foundation in any way, the possibility of mold and fungi will disappear.
Before starting landscaping work on the site, it is necessary to determine the degree of threat of flooding, your capabilities and select the necessary and most suitable drainage system for this case.
Open or surface drainage
The easiest system for DIY work.
 Design of an open drainage ditch made of granite cobblestones
 Large-scale excavation It is not required here; ditches dug throughout the territory into which a storm pipe drains its water, rain flows, and excess irrigation flow off are sufficient.
Deep drainage system
A more complex option, which is needed in an area with a high level of groundwater located in the lowlands, and will also not be superfluous in clayey and loamy areas. The basis of such drainage is a drain - a pipe that is laid in a trench at a certain depth. The trench leads to a catchment well or larger diameter sewer pipe.
Vertical drainage
This structure is in the form of several wells located around the building. The water collected in them is pumped out by a pump. In order to make such a drainage system, engineering calculations and design are needed.
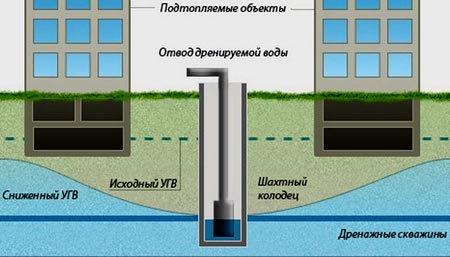 Scheme for installing vertical drainage wells
 Beam system
Complex type of irrigation and drainage structures. Consists of pipes and wells. It is mainly built on large areas or on industrial sites.
Open drainage device
The simplest option for drainage in a dacha is open drainage systems. They are divided into two types: point and linear. Point ones are storm water inlets that are fixed in the places where the drain ends.
Such storm water inlets are usually equipped with grates for collecting debris. Linear option open drainage represents a drainage ditch.
The simplest drainage systems are easy to make with your own hands. The art of creation engineering communications It was also owned by the ancient Romans. A version of Roman drainage is still used in some farms today. Ancient engineers came up with the idea of strengthening drains with bundles of thick rods that prevented collapse.
 Option for installing an open drainage ditch
 It’s easy to make such a simple reinforcement with your own hands; you don’t need a pipe here, and it can last 15 years.
Stages of creating a drainage trench on the site:

Unfold to maintain the required level of soil moisture on the land plot. If groundwater lie close to the surface of the earth or there is heavy rainfall, then a drainage ditch is needed to remove excess water. A drainage ditch is usually located along the site.
The area where the house is built needs a drainage system - a complex and by no means cheap designClosed drainage network ( concrete pipes for a ditch) requires a lot of costs, so land owners prefer to deploy several open ditches interconnected. In this case, no pipe laying is required. However, an open drain also has a disadvantage. It consists in the fact that over time the slopes crumble. Therefore, it is advisable to strengthen them, especially if there is a drainage ditch along the fence.
The strengthening method is chosen depending on the angle of inclination of the ditch walls and the depth of the trench.
- If the angle of steepness is less than 8°, then the slopes are strengthened by planting plants.
- Geogrids and geomats are used to secure slopes whose angles range from 8° to 15°.
- Steep slopes, the angle of steepness of which is more than 15°, are strengthened using reinforcement from the inside. For this, reinforcement methods with geogrids and gabions are used.
Shallow trenches are lined with stones from the inside.
Let's look at the most popular strengthening methods.
Option 1 - three-dimensional geogrid to strengthen the walls of the drainage ditch
Geogrid is very often used to fix a slope. It is a mesh made of reinforced threads intertwined with each other. The joints of the threads are additionally secured. Used for production polymer material. Also polymer compositions used for additional processing to strengthen the grid. The roots of plants planted nearby easily penetrate the mesh holes and thereby create additional soil anchorage on the surface of the slope.
Geogrid limits slope deformation and ground movementThe polymer from which the geogrid is made is resistant to rotting, adverse natural factors, and corrosion processes. The mesh is not subject to deformation and has high wear resistance; able to withstand high loads and stress. The geogrid is made from flexible material, so it can be laid even on an uneven surface.
Lay the mesh as follows:
- Using a hand roller, the soil inside the ditch is compacted.
- Next, rolls of material are rolled out, and the strips are joined together.
- The material is secured inside the trench every 1.5 m with special brackets.
- The mesh is decorated or camouflaged by backfilling or planting plants.
Option 2 - anti-erosion geomats
The structure of the geomat consists of layer-by-layer connected polypropylene lattices fastened with polypropylene threads. Outwardly, it resembles a multi-layered web. The gaps between the threads are small, so the geomat holds the soil of the slope and prevents the spread of vegetation roots. Over time, the plants tightly intertwine with the material and strengthen the walls of the ditch.
Geomat polypropylene is resistant to environmental conditions (exposure to water, sunlight, temperature changes, rotting), non-toxic, and non-fire hazardous.
Laying the coating is easy and can be done even in winter. The work is performed in the following sequence:
- Trench preparation, cleaning.
- We fasten the edge of the roll with anchors to the top of the slope.
- Roll out the material to the bottom of the trench and cut it off.
- The lower part of the piece of material is secured.
- Roll out the next strip of material from top to bottom, overlapping 15 cm with the previous one.
- A 3-5 cm layer of earth is laid out on the covering and seeds are planted. At the same time, the mesh to strengthen the slopes is additionally reinforced with vegetation.
Option 3 - homemade gabions
Gabions are a frame made of metal mesh, filled with material such as stone, pebbles and others. The cell size of the frame is made larger than the poured material. This structure holds and decorates the slope.
The mesh is made of double twisted metal, galvanized or PVC coated to avoid corrosion. First, the gabion is installed, and then the selected material is filled in.
Gabions can be factory-produced or your own. To make gabions yourself you need:
- Weld from twigs for the slopes of the ditch. The diameter of the rods is about 6 mm.
- Install the frame into the ditch.
- Next, fill the frame with pre-purchased filler and cover it with a metal mesh.
Option 4 - volumetric geogrid
Geogrid consists of ribbons of synthetic material bonded in such a way that the coating itself appears to be a honeycomb structure. Filler is poured into the cells. At high humidity It is preferable to fill with crushed stone or pebbles. If the slopes are dry, then sand can be used.
Geogrids are made from perforated strips and tapes. Perforated geocells have the best drainage properties, so they are the most preferable for strengthening the drainage ditch.
Coverings without perforations can be used if a geotextile layer is first laid!
The width of the tape determines the height of the lattice rib. The width of the cell also varies. The bulk material and the angle of inclination of the trench wall to be strengthened determines the choice of geogrid.
The material used for geocells is characterized by increased wear resistance, strength, resistance to putrefactive processes and other influences environment.
Various fillers can be filled into geogrid cellsThe coating installation process is carried out in several stages:
- We level and compact the soil on the slopes of the ditch. If necessary, we line the bottom of the trench with geotextiles.
- We lay the covering from top to bottom.
- We stretch the covering and secure it with anchors with a curved upper end. It is important to do this correctly, since the service life depends on it.
- We fill the geocells with filler.
Option 5 - budget methods
In conditions of shortage Money You can use economical design options that will strengthen the slopes. Ways to strengthen the ditch summer cottage a lot has already been invented. Let's describe some of them.
Old tires - popular for summer cottages
The tires are laid in rows, secured to the surface and to each other. Then filler is poured, including into the spaces between the tires. The drainage hole is also reinforced with tires.
Slate sheets
The option is inexpensive and does not require much effort. Installed and secured slate sheets on the slopes of the ditch perform a strengthening function, but the material is not wear-resistant.
Slate is popular and cheap material, and besides, there is one in almost every areaWe lay polystyrene foam with our own hands
An inexpensive option is foam slopes. The material is rot resistant. Polystyrene foam is also used as a geotextile layer. Strengthening the drainage ditch with polystyrene foam slopes is popular among owners of dachas and private houses.
Retaining walls
Retaining walls are a method of preventing soil from collapsing from slopes at different angles. It is widely used not only in drainage ditches.
Eat different types retaining walls. They are made from materials: wood, stone, brick, concrete and others. For drainage ditches, it is preferable to use moisture-resistant material: concrete, stone. The design of the retaining wall can be calculated by professionals or independently in specialized computer programs. Retaining walls are needed to strengthen the drainage ditch.
The structure of the retaining wall looks like this:
- Foundation. Takes on the main load. This part of the wall is located below ground level.
- Body. Actually the wall itself, which is created from selected materials.
- . It is placed behind the wall above the foundation. It prevents erosion of the structure.
For example, consider the construction of concrete retaining walls.
Concrete reinforcement of a ditch in a summer cottage is characterized by strength and durability. If necessary, the concrete wall is decorated with stone, brick or other facing material. The first step is to dig a trench, the depth of which depends on the slope being secured against collapse. For example, for a slope of 1 m, a trench for the wall is dug 0.3-0.4 m deep. A frame is made from boards fastened together. A layer of crushed stone is laid at the bottom of the trench and installed reinforcing mesh. Concrete is poured into the prepared frame.
WATCH THE VIDEO
Wood is often used to strengthen the walls of the pit. To eliminate the risk of soil collapse along the perimeter of the pit, vertically position wooden beams end-to-end Spacers (horizontal boards resting against vertical ones) are laid out at the bottom.
There are many ways to strengthen yourself. Factory-made materials are considered more reliable than improvised materials. To determine the reinforcing material, analyze the type of soil, slope angle and financial capabilities. Strengthening the drainage ditch is important point, which must be taken into account when installing a sewer system in a dacha.