The baby is growing by leaps and bounds, and all the time he really wants to be like adults. A table and a chair are one of those things that are not only “like an adult’s,” but are also highly functional. Most of these products are in stores or sold at very high price, or made of low-quality plastic with a specific odor and short-lived chipboard. But there is a good way out for parents - these pieces of furniture are easy to make yourself.

Required materials and tools
There are not so few materials for making a children's table and chair from wood yourself; they are available and can be bought at any construction supermarket. As the main material, you can use not only natural wood, but also plywood or chipboard. But, of course, much more durable and durable material- tree. It is environmentally safe and does not emit toxic fumes and does not cause various allergic reactions.

List necessary materials for the table includes a quite affordable assortment.
- Tabletop. You can work out its dimensions yourself. The tabletop, like some other parts, is best made to order. Classic square or rectangular shape. Round children's table is not a common practice.
- Four wooden legs. It is also recommended to buy them to order. Now such products can be ordered in carpentry workshops and even in some construction stores.
- Boards for the power body. They must be purchased in quantities of 4 pieces.
- Screws, nails or tenons with glue of your choice.


You also need to purchase material for a hand-assembled chair.
- Boards for back and seat.
- Bars for handles. They are purchased optionally, depending on whether you plan to make armrest handles or not.
- Four legs. They should be small, but carefully sanded.
- Screws or nails of suitable sizes.


In addition to these things, you will need tools that will be needed for both the high chair and the table:
- electric drill;
- wood glue;
- sandpaper;
- roulette;
- ruler;
- pencil;
- hammer.

Construction schemes
When purchasing wood materials, you must check their quality. The bars and boards must be free of nicks, cracks or small protruding burrs. The wood should not be damp, rotten or infested with pests. Table. The design of the table itself is not complicated, so the absence of drawings is allowed; the main thing is to carefully connect and “fit” the parts of the future product to each other. Initially, you need to count on the fact that the height of the table will be no more than 50 cm. This height will be the most optimal for a child. It is important to consider that the dimensions of the table and chair should be comparable.

The design of the table itself may be different, but we will focus on the classic square version with 4 legs. A special feature of the table design are its legs. They should be quite thick and stable. The cross-section of each leg should be within 5x5 cm. Chair. As a rule, the design of all chairs with a back (this is what we are considering in this article) is identical; differences can only be in the shape and size of the back. You can also experiment with the shape of the seat. It can be classic square, polygonal, round, carved or upholstered.

Not so popular self-production, but quite real tables and chairs, assembled without the use of screws, nails or other fastening materials. The parts are fastened using a special technique for fastening wooden blocks at the joints. Similar work requires experience and skill, so is not entirely suitable for non-professionals. Regarding the fastening of the structure, there is a large number of options - various screws, nails, types of glue and even spikes.

Upon completion of the process of constructing the table and chair, it is imperative, as in the beginning, to check them for the presence of protruding pieces of wood and cracks. All sharp corners and uneven surfaces should be smoothed as much as possible. But more about this below.
How to do it yourself?
Let's take a closer look at the furniture manufacturing process.
Chair
- Preparing the legs. Since a children's high chair is furniture with small dimensions, then, accordingly, its parts should be small. In particular, the length of the legs should not be more than 30 cm for a 70 cm high chair. All legs need to be cut down and adjusted sandpaper up to one length. Of course, the planks must also be sanded.
- Prepare strips for the legs and jumpers for the seat. This is done for the subsequent stable and strong construction of the chair.
- Connect the entire structure. At this stage, you need to carefully check all the connections of the parts.
- Glue the structure. The best way to do this is to use furniture glue, but superglue from the hardware store will work just fine.
- Securing the seat and legs. This can be done using self-tapping screws or with a simple hammer and nails. IN Lately Spikes have gained relative popularity. The part is “slung” onto the spikes and the whole thing is held together with glue. It turns out to be a fairly reliable mount.
- Processing with sandpaper. This process is necessary in order to remove all potentially dangerous nicks on the wood and give the high chair a pleasant appearance.


Table
- First of all, you need to use a tape measure to measure the length of all the legs. If there is a difference in their length, then they need to be adjusted. A child's wobbly table can cause a lot of inconvenience, especially when feeding the child. This is done using a hacksaw.
- Drill slots in each of the legs with an electric drill. You need to make a groove at the end of the part, and then make it rectangular.
- Measuring the depth of the grooves. Next, you need to measure a distance on each of the bars equal to the depth of the grooves.
- Correction. To do this, you need to saw each of the wooden blocks on all sides, and remove the excess with a knife or sandpaper.
- Connecting parts. At this stage it is important to check the accuracy of the angles; they should all be straight.
- Bonding the structure. The final stage, in which all the parts, if they are tightly connected to each other, are glued together with wood glue. For greater structural stability, you can use a hammer and nails.


Furniture decoration
The main thing when decorating children's furniture is the safety of the coatings. Paints and varnish should be purchased from a reliable manufacturer and tested on a piece of wood in advance. Relatively recently, domestic and Western manufacturers released a special varnish for children's furniture. According to the manufacturers, it is safe to apply and does not emit harmful fumes after drying. The most common design option for a chair after painting is stencil designs. They can be applied with a regular small brush from an art supply store. The same applies to a wide variety of stickers on furniture.

Paint colors should be bright, but not toxic. Primary colors are welcome - blue, red and yellow. As drawings, you can choose various folk ornaments, simplified drawings of animals, symbolic symbols such as stars, hearts (for girls), cars (for boys), and even letters and inscriptions. Your child may be delighted and inspired by the opportunity to decorate their future furniture themselves. A good option in this case, the prints of his palms are. Special craftsmen with golden hands can experiment with carving. You can decorate the back of a chair with it. To do this, you first need to draw a drawing with a pencil, and then begin the work itself with a jigsaw. If you initially plan to do the carving, it is best to do it before you assemble the chair.

Children's things are very often exposed to various mechanical and other influences, so it would be better to protect the surface and apply several layers of varnish. In extreme cases and when there is an urgent need to protect the table surface, you can use epoxy resin, which, when hardened, forms a thick film similar to glass surface. But this should only be done if the table will be used for drawing or will be frequently exposed to wet cleaning with chemicals.
Purchased furniture for a child’s room, especially from natural materials, can be quite expensive. In a store or online, you don’t always find exactly the option you like. High chair and you can create a wooden table yourself. The work will not be difficult if you prepare all the necessary parts and tools, use your ingenuity and imagination. The reward for the work is a unique product, as comfortable as possible for the baby and practical in home life.
You can create a children's high chair and table from wood yourself.
A DIY chair will cost much less, and one made according to your own sketch will meet the intended parameters and the required degree of comfort for the baby.

The reward for the work is a unique product, as comfortable as possible for the baby and practical in home life.
All details from natural wood can be purchased in specialized departments of construction stores. They will select boards and bars of the required sizes for you.
A DIY chair will cost much less.
A child's high chair, created with one's own hands, is high-quality furniture for a child. In the process of work, you take into account the dimensions of the seat and backrest, which are as comfortable as possible for a growing baby, and check the strength of the structure directly at home.

All natural wood parts can be purchased in specialized departments of construction stores.
Created by yourself wooden high chair you can decorate according to your taste, and not be satisfied ready-made solution purchased furniture.

They will select boards and bars of the required sizes for you.
Required materials and tools
To create a chair you will need various materials. Individual parts will be made from them. First of all, this wooden blocks and boards from which the frame, seat and back are assembled. Instead of natural solid wood, you can use chipboard or plywood, but these materials are not durable. For fastenings, take sufficient self-tapping screws. You will need medium-hard sandpaper.

A child's high chair, created with one's own hands, is high-quality furniture for a child.
Dimensions of bars (length):
- support legs – up to 20 cm;
- seat frame connecting strips – up to 20 cm;
- backrest lintels – up to 20 cm.

A wooden chair made by yourself can be decorated to your liking.
During the manufacturing process, the thickest bars with a cross-section of 5x5 cm are used for the legs. For the planks, parts are taken with a diameter half the size of the supporting ones.

For the planks, take parts with a diameter half the size of the supporting ones.
The parameters of the seat board (height and width) should also not exceed 20 cm. The back part may be slightly higher, but preferably no more than 30 cm.
- they are less durable;
- The environmental friendliness of such products has not been 100% proven.

The parameters of the seat board (height and width) should also not exceed 20 cm.
To make a chair with your own hands, you need the right tools:
- screwdriver;
- screwdriver;
- jigsaw;
- hacksaw for wood.

The dorsal part may be slightly higher, but preferably no more than 30 cm.
The assembled chair will “require” original decor. In addition to the carved option, you can use paint or other materials to apply a design or appliqué. To accurately apply the image you will need a stencil.

The assembled chair will “require” original decor.
Deciding on design and construction
For a wooden product, you can come up with any option. A highchair is usually made with straight supports and the following forms of the back structure:
- solid square or rectangular;
- wide truncated cone;
- straight through (with jumper bar).

To accurately apply the image you will need a stencil.
Creating a product with your own hands requires careful preparation. You must first make a sketch of the project. Visually draw a diagram of the connections of all parts separately with calculations of sections and lengths. Following the sketches, you will recreate the model in reality with exact parameters. A chair that has all the right dimensions will fit the baby and will not create any inconvenience.

For a wooden product, you can come up with any option.
Certain models are created with the expectation that the child will sit behind common table along with other family members. In this case, high legs are chosen for the product, which are not attached exactly vertically in relation to the seat and floor, but more widely. The lower part of such a chair will look like a truncated cone, connected for stability by wooden blocks around the perimeter. The top part will be approximately 30-35 cm below the table level.

A children's high chair is usually made with straight supports and the following forms of the back structure
If you have certain skills, you can assemble a folding product. Such items can be easily removed if necessary into storage areas.

For selected design solution parts are processed in accordance with it.
Manufacturing process: step-by-step instructions
After preparing a drawing with exact parameters, we begin to assemble a simple children's high chair.
- Calculate the length of the legs exactly according to the diagram, saw off the excess with a hacksaw.
- Cut out the jumper bars to size that will secure the frame in the seat area.
- Connect them with supporting structure. Add furniture glue for reinforcement.
- Attach the pre-sized back and seat using self-tapping screws.
- All wood parts must be cleaned with sandpaper to avoid roughness and burrs.

A chair that has all the right dimensions will fit the baby and will not create any inconvenience.
If the parts are disproportionate, “adjust” them according design scheme using a hacksaw. To make the chair you created with your own hands comfortable, ask your baby to sit on it, ask how comfortable he is.
If all sizes were determined correctly, the child will like it New furniture. To ensure the parts are smooth, sand the surface again.

Certain models are created with the expectation that the child will sit at a common table with other family members.
To varnish the product, use only safe compounds - a special coating for children's furniture, environmentally friendly and having the appropriate certificate.

The top part will be approximately 30-35 cm below the table level.
After exterior finishing varnish, let the chair dry thoroughly for a day or two. Then you can start decorative finishing, if such is intended. If it involves carving, then varnishing is done after completion artistic treatment and sanding parts.
Decorating a chair
Use a jigsaw for carving. You can make a decoration in the form of a flower by cutting it in the center of the back, or any geometric figure. First, mark the area of the future decoration with a pencil so that the carving is even. Parts such as legs and back can be carved. The corners of the seat can be rounded using a jigsaw and sandpaper.

During the manufacturing process, the thickest bars with a cross section of 5x5 cm are used for the legs.
The top can also be made not strictly rectangular, but a truncated cone, rounded, compound. In the latter option, you will need additional bars and cross bars - one or two. They are secured using special holes at the junction with the dorsal frame. It's pretty labor-intensive process, but if you wish, you can choose this option.

For fastenings, take sufficient self-tapping screws.
All steps for processing parts must be performed before the chair is assembled - this way the work process will be faster, more convenient and neater.

If you have certain skills, you can assemble a folding product.
To make a home-made piece of children's furniture look more interesting, you can apply a design to the back and seat. To do this you need to use safe paints. The color scheme should be bright and cheerful. Simple ornaments, floral patterns, and imitation of children's toys, such as cars, look great on wooden furniture.

Instead of natural solid wood, you can use chipboard or plywood, but these materials are not durable.
Due to the fact that the size of the product is small, a large pattern will become a kind of accent that attracts the child’s attention - he will like to sit on such a beautiful chair, play games or have breakfast.

You can use appliqués for decoration – there are plenty of adhesive bright films on sale.
The image will turn out smooth if you use a stencil pre-cut from paper or thick plastic.
You can use appliqués for decoration – there are plenty of adhesive bright films on sale. Whether the image will be monochromatic or multi-colored depends on your imagination.

First of all, these are wooden blocks and boards from which the frame, seat and back are assembled.
In the seat or back trim baby chair It is not recommended to use bulky (protruding) parts, both small and large. Firstly, it is inconvenient for the child, and secondly, they quickly fall off when frequent use products.

To create a chair you will need various materials.
VIDEO: DIY high chair
When it comes to wooden furniture for a child, many parents ask themselves: is it possible and how to make a high chair for children with their own hands according to the drawings? There is only one answer - of course, you can, if you know how to hold a plane, saw and hammer in your hand. The main thing is to decide what kind of wooden chair you need to make - folding (regular), transformable, growing, or simply sew a mobile one from fabric. In this article we will focus on a regular folding chair, and use its example to look in detail at how to make a children's high chair with your own hands, and also show improvised diagrams with dimensions.
Do-it-yourself baby high chair, drawings, dimensions, diagrams - getting started
To get started, we invite you to watch the video, which may inspire you to make a folding wooden baby highchair with your own hands. Of course, the video has flaws. There are no drawings, no step-by-step demonstration of how and what is being done. The author of the video himself said that he took the dimensions from his head. He shows what he did. However, if without exact dimensions and having only a rough plan, you can do THIS, then it’s simple. He made a great chair, and it can’t help but inspire you to create your own masterpiece.
Usually, before you start making anything yourself, you need to clearly decide on the type of chair and its size. To do this, sketch out at least a rough plan on paper. For more experienced craftsmen, it may not be needed, but the dimensions are still needed.
So, what is a classic folding wooden high chair? A seat with a small table, located on high legs that fold down. The table and seat can also be folded. Only the back and front legs remain stationary.


In order not to reinvent the wheel, you can search for the diagram on the Internet. There are several of these DIY high chairs with drawings and dimensions. Most good options shown in the picture.
When deciding on the size, first of all, you need to know the height at which the chair itself is located. Optimal height The legs of a folding wooden chair are about 80 cm (800 mm). At this height it is convenient to feed the child - there is a table and armrests on it. The seat itself is located at a height of 60 cm (600mm) from the floor. But the legs will have to be made exactly according to the height of the table.
 In general, when choosing the height of the legs of a baby high chair made by yourself, you should adhere to two rules:
- Parents should be comfortable feeding their child, and not bend over backwards next to him. At the same time, the height of the chair should be such that a grown-up baby, if desired, can fit into it himself.
- It is very convenient for the chair, in its unfolded state, to fit under a regular table with its small table. big table, or was on par with him. This way you can not only feed the baby while you are at home big table, but also let him play at this big table, or let him just be next to you at the table. Choose your option.
Do-it-yourself baby high chair - looking for suitable material
 At all wooden furniture best made from coniferous species tree. The bars made from them are cheaper and are the easiest to work with. However, both spruce and pine can release resin, which is very toxic and may not have a very good effect on the health of babies. Therefore, it is better to make a do-it-yourself highchair (and indeed all products for small children) from linden. Linden bars are also easy to process, but the linden tree does not emit toxic resin.
After you have decided on the type of wood, you need to prepare (buy, find in bins) required quantity bars and boards from which parts for the future chair will be cut. And to do this, you need to choose a suitable diagram or drawing of a children's high chair with dimensions in order to have a clear idea of what parts you will use to make it with your own hands. 
So, we liked the following diagram, then the spare parts for the high chair will be like this:
- 4 long bars for legs (80 cm each)
- 2 cross bars located between the legs at the bottom - the main support for the high chair (450x60 mm)
- Side “walls of the chair” - 2 pieces. (200X200 mm). The legs are screwed to them.
- Armrests – 2 (400Х30 mm)
- 2 slats between which the back of the chair is attached (170x20 mm)
- 2 rear crossbars - located between the two rear legs, the seat rests on the upper one (310x30 mm).
- Table – 1 (500Х200mm)
- Seat and back (300X300mm), (400X300mm)
- Two crossbars located between the front legs. They act as steps so that the baby can climb onto the chair. They are also needed so that the chair legs do not move apart spontaneously in case of poor fastening. Although... they play a secondary role, so making steps is optional. (310X60mm).
The thickness of all bars is 25 mm. This is quite enough for a toddler up to 20 kg - the design will withstand it. Of course, if he doesn’t jump on the chair like on a trampoline g)
Do-it-yourself folding wooden children's high chair for feeding - preparing the details
 As an example of a do-it-yourself folding wooden baby high chair, you can use the following videos. It's shown there first step-by-step production, and then the final result of production. The author tells what and how he did. A glimpse of the dimensions and approximate plan. However, even such a short review is quite understandable in order to learn from his experience and make your own chair.
After you have decided on the number of parts and their sizes, find required material, you should proceed directly to cutting them out. The most convenient way to do this is to use electric jigsaw. Anyone who deals with carpentry will understand me, because not everyone has a machine at home. After all the parts are cut out, you need to CAREFUL properly remove burrs, then sand (process) with sandpaper. Little children not only feel everything with their hands, but also taste it. So once again ATTENTION. no burrs, the baby’s safety directly depends on this. No one needs unnecessary injuries and splinters, so we do it thoughtfully and with passion.
When all the parts are cut out and sanded, you can proceed directly to assembling the chair.
How to make a baby high chair with your own hands - assembly


Now, having ready-made spare parts and a plan in my head, to the question of how to make a highchair for children with your own hands, there is only one answer - to assemble it. For assembly you will need screws, hinges, wooden or metal dowels. So, let's go.
- First, the sidewalls are screwed to the front legs (processed bars).
- At the back, two strips are screwed to the sides, between which the back will be located.
- Screw the backrest to the slats.
- Install the hind legs. They are attached either in the center of the sidewall or in the middle to its upper part. It is the hind legs that are made mobile.
- Screw the crossbar onto which the seat rests. After this, you can screw in the remaining transverse bars, including the bottom ones, on which the chair will directly stand.
- Attach a seat. It is attached either to small hinges or to couplings that hold the pipes together.
- Screw the armrests to the table
- Attach the armrests to the chair. They are attached to the rear slats, to which the backrest is screwed.
High chair assembly completed
Do-it-yourself baby high chair - the final stage
 After you have made and assembled your own baby high chair, you should take care of the soft seat, in other words, the baby’s comfort. To do this, foam rubber is glued to the back and seat, after which the seat is upholstered with washable oilcloth in bright colors. If the foam stubbornly does not stick, then we fix it furniture staples or just large staples and a construction (furniture) stapler. Oilcloth can also be attached using construction stapler, here you can take small staples.
The finished chair must be painted or patched. In this case, use paints ATTENTION., exclusively ACRYLIC, and varnishes NON-TOXIC. This is necessary in order not to harm the child’s health, in case he decides to try the stool.
Do-it-yourself baby high chair – which is easier to make or buy?
 And now, having sweated and finally made it, let’s ask ourselves the question - is it easier to make a highchair for children with your own hands or buy it? Today, most parents don't bother. And they just go to the store and buy the chair they like. In general, this is justified. Of course, if you buy ready material and make a chair yourself, you can save money. Moreover, considering that folding wooden chairs from famous manufacturers today they are not cheap. However, an ordinary purchased wooden transformer is comparable in price to a hand-made folding chair. Therefore, if the question is what is easier: to make it yourself or buy it, then the answer is clear - it’s easier to buy it.
It’s another matter if you like to do everything yourself, this question will no longer arise. In addition, if you often make something, then you will probably have a large supply building material. Then you won’t have to spend a lot of money, but only clear away years of rubble, which is also not bad.
Ultimately, you yourself will decide what is preferable for you, but I would like to tell beginners: any dad can make a simple folding wooden baby high chair for feeding with his own hands. You don't need to be a professional carpenter to do this.
Every parent sooner or later faces the problem of purchasing children's furniture, and a highchair in in this case is no exception. Moreover, the market with similar products offers us a fairly wide range, but when choosing, some difficulties often arise. In particular, which material should you prefer? The tree, naturally, wins in this fight, but the price for such a product leaves much to be desired. You can buy a plastic high chair, but it is not very pleasant to the touch and is not always comfortable. There is a solution: make children's
Purpose of a high chair
The use of this piece of furniture has some features that depend on the age of the child. Accustoming your baby to a high chair should begin at the moment when the child can already sit independently (usually around 6-8 months of age). At first, it is used exclusively for feeding, and only then for sitting during creativity or other activities. Today, hand-made children's chairs that can be used for a child come in two types:
- simple chairs that can hold even an inexperienced baby;
- transformable chairs that perform several functions simultaneously.
With age, a child develops a lot of hobbies that require spending a certain amount of time sitting in a chair. The main function is still to use it for sitting at a table, including a dining table. A children's high chair, made with your own hands, taking into account all your wishes, will become your baby's favorite.
Necessary materials
It’s very easy to make a children’s highchair with your own hands, just strictly follow the sequence of actions and have everything at hand necessary tools and materials. To make it you will need:
- several bars that have a cross-section of 50x50 mm;
- bars with a cross section of 25x25 mm;
- bars with a cross section of 25x50 mm;
- board with a cross section of 25 mm;
- self-tapping screws;
- drill-driver;
- screwdriver (if necessary);
- sandpaper.
Since the high chair is intended for use by children, it is worth remembering high quality material and its safety for health. It is also necessary to think about what the chair should be like. You should make this piece of furniture with your own hands, using only those bars that have a smooth and dry surface. Only if these rules are followed will the life of the high chair be significant.
Preparatory work
Before you make a highchair with your own hands, you must make drawings of the parts. Before you start work, you need to carefully prepare the workpieces. The material should be dried and then walked over its surface. The latter must be done until the workpieces are perfectly smooth. This is necessary to eliminate the possibility of injury to the baby.
After preparing the material, you should make a schematic drawing, the so-called sketch. If you are making a children's high chair with your own hands, try to make the drawings as simple as possible. Then you will not have any difficulties during assembly.

Assembling the legs
You need to start making children's high chairs with your own hands from the bottom of the future product, namely from its legs. You will need two wooden blanks 27 cm long and 52 cm long. These parts of the chair must be carefully processed using special tools for working with wood - a workbench and a plane. All four sides of the bars must be brought to a size of 40x40 mm. For ease of processing, you can safely use a vice, between which you can insert a block. To avoid the appearance of dents, it is necessary to take preventive measures, in particular, the use of spacers made of thin aluminum or plywood, having previously given them an L-shape. After processing the legs of the future chair with a plane, you need to make markings and remove all unnecessary parts with a jigsaw.

Assembling the crossbars and backrest
At this stage, the back of the product is designed, as well as the corresponding crossbars. The blanks for the crossbars should be about 17 cm long, and for the back - 16 cm. When cutting out the crossbars and backs, you need to make a tolerance of about 5 cm. You cannot forget about this, since they are extremely necessary for further processing. The processing process itself is similar to the previous procedure. As a result of all actions, you should receive bars with the following parameters:
- 10x15 mm;
- 20x20 mm;
- 20x45 mm.
To sit you need to take wooden boards, there should be two of them. Moreover, the dimensions should be as follows: 150x250x25 mm. These boards need to be planed on four sides. Gaps are not allowed. After the edges are processed, the sharp corners of the boards need to be rounded. Various patterns will help you with this. At the end, the workpiece data in mandatory it is necessary to work with sandpaper, especially for the ends of the bars, which as a result should be perfectly smooth.
Manufacturing of locking elements
This stage involves performing the following actions. First of all, using a drill, in accordance with the existing markings on the legs of the future chair, you need to make holes that will not be through, but blind. A well-known tool - a chisel - will help make this task easier. Using this device in combination with a chisel, all excess wood must be removed from the resulting grooves.

Selecting a method for fastening parts
Before directly assembling all the parts, you must choose the method by which they will be attached to each other. There are several such methods:
- with spikes;
- using glue;
- using nails;
- wedge method.
The last method is the most popular. To do this, you need to make a cut on the tenons that are located on the crossbars along the entire length, 5 mm wide. The wedges should be about 5 mm shorter than the grooves, but it is recommended to make their width 0.5 mm larger. Before inserting the crossbars into the grooves, the wedge must be mounted into the resulting cut, and then assemble all the parts with a mallet. This will cause the wedge to expand the tenon and the chair will not be in danger of loosening.

Final assembly of the product
After all the workpieces are cut out and their surface is sufficiently smooth, you can safely proceed to final assembly products. You will get more reliable children's high chairs by additionally lubricating all their connections with your own hands. You need to start assembly with the frame. To do this you will need bars measuring 15x15 mm and self-tapping screws. After the frame is constructed, you can mount a board that will act as a seat. Before doing this, it is advisable to make holes in the bars for self-tapping screws. This is necessary so that when assembling the chair, namely when screwing the fasteners, the product is not damaged. The bars themselves need to be attached specifically to inside crossbars, and only then install the seat itself.

You can also make children’s tables and chairs with your own hands, such as in the photo below.

You can finish the job by covering the entire chair with varnish, after painting the product in the desired color.
It all started when I had a daughter :) Now she is 1.3 years old and she has already learned to deftly sit on daddy’s lap and read a book. Each child, like an adult, should have his own chair. Searches in children's stores were unsuccessful; the chairs were all plastic and large or with a hole for a potty. We needed a normal high chair for a very little girl.
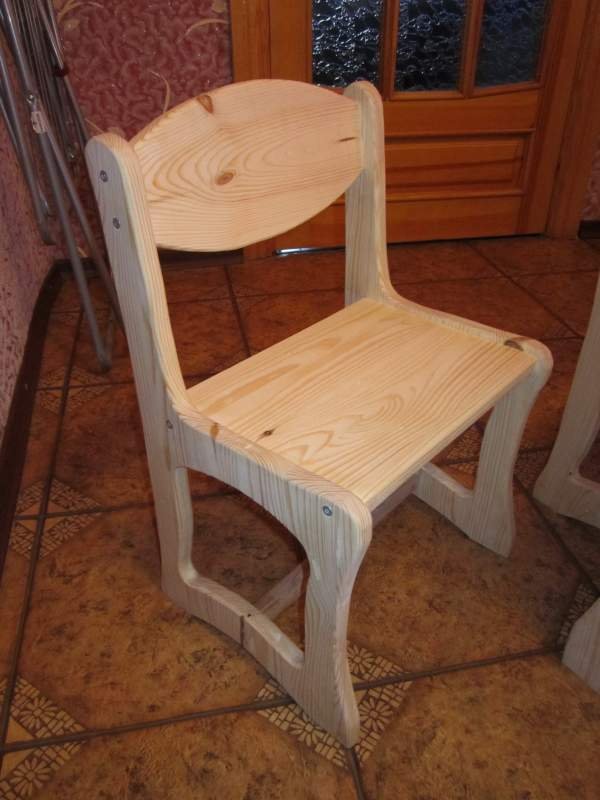
Here is a chair, made with my own hands in a couple of evenings, not a work of art, but very comfortable and my daughter loved it!
There were no drawings initially, everything was done by eye.
In the photo, my daughter is already sitting on the new chair:)

The children's chair is made of 8 mm plywood. The parts are glued together with PVA glue, several screws and the entire structure is coated with colorless varnish in one layer. The weight of the chair is 715 grams, the child can easily drag it around the apartment.
The height from the floor to the seat is 180 mm, the size of the seat cover is 240x190 mm, the height of the chair from the floor to the upper edge of the back is 360 mm, the dimensions of the back are 235x115 mm.

The test version of the chair was made from cardboard in three minutes. It was made in order to get approximate dimensions and understand how comfortable it would be for a child. It didn’t work out very well to sit the baby on this chair, but in terms of size it turned out to be just right!


To make the second part of the chair, I simply traced the first part with a pencil and also cut it out with a jigsaw.
By the way, I must say about connecting parts. Initially, I planned to do everything without screws and nails, and since I did everything impromptu, there were some mistakes. In the photo below you can see that the parts have spikes, on the part on the right one spike is missing, I forgot to draw it and sawed it off :)

I also sawed off the tenon on the part on the left later, so the back had to be secured with screws.
Below in the photo is a detail of the back and a detail that is located under the seat; it prevents the chair from swaying. This part should also have spikes, which I also forgot about :)

After all the parts of the chair are cut, everything needs to be cleaned with sandpaper, I spent a lot of time on this so that not a single scrape was made! Afterwards, we glue everything with PVA glue or screw it together with screws, if suddenly you, like me, forget to make spikes :) And finally, we cover the product with a layer of varnish or, as is now fashionable, we do decoupage. I would like to paint the chair with bright colored paints, but for now I will leave it as a pure wood color.

Update: I cut several of these chairs using CNC, so I had to transfer the drawings to AutoCAD.
Alice: “But I’ll still sit on daddy’s chair!”:)

Send photos of your chairs and happy smiles of kids, email address on the page