Often interfloor ceilings in apartments and houses are made from reinforced concrete slabs, but there are ceiling structures with wooden beams. Such ceilings, as a rule, are used as decoration in the interior design of rooms in any style.
Features of ceilings with wooden beams
Beams used for ceiling, are made from a bar with a section of 150x150 or 150x200 millimeters or from boards sewn together with a size of 50x150 or 150x100 millimeters. Such a base is able to provide the necessary level of strength and allows you to perform ceiling filing from many materials.
Overlappings are interfloor and attic. The first of them are located between the heated rooms and in this case they equip only sound insulation, for which they use mineral or basalt wool also providing thermal insulation.
For attic floors, it is necessary to lay a sufficient layer of insulation, which must be protected from the penetration of moist air and vapors into it by installing steam and waterproofing. To make it, special films made of non-woven material are used.

The ceiling pie consists of several elements:
- vapor barrier film - it is needed to create protection against the penetration of vapors from the side of the room;
- crates of slats - they are attached to the finishing filing of the ceiling in a house or apartment;
- sound or heat insulating boards or mats;
- waterproofing - created from a vapor-permeable diffusion membrane.
Thanks to a similar arrangement of overlaps decoration ceiling by wooden beams always provided with protection against moisture, condensate and deformation processes, regardless of the material chosen for surface design.
For filing finishing coating use one of two methods:
- complete concealment of the ceiling ceiling material;
- use of beams as decorative elements.
If you are filing along the wooden beams of the ceiling from below, soundproof material and insulation is placed between the timber or boards. From the side of the room, a vapor barrier and a fine finish are mounted, and from above - waterproofing membrane and floor covering top floor or attic space. This method is used if there is sufficient height and there is no need to save space.

If a decision is made to use beams as a decorative element, a fine finish is placed on top of the beam or hemmed to the beams, which are fixed on the side surface of the wooden floor. The vapor barrier is placed on top of the beams, the floor logs are mounted on top, and the heat insulator is placed between them.
Materials used for hemming
After the ceilings are ready, they begin to design their surface, for which you can use the following materials for ceiling lining:
- natural wood;
- plastic panels;
- drywall;
- MDF panels;
- ceiling tiles;
- cloth or pvc film for tensile structures.
The technique looks original when different materials are combined with each other. For example, it can be drywall plus lining or stretch ceiling. By combining different textures achieve interesting design solution and make the ceiling surface more practical. As a result, beam defects become invisible.
The better to hem the ceiling in a private house or apartment, largely depends on personal choice owner.
natural wood
For finishing ceilings, you can use:
- high-quality wood of deciduous or coniferous breeds;
- block house;
- lining;
- edged board;
- imitation of timber (for more details: "Imitation of timber on the ceiling - types, differences, installation and finishing rules").

This design of the ceiling surface fits perfectly into the interior of the room, if the walls are partially or completely sheathed with natural wood materials.
Looks very nice in wooden house ceiling boarding. Since in this case the ceiling elements have the same expansion coefficient, you can fasten the boards to the beams using nails or self-tapping screws. In order to extend the service life, wood trim should be treated with special compounds, painted or fired wood and then varnished.
Benefits of using natural wood:
- affordable cost;
- good combination with other finishing materials;
- simple installation that you can do yourself;
- environmental friendliness of the material;
- the ability to paint the coating in any shade.

This type of finish has disadvantages:
- fire hazard;
- the need for regular processing or painting in order to protect against aging.
Plastic panels
This finishing option is used for rooms with a high level of humidity. Plastic is not dangerous condensate and water splashes. If, when deciding how to hem the ceiling on wooden beams, the choice is made in favor of panels, you can implement such work yourself.
The plastic is fixed on the guide profiles or with the help of self-tapping screws directly to the beams, but on condition that they are located in the same plane and are qualitatively aligned. If necessary, adjust the height, slats are attached to the beam from below, and panels are attached to them.

The strips are joined together using a tongue-and-groove lock, resulting in an even coating that does not have gaps and cracks. If the joints are processed silicone sealant, you get a vapor-permeable lining. When the finish is made of plastic panels, in order to avoid the appearance of condensate, exhaust ventilation will certainly be equipped.
Pros of plastic:
- a large selection of shades;
- affordable cost;
- light weight;
- resistance to moisture and the process of decay;
- easy to clean - it washes well warm water;
- no load on ceilings.

Of the shortcomings, it should be noted:
- fire hazard;
- fragility.
MDF panels
The appearance of MDF panels often resembles the texture of natural wood, so they can be replaced with boards or lining, since they are easier to process and have less weight. Attach this material to beams or rails.

Advantages of MDF panels:
- cheapness;
- ease of processing;
- good thermal insulation;
- light weight.
- material fades under the influence of direct sun rays;
- a small thickness causes sagging, so they need to be fixed in increments of no more than 60 centimeters, it may be necessary to install an additional frame.
Plasterboard sheets
This material is often used if you need to decide how to hem the ceiling in a private house. From drywall, you can perform the usual finishing of the ceiling or build a multi-level system with built-in lighting fixtures.
GKL sew up niches between beams or completely close them, creating a perfectly flat surface. ceiling covering putty from drywall and then paint with a water-based emulsion in any color. This method of finishing can, if desired, be combined with wooden elements or tension structures.

Due to the difference in coefficients thermal expansion and big size GKL they are not attached directly to the beams. They are mounted on suspensions and guides that have flexible contact with a wooden beam.
Advantages:
- low price;
- ease of processing;
- you can create structures different shapes;
- good combination with any finish;
- the material "breathes", so condensation does not collect on it;
- easy to color.
Disadvantages:
- the drywall construction turns out to be quite heavy and therefore it exerts a load on the floors;
- the material is dangerous for water leakage;
- fragility.
Stretch ceiling structures
If you hem the ceiling with a stretch fabric, you can completely cover the beams and niches between them. The structure is fastened to the walls. It can be combined with other types of finishes.
Stretch ceilings are mounted by professionals who will help you choose the material for their manufacture, design, and also arrange lighting. To avoid condensation, ventilation of the subceiling space should be provided.

- wide range of textures, shapes and color solution;
- strength and, as a result, durability;
- the material is not dangerous moisture and leakage.
- high price of the material;
- installation cannot be done by yourself.
Ceiling tiles
Using this type of finish is inexpensive and at the same time it is a short-lived option. The tile weighs a little, so it is mounted on glue. It burns well, releasing acrid smoke and harmful substances. It must not be used in buildings with furnace heating. The material is easy to install, not afraid of moisture, it is inexpensive. At the same time, it is flammable, breaks and looks too simple.
Combination of finishes
In order to get the original design of the ceiling surface as a result of the repair, you can combine some types of finishes. For example, if the main material is wood, then it goes well with tension systems and drywall in the arrangement of multi-level systems. Beams or some niches are decorated with wooden elements.
If, when choosing how to knock out the ceiling, a decision was made in favor of plastic panels, they are laid in niches between the beams, and the beams themselves are covered with moisture-resistant drywall or natural wood. Looks good too stretch fabrics in combination with wood and plasterboard.
Self-assembly
The arrangement of the ceiling surface is carried out in several stages, each of which is important, if one of them is neglected, this can adversely affect it. appearance and shorten the service life. After we managed to decide what is better to hem the ceiling in the house, we begin to prepare the tools and purchase the necessary materials.

The work is performed in the following sequence:
- Processing beams. Before sewing the ceiling, the timber is covered with fire protection - a complex impregnation designed for wooden elements- and then dry it thoroughly. This will extend its service life and prevent rotting, insect damage and loss of bearing capacity.
- Alignment beams on the ceiling. To make the surface even, the location of the beam is checked laser level or a rope that is pulled diagonally across the room between the extreme elements. In the presence of irregularities, alignment is performed. If the lining is solid, you can make the ceiling even by building a crate along the lower plane of the beams, using 40x60 or 50x50 mm bars or a drywall profile. With a significant difference, U-shaped brackets for plasterboards are used. See also: "How to make a false ceiling - installation sequence".
Sheathing board or panels
To hem fiberboard ceiling or plastic on beams or on a counter-lattice, they begin to do work from the most noticeable wall in the room.
Exist certain order how to hem the ceiling in the house with a board:
- The material is measured with a tape measure or in place and cut off with an electric jigsaw from the wrong side.
- It is attached to nails or screws. The first of the boards is fixed at the points of its intersection with the counter-lattice.
- Lining or grooved board knocked out wooden mallet or with a bar until a complete tongue-and-groove connection occurs and is fixed on the extreme elements of the crate. To intermediate bars are fixed through one in a checkerboard pattern to avoid damage to the cladding.
- After the completion of the sewing of the entire ceiling surface, the points of contact with the walls are covered with skirting boards made of wood or polymeric materials.
- Boards are coated with impregnation for wood on water based or dye composition.

When fiberboard is planned to be used only for sewing niches between beams, the finishing material is attached to pre-nailed bars. At the same time, the filing technology is similar. Finishing in the same way plastic panels or MDF, but to prevent the appearance of chips, experts recommend pre-drilling small diameter holes in the products at the attachment point.
Plasterboard sheathing
This type of finish differs from the design of the board by the need to use a galvanized profile for plasterboard in order to prevent deformation of the ceiling surface.
The work is carried out in stages:
- The profile is mounted along the beams using hangers or U-shaped brackets. The transverse profiles are installed so that a crate is formed, having dimensions that allow the GKL to be joined.
- Drywall is cut sharp knife, hacksaw or electric jigsaw. Fix the sheets on the crate with self-tapping screws, trying to immerse them in the material to a depth of 1 millimeter.
- The joints between them are puttied using sickle tape, sanded and re-coated finishing putty. You also need to wipe the fixation points on the screws and other irregularities.
- The ceiling is covered with interior paint on water or acrylic base using a roller. To create a more even tone, a second layer is applied.
If hemming the ceiling in a wooden house in the kitchen is made of drywall, paint it water-based paint, it will look good subject to the successful selection of fillets.
Different types ceiling cladding along the beams are often combined, creating indoors unique design.
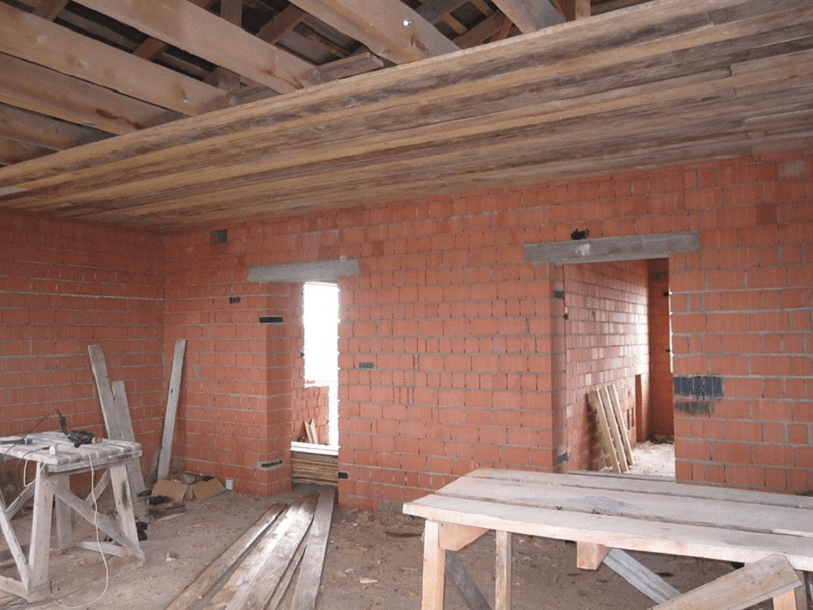
The problem of choosing how to hem a draft ceiling along wooden beams always arises during the construction of wooden log cabins, timber buildings, frame cottages, summer cottages and even extensions to the main room. You will need to choose the material and method of laying on the ceiling base so as to provide it secure fastening to the supporting joists, and any shrinkage or deformation processes that accompany all timber structures did not lead to subsidence or deformation of the supporting structures.
Materials for filing floors
Wooden beams remain today universal remedy for arranging the ceiling, they are light and durable, relatively easy to process, cut, drill. Any type of fastener can be driven into wood, for carrying out installation work and laying does not require powerful lifting equipment.
But wooden beams, like any wood, with all their advantages, have two significant drawbacks:
- A beam or a log, even after being carefully processed, still remains subject to temperature deformations, shrinkage, shrinkage, which can ultimately lead to a break in the fastening for hemming the ceiling in a wooden house;
- The plane formed by the lower edges of the wooden beams, even with the most careful alignment of the supporting surface of the walls, always remains uneven. Therefore, the material planned for the rough hemming of the ceiling in a wooden house must have maximum strength.
Note! The last point is extremely important for high-quality stuffing. draft ceiling. Usually the correct filing with a long wooden lath, OSB plate or plywood allows you to dramatically increase the rigidity of the structure.
The most difficult is the situation with large rooms. The problem of how to make a draft ceiling in a private house on wooden beams of large elongation is always aggravated by the fact that the carriers wooden logs or double boards under their own weight, the mass of insulation and attic furniture always sag.
Therefore, it is important not only to choose the right one, the better to hem the ceiling in a private house, but also to choose a method for attaching the filing to the beams. Ideally, the material should be laid in such a way as to compensate for any deflections in the subfloor, or at least make them invisible.

Materials for laying on wooden beams
For filing a draft ceiling, several of the most affordable and easy-to-process materials are used:
- Edged board with a thickness of 20-25 mm with a polished and untreated surface;
- OSB boards with non-laminated surface;
- Plywood;
- Old laminate.
All of the listed materials are made on the basis of wood chip mass, which, after deep processing using pressure and chemical reagents, still retains the coefficient of thermal expansion within the limits of the characteristics of construction wood.
Plasterboard sheets, for all their merits, are not suitable for mounting directly on the wooden beams of the rough floor. You need a transition frame.

In this case, in order to equip a drywall rough ceiling on ceiling beams, you will need to install metal carcass from a thin profile.

There are many alternatives materials. Before hemming the ceiling base in a private house with expensive plywood or clapboard, you can use an old wooden lath from the facade of the building or even trim panels.
An old dismantled laminate can be used as a backing material for a draft ceiling. Usually the owners throw it away or use it for flooring in the most unexpected places. Lamellas treated with oil varnish can solve the problem of choosing how to sew up a ceiling on beams in a small room.
Plank filing of a rough ceiling on wooden beams
Most suitable option filings have to be chosen based on the characteristics of the building, the method of its insulation, the presence of a warm or cold attic, the material of the walls, and the humidity of the atmosphere inside the box.
The ideal option for a draft ceiling may well be the padding of wooden floor beams with an ordinary shalevka or edged board.
There are three most proven ways of flooring:
- Fastening a long board along the lower ends of the rough floor;
- Installation of boards on cranial slats;
- Flooring by outer surface wooden beams.
At first glance, the material options are not much different, but this is not entirely true, there are certain differences. Before hemming the draft ceiling along the beams, you need to pay attention to the construction of the attic and ceiling.

The flooring of a wooden lath along the upper plane of the beam is used only in case of a serious need to increase the height of the ceiling or to arrange attic rooms winter type. In this case, to reduce losses, the floor is insulated with an additional layer. mineral wool above the rough crate of wooden beams. The removal of the log from the insulation layer reduces heat loss and significantly improves the vapor barrier.
The classic version of filing the ceiling on wooden beams
On the draft coatings grooved boards are rarely taken due to high price. In the simplest case, an edged board is used for filing the floor. But there are also exceptions in frame buildings draft ceilings can be hemmed with wooden clapboard or floorboard.
Shalevka is cut to size, stitched to the length of the overlap and sanded along the wrong and front parts. This option turns out to be cheaper than if you purchase a cut or, especially, a grooved board. At first glance, the material used for the arrangement of the draft ceiling does not have to be ground or processed on a jointer. In fact, the removal of coarse pile from wooden surface, remaining after sawing, significantly reduces the consumption antiseptic impregnations and flame retardants.
If the distance between the beams does not exceed 60 cm, then the board can be beaten directly on a wooden beam. In this case, the material must be laid on the draft ceiling perpendicular to the direction of laying the floor. If the room is large enough, and the step between the beams is more than a meter, then you will need to sew an additional crate from a cut inch board to reduce the distance to 40 cm.
The only problem that one has to face when arranging a draft ceiling is the difficulty of holding the board on wooden beams with outstretched arms. If you have to work alone, then in this case climbing scaffolds, home-made wooden props or carpentry clamps come to the rescue. The laid board is gently pressed to remove the gap, and fastened with self-tapping screws and a screwdriver.
In the same way, a draft ceiling is assembled from a grooved floorboard or wooden lining.

The advantage of filing a draft ceiling on cranial beams
You can also make a filing of the ceiling surface using cranial wooden blocks. This is wooden slats with a section of 40x40 mm, sewn on both sides of the beam along its entire length. The draft ceiling is recruited from short wooden planks or scraps of boards laid on cranial supports along the entire length of the ceiling.
This method of filing has its advantages:
- The laying of the material can be done independently, without assistants, while the worker is directly on the floor from the attic side, so it is much more convenient to lay the hemming material than to lift it with outstretched arms above your head;
- The type-setting ceiling is much simpler than the option of tamping long boards for the entire length of the ceiling. You can always remove one or two boards in order to check the condition of the insulation or lay additional communications.

The technology of laying a draft ceiling on cranial bars has its own, quite serious drawbacks. Firstly, the dimensions of the support rail-bar must be at least 40x40 mm, otherwise the weight of the filing will simply push through it. Secondly, the thickness of the draft ceiling insulation is reduced by the height of the support. Otherwise, the floor surface will need to be raised by the same 40 mm.

Thirdly, horizontal dimension between wooden beams is automatically reduced by 80 mm, which leads to a deterioration in vapor permeability, most of which is not removed through the ventilation gap, but will linger on the draft ceiling.
Another factor, short boards do not affect the strength and rigidity of the draft ceiling. Conversely, long-length filing significantly improves bearing capacity timber, so it is recommended to sew up strongly elongated ceilings without the use of cranial supports.
Padding with plywood, OSB and fiberboard
Of the three materials used for filing draft ceilings, fiberboard is considered the weakest, but at the same time, due to its low weight, it is possible to install or lay fiberboard on wooden beams alone, without helpers.

Fiberboard ceiling
Filing with wood-fiber material is used as a rough base before installing stretch ceiling membranes, pasting foam tiles, stucco, any kind decorative finishes with low weight.
If wooden beams made of hewn logs are laid on the walls, then, before assembling the draft ceiling, a crate of thin laths with a section of 20x60 mm must be filled on the lower edge. If you fix the fiberboard directly on the uneven surface of the log, the surface will be curved and uneven.

Sheathing wooden beams with plywood
For the arrangement of the draft ceiling, plywood up to 10 mm thick is used. The material can be laid in any order, directly on the beams, without any crate or intermediate rail.
If the ceiling surface will be further finished, painted or tinted under the lining of solid wood, then the joints and seams between the coatings are sealed with a special paste prepared from dyed birch shavings and oil varnish.
Before laying the material, the seams and edges are sealed with adhesive tape so that the varnish does not get on front side, otherwise the plywood will remain stained and streaked due to poor absorption of the toner.

Use of OSB boards
The arrangement of the hemming layer on wooden beams using OSB boards is rightly considered one of the most optimal options for filing a draft ceiling. The cost of a plate, 10 mm thick, is about half the price of plywood, despite the fact that the OSB strength is enough to hold a layer of insulation, and when correct fastening, at least five self-tapping screws for every 20 cm of the length of the wooden beam, the panel can withstand a weight of up to 100 kg per square meter.
Conclusion
The technology of laying a draft ceiling on wooden beams is available to all novice finishers in terms of complexity. Anyone who has ever dealt with the installation of rails and boards, without resorting to the services of hired workers. Of course, before proceeding with the equipment of the draft ceiling, it would be right to think over the entire technology for performing work, especially in terms of transferring the floor material and temporarily holding it until it is completely fixed.
Ceiling filing is possible with different materials: solid, foam, osb, PVC and gypsum boards, clapboard, board, etc. Mistakes are often made when independent work. When I got to work, questions immediately arose: how best to hem the ceiling? What material is better? What are the details of the work? Consider the basic rules when performing filing.
Do-it-yourself ceiling filing
Surface preparation
When cladding with foam boards, it is important to prepare and level the surface. You can’t work hastily, saving on glue, without removing dirt from the surface, without treating with a primer, after which the tile lags behind, it is glued back, smearing more glue, without learning from your mistakes.
But this is not worth doing, especially since, having spent money once on thorough surface preparation, we can safely mount on it various designs, being confident in the reliability of the foundation.
Without preparation, we will have to check every time, or randomly mount the structures, hoping that everything will be fine, the neighbors may not flood, and the tiles may not fall off. I always carefully prepare the surface, putty defects and have never regretted it.

You can not work hastily, saving on glue
Ceiling lining with foam boards
I often hem ceilings with this material due to ease of installation, accessibility, good performance for sound insulation, and in a room with such a ceiling it will be warmer.
The main mistake is the lack of a primer and putty, the tiles are carelessly glued to a layer of dust, after which they soon fall behind along with thin layer dark dust, which is visible on reverse side, this is because there was no primer sealing upper layer, creating an additional barrier for waterproofing. We will learn from the mistakes of others, and make the installation correctly.
For installation, it is better to use acrylic glue, whoever tried to replace it with a standard one at least once will not refuse it.
It is also quite possible to hem with other materials. But it should be borne in mind that the principle of fastening the skin, the construction of the frame is not much different when replacing the filing.

Ceiling lining with foam boards
Hemming of frame ceilings
Note that shelving and suspended ceilings differ in distance from the base, suspended ceilings are used for rooms with high ceilings. Hemmed ones - on the contrary, with low ones, so as not to steal precious space.
There are 2 types of binders:
- Without a frame when the material is mounted to the ceiling.
- With a frame, when the filing is mounted to the crate.

Ceiling without plywood frame
The frame can be wooden or metal, the former is used to save material, improve sound insulation, in short sections with a constant temperature and normal humidity more appropriate to use wooden frame.
The metal is durable, it is often used on large planes to increase strength, is prerequisite for wet areas. The frame steals 5-6 cm, which is less than suspended, but also more stretch ceilings.
With differences of more than 3-4 cm, I recommend using a frame for filing. According to technology, it will be much easier and faster than plaster, although the costs are about the same, but more economical and faster than a suspended ceiling, less cost, stolen space.

The lining is mounted to the crate
A tape is used to seal the joints between the walls and drywall, we should not forget that for drywall it is very important not to fix it around the perimeter rigidly to the walls, plinth or stucco molding, the ceiling must be free to avoid deformation.
When choosing a filing, it should be borne in mind that drywall is less expensive than lining or plaster, but it is less durable, it will have to be changed every 3-4 years, whoever is not ready for such sacrifices should opt for PVC or lining.
Installation of PVC panels
In this method, it is quite possible to place thermal insulation under the crate. A wooden frame with a section of 20 by 40 mm is attached to the "quick installation" or self-tapping screws, depending on the material under the crate.
Installation procedure:
- Reiki are located perpendicular to the direction of installation of panels, at a distance of 40 cm from each other;
- The places between the fasteners at the locations are reinforced lighting fixtures with additional two bars running across the existing ones, and attach to the ceiling and to the crate with self-tapping screws;
- Then, a mounting plate is fixed along the perimeter, having an angle of 90 degrees, it includes ceiling plinth, which is fixed at the beginning, the first panel enters the groove between the plank and the plinth, we attach corners to the plank on the sides for attaching the plinth and planks;
- In the places where the lighting fixtures are attached, we make holes and bring out the wires, you can mount the lighting on top of the panels, for reinforcement.

Ceiling made of plastic panels
Clapboard lining
It is necessary to dry the lining well before installation, if it is damp. Before work, you should also install a vapor barrier film, carefully study the instructions so as not to confuse the sides, the joints are glued along the length with double-sided tape.
The rule is often neglected, it is extremely important to follow the recommendation in winter, when the material shrinks, if it is quickly fixed to the ceiling, this is fraught with a slightly convex surface, the appearance of cracks over time, which many attribute to low-quality material, and everyone is advised not to install such a filing later, they say , I've put it, but it burst all over.

Lining the ceiling with clapboard
Often craftsmen are faced with such a problem: painted lining is often crooked, factories come to such tricks to mask flaws.
Before installation, I recommend placing the lining on the floor with an edge, and looking at what is the most curved, and using it to bypass lamps and other elements so that they are even in the center and the curves are not conspicuous. Also, uneven filing can be used at the beginning or at the end, so as not to be very conspicuous.
Installation of lining occurs with nails 40 mm long. As practice shows, they are quite enough for reliable fixation, because the weight of the lining is small.
In the case when the house is less than 2–3 years old, a gap is left between the lining and the walls in the region of 15–20 mm. During installation, it is important not to lose sight of the mounting points of the fixtures before the final sheathing. A similar scheme for filing the ceiling with a board, only the nails are selected depending on the thickness of the material.

Do-it-yourself clapboard ceiling lining
After sheathing, the lining is recommended to be treated with one layer of primer or two layers of paint.
Ceiling filing is possible with other materials, no matter how the ceiling is hemmed, the main thing is to follow the technology correct installation various materials, they are mounted in a similar way. As my practice shows, these tips allow you to make high-quality filing, using the entire resource of the material, a replacement only in case of extreme wear of the material.
Do-it-yourself ceiling sheathing from A to Z
The appearance of housing and the microclimate in it largely depend on the condition of the ceiling. If you properly equip the rough ceiling on wooden beams, you can get a presentable and warm surface. Depending on the technology by which the house was built, apply various ways ceiling repair and fabrication. We will consider the sequence of work for various options ceiling construction.
Work in a wooden house
Previously, wooden houses were built in 1-2 floors. To create a ceiling between floors or a roof, wooden beams were used. From above, the beams were sheathed with a floorboard. From below, the ceiling of the beams was upholstered with a lath and plastered. This type of finish is short-lived, as the wood ceiling bends, causing cracks and the destruction of the plaster. The use of modern materials allows you to create a durable and durable coating with high aesthetic qualities. In order to carry out the installation of a new ceiling, it is necessary to get rid of the old coating and prepare the base for work.
This event is held in the following sequence:
- All furniture, curtains and paintings are taken out of the room. Disconnect lighting fixtures. The bare ends of the wiring are insulated.
- All fights back old plaster. This is done with a hammer, chisel and nail puller.
- The railing is detached. You can use brute force, so this material will be recycled.
- The insulation is removed and thrown away, which has lost its qualities over the years of operation. It needs to be packaged immediately. plastic bags to prevent clogging of housing and the site with small fibers.
- Beams are cleaned of debris, dust, mold and mildew. Can be used grinder with hard brush and sandpaper. After cleaning, the beams are treated with antiseptic and hydrophobic preparations.
When all unnecessary is removed, you need to check the condition of the wiring. If it is worn out, it is better to replace it.
After the base for work is cleared, the rough ceiling is equipped.

It is done like this:
- Waterproofing is in progress. A special membrane type film is fixed between the beams. The joints between the strips of the film are hermetically sealed with adhesive tape.
- Insulation is placed between the beams. You can use basalt wool or foam. They fit in such a way that there are no gaps.
- Another layer of vapor-permeable material is fixed on top of the insulation. The film is attached to the supports with staples.
- Raw boards are screwed to wooden beams. They will be the basis for fine finish.
After fixing the draft ceiling, the wires are brought out, the cladding is being installed. Read about how to hem the ceiling in the final section.
Draft ceiling on reinforced concrete slab
Floor slabs do not always have a perfectly flat surface. This is especially true for houses that were built several decades ago. Concrete plates severely deformed and bent. In typical five-story houses, the ceiling can be made of several slabs with significant differences in height. In order to create a smooth and presentable surface, it is necessary to carry out a large amount of preparatory work.

Prepare concrete ceiling alignment can be done like this:
- All old finishes are removed from the surface - wallpaper, tiles and plaster. The seams between the ceiling tiles are cleaned and wall panels. They are sealed with cement mortar.
- The gaps between the panels are cleared of cement chips. They are filled with sealant or mounting foam.
- The entire surface of the ceiling plate is coated with a primer. To achieve the desired effect, this process is carried out 2-3 times.
In order for the primer to dry completely, it takes at least a day. After that, you can continue to work.

The draft ceiling for concrete is equipped as follows:
- Beacons are displayed. You can use plastic dowels and screws. The alignment is checked by the level.
- The solution is applied starting putty. This is done with a wide spatula or a rule. The choice of tool depends on the degree of curvature of the floor slab.
- The starting putty is covered with a liquid primer.
The work on creating the basis for the fine finish is completed. After that, the ceiling can be painted, pasted over with wallpaper or tiles.
How can you hem the ceiling
The interior and style of the room largely depends on the material with which the draft ceiling will be closed. In addition, you should take into account the features of the place of repair.
You can hem the ceiling with such materials:
- Drywall. GKL has an affordable cost and is quite simple to use. On the draft ceiling, it is glued or screwed to a spatial frame made of steel profile. It should be borne in mind that in damp rooms it is only necessary to install moisture resistant drywall. External putty of the assembled surface is required.
- plastic panels. These products have a presentable surface and low weight. As a rule, they are fixed on a frame made of timber, steel or plastic profile. If the base is well leveled, then the panels are glued to it with liquid nails.
- Wooden lining. This type of finish has a pleasant and beautiful view, environmentally friendly and durable. Reiki can be attached both to a solid base and to a frame. Fixation is carried out using thin nails without a hat or self-tapping screws.
- MDF panels. front part of these products can imitate wood, natural stone, sky or plants. Fastening is carried out with the help of special clamps (kleimers), which press the edge of the rails to the base or frame.
- Plywood. Before installation, plywood sheets must be treated with an antiseptic and a primer. If the installation is carried out on the frame, then the joints of the sheets should be on its guides. After installation, seams are sealed and painted.
- Siding. plastic siding is ideal material for finishing non-residential and damp premises, such as a bathroom, summer kitchen, garage and balcony. Installation of this cover is quite simple and does not take much time.
A wooden house always looks attractive from the street side, but in order to achieve the same attractiveness and comfort indoors, you need to carefully consider the finishing of all surfaces in the house, including the ceiling on wooden beams. Therefore, in this article we will talk about how to hem the ceiling on wooden beams.
Ceilings on wooden beams can easily be found in modern buildings. However, modern design involves the design of the room, which includes the ceiling space of the rooms. Therefore, it is extremely important to deal with questions of how to hem wooden floors for arranging a draft ceiling in a wooden house.
If you do all the work in accordance with current trends and with the use of modern materials, the room will look stylish and at the same time be comfortable, warm and cozy. Gathering in such a room with friends and family will be very pleasant.
Materials used for filing the ceiling on wooden beams
There are several options for finishing materials that can be used for finishing filing the ceiling on wooden beams:
 Despite the variety of modern cladding methods, gypsum plasterboarding of beams still occupies a leading position among the methods of finishing the ceiling space in a wooden house. Professional builders quite often used given material for interior design.
Thanks to the diversity various forms, which can be created using GKL sheets, it becomes possible to create a unique design of the room and achieve coziness and comfort.
From GKL, you can create unusual multi-level structures or even combine it with other materials, achieving a unique finish, and hence the uniqueness of the design of the room.
The material looks great and complements any interior, placing accents on individual details with the help of recessed spotlights.
Lighting devices can be arranged in such a ceiling in absolutely any order and quantity, and the electrical wiring can be safely hidden under the false ceiling structure.
After fixing the GKL panels and after a little preliminary preparation, such a ceiling can be painted, wallpapered or covered decorative plaster. All options are acceptable for decorating the ceiling space.
The disadvantage of such a ceiling in a wooden house can be its poor moisture resistance and instability to various influences. As you know, a tree has the properties to "move" over time. Having accumulated moisture or when the house shrinks, the beams can sag or move, which will have a very negative effect on the GKL structure. The material may lose its external qualities, crack or gain moisture, which will require its complete or partial replacement and a new installation of the ceiling.
In a wooden house, you want all finishing materials to be as environmentally friendly and natural as logs and floor beams. In this case, a wooden lining is an excellent option for filing the ceiling.
 Of course, such a ceiling will not please with a variety of forms and levels, but such a ceiling will harmoniously fit into the interior. wooden house and is perfect for decorating the ceiling in any room. In addition, it does not require particularly careful pre-training black ceiling.
The construction of the lining will reliably hide the electrical wiring and communication pipes. If necessary, the panels can be easily dismantled and mounted by hand, without requiring the help of specialists.
Via wooden finish you can decorate the room in any style, while this species finishes will feel great even with the "movement" and shrinkage of the house.
The reliable locking system of lining initially provides for surface roughness and easily perceives the shrinkage of logs.
The lining after installation can be varnished or painted, complementing the interior of the room and filling it with color and style. Many modern designers use wooden lining to create amazing interiors that will appeal to anyone, even the most sophisticated and demanding consumer.
Stretch ceilings are one of the most popular types decoration of the ceiling space, including in wooden houses with wooden beams.
The undoubted advantage of such a finish is the absence of the need for careful preparation of the draft ceiling.
In addition, a stretch ceiling is easily able to hide defects in the draft ceiling, communication pipes and various wires.
 In addition to everything else tensile structure can be supplemented with a drywall box, various lighting fixtures or a pattern, photo printing. All this can create an unforgettable unique atmosphere in the room, complementing it with bright details.
Can be easily installed in a stretch ceiling different kinds lighting fixtures (spotlights, chandelier, sconces, LED Strip Light etc.) in any order and quantity necessary to decorate the chosen style of the room.
If the ceiling height allows, the stretch ceiling can be made multi-level, placing accents and visually dividing the room into different functional areas.
 Wooden are not only residential buildings, but also garages and baths. And it also requires high-quality design of the ceiling space. In the garage in a good way finishing will be the strengthening of profiled sheets on the ceiling.
This material will not ensure the beauty of the room, but it will serve reliably and long years. In addition, this type finishing material very pleasant in price and has good performance properties.
 Plastic panels - great option for finishing the ceiling in the garage. It is moisture resistant, not prone to the formation of mold and fungus, which is extremely important for the design of an unheated room.
In addition, this material is quite cheap, has a large assortment colors and textures and extremely easy to install.
You do not have to resort to the help of professional installers to fix PVC panels on the ceiling. It is quite possible to do it qualitatively and with your own hands.
The only disadvantage of such a coating will be its instability to mechanical stress. If the ceiling in the room is low enough to be reached by hand, then plastic lining is unlikely to work, as it can be easily damaged.
plywood sheets
Another one of the most eco-friendly materials for finishing the ceiling in a wooden house, plywood can become. This coating looks neat and even.