When breeding birds on a private farm or on a farm, you simply need an incubator in which the chicks are hatched artificially. For a small number of eggs it is not advisable to buy it. Therefore, many poultry farmers knowledgeable about the device This device, they prefer to make it with their own hands.
If you know how to hold a tool in your hands, then making an incubator will not be difficult for you, especially since it is also economically profitable. The entire process of hatching chicks in the incubator will take place under supervision, and the young will grow up healthy and strong.
Advantages of homemade incubators
Many poultry farmers believe that an incubator is a complex device, so it’s unrealistic to make it yourself at home. In fact, making an incubator with your own hands is quite simple, and it can be done at minimal cost.
When making the device yourself, you can choose the desired dimensions and supplement it with the necessary functions such as adjusting the temperature or turning eggs. Since such a design will consist practically of improvised materials, it will be economically profitable, which is one of the advantages of the device.
Other advantages of a homemade incubator include:
- reliability in use;
- possibility of breeding various types birds;
- obtaining chicks within the required time frame;
- ensuring the survival rate of young animals up to 90%;
- self-selected sizes for laying the required number of eggs.
- low power consumption.
Preparatory work
No special materials or tools are required to make the structure. Materials that are found in almost every home are suitable.
First of all, it is necessary determine the size of the device for raising chickens. They depend on the type of future poultry being raised, the number of young animals and the conditions of placement of the incubator itself. So, for example, the design for quail eggs should be smaller in size than for chicken and duck. The slope of the trays is also taken into account, which should be different for each type of bird.
To provide the eggs with constant heat and the necessary humidity, it is best to make an incubator with a housing, which can be homemade or taken from an old refrigerator.
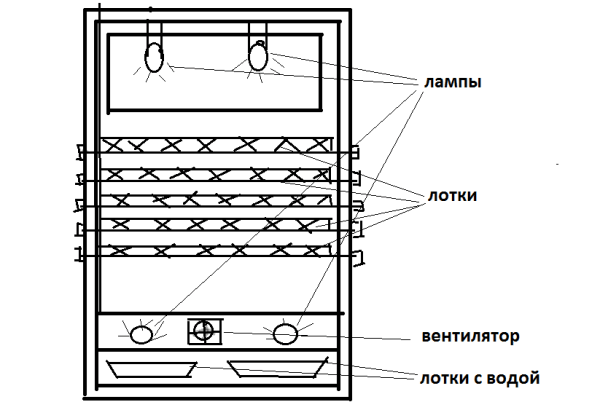
The main components of the incubator are:
- body with insulation;
- egg trays;
- heating system;
- devices for monitoring temperature and humidity in a structure.
Making incubators with your own hands
At home, the case can be made from cardboard boxes, basin, chipboard sheets, foam plastic, wooden beams. By applying your imagination and using available materials, you can make a high-quality incubator.
From a basin or bowl
The easiest device to make for breeding chickens can only be used if power outages are possible. An incubator is being made from two containers same size , which can be used as basins or bowls. It is desirable that they be metal.
The bowls are placed one on top of the other, and on one side are fastened with furniture canopies or other devices. There should be space between the bowls to accommodate the eggs. The top bowl in this design will serve as a lid. Since the containers are round, the eggs in them will heat evenly.
A 2 cm layer of sand is poured into the lower bowl and covered with foil. Hay or straw is placed on top. To allow moisture to evaporate, several holes are made in the foil.
A cartridge will be inserted into the upper bowl, for which you need to make a hole. If the capacity is large, you will need several light bulbs.
To the center assembled structure You should place a thermometer at the height where the eggs will lie. The incubator is installed in a place where always the same temperature. Then it should be warmed up, after which it can be filled with eggs of quails, chickens or other birds.
If the lights are turned off at home, the device will need to be covered with a blanket and placed in a pan with warm water. In summer it can be taken out in the sun, and in winter it can be placed near the radiator.
Sand in this design serves as an air humidifier and heat accumulator, so it needs to be moistened regularly. Eggs should be turned and sprayed daily.
Incubator out of the box
You can make such a cost-effective device with your own hands quite quickly.
Manufacturing stages:

Styrofoam incubator
Good thermal insulation material available in almost every private home. Therefore, making an incubator for chicken or quail eggs from foam plastic with your own hands will not be difficult. In addition, you can choose its dimensions yourself.
Manufacturing stages:
- The cut pieces of foam are fastened in any convenient way.
- Light bulbs are inserted into the top cover at a distance of 15 cm from each other. You can buy a special heater for the incubator. However, light bulbs cope with their functions quite well and are the most budget option.
- The tray can be purchased or made from wooden planks. For quails, the cell sizes should be 5x5 mm.
- The tray with eggs is placed in the middle of the structure so that the distance to the heating elements is equal to the distance to the container with water.
- It is necessary to leave space between the laid eggs and the walls of the homemade box for air ventilation.
Using an old refrigerator
 Making a device from an old refrigerator is the best option. This is explained by the ability to use several chambers and ready-made thermal insulation. It is very convenient to use the refrigerator even when if the power goes out in the house. You can simply put a closed container with hot water, which will keep the eggs warm for a long time.
You only need to make ventilation holes, install incandescent lamps, a fan, water trays and a thermostat.
Stages of work:
- The freezer and other unnecessary parts are dismantled.
- A window is cut out in the door and sealed with glass.
- Egg trays are secured.
- There are two light bulbs installed at the top of the refrigerator, and four at the bottom.
- The gyroscope and thermometer are attached so that they can be seen through the window.
- A container of water is placed at the bottom of the refrigerator.
Can buy special trays with an egg turning mechanism and install them in the incubator from the refrigerator. They will make the job easier for those who cannot pay enough attention to hatching the bird. In addition, when installing automatic turning, the number of openings will be reduced to a minimum, which is very important when breeding birds.
Quail incubator
Many poultry farmers are interested in the question, what should an incubator for quail eggs be like? Designs for birds of this species are made according to the same principle. They differ only in size.
A quail incubator should be two to three times smaller than a chicken incubator. In a ready-made incubator, which was intended for chickens, Three times more quail eggs will be included.
When making an incubator with your own hands, you should keep in mind that its assembly requires attention and precision. The slightest disturbance in humidity or temperature can lead to egg spoilage.
" Equipment
In this article we will talk about what a simple household incubator consists of and how you can make it yourself without large investments. The components of a home incubator can vary depending on whether you want it to be fully manual, semi-automatic or automatic.
You will need:
- lid with viewing window;
- frame;
- lattice for eggs;
- light bulbs with chambers;
- containers for water;
- fan at 12 V;
- Regulator voltage 12 V;
- thermometer;
- thermostat;
- temperature sensor;
- controller revolution frequency (digital timer).
What can you make this useful thing from at home?
- from foam plastic;
- made of cardboard boxes;
- from plywood or wood;
- from old refrigerator.
This list is not final. The specified list different materials involves making the cover and body from these materials. WITH detailed description, the characteristics and structure of each type of incubator can be found below.
Incubator dimensions will depend primarily on:
- number of eggs, which you will put.
- from location light bulbs, which heat the incubator.
For reference: with an average incubator length of 450 - 470 mm and a width of 300 - 400 mm, egg capacity, pcs. (depending on size):
- chicken up to 70;
- duck or turkey up to 55;
- goose up to 40;
- quail up to 200.
Homemade foam incubator, description and drawings
You will need: sheets of foam plastic (expanded polystyrene) measuring 50 x 100 cm. Thickness - 50 mm.
Mark the sheet with a pencil and ruler. We take arbitrary sizes. Example:
Side wall: Length – 50 cm, height -50 cm.
End wall: length – 35 cm, height – 50 cm.
Cutting foam to size sharp knife. If the foam is not extruded, then it is better to cut it stationery knife — it is very sharp, the blade is thin.

We do the same with the second sheet.
Further assembling the body in accordance with the presented drawing. This is done using rubber glue or simply wrapping the joints with wide tape. Thus, we will get a side one, end side and the bottom of the body. At the bottom of the hull, which is also cut to fit the dimensions of the walls, be sure to make 2-3 holes for air ventilation.

cover manufactured separately with a viewing window and a pair of holes for ventilation, as shown in the diagram below.

Glass There is no need to “tightly” fix it. After the chicks hatch, we adjust the temperature in the incubator by turning it a quarter or half way. The proposed design of the incubator assumes that it will be heated by three electric 25 watt light bulbs, this is enough to maintain required temperature. We make sure to make the lid with the sides partially cut out so that it does not move around the body. For this purpose, you can also glue sides. The material used is wooden blocks or foam blocks.
On the lid, we attach three electric chuck with light bulbs.

We install a thermostat on top (if the design requires one).
The egg grid is made from welded galvanized mesh 16 x 24 mm, closed from the inside with a plastic mosquito net. The mesh is needed to prevent small chicks from falling into the cells with their paws. They also stick their heads into the cells, which ends badly for them (and you). On the grid we increase sides(walls), the height of which should not be lower than 8 - 10 cm, otherwise the chicks will jump over it. If you do not plan to roll the eggs by turning the grill along its axis, then we make the sides smaller than the grill along the entire perimeter, and the grill will cover everything inner space incubator, and will lie on the bars. In this design you will have to turn each egg by hand, marking them on one side with a plus (+), and on the other, respectively, with a minus (-). Come up with your own designations.

This design Can improve, equipping it with an ordinary 12-volt computer fan, using a voltage regulator, an adapter (12 volts, respectively) and a thermostat.
You can design an indicator with heating from light bulbs, which will be located below, under the tray (grid) with eggs. Then the design will be more compact. Its height may not exceed 25-30 cm. Bulbs and chambers for them can be taken the same as in a regular household refrigerator. You can use a different type of heater (film from underfloor heating systems).

To do not turn each egg, you can place the grid (tray) not on the bars at the bottom, but make holes closer to the bottom of the incubator, insert bushings there, and attach the grid to the bushings with corners or other clamps. Attach handles or holders to the outside. In this way, the grate can be rotated along its axis, changing the degree of inclination of the eggs and, accordingly, heating one side of the eggs, then the other. In this case, the grid should be smaller in size than the internal walls of the incubator so that it can change the angle of inclination without interference. Grille sides then they should be higher than 5 cm, since otherwise the chicks may fall over the side and fall to the bottom of the incubator towards the light bulbs and water containers.

From a cardboard box, diagram and device
Perhaps the simplest and cheap option incubator is a construction made from cardboard box. Cardboard is very inferior in strength to all other materials, so this type of incubator has certain features.
Ventilation holes located 3-4 cm from the bottom; on the side walls, at a distance of 6-7 cm from the bottom, attach wooden slats to the walls. Instead of slats, you can put bars on the bottom of the box, which we cover with film. It should be larger in size than the bottom so that its edges extend onto the walls. On a pallet install any container with water.
We lay it on slats or bars regular packaging for eggs. We cut a hole in the middle for better air ventilation. A lid is made for the box with two holes: in the middle, for a lamp, and on the side for a thermometer.

DIY plywood
If you make an incubator from this material, then it the walls must be double. The top cover, as in previous versions, is removable. A viewing window with glass is cut into it. Let's do ventilation holes similar to the previous options.
Mounted on the inside of the incubator lamp sockets, and below they nail the slats for the tray. IN plywood floor We also drill holes for ventilation. There can be 4-10 pieces.
Tray or egg rack frame type is also suitable. We place a mosquito net or construction mesh on the grate for puttying. The incubator is installed in a warm room.
Attention! Don't forget that minimum distance the distance from the lamp to the eggs should not be less than 25 cm if low-power incandescent lamps are used as the source.
From an old refrigerator
If you have a old refrigerator , which you managed to replace with a new one, but have not yet thrown away the old one, you can use it as a homemade incubator.
We throw away everything unnecessary, including freezer. They are done from above ventilation holes. They are also made at the bottom of the incubator. Install below 12 volt fan.
Next you need to install heaters. This role is performed by electrical 25 watt light bulbs. You need 4 such light bulbs. Two light bulbs are placed at the top of the refrigerator, and two at the bottom. At the bottom we attach the chambers in such a way that it is possible to place a tray with water at the bottom.
Egg trays are also made from galvanized welded mesh with sides. If you choose as a material plastic boxes from under fruit is also good. Then they are cut to a height of 6 cm. All trays are mounted on an axle and are connected to each other by a bar, with the help of which the inclination of the eggs changes.
Auto
In some of the above options, it was proposed to manufacture manual or semi-automatic incubator. In order to do automatic incubator , you must additionally purchase:
- block thermostat;
- tray automatic egg turning, which turns the eggs at a certain angle;
- frequency controller revolution (timer).
Differences in temperature regimes for different types of poultry
In the first two days, you need to warm the eggs well, so the temperature in the incubator is set at 38-38.7°C.
Remember! An increase in temperature has a detrimental effect on the embryos.
Chicken eggs in the first days of incubation, they are kept at a temperature of 39 to 38 degrees, gradually lowering it. IN last days (20-21) – 37,6.
Duck- from 37.8 to 37.1 degrees downward.
Goose– from 38.4 to 37.4.
Turkeys– from 37.6 to 37.1.
Quail All 17 days of incubation are maintained at the same temperature of 37.5 degrees.
As you can see by doing incubator at home, the material can be varied and depends on what is at hand. To orient the reader what the financial benefit will be from this event (meaning the difference between a ready-made incubator bought in a store and made by hand), we can say that the benefit is at least threefold. If you don’t buy automatic equipment, the difference will be even greater. Of course, what you make will also have minuses: It doesn’t look as aesthetically pleasing and may not have such a long service life. Despite this, many prudent owners prefer make an incubator, and not buy.
Comparing the material from which the incubator body is made, we can say that foam incubator has the lowest heat loss, from a cardboard box- the cheapest. What material you will make it from is up to you to decide.
Since polystyrene foam is a poor heat transferr, it can be used to make a home incubator. Polystyrene foam can be purchased at any hardware store, all that's left is a little bit of work. It is necessary to calculate the number of eggs to lay, temperature, humidity and begin making the incubator. We have already done all the calculations for you, so we suggest doing it step by step according to the scheme described below.
How to make an incubator with your own hands from polystyrene foam: step by step
To build a polystyrene foam incubator with your own hands, you need to use 2 sheets of foam plastic (or rather, one and a half, but half a sheet will not be sold) (5 cm thick), four light bulbs, including electric sockets (I took a mini-socket and 25 W lamps), 2 scraps of welded galvanized mesh, glue - for fixing sheets and bars of foam plastic (I treated it with polymer glue universal application), tape (50 mm wide), and a thermostat - industrial or homemade.To build a tray for an egg, you can use a welded galvanized mesh or a ready-made plastic tray for vegetables or other products.
We work with a standard foam sheet - 100 x 100 cm.

One sheet needs to be cut into 4 equal parts, with sides of 50 cm. These parts will serve for gluing the body of the incubator - they will be its side walls.

After this, you need to take the second sheet, cut off half - 50 cm, and divide into two pieces rectangular shape, their sides are 50 x 40 and 50 x 60 cm.

During gluing, the body is conveniently held together with tape.

From the first rectangle we make the bottom of the incubator, from the second we make the lid. The lid must have a hole - it needs to be cut, it is approximately 12 x 12 cm, and then closed with a piece of glass. This will make it convenient to view and control the temperature. During the first 5–6 days, the hole is completely covered with glass, which then gradually needs to be moved back by 1–2 cm. When hatching, half of the hole or more needs to be opened.

Taking the squares of the first sheet, you need to glue the body, focusing on the diagram - shown from the top point. As a result, we get the walls of the box with external dimensions of 50 x 60 cm, and internal dimensions of 50 x 40 cm.

After about an hour, when the body has dried, we begin gluing the bottom (40 x 50 cm).

Then we use tape for additional fixation. First we cover the bottom, with fly fishing on the sides - about 20 cm, then the sides over the entire area. This way the body will become stiffer and, as a result, durable.

After that to the long inside body (50 cm), where the junction of the bottom and the wall, should be glued to a foam block 5 x 3 or 6 x 4 cm. We will install the tray on it. Inside, on the sides of 40 cm, retreating 1 cm from the bottom, you need to make 3 ventilation holes on each side (diameter about 10–12 mm), with an even distance between them and from the edge of the case. After drilling, you need to insert something like tubes into these holes, otherwise the foam dust will block them. Therefore, it is better to burn them with a soldering iron. Now the body is ready.

We present the diagram of a do-it-yourself incubator at home (section):
1. Bath;
2. Hole for viewing and ventilation;
3. Tray;
4. Thermostat;
5. Thermal sensor;
6. Distance from lamp to egg.
Let's take the lid again. On its inside side, 5 cm away from the edge, it is necessary to glue a block of foam plastic measuring about 2 x 2 or 3 x 3 cm. With its help, the lid will be fixed. Then on the inside of the lid you need to secure all the electric sockets (4 pieces) and light bulbs - for this I used a base of two strips of welded galvanized mesh.

A thermostat must be mounted on the lid. For a temperature sensor in the lid, you need to take an awl and make a hole, pass the sensor with the wire and place it above the egg at a distance of 1 cm.
For the tray I used a welded mesh with a galvanized coating 16 x 24 cm, inside it is closed with a plastic mesh to prevent flies. The walls should be 8–10 cm high and higher so that young quails do not jump over them. To make the bottom of the tray, it is better to focus on the bottom that the incubator has. The design requires a distance of 5 cm from the side walls for normal air circulation. This tray holds about 160–170 quail eggs.
Any bath with walls of 3–4 cm, for example, cut from a plastic canister, can serve as a water container.
So my incubator worked for 2 years. Then I covered it with foil on foam rubber (a popular building material for heated floors, etc.), and in this way improved the heat capacity.

This is how a simple do-it-yourself incubator has a height of 55 cm. We take this parameter into account, since the light bulbs should be installed at a distance of 25 cm from the egg. If we install it closer, the excess energy will harm the development of the bird.
Conclusion
As a result, making an incubator from polystyrene foam with your own hands is not difficult and does not require much effort. Naturally, such incubators can be made in different sizes, egg capacity and degree of equipment with various equipment. To do this, we suggest that before assembling the incubator, you plan the project well, think through all the details, set realistic tasks, so that everything is correctly calculated and then implemented.Every respectable farmer has on his farm a large number of living creatures. He needs to spend a lot of time and effort on maintaining and caring for the animals. In this article we will talk about how to make a polystyrene foam incubator for chicken or other eggs. What subtleties need to be observed and what materials to use.
First, let's define What is an incubator? This is a device that supports optimal temperature and humidity, promoting the hatching of chicks.
Types of incubators
Incubators, by their nature and classification, are of two types: industrial and home-made.
Industrial incubators are quite expensive, but have a number of advantages:
- The buyer does not need to draw drawings;
- No need to look for special materials;
- There is no need to solder the power supply circuits for heating/tilting the eggs;
- The device will have the required dimensions.
if you have cash, then buying an incubator will not be difficult for you.
DIY making
A home device can be made from the most cheap material , for example, from polystyrene foam. The advantage of this material is that it is lightweight, can be easily disassembled/assembled if desired, and retains heat well inside. After all main collateral ensuring that the offspring will be healthy is maintaining the correct temperature.
Let's look at what you will need for this type of device:
- Two sheets of polystyrene foam with a wall thickness of 50 mm;
- Adhesive tape, glue;
- Four incandescent lamps, 25 watts each;
- Computer cooler (if necessary);
- Trays for water and eggs.
 The most important thing when drawing a project is to carefully consider the distance between the walls of the housing and the trays, which should be at least 4-5 cm. The distance between incandescent lamps and eggs will be at least 15 cm. There should also be a distance of at least 4-5 cm between trays.
It is very important to remember that the air flow should be evenly distributed throughout the device. Remember the necessary ventilation! In a large model, computer coolers, the so-called active ventilation of the device, are perfect. For a small one, it is enough to make a series of holes. Let's look at how to make them below.
Temperature control can be carried out either using a conventional thermometer or using electronic thermostat with sensor. The latter option will be more convenient, since the temperature display will be located outside the housing. The temperature value in each corner of the device should vary by at least 0.5 degrees after it has completely warmed up.
Let's start assembling
 Expanded polystyrene is cut into 4 parts. This is the so-called backing sheet from which the walls of the incubator will be made. The second sheet is divided in half, and one of the halves is divided into parts equal to 40 and 60 centimeters, respectively. The first part of the sheet with a size of 40x50 cm will serve as the bottom, and the second - 60x50 cm - will serve as the lid. Thanks to this, everything will close tightly without leaving any extra holes.
A hole of 13x13 cm is cut out in the lid. This hole will simultaneously serve as an observation window and will additional ventilation. This window can be covered with plastic or glass.
The body is glued together from the cuts of the first sheet of foam plastic. After this, the bottom is glued (the same sheet with a size of 40x50 cm). After this, the entire body of the incubator is covered with tape. To ensure passive air circulation, an incubator made of foam cuts is placed on legs 6 cm high.
3 holes with a diameter of 12 m are drilled on the bottom m at an equal distance from each other. To make holes, it is recommended to use a heated metal object, for example, a knitting needle.
To add density to the lid of the device, it is necessary to glue foam blocks measuring 2x2 cm inside it. They need to be glued so that they fit tightly into the body of the incubator.
After the case is ready, we install the electronic filling. For this you will need metal grid, 4 cartridges and the same number of 25-watt incandescent lamps.
After the lamps are installed, the thermostat sensor is mounted. Its base will be located on the lid of the device, and the sensor itself should be located at a distance of 1 centimeter from the eggs.
When the assembly is completed, you need to carefully check the distance between the trays, walls and lamps of the device again. If the values are not met, ventilation will be impaired, as a result of which you risk the future litter of chickens.
Automatic egg incubator
You can make a home incubator with automated system turning eggs. Let's see what technology is used to turn eggs:
- Rollers;
- Net;
- The tray is tilted at an angle of 45 degrees.
 The constant movement of eggs is prerequisite for breeding offspring. The option, for example, with roller rotation is more used in products industrial production due to the complexity of its implementation. But if you have a regular home incubator, then your option is to use a mesh.
The principle of operation of this method is that the eggs are placed on a net (for example, a mosquito net), and a piece of wire is attached to the net. The wire can be fixed on a small electric motor in order to right time it worked and pulled the net with the eggs over itself and vice versa.
Minus this method it may be that the eggs simply drag along the net without turning over. It is recommended to tension the mesh lightly, so that there are some indentations. Or modify the tray.
To make your own incubator tray, you will need boards. You should choose the size of the boards taking into account internal dimensions your incubator. Always remember proportions.
 Has everyone played the game tic-tac-toe? So here it is. From the boards it will be necessary to make the same structure with the right amount cells for eggs. The bottom of such a tray can be a mesh, which is automated using an electric motor.
The designs of such trays, by the way, are used in large incubators made, say, from an old refrigerator. They can be placed directly on old grilles that were used when operating the refrigerator.
The method of building an incubator from a refrigerator is not much different from a foam incubator. The model will simply be larger and more spacious.
As you can see from the article, making automatic incubators with your own hands is much cheaper than buying a ready-made one. But, unlike industrial products, you have to try hard. With proper skill, everything should work out, and you will enjoy the hatched offspring of chickens.
Attention, TODAY only!
You should definitely purchase or make your own incubator. At home, this functional device will allow you to acquire chicks in a timely manner and control the conditions in which they are born. We invite you to get acquainted with the operating principle of this design.
Read in the article
How an egg incubator works and works: basic elements
If you are thinking about how to make an incubator yourself, then you will be interested to know that such a device consists of:
- housings;
- heating systems;
- egg trays;
- devices that control temperature and humidity conditions.

Now let's talk about how an egg incubator works. It imitates the conditions typical for the natural brooding conditions of various birds. During operation, the device not only ensures optimal temperature and humidity conditions, but also turns the egg in a timely manner.

How to make an incubator at home - general manufacturing principles
To finished design allowed to hatch a high-quality egg, you need to know how to make an incubator at home. Such devices must meet certain requirements which we invite you to get acquainted with.

What requirements must the body of an incubator for eggs made by hand meet: characteristics of the material
In order for a self-made egg incubator to function well, materials that have good properties should be used to create it. This element should not only help maintain the temperature inside at an optimal level, but also prevent sudden temperature changes.

What devices are used to heat air, and how the temperature is controlled: thermostats used
As heating element Incandescent lamps are most often used for incubation. Depending on the dimensions of the structure, their power can start from 25 W and reach a maximum possible values. Can be used as:
- electric contactors – mercury thermometers with an electrode soldered into the tube. The second is a column of mercury. As it heats up, the mercury begins to move and, as soon as it reaches the soldered electrode, it closes the circuit. The incubator will turn off;
- bimetallic plates. Heating this thermostat will cause it to bend due to different thermal expansion elements included in its composition. When you touch the second electrode, the circuit will open;
- barometric sensors. This is a hermetically sealed ether-filled object cylindrical, the height of which is less than the diameter. The cylinder is the first electrode, and the screw, located 1 mm from the bottom of the object, is the second. As the ether heats up, it causes the internal pressure to increase and the bottom to bend. As a result, the circuit closes and the heating system opens.

How to ventilate an incubation system: useful tips
The system must be provided in mandatory. The state of the air inside the device and the temperature and humidity conditions depend on its presence and stability of operation. To create an optimal microclimate, you should ensure average speed ventilation about 5 m/sec.
For moving air masses generally used . Ventilation holes are drilled at the top and bottom of the housing into which tubes of suitable diameter are inserted. By changing the degree of their overlap, the flow of fresh air is regulated.
Attention! The embryo located inside the egg consumes oxygen from the outside on the 6th day of incubation.

What mechanisms can be used to turn eggs: implementation options
In order for the egg to heat up evenly, it is necessary to provide swivel mechanism for the incubator. It can be implemented in different ways. The simplest option for small structures is using mosquito net, which acts as the bottom of the structure. The mesh is mounted on two rollers, providing circular movement. The rotation of one of the rollers moves and turns the eggs in the trays. Having provided a relay, timer and electric drive, you can automate the process. The disadvantages include that sometimes this mechanism does not work, and the egg simply moves along the tray.
Inclined mechanisms are more reliable design. The egg inside does not rotate, but simply tilts. To do this, the trays are fixed in the axial direction so that they can be tilted freely. There is a handle on the outside with which you can change the inclination of the trays.

It is possible to use swivel casters. The eggs are placed in trays between rubber rollers, which are connected to each other by a chain that ensures simultaneous rotation. Such a system allows connection. We invite you to watch a thematic video.
How to decide on the size of a home egg incubator: average values
The dimensions of the manufactured device are affected by:
- the number of lamps used to heat the incubator;
- the number of eggs that are planned to be placed in the device at the same time;
- egg size.
As a rough guide, we can assume that in a home incubator for eggs 47 cm long and 40 cm wide, you can simultaneously place up to:
- 70 chicken;
- 55 turkey, duck;
- 40 goose;
- 200 quail.

Differences in temperature conditions for birds of different breeds
To breed a bird, it is necessary to maintain optimal temperature regime. Maximum and minimum temperature The temperature at which the eggs should be located depends on the breed of birds.
| Bird breed | Temperature at the time of laying, °C | Temperature at the end of incubation, °C |
| Chickens | 38-39 | 37,6 |
| Ducks | 37,8 | 37,1 |
| Geese | 38,4 | 37,4 |
| Turkey | 37,6 | 37,1 |
| Got over it | 37,5 | 37,5 |
Attention! Overheating of eggs is undesirable, underheating is unacceptable.
Violation of the temperature regime will lead to the development of embryos slowing down, and many of them will simply die. Overheating can affect the health of hatched chicks.

How to make an incubator from an old refrigerator with your own hands
If you still have an old refrigerator at home, we suggest you learn how to make an incubator out of it yourself. By following our recommendations, you can create a functional device that fully copes with the task assigned to it.

What tools and materials are needed for the job: an indicative list
To make a quail incubator with your own hands, in addition to the body of the refrigerator itself, you should prepare:
- glass;
- low power motor with gearbox;
- metal gratings;
- frames made of wood or aluminum;
- light bulbs of suitable power;
- heat reflecting material;
- computer coolers;
- sealant;
- Building tools.

Preparing the refrigerator body
We begin work by preparing the body.
| Illustration | Description of action |
 | The entire cooling system should be removed from the refrigerator body and all unnecessary details. This will increase the volume of the internal space of the incubation chamber. |
 | We mark the door and secure the glass with screws. We ensure sufficient tightness at the junction of the window and the door. |
 | We decorate the interior space using panels. We use screws as fasteners. All joints must be foamed to ensure sufficient tightness. |
Ventilation system installation
To ensure sufficient air speed, preference should be given to forced ventilation.


A comment
Leading engineer for heating, ventilation and air conditioning LLC "GK "Spetsstroy"
Ask a Question"Purchase two fans for the incubator. One should be mounted at the top of the chamber, the second at the bottom. In this case, you will be able to better control the humidity and temperature conditions inside the chamber
"Installation of a heating and thermoregulation system
To heat the incubator, incandescent lamps with a power of 25-40 W should be used. They are connected to lamps.
Attention! It is preferable to use four 25-watt lamps instead of two 40-watt lamps.
Heating elements should be located either at the top of the chamber or along its perimeter. The thermostat should be mounted outside the chamber, the sensor inside the chamber.

We invite you to watch a video that shows the connection diagram of the incubator.
How to make a mechanism for automatically turning eggs for an incubator with your own hands: video and nuances
In order not to miss time, it is worth making your own incubator with automatic turning. Such a system will independently change the position of the eggs after a given time.

It can be made on the basis of a gear motor for a windshield wiper. This video describes in sufficient detail the diagram of such a device.
We think you will also be interested in the video instructions for making your own incubator from the refrigerator.
The nuances of making a foam incubator with your own hands: video instructions
Such structures can be made entirely of polystyrene foam, or this material can act as a . Schemes and drawings for making such incubators with your own hands are presented in the public domain. We offer you to look at photos of the simplest options.


Lamp sockets are attached from the inside, under which slats for a tray or grille are mounted. The latter should be done as a frame type. It is worth laying a construction mesh for puttying or a mosquito net on the gratings.
Note! When choosing the distance between the cartridges and the slats, keep in mind that there should be no more than 25 cm between the low-power incandescent lamp and the egg.

How to use an incubator: important points
To ensure a healthy brood, you need to know how to use an incubator. To do this, the chamber is first cleaned and disinfected using a weak bleach solution. Wait until the internal surfaces are completely dry.
Attention! The incubator should be operated in a room where the air temperature is 21-23°C, located away from a source of cold or heat.
Before laying eggs, you should check the functionality of the device for at least 24 hours. If the temperature conditions are met, you can begin incubation. To do this, place the egg in the tray with clean hands, placing it with the sharp edge down.
Initially, the temperature inside the device may become lower than the required values. Over time, the indicators level out.
During the incubation process, the egg is turned over three times a day. 3-4 days before the chicks hatch, the rotation of the trays is stopped. After they hatch from the eggs, you should wait a bit until they dry properly.

How much can you buy an automatic egg incubator - price review
It is quite difficult to create a homemade incubator with automatic egg turning. It is required to have certain knowledge and be able to perform certain manipulations. If manual turning is difficult, you should buy an automatic egg incubator, the price of which depends on technical characteristics And design features. Particularly popular models are:
- "Cinderella". The manufacturer offers devices for different numbers of eggs, which allows you to choose best option for myself. Can be used for incubating chicken and goose eggs. Operates from a 220 V network. The model for 98 eggs weighs 4.5 kg;
Review of the “Cinderella” model
More details on Otzovik: https://otzovik.com/review_1059377.html
- WQ-48. Comfortable and enough simple model. Made of plastic, which greatly simplifies the process of caring for the device. Equipped with rotating trays. Designed for 48 chicken eggs. Allows the installation of special trays for incubating quail eggs. Weighs 5.1 kg;
Model overview:
- MSN 32. Incubator for 42 eggs. Weighs 2.6 kg. The electronic control system ensures fairly accurate setting of the required parameters;
- "Laying hen BI-1". A universal model suitable for breeding young birds of all breeds. Equipped with an analogue thermostat and an automatic egg turning system.
Review of the model “Layer BI-1”
More details on Otzovik: https://otzovik.com/review_1935873.html
Now you know how to make an incubator from a refrigerator and other scrap materials. You can safely get to work. Share your successes and photos of hatched chickens in the comments.