Do-it-yourself acoustics modification.
You have a pair of speakers on your hands, or maybe not a pair. Active or passive. Floor or shelf. It might even be a subwoofer and not speakers.

This article will help you learn about ways to improve the sound quality of your acoustics without extra costs. The most effective methods improvements to acoustics that are easy to implement with your own hands. This can be called polishing what the manufacturer could not implement, due to the feasibility of production and its payback.
All instructions and tips from this article are suitable for any acoustics with a bass reflex, including subwoofers and floor-standing speakers. Many tips will also apply to other types of speaker systems.
So, let's begin.
Upholstery of the body with sound-absorbing material and strengthening of the structure.
First, let's find out for what purposes this procedure is being performed.
Opening the columns.
Disassembling the column is very simple.
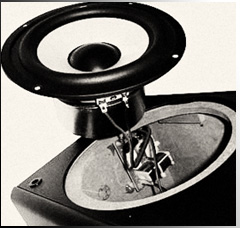
If this is an active speaker, then on the active speaker you need to unscrew the amplification unit from the back, which is screwed on with screws.
You need to remove the block very carefully, without sudden movements. If there are plugs that come unfastened, disconnect them and place the amplifier unit nearby without over-tightening the wires. On passive speakers, you just need to unscrew the screws on the midrange speaker and carefully remove it without damaging the wires.
*All these operations must be carried out carefully and without sudden movements, in order to avoid damage to wires and circuits.
Strengthening the body.
This modification is worth carrying out if you doubt the structural strength of your acoustics and there are no additional rigidity structures inside the case (reinforcing strips, “plugs” on the walls, screeds between the walls). Almost always, speakers need additional strengthening.
For this procedure you will need small 1x1 - 1x2cm bars and rubber glue. We will glue the bars along the corners, on which there are no bars, which will strengthen the fit of the side walls to each other. We measure and cut, apply and estimate, spread plenty of glue on the beam and the place to which it will stick. We glue over all the corners where the manufacturer saved wood. Naturally, we use the beams as spacers, and not just glue.

It is also worth laying beams along long walls columns, if missing. As shown in the picture, or diagonally. The beams should fit snugly at the edges.
It is also advisable to make horizontal struts between the walls, this will significantly strengthen the structure. This is especially true for large speakers with long walls (for example Microlab Solo 7).
After this procedure, we get a stronger structure that creates less resonance of the walls, as well as less vibrations when micro-friction and walls touch each other.
To carry out this procedure, we will need double sided tape And sound-absorbing material.
For which goals it's being done.
All this action is carried out with the purpose reduce reflection of sound waves from an acoustic body with a bass reflex. If this is not done, then often, instead of bass, incomprehensible buzzing and whistling sounds will come out of it. Upholstery gives more smooth And balanced bass which is becoming more soft and better audible. It removes the buzzing, resonating sounds that arise in the acoustic body due to the collision of sound waves. This also allows you to slightly expand the lower range of reproduced frequencies.
As sound absorbers, the best materials are: padding polyester(can be found at any clothing market, or can be found in an old jacket :) felt, rolled wool or the most interesting material - cotton wool, sound-absorbing – type “ URSA”, besides, it is non-flammable. Only non-insulating glass wool made of quartz sand, and home for installing partitions. If obtaining these materials is problematic, as a last resort you can use rolled foam, which you can get at any HozMage. But its use is still highly undesirable. Do not forget that padding polyester, felt, cotton wool must be fluffed before gluing.
To begin with, we take out the sound-absorbing material that the manufacturer put inside, if any.

What are we doing.
1) We glue with double-sided tape as much of the area inside the column as possible. Immediately peel off the protective paper.
2) We cut or stretch the sound-absorbing material so that the bare walls are completely covered, including (especially) the corners.
3) We line all the cavities with material so that the wooden walls are completely sealed. The thickness of the layer should be no more than 2 cm, otherwise it can significantly reduce the volume inside the case, which is not in the best possible way will affect the depth of the bass component.
Warning.
In areas that get hot, it's best not to overdo it. This applies to places near the transformer and amplifier unit. It is better to leave an empty space of 1-2 cm between them and the sound-absorbing material. Therefore, best material– this is a non-flammable sound-absorbing wool type “URSA", which, for example, may remain after repairs. It can be used without restrictions.
You need to try to fix the material as thoroughly as possible. After all, you don’t want cotton wool or synthetic padding to jump around inside or, even worse, fly out of the bass reflex during large movements of air masses inside the housing :)
Modification of the bass reflex.
To reduce rattling and possible whistling from the bass reflex, it is worth doing 2 things.
1. Wrap the bass reflex with sound-absorbing material, like a “fur coat,” in one layer. Leave 1 cm of bare space at the end of the bass reflex. Secure the “fur coat” tightly with thin elastic bands, wrapping them around the bass reflex, as shown in the figure above.
2. Using wire cutters, cut off any protective grilles inside the bass reflex pipe evenly. There is no benefit from them, but there are a lot of unnecessary sounds and whistles. If there is a mesh glued to the end, then it is also better to remove it. This will allow air to flow more easily, which will increase the overall responsiveness of the speaker.
Installation of acoustics on spikes.
Try pressing the speaker for a while while playing music. You will hear that it will be out of tune and swallow a good half of the frequencies. This happens because the finger absorbs vibrations, preventing the speaker from releasing them into the air.
Speaker housing is a continuation of the speaker. When it comes into contact with the floor, table, shelf or other things, the speaker body gives off some of its vibrations to these objects, as in the example with a finger.
In order for the acoustics to efficiently transmit sound waves into the air without physically scattering them on the floor and objects with which it comes into contact creating distortions, spikes are used.
The spikes are attached as legs. To do this, 4 small holes (not through) are drilled on the bottom wall into which they are screwed. You can buy them in many consumer electronics stores that sell acoustics and accessories, or order them online. Under acoustics with spikes, there must be hard material – ceramic tile, parquet or other. The main thing is that the legs have as little contact with it as possible and were not recessed.
The principle of action of the thorns is that they strongly reduce the contact area columns with the surface on which it stands. Thanks to this, the sound waves that are supplied to the body begin to sound, and not fade away on the floor, parquet or shelf. Distortion is reduced to a minimum, the bass component becomes more audible and much more detailed.
Important note.
Spikes make sense to use for acoustics with decent weight and a decent size. Spikes should be used primarily for floor-standing acoustics weighing more than 12 kg. Or for subwoofers weighing 5 kg or more. In smaller acoustics the effect will be there, but not as noticeable.
Replacing wires on the amplifier part of the acoustics. For active acoustics.
Often, the manufacturer saves on such things as the quality of wires from the crossover to the speaker and from the board to the crossover. The thickness, as well as the quality of the wire, directly affects the sound quality. The thicker the wire, the deeper the bass and the clearer the mids. This modification should primarily be carried out on subwoofers, due to the greater energy that flows through these same wires.
1.
We select a suitable replacement wire, naturally copper itself High Quality what is available. Preferably not VVG (solid), since the signal changes when passing through such a wire. It is better to take a PVA (braided) core made of oxygen-free copper. Thicker is not always better, you need something in between, depending on the power of the acoustics.
2 . Unsolder and cut off the old wires. If there is a bracket at the other end, then, if possible, solder the wires to the terminals themselves on the board. If this is not possible, cut off the bracket at the root, remove the terminals, solder the wires to them and insert them back into the bracket. We also wrap the speaker and crossover terminals and solder them liberally. Soldering is a MUST!
3. We make sure the quality of the soldering.
It is also worth paying attention to connecting wire between the columns.

The manufacturer rarely slips in something sensible. The best option among the most affordable ones is braided wire with transparent insulation, which is supplied with, for example, SVEN Royal or Microlab SOLO 6 and higher.
A similar wire can also be purchased at electrical stores. How is that inexpensive option replacing the flimsy wires that come with the speakers. For floor options, speaker wires with a thicker cross-section and higher quality, oxygen-free copper are best suited. These can be bought at any store that sells home theaters, or at the electronics market.
A few words about the wires from the sound source to the acoustics.
The wires that go from the sound source to the speakers (usually tulips) or receiver must be good quality.
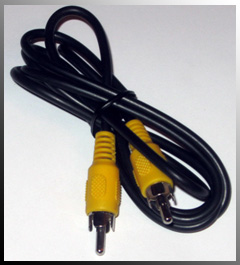
It is highly desirable that they be shielded from interference from power lines, cellular networks and radio. To do this, wire manufacturers wrap them in a layer of foil, or braid them with aluminum or copper thread. It is not difficult to distinguish them - they are much thicker than non-shielded ones. Also, high-quality wires should have gold-plated plugs for lower resistance and less signal loss on the plugs. You can buy such wires on the radio market or in stores that sell home theaters.
Note.
In order to have a noticeable effect from changing the wires, we recommend replacing them on acoustics with a price level 100$ and higher (for 2.0). Or, if the wire used by the manufacturer is of really poor quality.
Use surge protectors.
Good network filters, which are equipped high frequency suppressors, they are quite good at cleaning up the so-called White noise and other interference caused by poor power supply and network interference.

Often, in built-in amplifier circuits, there is no high-quality noise suppression circuit, which leads to distortions, noise from speakers and different sounds when the refrigerator or electric ignition starts working gas stove at the neighbors :)
Remember that cheap filters will not save you from interference. These are capable of protecting equipment from pulse currents that arise, for example, when lightning strikes the wiring, and nothing more.
The filters that we need must contain a suppressor (filter) of high-frequency interference. They are also useful for receivers and amplifiers, both for protection and for better noise immunity.
Companies make good filters ZiS Pilot(starting from series G.L.), APC.
If the speakers hum or there is strange sound coming from them.
There are usually two reasons:
- Poor quality signal source or cable.
- Poor quality input capacitors in the built-in amplifier part (if the speakers are active).
IN first case, you need to check the cable, look inserted Are there connectors? fully into the plug and check integrity cables Also need take away wires from others, especially cables supply network And radio, since they create magnetic fields around themselves.
In second case, you need to open the column with the amplifier part. It is usually heavier and has a heatsink.

Next you need to find the capacitors of the power supply filtering circuit. Usually there are two of them and they are the largest. They should be desoldered and replaced with new ones, of high quality and with great maximum voltage and capacity. It is also worth looking to see if others are swollen or leaking (brown or yellow dried liquid nearby). If yes, then replace it without hesitation.
You can also replace other large capacitors, since they do not stand out in terms of quality in multimedia acoustics.
Other useful tips for improving the sound quality of your acoustics, without any modifications.
Correct placement of acoustics.
To achieve the highest possible sound quality, the acoustic system needs arrange correctly around the room.
30% of success in achieving the correct sound picture depends on the correct placement of acoustics.
_________________________
1. Tweeters (HF) - must be flush with the ear listener for better positioning in space.
2. Port the bass reflex should not be anything closed. The distance from a wall or other obstacle should be more than 15 cm so that low frequencies are not lost at the output and nothing prevents them from spreading throughout the room.
3. The front speakers should be positioned at 30 degrees, from the listener’s point of view and directed strictly at him.


Rear, on 30 degrees from the listener's side point (from 90 degrees) Only in this case the best depth of the sound picture is ensured.
4. Optimal distance, on which the speakers should stand from the listener - 2 meters For floor speakers and 1 meter For shelf.
5. Eliminate extraneous sound sources. It could be open window, not a quiet system unit, and so on. All these sounds interfere with the perception of sound and can even make a great sound illegible and poorly detailed.
Conclusion.
Let's repeat the steps again:
1. Strengthen the overall structure.
2. Upholster the body with sound-absorbing material inside.
3. Modify the bass reflex.
4. Install the acoustics on the spikes.
5. Replace the wires inside and outside with better ones. Connect through a good surge protector.
6. Correctly arrange the acoustics, eliminate noise sources.
7. Listen.
Most of these tips are suitable for both active and passive acoustics.
Create and be surprised how better side the sound changes.
Happy modification!
You can learn how to cover a subwoofer with carpet from this article. In general, this process is not too difficult for those who prepare in advance.
After all, for carpet pasting to be successful, you need not only to purchase suitable material, but also to choose the technology by which the operation will take place. You will learn how to cover a subwoofer with carpet without spending a lot of time and effort.
Reasons for pasting
There are only a few reasons why you may need to cover a subwoofer with carpet:
- If the old coating has worn out and lost its proper appearance. Because of this, the speakers (see) will spoil the style of the car;
- If the subwoofer housing was created with your own hands. In this case, pasting with carpet will be the last step in creating the column.
Note: the subwoofer can be covered not only with this material, but also with leather, dermantin or some other material.
How to make a subwoofer with your own hands
It's hard to imagine any car without. After all, almost every driver loves loud music so that his ears ring.
To achieve high-quality sound, it is not enough just to choose a good speaker system, it must also be installed correctly. Soundproofing also plays a role important role.
Let's look at how to make a subwoofer with your own hands, Special attention paying attention to final stage work.
Stage 1 and material selection
The choice of material from which the subwoofer will be made (see) should be approached responsibly. The quality of the sound produced will largely depend on this.
The material must meet three basic requirements: it must be strong enough, dense and provide good sound insulation.
Therefore, at present there are only a few materials suitable for making a subwoofer box:
- Chipboard. It is inexpensive, but at the same time combines all three necessary characteristics;
- Multilayer plywood. Its advantage is that it is easy to process, but it should be remembered that this material is exposed to moisture and swells;
Note: For safety reasons, it is better to install subwoofers made of this material in dry places.
- Chipboard is slightly inferior to its competitors, but it is used quite often. The fact is that it costs even less, but it is less durable;
- You can also use plastic to create a subwoofer, but in this case the sound quality will be poor.
Stage 2 or assembly
Assembling a subwoofer involves several basic steps:
- To make it easier to cut out all the details, you can make templates on cardboard. In this case, it is very important to take into account the dimensions of the future box;
- Transfer the template to the material;
Note: for this you can use chalk or a piece of soap (if you need to erase), or a marker (if the stripe will not interfere).
- Cut out the sides of the box using a jigsaw. We must not forget that a hole should be made for the future speaker.
It should be round. It is desirable that its diameter be several mm smaller than the diameter of the speaker itself; - The weak point of the future subwoofer is the terminal block. This could happen here short circuit. Therefore, it is advisable to make protection for this vulnerable spot in the form of a small box;
- The box must be fastened using self-tapping screws, since all parts must be securely screwed to each other;
- Another important stage– leveling the surface of the subwoofer. To do this, first of all it should be sanded, and only then leveled using putty.
- The cracks in the box must be sealed, since there should be a good resonance inside the box. And if there are a huge number of cracks in it, then the music will sound different
Stage 3 or decoration
The most popular decoration method is painting. But you can approach this more creatively and cover the subwoofer with carpet.
For this you will need the following materials:
- Carpet. It is usually sold in shoe stores;
- Solvent for degreasing;
Note: gasoline will not work - it is too rich.
- Glue. It's better not to use rubber;
- Brush.
Pasting with carpet occurs like this:
- First of all, you need to estimate how much material should be needed for gluing. This depends on the size of the subwoofer;
- You can take about a meter of material and cover the subwoofer with it, and cut off all the remains;
Note: for cutting out carpet parts you can already use ready-made templates, which were made during the creation of the case;
- Take an unnecessary rag and thoroughly lubricate the surface of the box with solvent;
- Let it dry. After the subwoofer has been lubricated, it is not advisable to touch it with your fingers, as grease marks may remain;
- Take a brush and thoroughly coat the box with glue;
- Take the cut out parts and carefully attach them to the intended place. It is important to consider that it is better to make the joint not at the edges, but in the middle of the sides. This way the carpet will be better sealed;
Note: you can smooth the material using a wallpaper spatula.
- Let dry;
- The edges of the subwoofer can also be decorated.
After this, you can install the created subwoofer anywhere. Most often, the speaker is placed in the trunk of a car.
Sometimes they find a place for it on the back shelf. Anyway appearance The subwoofer is very important, so it should also be given sufficient attention.
Thus, you can make a wonderful subwoofer with your own hands at home. Naturally, the price of such a device will be much lower than a ready-made one.
Our instructions will definitely help you cope with the operation. But before starting work, you can also familiarize yourself with the photos and videos on this topic, of which there are many on the Internet.
Those who improve acoustics are like car enthusiasts who invest enough money in their “nines” to buy a good foreign car. Let's share some enough simple techniques improvements to speakers that allow a significant increase in sound quality to be achieved at a low cost.
Before you start modifying your speaker systems, see what your analog signal source will be. Integrated codec? SB Live sound card? If so, then keep in mind: you will not get really good quality sound, since the sound card (codec) will greatly distort it. Of course, you will notice an increase in quality, but there will be little joy from it. The ideal option would be, of course, external CD players, DVD players, and so on. If you are concerned about good sound, try to find something from this list.
Before you begin any modifications, find out as much as you can about your speaker system. Depending on what it is initially, you can achieve a greater or lesser increase in quality from it.
What needs to be improved?
It makes sense to refine the acoustics that initially had some potential. The greatest potential for improvement is with "average" acoustics - those that are in the middle price category and has a sound quality that can be called decent. As a rule, it is almost pointless to modify high-quality systems - replacing or changing the properties of one component will require replacing all the others. That is, with the same success you can immediately assemble new acoustics from scratch. However, some things can be improved in them; The quality, of course, will not increase significantly, but you can get a noticeable increase. The best option for improvement is domestic acoustics production Soviet Union and its republics. The middle ones are of the greatest interest from the point of view of improvement (it makes no sense to list such systems, since there are a huge number of them).
Refinement of columns
The hardest part remains - modifying the speakers. It makes sense to modify the filter only in the in simple form- replace standard elements with higher quality ones of the same denominations. If electrolytic capacitors are installed in the filter, they can be replaced with film, metal film or metal paper ones. Coils made of thin wire and with a metal core can be replaced with similar ones, but without a core and wound with thick copper wire (cross-section approximately 1 mm2). With this approach, you can achieve a good increase in quality with little cost. It might be worth replacing the standard wires running from the amplifier to the speakers (as well as those running inside the speaker cabinets) with thick ones copper wires(special speaker cables can be used).
For small acoustics, cables with a cross-section of about 1-1.5 mm will be quite sufficient (most likely, the terminals will also need to be changed - do not forget to seal the speaker housings), for large ones, at least 2.5 mm2. True, there is a risk that the remaining components will not allow you to get an increase in sound quality from replacing wires and terminals, or it will be very insignificant. Unfortunately, this can only be verified experimentally.
Modification of the case
In addition to modifying the electrical circuit, it is useful to work on the speaker housings (in systems with a subwoofer equipped with small-sized satellites, it makes sense to modify only the subwoofer housing). As a rule, they are very far from ideal. In theory, they should be sealed, rigid and correctly calculated - have a volume corresponding to the parameters of the speaker. Many cases of mainstream systems do not meet any (!) of these criteria. As a result, such constrolabes hum (mumble, as many home-made people put it) at low frequencies, swell and emit sounds that are not included in the phonogram (this is not noticeable to the eye, of course, but noticeable to the ear), and the speakers dangle and introduce distortion into the sound, therefore that unsealed enclosures do not support them.
If we eliminate these shortcomings, the increase in quality will be significant, approximately as noticeable as from changing and modifying the power supply, but of a different nature - there we fought with transient distortions, and here we will reduce the level of linear and nonlinear distortions.
First of all, let's deal with rigidity using ties or spacers. One spacer will be more than enough between the top and bottom walls; it would be nice to install two between the side, front and rear walls (if the cases have a volume of about ten liters or more). The simplest option in terms of technical execution is to tighten the opposite walls with thick metal bolts, drilling holes of the appropriate diameter in them. Not very aesthetically pleasing, but simple. Another way is to install from inside the housings as spacers wooden blocks 15x15 mm, attaching them to the walls with glue and screws. Naturally, they must stand in a spacer.
If the speakers are on the front wall speaker system located close or, due to some other design features, it is impossible to install a spacer between the front and rear walls; you can increase the rigidity of the case using wooden blocks attached to the corresponding edges of the case (running from the front wall to the back). Not good effective solution, but still it’s better than nothing.(mospagebreak)
Sealing
After strengthening the housing, take care of its sealing. To do this, remove all the stuffing from it - filters, speakers, wires, padding polyester or other absorber. And carefully treat it from the inside with some viscous sealant ( necessary materials can be found in hardware stores or auto enthusiast stores). It is best to use bitumen mastic, sold in bottles with sprayers - it is quite easy to treat columns with it, and it copes with its task one hundred percent. Never use substances that become hard and brittle after curing.
It is best to carry out processing and dry the columns after it. outdoors- dukhan from bitumen mastic, silicone and other similar substances will be so high that even the neighbors will cough :). After the cases have dried, it is useful to repeat the processing and drying procedure. Ready? Great. Finishing touch- make gaskets for the speakers and the back cover (the one with the terminals) from soft rubber and screw the speakers with the cover through them. When you finish the modifications and close the case, you can apply putty or other sealants to the joints of the speakers and the back cover with the case for greater reliability.
Volume
If the speakers are humming, it is useful to slightly increase the internal volume of the case (it is simply not possible to increase it significantly). No, you don’t need to bore it - just put fluffy cotton wool in it. But first, suspend the synthetic padding mat that was already inside the case (if the manufacturers, of course, put it there). There should be 25 grams of synthetic padding per liter of body volume. Not enough? Add cotton wool, previously well fluffed. The normal amount is 10-15 grams per liter. In principle, you can put more, but it only makes sense to do this if the low-frequency hum has not stopped. You will lose a little bass, but the unpleasant hum will disappear.
There is another procedure, but it is quite tedious and not as effective as those described above. The walls of the case can be covered from the inside with felt or, at worst, with batting. This measure will reduce the number of reflections of sound waves inside the housing, which will lead to a reduction in the distortion introduced by the housing into the sound. If you decide to do this procedure, when attaching the material to the walls, do not use too much glue so that the felt or batting does not become dense and useless. Apply glue in small dots. Personal recommendation: do not use padding polyester with a thickness greater than 15 mm.
Further tuning
Like any tuning, the process of modifying speakers tends to drag on and over time turn into a favorite hobby. Perhaps the improvements made will not seem enough to you, and you will want more. And after some time, you will become interested in what is, in principle, possible to squeeze out of your system.
A deeper and more thorough modification for each system is individual and requires not only more time and money, but also certain knowledge. In addition, you will need some experience in assessing sound quality by ear, the ability to select test material, and work with ready-made tests (for example, FSQ). If you want to dig deeper, look for information on the Internet. Find like-minded people online, use search engines to get scanned books and articles on relevant topics.
If you have small plastic speakers installed, there is no point in modifying them. Even if your pockets are not full of money, try to get hold of a system of dollars for 100-60 first, so that you can then make the most of it. It is basically impossible to achieve anything good from cheap plastic speakers. According to the laws of pricing, what reaches retail sales increases in price at least three times. Accordingly, it turns out that the developers of acoustics for ten dollars spend no more than three and a half dollars on everything. And everything is an amplifier, speakers, housing, filters, power supply (by the way, even a low-power, but high-quality power supply unit costs 5-10 dollars), small nonsense like wires and packaging materials (which also cost money). The development engineers also had to be paid something, out of the same ten dollars.