The macrame weaving style has been known since ancient times. Products that were made using this weaving technique were popular not only among disadvantaged and poor people, but even in rich and wealthy estates. Depending on the nature of the item, it could be useful and made in various variations of macrame weaving. Weaving a hammock is easy to do with the diagram and text instructions that we provide in our DIY article!
In the age of developed computer technology, macrame knot technique diagrams can be performed even on laptops and tablets. It is not surprising that today, such a method of making things with your own hands is losing relevance. Because in pursuit of cheapness, people forget about the uniqueness and durability of things that they can do on their own at home.

Having studied the master class and learned what to do step by step, a person is capable of incredibly cool crafts. Many of you have no idea how significantly factory-made items are inferior in quality to crafts made from photos for beginners.
Using a minimum of knowledge and spending a little time, you can relax while making crafts with your own hands. Having studied the main knots, the technology of their weaving and correct location in the macrame technique, you will have a significant set of knowledge.

In addition to accessories and applied crafts, using this method, numerous interior items are made from rope. Not only a sofa, but also an armchair, can be built using the macrame weaving technique.
On the Internet there are countless exclusive photos and videos of real things done with your own hands, at home without worries and hassle. They fit perfectly into the interior, as that is exactly what they were made for.

Weaving a hammock, detailed diagram performing the item and possible use with your own hands - you will learn all this from this article.
Learn how to weave a hammock step by step with your own hands with a work diagram
To complete the craft, you need:- Ruler
- Scissors
- 2 wooden beams - durable material. With pre-made holes for threading the hammock material.
- Durable clothesline.
To ensure that your hammock is not only visually pleasing, you must use good, wear-resistant material. For this, just in time, you will need a clothesline, about 1 cm thick.

Not only thick clotheslines, but also cords have high strength. Its only difference from a rope is its unusual low level comfort. Still, it’s more convenient to stay on soft rope than on a rigid cord.
Step-by-step instructions for making a hammock using macrame technology:- Cut 20 m for fasteners, the rest of the rope in equal parts of 6 meters.
- Secure each rope with a loop and a knot on the bar.
- Knot patterns for weaving a hammock.
- The optimal cell size is about seven cm: this way you will have a comfortable rest without falling through or getting tangled in the hammock.
- When you have finished the hammock, attach the tails of the cords with knots to the second plank and to both straps with fasteners. The hammock can be hung on supports after first checking its strength.
When you find a place where it is better to secure the craft, you will be pleasantly surprised by the quality and appearance of the hammock. Enjoy using it, we wish your product a long service life!
One of the many recreational items is a hammock. He came to us from ancient times. It was with the help of a hammock that people could fall asleep in unusually unsuitable conditions. Previously, the hammock was used exclusively by sailors, since there was nowhere to rest while sailing. The hammock was built to create comfort. Because the sea lacked comfort and tranquility.

Mainly, pay attention to the reliability of the hammock supports. It happens that, quite by accident, a person can spend a couple of hours lying in it. Therefore, before you start using the item, test it for strength and endurance.
Such a craft will have special meaning and relevance in summer time of the year. Therefore, you can start making it in mid-spring. An ideal place to relax may be a hammock, which is located in the country. Soviet people those who have dachas do not have the habit of relaxing there. They are used to working hard in the garden, working on the territory, constantly improving it. Therefore, if you still have a hammock at your dacha, you may be tempted to relax at least a little during a break between work. Or maybe even fall asleep after a difficult harvest.

Appreciate your work, find time and place to relax. A hammock, designed and made with your own hands using the macrame technique, will help you with this. Don’t be lazy and adapt things to suit your comfort, thereby creating comfort. After all, in modern world, sometimes, that’s all that’s missing.
Video on this topic
Hammock is one of the most popular country houses in the summer season. Lying in a hand-made hammock under the treetops, listening to the peaceful whisper of leaves and the chirping of birds is a real pleasure and a kind of psychotherapy. You won’t even notice how the burden of problems from your shoulders, troubles and physical fatigue will begin to disappear somewhere. It is not clear how such a seemingly simple structure can have such a strong impact on inner world person.
The benefits of relaxing in a hammock in the country
A hammock is a place to relax that has a number of positive aspects:
- Sometimes hanging a little is healthier than lying down. In this position, your body relaxes more and, accordingly, your sleep becomes deeper.
This device is ideal for rocking a baby. The material of the hammock wraps the baby like a mother’s arms, and the child falls asleep faster.
- A swinging hammock is great for calming and stress relief. In such a bed you will not have nightmares.
- This is a great piece of furniture for your garden.
The human spine requires a moderately level and rigid base so as not to bend. So don't turn your hammock into permanent place for sleep, otherwise it threatens with unpleasant complications.
What to attach to (trees, poles), how to hang
There are several rules that will help make relaxing in a homemade hammock as comfortable as possible:
- In order to rest comfortably and safely on a hanging bed, you need to find reliable support. Two trees located nearby are ideal for this, but this is not always possible. Therefore, you need to make the support yourself. Alternatively, use posts with a cross-section of at least 80 mm. They should be dug 80 cm into the ground and filled with concrete for strength.
- The optimal height for hanging the structure is considered to be one and a half meters. The distance between the support points depends on the length of the future hammock. The length of the fabric for the bed + 30 cm for deflection = the distance between the support points.
Important! The higher the hammock is hung, the greater the deflection should be.
Please note the following:
- For fastening, a strong rope made of synthetic materials is used, the diameter of which must be at least 8–10 mm. From it you can weave a durable configuration using the macrame method. For greater reliability, it is recommended to use eyelets.
- Preference should be given to natural fabrics (tarpaulin, jeans). Synthetic ones, despite being cheap, light and durable, bring more discomfort, causing increased sweating.
- A wicker hammock is best made from cotton cords. Such a bed will be pleasant to the touch, the knots will not become an irritating factor.
A wicker hammock may fray in some places. Protect yourself from this by strengthening it in such places with polyethylene tubes.
Photo gallery: photos of various designs


Types of hammocks
A variety of hammocks allows you to choose the model that is most suitable for you.
This wonderful invention belongs to the Mayan Indians, who came up with the idea of sleeping in such a way as to protect themselves from snake bites and insects.
Mexican fabric
This is the most classic option. For its production it is usually used synthetic fabrics(although this is not recommended) or braided wire. It is lightweight and durable. You can always take it with you anywhere, but it will only last a couple of seasons. Such a hammock can replace a light tent.
You can attach such a hammock to natural supports (trees, small buildings) using a regular belt. Installing a stationary hammock is also quite simple: just dig in and concrete the pillars.
You can purchase a ready-made support that does not need to be strengthened. There are even hammocks with built-in mosquito net. Their cost is a little higher, but you must agree that it is very convenient.
Take this hammock with you on the road, then you can fully relax in the fresh air
One significant disadvantage of such a device is that children climb onto it with difficulty and get out without outside help can not.
Brazilian on cords
The material for it is used from cotton fabrics or from special threads that are made by splitting Brazil nut wood.
Such hanging devices have a beautiful fringe self made. If it is not there, then it is considered that the hammock is made for poor people.
A durable frame with additional supports is another feature of this structure (although there is also a suspended version).
Relaxing in such a hammock is a real pleasure.
Most often, the frame is made of metal, which is why it weighs a lot. It is not suitable for travel, but folding designs are also available. Their weight is less, but in quality they are significantly inferior to solid options.
This hammock is safe for children and the elderly; it can be placed absolutely anywhere.
Colombian
Basically, these hammocks are made by weaving vines using a special technique.
Sometimes treated bark of agave or hamak trees is used instead of vines.
This type is used less and less. It looks like an ordinary volleyball net, which causes a lot of inconvenience. After lying on such a hammock, marks remain on the skin.
Home hammocks: sitting, with frame, hanging
According to their design features, hammocks are divided into:
- hanging;
- frame;
- hammock chairs.
The first models are the most popular and recognizable. They differ in that they are attached to two side by side standing trees or to specially made pillars. Ready-made models often equipped additional elements such as a waterproof removable bottom and a mosquito net.
The frame device does not require trees or poles. If the frame is made of wood, then the bed is light and mobile. It can be moved anywhere: in the sun, in the shade, under a canopy from the rain. This species has a variety of forms.
Often its design includes a canopy.
Sometimes the size of such a hammock can be quite large.
Hammocks eventually evolved into chairs. Of course, it is sometimes difficult to recognize their original appearance; for the most part they have turned into swings.
Step-by-step instructions for making a hanging bed
For self-construction hammock you will need:
- decide on a suitable design;
- choose material;
- prepare the necessary tools;
If the choice fell on frame structure, ensure that everything is secure. Otherwise, if the cross bar breaks, you will be twisted into a cocoon and it will be difficult for you to get out on your own. You need to choose materials that are durable and reliable, don’t skimp. The hammock should last you a long time and be safe. Minimum weight which it must withstand is 200 kg.
The best materials for a hanging bed would be cotton or nylon. They do not irritate the skin and allow air to pass through. The first one is soft and elastic. The second is rigidity.
High-quality cross threads will hold their shape well. A wicker hammock is best made from nylon materials.
For construction you will need the following tools:
- Two wooden slats.
- Thick laundry cord.
- Rings for fastening.
- Rope.
- Thick fabric, for example, tarpaulin (2.5x1.8 m).
- Set of fastenings for a hammock.
Construction stages
- Drill 20–30 holes in the slats, approximately 5 cm apart.
- Cut out the fabric.
- Make additional fixation of the shape of the future hanging bed. To do this, sew a rope along the longitudinal edges.
- Attach the ropes to the wooden slats and lead them to the fixation point.
- Pass the laundry cords through the rings in the base of the bed and the holes in wooden slats. Take them to the place where the fastening will be. This must be done on both sides of the hanging bed.
- Connect ropes and cords on each side of the stock and secure them with a special fastener.
- Install the finished structure on supports prepared in advance.
Do not forget to retreat 15–20 cm from each of the supports to the hammock. This is necessary for free adjustment of the suspension and greater reliability.
Video: how to make a hammock out of fabric with your own hands
Do hanging hammock Everyone can do it on their own. There is nothing complicated in the process. Whereas ready-made ones are quite expensive. Of course, there are budget models, but they will last you a couple of seasons. And it will be doubly pleasant to relax on a structure made by yourself. Good luck!
Materials for production
The most important thing to consider when making a hammock chair with your own hands is the choice of material. The most durable fabrics:
- canvas;
- calico;
- mattress teak;
- camouflage or canvas fabric.
Synthetic products are also suitable for use, but they have one significant disadvantage - they do not “breathe”.
If we talk about cords, it is better to choose threads made of cotton. Synthetics in in this case loses again. Cotton cords are more pleasant to the touch. They are easy to tie into knots and intertwine with each other.
General rules
Regardless of what kind of hammock chair you decide to make with your own hands, there are some rules that for all types garden furniture of this type remain the same.
- The product is suspended either between two supports or between two trees. If you choose the latter option, the diameter of the tree trunk must be more than 20 centimeters. The supports are sunk into the ground to a depth of one meter.
- The ropes are strong and thick. They should reach 8 millimeters in diameter. In some cases, the fabric is strengthened using eyelets.
- Install the hammock at a height of one and a half meters above ground level. Between support pillars the distance should reach 3 meters.
DIY hammock (video)
How to make a Mexican cocoon hammock
If you are thinking about how to make a hammock with your own hands, the presented option is one of the simplest. At the same time, it is quite convenient to use.
When folded, the hammock weighs 1 kilogram, making it convenient to carry. It is almost impossible to fall out of the “cocoon,” but you will have to work hard to get out of the product.
To make this type of hammock you will need:
- a cord 20 meters long (it can withstand weight up to 200 kilograms);
- dense fabric - 2 pieces of 3 meters each.

The assembly proceeds as follows:
- the cuts are folded together;
- they are stitched towards each other on both sides, it should look like a tunnel with unfinished edges;
- the narrow side of the hammock is turned up a couple of centimeters and stitched;
- the resulting tunnel is pulled through the cord;
- then the cord is crossed and tightened so that the fabric gathers slightly;
- The place of tightening is wrapped several times with a cord and a knot is tied.
Important! To avoid damaging the tree bark, there should be a cloth at the point of contact between it and the cord. What should a hammock look like? finished form, you can see in the photo.
Wicker hammock
Previously, hammocks resembled a regular volleyball net. Now there are many improved options. It is enough to learn the macrame technique and you can make a beautiful and comfortable product yourself.

You will need:
- 2 slats - the length should be one and a half meters;
- rope with a diameter of 8 millimeters.
The rope is attached to the bars through specially made holes, whose diameter should be 20 millimeters. The distance between them should reach 5 centimeters. In order for the rope to fit firmly into the holes, the diameter of the latter must be made according to the 1/3 principle.
How much cord you need depends on the pattern you choose. How to calculate the amount of rope required? Measure the distance between the slats, multiply by 3. Then the result obtained should be multiplied by the number of holes.
Important! During use, a hammock made using the macrame technique does not lose its shape.
The technology is simple. To create a knot, 4 ropes are required. The cells should be less than 7 centimeters. Metal rings provide additional structural strength.
How to secure a hammock (video)
When installing a hammock on supports, the length of the product is adjusted by tension. You can tie it higher and make the bend stronger.
Brazilian hammock
How to make a Brazilian hammock with your own hands? You will need:
- nylon linen cord (2 packs of 10 meters each);
- 2 pieces of fabric measuring 90x200 centimeters;
drill; - 2 wooden sticks 90 centimeters long.
Assembly of the product consists of several stages.
- Two pieces of fabric are sewn together.


- Then markings are made for the eyelets; the distance between them should reach 8.5 cm. You can insert the eyelets. If there are none, loops are sewn on. The cord passes through them, as well as through the eyelets. If possible, it is better to use hardware, they are more reliable.
- The sticks must be marked. A distance of 2.5 centimeters is departed from the edges. Then measure 8.5 cm from the marks.


- For an 8mm cord folded in half, you need to drill holes with a diameter of 20mm.
- The cord is cut into meter-long pieces. Each piece is threaded through a hole in the stick. It must be inserted through the grommet, then again through the stick.
- At a distance equal to half a meter from the end of the stick, all the cords are collected together. All that remains is to tie a knot and tighten it.


- Next, the knot is braided. The hammock is ready to use! You can see what it looks like in the photo.
- You may also be interested in an article in which we talk about what can be made for a summer house from plastic bottle caps.
Anyone can make a hammock on their own. It is important to choose the right materials. The cord must be durable, the fabric must be reliable, breathable, and made from natural materials.

There are several types of hammocks, which one to choose is up to you. If you want to get a comfortable place to sleep, you should choose a “cocoon”; if the main thing is aesthetics, you can weave a product using the “macrame” technique. Whichever option you choose, you should stick with it. general rules for product installation.


A hammock evokes only the most pleasant associations associated with vacation, summer, hot sun rays and a relaxing holiday. It’s a pleasure to soak in it not only at the dacha and in the garden, but even at home. All appearance This hanging design literally screams simplicity. That is why the question of how to make a hammock with your own hands is always relevant. Of course, the process of creating it is not complete without pitfalls, nuances and little secrets.
Hammock options for relaxation
Classic version a hammock suspended between trees is familiar to many from childhood. Today it coexists with more original models. Several canvases (beds), a variety of decor, the presence of a frame, an awning, a hammock in the form of a chair or a swing - everything for best holiday! Ideas for a hammock and photos will help you decide.

Frameless hammock cocoon
Simple frameless hammock("Mexican"). It is suspended from two supports and has the appearance of a cocoon. Relaxing in it is a pleasure, but getting in and out of it is a bit difficult. It is mobile, but if you choose low-quality materials, it will not last long.
Suspended structure on yards. The width of the product canvas is fixed on them, only then suspended from the supports. Easy to use even for children, but must be at least 1.5 m wide.

Hammock on yards
Frame hammock. Does not require additional supports. Both stationary and mobile models are available for sale, which are easily folded and transported. The frame can have a rather bizarre shape, which makes the product not only a place of relaxation, but also a real decoration of the garden. It looks especially advantageous on the patio, near the pool. Often complemented by an awning and a side table.

Mobile hammock on a metal frame

Hanging bed on wooden frame
It differs from the traditional design in the shape of the lounger, as the name suggests. It is comfortable to relax and even work while sitting or reclining. A pleasant addition will be soft pillows under the back and for the seat, and a canopy.

Wicker hammock chair
Perfect option for children. Rocking occurs due to the fastening of the structure at just one point.

Swing-hammock in the interior
Hammocks decorate not only gardens, but also the interiors of apartments and houses. They find a place on spacious balconies, in rooms with interiors in the appropriate style - Scandinavian, ethno, marine, eco-style and others.

Hammock in the attic interior
Have you decided on your preferences? It's time to learn how to make a hammock yourself.
Basic points of creating a hammock with your own hands
It is necessary to learn the basics of making such unusual place recreation. Knowing them, you can find new ones, original solutions, produce more complex products.
Selection of materials for the canvas
So, you've wondered how to make your own hammock. To begin with, stock up on the necessary materials. Fabric or strong rope is used to make the base. They can be natural or synthetic.
Natural fabrics allow the body to breathe, which is important in summer heat, easily take its shape due to its softness. But they stretch out and lose their appearance if the hammock regularly gets wet in the rain, fog, etc. It is quite difficult to remove dirt from such fabrics. Synthetic analogues are more durable, lighter in weight, and sometimes have good moisture resistance.

Canvas for a hammock
Available and suitable quality fabrics - calico, canvas, mattress teak, nylon, nylon with cotton.
For braided versions, cotton ropes are often used. They make working on the product and its operation comfortable, since the knots are soft, tighten well, and do not slip. The disadvantages are the same as those of natural fabrics. Nylon cords and ropes are suitable from synthetics. You can opt for nylon analogues, but they are slippery and not very convenient to work with.

Fabric woven from ropes
Measurements required for work
In order for your hammock to be comfortable and safe in all respects, you need to take some measurements. Important for you:
- Distance between supports. It consists of the length of the canvas and 30–35 cm of fastening towards each support. On average, this is about 2.8–3 m for an adult.
- The height of the hammock attachment to the supports. This takes into account your height, the sagging of the canvas and how comfortable it is to climb into it. Average height fastenings - 1.5 m. The sagging depth of the product can be adjusted by tensioning the ropes.
- Web width. Usually it is 1.5 m.

Scheme of hanging the canvas between the supports
Fastening matters - how to hang a hammock in the country and at home
The hammock must be safe and strong. It’s not pleasant to enjoy the singing of birds and the measured movement of clouds, and then suddenly fall from a height of half a meter (at best case scenario). For this reason, it is important to know how to hang a hammock correctly. You will have to work on two fronts: attach the retaining elements to the canvas and fix the entire structure on the supports.
Please note: supports can serve not only suitable trees, but also specially installed wooden poles. For more reliable fastening, the diameter of the supports should not be less than 20 cm. They are installed to a depth of at least one meter in a pre-prepared concrete solution.

Wooden log supports
How to secure a hanging structure to a tree
To connect the support and the canvas, ropes with a diameter of 8–10 mm are usually used. An alternative could be a metal chain with a carabiner or a fabric strip. A loop is made on the support and tightened tightly. To avoid damaging the trees, you can put a cloth under it or put a soft silicone cover on the rope and chain.

Loop for hanging the lounger from a tree
Please note: this loop can be independent or integral with the hammock. In the first option, a loop is also made at the end of the product (alternatively, a “torus knot”). Using a carabiner or chain with carabiners, it is connected to a loop on the tree. This is the most common solution.

Loop on the hammock for attaching it to the support
The second option involves tightening and wrapping the edge of the canvas with a fastening rope. Then its free end is wrapped around the support and tied with a knot. It's faster and easier. Relevant for fans hiking trips, fishing.

Scheme of a “torus node”
How to hang a hammock at home
How to secure a hammock to a tree is more or less clear even to a beginner in this matter. But not everyone can immediately answer how to hang a hammock at home, but here everything is even simpler. You will need an anchor hook.
The procedure consists of performing the following steps:
- Places for anchors are marked on the wall or ceiling.
- Using an electric drill, holes are made to a depth equal to length fastening element.
- The hole is cleared of dust.
- An anchor is inserted into it.
- The nut on it is screwed tightly.

Anchor bolt with hook
Similarly, install another anchor (if you are not hanging a swing) and hang the hammock. For a suspended bed in the form of a bed, you will need 4 attachment points and, accordingly, 4 anchors.
It is important! Before hanging a hammock at home, make sure that the walls can withstand the load. It is not recommended to experiment in houses old building, for example, in “Khrushchev buildings”.

Hammock bed in the interior
Workshops on making a hammock with photos
Initial ignorance of how to make a hammock at home stops few people from trying to sew or weave it. The spirit of adventurism and the desire to feel like a real Indian are too strong in this.
For sewing lovers - a fabric hammock
Even if you do not have any sewing skills, you can cope with the task. For simple summer version cut a piece of fabric measuring 150x300 mm, fold its edges along the length and sew them on sewing machine. Along the width of the hammock, fold the fabric 5–7 cm and also sew it, forming a tunnel. The canvas is ready! All that remains is to decide how the slings will be attached to it, but more on that below.

Hammock pattern
If you want to make your hanging lounger softer or protect it from moisture, then you need to make a special “pocket”. To do this, cut two rectangles of fabric of the specified size. Sew them together, leaving a hole (about 80–120 cm) so that you can put moisture-resistant fabric or a thin soft mattress inside.
Video: how to make a fabric hammock
Attaching slings to fabric
Slings can be used for fastening wooden slats, eyelets or fabric loops. The slats are inserted into the resulting tunnel. The ropes are fixed on their protruding parts in advance drilled holes. They can simply be tied, but then it is necessary to provide plugs at the ends of the slats so that the rope does not slip off.

Fastening the slats in the canvas tunnel

Fixing the hammock fabric on the yardarm
The most popular solution is to install eyelets (special rings) in the fabric. Future holes are marked along the side line of the canvas, the distance between which is 7–10 cm. These holes are made using a knife, screwdriver and other tools. The main thing is that they match the diameter of the purchased rings. Then the grommets are installed. For this purpose it is used special tool or a hammer with a bearing.

Eyelets for securing holes in fabric

Grommet Installation Tool

Eyelets in the hammock fabric
Slings are pulled through holes reinforced with eyelets in the fabric and then secured using one of the methods discussed above. To give the hammock a more formal shape, you can additionally use slats.

Eyelets + slats
Another way to attach slings is to sew fabric loops to the fabric of the product at a distance of 7–10 cm. A rope is pulled through them or a strip is laid with holes into which the rope is inserted.

Fastening slings in loops

Hammock with hinges
The basics of macrame in action - creating a woven fabric
Anyone who is familiar with the art of macrame or would like to get acquainted with it can try their hand at weaving a hammock. To work, you will need strong rope, wooden slats with holes, or metal rings.

Wicker hammock on a support
Calculating the length of the rope is simple: the length of the sheet in meters is multiplied by 3 (you can do it by 3.5 to have a reserve) and multiplied by the number of holes in the prepared rail. If you use rings, then instead of the number of holes, take into account the number from 20 to 24.
Once everything is ready, you can choose macrame knots to weave the hammock. A few examples below.

tie knot

Flat knot for weaving
By the way, the threads can simply be crossed, but then the fabric will quickly “float”, the cells will differ in size.

Simple crossing of fabric ropes
To work, you need to secure the threads to a wooden or metal base. This can be done around a ring or rail.

Securing the rope around the base

Securing the slings to a metal ring
Or you can pull the threads through pre-drilled holes in the rail.
Please note: it is convenient to carry out weaving work with a base securely fixed with threads or, at least, on a hard, flat surface - on a table, chipboard sheet, plywood. The finished canvas is attached to the supports. For wicker products, carabiners are usually used.

Securing the woven fabric in the rail
Thus, you can amaze your friends and acquaintances not only by having a hammock in the garden or at home, but also by the fact that it is made by hand. This will cause real admiration!
Video: how to knit a hammock from a rope
Hammock – comfortable spot for relaxation, capable of decorating any suburban area. The product, invented by South American Indians, made it possible not only to provide a comfortable sleep, but also to effectively protect against flying midges and the night dampness inherent in this area. Modern people They use a hammock mainly for short-term daytime rest in order to relax in the shade of trees, enjoying the rustling of leaves and the singing of birds. There is nothing difficult about making a hammock with your own hands. All you have to do is stock up necessary materials, tools and the desire to create an original and functional interior element.
A hammock can become not only a wonderful decoration for the site, but also quite useful item interior

According to psychologists and scientists, a couple of hours of rest in a hammock can replace a full night's sleep.
Deciding to create a product in which it is pleasant to sway and restore strength after working day, it would be useful for each of us to know a few basic rules:
- Material of manufacture. Before you make a hammock, you need to think about the variation of its design and choose the right fabric. To create a durable product, it is advisable to choose camouflage, canvas, canvas fabric, calico or mattress teak. Synthetic materials, despite the fact that they are lighter and no less durable, it is not advisable to use them for sewing products, since they do not allow the body to breathe.
- Cords for a wicker hammock. When choosing ropes, it is better to give preference to cotton threads rather than synthetic ones. It is more convenient to work with cords made from natural threads when making products for weaving and tightening knots, as well as to come into contact during rest.
- Reliability of support mounting. You can place a hammock either between special supports or pillars, or between two adjacent trees in the garden. If supports are specially installed for arranging a hammock, then they must be buried at least a meter deep. Among garden trees the choice should be made on those whose trunk diameter is at least 20 cm.
- Hanging height. The height of hanging the hammock above the ground is 1.5-1.6 meters. The distance between the supports is calculated as follows: 30 cm is added to the length of the product, on average it is 2.75-3 meters. In the absence of the ability to change the distance between the supports, the length of the hammock can be varied by changing the height of the brace, creating a stronger deflection, or changing the tension.
The mobile structure will be convenient to carry around the site and place in any corner of the garden, thereby changing the scenery.
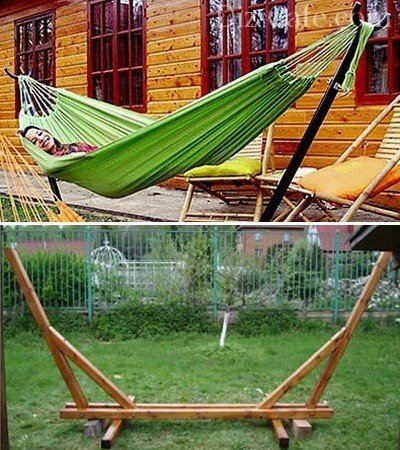
In order to avoid being tied to the location of trees in the garden or existing ones when arranging a place to relax supporting structures, you can make such a frame for any hammock
Sample metal frame under the hammock:
The most popular hammock designs
To better and more clearly show how to make a hammock with your own hands, we suggest considering several design options for this product. This will allow you to make the best choice that will suit your preferences and capabilities. There are many options, some of them are presented below.
Option 1 - Mexican “cocoon” made of fabric
This hammock, which looks like a cocoon, is one of the easiest to make and quite convenient to use.

Despite the simplicity of the design of the product, relaxing in such a hammock allows you to perfectly relax all your muscles.
It is impossible to fall out of the cocoon. But in order to get out of it or change the position of the body, you also need to make some effort. When folded, the product takes up quite a bit of space and weighs no more than 1 kg, making it convenient to take with you outdoors or on a hike.
This version of the hammock is quite simple to make. In order to sew a Mexican hammock, you need to prepare two pieces of dense fabric measuring 1.5-3 meters and a cord 20 m long, which can withstand a weight of 150-200 kg, for tightening and hanging the product. Both pieces of fabric are folded together.

Pattern for sewing a standard single Mexican hammock
The cuts are sewn on both sides along the length of the pattern towards each other. The length of the line seam is 2 meters (indicated in the figure green). As a result, a tunnel with unfinished edges is formed. The sections of the pattern marked with a yellow line on the drawing are not sewn together. This will allow you to lay inner layer products water-repellent film or padding polyester soft mat, which will significantly increase the comfort of your stay. The narrow side of the product, indicated in red, must be folded 2-3 cm and stitched. The product is ready. All that remains is to stretch the cord into the resulting tunnel.

The stretched cord must be crossed and tightened at the ends, gathering the fabric. The tightening area is wrapped a couple of times with the same cord and tied with a knot.
To attach the structure to a tree without damaging its bark, you need to put a tube on the hanging rope or place a cloth under it.

For relaxation of small children and elderly people, you can improve the product by attaching the narrow side of a rectangular cut, made according to the same pattern, to wooden sticks
Option 2 - wicker hammock using macrame technique
The hammocks of Soviet times, known to most of our compatriots, look like a volleyball net.

Such a “bed”, which leaves a checkerboard pattern on the back of the vacationer, has been replaced by more comfortable and aesthetic handmade products
In order to knit a comfortable and beautiful hammock, you need to learn how to weave several knots using the macrame technique. To work you will need a strong rope or clothes cord d=8mm, as well as two wooden slats same size about 1.5 meters long. To secure the rope, holes d = 20 mm are drilled in the bars at an equidistant distance of 4-5 cm. The ratio of the hole diameter to the rope diameter should be 1/3, which will allow the rope folded in three to be fixed more tightly.