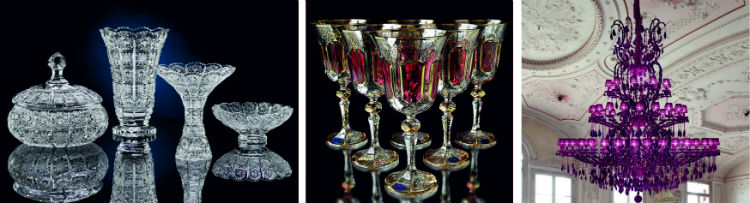
Glass bottles have long been perceived by people as ordinary garbage that should be thrown away, but this is far from the case. Few people know that from glass bottles you can make many interesting, and most importantly, useful things for decorating your home interior or original design. summer cottage. You just need to show your imagination and spend a little time.
Second life of glass bottles
Giving a second life to a seemingly unnecessary bottle is within the power of every person. You don't have to be a professional artist or designer to do this. If you use a little imagination, you can turn it into an unusual art object without spending a penny.
Most people always have beautiful but unnecessary beads, trimmings of braid, ribbons and many other little things at home that can be used for decoration. Anything that can be used as improvised material to turn a bottle into designer item. Conventionally, all crafts made from glass containers can be divided into three groups:
- Interior decorations.
- Exterior design for a personal plot.
- Useful gadgets.
Glass is considered an environmentally friendly material that cannot harm human health. It is stored for a long time, tolerates heat and cold well, so use it as a basis for various crafts very comfortably.
Crafts for interior decoration
This group includes all crafts that are intended to decorate the interior of a room. If you want to make your home cozy and beautiful, you don’t have to buy expensive things. You can make them yourself, the main thing is that they look original and beautiful.
Vase from a bottle
What else can you use an empty glass container for, if not for a vase? Such a remodel will not only decorate the interior, but also useful thing in the house, while the cost of its production is practically not required. There are quite a variety of ways to turn a bottle into a vase yourself.. For example:
Original candlestick
 Making glass candlesticks has been practiced all over the world for quite some time. But why shouldn't candles burn in glass bottles? Crafts of this type will not only decorate any interior, but will also protect your home from fire.
In order to make a candlestick, you will need to cut off the bottom of the bottle. This can be done using a glass cutter or a burning rope. Many people know how to use a glass cutter, but one problem often arises: it is very difficult to make an even cut, even if the tool is sharp.
It is much more convenient to tie the bottle around the bottom with a rope soaked in gasoline or alcohol. It needs to be set on fire. When the thread burns out, place the bottle in cold water. The bottom will fall off on its own, and the cut will be smooth and neat. All that remains is to clean up the edge sandpaper so that you can’t cut yourself on it, and the exclusive candlestick is ready. You just need to put a candle inside it. The bottle can be decorated with stars cut out of foil, then instead of the usually dim candle light, stars will twinkle in the room.
Furniture supports and legs
Oddly enough, but bottles can be used as load-bearing supports or legs for the production of original furniture. Despite the apparent fragility, empty container made of glass can withstand quite a large load. It can be used in the manufacture of such interior items as:
- coffee table;
- shelves and racks of various types;
- tabletop rotating dishes-trays.

In order to construct a coffee table, you should cut out round holes for the legs in a pre-prepared tabletop. There can be three or more, depending on the size and shape of the table. You need to insert the bottles with their necks up into the holes, and the mini-table is ready. Shelves and racks are made in a similar way. If desired, they can be made multi-tiered, using bottles as supports.
A round dish-tray, which all guests will surely enjoy, can also be made using a regular bottle. To do this, a soft limiter should be attached to its neck (where it begins to expand). It can be an elastic band or simply wound in several layers beautiful thread. The bottom should be glued to a stable round surface.
A hole is made in the middle of a round dish (you can make it yourself or buy a ready-made one). The dish is placed over the neck and secured with an elastic band or decorative rope above. You can place fruits or sweets on it and place it in the center of the table. Since the tray will rotate, it will be convenient for any guest to take everything they need from it. To achieve greater effect, the entire structure can be painted in the same style.
Registration of a personal plot
Many gardeners know that glass bottles can be successfully used for original garden design. Some people even deliberately collect empty containers all winter in order to realize their ideas in the summer.
Fencing for flower beds and beds
It’s very easy to make low fences for dividing beds or decorating a border for a flower bed from bottles. Usually two methods are used - neck up or down.
In the first case, you need to dig a shallow groove (about 10-15 cm) around the perimeter of the future fence and place the bottles in a row with their necks up. Then fill the ditch with earth and compact it. The glass mini-picket fence is ready.

The second option is quite simple. Simply stick the bottles into the soil with their necks down about halfway. The fence can be made multi-colored or monochromatic; in any case, glass always plays well with Sun rays, which gives the flowerbed design an unusual look.
Such fences personal plot not only look beautiful, but also protect the plants in the flowerbed from external weeds. They do not require maintenance, do not rot and do not lose their original appearance. If the owner wishes, such a fence can last for more than one summer season without replacement.
Glass mosaic
Decorating facades with glass mosaics is an original and not very expensive way to decorate the appearance country house. To work you will need:
- broken bottle glass medium size (quantity depends on the area of decoration);
- mortar (cement or alabaster);
- grout material.
 The solution is applied to the selected surface. Glass is pressed inwards into it with sharp edges. How to arrange the fragments depends on the imagination of the master. There are known cases when entire paintings were laid out from glass mosaics or the facade of a house was completely finished. When the solution begins to harden, the finished surface should be rubbed. This will smooth out any rough edges and secure any broken pieces. Such a mosaic can be designed in the process repair work, which will make this activity more enjoyable and creative. The finished finish looks very original.
Useful devices
Homemade items made from glass bottles can be not only beautiful, but also useful. There are several options useful devices where this cookware is used. For example:
- unbreakable thermos;
- mug;
- bird feeders.
Homemade thermos
 To make a thermos you will need a block of foam plastic rectangular shape and some foil (you can use food grade). The bottle must have a screw cap. The foam is cut into two parts. A hole is cut out in the lower part to the size of the bottle without taking into account the neck. The upper half will be the lid; you should also cut a hole in it for the neck with a stopper.
The bottle is covered with several layers of foil, then fixed inside the foam using the same glue. The properties of foil have been known for a long time: it retains heat well, and the foam lid enhances the effect. The outside of the foam can be painted with paints to give the craft an original look.
Certainly, homemade thermos In many ways it is inferior to a purchased product, but it is simply irreplaceable in situations where there is a risk of breaking it. Even if this happens, it will always be without extra costs you can make a new copy.
Transparent mug
 A homemade mug can always come in handy. If you decorate it beautifully, it will not only serve its intended purpose, but will also help create a unique style in the kitchen. In order to make it, you need to cut off the neck (the upper round part) and the bottom about ten centimeters high from the bottle.
The cuts should be cleaned well. The round part of the neck should be glued to the resulting glass instead of a handle. To decorate a mug, you can only use special paints that will not harm human health, but even without decoration, the product looks very original.
Dining room for feathered friends
To make a convenient feeder for your feathered neighbors, you should attach a bottle of food to wooden base neck down. You need to place a saucer almost right under it. Thanks to this design, the grains will always remain dry and be added to the saucer as needed.

Such feeders can be hung in your garden. It’s good if children take an active part in making and placing them. Such crafts will not only help birds survive the harsh winter, but will also be a good visual aid for instilling in children a sense of responsibility for a living creature.
If you show a little diligence and use your imagination, then any glass bottles can be turned into designer items. And if you do this professionally, it will provide you with good additional income.
If there is unnecessary glass in the house (whole or broken) that clutters up the space, do not rush to throw it away.
You can make a beautiful product out of it, or decorate existing items.
This good way use this material, because handmade crafts and gifts are valued much more by people.
In this article we will tell you what can be done with whole or broken glass, how to make a herbarium in it or bake a flower, how to turn its surface into a matte or mirrored one, and other subtleties of craftsmanship.
 Glass is a universal material, used to create various interior items.
Not only dishes and furniture are made from it, but also paintings and panels.
You can give a second life to even a broken object by using shards and fragments.
Eat different kinds glass, different depending on application:
- construction;
- porous;
- liquid;
- artistic, finishing, etc.
Such a variety of materials allows a skilled person to create unique kaleidoscopes and make products of bizarre shapes and colors.
Many crafts Even a beginner can create it, the main thing is to have the necessary tools, patience and desire.
First you need to determine what exactly you want to make from glass. There's a lot here depends on the author’s imagination and resources available.
All products can be divided into categories:
- household;
- aesthetic.
Here are just a few examples:
- candlestick decoration;
- ornaments on glass, flower compositions;
- small souvenirs made of broken glass;
- thematic installations;
- decoration of household items - dishes, chandeliers, mirrors.
Let's figure out in order what items can be made from old unnecessary glass.
Shelf
Glass shelves are popular because can easily fit into any interior. In addition, they can withstand significant loads, although they seem fragile.
Glass furniture looks good in small rooms - because of its transparency, it seems less noticeable, so it does not visually take up space in the room.

The location must be accessible to adults, but out of reach of children(so that the child cannot hang on it).
To make a shelf you will need:
- glass cutter (it is more convenient to use an oil cutter);
- belt-type sander with abrasive sandpaper (grit value should be 120 units);
- respirator, gloves and other protective equipment;
- rulers (you will need to periodically check whether the layers are even).
It is created in the following order:

Aquarium
To make it yourself, you will need:
- Silicate glass premium.
- Glue, which contains silicone. Look carefully at the information on the packaging: it should indicate that it is suitable for aquariums (it does not contain antibacterial substances that harm fish and plants).
- About 8 pieces of small corners, suitable for predetermined dimensions.
When gluing parts, you need to remember certain requirements:
- the seams must be thick, at least 2-3 mm;
- The outer edges must be sanded, and those under the glue must not be touched.
The build process itself looks like this:

Do not rush to immediately “transport” fish and other marine life here. Swipe 3-5 hour hydrotest– fill it with water and check whether the structure does not allow liquid to pass through, whether the seams are leaking, etc.
Now you have an idea of how to make an aquarium yourself at home.
Greenhouse
Glass is often used in the construction of wooden or metal greenhouses. This classic version greenhouse structures, which allows you to maintain the necessary microclimate inside.
If you have a lot of leftovers window glass, they can be successfully used to create a greenhouse.
Such a structure has walls and a roof made of glass, which provides a number of advantages:
- You can use a greenhouse all year round. The material retains its transparency, structure, appearance and thermal insulation properties.
- Having connected the heating to it, you can grow plants in winter. In the summer clear glass allows light to pass through, allowing plants to grow.
- Glass withstands abrasive influences and is easy to clean.
- Walls of the structure Can be easily replaced if damaged. Replacement is inexpensive, and used glass is suitable for this.
- Glass does not emit harmful substances or odors even when exposed to heat. This is an environmentally friendly material that is also easy to care for. Glass is resistant to chemicals used for cleaning.
- The reinforced or tempered type (thermal glass) can withstand large hail and other adverse weather conditions.
In addition to all these properties and an attractive appearance that lasts for years, this design has disadvantages:
- You need to select a reliable frame and prepare a solid foundation (it can withstand such loads strip foundation), since glass characterized by increased mass. You wouldn’t say so at first glance, but the material weighs a lot: for example, glass 4 mm thick in a square shape weighs about 10 kg, and the weight of a 6 mm layer is 1.5 times more.
- Building a glass greenhouse will not be cheap.
- The glass resists shock and mechanical impacts poorly.
- Glass has high thermal conductivity, so it heats up and cools down quickly. This is especially harmful to plants during daily temperature changes. Therefore, you need to take care of the maintenance system desired temperature indoors.
- A glass room can only be built in the form of a house.

It all starts with preparation:
- Creating a drawing of the future greenhouse, determining its dimensions.
- Choice suitable place. It is necessary to take into account the level of lighting, orient the room so that the heat is distributed evenly.
- Taking into account the wind direction in a given area. It is best to protect the structure on the leeward side with some object (shrub or other small obstacle).
- Determination of soil and relief features. You need to choose a dry and level place.
- Calculating the distance of the greenhouse to the nearest source of electricity and water supply. The closer you get, the easier it will be to build a system for heating and watering plants.

Below is shown where should not be placed greenhouse If you do incorrect choice, the greenhouse may collapse, or the plants being grown will grow more slowly.

A reasonable solution would be to create a wall-mounted greenhouse. This will save area, reduce the distance to water and electricity and spend less money on construction.
Below is a typical drawing. If desired, it can be changed according to the desired dimensions.

Based on drawing building materials are selected. The foundation must be at least 0.5 meters in height and have a strong frame - metal or wood (bars or profiles measuring 5 by 5 cm, the distance between the posts is up to 0.8 m, based on the size of the glass and the frame itself).
Can be used different types glass Main, so that they match the dimensions of the frame. Eg:
- single (2.5 mm thick) suitable for side walls installed in a small wooden frame;
- double (up to 3.5 mm) cannot be used as a top window;
- showcase (6 mm) will become a strong wall, but will need reliable fastening and supports;
- multi-layer will work in almost any part.
Choose glass based on the purpose of the structure.
If there are tropical plants, it is better to use multilayer glazing, which will reduce the cost of internal heating.
Regular glass is also suitable for greens and vegetables.
Double-glazed windows provide the best growth. There are several types:
- single-chamber;
- two-chamber;
- heat-saving;
- energy saving.
Double-glazed windows from old plastic windows are perfect.

Will need to prepare the following building materials:
- support corners;
- wooden beams or metal bases for each side of the frame;
- beams;
- polyurethane foam and hardware;
- glass or double glazing;
- sealant (for fixing and insulating glazing);
- door parts (handle, lock, hinges);
- corners on which wooden parts will be attached.
Cords, pegs, containers, buckets and shovels are needed for marking and preparing the foundation. A hacksaw, chisels, glass cutter, electric planer and construction level will be needed when assembling the greenhouse.
Now that everything is ready, we’ll tell you in detail how to make a greenhouse.
Assembly is carried out in the following order:
- At the selected location, you need to level the soil and remove vegetation. Make markings for the trenches by installing pegs and cords.
- We dig trenches according to the intended markings (depth 0.4 m, width 0.2 m). Let's plan the bottom of the pit, fill it with a 10-centimeter layer of a mixture of crushed stone and sand.
- We assemble the formwork and check the height of the edges. Laying it down welded mesh or steel reinforcement, we attach the anchors to the frame.
- We prepare concrete (a mixture of cement and sand 1:3 with the addition of crushed stone and water). Pour in the resulting solution and give it time to harden.

We lay two layers of roofing material directly on the surface of the foundation. They will provide protection wooden frame from moisture. We treat wooden blanks with an antiseptic.
Screw the frame support bars to the anchors, then make holes in the bars on which the glass will be attached.
We fasten the racks and beams.
Make sure the structure is upright. Install the braces and fix all elements with metal corners .
Connect all the remaining elements together. Check everything first for cracks and gaps, then make sure the structure is durable. When it is clear that the greenhouse retains heat, bring all the plants into it.

Colored mosaic
A special mosaic - smalt - is suitable for decorating surfaces. But if it is not available, you can use colored broken glass. By the way, smalt is also made from broken glass; you can read about it in detail.
To do this kind of work, you need to prepare:
- drawing, glass base for mosaic (or plexiglass);
- glass cutter, wire cutters and a special breaker for working with glass;
- colored glass from which the mosaic will be made;
- medical syringe, which is useful for applying the material;
- transparent silicone;
- tile grout (black).
Consider making a mosaic in the shape of a butterfly.
So, the finished drawing needs to be transferred from paper to a glass base. Using tools, we cut out wings from colored glass. Then we cut it out with a glass cutter.

After they are separated from the base, you need arrange them into a prepared drawing.
The pieces of glass need to be coated with silicone, then glued to the glass base. For this you will need a medical syringe.
When you glue the fragments together, leave gaps between them. They will need to be filled with grout later.
The seams need to be rubbed only after the silicone has grown.
We definitely put it on latex gloves. The grout itself dilute according to instructions located on the package with the substance. The result will be a mixture as thick as sour cream.
We apply it to the mosaic.

As you can see, it covered the entire surface of the product, and the seams are securely sealed. All that remains is to remove the excess mixture from the glass. Do it you can use a wet sponge.
The procedure for creating any other mosaic is similar; the specifics of the work will vary slightly depending on the design.
Here is an example of another product made using the same technology:
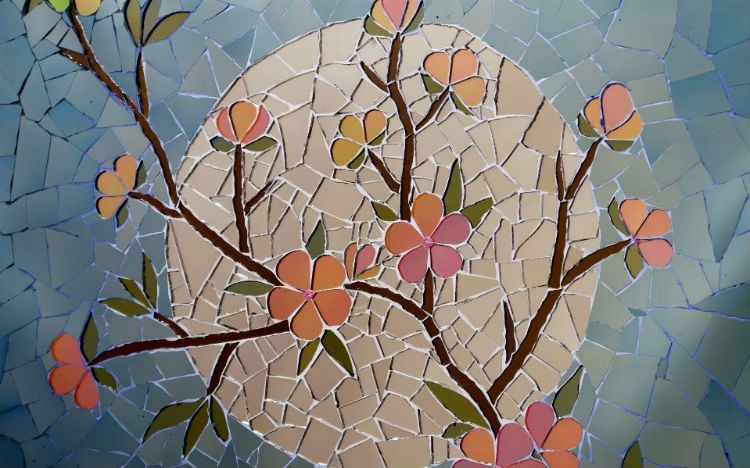
As you can see, the mosaic is a universal technique, with which you can decorate absolutely various items interior using broken glass.
The main thing is to draw the contours in advance so that the resulting drawing looks organic.
Herbarium and flower in glass
This is a very unusual, rare and beautiful fake. This technique allows you to “immortalize” any flower (or other object) in glass, making it into a decoration (for example, a pendant).
Naturally, in order for the sheets to be visible, you need to use only transparent glass (intended for fusing or regular glass).
The only tools you may need are a special oven, a glass cutter and a machine for grinding the edges of glass.
Needs to be cut and sharpened two circles of equal diameter, the dimensions of which will fit the flower. Plus, you need to leave a little space if you want to make a pendant (in small area a hole will be made for the lace).

By the way, this is a difficult operation to predict the end result. Difficult to control the process: The grass may burn completely, or a clear silhouette will remain.
To minimize possible damage, it is better to paint the flower in advance: even if the leaves fade, the paint will retain the original shape of the flower and remain inside the glass.
You can approach the matter artistically by coloring the flower with transitions of shades.
You need to use only fusing paints - they do not fade at high temperatures. After applying it, you need to let it dry.
We put the painted plant between the pieces of glass and put it in the oven.
Need to pick up correct baking mode. It is selected depending on the glass used. The approximate range is 740-800 degrees.
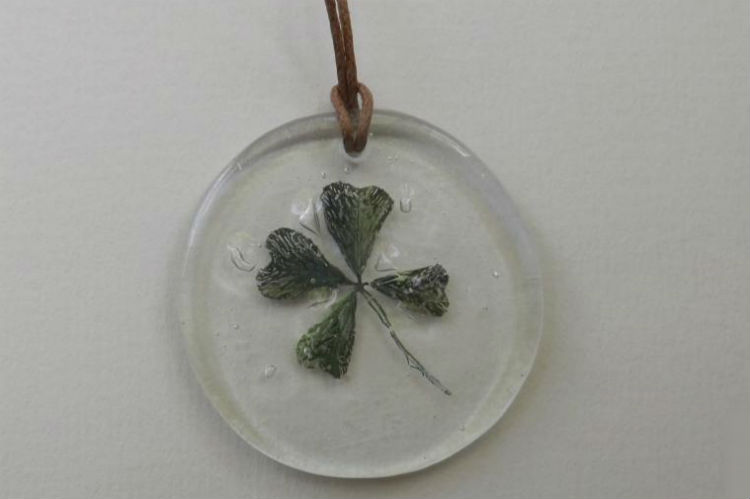
Please note that between the pieces of glass air bubbles may form. If after baking there are few of them and their sizes are small, they can further decorate the product.
If the plant burns out only partially, it may turn out a little lacy and fibrous.
Photo frame
A more difficult operation will be decorating frames, panels and paintings.
Before making a frame with glass, you will need to prepare:
- a sheet of fiberboard of a suitable size (dimensions are selected based on the intended design);
- broken glass (transparent and colored);
- acrylic paints, gouache or ink;
- glue.
A thick layer of acrylic paint is applied to the fiberboard sheet. Optional, can be coated with one or more shades. This is necessary to prepare the background. When everything is dry, the sheet needs to be inserted into the frame of the future product.
Then, on the future panel or painting, you need to apply the contours of the planned design using a stencil or by hand.
This is why ink or gouache was needed - to circle the outlined lines twice and glue the fragments along them.
Having pasted them in the background area, you need to let the product dry.

Mirror
The easiest way is to decorate mirrors using shards (colored or transparent). This can be done with vases, candlesticks, and trays.
Since the essence of the decoration is gluing pieces of glass, be sure to wear rubber gloves before starting work; they will protect your hands from cuts and allergies to substances contained in the glue.
On the surface of the object you need pre-mark the pattern, along which the fragments will be laid out. Only ceramic glue is suitable, layers of which must be applied using special tool– scrapers.
If transparent pieces of glass were used, they can be painted with acrylic paint designed for working on glass.
After the layer with the fragments has dried a little, the holes between them can be sealed tile putty or mosaic cement. You need to act carefully, but there will still be excess. You can remove them using a damp cloth.
This is what mirror frames made in this style look like.
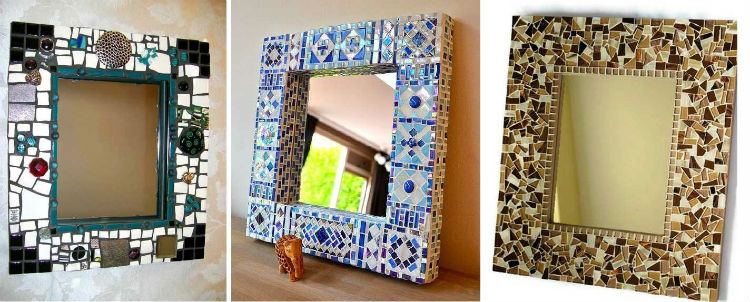
You can decorate in a similar way:
- frames for photographs, mirrors, paintings;
- flower pots;
- caskets;
- drawers;
- countertops and other items.
- accurately calculate the number of pieces of glass (prepare paint to finish painting the transparent pieces);
- apply clear markings and indicate where and what layer will need to be laid.
Other items and decorations
The list of crafts is not limited to this. Here's how else you can decorate your interior.
Picture made from multi-colored glass cullet
All work can be done at home, having prepared in advance:
- plywood;
- finished drawing;
- a bunch of colorful pieces of broken glass.
Plywood is needed as a base-frame on which the drawing with glued pieces of glass will be held. The picture itself can be drawn in advance, or you can take a suitable template.

The pieces should be glued so that they fit tightly to each other. Better to use more stable glue. Try to have them walk along the lines, respecting the pre-planned color scheme drawing.
Do not touch the glass under any circumstances until the glue has dried, otherwise there is a risk of moving the pieces from their original location.
In addition to pieces of glass, you can use other elements for decoration:
- beads;
- seashells;
- glitter;
- buttons, etc.
Drawing using fusing technique
You can make a multi-colored picture using either mosaic or fusing techniques. It involves baking pieces of glass, pre-folded into a specific pattern. The whole operation carried out in a muffle furnace at high temperature (at least 800 °C).

This technique first appeared in the 90s. in Germany, and it was based on another, more ancient method of glass processing - the “hot enamel” technique.
The main task is to correctly position the glass elements in advance so that as a result heat treatment they merged into one. Consequently, the material becomes homogeneous; there are no metal compounds in such a product.
The image completely depends on the artist: you can make it more voluminous, convex, leave some areas flat, increase the thickness and relief of the stained glass.
All disparate parts are laid out on a glass base - as smooth and flat surface. Thanks to this, the illusion of perspective, volume, and depth of the product is created.
The use of colored pieces allows you to expand the color range. This is precisely why you need a glass base, since working on a metal plate you cannot achieve such an effect.

This product is also quite durable. It practically does not age, the color remains unchanged.
The only drawback in the heat treatment itself is this technique will not allow you to get clear image contours. Colored pieces inevitably float on top of each other, resulting in an effect similar to watercolors.
Using liquid glass
Advanced craftsmen can create crafts using.
You can buy this material at a hardware or hardware store. Or use other varieties liquid glass, for example, stationery silicate glue, which is often used to imitate sea spaces.
But such a substitute will be less durable and hard than liquid glass.
Almost any item can be decorated with this material.
After applying a layer of liquid glass, apply decorations on it - pebbles, shells, beads, sparkles, etc.
If you want to do decorative elements more voluminous, apply two layers of liquid glass.
With liquid glass quite easy to work with. You can use it to decorate the surfaces of various objects or make your own decorations:
- hairpins;
- earrings;
- brooches;
- figurines;
- vases, etc.
You can decorate your interior with liquid glass in a simple way - apply small objects to a layer of glass according to a pre-designed pattern, then let the product cool.
Decor elements
What can you do if you only have small broken glass on hand? It can be turn into powder and use as decoration.
To crush it into powder, safety precautions must be followed:
- use gloves and safety glasses;
- Find a container that is deep enough and strong enough.
The resulting broken glass powder is applied to the selected item in areas where glue was previously applied. Once the glue dries, you can cover it with another layer. By analogy, powder can be used to paint pictures and decorate interior items.
In addition to glass, you can additionally decorate objects with the following materials:
- shells (sea or river) and shells;
- beads or beads of a suitable size;
- walnut shells and other available materials.
The challenge is to choose the right combination of all decorative materials, then the product will look beautiful and organic.

Making black, white and colored paint for glass at home
How can you make glass colored, white, or apply a design on it at home?
Glass surfaces must be treated with special paints that have good adhesion to smooth surfaces. Conventional paints and varnishes are not capable of this, so the coating wears off quickly.
The composition of the paint should not be too liquid, and it should be applied in thin and translucent layers.
Acrylic paints are best suited for liquid glass. They have good adhesion, and on surfaces they look like a matte film. Even when mixed, they retain color purity and are resistant to ultraviolet rays.
You can paint the surface with polyurethane mixtures. This is an elastic substance that instantly hardens on glass. The layers are perfectly transparent.
You can make the compositions yourself.
 Here are a couple of recipes:
- White paint is prepared by mixing four parts silicate glue and one part kaolin (it must be thoroughly ground).
- Black shades are created by mixing one part charcoal with three parts silicate glue and one part printing ink. The resulting mixture must be filtered.
Various colored dyes can be made using special fabric dyes.
The procedure is as follows: dissolve 5 g of gelatin in 200 ml of water, then dilute the necessary dyes in a separate bowl. The required shade is obtained by gradually mixing the contents of two prepared solutions.
Prepare the following tools in advance to paint glass with paint:
- spray;
- end brush with bristles;
- a paint roller or a foam swab.
You need to pre-treat the glass:
- Wipe the glass with soapy water, then rinse first with warm and then with cold water.
- Apply acetone to degrease the glass. Traces of solvent can be removed with a simple dry cloth.
- Those areas that do not need to be painted should be protected. Apply one or two layers of masking tape to these areas.

Instructions for painting glass at home:
- Prepare the mixture and pour it into a small container (this will make it easier to apply paint to the surface).
- Paint glass using a brush, spray gun, foam pad or roller. Follow, so that the layers are distributed evenly over the entire surface.
- When the paint is dry, remove the pieces of masking tape. If some areas are poorly colored, apply an additional layer.
How to make it opaque?
You can achieve a matte glass texture:
- chemical and mechanistic methods;
- using a sandblaster.
Follow the instructions below and you will learn how to make glass opaque.
It is easier and safer to use a mechanical method based on the use of abrasive paste or sand.
You need to take polished glass with a thickness of 4 to 6 mm, place it on a flat surface, placing a thick cloth under it.
Thin spatulas need to be nailed to the sides of the glass so that it does not slide on the table.
Prepare sand (river sand or corundum sand is best: it scratches glass more smoothly), then sift it through a sieve until smooth.
 Then apply sand to a board measuring 20 by 30 cm and moisten it with water. Place glass on top of the board, and any weight on top of the glass so that it presses it tightly to the surface.
Move the board parallel to the side edges of the glass. Do not make circular movements under any circumstances.
Moisten the sand as it dries.
Periodically check whether the matting process is successful by removing sand from the surface and holding the glass up to light. Continue the procedure until you get the expected result.
Create a mirror surface
How to make a mirror? First you need to polish our glass by wetting its surface with water.
Will be required in advance prepare the following items:
- glass;
- containers in which the solution will be prepared and mixed with silver;
- latex gloves;
- silver (nitrate) and tin (bichloride);
- distilled water, caustic potassium or soda;
- honey, ammonia and formaldehyde;
- alcohol, cotton wool;
- clear varnish;
- glass rod and nitric acid;
- a spray bottle that will be used to apply the mixture to the glass, plus a brush with soft bristles;
- frame or wooden sheet with clips;
- dye.
We put on rubber gloves and carry out all work exclusively in them.
Next, when you manipulate the glass, hold it carefully by the edges, otherwise you risk stain a smooth surface. This is important because the material will need to be frequently dragged from place to place, washed and various substances applied to it.

The procedure is as follows:
- We wash the glass with distilled water and crushed chalk. All sides must be clean, incl. ends.
- We treat the surface with a degreasing alkali solution (sodium or potassium, containing about 10%).
- Rinse the glass again with distilled water.
- Wipe clean glass with a cotton swab dipped in a 1% solution of stannous chloride. Then immediately place the mirror in a container filled with distilled water. Let it get wet.
- While the glass is poured, clean and degrease (with the same alkaline solution) the container in which you plan to silver the glass. Please note that the surface temperature of the future mirror in water should be 10 degrees higher than that of the solution induced for silvering.
Required prepare two solutions with the contents with which the glass will be coated. Use only distilled water:
- The first solution consists of silver nitrate (1.6 g) and water (30 ml). After mixing them, watch what kind of sediment you get. Drip 25% ammonia into it until it disappears, then add another half cup of water.
- Pour a 40% formaldehyde solution (5g) into the second container with divisions.
- Place the glass horizontally on the surface prepared for silvering.
- Now start covering the glass: pour the resulting solution into the middle, roll it out in an even layer using a glass rod. Or lower the glass into the chemical mixture so that the silver does not fall on the opposite side.
- The solution needs to harden. To “mirror” it needs 3-10 minutes, depending on the initial temperature of the mixture.
- When everything is dry, you need to place the mirror vertically. While the silver layer is not fixed, it may be damaged, so lean the product against the support with the untreated side.
- The mirror needs to dry for 2 hours at temperatures up to 100 degrees.
- Inspect the received product. Silver stains can be wiped off with cotton wool and a solution of nitric acid.
- Rinse the mirror first in water and then in alcohol.
- The silver layer should have cooled by this time. Spray it with clear varnish from a spray bottle.
- When the varnish is dry, paint the darkened surface. Then paint the silvered part with red lead, diluting it in turpentine. The glass part must be wiped with a solution of nitric acid.
- Let everything dry and look at the result. If everything suits you, all that remains is to place the mirror in a frame with clips.

How to make a hole?
A hole in the glass can be drilled using:
- drills with flexible shaft;
- dental burs.
The structure itself amenable machining , but you need to take into account the fragility of glass. Therefore, it is necessary to calculate the force and impact points, as well as the operating procedure.
The processing should not lead to cracks, breaks and chips on the main surface, otherwise the entire product may break.
Before making a hole, you need to prepare the glass for processing. The working surface must be cleaned and leveled. Watch for defective areas - under mechanical stress they can chip and damage the workpiece.
First, make markings: mark the lines of future holes so that surface flaws are located inside the circle and do not extend beyond its limits. Additionally You can treat the surface with chemicals, ridding it of oil traces.
 Determine where the work will be done. You need to prepare the fixing equipment.
The method of glass fixation itself is determined based on the chosen technology for creating the hole.
Typically, the workpiece is placed in a vice, and under the areas that will be affected, a damping soft materials.
What if you need to make a small hole?
Miniature holes can be drilled using a drill and drill. A drill is required first:
- heat up;
- immerse in sealing wax and hold until the substance begins to melt;
- moisten the tip in turpentine.
After this you can start working.
The second option is:
- Grind camphor and coarse sandpaper particles.
- Pour the resulting elements into a small container and then dilute them with turpentine. Place this paste on a clean glass surface of the workpiece.
- Prepare a small section copper wire. It will need to be clamped in the drill chuck. This type of equipment needs to be guided, so prepare a guide jig (plywood).
- The preparation is completed. You can start drilling.
Large holes in glass are made in a different way. If necessary diameter exceeds 10 cm, household equipment will not help here.
 You can still drill, but you must first make a small through point in the center of the future hole.
Any small-format glass of small diameter (up to 1 cm) can handle this. Extraneous chips will occur, but this is not a big deal: they form in areas that will later be removed.
Having received a small through opening, you need to insert and secure a piece of wire into it.
One end is fastened with a glass cutter. After checking whether the elements are securely fixed and Does the tool move smoothly in a circle?, you can cut a circle.
If you can't drill a hole, you can melt it. You will need to prepare equipment in which liquid tin or lead will be prepared. The glass blank is treated with gasoline, acetone or alcohol.
Having made the markings and formed the area for the future hole, the resulting area is sprinkled with moistened sand.
It should be enough to create a funnel, the bottom of which will be comparable in size to the edges of the hole, then metal is poured into it.
After 1-2 minutes it will cool down, and the sand equipment can be removed along with the mold.
As a result, in a glass blank a hole with smooth edges is formed. The risk is only in the melting process itself: it is impossible to control the diameter that is formed after the interaction of glass and metal.
 The last option is to cut the hole using a soldering iron. You need to start by creating risks using a needle file.
Carefully mark the zones in which the melt will be made with a soldering iron in depth.
Then you need to warm up the tip and start cutting. Proceed slowly and carefully.
Better melt small sections, periodically cooling the glass (this will reduce the risk of deformation in nearby areas).
The result will be exactly the opposite of the above method:
- the boundaries of the intended diameter of the hole will be maintained;
- the edges will turn out uneven.
Video on the topic
conclusions
As you can see, unnecessary or broken glass is suitable for decorating a room with handmade items. The main thing is desire and imagination.
You can also decorate other glass containers.
If you don’t want to work on crafts, don’t throw away the glass anyway. Take it to or into a special container for collecting glass.
In contact with
Glass bottles accumulate in any home or family, especially after the holidays, but you don’t always want to throw them away. And there is no need to do this. In this article we will look at what can be made from empty and beautiful glass bottles.
What can you make from bottles for your home?
Today, many bottles have non-standard shapes and their variety is very large. Make useful decorative crafts from glass bottles with your own hands that will add zest to your interior or exterior of your home and bottles will no longer be just trash for you. From empty glass bottles you can make stylish vases, all kinds of candlesticks, chandeliers, glasses, magnificent flower vases, terrariums for plants, hedges, it is interesting to decorate flower beds in the country and much more, as long as your imagination is enough.
Just before you give empty glass bottles a second wind, you need to decide what you want to do and choose a range of possibilities. Crafts made from glass bottles can be divided into two large groups:
- Interior– this group includes crafts for filling interior space and creating a positive mood (chandeliers, stands, vases, candlesticks and much more).
- Exterior– a group of crafts for creating coziness in a dacha, in a country house (paths, fences, etc.)
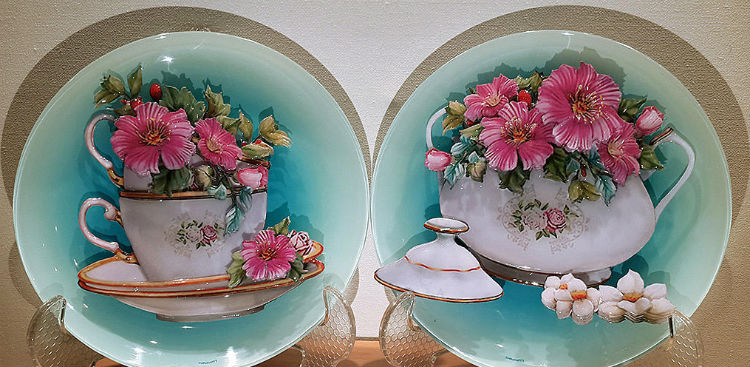
Vase made of bottles
The simplest and most beautiful thing in the interior is a flower vase. Vases with flowers create a cozy and warm atmosphere in the house. They can be placed anywhere, on tables, on the floor, on shelves. Whole bottle- a ready-made flower vase. There are many ways to decorate a bottle.

Vase made of bottles. Acrylic painting method
Manufacturing process:
- To do this, take beautiful bottle wine bottle, unusual shape, cover it with acrylic or oil paint(e.g. white), apply a second coat of paint if necessary. Complete Guide How
- Then take a beautiful lace, 10 centimeters wide and glue it to the bottom of the bottle. (see photo).
- The last step left is to put the flowers in the vase. And your home will shine with tenderness.
Vases can also be not only tabletop, but also wall-mounted. Make a wooden base, attach it to the wall, and place a vase of flowers in the middle of it.

Set of vases for table decor

Wall vase


There is a whole selection of master classes on Kolibri - see the link!
Candlestick
No lamp that emits artificial light gives such a romantic effect as the light of a smoldering candle. Candle fire can make the atmosphere of any room more mysterious and exciting, but at the same time more calm and cozy. The most ideal solution would be to make an individual candlestick with your own hands.

Candlesticks from a bottle

Candlesticks made from clear bottles
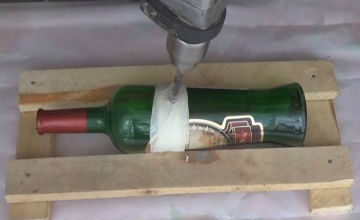
The easiest way to make a candlestick from the bottom halves of bottles. To do this you need to cut the bottle. How to cut a glass bottle? There are several options. Most often used special machine or a glass cutter, but not everyone has such tools in their home. Therefore, at home, glass can be cut using a burning thread.
To do this, you need to thoroughly moisten a middle rope in acetone (or nail polish remover), wrap it around the bottle in the place where you need to cut it, set it on fire, and then sharply dip it into ice water (water/ice = 1/1). Step by step.

Candlestick from the bottom of a bottle
You will get an absolutely even cut. Then, to finish the edges so they are smooth, use emery wheel or waterproof sandpaper. When working, be sure to follow safety precautions.
Manufacturing process:
- After you cut the bottle, melt the paraffin in a water bath.
- Then take a piece of wick, put it in the lower part of the bottle, securing it with a dry piece of paraffin, and fill it with melted paraffin, while securing the wick in place with something. Leave it until completely dry (1-2 hours). That's all, our wonderful candle is ready for use.
- Or simply insert a thick candle into the bottom of a glass bottle for another great candle.
Wine bottle chandelier
If you are tired of old lampshades, then another variety for your home will be one made from glass wine bottles with your own hands.
It is necessary to cut off the bottom of the wine bottle, and we use this bottle as a lampshade; you just need to carefully fix the socket with the light bulb. It is also possible not to limit yourself to just one lampshade, but to make a whole royal chandelier in the same way, which will decorate your room and fit perfectly into your interior, especially in a country house.
Do you want to make such a lamp? — Below are 3 detailed and step-by-step lessons!

Chic chandelier made from bottles

The finished cartridge with wiring is inserted into the cut bottle

Rustic chandelier
Dishes
The simplest and most popular crafts to make from glass bottles are various elements of tableware. If you want the products flat dishes with your own hands, you need to go to a workshop, where at high temperatures, it will be given a different shape.
Although there is an easy way to make a plate at home, as mentioned above. And your plate is ready to use.

Original serving of food in a plate from a bottle
Sweet plates
To make a plate for sweets, you need to:
- take a tray or an old plastic plate,
- make a round hole in the middle and put it on the neck of the bottle.
- the bottle can be decorated various elements decor (paint, beads, pebbles and much more)

Original dessert plate
Jars for bulk products
By cutting off the neck of the bottle and sanding the edges, you will get an original jar for bulk products. Which will delight you with its appearance when preparing various dishes.

Jars for storing bulk products. You can use a cork or foam ball as a lid.
Mug
Already knowing the principle of cutting a bottle, you can try to make a glass mug, just remember to carefully process the edges. To do this, you need to cut off the bottom of the bottle and separately the very top of the neck, then glue the neck to the bottom as a handle with liquid nails and your glass is ready.

Glass bottle mug
Whiskey bottle soap dispenser
Bottles beautiful shape will serve as a dispenser for you liquid soap. This option will certainly look original in your bathroom.
- To portray such beauty and practicality, instead of a cork, attach a pump or nozzle for liquid soap or dishwashing detergent that was left over from the used one.
- You can secure the nozzle with liquid nails or select a bottle with a suitable thread.
- If you want to leave the label and prevent it from getting wet from water, cover it with clear varnish.
Done, you can already enjoy.

Whiskey bottle soap dispenser
Wine bottle shelves
Using glass bottles as supports for wooden shelving– this is just a wonderful idea. Hollow bottles are incredibly strong and easily hold wooden planks. To do this, just make several holes in the wooden planks, connecting them together with bottles, and your book house is ready.

Bottle storage shelf
Hangers and hooks
Glass wine bottles will find their use in the hallway if they turn into an unusually original hanger. This idea was first introduced by Lucirmás in Milan. On the one hand, this is art, and at the same time, it is a useful thing.
Manufacturing:
- To make a hanger we will need wine bottles with a long neck.
- It is necessary to cut them at such an angle that they are at the required slope on the wall.
- Then we attach a mirror or glass base to the wall and glue our neck using liquid nails.
If it was not possible to glue it carefully and the glue is visible, the base can be decorated with cord.
DIY designer bottle hanger
Glass bottle tables
Same as for making shelves, you will need a board of the shape and size that you would like your table to be.

Coffee table made from bottles
Sample board for a table made from bottles
Drill holes for the necks of the bottle and insert them. And your table will certainly delight not only you, but also your guests with its originality.
Exterior
Planting original DIY crafts can decorate not only the interior of your home, but also the exterior.
Hanging terrarium
Transparent bottles made of any glass are perfect for a home terrarium or flowerpot for living plants. Such a hanging flowerbed creates the impression and feeling that the bottle grew from plants, and not vice versa. It’s very simple to make; you need to cut off a small part of the bottle and plant a plant inside on the ground. They can also be not only hanging, but also tabletop or wall-mounted. 

Bird feeders
Feeders can be made from upside down bottles. Fill the bottles with food or grain, after securing it in a wooden structure, turn it upside down, and place a glass or saucer underneath. Some of the food will be poured into a glass or saucer. As soon as the birds peck at the food, it will gradually be added. Such feeders can be safely hung on trees and they will decorate your site.

Bird feeders on a wooden mount

Stylish bottle bird feeder
"Music of the winds" from bottles
These bells are made from a colored glass bottle, first cut into several pieces. In the largest part and the rest of the small ones, it is necessary to make holes for the wire with decorating material, which will connect all the cut parts of the bottle to each other.
This thing will look fabulous in your summer garden.

Flowerbeds and fences
Making a flowerbed out of bottles for the garden is not that difficult. And so let's get started:
- For the base we take car tires. The lower part of the base is plastered with mortar.
- The first row is laid with the necks towards the center, the second and subsequent ones in the same way, but with a gradual offset so that the bottles are stacked in a checkerboard pattern.
- All voids are filled with mortar to make the structure stronger.
- The last layer is fixed with a solution, covered with soil, and only a wide part of the bottles should remain on the surface.

Round flower bed made of bottles
It’s also very easy to make a fence from glass bottles by separating vegetables and berries decorative fencing. First, draw the boundaries of the divisions, then dig a ditch to place the bottles, placing them tightly in a row, and then tamp the soil around.

Fence for flower beds
The bottle fence also looks very original. It’s especially beautiful if the bottle is different shapes and colors.

Original fence made of bottles
Installation process:
- We dig long wooden poles into the ground. If desired, the poles can be mounted into a wooden base.
- In each bottle, you need to make a hole in the bottom 1 centimeter larger than the diameter of the pole.
- We string the bottles onto the poles and secure them with a bar on top.
Also look at the detailed photo master class.

Prepare the base for the poles

String bottles on poles
Making such crafts will entertain you and will also benefit not only you, but also the environment.
Fusing at home is real. This, of course, will not be as bright and beautiful as that made by factory craftsmen, but it will turn out unique and made with your own hands.
Fusing is a glass baking technique. Using this technique, you can make interesting things from an ordinary bottle, such as jewelry, panels or stained glass. Products can be made either single-layer or in several layers, or you can create relief compositions.
Story

This technique was first used in Germany in the early 90s. Pieces of different colors were melted, and at a temperature of 800-900 degrees they merged into one whole. Now fusing is used in various industries applied arts such as: art objects, decorative items, jewelry, original design windows and shop windows and so on. This type of creativity has become quite diverse.
Methods for making glass products
Pieces are cut out of multi-colored glass plates using a glass cutter or special tweezers. the right size. They are applied to each other, the future composition is assembled, and the gaps are filled with powder from glass plates (crushed pieces). Place in the oven for 18-22 hours (depending on the thickness and diameter of the glass) and close.

Fusing at home
In order to make something in the fusing style with your own hands, you will need:
- special glass, crushed or in the form of plates (for a good connection of glass pieces, make sure that the COE indicator is the same everywhere);
- oil glass cutter (oil is poured into the middle);
- protective glasses;
- tongs 2 pieces;
- PVA glue and brush;
- Sander;
- special furnace for fusing.
First you need to decide on the craft. If you are doing this for the first time, then it is better to take something simple, for example, flowers or abstraction.

The cutting technology for this type is exactly the same as for regular glass. You need to use a glass cutter and then break it. If you have round or complex shapes, then after using a glass cutter, you need to pinch off the excess with tongs and smooth out the irregularities.
Then the pieces need to be glued to the glass base with glue (after baking there will be no trace of PVA left) and put into the oven for 6 hours at a temperature of 700 degrees.
Unfortunately, this technique does not produce clear contours. Therefore, if you want clarity, you will have to decorate the product using cloisonne enamel. And don’t forget to erase traces of the marker with alcohol (if you drew outlines with it).
This way you can make several tiles and insert them into the bathroom or kitchen, it will look original. Everything that your imagination allows can be done without special effort, the main thing is to have a stove, material and desire. A lamp, vase, frames, jewelry, Christmas tree decorations, dishes and much more will decorate your home and give it originality.
Step-by-step master class on making watches in fusing style
For work we will need:
- glass;
- glass rods;
- frit;
- ruler;
- glass compass;
- glass cutter;
- marker;
- emery block;
- wire cutters, drill and glass drill bit;
- glue.
Even the most simple work It’s worth starting with a sketch, so we make one. Then we select the glass by color and compatibility.
- Using a compass, draw a circle on a transparent base.
- The compass is attached like a suction cup, so there should be no problems with drawing a circle. Using wire cutters, remove the circle, biting off the glass a little at a time.
- And knock with reverse side glass cutter handle.
- The workpiece is ready, now pour some water to make a hole
- Turn on the drill and add water
- Make rays for the sun
- Yellow glass (3 shades) cut into pieces
- Attach them to the base
- Set aside temporarily and make notes for the numbers.
- Using wire cutters and a glass cutter, make a palm tree, elements and figures
- Secure everything with glue
- Scatter the frit
- Place the product in the oven and lay out the rays, then place the round piece on top
- Add clear glass between the beams. This will be the fastener
- Close the oven and bake for 5 hours, then 7 hours to cool. Open the oven and remove the product.
Many people think that working with glass is difficult, but this is not so, if only there was a desire. This master class is proof that you can do the most amazing things and make any fantasy come true.
There may be options for the product with iodine, it looks very chic! And white light fusing (white glass) looks absolutely incomparable.
Glass products can be made both for yourself (home decoration) and as gifts for loved ones. You will definitely surprise everyone if you give a vase. self made or a candy dish.
Inspiration to you and successful crafts!
Video:
Here's a video on how to create different products using fusing techniques:
The most interesting articles:

How to decorate glass
- You will need
- The process of how to decorate glass with your own hands
- Examples of what can be done using the presented method
Is it possible to turn old dishes into a New Year's masterpiece (especially if there is another one that you are not ashamed to put on New Year's table, No)?
Certainly. We decorate the glass using the decorating techniques presented below.
You will need
- Glass dishes (for the first time it is better to take dishes with a flat surface)
- Masking tape
- Pencil and eraser for drawing (you can do without them if you have a drawing template)
- Stationery knife
- Acrylic paint
- Glass paint
The process of how to decorate glass with your own hands
1. Paste masking tape glass. In this case, each subsequent strip should slightly overlap the previous one.
Draw an image on the tape. In this case, the lines of the drawing should not be interrupted.
10 Crazy Cool Glass Bottle Ideas
Cut the outline of the image with a stationery knife.
4. Remove the tape from the areas you will paint.
5. Color the drawing. To do this, use a small piece of sponge.
Can be spray painted.
6. Wait for the paint to dry.
Remove the remaining tape. Be careful not to touch the paint on the glass.
This is what you get in the end.
Examples of what can be done using the presented method
When you train your hand, you can decorate any glass and get such beautiful objects.
So now you know how to decorate glass.
All that remains is to prepare the materials and get to work. If you don't have time right now, bookmark the page or print it out so you can find it quickly.


In this and several other articles I will talk about sea glass?
- a mysterious material that is used all over the world to create jewelry?
Is sea glass a human creation?
Mounting on glass at home
and nature?
Once upon a time at sea? glass? after many years it becomes the sea. It gets foggy and rough surface. Glass becomes from interaction with salty sea water and rough - due to friction against stones and sand.
Are some sea glass specimens found by humans on the shore equally valuable as gemstones?
Well, I offer these glasses with my own hands.
I'll show you how to create a simulation of sea glass from improvised materials in the video course "Sea Glass with My Hands" ➡ HERE

Stained glass is the art of decorative glass.
Unusual handicrafts that you can make with your own hands from bottles
The classic stained glass window is to create a pattern by attaching colored glass with lead, copper and brass bulkheads. This method is definitely great, but it is quite complex and requires a certain amount of time and skill. Today, the process of creating stained glass has become much more accessible and easier.
Market contemporary art offers a line of colors, contours, pastes and all types auxiliary materials for glass decoration. In this section you can purchase all the necessary materials for transforming and decorating glass, ceramic, porcelain and plastic interior items.
Your most complex fantasies will be realized in real parts.
You'll need it first:
Glass chromatograph (marking pencil). You can simply sketch them onto a glass, ceramic, porcelain or plastic surface.
Relief, contour (in bulk in a tube with a fine tip to remove boundaries between colors on the glass).
Color (transparent colors).
In addition to these basic items, manufacturers also offer auxiliary media for creating additional effects, varnishes to protect products from environmental influences, various pastes with numerous textures, glazing for glass, decorative coatings for crushing products.
Liquid glass: application in construction
Silicate glue (liquid glass) is one of the most interesting and multifunctional materials used in construction. Despite the fact that in wide sale the material appeared relatively recently (about two decades), silicate glue has been used to impart strength to concrete and as a waterproofing agent for almost two centuries.

Liquid glass: composition and properties
The basis of liquid glass is sodium or potassium silicates.
They are combined with an aqueous solution of alkali to form liquid glass itself. There are other ways to make this composition, but this is the most common.
The properties of silicate glue allow it to perfectly bond various materials. The molecules of the outer layer of any solid material have a greater distance between them, so there is room for liquid glass molecules. They, in turn, penetrating inside, release moisture, due to this the viscosity of the adhesive layer increases.
Therefore, liquid glass can be used as glue for linoleum or PVC boards.
Excellent adhesion allows the use of liquid glass for bonding materials of various structures with low adhesion (glass, ceramics, etc.)

Where is liquid glass used?
Waterproofing. In addition to being used as an adhesive, liquid glass has several other uses.
The most common way to use silicate glue is waterproofing.
This composition can be used to impregnate walls, floors, and foundations. For the foundation this is perhaps most important. A large number of moisture, adverse effect atmospheric phenomena, precipitation and temperature differences make this part of the structure the most vulnerable.
Coating with liquid glass helps protect the foundation from damage and prevent its destruction.
This material is often used in the construction of swimming pools and other water containers, including wells, since liquid glass can effectively insulate the surface and seal even the smallest holes and cracks, preventing water leakage.
Varieties of DIY liquid glass crafts
First, liquid glass is applied to the walls, and then a waterproofing composition of sand, cement and glass.

Putty for water pipes is also prepared with the addition of liquid glass.
Antiseptic properties of liquid glass. Liquid glass is used as an antiseptic.
In this case, the material of the wall or ceiling does not matter. Such a coating will prevent the appearance of mold, fungus and other formations.
The solution for such impregnation is made from water and silicate glue in a one to one ratio.
This product is used to impregnate wood and is not recommended for use on other surfaces, because it forms a coating with very low adhesion, which does not allow further painting or plastering.
Increased fire safety. Liquid glass dissolved in water (400 g per 1 liter of water) is also used to treat surfaces.
This impregnation will also serve to increase the fire resistance of the structure (withstands temperatures up to 1200 degrees Celsius).
Thermal insulation.
Liquid glass is also used for the production of heat-insulating materials due to its low thermal conductivity. Also, insulation made on the basis of liquid glass can withstand repeated freezing and thawing without losing its properties.
Building mixtures with liquid glass
Primer with liquid glass. To prepare such a primer, cement and liquid glass must be taken in a 1:1 ratio.
First it gets ready cement mortar, which is then poured into liquid glass.
After thorough mixing, the primer is ready for use. If the mixture hardens too quickly, it must be diluted with water.
Plaster. You can also make wonderful waterproof plaster using silicate glue. To do this, cement and sand are mixed in a ratio of 1:2.5, to which 15% silicate glue is then added.

Composition for furnaces.
You can prepare a special refractory composition for laying bricks in fireplaces and stoves. To do this, 25% liquid glass is added to the standard cement-sand composition.
When making such a solution, you need to remember that it is better to prepare small portions - the composition hardens quickly.
Concrete and liquid glass. Silicate glue is often added to concrete during construction; this not only improves the properties of the solution, but also increases the waterproofing and fire-resistant properties of concrete.
Such material will subsequently be less likely to be subject to the formation of mold and mildew.
Adding liquid glass is justified from a cost-saving point of view. The material is low cost.
This method is used when it is not possible to apply the composition to the surface. For example, when it is expected further painting or plastering.
And also when it is not possible to quickly use the solution. Concrete with liquid glass hardens much faster.
Thus, we can say with confidence that, despite the abundance on the market of various specialized products used in construction (antiseptic, fire-resistant, insulating, etc.), liquid glass is still not losing ground.
Very often, you can use unnecessary things to create decorative elements for the interior or the territory of a suburban area. Many people accumulate glass bottles, but they don’t always want to throw them away. Yes, and this is not necessary, because you can make stylish vases from them or interestingly decorate a flowerbed for your dacha, especially if the bottles have unusual shape.
Before you start creating interesting crafts, you need to understand how to cut a glass bottle. After all, doing this is not as easy as it seems. It is difficult to make the cut edge perfectly even using any available means, so most often the processing is carried out more in modern ways. Most often, a special machine or glass cutter is used. But such equipment is unlikely to be available at home. Therefore, at home, glass can be cut by heating it with a flame or boiling water, or using a burning thread.
When working, be sure to follow safety precautions when working with fire and electricity; in addition, glass dust settling in the room will get into your eyes or respiratory organs. If you are sanding edges, it is best to use a sharpening stone or sandpaper. Since it is impossible to cut a glass bottle using simple methods, many turn to glass blowing workshops. Here the glass is heated to a high temperature, as a result of which it becomes soft, plastic, and the bottle can be given any shape. The most popular and easiest to make crafts from glass bottles are a variety of tableware items. If you cut them into two halves, the first can be used as a glass or glass, and the second as plates. Of course, they are not suitable for use right away, since the edges must be processed, otherwise you can get hurt from uneven edges. If you want to make flat plates with your own hands, you will need to go to a workshop where they will be heated, after which they can be given a certain shape. Few people think about what can be made from glass bottles. But you can create the most interesting decorative elements that will decorate not only the interior, but also the exterior. If you don’t want to throw away old bottles, we suggest making original hanging plant pots out of them. To create them, it is better to take the most voluminous products, from champagne or wine, and a 20-liter glass bottle is even better. Making a flowerpot at home is easy and simple: Such an original flowerpot is inexpensive, and you can plant petunias, lupins and any flowering plants in it that will add variety to your garden. Photos of crafts made from glass bottles show that this improvised material is suitable for a variety of purposes. So, an original bottle lamp will complement the interior very interestingly and effectively. It's easy to do. After thoroughly cleaning the bottle, a place for the wires is marked on it; most often, the side wall near the bottom is selected, which is neat and aesthetically pleasing. A clay cake is placed on the place where the hole for the wires will be drilled; while drilling, you need to gradually pour water into the hole so that the drill does not heat up. You need to drill very carefully, then the resulting hole is processed with sandpaper to obtain smooth edges. We will use garlands or LED lights as lighting equipment; bottles that contain several types of lighting at the same time look especially beautiful. The wires are pushed inside the bottle, and only the part that is needed to connect to the outlet remains outside. All that remains is to connect the finished lamp. The composition can be supplemented with candles, and the neck of the bottle can be decorated with ribbons, laces, and other decorative elements. Glass bottles are good to use to create vases. This is where you can give free rein to your imagination! These vessels are easy to make, and their design can be very different - it depends on your preferences. Let's look at the most popular ways to create vases from glass bottles. The simplest option is the most laconic - simply cut off the neck of the vessels so that there is enough space to place the flowers. The edges are carefully processed so that you don’t get hurt when using homemade vases. If you want to make interior elements more beautiful, you can decorate ordinary bottles. To do this, they need to be cleaned of labels and glue residues using vegetable oil or solvents. For painting, you should use special compositions for painting glass - they will reliably adhere to the glass surface and will not be washed off under the influence of water. There are many options for painting: some paint patterns on the outer surface, while others simply pour paint in a thin stream inside so that it covers the entire inner surface. In the latter case, the bottle must be thoroughly dried. Such bright DIY vases made from glass bottles will become a bright decorative accent in any room. They can be placed on a table or window. If your hands are out of place, you will probably find a way to decorate an ordinary wine bottle to give it an unusual appearance. In addition, there are a huge number of design options. A simple way is to knit a bottle cover using different techniques and cut off the neck - this way you will get a very cute and romantic vase that will add zest to any interior. Using beads is another beautiful, but quite labor-intensive option, since it will take more than one week to knit the pattern.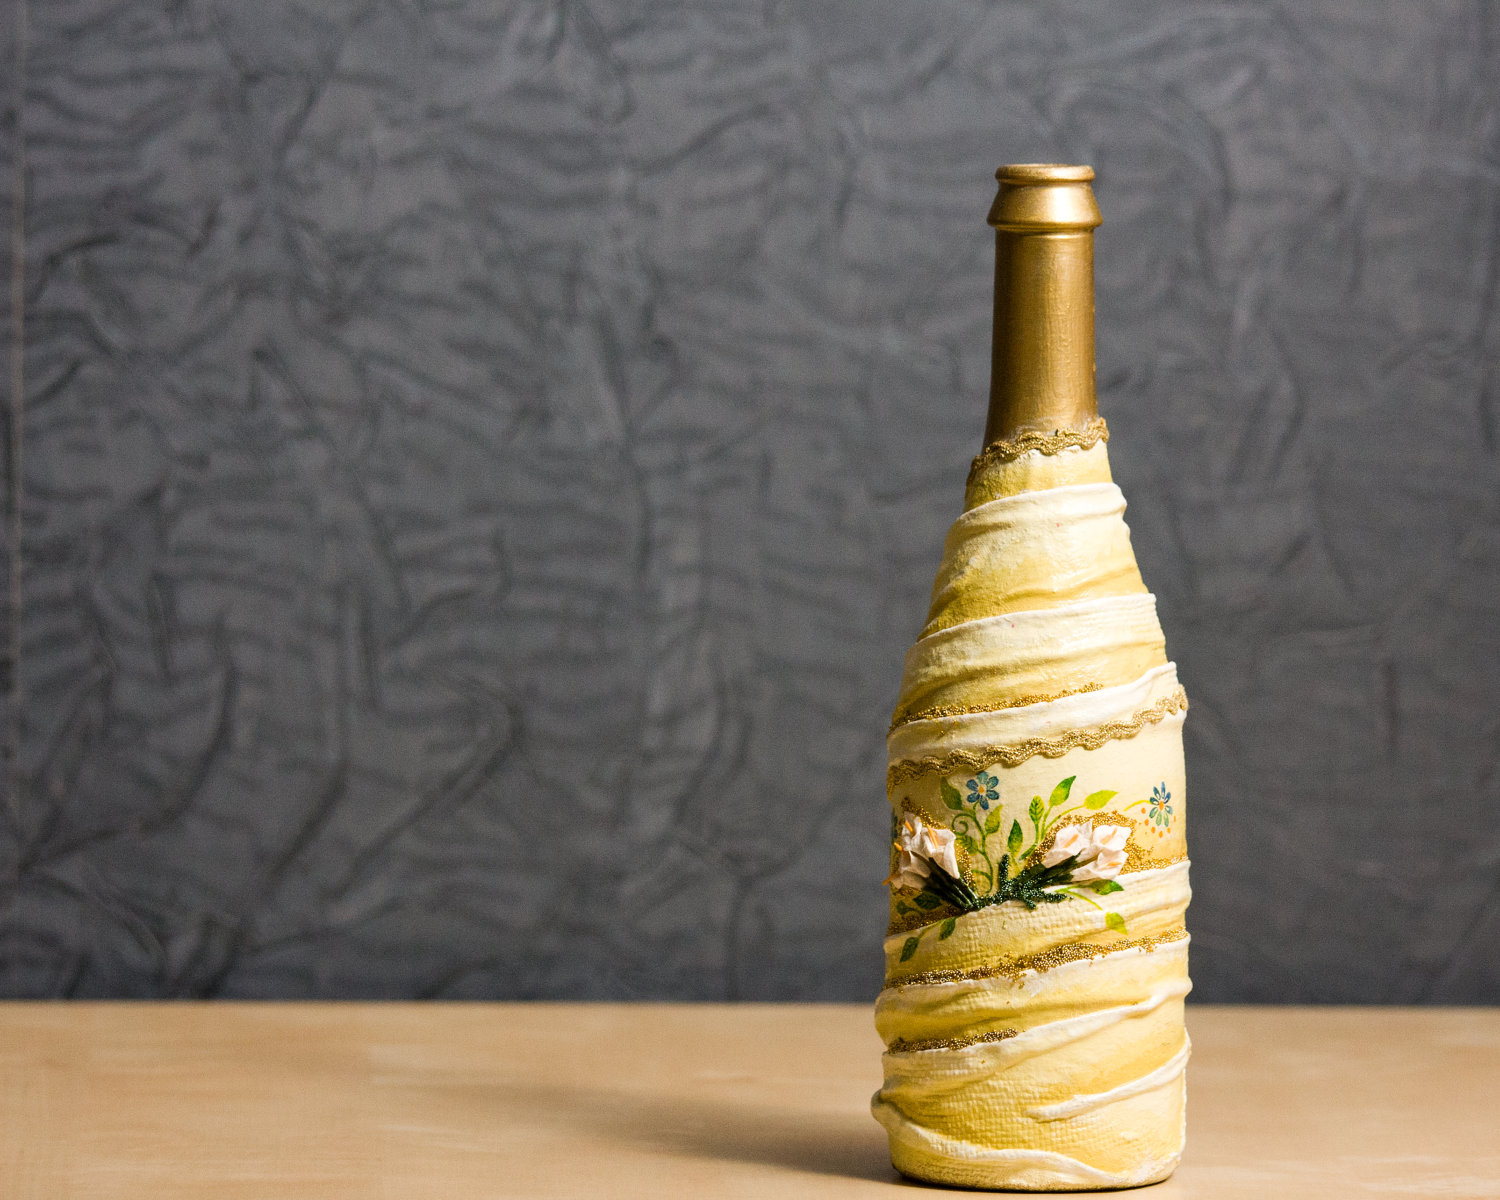
Dishes
Flowerpots
Lamps
Vases
We use wine bottles
Painted vases
Use of beads and knitted inserts
Decoupage