To achieve comfortable living in a house during the winter, you need to think about insulation at the construction stage. This will prevent cold air from entering the room and ensure compliance with temperature and humidity conditions. Insulation frame house you can do it yourself. Step-by-step instructions for each type of structure are given below.
Why is it necessary to insulate a house?
Using thermal protection of structures in contact with cold air, the following problems can be solved:
- condensation from inside the premises;
- the appearance of dampness, mold and mildew;
- increased heating costs;
- non-compliance temperature regime living space and a decrease in the comfort of living in it.
In addition, competent technology for insulating a frame house can extend the service life of the main structures of the building.
Materials for thermal protection


House insulation can be carried out using the following materials:
- mineral wool;
- extruded polystyrene foam;
Types of mineral wool
There are two classifications of this insulation. The first is based on the raw materials used for manufacturing:
- basalt;
- glass;
- slag.
The most popular is the insulation of the walls of a frame house and other basalt structures. mineral wool.
 The second classification is based on the form of insulation:
- rigid slabs;
- roll material.
It is worth noting that glass wool is only available in rolls.
For floors, rigid slabs that can withstand fairly high loads are suitable. Insulation of the walls of a frame house can be carried out using both slabs and rolls. For mansard roof It is best to use slab material. This will allow you to easily install mineral wool insulation between the rafters.
Insulated frame house structures
Before insulating a frame house, you need to decide which structures require this additional measure.
You can protect the following building elements from the cold with your own hands:
- first floor floor;
- attic floor (if the attic is cold);
- attic roof;
- exterior walls.
Do-it-yourself insulation work can be done both outside and inside. It is best to install thermal insulation between the racks, as this will ensure proper operation of the material. Insulating a wooden house with mineral wool from the inside of the wall will greatly simplify the work and allow you to carry out events in any weather conditions.
 Double-layer insulation – guarantee of 100% thermal protection
 An insulation scheme from the outside is possible if the insulation from the inside is not sufficient and additional insulation is required. Peculiarities:
- external thermal insulation material should not create a barrier to steam. Otherwise, the resulting condensate from water vapor will accumulate between two layers of insulation, which is fraught with the formation of mold and mildew;
- thickening the house wall
Based on all of the above, it follows that thermal protection of a wooden house from the outside with mineral wool should be carried out only in exceptional cases when the scheme from the inside is not applicable.
Wall insulation
 Double-layer insulation (double frame)
 To guarantee a comfortable stay during the winter period, it is important to take care of the thermal protection of the walls. To reliably insulate walls with basalt or other wool from the outside with your own hands, you need two-layer insulation. Adhere to the following layer order:
- interior decoration;
- vapor barrier;
- insulation with mineral wool (2 layers with offset racks);
- windproof membrane;
- OSB-3 for sheathing;
- external finishing of the facade.
It is important to remember that the scheme for using this type of insulation requires the presence of a ventilated layer with a thickness of at least 4 cm. This is necessary due to the high hygroscopicity of the material. In order for the insulation to maintain its performance characteristics, it is necessary to remove excess moisture from its surface. This is ensured by the circulation of cold air outside the surface of the mineral wool.
 Most often, the technology for insulating the walls of a frame house is the following scheme: the material is not laid on any side, but between the frame posts. This allows you to reduce the overall thickness of the wall and significantly reduce the construction time of the building. Mineral wool is fixed between the frame posts, after which sheathing is done on both sides.
When carrying out DIY work, vapor barrier and wind protection are positioned similarly to the previous cases: steam protection is on the inside, and wind protection is on the outside.
When thermally protecting walls from the inside under curtain façade The order of layers is as follows:
- interior decoration;
- vapor barrier;
- mineral wool;
- superdiffusion membrane;
- wall design;
- façade finishing.
Insulation of floors


A wooden frame house is characterized by ceiling beams. When arranging thermal insulation with your own hands, insulation boards are laid between the load-bearing structures of the floor. You can also use rolled materials, but spreading them will require preliminary installation of the bottom sheathing or continuous flooring.
When insulating with mineral wool in the form of rigid slabs, it is better to take the pitch of wooden floor beams so that there is a clear gap of 580 mm between them. This will ensure maximum ease of working with 600 mm wide slabs and complete filling of the space with heat-insulating material.
When doing things with your own hands, you need to remember that the vapor barrier is located from the inside of the room, and the waterproofing is on the cold air side. In case of interfloor ceilings Steam protection should be provided from the ceiling.
 Insulation attic floor
 It is also important to remember that when working with any type of mineral wool, it is better to prevent particles of the material from getting on your skin and into your lungs. For this, it is best to use gloves and a mask. Workers must also have special clothing that completely covers their arms and legs.
Insulation of pitched roofs
 The DIY installation technology is similar to ceilings. The pitch of the rafters, as in the previous case, is selected to maintain a clear distance of 580 mm.
The work is performed in the following order:
- installation of the rafter system;
- laying a waterproofing layer on top of the rafters;
- thermal insulation;
- installation of vapor barrier;
- top and bottom sheathing;
- laying roofing material;
- interior ceiling decoration.
Preparatory work
Before properly insulating a frame house, it is necessary to prepare the surfaces. To do this, follow simple steps:
- treating all wooden house structures with antiseptic compounds to prevent damage by various microorganisms;
- cleaning the surface from dirt and dust;
- elimination of significant irregularities.
These simple do-it-yourself manipulations will ensure that the insulation is securely attached to the structures and has the longest possible service life.
September 6, 2016Specialization: Capital construction work (laying a foundation, erecting walls, constructing a roof, etc.). Internal construction work (laying internal communications, rough and fine finishing). Hobbies: mobile communications, high tech, computer technology, programming.
The day before yesterday I received an order to insulate a frame house. The client took up self-construction this building, but in the process of work I decided to immediately adapt a country house for year-round residence. He didn’t know how to properly perform thermal insulation, so he turned to me.
I think any novice builder may encounter a similar situation, so today I will tell you how and with what to insulate the facade, floor and attic country cottage, built according to frame technology.
Choosing a location for installing thermal insulation
First, I will pay a little attention to where it is better to equip the thermal insulation layer - outside or inside. I prefer external insulation, but in order not to be unfounded, I suggest that you familiarize yourself with the table, which outlines the features of the two mentioned options. After studying it, you will be able to make an informed decision yourself.

| External | Internal |
| The external insulation scheme provides that the entire insulating pie will be placed with outside living space, therefore during construction work the interior of the rooms does not suffer. | When installing internal insulation, it is necessary to dismantle the decorative finishing of the rooms, and after installing the insulation, carry out finishing from scratch. This increases the time to complete the work and the estimated cost of construction. |
| With external insulation, the heat-insulating layer simultaneously protects the enclosing structures of the frame house from the effects of destructive external factors: temperature fluctuations, rain and ultraviolet radiation. | Internal insulation shifts the point of moisture condensation inside the wall, as a result of which the enclosing structure becomes moist, which significantly reduces its service life. |
| A wooden wall, which is in direct contact with the warm air in the room, accumulates thermal energy, and when the outside air temperature drops, releases it, eliminating the need to use heating devices. | The insulation installed inside does not protect the enclosing structure from frost. The wall is subjected to numerous freeze and thaw cycles, which lead to the destruction of its internal structure. |
In my opinion, to internal thermal insulation can only be used when insulating a very old house: installing insulating material from the inside will allow you to avoid dismantling the external finishing, which is not always possible for objective reasons.
Yes, and one more thing. Several times I have encountered situations where even the correct internal insulation was not effective enough to maintain a comfortable microclimate in the house during severe winter cold. And we had to install additional ones - outside. So, whatever one may say, external insulation is more reliable.
Well, now let’s figure out what is the best way to insulate a frame house from the outside.
Selection of thermal insulation material

Taking into account the specifics of a wooden house built using frame technology using sheet facing materials, it is necessary to select insulation taking into account the following requirements:
- The heat insulator must be environmentally friendly. The insulating layer should not emit hazardous substances into the air chemical compounds even if it heats up during operation.
- The material must have fire-fighting properties - it will not ignite under the influence of fire and not contribute to the further spread of the flame. It is also advisable to select insulation that does not emit during a fire. large quantity smoke, making it difficult to evacuate people.
- It is better to select insulation with the lowest thermal conductivity coefficient, so as not to use a large layer for insulation. Optimal thickness– no more than 100-150 cm (this is the average section of the timber usually used to construct the frame).
- Strength and ability to maintain geometric dimensions. The material installed in the gaps of the frame should fill it completely, without shrinking over time.
- Ease of installation. To simplify the process of constructing a frame house, you need to buy insulation that can be easily installed inside the frame walls without the use of complex engineering equipment.
Another factor is price. Considering the total estimated cost of constructing a cottage using frame technology, it is necessary to select such insulation that will not significantly increase construction costs. However, I would not put price at the forefront, preferring thermal insulation with optimal technical characteristics and performance properties.
In my opinion, the closest thing to the requirements listed above is basalt insulation - mats based on fibers made from minerals of volcanic origin.

This material has many advantages, which I reflect in the table below:
| Characteristic | Description |
| Low thermal conductivity | Thermal conductivity coefficient λ basalt wool equal to about 0.036 W/(m*K) depending on the density of the material. Thermal calculations show that for middle zone Russia energy efficient house can be built with a layer of wool 10 cm thick. |
| Non-flammability | Basalt fiber melts at temperatures above 1000 degrees Celsius, so the material not only does not ignite itself, but also serves as a reliable barrier to the spread of fire. |
| Hygroscopicity | Mineral wool fibers do not absorb water, and the formaldehyde resins that glue the mats together have hydrophobic properties, helping to remove moisture outside. |
| Light weight | After installation, the insulation places virtually no additional load on the enclosing structures, which is important for a fragile frame house. |
| Easy to install | Dense mineral mats of suitable size are simply inserted into the gaps between the frame beams, without requiring additional lathing, fittings or wet construction processes. |
In my opinion, the listed properties are quite enough to persuade you to choose mineral wool. For work I use products from TechnoNIKOL or Rockwool.

And if you are wondering what is the best way to insulate from the inside, refer to the corresponding article on this blog, which describes in detail the technology you need. Although I can say in advance that mineral wool is so versatile that it can be used to insulate both the outside and inside of a house.
Tools and materials

In addition to mineral wool (and we decided that it would be basalt fiber), you will need a lot of different materials:
- OSB boards for internal and external cladding of the load-bearing frame of the walls of a home;
- wooden beams 30 by 50 mm for arranging a counter-lattice and a ventilation gap between the insulating layer and the decorative finish;
- hydro- and windproof membrane - a special polymer vapor-permeable film (Juta or Strotex), which prevents the insulation from getting wet and being destroyed by air flow, but does not prevent the removal of accumulated moisture from the heat-insulating layer;
- internal vapor barrier film - in the described case, I will use foil insulation based on polyethylene foam (for example, penofol) to increase the operating efficiency of heating devices;
- block house, with the help of which the external decorative finishing of frame walls will be performed;
- eurolining, which I will use to cover the surfaces of the walls from the inside.
I won’t dwell on which tools to use. You will understand in the course of further presentation.
Insulation process
Now I’m telling you how to insulate a frame house for winter accommodation. The thermal insulation technology of such a structure consists of several steps, which are presented in the diagram:

Step-by-step instructions for insulating a frame house with your own hands are presented below. I’ll say right away that in my case the frame of the house has already been erected, but internal lining was not installed. Therefore, the described insulation technology itself has some nuances.
Step 1 - Preparing the Frame
First of all, it is necessary to prepare the frame of the home for installation inside heat-insulating material. I do this in the following sequence:
- I cleanse wooden parts from dust, debris and dirt. In the future, the frame will be completely hidden by facing materials, so contamination may negatively affect the integrity of the structure, efficiency and service life of the insulating layer. You can clean the wood using a regular brush or vacuum cleaner.

- I repair damaged frame parts. In my case, there were no defective areas, since I insulated the new house during the construction process. But if you find areas of timber damaged by rot, you need to replace the part before installation. insulating material.

- I install engineering communications. If hidden installation of engineering systems is planned, then it is better to do this before covering the walls with decorative material. There are several features that I want to mention:
- All electrical must be installed in flexible or rigid plastic or metal cable channels, which protect the insulating layer and the building itself from fire in the event of a short circuit.
- During installation water pipes There should be no detachable connections inside the wall, which over time can loosen and leak.

- I perform antiseptic treatment of the frame. To do this, it is better to use a universal composition (for example, Guardian), which prevents the formation of mold and mildew on the supporting frame of the home and gives the wood fire-fighting properties. Wood must be treated with two layers of impregnation with intermediate drying.

Step 2 - Interior lining
For internal lining I will use OSB boards and a vapor barrier material with a heat-reflecting layer of polished aluminum foil. The work is carried out in the following sequence:
- I cover the frame of the house from the inside with OSB sheets. They will serve as a support for leveling the insulating material. The vapor barrier inner layer will be attached to the same surface:
- Glued fiber sheets must be cut into parts of the required size according to previously made drawings.
- The parts must be made in such a size that after installation they do not reach the surface of the ceiling, floor and corners. A gap of 2-3 cm thick is needed through which the moisture condensed there will be removed from the surface of the heat-reflecting layer.
- The sheets are attached with self-tapping screws to the supporting elements of the frame. The step between adjacent screws should not exceed 20 cm.
- The cladding seams should be staggered and offset relative to each other. Their thickness is 2-3 mm, which allows them to avoid warping of the surface when changing the size of the base.

- I am installing vapor barrier material. As I already said, its role will be played by penofol - foamed polyethylene (it will become additional insulation) with glued foil (it reflects infrared rays, increasing heating efficiency):
- The material should be placed on OSB sheets with the reflective layer facing outwards, and then secured to the panels using construction stapler or nails with wide heads.
- Penofol rolls must be mounted so that each subsequent layer overlaps the previous one by a distance of 10 cm.
- To seal the seams, double-sided adhesive tape is placed inside the overlap, which glues adjacent sheets of heat-reflecting material, preventing water vapor from penetrating into the thickness of the enclosing structures and the insulating layer.

- I'm installing counter rails. They are necessary to create a ventilation gap between the foil and finishing cladding. You can orient the parts vertically or horizontally depending on how you will secure it decorative material(in my case, lining). The slats are fixed to the OSB boards using self-tapping screws directly through the foil foam.

- I secure the paneling on counter slats. I have already described the technology of wall cladding with clapboard once, so I will not go into detail. I will only say that it is better to install lamellas on clamps, thanks to which changes in the dimensions of the eurolining during operation are compensated.

Step 3 - Laying insulation
TechnoNikol Technolight Extra slabs are best suited for thermal insulation. On the one hand, they are strong enough to fit tightly between the supporting elements of the frame and stay there without additional fastening. On the other hand, they have a low thermal conductivity coefficient, so two layers of 5 cm mineral mats are sufficient for insulation.
Another advantage is that I advised the client in advance to make the frame of the house with a distance between supports of 60 cm. This is exactly the width of the insulation board. Therefore, there is practically no need for pruning. Thereby expensive material used with maximum efficiency.
- I am installing the first layer of insulation. As I already said, the width of the slabs exactly corresponds to the distance between the frame beams, so you just need to bend them in the middle and insert them inside the wall. Having straightened out, the mineral mat will firmly occupy the place intended for it. Let me draw your attention to a few nuances:
- The mineral mat cannot be fixed to the internal OSB board. Otherwise, using a self-tapping screw can damage the layer of penofol that is laid on the surface on the reverse side.
- Trimming the slabs, if necessary, is done using a sharp stationery knife or saws with fine teeth.
- After installing all the slabs, it is necessary to additionally seal the seams between the slabs with polyurethane glue from a can. It will glue the fibers of adjacent mats together, eliminating the formation of cold bridges.

- I am installing the second layer of insulation. It is placed on top of the first one so that the lower and upper seams run apart. The remaining rules are the same as in point 1. Do not forget to fill the seams between the slabs with polyurethane foam. After final hardening, the excess will need to be cut off with a sharp knife.

- I install insulation into structural elements of complex shape. It is imperative to insulate all sections of the walls. Particularly difficult are usually the bevels, which serve to strengthen the structure. In this case, you need to cut the mineral mat according to the shape of the recess so that it fits as tightly as possible.
As you can see, the installation of insulation itself is a simple operation, but it takes a lot of time. However, the thermal insulation process is not yet over. External thermal insulation must be reliably protected.
Step 4 — Installation of water and wind protection
To protect the insulation from external influences, a special polymer vapor-permeable membrane of increased strength is usually used. Its installation has some features that I want to describe.
The gist is this:
- A film is laid over the insulation layer. The material is secured to the frame beams using staples and a construction stapler. You can use carnations with wide heads:
- Work should begin from the bottom of the wall, gradually moving upward.
- The film panels must be placed horizontally.
- Each subsequent sheet should overlap the previous one by a distance of 10 cm.

- I seal the joints between the individual sheets. To do this, use adhesive tape, which is glued to the joints of the film. At the end of the work, you should get a completely sealed sheet that protects the mineral wool from water penetrating through the outer cladding and a draft blowing in the ventilation gap (more on that below).
- I'm stuffing on polymer membrane counter batten slats. Here, a ventilation gap is simply required, since moisture condensed on the surface of the insulation will be removed through it. The slats are installed horizontally or vertically and secured to the frame using self-tapping screws.

- I attach OSB boards to the slats. I already described the technology for their installation when I talked about the internal lining of a frame house. Therefore, I will not dwell in detail at this stage.

Step 5 - Finishing
The technology for decorative finishing of house facades depends on the chosen material. In my case, it will be a block house, the individual parts of which must be secured to OSB boards using self-tapping screws.

If you are going to use for example vinyl siding, OSB boards can not be used at all, but the lamellas can be attached to a profile mounted on a counter-lattice.
Step 6 - Attic floor

To make it comfortable to stay in a frame house in winter, it is not enough to insulate the walls, because most of the thermal energy losses occur through the attic floor. Therefore, I will briefly tell you how to thermally insulate this surface:
- Hem the ceiling from below with OSB boards. You already know the scheme, as I described it above. The backing will not experience a large load, so it is enough to secure the parts with self-tapping screws with small tolerances on the seams to compensate for the increase in the size of the backing.
- Secure penofol. I also described the rules for installing heat-reflecting material when I talked about the technology of wall insulation.
- Screw the sheathing bars. By the way, they are necessary if you use a vapor barrier with a heat-reflecting layer. It can be replaced with a conventional vapor-permeable membrane. Then the decorative material can be fixed directly on the film, but the overall thermal resistance of the walls (R) will decrease, since the walls will not reflect, but absorb infrared rays.
- Decorate the ceiling surface with clapboard. It is attached with clamps or self-tapping screws.
- Install insulation from the attic side. Mineral wool is placed in the gaps between the attic floor beams, after which it is covered with a waterproofing film and sewn up sheet material(in my case, OSB boards).
Step 7 - Floors

The last stage of work is insulating the floor with your own hands. The technology is practically no different from the ceiling thermal insulation scheme, with the exception of a few small nuances:
- the vapor barrier film is placed on the side of the living room, and the waterproofing is below;
- a tongue-and-groove board is used as a floor covering, which is placed on a counter-lattice;
- if it is impossible to hem the beams from below, the subfloor boards can be laid on the cranial bars, which are screwed to the side surfaces of the beams.
If you have any questions, you can read the separate material on floor insulation.
Summary
The technology described above talks about the thermal insulation of a wooden home from the outside. About how to insulate a frame house from the inside, from the video that I bring to your attention.
If you are interested in even more information about the construction and insulation of a frame house, ask your questions and express your own opinion in the comments to the material.
September 6, 2016If you want to express gratitude, add a clarification or objection, or ask the author something - add a comment or say thank you!
Frame houses are distinguished not only by practicality, but also by attractive external characteristics. This perfect option for those who want to acquire inexpensive but comfortable housing. Today we will talk about insulating a frame house.
Do-it-yourself insulation of a frame house
Design Features
There are two main methods of constructing frame buildings:
- frame-panel (buildings are assembled directly at the factory with ready-made elements);
- frame-frame (all elements are prepared and assembled at the construction site).
In cross-section, the wall of a frame house looks like a multi-layer cake (this can be seen in the image above). It is also worth noting that the frames themselves can be of two types:
- wooden;
- metal.


For a long time, wood has been the main building material, and no wonder - it is cheap, durable, lightweight, easy to process and has excellent thermal conductivity. Metal structures are erected from perforated steel profiles, mostly galvanized (this extends the service life to one hundred years).
Now - directly to the process of insulating a frame house!
Stage one. Choosing a material for insulating a frame house
After it's ready Basic structure, you need to start thermal insulation, and here, of course, there are a lot of questions. And the main one is the choice of suitable material. There are quite a lot of them, but the most popular are polystyrene foam, basalt, eco- and glass wool, extruded polystyrene foam, materials that are sprayed or filled. It would seem that the choice is quite wide, but not all of the insulation described are suitable for frame building.

For example, expanded polystyrene and polystyrene foam are not suitable because if they are placed tightly in the inter-frame voids, then the structure itself will increase in volume in the future or shrink due to natural properties wood, which causes cracks to form between the thermal insulator and the frame. It is quite obvious that through these cracks the thermal energy, and the insulating material itself will no longer be effective. Therefore, a thermal insulator suitable for us must be elastic: even if the shape of the frame changes, there will still be no gaps, since the freed-up space will be filled with this material.
Now let's move on to specifics. Let's look at all the remaining materials, and you can decide for yourself which one is more suitable (in terms of price, quality, etc.).
Option #1. Basalt wool for insulating a frame house
Perhaps one of the most popular insulating materials. It has excellent noise and thermal insulation properties and is produced by melting rock basalt. For this reason, the material is sometimes called stone wool.
Note! The temperature it can withstand is +1000 C, so it is a real fireproof insulation.


The disadvantage of the material is that it absorbs moisture, which is why its main properties deteriorate over time. Therefore, when insulating a frame house, you should protect the basalt wool using vapor and waterproofing materials. We also note that for thermal insulation of walls it is necessary to use the material that is produced in slabs. It is advisable that there is a special marking on it indicating that it is for walls, otherwise after a couple of years the wool will shrink and cracks will form in the wall (namely in its upper part), through which cold air will penetrate.
Option #2. Ecowool
Modern material made from cellulose. It differs from the previous version not only in appearance, but also in installation technology. To insulate ecowool, you need a special machine to mix the material with water droplets; then this entire mixture is driven into the interframe space.

Droplets of water are here for a reason - they glue pieces of ecowool together, forming a monolithic thermal insulator along the entire perimeter of the building. Consequently, there cannot be any cold bridges in such walls. Although it is possible to install ecowool without using special equipment, that is, dry. In this case, it is simply poured between the layers of walls and carefully compacted.
Ecowool is immune to high humidity emanating from the room, so no vapor barrier is needed in this case. The only drawback of the material is the high cost (not only of it, but also of installation work).
Option #3. Glass wool
Another very popular material that can be used in a frame house. It differs from basalt wool in that it is made from molten glass. It is characterized by excellent thermal insulation properties, fire safety and the fact that no toxic substances are released when exposed to fire.

Note! Glass wool is often produced in rolls. You should pay attention to the fact that it must have markings for the walls (this is necessary for a frame-type house).
Option number 4. Bulk insulation materials
These include sawdust, expanded clay, slag, and the like. At one time, this technology was a great success, since it was quite difficult to get good insulating material. But today bulk materials are practically not used. Everything is explained quite simply: their common drawback is that over time they shrink, and thermal insulation properties very doubtful.

Option #5. Glassine
Glassine is thick paper treated with bitumen. The material is often used in construction to protect against wind and moisture, although in reality this is not necessary - the material does not allow moisture to pass through, which comes from the room, and it accumulates in the frame itself.

Note! We do not consider spraying polyurethane foam, although it is very effective and can be applied to almost any surface. Firstly, it is afraid of direct sunlight, which reduces its service life by half. Secondly, its application requires special equipment, and this is not a cheap pleasure. We are talking about insulating a frame house, which in itself implies minimizing costs.
Video - How to insulate a house
Stage two. Preparatory activities
First we need to understand a number of important points, without which the thermal insulation of a frame building can easily turn into a waste of money. First, we note that you need to think not only about the walls, since both the ceiling and the floor can also let in cold air! In addition, the insulating material should be properly protected from moisture using internal/external waterproofing. Finally, when performing installation work, you need to leave small ventilation gaps between the walls and the insulation itself.

Before you start installation work, thoroughly clean all working surfaces from dirt and dust. If protruding screws or nails are found, remove them. And if there are gaps between the frame elements of the building, then fill them with polyurethane foam. Dry all damp areas (if any) using a hair dryer.
Note! If before that outside surface the walls were thermally insulated using waterproofing material, then its re-installation inside the building is no longer required, otherwise an excess amount of moisture will accumulate in the structure and, as a result, it will quickly collapse. Below are instructions for internal insulation only.
Stage three. Waterproofing layer
Let’s immediately make a reservation that the installation technology for all materials is approximately the same. First, measure all the walls of the frame, then, in accordance with the calculations, cut strips of the material that was chosen for waterproofing. Attach the material to the posts using a stapler so that the frame is completely covered.

Stage four. Installation of a vapor barrier layer
Even if moisture-resistant materials are used for insulation, vapor barrier must still be performed. At first glance, these are unnecessary expenses that can be completely avoided. But the fact is that inside the frame there will be not only insulation, but also other elements (for example, wood), which still need protection from steam penetrating into the walls from the room.


Scheme for laying a vapor barrier layer when insulating a frame house
Both a special film and foamed polyethylene can be used as a vapor barrier. Attach the selected material to the frame racks close to the thermal insulator using a mounting stapler. Sometimes insulation blocks are simply wrapped in this material, but in reality this is not necessary - as we just noted, protection must be provided for all frame elements without exception.
The material is laid with an overlap of at least 10 centimeters, and all joints are carefully sealed with high-quality double-sided tape. Also, do not forget the fact that the thickness of the vapor barrier material in no way affects the similar indicator of the insulating material.
Stage five. Installation of insulation
If mineral wool is used for thermal insulation, before starting work in mandatory put on personal protective equipment - a respirator, gloves, safety glasses, special clothing. If you use polystyrene foam (and this material, as we said, is not very suitable), then such safety measures are not needed. When insulating a frame house, lay the material evenly between the frame posts, not forgetting the ventilation gaps required between the thermal insulator and the sheathing. To cut mineral wool, you can use scissors or a regular knife, but for polystyrene foam you will need an electric jigsaw or a hacksaw with small teeth.

Note! Experts say that it is more effective to lay insulation in two layers. So, first there should be a first layer 10 centimeters thick, then a wooden sheathing is laid in a horizontal position, on top of which the second layer is laid (its thickness should already be 5 centimeters). This little “trick” will help avoid the formation of cold bridges.
Place on top of the insulation protective film(if it is necessary, that is, if the outside of the house was not properly insulated). This will ensure that the material will always be in a dry state, and moisture will not get in from the outside.

Note! For the ventilation gap, which has been mentioned more than once, fill the wooden sheathing with a thickness of 3 centimeters.

After this, you can begin installing OSB boards and decorative trim.
Stage six. We sew up the walls in a frame house
The procedure for insulating a frame house is almost complete; all that remains is to sew up all the walls from the inside. OSB boards are often used for this, although you can also use sheets of plasterboard. Although we note that drywall is advisable only in the case of a fairly even frame, otherwise it will take on all forms of irregularities. On the contrary, OSB is much tougher, so it can be used to eliminate minor flaws. Start finishing on top of one of them.


Fastening OSB boards to the frame in the presence of a second floor


Two options for joining plates


About additional insulation
If what is described above is not enough, then you can additionally take care of external insulation (if, of course, it is not already present). If mineral wool was used inside, then lay a vapor barrier on the outside, which will protect the material from condensed moisture. By the way, it can be not only film, but also aluminum foil, although, to be honest, this material is not the best.
You can use the same OSB or plywood as wind protection. The finishing coating can be eurolining, siding or other suitable materials. That's all, good luck with your work and have a warm winter!
Video - Do-it-yourself insulation of a frame house
For year-round operation of a frame house and its long-term service, high-quality insulation is necessary. Everything needs to be insulated - walls, ceiling, roof, floor. What materials and technologies are applicable to solve the problem, and which heat insulators are better to refuse? We will answer these questions and provide step-by-step instructions for insulating a house with your own hands.
Requirements for thermal insulation material
The frames of houses built using “Canadian” technology are assembled from OSB boards or wood. To ensure that the insulation does not cause damage to structures, it must have sufficient vapor permeability – not less than 0.32 Mg.
This requirement in absolutely Corresponding to fibrous heat insulators are mineral wool materials. Popular synthetic insulation, such as polystyrene foam and analogues on polymer based, cannot be used in wooden structures for two reasons:
- Firstly, due to the lack of elasticity, the heat insulator will not be able to adapt to temporary deformations of the wood (shrinkage, increase in volume). The result is the formation of cracks and cold bridges.
- Secondly, polystyrene foam and its analogues do not allow wood to “breathe”. This leads to moisture accumulation, mold and rotting of structural elements.

When choosing how to insulate a frame house, in addition to vapor permeability, you should also take into account the additional properties of the heat insulator. The following indicators are welcome:
- fire safety;
- environmental friendliness;
- low thermal conductivity;
- resistance to shrinkage;
- minimal water absorption.
Choosing the optimal insulation
Mineral wool heat insulators are the most acceptable option for insulating a frame house. Materials are made from different raw materials, which determine basic characteristics and scope of application. The general advantages of all types of mineral wool include: light weight, fire safety, resistance to pests and the necessary vapor permeability.
The main disadvantage of fiber insulators– hygroscopicity. To preserve the insulation properties, mineral wool needs high-quality vapor and waterproofing.
Basalt wool - environmentally friendly and fireproof
The main component of the insulation is rocks of volcanic origin: basalite, diarite and basalt. Stone wool is a completely non-flammable material that can withstand temperatures of 1000 °C. The heat insulator retains its physical properties for 40-50 years.
The main advantages of basalt-based mineral wool:
- low thermal conductivity – 0.36-0.42 W/m*C;
- resistance to mechanical stress;
- good noise insulation characteristics;
- resistance to temperature fluctuations.

The insulation contains hydrophobic additives that ensure rapid removal of moisture. Basalt heat insulator is produced in slabs, the density of the material is 35-50 kg/cubic. m.
The disadvantage of stone wool compared to fiberglass counterparts is less elasticity and susceptibility to rodents.
Glass wool – elasticity and moisture resistance
Basic components of a heat insulator - broken glass and sand. The addition of binding components makes it possible to form rolls from the finest glass fibers. Approximate dimensions of the mats: thickness – 100 mm, width – 1200 mm, length – 10 m.

Features of glass wool:
- high elasticity – the material easily takes on and quickly restores its given shape, which is very convenient during installation;
- vibration resistance;
- not susceptible to mold and unattractive to rodents.
Like stone wool, fiberglass is fireproof. However, in comparison with the previous insulation, loses on several points:
- Unsafe material - installation is carried out in a respirator and protective clothing. The fibers are very fragile and when cutting, a lot of “glass” dust is released.
- Shrinkage of the heat insulator - over time, the risk of the formation of cold bridges increases.
Ecowool – versatility of use
A new word in the segment of thermal insulation materials -. The material is 80% recycled paper. Additional components: boric acid and sodium tetraborate. Minor ingredients provide protection against microorganisms and reduce flammability.

Distinctive features of ecowool:
- Ecowool – bulk insulation, and therefore the technology of its application is radically different from working with sheet mineral wool. To create a thermal insulation layer, special equipment is required - a pneumatic inflatable device.
- At poor quality insulation frame house walls exist risk of ecowool shrinkage, which is fraught with the formation of uninsulated zones.
- The material is not recommended for use near open sources fire, fireplace pipes and chimneys. A protective layer of basalt foil-clad fireproof mats or fencing made of asbestos-cement slabs is required.
The main advantages of ecowool: environmental friendliness, the possibility of insulation hard to reach places and high sound insulation qualities.
“Warm wood” - an alternative to mineral wool
This group is represented mats and boards made of wood fiber materials. The technical and operational characteristics of the insulation are at a fairly high level:
- good thermal insulation - thermal conductivity is comparable to that of mineral wool;
- preservation of the structure even when wet - the properties of the insulation do not change when absorbing moisture in a volume of 20% of its own weight;
- high strength and excellent sound insulation – protection from impact and “air” noise;
- sufficient density and elasticity - the insulation is attached between the frame posts without additional fasteners;
- environmental friendliness of the material and safety of installation work.

Wood fiber insulation “breathes” and helps maintain a comfortable microclimate in the house. The disadvantages of a heat insulator include: high cost and flammability.
Thermal insulation with mineral wool: step-by-step instructions
In most cases, for insulation frame structures used mineral wool in the form of mats. Therefore, subsequent instructions will be based on working with this material.
Preparatory activities
The first thing you need to do is understand the structure of the insulation cake, calculate the material and prepare the surface for installation. It doesn’t matter which side to start the work from - outside or inside. Some people believe that it is more convenient to perform thermal insulation from the street side. However, weather factors must be taken into account.

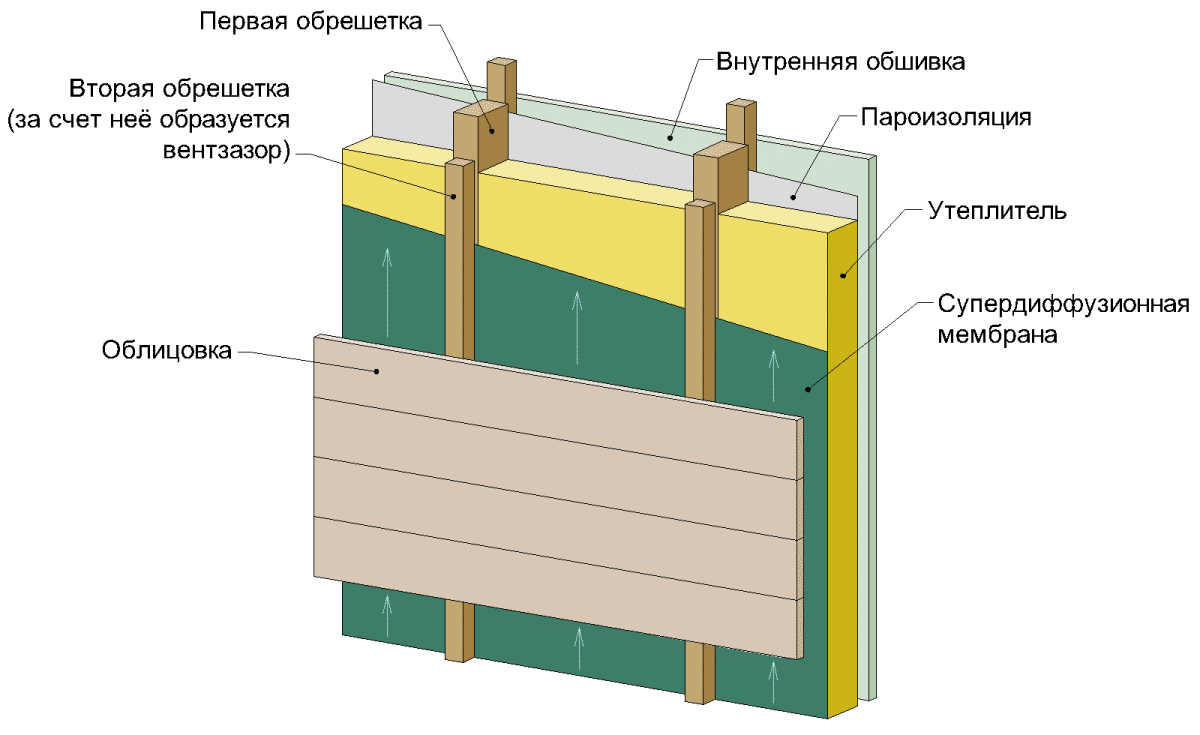
The standard structure of a thermal insulation cake with the order of layers from the internal cladding to the facade of the house:
- Decorative finishing indoors.
- OSB board.
- Vapor barrier.
- Insulation layer.
- Windproof membrane.
- Lathing made of bars for arranging a ventilation gap.
- OSB board.
- External cladding.
Recommended pitch of frame beams – 580-590 mm. This range is optimal when using standard mineral wool mats with a width of 60 cm. According to the standards, the thickness of the insulation for temperate climate– 150 mm. To fill the space between the beams of 15 cm, it is advisable to use mineral wool of two sizes: 50 and 100 mm.
Surface preparation comes down to cleaning off dust, removing protruding nails and blowing in the cracks with foam between the frame elements. Before installing the insulation, you must check wooden structures for the presence of dampness, dry problem areas with a hair dryer.
Interior finishing: sequence of layers
First you need to prepare the base for laying the insulation. WITH inside at home this role will be fulfilled vapor barrier film and OSB boards.
Procedure:
- Roll out a roll of insulating material and cut it to the size of the walls of the house.
- Secure the vapor barrier sheets one by one to the vertical posts of the frame using a stapler. Installation rules: insulating strips are directed perpendicularly wooden beams, minimum overlap – 10 cm.
- Check the tightness of the protective layer.
- Cut OSB boards with a jigsaw.
- Secure the panels to the frame, covering the vapor barrier film.

In the future, OSB boards will serve as the basis for applying the final finishing to the walls.
Rules for installing insulation
An important advantage of using mineral wool or wood fiber insulation is the ease of installation with your own hands. Both heat insulators are quite elastic, so they do not require additional fixation. The slabs are inserted between the frame posts and are held in place due to the slight difference in size.
To ensure that the thermal insulation layer does not lose its effectiveness over time, it is necessary to observe certain rules its installation:
- Laying is done in two layers, the slabs are placed in a checkerboard pattern. The second row of mineral wool should overlap the joining seams of the first in the middle. This technique prevents the appearance of “cold bridges” that contribute to the accumulation of condensation and dampness.
- Insulation boards need protection from strong winds and precipitation. By analogy with internal wall, the heat insulator is sheathed with a special hydro-windproof membrane.

The film insulation is fixed with a stapler. For more reliable fastening, you can use a counter-latching system.
External wall cladding
The bars attached on top of the wind barrier create the necessary air gap between the thermal insulation material and the exterior finish. Further insulation of the facade depends on the material of the finishing cladding.

Under and siding of different types, moisture-resistant OSB boards are nailed onto the sheathing, to which guide bars are attached. Artificial, a natural stone or facade tiles laid directly on oriented strand boards.
Thermal insulation of a house roof
High-quality roof insulation is of great importance in preserving heat. Thoughtful and well-executed thermal insulation of the roof of a frame house saves 25-30% of thermal energy.
A popular insulation option is placing mineral wool between rafter legs. Roofing pie must be supplemented with a vapor barrier film and a diffusion membrane.

Let us describe sequentially, how to properly insulate a roof:
- Stretch a water-repellent diffusion film along the outer end of the rafters. Secure the membrane with a counter-batten.
- Lay insulation on the inside of the rafter system. Thermal insulation is placed in two layers 100 mm thick, the installation pattern is a checkerboard layout.
- Cover the mineral wool with a vapor barrier film, observing horizontal laying vapor barrier in the direction from bottom to top. The overlap of film insulation is 5-10 cm.
- Cover the ceiling with OSB, plasterboard, plywood or clapboard.
Exterior finishing the roof is carried out using counter-lathing. Sheathing bars are nailed onto the slats, creating a ventilation gap. OSB boards or directly roofing material (slate, corrugated sheeting, metal or flexible tiles) are attached to the top.
Insulation of the first floor floor
A lot of heat also escapes through the foundation of the house - about 15-20% of heat costs fall on the floor. Alternatively, you can organize a water underfloor heating. However, it is easier and cheaper to insulate the base with mineral wool.
The described technology is suitable for insulating interfloor or attic floors.
A variety of methods for using ecowool
The second most popular material for thermal insulation of frame buildings is ecowool. But here it is better not to experiment and entrust the work to professionals. Mechanized backfilling will ensure the required density and uniformity of laying.
There are three methods of using ecowool:
- dry "spray";
- wet application;
- glue method.
Dry method applicable for horizontal surfaces, inclined closed cavities, filling interfloor ceilings And non-demountable structures. The packing density of ecowool using this method is 45-65 kg/cubic meter. m depending on the slope.
Wet technology Suitable for vertical open walls. Ecowool flakes are moistened and applied to the surface under pressure. The density of the thermal insulation layer is about 65 kg/cu.m. m.

The adhesive method is similar to the previous one, but instead of water, an adhesive component is added. Advantages of the technique: high adhesion of the insulation to the wall, elasticity of the material and low deformation after drying. Glue method indispensable for thermal insulation of flows from below; this option is also suitable for treating walls.
The issue of insulating a house needs to be thought through at the construction stage. This is more profitable from a financial point of view and technically correct. Structural elements are insulated as the building is erected, and there is no need to carry out major renovation buildings after commissioning.
Video instructions for do-it-yourself thermal insulation
More information about the technology of home insulation is described in the video.
In contact with
Classmates
Construction of a frame house is a process of sequential step-by-step creation of all structural elements of a building.
Wherein the order of work is strictly defined, changing or disrupting the sequence of actions is impossible - all operations are interconnected and logically follow from one another.

Proper insulation of a frame house is not a separate event, carried out if possible or desired. This an obligatory part of the technological process, one of the stages of construction.
Thermal insulation for the walls of a frame house is a fairly simple process, but responsible and requires a clear understanding of the physical meaning of the actions. Its peculiarity is that no trifles that can be ignored are recognized - any shortcomings are equated to serious violations of technology, leading to the failure of many elements of the wall structure. Let's consider the issue in more detail.
Requirements
Insulation - component frame house wall systems. This is not an additional measure that enhances overall functionality, but a standard part of the design.
Little of, the walls of a frame house consist almost entirely of insulation- it accounts for 3/4 of the volume of all materials.
In addition, insulation is the main part of the wall; all other elements, in fact, solve the issues of structural rigidity and protecting the material from moisture and maintaining its working qualities. The importance and responsibility of the tasks performed are put forward to The insulation material has a number of requirements:
- Low thermal conductivity.
- Low density, light weight.
- No reaction to the appearance of moisture, low (ideally no) hygroscopicity.
- Constancy of shape, absence of shrinkage or swelling of the material.
- No harmful emissions such as formaldehyde, phenol, etc.
- The composition of the material should not encourage the appearance of insects or rodents.
In addition to the listed properties, An important quality of insulation is rigidity. Some types of materials are produced both in a rigid state (slabs) and in a liquid state, requiring special equipment for application, which significantly complicates the work process and requires experience and skills. For independent work much more convenient materials, which do not require the use of additional equipment.
Main types of insulation

The list of materials that are used for thermal insulation of frame walls is quite wide.
Available in the form of slabs, rolls, granules, powder.
Main groups of insulation by origin:
- Mineral. Basically, these are various melts of minerals, slag or glass, technologically converted into wool - mineral wool, glass wool, slag wool, etc.
- Natural. This group includes various modifications of sawdust or shavings (arbolite, chip concrete, etc.), wool, ecowool, reed mats, etc.
- Synthetic. Various materials obtained by chemical means, for example - polystyrene foam, polystyrene foam, polyurethane foam, isofol, etc.
Typically in practice Most often, frame walls are insulated with mineral wool and polystyrene foam. For this they use Various types mineral wool, glass wool or synthetics - polystyrene foam, expanded polystyrene, etc. They are reliable, lightweight and do not put too much strain on the wall frame; in addition, insulating the walls in a frame house with your own hands is quite a feasible task.
Tools and protective equipment

The method of installation of the material largely depends on its properties and form of release.
Some simply need to be precisely cut to the shape of the spaces between the step posts, while others require special equipment and protection.
For independent work, insulation materials are usually used, which allow installation with minimal use of equipment and protective equipment. However, if glass wool is used as insulation, basic protection will be required. For work you may need:
- ABOUT sharp knife. Shoe material will not work, as the insulation can be up to 200 mm thick. You need a knife with a fairly long blade.
- Polyurethane foam. An excellent means of sealing cracks and gaps.
- Hammer, small nails, thick threads. All this is useful for temporarily fixing the insulation in the sockets.
- Putty knife. It will help to tuck the material tightly into the cracks.
- Latex gloves. When working with prickly materials such as glass wool, they are indispensable.
- Respirator. Inhalation of dust and small particles of insulation can lead to various diseases, so respiratory protection will not hurt.
Often when working with insulating materials use a full protective suit, covering the entire body and face. The measure will not be unnecessary when using liquid spray materials that create a suspension in the air and can get on skin, hair or clothing.
Preliminary preparation
The insulation is installed on a wall frame that is fully prepared for this.
The following items should be ready at the time of installation:
1.
Fully assembled - racks, and top harness, jibs and other elements.
2.
Installed outer skin from OSB, chipboard, plywood or similar sheet materials.
3.
Installed waterproofing membrane(or other roll-type waterproofing material), all joints are connected with tape, there are no gaps or cracks.
That is all operations that cannot be performed with installed insulation must be performed, and then the walls of the frame house will be insulated from the inside. If it is done using the platform method, i.e. in a lying state, then the insulation is attached only after lifting the wall and aligning it with the markings.
Technology
How to properly insulate the walls of a frame house? How to properly install insulation in frame walls? As mentioned above, there are several types of insulation. The insulation scheme for the walls of a frame house has its own characteristics for each of them.. Let's consider one representative from each species.
Mineral wool

Frame houses: insulating walls with mineral wool for such prefabricated structures is very common. It is best to choose basalt slab wool.
It has sufficient rigidity and does not lose its shape during installation. The thickness of the slab is selected so that it corresponds to the width of one or more layers.
Important! The insulation should not be thicker than the width of the studs!
Insulation of the walls of a frame house with mineral wool is carried out as follows:

1.
First of all, a waterproofing layer must be installed. Strips of rolled material are attached in horizontal rows, starting from the bottom. The joints are insulated with special tape.
2. Mineral wool slabs are cut into pieces, exactly matching the width of the frame slots.
3. The cut parts are inserted into the sockets. If necessary, use a spatula to tuck the edges.
Attention! When working with a spatula or similar tools, be careful not to damage the waterproofing layer!
4. The installed parts of the insulation are fixed in place using thick threads, looped over small nails driven into the studs. If you don’t want to spoil the waterproofing layer with nails (and this is inevitable), then Insulation boards should be cut and installed as accurately and tightly as possible.
5. The joints of the pieces of material are glued with special tape. As an option - sealed with polyurethane foam. There should be no gaps.
6. On top of fully installed insulation a vapor barrier layer is attached. Its installation is carried out similarly to waterproofing - horizontal rows, starting from the bottom, the rows are overlapped by at least 150 mm, the joints are reinforced with tape.
All layers of the cake must be sealed, without cracks, holes or other damage.
Important! Even a small hole or gap will definitely cause the materials to become wet and the wood to rot!
Styrofoam

First of all, it is necessary to select the thickness of the material slabs in order to ensure the most favorable ratio of the thickness of the insulation and the width of the racks.
If necessary, you can use a combination of several plates with different thicknesses.
Insulation of the walls of a frame house with foam plastic is done in the following order:
- The first layer is roll waterproofing.
- The material is cut to the size of the nests. It is better to cut with a fine-toothed hacksaw, being careful not to crumble the material.
- Installing polystyrene foam into the nests. Keeping in mind the rather fragile structure, you should not use force to drive the piece into the nest; it is better to trim it. It can be temporarily fixed with small wedges.
- All existing cracks and joints are filled with polyurethane foam.
- After crystallization, excess foam is trimmed with a knife.
Sawdust

Sawdust is a cheap and accessible material. They are mainly used as insulation in the form of various connections with cement bonds.
IN pure form they are too dangerous from a sanitary point of view, in addition, they are susceptible to rotting and easily absorb water.
In addition, the use of bulk materials for wall insulation is almost impossible, since it will not be possible to achieve the required density of filling the nests. The cavities that appear in the thickness of the sawdust will inevitably create cold bridges, which will completely disrupt the operation of the insulating cake and cause the frame and sawdust to get wet. That's why You can only use derivatives - wood concrete or other slab material.
Insulating the walls of a frame house with sawdust is done in the same way:
- A waterproofing layer is installed.
- The plates are cut into appropriate pieces and inserted into the slots.
- The cracks, joints or gaps are filled with polyurethane foam, which is trimmed after crystallization.
- A vapor barrier layer is installed.
Important! Using sawdust is a questionable decision because it favorable environment for insects or rodents, and they also rot and absorb water. The presence of such circumstances makes the use of sawdust the least successful choice of all possible.
Useful video
How the walls of a frame house are insulated is additionally described in the video below:
conclusions
Self-installation of insulation usually occurs in conditions of limited tools and lack of proper experience and skills. Since it is very important to properly insulate frame walls, it is recommended to use the most successful types of materials that do not require equipment and do not have serious restrictions during the installation process. The simpler the material is to work with, the better the result and there will be no consequences.
Taking on a job without having the skills to handle insulation is a hasty decision. In any case, it is necessary to first study the technology, especially the physical meaning of the processes occurring in the thickness of the pie. Then the work can be beneficial and provide coziness and comfort in the home.
In contact with