This option and type of gate will be optimal for self-made. This does not require much time or any specialized skills. Basically, to make a gate with your own hands, you will need:
- welding machine;
- metallic profile;
- rollers;
- The shield itself is for the gate.
Basics of work
First, you should finish any work inside the garage. The design feature means that dust getting into the guides or rollers can interfere with normal operation and malfunction. Again, the floor should be finished after installing the gate, since it (the frame) must go at least 2 cm deep. The walls and garage opening must be level so that the guides can be easily installed.
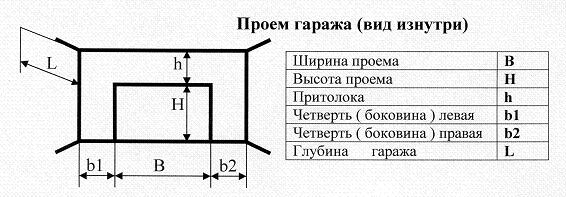
The next step will be to take measurements of the opening. This is how you can determine what height the guides are needed and what size the shield will be. In Fig. 1 is an example of what sizes you will need.
Frame making
The next action that should be taken is the manufacture of the frame, the base of the gate. Here are several options available for use:
- steel structure can be used;
- can be used wooden blocks.
The final choice is yours, but still, metal will be more reliable. As soon as the frame is welded, it should be tried on in the opening to eliminate various errors or miscalculations. If the frame is level, you have checked its position both horizontally and vertically, it should be secured at least with anchors. Your frame should look like this:
If you have gaps between the wall and the frame, the gaps should be blown out construction foam, and then secure the horizontal guides that should be under your ceiling.
After you install the frame, you should weld the brackets for the rollers to the guides and install the rollers themselves. The upper brackets with rollers should be installed a little further forward. This will ensure normal work– the gate will not cling.
The image below gives you a closer look at what your frame should look like from the outside.

Selecting and creating a gate shield
Since it will be located outdoors, the shield should be made most resistant to various climatic conditions. The shield is made from any available materials. It can be:
- wooden blocks covered with metal on the outside;
- you can use a solid sheet of metal;
- you can make a frame from several steel profiles, With minimum distances from each other, and then sheathed with pieces of metal.
Again, no one forbids you to use it as finishing material Let's say plastic. In this case appearance your gate will be aesthetically pleasing. Moreover, the color of the plastic is offered in a wide range.
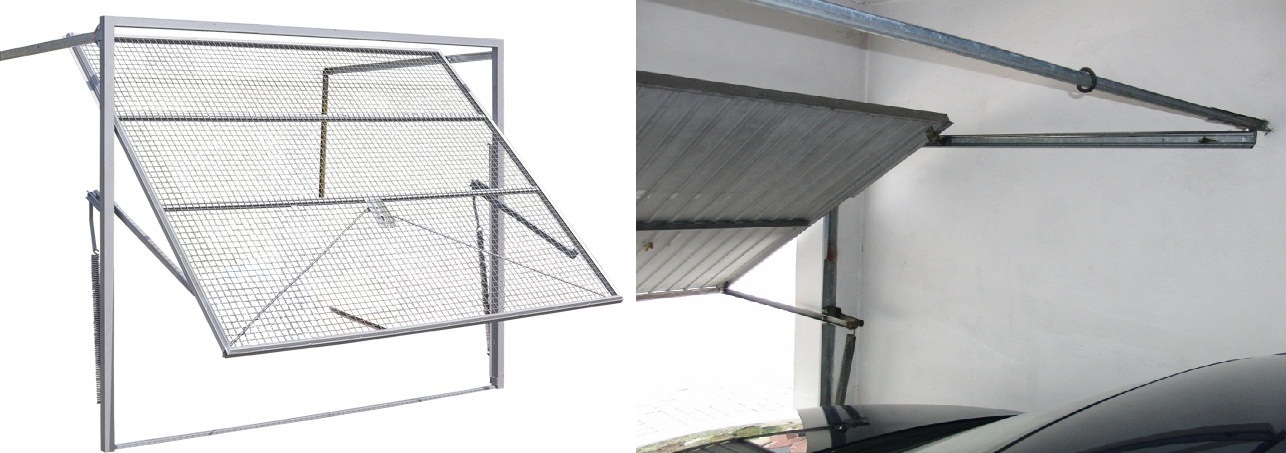
In the picture below, you can see ready-made options. In the first case, a solid a metal sheet, in the second - a shield covered with metal is presented.
When making a shield, there are several little tricks that will be relevant for any owner.
Firstly, you can knock down your gate special materials which will help keep the room warm even in frosty weather. Such materials will be quite easy to find. And hitting the gates with them will not be difficult and will not take time.
Secondly, it's worth giving one more helpful advice. In order not to once again use the entire structure of the gate, and not to open it completely, you can make a gate in the shield through which the owner can enter. In the figure below you can see an example of such a solution.

Many people make windows in the gates. In this case, you also have two solutions. You can cut a hole in the canvas and seal it yourself with glass or plastic, or you can buy a ready-made gate window at a specialized store.
Having completed all the work, the finished shield should be placed on the runners and the functionality of the structure should be checked. Next, install (weld) the springs. They will ensure smooth opening/closing of the gate, and will also facilitate this process.
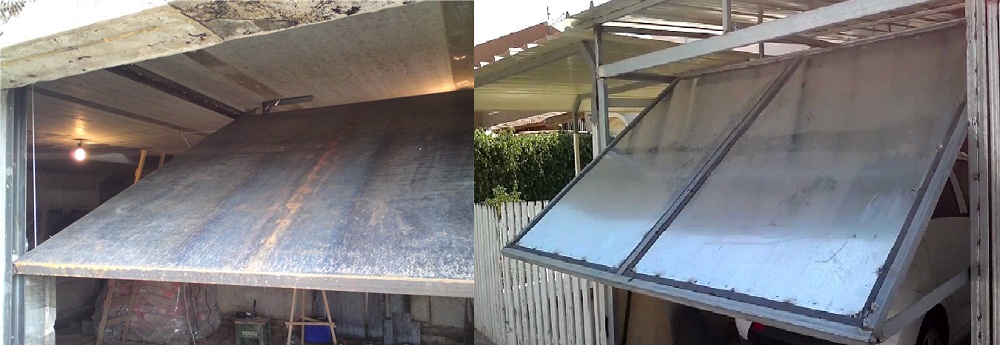
In the photo below you can see the finished structure, how it should look outside and inside the garage.
Installation of additional parts
These include:
- handles for opening;
- latches for fixing the gate;
- locks and temples.
Handles should be made at the bottom of the canvas, both from the inside and from outside. This approach will allow you to easily close and open the gate without clinging to the edges with your fingers. And in the cold season this will be very problematic.
The latches should be installed with inside canvases. So, if you have made a gate, you can only open the gate from the inside. This will completely secure your garage. If the garage is attached to the house, and there is an entrance to the garage from the residential part, then the purchase and installation of latches and latches can also be called the optimal solution.
If the garage is a separate building, then it should be closed with special locks. Or, you can buy ordinary, hinged ones, having previously made bows on the canvas and on the vertical frame (on the side facing the street, outward).
In fact, this will be the final stage self-installation and creation overhead gates with your own hands. All you have to do is paint the frame and the shield in the desired color, or, as mentioned above, do the upholstery of the shield thermal insulation materials or soundproof.
But this is not all the work that can be done. Eat alternative options in the mechanism, as well as modification of existing gates.
In particular, you can install a counterweight system. To do this you will need a winch and cables. In this case, a smoother ride can be achieved, and it also opens up greater possibilities for modifications.
The basis for safe operation
In the process of working on the gate, having finished the basics and checking the functionality of the structure, it is worth taking care of safety. It is necessary to make stoppers that will not allow the canvas to leave the guides. This is very important point which can protect you from injury.
Gate automation
In most cases, overhead gates, which are created with your own hands, open and close manually. It's simple and reliable. But, on modern market We offer a wide range of various drives that can be installed on your gate. In this case, you can open or close the gate only by pressing the corresponding key.
Installing such a system will also be quite simple. The drive, along with the necessary components, is sold in any store specializing in the sale and installation of gates.
Again, you can make your gate open remotely. It's very simple. On almost all drives you can find a control panel, and in the instructions you will find sawing of the contacts. Connecting everything correctly will not be a problem - it will be difficult to give an example here, since different manufacturers use their own standards. But in any case, such information can be found in the instructions for the drive.
By installing the drive, you will receive a gate that is in no way inferior to the factory one, with the ability to open remotely, with all the advantages and features, but much cheaper. The final appearance of the DIY gate can be seen below.
By following this guide, you will surely be able to create your own gate easily and simply. And you can see the results of the work of other people who also set out to create lifting gates with their own hands in the video below.
Video - Do-it-yourself lifting gates, drawings and assembly features
16.07.2014
If there is a small space in front of the garage, overhead gates will come to the rescue. Their design involves lifting the sash to the ceiling. This is much more convenient than conventional swing options. Of course, there are a lot of similar designs from various manufacturers in stores. But you can make lifting ones. It will cost much less than purchasing a ready-made structure. And installing an automatic drive will allow you to control the gate remotely.
Features of overhead gates
Before you start making gates with lifting mechanism It’s worth finding out how they differ from other types, what advantages and disadvantages they have. This will help make sure that this type device is the one that is needed.
Quite often these days you can find overhead garage doors. It's easy to make them with your own hands. The main thing to start with is to decide on the design of the gate. In any case, the overhead gates perform their functions. In addition, overhead gates have a number of advantages over other types. They can be used in any room, regardless of size.
Types of gates
Lifting gates are divided into two types:
- Lifting sectional. The door leaf consists of several parts that are connected to each other by a rigid structure. As they rise, they bend and gather. When lowered, the assembled sections are straightened and leveled to their original (flat) position.
- Rotary. Unlike previous type, V in this case The main door leaf is not subject to deformation. The principle of their operation is that the sash rises along a curved path. In this case, the upper part goes slightly deeper inward. The remaining part of the sash rises from the outside.
Installation garage doors with the lifting mechanism in two cases it happens almost the same way. And you can do it yourself.
Advantages of overhead gates and their disadvantages
Homemade overhead garage doors have a number of undeniable advantages that set them apart from other types of devices. The main advantages are:
- Space saving. To raise the sash, a space under the ceiling is used, which, as a rule, is never used. Due to this, there is no need to waste useful meters on the ground next to the garage.
- The doors are a single piece. And this is reliable protection from the entry of strangers.
- It is possible to insulate the doors. Most often, polystyrene foam is used for this.
- It is possible to install a mechanism for automatic lifting.
- Suitable for installing not only single, but also double garages.
- The external finish can be any, due to which the gate will harmoniously fit into the decoration of the garage and the design of the entire site.

The disadvantages of overhead gates stem from their design. There are not many of them, but there is no need to write them off. The disadvantages include:
- A solid sash leaf cannot be partial repair. If damaged, it must be completely replaced.
- Gate installation is only possible in rectangular openings.
- Installation requires certain knowledge.
- The gate rises upward, thereby reducing the height of the opening.
- Insulation must be taken into account in advance. The fact is that the lifting gate mechanism is designed for a load of a certain size. An additional layer of insulation will increase the load on the mechanism.
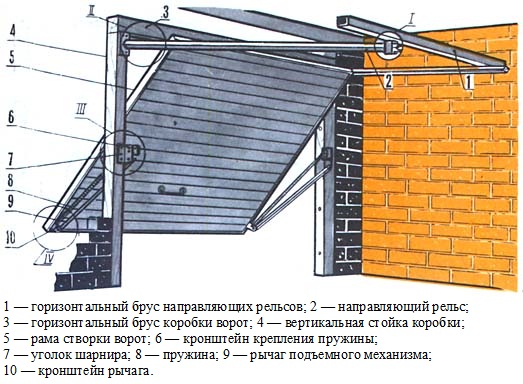
The design of the gate and the principle of its operation
The main structural elements that bear the load are the frame, guides and a mechanism for moving the blade. The gate opens automatically (using remote control) or manual mode.

Levers are attached to the bottom of the sash. At the upper ends there are two more guides along which the rollers move. With the help of these elements, the sash is lifted. To do this, you just need to pull the handle, which is located at the bottom of the canvas. There are no difficulties with this, since springs in an extended state come to the rescue. The sash lifting diagram can be seen in the picture above.
Lifting mechanisms
The lifting mechanism can be of two types:
- Lever-spring. This is the most popular mechanism among garage owners. It is distinguished by its simplicity of design and reliability. Manufacturing metal gates with a similar mechanism requires precise adjustment of springs, precise installation of guides (along which the rollers will later move).
- If the sash is heavy, preference is given to a mechanism with a counterweight. In this case, a winch is used. A counterweight is attached to one side, which is connected to the other edge of the sash using a cable.
The choice of a suitable mechanism is made taking into account the specific situation.
Preparatory work
Before making and installing overhead garage doors with your own hands, you need to carry out preparatory work.
The surface of the walls and ceiling must be flat so that the guides can be installed without tilting. Any dust that gets on the rollers or guides can disrupt the operation of the entire mechanism. Therefore, all construction and Finishing work the inside of the garage must be completed. This doesn't apply to gender. This is due to the fact that the frame extends inside by at least 2 centimeters. Therefore, it will be necessary to complete the construction of the floor after the installation of the garage door has been completed.
The opening must be ready for installation of the gate frame. Basic calculations are made using it. Therefore, you need to know its dimensions. The dimensions required for the construction of the gate are described in the drawing of a lifting garage door in the picture below.

Required materials and tools
Depending on the size and chosen gate design, the number necessary materials may change. But at the very simple solution For the manufacture of metal gates you will need:
- Wooden blocks 120x80 mm for the box;
- Wooden bars 100x100 mm for the ceiling;
- Metal pins to secure the structure;
- Metal corners 35x35x4 mm for making a frame;
- Metal corners 40x40x4 mm for rails;
- Channel 80x45 mm;
- Spring with internal diameter 30 mm;
- Metal rod with a diameter of 8 mm;
- Cloth for the sash.
This is a set of necessary materials for the manufacture of gates with manual lifting mode. If desired, you can purchase a drive to automate this process. The list of required materials may be changed or supplemented. It is difficult to describe everything in detail, down to the screw or screw. After all, every even minor change in the design of the gate will entail a change in this list.
In order to assemble and install overhead garage doors with your own hands, you will need an angle grinder, a drill with drills for metal and wood, and a welding machine. You will also need other tools that every owner has: a hammer, a tape measure, a screwdriver, spanners, level, pencil.
Construction stages
Gates from corrugated pipe are manufactured in accordance with the following steps:
- Preparation and assembly of the frame;
- Installation of rollers;
- Making the sash;
- Fastening additional elements.
These steps explain how to make your own overhead gate. Next, we will consider each stage in detail.

Frame making
The basis on which the gate will be attached is the frame. It is on it that most of the load of the entire structure will lie. The work begins with its manufacture.
The list of required materials includes wooden blocks. This is the simplest and economical option. They can be replaced metal structure, which would be a more reliable option. But everyone makes their own choice. This has virtually no effect on the installation process.
A box is assembled from the bars. To connect them use metal corners or plates. Bottom bar must be recessed into the floor by at least 2 cm. This must be taken into account during the assembly process. When the box is twisted (in the case of metal, welded), it is checked. It is placed in the opening and the position is checked vertically and horizontally. If the frame is positioned correctly, it is secured with anchors ( metal pins) with a length of 30 cm. They are taken at the rate of 1 pin per 1 linear meter.
After this, horizontal guides are installed, which are located under the ceiling.
Installation of rollers
Once the frame is installed, you can begin attaching the caster brackets. To prevent the gate from clinging, the upper brackets are attached a little deeper than the lower ones. This can be clearly seen in the picture below. Bolts are used to secure the rails. At this stage it is very important to accurately measure the level.
Clamps are installed at the edges of the rails. They will hold the rollers, thereby keeping the blade in the open (closed) position.

Preparing the sashes
The shield itself, which will serve as a gate leaf, can be made of various materials. But, since it will provide reliable protection for the garage and will be exposed to external climatic influences, it is better to choose more resistant materials. These may be the following options:
- Frame made of wooden blocks, upholstered on the outside with metal sheets;
- Use a solid metal sheet;
- Frame from metal profiles sheathed with metal.
The finishing (outer) layer can be anything, even plastic. To protect against frost, the shield can be covered with a layer of insulation.
To prevent the gate from the corrugated pipe from opening completely each time, you can make a gate in the shield. It will be possible to enter (exit) through it without using the entire structure. Some garage owners also include a window in the sash. If necessary, it is easy to install.
When the shield is ready, it is installed on the guides and the functionality of the mechanism is checked.
Additional items
Gate installation is completed with the installation of additional elements. These include handles, locks, and latches for securing the gate.
Handles are necessary to make opening (closing) the gate more convenient. If they are present, there is no need to cling to the edge of the sash. It is more convenient if the handles are located at the bottom of the shield. And both outside and inside.
If the gate is equipped with a wicket, then you can make a latch inside. This will allow you to protect your property. This technique will allow you to open the door only from the inside. The same solution can be used if the garage is attached to the house and a door connects them.
If the garage is separate and there is no gate, it is necessary to provide locks. If it is not possible to buy special ones, then you can hang regular ones. This is done using bows that are attached to the canvas and outside vertical frame.
The production of metal gates with a lifting mechanism is being completed external finishing designs. They are being processed protective equipment, paint, attach finishing materials.

Automation system
An automatic drive can be installed on overhead garage doors. This will increase prices for the entire structure. But the level of comfort will also increase significantly. There will be no need to open (close) the gate manually. Everything can be done using remote control. At the same time, it is important to choose the type of drive that suits your overhead garage door. Their prices are in the range of 300-800 euros.
Installing the drive won't be much of a problem. The instructions indicate the cutting of the contacts, which will need to be followed. It is difficult to give an example, since each manufacturer has its own connection standards.
By connecting the automatic opening system, lifting gates manufactured and installed on your own will not differ from the factory ones. This will make it possible to control it remotely using a remote control.
So, by following a few simple steps, you can get overhead garage doors. In addition to significant savings Money, this will also entail a lot of other benefits. Similar design saves space. No gate required free space in front of the garage as in the case of the swing option. They take up space under the ceiling that is not used in other situations. Independent choice materials for the manufacture of the structure will allow you to do everything in accordance with your views and requirements. Device addition automatic drive will increase the level of convenience when using the gate.
Tile adhesive is a composition of cement, sand, chemical additives and plasticizer. It is designed for gluing mosaic, ceramic and other tiles. From the moment the composition of tile adhesive for external and interior works in the form of specialized dry mixtures, the speed and quality of finishing have increased manifold. Tile adhesive is usually heat-resistant and is characterized by high load resistance, elasticity, adhesion to surfaces, moisture resistance, etc. One of the most important advantages of the tile adhesive composition is low consumption and high degree of retention of tiles, natural stone, gypsum boards, etc.


[ Click on photo
for increase ]
Tile adhesive is a composition of cement, sand, chemical additives and a plasticizer. It is designed for gluing mosaic, ceramic and other tiles. From the moment the composition of tile adhesive for external and internal work appeared in the form of specialized dry mixtures, the speed and quality of finishing have increased many times over. Tile adhesive is usually heat-resistant and is characterized by high load resistance, elasticity, adhesion to surfaces, moisture resistance, etc. One of the most important advantages of the tile adhesive composition is low consumption and high degree of retention of tiles, natural stone, gypsum boards, etc.
Technologies
Polyurethane adhesive - application features
Polyurethane adhesives are synthetic adhesives that are obtained from substances used to synthesize polyurethanes. Polyurethanes are polymers that are film-forming substances that have increased resistance to gasoline, acids, oils and other aggressive substances
How to choose heat-resistant tile adhesive
Using heat-resistant tile adhesive, ceramic clinker tiles are laid, insulating materials, concrete blocks, a natural stone, glass, mosaic panel, wooden panels
Frost-resistant tile adhesive for outdoor use. Description and Application
Frost-resistant tile adhesive is not afraid of temperature differences, does not deform, has high strength and a high degree of adhesion
Ready-made tile adhesive: application features
When working with ready-made adhesives, complex and messy work on diluting mixtures is not required; laying ready-made tiles on tile adhesive is easy and simple
Two-component tile adhesive. Features of use
Polyurethane two-component adhesives are used for gluing PVC tiles, ceramics, earthenware, concrete, metal, wood, polystyrene on absorbent and non-absorbent substrates, also on industrial and sports floors
Many of you have encountered the need to lay tiles in an apartment or house, since it is not always possible to entrust this task to professionals. Therefore, you have to become professionals yourself, and often in a completely new business.
So, if you have already purchased tiles, you have found free time and the desire to stick it on, then all that remains is to prepare the adhesive mixture needed for the job. It's not difficult, you just need to have the necessary components and know some features.
The mixture is usually made from cement and sand. Cement is a binder and sand is a filler.
The sand should not be large, the maximum diameter of the grains is two millimeters.
Sand and cement must be homogeneous in composition and not contain any impurities, including clay.
The ratio of cement and sand for a dry composition is taken as one to three. That is, for one bucket of cement, take three buckets of sand. In this case, the measure is the volume of materials, not their weight.
The dry mixture is mixed with water. But before adding water, the sand and cement must be mixed thoroughly and evenly. The finished composition should be similar in density to sour cream.
The finished glue should be used immediately, without waiting until it begins to harden.
If the solution has hardened and you have not had time to use it, under no circumstances should you dilute the glue with water. Otherwise, your efforts will be in vain, as the tile will simply fall off.
If the glue hardens, it is better not to be lazy and make a new one.
Using this glue you can lay ceramic tiles not only indoors, but also outdoors. In addition, tile adhesive based on cement and sand is suitable for facade works, for applying mosaics. The surface on which the tiles are laid can be made of different materials- made of concrete, brick, cement plaster or plaster. This glue is universal in use.
Dry mixture for cement based You can also buy it in the store. Typically, cement-based glue dries within 24 hours. Therefore, manufacturers often add accelerators to ready-made dry mixtures. Some ready-made mixtures dry in twenty minutes. If you use such a “quick” mixture, do not rush to grout the seams right away. It is advisable to do this the next day.
If cement-based adhesive is not suitable for the job (tiles are glued to a non-rigid base, for heated floors or outdoor work), then you can purchase a ready-made elastic paste made from synthetic binders. Sometimes such pastes are sold in dry form, in these cases they need to be diluted with water. Elastic pastes, like cement-based adhesives, are quite versatile. Due to the fact that manufacturers use many different components in these pastes, they are usually frost-resistant, water-resistant and economical. Some compositions can even be used for putty work or grouting minor defects.
Before you start gluing tiles, you need to “evaluate” the scope of work and calculate which adhesive will be more economically beneficial for you, then you can choose a ready-made cement mixture or elastic paste, or glue made with your own hands.
If you nevertheless decide to visit a hardware store and purchase ready-made glue, then carefully read the instructions for use before use. Since various manufacturers give for their products different recommendations by application. This applies to the amount of water, mixing and holding modes before work.
Be attentive and confident. And you will succeed!
Several of the main elements that are used in ceramic tiling are the mixture and crosses for laying tiles. And the mixture becomes quite an interesting point, since there are a number of its varieties, and in addition, you can use both a regular solution and special adhesive compositions.
Tile mixture and its features
When deciding on cladding with tiles, the first step is finishing the walls. For these elements, you can use ordinary mortar, which is made on the basis of sand and cement, as well as ready-made adhesive compositions.
Ready-made glue can be sold either in the form of a mixture already prepared for use, or in the form of a powdered material, which additionally needs to be diluted. The mixtures are prepared strictly according to the instructions on the packaging.
Ready-made dry compositions are cement with the addition of a special modifying substance. Usually found in packages of 5 or 25 kg.
Some nuances
When considering the floor covering, it should be noted that it is large, in contrast to the walls, which exceeds 3 mm. And therefore, what kind of solution is needed for the tiles will be determined by several factors.
- First of all, the evenness of the base. Because in the presence of unevenness, it is advisable to use cement mortar, which will not only serve as glue, but also help smooth out the unevenness. In this case, the thickness of the solution layer can reach 3 cm. In turn, the use of ready-made adhesive mixtures requires a perfectly flat surface.
- Also important factor becomes a tile appearance. Considering, for example, porcelain stoneware, this material has low adhesion, therefore the mixture for laying tiles of this type must contain special plasticizers that improve this indicator.
- The human factor, or more precisely, the economic factor, also has an impact. Since a mixture prepared independently is cheaper than a ready-made one, therefore, if everything indicates the possibility of using a standard cement mortar, then it is better to use it.
Speaking, by the way, about the issue of saving, there are also several factors here:
- When finishing a cement base, slightly more mortar will be spent than when laying it on concrete.
- There is also another factor regarding tiles. In particular, a glazed one will require less solution than an unglazed one.
Structure and composition
When considering ready-made adhesive for laying tiles on the floor, it is almost impossible to fully know the composition, since this is a manufacturer’s secret. The big advantage of such mixtures is that they are divided into different types, intended for various conditions operation and surfaces. Thus we can distinguish:
- Universal glue. Used under standard conditions on flat surfaces.
- Reinforced, which is often used when laying fragile tiles.
- Non-traditional compositions intended, for example, for glass or metal tiles.

At the same time, the standard composition of cement mortar is known to everyone. It also adds cement and sand in different proportions depending on the brand of the first element. In particular:
- With M300 cement – 3 parts sand.
- For M400 – 4 parts of sand.
- For M500 or M600 – 5 parts.
The sand itself must be sifted, which is done to remove debris and clay.
If it is necessary to strengthen adhesion, standard PVA glue is also added. It is added in a proportion of 1 to 50, where the first value is the proportion of glue, and the second is the proportion of the total amount of the mixture. To put it more clearly, 200 g of glue is added to 10 liters of solution.
Also, when laying tiles, tile adhesive does not always meet the requirements for elasticity and water resistance.
In some cases, to increase elasticity, you can use detergents. For example, liquid soap, shampoo or diluted powder.
If it is necessary to improve frost resistance, then special additives are used for this, for example, Primer EC-30. It is a universal hardening accelerator, which, accordingly, imparts resistance to low temperatures.
Preparation of the solution
Now you need to consider the preparation as ready-made composition, and made independently.
Ready dry mix
Let's start, perhaps, with ready mixture. In this case, the first thing you need to do is carefully read the instructions, which are usually found on the packaging. In some cases it is additionally included.
The main thing is not to pour water into the dry mixture, but do the opposite. Otherwise, lumps will remain, which will affect the quality. The cooking process itself is as follows:

Water temperature becomes an important factor. It should not be cold, warm or hot. The liquid is used strictly room temperature. Otherwise, the components of the composition may lose their properties. The immediate temperature in the room during work should be in the range from 10 to 24 degrees.
At the recommended temperature, the mixture for floor tiles It hardens quite quickly, so it is not recommended to make large batches. It is advisable to prepare as much glue as you can use within 30-40 minutes.
As you know, tiles are often soaked before laying, and the base itself is moistened. It is not recommended to do this when laying with glue.
Homemade cement mortar
In the case where the solution is selected self-cooking, and not glue for laying tiles on the floor, you need to clearly know how to prepare it, which we will talk about next.
Preparation proceeds as follows:

The tiles should be immersed in water for 8-10 hours before such installation. Just to begin with, soak one tile, because if you come across poor quality material, you will end up with unsightly marks under the enamel. yellow spots, which will ruin the whole look of the room.
If, after soaking and laying on cement, the sample has not lost its appearance, then the entire tile is soaked. If soaking is not possible, then immediately before laying it is necessary to wipe the back side with a damp cloth.
When laying floor tiles with home-made tile adhesive is carried out using concrete base, the work is somewhat simplified. In this case, a sufficient process will be to pour water onto the surface and pour cement through a sieve. Next, the tiles are laid on the resulting “dough”.
Most common mistakes
Quite often, when you plan to quickly lay tiles, a number of mistakes are made when preparing the mortar:
- Often you come across low quality sand, not sifted and not dried, and in a hurry this is what is used.
- It is also an unacceptable mistake to use old cement, which often loses its properties.
- Only clean water should be used and should not be used under any circumstances. sea water or dirty, settled.
- The mixture must be thoroughly mixed so that no lumps remain, which entails a loss of quality.
- It is also a mistake to lay tiles with increased requirements (for example, porcelain stoneware) on a standard one. glue mixture or cement mortar.
This was a series of mistakes when using cement mortar, now let’s look at the use of ready-made compositions:
- The use of cold or hot water is strictly prohibited.
- You cannot add the mixture first and then add water, otherwise lumps will form.
- Do not soak the tiles or wet the base.
- Containers for preparation must be clean, after each batch they must be cleaned and washed.
- The mixture must be stirred at a low speed of rotation of the mixer. At high speed The mixture will foam; if low, lumps will remain.
And finally, a little advice, if you plan to lay tiles on tiles, our article on this topic will help you decide.