According to psychologists, it is good if children have the opportunity to have their own space while playing. So why not organize a bed-house for them?
House - favorite place children play until about adolescence, although numerous tree houses abroad indicate that privacy is also important for teenagers. Unfortunately, for Russian latitudes this is not an option, apparently due to the long, cold winters.
But when a baby outgrows his crib with railings and begins to realize the possibility of a new crib in his life, he often wants to participate in choosing it himself. And if there is a furniture store nearby with beautiful children's furniture, boys very often choose a car bed, and girls - a house.


Types of bed-houses
Manufacturers are trying to diversify the models of house beds so that children would be interested not only in sleeping, but also in spending time:
- with a play area. This is a two-level bed that combines play and sleeping areas. Depending on the design, the play area may have shelves and swings. The second tier usually houses a play area;
- teenage It is a comfortable design with a study area, a bed and places for sports and games. As a rule, the roof in such a house is made of slats, and the walls are hung with fabric. The bed is placed at a height of 1.6 meters from the floor;

- princess model. Interesting design usually decorated in delicate pastel colors, ruffles and lace, with a canopy. The original bed house becomes an unusual decoration for a child's bedroom. Wooden house withstands weight up to 100-120 kg;

- universal. This model is suitable for girls and boys. Textiles in the bed house create a false wall. The free area of the bed can be filled with mirrors, swings, and sports equipment as desired.

How to choose a children's bed-house?
Unfortunately, not all brands responsibly and seriously take children’s desire to have their own “haven” for games. The Internet is literally full of reviews about strange, supposedly cribs made of toxic chipboard with sharp corners and rough surfaces. Of course, the question arises, what were the parents thinking when they bought this “luxury”? After all, today everyone can read reviews of cribs and choose one that has caused few complaints or has only positive characteristics!

We tried to study some reviews and came to the following conclusions. For example, some modifications of “Legend” beds produced in St. Petersburg have a beautiful display appearance, but in reality, it turns out that the furniture brought from the warehouse emits bad smell glue and made entirely of chipboard. Most reviews about this furniture contain negative characteristics.
The Austrian plant Egger has improved children's loft beds, made from high-quality laminated chipboard, and some of these “Funky Kids” are complemented at the top with a sleeping place, at the bottom with a work table and a multifunctional cabinet. Describing their cribs, manufacturers claim that they have strengthened the frames as much as possible, no longer use plastic, and have made other changes and additions.

Cure house bed from Ikea - the best choice
After analyzing a hundred or two Internet pages, we came to the conclusion that the most popular among consumers is the Kura house bed from Ikea. It is made from natural, high-quality processed pine, does not have protruding sharp corners, like many products from Ikea, has the ability to transform, and in appearance resembles a two-story house without a roof. But the manufacturers also came up with a roof! It is a tent made of washable fabric stretched over arcs. There is also a tent option in the form of a house. At the request of the owners, a sleeping place can be equipped on the first floor, and a house under an awning - on the second. You can do the opposite. Children like both options.
Many who bought a bed-house from Ikea improved the product by equipping it with “walls” made of fabric with windows cut into it. The awning and mattress are purchased separately and have standard sizes, which is convenient for purchase bed linen. Until the age of six, a child can sleep surrounded by sides; after six years, some of the sides can be removed. Some argue that the crib can be used until the age of ten or twelve, if the child understands that the structure is not intended for jumping on it.


What should a house bed be like?
Many loving parents, not trusting manufacturers too much, make bed-houses on their own, purchasing solid wood for this and using either light slats and beams for decorative and functional elements, or carefully rounded fragments. Fathers who love and know how to make things create entire princess palaces or fairy-tale huts. Such “real estate” is perceived by children with great enthusiasm.

A chidhood dream - cozy house with windows and the possibility of dolls and toy animals living in it - it must be absolutely durable and safe for the child and for the mother, who regularly lays out fresh linen, wipes off dust, and washes dirty surfaces. In its manufacture should not be used toxic adhesives and dyes. All surfaces must be carefully processed. Otherwise, splinters and hangnails cannot be avoided. There should be no protruding screws or similar metal parts! The child must confidently grab the ladder if he has to climb to the second floor. And if the staircase leads to the first floor, it should be as comfortable as possible. There should not be any unnecessary parts that clutter up the space and contribute to unnecessary accumulation of dust.

Those craftsmen act wisely who make the house quite spacious, making only hints of the contours of the roof from natural slats. By covering the “walls” with fabric while playing, children will play in such a house, and when it is necessary to do cleaning, the fabric can be easily removed, and the walls of the house will not cause a huge number of bumps on the head and bruises on the body.

Experts recommend that when choosing children's beds “attic”, “teremok”, “house”, choose those options where the bed is a full-fledged place for night rest, and not an auxiliary folding sofa. The sleeping area should not be cramped. For its manufacture must be used natural materials. If the children's space allows, the bed should, first of all, fulfill its main purpose. You can make a house yourself from almost any children's bed, providing it with a light canopy that is easy to wash.

You should not save on a mattress by choosing it according to the child’s weight. If the main conditions and wishes of the “little master” or “mistress” are fulfilled, rest assured that children's playhouse will give its owners a lot of positive emotions!

Children's bed house. Photo


6209 0 0
DIY children's bed: drawings, photos, manufacturing materials
It is difficult to overestimate the importance of good sleep for a child’s health. That’s why it’s so important to get a comfortable and safe bed. By the way, you don’t have to buy furniture to decorate a child’s bedroom, because you can assemble it yourself. Read on to learn how to do this correctly.
Elements of a baby cot
Before we start making a children's bed, let's decide what distinguishes it from its adult counterparts. Among the distinctive features:
- Dimensions. Mattresses for children's beds are shorter and narrower than their adult counterparts (see table standard sizes sleeping mattresses).
- Number and location of beds. The bed in children's furniture is not made double, more often it is a single design. If you need to accommodate two children, the structure is assembled in two tiers.
- Operational safety. Quality furniture for a children's room does not have sharp corners or traumatic parts.
- Decorative design. Furniture for a children's room should not be boring and visually attractive to the child.

Let's summarize the points listed. A children's bed is made from the same elements as its adult counterparts, that is, it uses a supporting frame around the perimeter, mattress holder slats, a mattress, etc. But all these elements have smaller dimensions and are made of environmentally friendly materials.

Elements in the design of children's furniture are rounded at the corners and painted in bright colors. Important point– to ensure safety, the design of most children's beds uses high sides. The use of such elements is mandatory in cribs for children under 3 years of age.
Deciding on the model

The choice of children's bed design determines:
- Children's age. The dimensions of the bed depend on age - the older the child, the larger the bed.
- Amount of children. A single-tier bed is built for one child, and as the number of children increases, the number of tiers increases.
- Gender of the child. The gender of a child affects decorative design furniture.
- Features of the room. In a spacious nursery you can install several single-tier beds, but in a cramped room the structure is built in several tiers.
- Project budget. Material capabilities determine what materials the furniture can be assembled from.
Basic details of wooden beds
The design of a single single-tier children's bed consists of a supporting frame, which is assembled from boards and encircles the product around the perimeter. At the corners of the supporting frame there are vertical supports that serve as legs and as side holders.

At the top of the supports there are horizontal boards - sides. Sideboards for older children are installed on three sides of the bed, and for children younger age four at a time.
Along the inner perimeter of the frame there are slats that will hold the mattress. At the bottom of the bed there is free space in which there are drawers for storing linen and bedding.

Design bunk bed repeats the design of a single-tier structure with the difference that two beds are supported on the same supports. To make it easy to climb onto the second tier, the design uses ladder. To ensure safety, the side of the second tier is located on four sides.
Materials
| Illustrations | Materials and their description |
 |
Solid wood lumber. Boards, timber, furniture panels are solid wood, environmentally friendly safe materials, which I primarily recommend for assembling children's furniture. |
 |
Metal. Children's beds can be assembled from rolled metal, provided that welds will be neat. |
 |
Chipboard (chipboard). Chipboard - not the best option in respect of environmental safety. But because affordable price Laminated chipboard is still the most popular and in demand material. |
 |
Oriented Strand Board (OSB). From the point of view of environmental safety, OSB is worse than chipboard, since the formaldehyde content in these boards is higher. If OSB is used to make furniture, it must be provided that the surface is covered with several continuous layers of varnish. |
 |
Fiberboard– auxiliary material . Fiberboard (fibreboard) is used as a structural material, which is used to line the bottom of drawers or cover the top of a bed. |
About fasteners

If you are making a bed from lumber or particle boards, for fastening you will need confirmations - universal fasteners in the form of screws with an increased thread pitch. In order to provide greater strength to the confirmations, you can use dowels - wooden choppers that are driven into pre-drilled holes.

You will also need L-shaped corner perforated plates and self-tapping screws to secure them.
Available for sale corner mounts regular and reinforced with scarves on the fold, as shown in the photo. When choosing, we give preference to reinforced plates, as they are stronger and more reliable.
About accessories

A children's bed is a simple structure, where the list special fittings limited by guides for tilting the front wall, pendulum mechanism for rocking cradles, etc. At self-assembly you can limit yourself to rollers for drawers, as well as hinges and latches for the folding front wall.
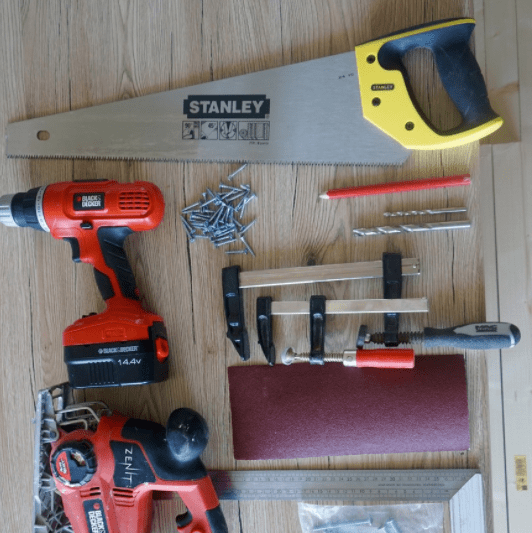
Necessary tool

The choice of tool depends on what the furniture will be assembled from. To work with lumber you need basic set carpentry equipment, including drill, screwdriver, jigsaw, router, 5 mm hex key, measuring tool. You will also need free space on which to cut necessary details and then put them together.
Wooden bed

After we have decided on the choice of materials, fastening hardware and fittings, we will consider how to assemble it with our own hands wooden furniture for a children's room. As an example, I offer instructions for assembling a typical bunk bed shown in the drawing.

The structure assembled according to the proposed scheme is durable, neat and at the same time budget-friendly in terms of materials. The most important thing is that such a bed is not difficult to make yourself, even if such work is being done for the first time.
| Illustrations | Making a crib with drawers |
 |
Materials and tools. To assemble this bed you need pine or beech boards with a section of 35×100 mm and 25×100 mm. To process wood you will need Miter saw, router, drill, confirmation wrench, screwdriver. |
 |
Cutting out the details. From a 35×100 board we cut 4 pieces 1900 mm long, 4 pieces 1810 mm long and 4 pieces 800 mm long. On workpieces 1810 mm long we make grooves 35×100 mm as shown in the photo. |
 |
We make legs (supports). As shown in the photo, we attach transverse crossbars into the grooves of the vertical supports, which will be the head and foot of the bed on the upper and lower tier. |
 |
Assembling the bed and installing the ladder. After the end units of the bed are ready, we attach the longitudinal boards and safety barriers. We install slats—mattress holders—in the inner perimeter of the upper and lower beds. We assemble a ladder from a board and a rounded block if round timber no steps can be made from boards. |
 |
Installation of drawer fronts. We assemble the boxes from boards as a rectangular frame, with a bottom attached at the bottom. For convenience and safety of operation, we make the fronts of the drawers without handles with recesses, as shown in the photo. At the bottom of the boxes we attach roll-out rollers. |
Let's take a closer look at the operations you will encounter during assembly.
| Illustrations | Assembly process details |
 |
Screwing in confirmations. To screw in the confirmat, we drill a hole - for this we use a drill with a special cutter. If there is no special drill, drill a hole the length of the confirmation and a diameter of 3 mm. Then we expand the edge of the hole made to 5 mm to a depth of 5 mm and get a recess under the head of the confirmation. We screw the confirmat so that its head is completely recessed into the wood. Subsequently, the mounting hole will be closed with a decorative plug. |
 |
Holes for dowels. To install the dowel, holes of the appropriate diameter are drilled in the parts to be connected, most often 6 or 8 mm. The depth of the hole in each of the connected parts is 15 or 20 mm (depending on the length of the dowel). The dowel is driven into the wood with or without preliminary application of glue. |
 |
Making the base for the mattress. For installation orthopedic mattress You can purchase ready-made lamellas, like those shown in the photo, or you can cut the same pieces of boards yourself. A barrier is made from a block along the inner perimeter of the bed, onto which prepared lamellas are laid.
|
 |
Installation of swing facades. As an alternative drawers You can install hinged fronts at the bottom of the bed. Installation of facades is carried out using conventional adjustable hinges. |
 |
Decorating the bed. Finished furniture can be treated with stain and varnished if it is wooden. In other cases, painting is the preferred option. Alternatively, a bed made of wood or chipboard can be upholstered with fabric pre-pasted with foam rubber. |
Homemade bed-car
| Illustrations | Assembling the car bed |
 |
Support frame. From furniture board going rectangular frame- box. Gaps are cut out from one of the ends of the box using a jigsaw to imitate a radiator grille, headlights, etc. |
 |
Imitation windshield. Openings are made on the sides of the body through which the child will enter the structure. At the distance at which the hood is expected to end, we attach a frame assembled from slats. |
 |
Installing the Drawer Lid. The lid of the bedding box, imitating a hood, is attached to a piano hinge at the front of the bed. At the same stage, the wheel rims are attached to the sides. |
 |
Mattress holders. Inside assembled box a plywood sheet is installed on which the mattress is laid. |
 |
Primer and painting. After the bed is assembled, the surface is primed and painted. Considering complex design furniture, for working with paint and varnish materials It is preferable to use a brush. The choice of paint is not important, the main thing is that it is completely dry before use. |
Let's sum it up
Now you know how and what to make a children's bed from. If according to the proposed step by step guide If you have any questions, ask them in the comments to the article.
The Scandinavian style for children's rooms is gaining more and more popularity, and a do-it-yourself bed-house is a real manifestation of parental care, skill and imagination. Original project a bed made taking into account the size of the room and the age of the child is beautiful, safe and economical. Adults can be confident in the reliability of the bed’s design, and children can have a place to rest, just like the heroes of fairy tales.
There are a lot of options for how to make a bed-house. In respect of construction work increasingly standard, it is important to draw up a diagram of the proposed product, preparing the necessary materials.
Tools
House walls
First of all, drawings are made for the bed-house using a simple pencil and a square. To build the walls of the described bed, four wooden beams are taken, each of which is 1 m 20 cm. These will be the supporting parts for the vertical structure of the house bed. To add aesthetics gable roof, the edge of all supports is sawed off from above to form an angle of 45 degrees.

Marking

Details of the walls of the house

The edges of the supports are sawn off at an angle of 45 degrees.
Roof
This part of the bed-house will also require four bars and the same steps, including finishing the edges at an angle of 45 degrees. All processed bars are assembled, the upper ridge is attached using wood glue. The parts can also be secured with a self-tapping screw, which should be screwed in at a distance of 3 mm from the border of the junction of two wooden parts. We advise you to follow some rules when working:
- It is recommended to clean all cuts with sandpaper;
- the self-tapping screw must be screwed in slowly so as not to delaminate the wood;
- When drilling, it is recommended to use a vice to secure the product;
- Optimal modern drills and a slow process are the key to quality work.
When two slats are fixed to the two supports of the future bed, the end result is the frame of the house. Repeating the procedure will lead to the appearance of two equal frames - the end walls of the bed.


Gluing parts

Connecting parts

End frame attachment
To complete the manufacture of the end frame of the bed, a block of 8.2 cm is screwed at the bottom to support vertical racks and stabilization of the entire structure. For bed assembly, an eccentric tie of the side components is preferable. It is very important to make an accurate design for the desired hit. Self-tapping screws will help make the task easier. The structure is also fastened to simplify assembly and save time. flat corners– squares with a side of 3 cm. All accessories for the procedure are available in a hardware store.
When making this tie, drill holes in the crossbar with a 10mm drill bit. They should be located on its midline, not through and have a depth of 12.5 cm. The diagram shows how to fix their outer edges 3.5 cm from the edge of the crossbar.
A 6mm drill bit helps create the hole on the side. It is fixed exactly in the middle and falls into a pre-prepared recess. The eccentric then firmly secures the required appearance of the screw. It is also possible to use wooden parts on long self-tapping screws with pre-gluing. We should not forget about stabilizing the connection using corner brackets.

Attaching the end crossbar


Finished end frame
Assembling the basis of the structure
Two thick bars are prepared as the sides of the bed. The inner side of the beam accommodates thin strips using self-tapping screws and involves screwing in the screws at an equal distance from each other. These parts will support the frame of the future bed of the house, which will make it possible to secure the slatted bed bottom.
Important for precise work make a template measuring 6 cm with holes for self-tapping screws - 2.5 cm. Use a pencil to mark the positions of the holes on all racks so that the upper edges completely coincide with the crossbar. A 6 mm drill is an assistant in organizing through holes in the marks. The procedure is fourfold: in this way, all the posts are connected to the sides of the bed.
Next, prepare the hole for the eccentric on the longitudinal post inside. Long self-tapping screws are screwed in from the outside, which should smoothly connect the side components of the bed and the vertical support with possible gluing of the joining point. The eccentric is inserted into the holes from below and the bolts are then tightened. Repeat the procedure to connect both frames to the sides of the bed.
After fastening the sides of the product to the ends of the house bed, the frame is supposed to be fixed, thanks to the three longitudinal components of the roof. Three beams according to the size of the sides are attached using an eccentric or self-tapping screws and glue. When choosing the latter, the bed-house must be strengthened with corner fasteners.

For assembly you will need two thick timbers

Thin strips will support the frame


The frame is assembled using an eccentric tie

Connection of side supports with crossbars

Slatted bottom
The slats are screwed to flat strips, which in turn are secured to the frame sides. It is important to carry out the correct tightening to hide the screws. The interplank interval is on average 7 cm, 13 parts go to the bottom. The remaining slats will be suitable for the safety side, assembled using corner brackets, but this is not necessary.
These slats can be borrowed from other sleeping places. There are new types of bed slats on sale. There are also ready-made models, which are inserted directly into the bed frame. This option is suitable for standard size beds.

Fastening the slats

Decoration
A do-it-yourself house bed has an undeniable advantage - it includes the author’s proportions, color scheme and sizes. For the boys' version, you can use a sea-colored canvas or thick curtains to organize a military headquarters, and for girls - decor with flags and a canopy made of organza or tulle.
IN modern world original children's beds are becoming the most popular and in demand. Their selection is presented in huge quantities on the world market. Everyone can find a children's bed to suit their taste and color, taking into account all the child's preferences.
How to make a house bed with your own hands
Beds can be presented in the form of cars, boats, animals, ships, airplanes and much more.
But what's better than a children's bed made with my own hands, into the production of which the love and affection of parents who so want to please their child is invested. Therefore, it is possible not to purchase furniture, but to make it yourself. This is especially true for a house bed. Since such furniture is not difficult to make, and this process will not take too long for a long time. If you have never made a snowstorm with your own hands, you don’t have to worry that you won’t succeed. Since to make a bed-house you do not need any special skills.

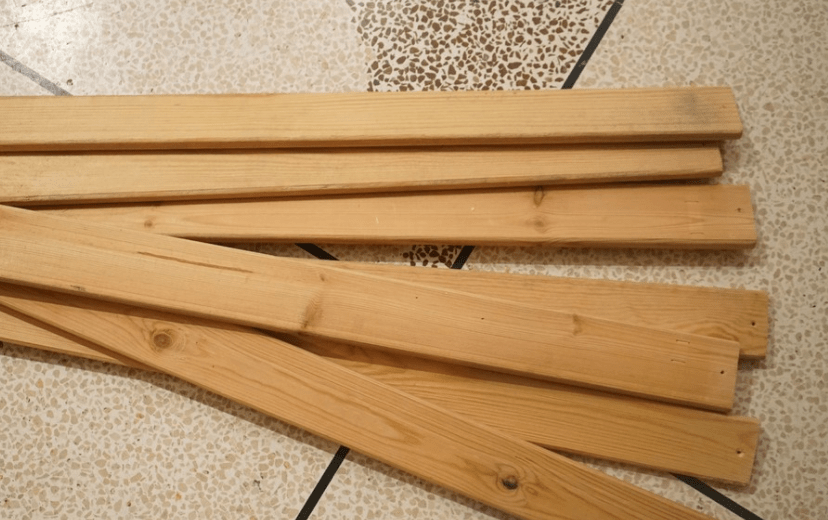
Selection of materials for manufacturing
Depending on the shape of your furniture, select the appropriate material. For the frame of your bed you will need timber. The cross-section of the timber should be 5*5 centimeters. What quantity required material you will need depends on the dimensions of the future furniture.
If you want to make an inexpensive house bed, you can make the furniture in the shape of a tent. If you choose this option, then you will need to make the walls and roof in the form of a frame, for which you will need a canopy. On canopy day, any light fabric can be used.
You can make a canopy yourself to save your budget. And they can also sew it for you to order if you don’t have one free time for making a canopy yourself.
The walls and roofs of a bed in the form of a house are usually made of plywood or regular boards. From plywood you can make any part for a future bed. If you decide to make it from plywood, then experts recommend purchasing birch plywood, the thickness of which is 0.7 or 1.3 cm.
If you do not want to make parts from wood, then excellent option will serve as drywall. From plasterboard you can make a niche for furniture, as well as decorate in the shape of a house. To do this, you will need to cut out openings from drywall for future windows of the house, as well as an opening for the door to the house. The place to sleep is installed inside the resulting house.
Attention! The easiest way to work is with drywall, because it can be cut with ordinary stationery knife without putting in too much effort. The disadvantage of drywall is that it is difficult to seal seams and joints during finishing installation.

Required Tools
In order to make house-shaped furniture with your own hands, you will need the following tools:
- hacksaw;
- screwdriver;
- drill;
- a simple pencil;
- ruler;
- square;
- sandpaper;
- set of self-tapping screws;
- set of bolts;
- panels;
- slats;
- special glue for wood.
How to take measurements and drawings
The manufacture of a bed-house should be approached with all responsibility. Everything needs to be carefully thought out and prepared. correct diagram and take correct measurements of future furniture.
In the drawing, in accordance with the measurements taken, it is required to correctly enter the number of parts and elements that will make up the bed-house. You also need to write down the dimensions of each part, as well as the method of fastening.

Please note that the size of the frame is similar to the size of the mattress. Therefore, before you make furniture, you must first purchase a mattress for the bed.
The size of the bed is directly related to the age of your child for whom the furniture is made. If the bed is made for a child before school age, then the dimensions of the bed-house should be 1300*750*1400 mm. For school-age children, the bed dimensions are 1600*900*1700 mm.
Important points before assembling the house bed
Before starting to assemble the bed, parents need to decide in advance whether the bed will have drawers or whether it will be without them. Some parents prefer the space under the bed to be free, while others prefer to make the furniture as functional and spacious as possible. Therefore, such parents give their preference to a house bed with built-in drawers.
Before assembling furniture, you need to decide on the choice of drawers built into the future furniture. Drawers can be of two types: on wheels or on guides. It is recommended to make drawers on guides, as this is a more advantageous option, the floor will not deteriorate and the structure will be more durable. Also, you should decide how many drawers will be installed at the bottom of the house bed.
Parents should also make a choice on a specific furniture design for the child. You will first need to decide on the choice of shape for the place to sleep. If you have Small child, then it is recommended to make low single-tier beds. If you have more than one child, then it is better to make two floors in houses with stairs.
Worth remembering! Such furniture should be absolutely safe for your child. In order for the crib to be more stable, it is necessary to make the sleeping place without legs so that it is on the floor. Having made this choice, you can rest assured that such furniture will withstand any weight. The advantage is that the child will not fall from a low crib.

Bed house yourself: step by step
Before you start making a bed-house, you must first make a base for future furniture.
Crib base
First you need to make a base. To do this, you need four bars, the length of which should be 1300 mm. This design will serve as a vertical support for the bed. After you have fixed and secured the block, you need to cut off a small part at the top of each block at an angle of 45 degrees. This procedure is needed for a future roof with slopes.
Before sawing a piece of beams, you need to mark the part of the cut with a pencil, using an ordinary ruler. It is necessary to cut down using hacksaws.
Roof for home
In order to make the roof of the house, you will need four bars, the length of which should be 730 mm. After the beams are secured, you need to cut a part of the beam on top of each beam at an angle of 45 degrees. Don't forget to walk sandpaper in those places where you cut the beams so that your child does not get hurt on them. 
The support is made from scraps of beams. Everything should be attached to the roof ridge. It is necessary to take glue and attach the upper part of the ridge to the entire blank of future furniture.
Vertical joints and supports will need to be glued. Moreover, this procedure must be repeated several times. After all, the upper part of the house must be mounted on self-tapping screws, the length of which should be 40 mm. Self-tapping screws should be screwed in at least 4 mm from the line of the two roof components.
After completing these steps, we will see the final outlines of the entire structure.
Frame attachment
In order to complete the work with the end of the house, you need to screw a block to the bottom of the structure. The length of which will be 830 mm. This beam will serve as a baluster. Which will support the entire weight of the house.
For such an inconspicuous installation, you need to drill holes in the bottom of the furniture (in the block) using 11 mm drills. Drilled hole should be in the middle on the crossbar. Remember that the hole should be through. 
Then, you will need to drill a hole in the middle of the block itself using a 6 mm drill. You need to place a screw in the resulting hole, and then secure it all with a tie.
You can also use long screws instead of short ones. But it is necessary to pre-treat them with an adhesive substance.
Assembling the base of the house
In order to make the base of the house, it is necessary to use thick beams. Such bars should be identical in size to the sides of the bed. WITH inside thin strips must be screwed to the beams using self-tapping screws.
It must be remembered that the screws must be placed at the same distance. Such plates are a support for the manufactured frame of the house, which supports the bottom of the furniture itself.
It is necessary to make templates from the bar in advance, the length of which should be 6 centimeters. Must be manufactured in wooden block several holes for self-tapping screws. The distance between each hole made must be at least 25 mm.
On the inside of the rack, mark the location for the hole in which the eccentric will be located. This hole is made with a drill, and then screws 10 cm long must be screwed into it. 
Pay great attention to the joints. After all the procedures, it is necessary to pour adhesive liquid into the holes on the lower tier and tighten with bolts.
Reference! This procedure must be done with all components of the structure, and then connect all the parts into a single whole.
Securing the frame for the future crib
It is necessary to attach all components of the furniture well. To do this you will need four bars. The length of each of them should be 1660 mm.
Remember that the length of the beams is equal to the length of the sidewalls sleeping place. All components are attached using glue and screws. Strengthen the entire structure using corner fasteners.
Using a photo, you can make your own bed-house for a child. 
Furniture slatted bottom
The slats need to be secured to the slats. Attach the slats to the four sides of the entire crib component. You need to screw all the parts well, so that the screws do not stick out. For the bottom of a universal mattress you will need to use 14 slats.
Such furniture made for your child on our own- this is not only good safety, but also the realization of all your dreams for your child.
Small areas of living quarters lead to the fact that owners have to look for ways to organize children's sleeping places on 2 floors. This solution leaves more free space for games, sports, study. Despite the fact that the industry offers practical loft beds, it is much more interesting and cheaper to make bunk furniture yourself.
Traditional options for loft beds offered by our projects
A man who knows how to craft can make a bunk bed with his own hands according to the drawings. We offer some options for drawings that are suitable for your situation and the size of the children's room, photos 1,1a,1b,1c,1d,1d. These are simple and understandable projects of a traditional nature with a length from 1.9 to 2.1 m, a width of 0.8-0.9 m and a total height of 1.5-1.8 m. If desired, the owner can slightly change the length dimensions, width, height of bunk bed elements, order of placement of stairs, frequency of crossbars.
Ecologically used in the manufacture of loft beds pure material– natural wood. A caring dad will carefully process the bars and boards, and then varnish and decorate the finished product, as in photos 2, 2a, 2b. The main thing is that the bed is strong and does not wobble. For reliability, it should be firmly fixed to the wall. For fastening, wood glue is used, which is applied to the parts to be fastened. Then the place is pressed and tightened with clamps. When the glue dries, the elements are connected with self-tapping screws. It is best to use steel fasteners rather than aluminum, they are stronger.
 Photo 1 (a-d) - Drawings of bunk bed options
  Photo 2a - Children's bunk bed in the form of a house
  Photo 2b - Sleeping place and from natural wood
 Photo 2c - Appearance finished product from MDF
More complex versions of a bunk bed with your own hands according to drawings
When a sleeping place for children is equipped with drawers, shelves, cabinets, slides, the result is a product that is no different from those offered in furniture stores. But for this you will need more material and the diligence of the master. The result of the master’s work can be finished loft beds, as in photos 3, 3a, 3b, 3c. The execution and design of such cribs requires the skill of a specialist and additional fasteners, special tool. For connection wooden elements apply different types connections (in a foot, in half a tree, with full and incomplete cutting, with a steel angle, on rectangular keys, fastening " dovetail"on dowels, main tenon), as in pictures 4, 4a, 4b. In such structures, parallel and perpendicular placement of berths is possible.
 Photo 3 - Children's bunk bed in the shape of a ship
  Photo 3a - Bed house
  Photo 3b - Train bed
  Photo 3c - Car bed made of natural wood
The option proposed in photo 5.6 is considered simple to manufacture, but difficult to attach. To make a metal bunk bed with your own hands according to the drawings, you can make a design as in photos 7, 8. In this case, you will need metal tubes and the ability to work with metal and welding machine. If there are three young children in the family and a minimum of space, then the option of a bunk bed and an additional 3rd bed, as in photo 9, is possible.
An excellent children's room design is offered on f. 10 with provision of 4 beds. A practical solution For studio apartment is an option designed for 3 people. In this case, the lower part is made with a larger width, and the second floor is designed for one child. Parents or adult children can sleep below (f. 11)
 Photo 4 - Connections of wooden elements
  Photo 5-8 - Examples of work made by hand according to drawings
  Photos 9-11 - Options with 3 and 4 beds
  Photo 12 - Interesting option children's complex
The advantage of a loft bed
Making a bunk bed with your own hands according to drawings has many advantages. This:
- efficiency;
- ergonomics;
- sustainability;
- saving usable space;
- use of environmentally friendly materials;
- excellent room design, designed for the size of your room;
- gift for children;
- pleasure from the result.
Conclusion
There is nothing difficult in making a 2-tier bed for children with your own hands. You just need to have a great desire and skills to work with wood. Today there are many companies that can produce the necessary components with connecting elements in required quantities. You just need to assemble and fasten the product.