No matter how hard I tried to write only about travel, one way or another the site turns into a blog about how to be a fun mom) Traveling with a child, playing, working and just a mom of all trades. I just take the test for crookedness in Lately constantly, taking up the arrangement of the house, and in particular the child’s room. After a trip to India, I got a second wind and started to come up with a bunch of ideas for the nursery. One of these ideas is a magnetic board for children, or rather one child and his young guests, on which you can sculpt magnets and draw with chalk.
I made it for my son with my own hands back in December. And the time has come to tell you how I succeeded;) I have been dreaming about a large magnetic board for a child for a long time. We had all sorts of magnetic construction sets that could be used perfectly on such a board. The small ones didn’t suit me at all, there’s not much room to move around in a small square, it’s boring :/
When I started monitoring this topic, I realized that large boards are not cheap at all. Plus, if you have a huge board, then you immediately imagine a school one, on which you can write with chalk =) Moreover, it’s wooden and black - classic, and so soulful! And not these scary green ones that are everywhere now. There is no soul in them, no. Yes, and magnetic boards do not have it, they look cold and are not at all attractive, but with a child it is very important that it is cozy and attracts attention. In general, you understand my train of thought;)
And maybe all this would have remained just a wish if I hadn’t suddenly accidentally found out that in nature today there are special paints for school boards. And just on sale for home use. No, of course, I have repeatedly seen completely black walls on which you can draw with chalk, but somehow I didn’t think about what they were covered with. And here, wow, the paint is exclusively for school boards!!
The idea began to take on more concrete shape. I realized that I could cover a magnetic board with this paint and I would be happy :) But the prices for magnetic boards scared me off. Then I Googled “how to make a magnetic board with your own hands.” And then I got another shock. It turns out that magnetic soil and magnetic paints exist in nature!!! That is, I just moved the brush and the piece of wood suddenly became “metal”! Well, aren't they miracles?? For me personally - miracles:) And even more so for my child, because now he cannot be torn away from this wonderful board;) Do you want one for your children? Then welcome to the cat for a detailed recipe;)
Estimate
Let's start with the estimate. That is, what materials I needed to create this board, how much they cost, and how much it all cost. I think the price issue worries many.
Basic materials:
1. Tikkurila paint for school boards (black) - 1069 rubles
2. Marabu magnetic soil - 986 rubles for two 225 ml cans. This price includes delivery by Russian post; I couldn’t find this soil in Perm. Perhaps you will find this soil in your city, then the delivery cost will be deducted. The average price for a jar of soil is 350 rubles. I needed two (depending on the size of the board).
3. Plywood ( standard sheet: thickness - 6mm, length of sides - 1525x1525 mm) - 408 rubles + 30 rubles for cutting plywood, because I needed a size of 1200x800 mm. That is, the price depends on the size of plywood you take, as well as its thickness; it seemed to me that 4 mm would be too thin.
→ Intermediate cost: 2493 rubles*
*In principle, you can already get by with this set. Everything listed below is purely my initiative and idea. The functionality of the board is fully functional even if the three points above are present.
Additional materials:
4. Wood slats for frame (3 m x 2 pcs) - 60 rub.
5. White paint to cover the frame - 406 rubles. I took Tikkurila Pesto 10, but there is no point in taking a whole 1 liter can of paint, I just needed it for other purposes, and of course I spent very little on painting the frame. You can take any white one or whatever color you want depending on your room design. Small jars cost around 100 rubles.
→ Intermediate cost: 2493 + 466 = 2959 rubles**
**I decided to make a frame around the board to give it a more finished look. In addition, as it turned out later, thanks to the frame, the chalk powder does not spill onto the floor under the board, but remains on it, from where it can be easily wiped off with a damp cloth. I chose the color white because all the furniture in the child’s room is white, and with orange walls, a white frame should look much more advantageous in my opinion.
Final elements:
6. Railing Byugel - 129 rubles. I took 100 cm, but if the board were smaller, you can choose a rail 55 cm long, and it will be cheaper.
7. Kusiner hanging pockets for storing magnets - 199 RUR. It is very convenient that nothing is lying around the house, because... There are more and more magnets and they are quite small.
8. Byugel containers for crayons and sponges - 78 rub. The price is for 2 pieces, in the white one we store multi-colored crayons, and in the black one there is a cloth for washing the board.
9. Bugel hooks— 49 rubles for 10 pcs. I will still include this in the expense, because... I bought it specifically to hang pockets on the railing. But in the end they turned out to be inconvenient for us, because... because of the hooks, Kusiner’s pockets reached almost to the floor (the board hangs at the height of a child, i.e. not high), it looked very ugly. And also the pockets kept falling off, because... The hooks gave the child no peace :)) So I removed them and simply tied the pockets with strings. Now they are securely fastened, they don’t roll back and forth on the crossbar, I like everything)
→ Final cost: 2493 + 466 + 455 = 3414 rubles***
***Be sure to consider the size of the board. I needed a fairly large one - 1.2 m x 0.8 m. Plus, not everyone needs all these bells and whistles from pockets and frames) Therefore, the cost can vary greatly depending on your requests. Well, don’t forget that I took the prices to the maximum, although the consumption of materials is much lower, for example, 1 liter of black paint is not needed at all. That is, you can team up with friends who also want such a board for their children, and split the cost of materials in half.
Manufacturing process
1. Prepare basic materials. Namely, magnetic primer and paint for school boards. 
I chose black because... I really wanted a classic board, but Tikkurila also has a standard green one. That is, you can make the board green.
2. Plywood is also already awaiting transformation)) 
As I indicated above, I took a sheet standard size and ordered cuttings so that I wouldn’t have to cut it all out myself. That's why they already brought the plywood home to me the right size. I chose 6 mm plywood thickness, because... 4 mm is too thin, it bends and it will be uncomfortable for a child to write on it, but 8 mm is already thick and more difficult to attach to the wall, because she is already noticeably heavier.
3. I processed all the edges of the plywood sandpaper. And then I started covering it with magnetic soil. 
The plywood itself was High Quality, there were no noticeable splinters or roughness on it, so there was no need to sand the entire surface. But it is recommended to wipe with a cloth to remove dust and dirt from the surface. If you are wiping with a damp cloth then of course you will need to wait for the surface to dry before applying primer.
4. Magnetic soil is very thick. It consists of small particles of metal, a kind of “iron” powder, so crushed almost into dust that it is not visible to the eye. It is very surprising to take such a small jar and suddenly discover that its weight exceeds half a kilo. Due to the metal in the soil, the mass increases greatly. It is applied in a thick layer, reminiscent of cement both in color and consistency. I covered it with a regular paint brush, smeared a layer horizontally, and the next one vertically, this way it covers the surface better. The soil dries quickly, so the jar should not be left open for a long time. 
Magnetic soil has the peculiarity that the more layers you apply it, the stronger magnetic properties. In principle, this is easily explained, because in this case there are much more metal particles on the surface. Therefore, I decided to completely use up both jars I had. As a result, two 225 ml cans were enough for me to cover with three layers of plywood measuring 1.2x0.8 m.
I applied each subsequent layer when the previous one was thoroughly dry. As I already said, it dries very quickly, but still, I gave the first layer time to dry deeply for 24 hours. I applied the next layer only a day later, and the third a few hours after the second.
5. After the layers had completely dried, I tried to attach magnets that were at hand. Hold on!!! Magic! :) 
Please note that the edges of the board are not painted with primer. I just already knew that there would be a frame there, so I felt sorry for wasting magnetic soil on these unused areas in the future. I got it with great difficulty, because at first I looked for it all over the Internet, then it turned out that it was not available anywhere, in the end I ordered the last two cans and it took them a while to get to me by mail. In general, I was shaking over this magnetic soil =))) Because I tried to save as much as I could)
After coating, the surface was very rough, the primer was applied with some kind of small crumbs, I really wanted to sand the board at least lightly, but I imagined how much primer would fall off and that the magnetic properties would weaken, so I preferred not to touch anything at all. After all, it is also worth considering that under layers of paint these properties will also weaken.
6. Well, we got to the paint) Unfortunately, I didn’t have a photograph of how I painted it, although this is surprising, because... I remember exactly what I was filming. I will only show the result after this stage. The child and I immediately began testing, without waiting for other tricks to be attached)))

Tikkuril paint is easy to apply. I only needed one coat for a thick, even coverage. Its smell is specific, but not to say that it is pungent, and it dissipates very quickly. It looks like shoe polish)) It dries within a couple of hours, but I left it for a day, afraid to try it right away =) But the next day after painting, we already drew with chalk and washed it, and everything was fine;)
As a result, I only used 1/3 of a liter jar. I’ve already figured out where else to use it) But you can simply save it and over time, if the board loses its “marketable” appearance, just cover it with a new layer, and it will sparkle like new again;)
7. The next step I sawed the frames to the required size. Two pieces 1.2 m each and two 0.8 m each. Using a special nozzle, I cut out diagonal corners. I covered these slats with white paint. I also painted the railing with the same paint. Tikkurila Pesto 10 dries for almost two days and has a strong smell. The child had to sleep in another room. But it is ideal for both wood and metal, it does not need to be varnished afterwards and can be easily washed, which is why I chose it.
8. I screwed the railing to the board below with a screwdriver, measuring its location laser level. I planned to glue the frames with glue, but after the board hung on the wall. I wanted to use frames to cover the drill holes.
9. So, we got to the stage of attaching the board to the wall. I thought a lot about what would be the best way to hang it. There were thoughts about hinges and glue, but in the end it was decided that we would drill two holes at the top and bottom of the board. There are the same amount in the wall, we hammer in dowels there and screw the board onto the self-tapping screws. Why below too? Because if the board is fixed only at the top, then when drawing on it, it sways and bounces noticeably. If it is also secured from below, it fits very tightly to the wall and there is no movement.
10. I completed the fastening stage with frames, which I glued along the edges of the board using liquid nails. This is what they look like up close. Would you say that under this frame drilled hole? All holes are hidden) The screws, by the way, were chosen not with a round, but with a flat head, so the frame can easily fit tightly to the board. 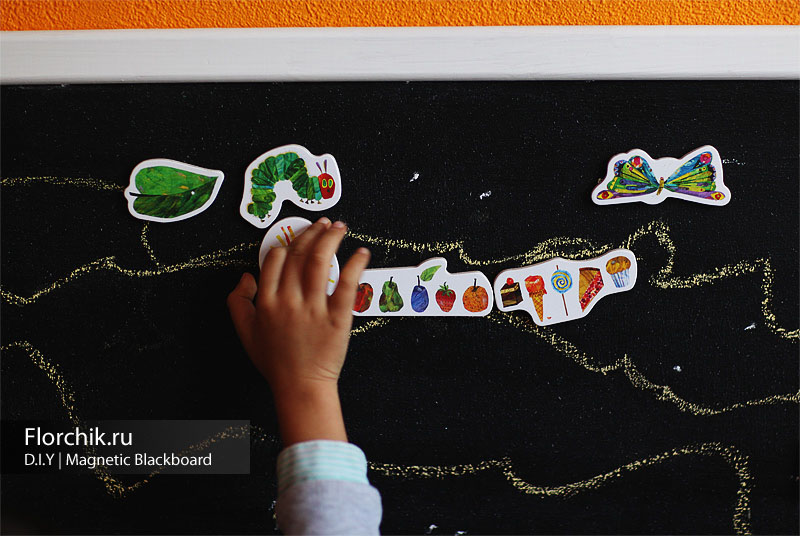
11. I hung pockets and containers on the railing. I put all the magnets and crayons we have in them. 
Focus on magnets with animals from Eric Carle's books. If you look closely, you can see wooden magnets of various types above. geometric shapes, and even letters and numbers that we inherited from my sister) We also have plaster magnets, which we make ourselves using molds and then decorate, there’s also a lot of room for imagination, because There are also sea animals and vegetables/fruits and fairy tale heroes. In general, there are a lot of variations for games.
12. For example, an educational game was literally invented on the spot. Mishutka learned to draw waves and imitated the sea on the board. 
When I saw this, I simply asked to find it among all the magnets of those animals that swim in the sea. The child did not make a single mistake; the octopus and gold fish. A polar bear I told him to take it, because... he also swims in the sea and catches fish. This is how a child develops, simply learning everything new in the game.
Well, in the end, to complete this post, I’m posting a view of the finished result from the outside. The photo is not staged, sorry, but this is the only shot I found where the entire board is visible) A child writes the letter A =)) 
I’ll make a reservation that I don’t teach him letters. I think that at this age there is no need for this. But he played ABC on his phone a couple of times and this is the result. Well, again, knowledge in the game is not forbidden;) Loading...
It’s not always convenient to leave messages on your family’s phone. Imagine this situation: a mother left early for work, but she wants to give certain instructions to her child. By sending a message to the phone she can wake him up.
And what happens is that you then forget what you wanted to say.
DIY slate board
Manufacturing slate board very exciting and not at all difficult to make.
The instructions described in this material will give you the knowledge of how to make a slate board yourself.
The following materials will help you make it:
- one of the types of bases: plywood board, special sanded blank or regular board for slicing;
- glossy acrylic paint;
- special powder that is used for grouting tile joints;
- medium hard paint brush;
- a bowl for preparing paint for painting the board.
Chalkboard paint is made according to a special recipe. If you start painting the board only with glossy acrylic paint without adding certain components, then all the work will be done in vain.
This is because it is impossible to write on this board. The recipe for making a coloring agent is as follows: in a bowl, mix the coloring agent with the mashing agent, observing the dosage - one part of the mashing agent per 1.5 cans of the coloring agent. Now you know how to paint your reminder board.

The paint must be made strictly according to the instructions. Coloring should occur quickly and accurately. This is due to the fact that paint with the above powder dries very quickly and irregularities and lumps may remain.
After the board has been painted, it needs to dry thoroughly. Once drying is complete, the board can be tested. Due to the fact that the surface of the board is rough, it is good to write on it with chalk. The inscriptions are quite clear and durable. A board made by yourself can be many times superior to the store-bought version.
When painting the board, you can safely experiment with color palette, so you may have the following options:
- gray slate board;
- black slate board;
- green slate board;
- white slate board.
As you can see, it is not at all necessary to follow the classic black version of the slate board.
How to make a magnetic chalkboard
Often, the store-bought version of a magnetic slate board is much inferior in quality. Over time, it becomes more and more difficult to write on it with chalk.
The surface of the board deteriorates, as a result of which the chalk scratches the board and thus the inscriptions are more difficult to wash off.

Contrary to this, the situation can be corrected by making a magnetic board at home.
To make it you will need materials such as:
- The basis. The basis can be materials such as: chipboard, plywood with thin layer, PVC.
- Magnetic soil. Contains metal particles.
- Chalkboard effect paint.
You can make your own paint with a chalkboard effect.
You'll need:
- latex paint - 1 cup;
- cement - 2 tablespoons;
- capacity;
- large spoon for mixing.
IMPORTANT!!! Make sure that there is no sand in the cement.
Cooking method
Pour two tablespoons of cement into a mixing container and mix with one glass latex paint. Mix everything well. The paint is ready!
As for the manufacturing process of the above board, then initial stage The board must be covered with magnetic soil. It is worth noting that the primer is applied to a degreased surface. Magnetic primer should be applied in four layers. The more layers, the better the magnets will be attached. Now you need to leave the board to dry for a whole day.
Then you can paint it. You need to paint with a special roller or brush.
The paint usually dries within one day. Next, you can safely test the board and attach various magnets to it.
A magnetic slate board for children will be real entertainment and a way to learn something new for themselves.
A magnetic slate board on the refrigerator will allow you to leave relevant messages to your household.

Today, the use of slate boards in the interior is a rather creative solution that allows you to add homely atmosphere some zest!
It is appropriate to use a slate board not only in a children’s room so that small children do not paint on the walls, but also in other rooms the board will look great.

For example, as a place for reminders, such an interior element would look great in the kitchen.
Also, the board will refresh the design of a bedroom or living room due to the fact that on the board it is possible to leave drawings in addition to notes.
A board as a home decoration is convenient because you can change the designs due to changes in taste and mood.
Slate board in the kitchen interior
When we come to cafes, bars and restaurants, we often notice that behind the cash register there is a board where the menu or all possible promotional offers are written.
As a rule, such a board is in some way very reminiscent of the board that was within the walls of the school. Today, the slate board is one of the most original and beautiful ways tell about new dishes, novelties and promotions.

Have you ever thought that this idea can be borrowed for your kitchen? Just imagine how convenient it is!
On such a board you can write all possible reminders, wishes about have a nice day to your household. You can also write menus on a slate board, write down current recipes, and write to your husband about purchases he needs to make at the supermarket. As you can see, there are a lot of advantages.

You can also nail shelves to the slate board on which you can lay out jars of spices and exclusive homemade wines, and then write the names of these products on the board. Looks very creative and beautiful! You can also leave drawings on a culinary theme on the board.
The slate board fits compactly into the kitchen interior as it fills the wall space. To save space, the board can also be used as a hanger. You can nail special hooks to it and hang it kitchen towels And kitchen apron. As they say, beautiful and useful!


You can also diversify the board by attaching magnets and stickers. If you study reviews on the Internet about slate boards in the kitchen, you can once again be convinced that this attribute is very convenient.
The board can be placed not only on the wall, but also on the refrigerator, on the kitchen door.
Slate board for children
A slate board on the wall in your child’s nursery will come in handy! This is a universal method that helps kill two birds with one stone.
On the one hand, you instill a love for art such as drawing, and on the other hand, you will save a decent amount on repairs and thereby make the interior of the room creative.

As for the decoration of the walls, you can decorate them either partially with a slate board or completely. If you decide to decorate all the walls with such a board, then choose a light color.
The slate board in the children's interior looks just great! A drawing board will delight them.
Such a board is also useful because it can be used to awaken a child’s interest in school and learning. The child will be happy to play with you or other children at school.


In addition, when the child grows up a little and goes to first grade, it will be much more interesting for him to learn his lessons using a slate board. In addition, it is very convenient for parents, because it is much easier to explain on the board than in a notebook.
As mentioned above, a slate board can perfectly serve as home interior decor.
Today there are a great many varieties of this board. There are different sizes. Also, there are plaques with and without frames. They can be purchased either in a special supermarket or made by hand.
And most importantly: the board provides the opportunity to create, to show your creativity in any way.

A small chalkboard looks very nice as a picture in the living room or bedroom. On such a small board you can create small paintings and funny illustrations that will refresh any interior design.
A chalkboard without a frame looks good in the kitchen.
There are shaped slate boards.
Often, they decorate the living room, bedroom, and children's room.


This type of board can be placed above the fireplace, above an elegant chest of drawers in the bedroom. It is worth noting that in addition to the children's room, you can completely decorate all the walls in the room with slate boards in the living room or in the office.
A certain charm and comfort of the room will be created.
Question answer:
How to erase chalk marker from a slate board?
If the inscription made with a chalk marker cannot be erased from the slate board, then you need to use a melamine sponge.
How to erase chalk from a slate board?
You can erase chalk from a slate board using a regular sponge or a felt sponge. Before you wipe chalk off the board, you need to make sure the sponge is clean.
What kind of crayons can you use to draw on a slate board?
You can write on the board with thick crayons. It is desirable that they write softly and have a bright shade - so the inscription will be clearly visible.
What is the difference between a slate board and a chalk board?
A slate board differs from a chalk board in that it is treated with special paints and materials, making the inscription look brighter, clearer and more beautiful.
How to make a beautiful inscription on a slate board?
In order to beautifully write on a board, you need to use high-quality crayons or a chalk marker. The crayons should not crumble, but at the same time they should write softly.
Now you know how to properly make a slate board at home without spending extra money.
Now you can easily decorate your home interior and thereby surprise your family and friends.
Chalk board is increasingly finding its use outside walls educational institutions. Strict rules the design of the classic school board was blurred, in their place came interesting shapes and decorative appearance. The chalk board became part of the interior, allowing not only to decorate the room, but also to introduce a useful component into it. Having picked up newfangled trends, designers began to widely use slate surfaces in their projects, photographers included chalk boards in the list of necessary props for photo shoots, calligraphy artists began to paint slate photo zones at weddings and presentations. This creative boom has come about thanks to a new take on the good old chalkboard.
So I, inspired by this idea, decided to make a chalk board with my own hands. I just couldn’t find a special paint with a slate effect. As often happens, if you get excited about an idea, you need to start implementing it on the same day. I don’t have enough patience, my hands are itching to get to work. I started looking for an alternative, as it turned out, there is a simple and a budget option, which I will talk about in today's master class.
In order to make a slate board with your own hands we will need:
- Acrylic paint for wood;
- Matte black (or other acrylic paint of your choice) work surface boards;
- White Spirit;
- Fugue for tiles (grout for filling joints between tiles);
- Drill;
- Jigsaw or hacksaw;
- Construction primer;
- Brush and foam roller for decorative paint;
- Sandpaper;
- Ring screw, screws;
- Baguette frame;
- Twine (rope or cord).
Tip: To decorate a chalk board, you need to find a base with a large flat surface, on which we will apply paint. The base can be a wall in the room, a kitchen cabinet door, a baguette frame with a back wall (back), a sheet of plywood or fiberboard.
An old frame was found in the attic. The back wall is cut out of fiberboard according to the dimensions of the frame (48x38 cm, thickness 0.5 cm). Since the baguette frame had lost its pompous appearance over time, and the stucco molding had partially fallen off, it was decided to remove it and clean the frame of paint.


Gypsum stucco is easily removed with a spatula, and old paintwork sandpaper. We clean the plaster and paint, apply a primer to the cleaned surface. After the primer has dried, cover the frame with two layers of paint at intervals of 24 hours. All that remains is to decorate the frame itself. Take paint and a brush. Using light strokes, without painting completely, apply paint to the surface of the frame.


After about forty minutes, we moisten the cotton wool with white spirit and erase with it those places that were unsuccessful during painting. You can also walk over the surface to be painted so that the unpainted areas acquire the shade of the paint being decorated.

Leave the decorated frame until completely dry. Now is the time to work on the back wall, which will be the base for the slate. To ensure reliable adhesion of the paint and the fiberboard sheet, we clean it smooth surface sandpaper. Then we cover it with a primer, after about an hour, apply a base layer of matte acrylic paint.

On top of the base layer we apply homemade slate paint. In order to make paint with a slate effect, we need acrylic paint itself. matte paint and fugue (tile grout). Take 3 parts of paint and one part of fugue (3:1) and mix with each other until smooth.

Tip: In order to minimize the formation of lumps, add the fugu gradually while simultaneously stirring the paint. You can choose the paint color to suit your taste. If the paint is not light, then the chalk on it will also be clearly visible.
After the mixture of paint and fugue is ready, roll it out foam roller along the surface of the future board. Use a roller to roll out the paint evenly and in one direction. The roller needs to be pressed a little when rolling on the fiberboard in order to roll out small lumps and press the fugue particles into the paint. If you want the chalk board to last a long time, then cover the base of the board with at least 3 layers.

After the paint on the frame and on the base of the slate has dried, we combine the frame and the back wall together and secure them together with clamps. On back side We mark with a pencil the markings along which we will fasten the frame to the back wall with screws. We take a drill with a drill with a smaller diameter screw thread, drill holes and screw the screws into them.

Tip: By screwing the frame to the fiberboard, we will get a gap between the frame and the fiberboard sheet. It will crumble into the gap (where the glass is usually inserted) chalk dust, which will prevent chalk from staining everything around.
Having decided in what position the board will hang (horizontally or vertically), we drill holes for fastening the ring screw. A ring screw is a screw that has a ring instead of a head. You can thread a rope through this ring and hang the board on the wall. Based on the thickness of the frame and fiberboard, we measure the length of the screw ring so that it does not come out when screwed in. front side baguette frame.


Along the measured length, we clamp the ring screw in a vice and bend it. Then we screw the screw with the ring into the holes until it bends. We insert a rope into the rings and tie it - the chalk board is ready! With proper decoration of the baguette frame, the coated board can fit into any interior.

Tip: To extend the life of your chalkboard, use soft crayons or a chalk marker.
Using the method discussed in today’s article, if necessary, you can paint any objects and surfaces. Using colored crayons you can create unique props for photo zones, wedding photo sessions and signs for messages to your loved one. If you cover with homemade slate paint metal surface, then magnets can be attached to the chalk board. This slate-magnetic board will be an excellent alternative to the refrigerator door. Housewives will appreciate the slate surface in their kitchen.

A chalk board is great for a child's room. On it you can study the alphabet, practice writing letters with chalk, draw and develop Creative skills The child has.

Such useful tool for records it will be an indispensable assistant In workshop. It doesn’t matter whether it’s sewing or metalworking, there is always a need to make a drawing that will always be visible when performing work. The most important thing is that at any time you can make changes, erase everything and draw again.

The chalk board fit well into our interior and became a good helper for organizing time and tasks. In addition, a home organizer from time to time becomes a message board.

The other day I took out a large framing frame from the attic, which I plan to remake and hang in the room. You will find out what will come of this in the next article. Subscribe to site updates, join groups in in social networks, and you will be aware of new publications!
About the author:
Greetings, dear readers! My name is Max. I am convinced that almost everything can be done at home with your own hands, I am sure that everyone can do it! IN free time I love making things and creating something new for myself and my loved ones. You will learn about this and much more in my articles!
DIY chalk board - our long-awaited master class. Without unnecessary sentimentality - such a board perfect decor in any interior. You can leave funny drawings, write a to-do list, and come up with funny wishes. Every day! And the best part is that you can make such a board yourself, armed with patience and a creative impulse.
INGREDIENTS

- Board of the size and shape you need: chipboard, solid wood or thick cardboard. Or a wall;
- Primer (excellent selection of primers);
- Short pile roller;
- Chalkboard paint (in a jar or spray can) or black paint and powder for grouting tiles.
FOR THE CASE
- 01 Depending on whether you will paint a sample or a wall, first of all, prepare the surface - clean it from dirt, dust and prime it. Leave it for a day.

- 02 Using a roller, carefully apply the slate paint in two layers. Let dry.

- 03 The resulting chalkboard can be inserted into a frame and hung on the wall.


Attention! You can replace slate paint by mixing any black paint with a few spoons of grout. But it’s still better to use special paint - it dries well, is odorless and safe for children.
Editor's note


- It is ideal to apply the paint in a thin layer 2 times.
- It is best to go outside to apply paint to the sample: the temperature should be above 10ºC and the humidity should be at least 85%. When painting a wall, ventilate the room well.
- When applying paint, use a short-nap roller to avoid unevenness.
- Take your time to use the board - it should dry well.


WHERE TO BUY SLAY PAINT IN MINSK?
You can find paint in construction hypermarkets, as well as online. For example, in the Tikkurila company it is presented as chalkboard paint, look in the Fanpaint store chalkboard effect paint(it is possible to buy a jar of 0.5 liters or 1 liter). Good offer for chalkboard paint Available in the Podarkino store.
Source: my-craft-inspiration.blogspot.com.by, livejournal.com
Today everyone can get everything necessary information About, To create such a device yourself, it is enough to follow a very simple sequence of actions, having previously prepared the following tools:
- Dark green, black or brown acrylic paint;
- Plywood board;
- Mixture for grouting joints between tiles;
- Ordinary roller.
How to make a chalk board at home?
 The paint is mixed with the grouting compound until a homogeneous mass is formed. The resulting mixture is applied to the surface of the plywood board using a roller. In order for the board to be suitable for drawing, the applied coating must dry. Also, some manufacturers provide those who wish special mixtures for processing school boards. But such products are available in small quantities, since for the most part they are used only when performing restoration work. Also for similar products A mixture of construction cement and enamel is used.
Coating alternative
It is recommended to create this type of coating only if there is no alternative, since after drying the surface of the board will be too rough. In this case, the drying process will be accompanied by a persistent pungent odor. It is recommended to create such a board not in a residential area. Now everyone knows
How to make a picture frame with your own hands from scrap materials?