DIY scarf hanger
Every young lady has several light colored scarves in her wardrobe. They are the ones who add completeness to the outfit and create the right mood.
If you like variety, and you have more than a few different scarves, then the task of organizing them neatly and compact storage. Meanwhile, making a simple and convenient organizer for scarves couldn’t be easier. This device will allow you not only to store all the scarves in one place, but also to easily select an accessory of the desired color.
You will need very little to get started:
Plastic hanger with round bottom bar
Masking tape (it will be more convenient to use a narrow one)
The plastic rings that come with each shower curtain (or any other rings that fit)
Threads of any color and composition for decoration (optional)

1. We estimate the places to which we want to attach our rings.

2. And “reliably glue with tape” each ring to the bottom crossbar of the hanger.

3. It should look something like this.

4. And a little later - so.

5. Those who are the most impatient can finish the work at this point, because the organizer is essentially already ready. But for aesthetes, there is another task: attach a thread of an interesting color to the hanger and wrap it around the bottom crossbar, also capturing the places where it is attached to the rings, in order to decorate the unglamorous tape.

6. For greater strength, you can smear the crossbar with glue, but, as experience shows, the threads stick perfectly without glue. The main thing is to reel in “gently, but firmly.”

7. This business requires patience and love for beauty...

8. As a result, the scarf organizer takes on a neat appearance and individuality. By the way, you can wrap threads around the entire hanger - then you will become the owner of a truly designer piece.

9. All that remains is to hang up the scarves and enjoy the convenience that the scarf organizer will give to each of its owners.


- DIY scarf organizer
Every young lady has several light colored scarves in her wardrobe. They are the ones who add completeness to the outfit and create the right mood. If you love variety, and you have more than a few different scarves, then the task is to...
- Organizer
So I scraped together an organizer! Topic: Alice in Wonderland. Size A5, fabric cover (soft!), inner sheets I designed it in Photoshop and printed it out :) The rings are detachable :) So you can insert additional sheets. I didn’t decorate with paper flowers - they would come off...
- scarf
after the hat. For Sashka. My first scarf. I've never knitted scarves before. I'm not very happy with the result. When I tied it, it didn’t turn out very neatly. Maybe there are some tricks? I think that a scarf is better with single crochets...
- organizer for floss
My husband was getting ready to embroider a towel, bought a blank and threads, but from experience he knows how threads get tangled, and decided to make himself a mini organizer for threads, it took 20 minutes + time to rewind the threads, and this is what...
All women know the problem of storing scarves, sarongs, belts and other accessories necessary in the wardrobe. Rolling them up into a ball does not help - they inexplicably unfold and make the same mess on the shelf. Our salvation from irritated digging in a pile of scarves will be provided by a do-it-yourself scarf hanger, simple to make and easy to use.
Scarf hanger made from cardboard rings
Perhaps this The best decision of all. As they say, cheap and cheerful. The product is a regular hanger with cardboard rings attached to it, into which we will thread our scarves.

We are preparing the following materials and tools
- Coat hanger. If you don’t find one in the house, bend it from wire.
- Strong thick cardboard.
- Colored ribbons (plain colors are also possible), cut from fabric or ready-made.
- Strong threads (iris, floss).
- Glue.
- Compass, pencil.
- Tailor's centimeter.
- Paper cutter or scissors.
Making a scarf hanger
We measure the length of the hangers. We divide the resulting figure by the number of rings that we planned to place in the top row. The number displayed will be the diameter of each holder. In our case there are three rings, so we divide the length of the hangers by 3.

We take a compass and draw a circle of the calculated diameter on the cardboard. We reduce the step of the compass by one centimeter to draw another circle inside the circle. We got a ring. How to make a scarf hanger without putting in extra effort? Here's how: we put the compass aside, since as a result of these simple steps we have a template for all the other circles.
Cut out the first ring. We lay it on cardboard and trace it as many times as we need holders (we have nine). We cut out the blanks using a paper knife or scissors with sharp tips.

Wrapping the rings fabric tapes, carefully laying the coils. We hem or glue the ends so that the attachment point is not obvious.
We think about the location of the rings relative to each other, choosing optimal combination by color.

Now we fasten the holders together with thick threads, securing the ends of the threads with glue.
It turns out this is the design.

We wrap the hangers with tape, bringing them into line with the general concept of the product. We connect them horizontally with a number of rings, using the same technology with threads.
The hanger can be easily upgraded by adding additional rings. By the way, the blanks can be wrapped with multi-colored ribbons, leftover yarn, and leather. If you don't want to deal with cardboard, use rings for plastic curtains.
We have created a wonderful hanger, where every item is in sight and in in perfect order. In addition to this, an entire shelf in the closet was freed up. Now choosing the right scarf won't feel like searching for lost treasures.
Glamorous scarf hook
The design of this scarf hanger is extremely simple - a wire bent in the shape of an S sign, studded with beautiful beads.

What do we need for work?
- Wire with a cross-section of one and a half millimeters, 1 m long.
- Plastic beads – 36 pcs. Two of them should have a larger diameter than all the others.
- Nail polish is the same shade as the beads.
- Aerosol paint for metal, neutral color.
- Metal scissors.
- Nail scissors.
Making a hanger
If the wire has been used, straighten it, clean it and degrease it. After wiping it dry, cover it with spray paint.
After the aerosol has dried, bend the metal strip in half - the hook should have a certain rigidity. We bend the wire along a given path, and the upper bend should be less than the lower one. We pass the first bead (of the larger ones) through the wire, leaving a loop at the end.

We string the remaining beads in order. If they go tight, you can drill out the holes with the tip nail scissors. Just be careful not to overdo it so the beads don't crack.
The beads should fit tightly. Don’t forget to adjust the bends of the hook, bringing it into line with the intended shape.

Having strung the beads, we cut off one end of the wire, trying to ensure that it ends up inside the last, large bead. The other end should be one and a half centimeters longer.
We form a loop from the long tip of the wire. We remove its end into the hole of the bead.

Very carefully give the hook its final shape. Paint the loops at the ends of the hook with nail polish.
The result was a wonderful hanger for scarves, small but very elegant. You can hang not only scarves on it, but also jewelry and other little things: a hair tie, a headband, sunglasses. So, with the means at hand and little effort, we achieved our goal - we placed our accessories in plain sight and put things in order in the closet.
Hangers are indispensable for careful and neat storage of clothes in the closet. Next are a few ideas for increasing the functionality of ordinary hangers. To make it convenient to hang scarves, ties, gloves, glasses and belts, so that dresses and blouses do not slip off their hangers, you will need a minimum of materials and time.
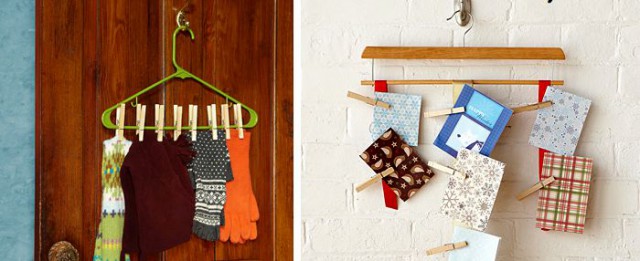
1. DIY scarf and tie hanger
Light summer scarves, winter knitted scarves, ties and other accessories lying on a shelf or in a drawer sooner or later turn into colorful chaos, where it is difficult to immediately find anything. Great solution You can make a simple scarf organizer with your own hands. You will need several rings for the bathroom curtain, attached to the crossbar of the hanger. A hanger for scarves and ties will make it much easier for you to find what you need!
2. DIY glove and sock hanger
Attach it to a hanger with a thin bar large clothespins. This way you can store winter gloves, scarves and even socks!
3. Belt hanger
It is useful for belts to hang straight, without bends or kinks. Screw some hooks into your hanger! The men in the house will appreciate such a convenient improvement to ordinary wooden hangers.

4. Glasses hanger
How do you store your glasses collection? Shelf, drawer? Here's another place for organized storage - just hang them on a hanger!

5. To prevent clothes from slipping off the hanger
Smooth, thin hangers can be inconvenient to store items on. Take 3-5 pieces of these hangers, connect them with tape and wrap them with multi-colored yarn! Firstly, the hanger will become thicker, and secondly, silky and light items will not slide off the hanger. And thirdly, this bright decor pleases the eye and enlivens the space, whether in a closed closet or on a hanger in the hallway.

To make your closet comfortable, functional and spacious, you need to choose the right content for sliding wardrobes - various stationary and pull-out shelves, drawers, rods and other necessary accessories. Jet-Systems specialists will help you choose inexpensive filling High Quality, will professionally perform all work to order.
Hi all!
A scarf hanger arrived to me, which I have dreamed of for a very, very long time. True, I constantly forgot to order it: Aliexpress, you know, it’s like this - you go there to look at the hanger, hang there for an hour, and forget what you actually wanted
Finally, I got my hands on this accessory, the order was placed, and exactly a month later I already had the hanger.
Cost 4.45 USD
For shipping it was folded three times. Bends/unbends easily.


Initially, I didn’t want to take a large one (they are different - for 8, 16, 24, 28 rings...), I was afraid that the more rings and more scarves hanging there, the more it would sag. I chose the middle option - 16 rings.
 The entire base is made of strong wire, wrapped with a durable paper rope on top. Wrapped well, neatly. I have no complaints.

Next photo will help you better imagine the “scale” of the accessory.
 Well, this is actually what I got after filling the hanger with scarves.

Everything is as I imagined:
Hanging/removing scarves is very convenient
Good overview, everything is visible (before scarves were in the chest of drawers, I constantly lost something, forgot about some scarves, but here everything is in full view)
The hanger did not bend and it is clear that this number of scarves is not at all a burden for her

******************************************************************************************************************
True, there is one thing: all my scarves, of course, did not fit on it))) But I knew about it, just as I wrote above, I wanted just such a small one and my plans were to have several of them, and hang scarves on them according to theme:
Summer (bandanas and scarves)
Demi-season
So far I’ve only ordered one to try, but I’m very pleased with the purchase, so I’m ordering two more for the remaining scarves, as I intended!
My great review of products from Aliexpress with photos of purchases can be found
*******************************************************************************************************************
I recommend purchasing a scarf hanger! By the way, you can order this not only for yourself! I am sure that any woman, even if she is not a scarf-maniac, will appreciate such a gift. This accessory organizes space, allows you to keep things in order, in a word, very convenient and practical! Can be used not only for scarves, but also for belts!

Happy shopping!
Good afternoon everyone!
The other day I visited our annual Baltic exhibition “Beauty and Fashion - 2012” and was very surprised at how interested people were in the presentations of beauty salons, jewelry stores, cosmetics, etc. Among other things (which is natural :)) my attention was attracted by a point that came to us from Ryazan.
I will write more about this company in the following posts, but now I just wanted to tell you how one lady bought “bundles” of locals.
She was delighted with hand-painted scarves and scarves and spared no expense on them, and there was a lot of painting, I must say...
But that's not what I'm talking about. Then the question crept into my head: how to store all this? After all, we, women, are creatures of mood: this is how we got up in the morning, looked at all our treasures and chose a scarf or handkerchief according to our mood - monochrome, colorful or checkered :)... So this is a pressing issue for batik lovers, and for some There are a lot of craftswomen of handkerchiefs like this lady’s.
Some store stoles in special cells (the products are carefully rolled up to avoid jams) or even boxes. These are: 


And, wandering around the Internet, I saw that people had come up with (or bought at Ikea - there is such a thing) amazing ideas for special scarf hangers and other women's "things". And what, I thought, is a very convenient solution for how to store it - and it doesn’t wrinkle, and everything is in plain sight. Try making this yourself by tying or wrapping curtain rings or even rings from corrugated cardboard. In any case, I want to implement this idea (then I’ll show you what happened).
First I’ll show you the finished hangers:


But these are handmade options. I think that's great too!

