In a high-quality frame house there are no trifles, and such a seemingly insignificant thing as fasteners generally takes on one of the main roles in importance. Without reliable and correctly selected fasteners there will be no reliable and durable home.


Important to use correct fastening not only for the frame of the house, but also for fixing the internal and outer skin.
Many future homeowners will not even think about such a “trifle”, at most asking themselves the question of what is better: screws or nails, which is quite understandable. Costs for purchasing fasteners and installation materials constitute a small part of the total construction cost frame house. It is much worse when they forget about correctly selected fasteners, or the builders themselves simply do not know. The other side of the coin in this matter is the regime of total savings on materials. With this approach, hardware is subject to reduction. In this case, the estimate will most likely include the most economical option, such as black self-tapping screws and regular construction nails. By and large, there is nothing wrong with such fastening options, but only if it is used strictly for its intended purpose, and not everywhere possible. For example, black self-tapping screws are indispensable as temporary fasteners; they are also great for internal lining walls with slab materials (plasterboard, QuickDeck) in preparation for finishing. The basic rule is to observe the purpose of the fasteners when building a frame house, apply it where it is needed and cope with its main task. To correctly assess the need to use certain hardware in the frame, you need to correctly assess what loads are acting in a particular node of the frame house.

To a popular question: What better than nails or self-tapping screws The answer can be given quite unambiguously that each fastener must be used for its intended purpose.
Look what happens to an ordinary hardened self-tapping screw when it takes a shear load. The self-tapping screw breaks at its weakest point and its head flies off, so using this type of fastener as a fastening for beam supports is strictly contraindicated. But in this place of fastening, special galvanized anchor nails with an annular notch and a conical head feel great. Such a nail has a diameter of 4.2 mm, and the conical head is wedged into the holes of the perforated fasteners, making it virtually impossible to cut off the head of such a nail, naturally, provided that a sufficient number of such nails are hammered in.

Be sure to consider the environment in which the fastener will be located.
When choosing options for using fasteners, it is necessary to take into account the environment in which it will be located. In places unprotected from precipitation, as well as in places where condensation is likely to occur, fasteners with a special protective coating that protects against corrosion are required. For example, we as fasteners exterior finishing from wood we choose nails with hot galvanization, the resistance to external factors of which has proven to be best side. We import such fasteners only from Finland, since Russian analogues with similar processing and similar characteristics do not satisfy us in terms of quality.
| Mounting location | Fastener type | photo |
| Attaching the strapping board to the monolithic base | Expansion anchor |  |
| Fastening decking boards To wooden joists | Structural Torx screw |  |
| Fastening the frame posts | Smooth nails for nails |  |
| Stitched (double, triple) frame posts | Rough / Screw nail for nailer |  |
| Stitched (double, triple) external posts | Rough/Screw galvanized nail or plated nail |  |
| Fastening joist supports, beam supports | Galvanized nail with tapered head and ring cut |  |
| Lathing, lath | Galvanized self-tapping screw, rough or screw nail |  |
| Soft roofing, Isoplaat | Galvanized roofing nail |  |
| The external cladding of the house is made of imitation timber. | Rough galvanized nail for nailer with galvanization. |  |
| Sheathing the house with windproof MDVP boards. | Galvanized roofing nail, galvanized staples 50-60 mm. |  |
| Fastening of structural beams, rafters, crossbars, tie rods | Galvanized stud, galvanized washers and nuts. |  |
Returning to the economic aspect of our article, I would like to mention that the price of special fasteners can reach up to 20 rubles. per piece, which is more than 60 times more expensive than the price of a regular black self-tapping screw 3.8*51 mm. On the scale of the entire construction project, where the total number of hardware amounts to tens of thousands of pieces, the amount is significant.
The cost of highly specialized fasteners can be several times higher than the cost of ordinary nails or self-tapping screws.
There is another unpleasant nuance that can “pop up” with dishonest developers, and which allows you to reduce the estimate on the total cost of fastening materials - this is the amount of fasteners used in a particular unit of a frame house. Less spent fasteners mean more benefits for the company, and in the absence of proper control, “extra” nails, corners and screws can go to satisfy the construction needs of a dishonest builder. With this approach, in some components of a frame house there is a risk of a very serious lack of reliability.

There are regulatory documents that regulate the required amount of fasteners in each frame node, plus there are recommendations from manufacturers building materials according to the required type and quantity of fasteners for fastening materials. In our work we try to focus on American and Scandinavian building standards, which are often stricter than Russian ones regulatory documents. For example, in Europe, if such standards are not observed, the house simply will not pass inspection by the responsible authorities. For us, compliance with such standards is the key to confidence in the maximum reliability of all our homes.
Basic and most common connections in a frame house easier and more reliable to perform using special fasteners. Each of them has its own fasteners, ensuring the strength and stability of the entire structure. It is easy to use and allows you to avoid such labor-intensive connections as inserting “half-wood” or various “locks”.
Connecting fasteners for assembling frame wooden building structures has been used for a long time: tightening brackets, bolts and clamps. Very often used in construction frame houses. Today it has become more diverse and perfect. Fasteners not only simplify and speed up the assembly of building structures, but also make them stronger and more stable. Fasteners are most effectively used in the construction of prefabricated frame houses. Connecting fasteners for assembling construction wooden structures too diverse to be described in one article. Therefore, using the example of a frame house, we will consider only part of the fasteners, but the most used and mass-produced.
Connection fastener made from cold rolled steel sheet 2.0 - 4.0 mm thick, in the form of perforated (with holes) plates, corners, holders, supports for beams, connectors (plates with needle spikes - connectors), as well as shoes for load-bearing posts and columns, mounted directly on the foundation . Depending on the purpose (the dimensions of the parts to be connected and the loads transferred to them), each type of such fastener is presented in several versions: by size, perforation configuration (holes) and even with additional elements(ribs) of increased rigidity.
The perforation of the fasteners regulates the thickness of the nails and tightening bolts, as well as their number: on the one hand, they are enough to securely fix the connection, on the other hand, cracking of the wood does not occur. Such fasteners can have various coatings that protect them from corrosion: zinc, primer or polymer powder paint. Part of the connecting fasteners is also used for repair work(for example, a corner when constructing a frame internal partitions). Therefore, when choosing such fasteners (standard sizes, metal thickness, design option, perforation, stiffeners and protective covering), you should imagine what loads it will experience during operation.
The connecting fastener has a number undeniable advantages before classical connections in the construction of low-rise buildings wooden houses and, first of all, prefabricated frame ones, in which a lot of different nodal connections have to be made.
Firstly, there is no need to make labor-intensive and skill-requiring classical connections such as half-timber inserts or tie-locks. Splitting of wooden structures does not occur due to an excessively large number and size of nails and bolts: the normalized perforation of fasteners (holes) does not allow the use of too thick nails and driving them close to the edge of the bar.
Secondly, the classic tie-in leads to a decrease in the strength of the beam due to a reduction in its cross-section at the joints (wood removal). Steel connecting fasteners, on the contrary, create additional reinforcement for the design of the units.
: Used in butt joints that are subject to tensile loads, such as splicing timber for tightening or making roof trusses.

Fastening plates are used in connections subject to tensile loads. They are applied to the connection on both sides and tightened: with bolts - 2 holes with a diameter of 11 mm and nails - the remaining holes with a diameter of 7.5, 5 and 4.5 mm. The dimensions of the holes determine the diameter of the bolts and nails used: their task is to provide the necessary strength of the connection, preventing splitting of the wood.
: used in various corner connections(walls, racks with a supporting frame, tie beams, roof rafters, etc.). An angle with a stiffener has more high stability to bending loads.

Fastening angles are used for angular connections between walls or an upper tie beam with a roof truss. Available in various standard sizes and several designs, including those reinforced with a stiffener. The corners are applied to the joint on both sides and tightened: with bolts - 2 holes with a diameter of 11 mm and nails - the remaining holes with a diameter of 7.5, 5 and 4.5 mm. Bolts for fixation are used only in particularly strong connections.

Installation of beams attic floor or roof rafters using mounting angles. Perforation of fasteners ensures the optimal number, thickness and location of nails in terms of the loads occurring in the joint and eliminates splitting of wood. Corners with a stiffener are more resistant to bending loads.
Beam holders and supports
Beam holders and supports: indispensable for constructing floors (floors and attics) in frame houses. Withstands high tensile loads in various corner joints. The holder is designed for fixing a floor beam to a wall, column or other beam during construction. The support (or shoe) allows you to install the beam on the walls or columns of an already erected building (during reconstruction).
The support can be universal (consists of separate left-handed and right-handed elements) - suitable for beams of any section, and specialized - for beams of a specific section. In addition, the support can be designed for open mounting or for finishing. Shoes for posts and columns: The shoe is bolted or poured with concrete into the foundation or foundation. Its design allows, even after installation, to adjust its height (± 25 mm).

The beam holder is used when installing wooden floors when it lies with its ends on walls or other beams. Each connection is fixed on both sides. Therefore, the holder can be left-handed or right-handed. It is nailed down. The number and size of nails are regulated by holes with a diameter of 5 mm.

It consists of two separate parts - left-handed and right-handed and is suitable for beams of various sections. The connection is fixed on both sides with bolts and nails. Mostly such supports are produced in one standard size and from sheet steel with a thickness of at least 2.5 cm.
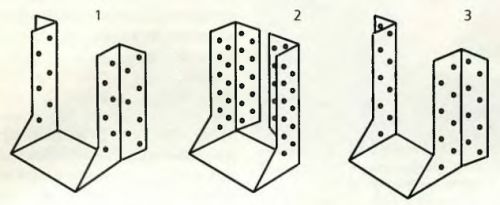
It is designed for a specific beam section and is available in several standard sizes and two design options: 1 and 3 - for subsequent finishing in order to hide their vertical “wings” curved outward for fasteners; 2 - without subsequent finishing (“wings” are hidden).

Beam support is used when constructing wooden floors, when it cannot be supported on the walls or columns themselves (for example, installing a floor in an existing building). Each connection is fixed on both sides with bolts and nails. In our example, two short beams are connected by supports through central pillar — practical solution a frequently occurring problem.
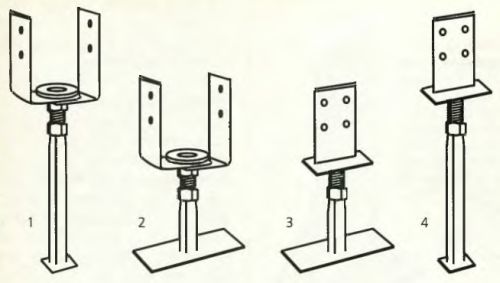
Shoes for load-bearing posts and columns are installed (anchored) in the concrete foundation during its pouring (and bolted to the finished one). Exist various designs shoes: 1 and 4 - for pouring in concrete; 2 and 3 - fastened with bolts; 1 and 2 - the rack is installed in the shoe; 3 and 4 - the shoe is cut into the rack; All structures, once mounted, can be rotated around their own axis and adjusted in height.

The rack or column is installed on the mounted shoe and fixed required quantity bolts: 1 - the rack is installed in the shoe; 2 - the shoe is cut into the rack. In this state, the stand can be rotated to the desired angle around the axis and adjusted in height within a range of ± 25 mm.
Connectors
Connectors: designed for complex joint connections in roof trusses spanning spans of 7.5 meters or more. The connector is a flat plate, in the body of which needle nails (or spikes) of a certain configuration are cut out by stamping. They are made both in the form of plates with specific dimensions, and as a tape (25 - 152 mm wide), cut to the required length. The connectors are pressed with spikes into the wood (across the grain) on both sides of the connection. The principle of working with connectors is well understood using the example of installing a roof truss, where two connectors (on 2 sides) allow you to assemble an assembly from 3 parts at once.

Connectors - special connecting fasteners
Connectors are special connecting fasteners. It allows you to assemble and strengthen complex joint connections of 3 or more parts, for example, in roof trusses with spans of more than 7.5 m. The connector is a flat plate with needle-shaped spikes cut into its body. They are made in the form of ready-made plates with specific dimensions or tapes (25 - 152 mm wide). They are pressed with tenons into the wood on both sides of the joint.
Fasteners in a frame house- a fairly simple topic, but it is important to think through everything in advance, so as not to run to the stores and buy one kilogram of nails, but to immediately purchase 150 kilograms (usually that much is spent on an average home) of the necessary fasteners on a base at a big discount.
I did so, but it still wasn’t enough; I’ve already gone back several times to buy new boxes of nails.
But of course, there are a lot of extra nails and screws left a large number of. Therefore, I want to make the task as easy as possible for my readers.
I would like to note right away that in a frame house forbidden use screws or self-tapping screws, since the load everywhere is shear, not tensile, and neither self-tapping screws nor self-tapping screws work for shear, so there is nothing to discuss here. Some builders are still confident that self-tapping screws can be used and will try to persuade you to do so. Don't give in.
But great for cutting nails work, they are incredibly difficult to cut. We are, of course, talking about the load-bearing part of the house, and not about the decoration.
And I also want to say about corners. Angles are not used by professionals in frame construction (not counting the temporary attachment of trusses to the frame). Use them Can, but it’s not profitable in terms of time and money, decide for yourself. Again, be wary of builders who recommend their use.
Foundation fasteners
The following fasteners are used for a pile foundation:
if you have screw foundation, then you need steel anchor bolts.
if you have a bored foundation, then you need studs m10 and washers with M10 nuts (if you do it like I do, filling the studs in the filler) or anchor bolts for concrete.
if you have a slab foundation or a strip foundation, then you will need again anchor bolts for concrete.
Fasteners for frame house frame

All boards in the frame box are hammered with ordinary smooth construction boards nails diameters 3.1-3.5 mm and length 80-90mm(usually 90 mm if the board is 50 mm thick and 80 mm if the boards are 40 mm thick).
An exception may be lathing on walls or floors, where it is better to use screw or razor nails.
Fasteners for cladding frame houses
Fasteners for floor covering.
60mm nails— it’s better to use rough or screw ones + glue (or self-tapping screws of the same length).
Such nails help to hold the floor tightly so that it does not creak and is not “alive.”

Fasteners for exterior wall cladding.
50 mm nails- better ribbed or screw ones.
This applies to both OSB-3 boards and plywood, as well as inch wood (which I will use for cladding a frame house).

Fasteners for interior wall cladding.
If the inside lining is plasterboard, then you will need special self-tapping screws for plasterboard length 25 mm(less often 35mm) length. Just remember to tighten the screws correctly:

If you have lining inside, then it can be secured with 50-70 mm nails.
Metal tile fasteners

For installation of metal tiles, special roofing tiles are used. self-tapping screws dimensions sizes 4.8x20 and 4.8x38 millimeters (metal-metal, metal-wood).
Window fasteners
There are several methods for fixing windows in a frame house.
- On the anchor
- On plates
Accordingly, in each case you will need appropriate fasteners. I’ll tell you more about installing windows in due time, when I fix them myself.
Siding fasteners

Galvanized self-tapping screws with a wide cap (at least 8mm) long not less than 15 mm or galvanized nails with a wide cap (less often) no less long 40 mm.
Fasteners for wooden facades
Galvanized nails 50-70 mm(preferably galvanized, since zinc coating is done using electrolysis, and not the usual “hot” method).

Deck fasteners
For terraces, it is better to use self-tapping screws made of stainless or galvanized steel. There is a special fastener for terraces, but for the price it comes out as half a terrace.
It is also recommended to fasten the deck boards with hidden “snake” fasteners. 
In this video you can look at almost every fastener in visual detail:
So, fasteners are very important element frame house, which you should pay close attention to if you don’t want it to fall apart or simply burst at the seams over time. Do not give in to the persuasion of builders who want to build you a house using screws, self-tapping screws and other inappropriate things.
Read reviews from real residents of frame houses on the forum or in my article and gain experience so that no one deceives you.
Self-tapping screws for frame construction must be used with caution. Many novice developers make their choice in favor of screws. They believe that it is threaded connection will give the structure strength and durability. Mounted on galvanized self-tapping screws big hopes regarding their resistance to corrosion. Nails are undeservedly forgotten today. For some unknown reason, these strong and reliable hardware are considered a relic of the past. Few people want to swing a hammer for hours and risk injuring themselves. With screws everything is much simpler: they are simply screwed into the wood and can be easily removed if a mistake is made. In fact, when deciding whether to use screws or nails when building a frame house, one cannot be categorical. Both types of fasteners can be used. Let's look at the pros and cons of each type.
To work with wood, it is necessary to purchase screws with a wide pitch between threads. Metal hardware has a smaller diameter and thread pitch. They do not provide the necessary fastening strength, since wood is much softer than metal.
When choosing screws as fasteners for a frame house, you should consider a number of factors:
- The products have quite high cost. It is an order of magnitude higher than that of nails. To assemble numerous frames, several thousand screws will be required. And this will cost a lot of money.
- The screws are made of hardened metal. They can only be used in connections where the load is due to pull-out. Under transverse pressure, metal breaks easily.
- If the self-tapping screw breaks, it will be impossible to remove the broken fragment. This can be a problem if precision work is being done.
- The screws are screwed in using a screwdriver. If you use an electric tool, there will be inconvenience with the cable. The battery life of the device is limited. After just an hour of operation, both batteries will run out. Construction will be suspended.
- To tighten wooden fragments, you need to use screws with threads only on the lower part. This is the only way to achieve a tight and reliable screed.
However, you should not unequivocally refuse to use screws in the construction of a frame house. You cannot do without self-tapping screws when installing locks, installing corners and hinges. Threaded hardware is needed when working with fragile materials that are destroyed by impact.
When conducting finishing works special self-tapping screws with a drill at the end and a wide head are used.
Such hardware is used to fasten drywall and siding panels. Using screws, you can attach thin sheathing strips by first drilling holes in them. The corrugated sheeting is screwed to the sheathing using special screws and rubber washers.
When deciding which screws to buy for construction, you should not choose zinc-coated products. They cost much more than ordinary hardware, but they also rust from moisture. It's better to spend money on screws from of stainless steel. They will last for decades without loss of performance. Stainless steel hardware can be unscrewed when dismantling the building.
Choosing nails

These products have centuries-old history use in construction wooden buildings. When a nail is driven into wood, its fibers move apart and the metal is tightly compressed. Even a smooth nail provides a fairly tight fixation of parts. In terms of shear load, it is almost impossible to break a nail. It may bend, but not burst. More likely, a timber or board will crack. To ensure reliable tear-off, it is necessary to use threaded or serrated nails. Such products work no worse than expensive self-tapping screws.
Let's look at what nails can be used on various stages construction:
- When creating a floor. As a rule, a multi-layer cake is created from boards and timber. Logs can have a thickness of up to 150 mm. They need to be fastened to the beams with smooth nails 200-250 mm long. Floor boards must be nailed to the joists using screw nails, the length of which is 2 times the thickness of the board.
- When installing the frame. It is assembled from timber with a section of 110x50 mm. Best choice To fasten such fragments together, 100 mm notched nails are used.
- When installing the casing. The thickness of the boards for internal and external cladding varies between 20-30 mm. The best option is to use 60 mm notched or threaded nails.
- When covering with clapboard or block house. So as not to spoil appearance cladding with hardware, it is advisable to use nails without heads. The length of such products should be 2-3 cm greater than the thickness of the skin.
- When installing windows. Nails are only used if window frames attached to the walls using plates. If a through fastening is performed, then long self-tapping screws or anchor bolts are used.
When working with nails, you must use hammers different weights and configurations. To drive nails 100-200 mm long, you must have a tool weighing at least 1 kg. Products of medium length (50-100 mm) need to be hammered with a hammer weighing 300-500 g. When working with hardware for finishing, a small hammer weighing 100-200 g is sufficient. It is better to buy nails in bulk.
Building a frame house is similar to assembling a construction set. The wooden frame house is assembled in accordance with the diagram. At the same time, the strength and reliability of the future structure depends on the quality of the assembly components. What are the features of the main components and connections of a frame house? And how to properly fix the lower and upper trims, racks, jibs, and crossbars?
Bottom trim connection nodes
The lower one is a frame made of wooden beams or several boards knocked together, which is laid on top. On a concrete foundation under bottom trim lay the so-called beds - boards. They perform the main function - they level the foundation and hide those flaws that could have been made during its pouring.
The beds are attached to the concrete foundation using anchors. The installation sites are located at a distance of no more than 0.5 mm. In this case, at least the ends of the beams are secured with anchors.
Connection of the beam to the concrete foundation.
To install anchors, holes of a certain depth are drilled. They pass through the board and go deeper into the thickness concrete foundation. The depth of drilling and driving in the anchor is determined by the height of the house wall and the design of the foundation. For traditional 2.5-3 m frame wall on concrete base The depth of lowering the anchor into concrete is 15-20 cm.
The second option for installing anchors is to concrete the anchor studs during the process of pouring the foundation. When casting concrete slab or tapes in specified places, hollow cones with internal thread. After the concrete has hardened, anchors are screwed into these elongated cone-shaped studs.
Features of the anchor connection
- The holes in the beam are drilled 2-3 mm larger than the diameter of the anchor pin.
- Wide washers can be placed under the heads of the anchor bolts to increase the area of their contact with the wooden surface, and increase the strength of the fastening connection.
 Anchoring bottom trim.
 Before fixing, mandatory waterproofing is carried out - roofing material is placed on the concrete or its surface is covered with a special waterproof compound, mastic. After installation, check the horizon. Deviations from the horizontal level are allowed in dimensions of no more than 0.5° per 3 m.
Bottom trim assembly on a columnar foundation
The fastening of structural units of a frame house described above is used on strip and slab foundations. For columnar bases, a different scheme is used:
- For ease of fastening, the upper part of the columnar supports should have a flat horizontal head with holes.
- Place on top of the headrest wooden beams, which perform the function of a grillage.
- Recesses of the required depth are drilled in the beams. They are drilled under the holes in the headband.
- Fix the beam with bolts or screws.
 Trimmed plank strapping on pile foundation.
 On a note
It is necessary to attach the timber to the foundation. Shallowly buried strips and slabs are subject to significant movement when freezing. Reliable connection The upper and lower frame ensures the reliability and durability of the entire structure.
Design of frame house components
Vertical frame posts are installed on top of the lower frame and secured with nails. Fastening with metal corners used for T-shaped connection of beams without cutting. It's easier to do. Fixing beams with metal nails is used at the junction with partial cutting of the lower beam. This is a more difficult connection to make with your own hands.
A joint without cutting is used for corner frame supports. Butt joints with fixation with plates or corners are used in the main components of a frame house, if the construction is carried out with your own hands, without the involvement of professionals. If they work experienced builders, then they use a partial insertion connection. It prevents strong movements of the timber and frame boards when drying out.
On a note
The size of the cutting for the vertical frame post is 30-50% of the thickness of the bottom trim beam.
The corner joint without cutting is fixed with metal plates using wood screws. In this case, reinforced steel corners with several perforations are used. As well as durable self-tapping screws in light golden and silver colors.
Strengthening the corners for fastening the corners of the house is carried out due to technological processing - the metal plates are hardened during the manufacturing process. Either through the use of metal with large thickness sections, up to 2-3 mm.
 Methods of fastening racks.
 A notch joint is often used to attach studs in the middle of a wall. The supports are inserted into the prepared recesses and additionally secured with nails. Then they are secured in a vertical position with jibs - diagonally inclined slats that rest against a vertical post on one side and a horizontal frame on the other. For ease of support, the ends of the jib are made beveled - part of the end is cut off.
Temporary jib
During the assembly of the frame, temporary jibs are also installed, which fix several vertical posts. Temporary jibs are placed between the upper and lower trim at an angle. They connect several vertical posts and are fixed with nails.
Temporary jibs are placed with outside frame. To attach them, you do not need to cut down, but they need to be fixed in such a way that upon completion of construction, the temporary auxiliary beams can be easily dismantled. Therefore, nails are used to fix them.
 Temporary jibs for racks.
 Temporary jibs hold the posts upright until permanent jibs are installed at the bottom and top of each rack. Once the permanent jibs are in place, the temporary fixing beams can be removed.
On a note
The construction project contains a description of the frame components wooden house in the drawings. They often do not describe in detail the method of attaching temporary jibs, since they do not bear the main load and support the frame temporarily.
Upper harness knots
The top frame of the frame house is laid on vertical frame supports after installing the corner posts. If the perimeter of the house is large enough (more than 6 m), then in addition to the corner pillars, intermediate ones are also placed - in the middle of the wall. And only after that the top harness is placed.
After laying the top row, temporary jibs are attached - across the entire wall. Next, attach the remaining vertical racks and jibs to them. After which the temporary jibs between the upper and lower trim are removed.
It is most convenient to assemble the walls of a frame house in a lying position, knocking together the lower frame, vertical posts, crossbar, jibs and top frame. And only after that raise the walls to a vertical position, where all that remains is to fasten all the walls of the house together. To firmly connect the walls of a frame house, a second top frame is used, which is overlapped with the first top frame.
 Double top knots.
 When using a double top trim, you can do without the use of steel corners. In this case, there is no need to partially cut off the ends of the boards, making a “claw” connection. Because such connections with cutting out part of the end violate the integrity of the board and, accordingly, weaken it.
Beams are placed on top of the second top frame interfloor covering. The beams are laid on the end, the distance between the beams is set depending on the size of the spans and fastened with nails.
Wall corner
The corner of a frame house is the place of maximum heat loss. As a rule, it is in the corners that condensation accumulates and it is them that need to be insulated first. Therefore, even at the stage of assembling the frame, it is necessary to ensure that the corners of the future frame house are warm. How to do it?
Smooth fixing plates are placed on the outside of the vertical beam. They connect adjacent single-level surfaces of the vertical post and horizontal beams. The fixing corners are located on the side. They connect mutually perpendicular surfaces. What else is important to know about angles?
During construction in regions with cold climates, non-solid materials are used as vertical posts. wooden beam, and assemble a corner post from separate boards. The resulting structure resembles a well. In it inner space install insulation that retains heat and limits possible heat loss.
 Installation of corners in the frame of the house.
 It must also be warm, for this purpose single racks are used, but the load from window and doorways removed using a bolt. The crossbar is fastened along the entire length of the frame wall by cutting into all vertical posts. It is important to take into account that under each window opening There should be at least 1-2 vertical support boards.
Knots of the rafter system
To nodes rafter system include all connections between its elements, namely:
- Fastening floor beams to top harness.
- Attaching the rafter beam to the top trim.
- Fastening the racks on the gables to the top trim and to the outer rafters.
- Attaching the internal posts to the rafter beam and to the ridge.
- Fastening struts - inclined beams that support the rafters and rest on the beam.
- Attaching the crossbar to inclined rafters.
- Fastening the sheathing.
 Knots of the rafter system.
 The fastenings listed above can be done using corners or using nails if the elements of the rafter system are connected overlapping each other.
Fasteners
The following elements are used as fasteners for the components of a frame wooden house:
- Fastening plates (angles or flat plates with or without holes). Plates and angles are attached to beams or supports using wood screws.
- Staples (straight and angular) are wire fasteners of a certain diameter. Their edges are folded and inserted into the ends or side surfaces beams
- Bolts - used to tighten adjacent beams and rafters, inserted into through holes and secure them with nuts.
- Nails.
All connecting, fixing and fastening elements for frame buildings are made of metal. To fasten load-bearing elements, reinforced corners made of hardened steel or increased thickness, 3-4 mm, are used. To fasten the supporting elements, angles made of ordinary steel with a thickness of 2-3 mm are used.
 Variety of fastening elements.
 In order to protect against corrosion, galvanized steel is used for the manufacture of corners and plates. Rust protection is especially important in outdoor construction, when metal fasteners in walls can become a point of moisture condensation, causing a section of the wall to become wet. Therefore, galvanized fasteners are in great demand in various components of a frame house.
Node connection errors
A drawing of components requires the presence of sketches and descriptions. However, despite this, novice builders often make offensive mistakes. Let's list the main and most frequently repeated erroneous actions that novice individual builders make when assembling a frame:
Not all jibs are installed. This is not true. The jibs ensure the wall's resistance to wind loads. In addition to the jibs, to withstand the wind it is necessary to use rigid slabs in the outer cladding.
- Use as corner posts solid timber or boards placed tightly next to each other. This corner will be cold. Moisture will condense and mold will develop.
- Use “black” screws for fastening. They are not strong enough, especially if not enough was purchased for construction. dry wood. When drying and warping, the “black” screws can simply be “torn off”. A more durable option is golden and silver-colored self-tapping screws, galvanized or coated with a layer of chromating and phosphating.
- They use wood that is not dry enough, which causes severe shrinkage and “breaks” existing nodes and connections.
- And another mistake is not to use nails. These proven fasteners are often stronger than any self-tapping screws.
Frame construction – new technology, in which, despite its apparent simplicity, there are many nuances and features.