Ceiling chandeliers are lighting fixtures that perform two functions simultaneously. Firstly, they are used to organize the main lighting in the room. Secondly, devices are one of the main elements of decorative decoration of a room.
Numerous manufacturers offer equipment different designs, but it’s not always possible to find something really worthwhile that fits into general interior rooms. In other situations, the cost of the chandelier you like may be too high. This is why many people are interested in how to make a ceiling lamp with their own hands.

Hand-made products will be unique and original, thanks to them you can express your taste and character. Making such devices yourself is not so easy. The work requires a certain imagination and perseverance. On the other hand, a ceiling chandelier can be created from improvised means and objects that have become trash for you.
Choose any materials for production - wood, plastic, metal or glass. Chandeliers constructed from wine bottles, wooden skewers or straw look very original. To summarize: the choice of material for homemade lamp completely depends on the imagination and idea that arose in the head of the apartment owner.
Types of lighting fixtures
The final stage of any repair and construction work will be the purchase of lighting fixtures. Often the main one is a ceiling chandelier, installed in the center of the room, provided its geometry is correct. There is a wide range of lamps on the market, differing in design, shape, principle of operation and even the presence/absence of certain structural elements.
Today, all people strive to save money, so it will be important to use a chandelier for energy-saving or LED bulbs. It is advisable to choose products with partially or completely closed shades in which the lamps are hidden. Due to this, you will protect the ceiling structure and be able to protect yourself in the event of a light bulb explosion (the fragments will remain inside the lampshade).

If you still like a chandelier with an open arrangement of bulbs, then inspect it and make sure that after installation the light flux will be directed downwards. There is also a simple rule - the simpler the product, the easier the subsequent installation.
Another point that should be taken into account when choosing a chandelier is the purpose of the room and its dimensions. In spacious halls with high ceilings volumetric lamps should be installed hanging type. For small rooms, saving space is required, so focus on flat (flattened) options.
Conventionally, ceiling chandeliers can be divided into two main types:
- classic hanging;
- flat with placement as close as possible to the ceiling.
And the latter are divided into two subcategories - built-in and overhead. Overhead lamps are considered the best solution for bathrooms, corridors and kitchens. The presence of a separation platform ensures their rapid cooling and high fire and electrical safety.

Recessed luminaires are also called spotlights. They are often installed (more correctly, built in) into furniture, suspended ceilings or arched structures. Manufacturers provide a wide variety of shapes, colors and design solutions for both traditional and flat lamps.
Finally, in addition to design features the lamps themselves, the type of light sources used is distinguished:
- An incandescent lamp is one of the most common and simple options. The cheapest possible light source. When exposed to mechanical stress, it quickly fails due to the vulnerability of the structure, and burns out relatively quickly (in the case of continuous operation, it can burn out in two or three days).
- An energy-saving fluorescent lamp is one of the best types of housekeepers. The advantages of the product are related to efficiency and long service life. Along with LEDs, it is the most common light source in developed countries.
- An LED lamp is an expensive product, the popularity of which is increasing every year. The efficiency factor exceeds 90%, and in the case of high-quality devices reaches 98%. They are characterized by a longer service life and increased reliability.

An example of a homemade lamp
Let's consider one of the most simple examples DIY ceiling lamp.
For production we will need:
- plastic bottle 5 liters;
- plastic spoons - their number depends on the size of the bottle that will become the frame;
- quick-drying glue for plastic;
- sharp knife;
- cartridge with wire.
First, prepare a frame from a plastic bottle. Remove any labels from the item, rinse it and dry thoroughly. After this, feel free to cut out the bottom. Cut off all the handles from the plastic spoons, but so that small pieces of 2 cm remain.
Glue the resulting scraps with “scoops” onto the base of the frame made from a plastic bottle. To do this, we just need the remaining pieces of the handles, which need to be poured generously with glue and pressed tightly to the surface (the convex part of the scoop should face outward). Cover the container in a circle until the entire surface is hidden. Ideally, the spoons are placed in a checkerboard pattern and then shifted to ensure a tight fit and no visible areas.

The sockets with wiring can be removed from an old chandelier, then installed and fixed in a new product by pulling it through the neck of the bottle. A decorative bowl can be decorated with the same blanks using glue and placing them on the neck.
To make sure the product is working, at the final stage, screw a light bulb into the lamp and connect it to the power source. If successful, all that remains is to install the chandelier on the ceiling.
For a more stylish design and change color solutions you can paint plastic spoons. This will increase the originality and attractiveness of the product.
Style selection
In addition to the points listed in the first chapter of the article, when choosing a chandelier you need to focus on a specific style. This is also true for those cases when you decide to make the product yourself. Comfort, coziness and how pleasant it will be to be in it depend on the interior created in the room.
The ceiling chandelier is the main element of decor, therefore, with a competent approach, the perception of the environment will improve, but with a careless approach, it will completely deteriorate. As you know, “breaking is not building”, therefore, to ruin the interior, it is enough to choose the wrong style.
Decide in advance on the design of the future lamp. The most common styles for chandeliers are high-tech, modern and Provence.
High tech
This includes products made of glass and metal. Modern appliances fit perfectly into the bedroom design and living room. Externally, the chandelier may look chaotic (with a random arrangement of decorative elements). Great option for people seeking to modernize their apartment or a private house, but not wanting to make something too complicated. Any errors made during the manufacture of the chandelier may look like an original design solution.

Modern
In accordance with this style, devices are made of glass and wood. The ceiling lamp is characterized by perfectly smooth and clear lines and has the correct geometry.
Provence
The most complex design, which is suitable for people who understand the principles of hand-made. Various fabrics, colorful ribbons, beads, and embroidery can be used to decorate a chandelier. The lamps are delicate and suitable for creating a romantic atmosphere. A Provence style lighting fixture is suitable for decorating any living space.

Installation materials
For ceiling mounting lamps will be required certain materials and tools:
- the lamp itself;
- junction box;
- screwdriver (curly);
- switches;
- as an alternative - dimmers (rotary toggle switch to adjust brightness, turn on/off a light bulb);
- wires;
- electrical tape;
- indicator (tester);
- pliers;
- connecting blocks.
Ideally, electrical wiring should be laid using connection blocks. If such products are not available, then twist the bare ends of the wires using pliers and hide them under a thick layer of electrical tape. The connections can also be placed under polymer caps. Make sure the wires are tightly wrapped around each other.

When laying the cable, pay attention to the material from which it is made. It is advisable to twist aluminum with aluminum or copper with copper. When two wires come into contact different materials Gradual oxidation will occur, leading to burnout and loss of contact.
Sequence of work
Before installing the ceiling light, determine the phases of the wires. To do this you will need an indicator screwdriver or a special probe. If you attach work surface to the phase conductor, the light bulb will start to glow. Otherwise, the wire belongs to the zero phase.
Next, you need to determine the phases on the wiring of the lighting fixture. Plug two wires into the outlet, but never touch the third one. If there are several bulbs on the chandelier, then about half of them will light up. Leave any wire in the socket and insert a third one instead of the second one. The second half of the bulbs should light up. Thus, the wire that is constantly in the socket (and when connected in turn with the other two turns on the light bulbs) is the zero phase.
Attach the lamp to the ceiling. To do this, use both a classic hook sticking out from the ceiling and a mounting rail (included in most modern devices). If there is a hook from an old chandelier, it is advisable to dismantle it.

Connecting lamps
If you need to connect a floor lamp or chandelier with a two-core cable, difficulties should not arise at all. Simply connect the ends of this cable to the two ends of the wiring. If the lamp consists of several parts and there are more wires, then they should be twisted correctly in pairs, subsequently connecting to the desired core electrical wiring in the apartment.
A three-core cable indicates the presence of two normal and one neutral phases. Follow the scheme described above to find the zero phase. After this, connect the device to the house wiring.
Traditionally, the zero phase on the lamp has wires with blue insulation, while the normal phase has brown, black or red insulation. If there are several blue wires, then they need to be connected in pairs, and then connected to the zero phase. Proceed similarly with other colored parts.
Products with four cores are much less common. The latter is intended for grounding and is usually colored yellow-green. It should be screwed to the lamp body using a regular screw. Be sure to insulate all connections.
Any materials can be used to make ceiling lamps with your own hands. The main thing is to choose the style and shape in advance and navigate the installation location. Also, before starting work, it is advisable to draw a sketch of the future product. Everything else is limited to your imagination.
Connecting homemade lighting fixtures is carried out according to the same scheme as purchased ones. Using our instructions, you can easily connect ceiling chandeliers with two, three and even four cores. The main thing is not to forget about safety rules and ensure complete insulation of the wires, excluding short circuits.
Chandeliers and lamps play a special role in the premises of a house, apartment, or cottage. They give each room its own style and are an interior decoration, especially if they are made by hand. Although such chandeliers are expensive, as they are made by hand.
Wooden chandelier with energy saving lamps hand made
If you want to make a lamp yourself, then with a little effort and imagination, you can make something special, individual, something that will give the room a special originality. This will not only save cash, but will also make the chandelier exclusive. Households and guests will admire her, and you can also make money from this.
Master classes, which are available in large quantities on the Internet, your own ingenuity, as well as the desire to create with your own hands will help you make a chandelier from scrap materials. There are no restrictions in design, as well as in the materials used.
Materials for the chandelier
Before you move on to making a chandelier with your own hands, you need to decide:
- for what room it will be made (kitchen, bedroom, living room, hall, etc.);
- with the style in which it will be made (business, romantic, classic, rustic, etc.).
These factors will help you choose the right material. It can be very different: fabrics, wood, plastic products, threads, lace, beads and much more. The first question concerns the foundation. There are many options here too. Old unfashionable chandeliers, metal and wooden hoops and frames, wire. Fantasy should not be limited. Anything will do, the main thing is to make the lamp carefully. It depends on it appearance.
Chandelier for living room
A chandelier for a living room should be elegant and formal. The picture shows one of the manufacturing options, made of beads. A master class on making such a chandelier begins with the selection of the necessary materials and tools. In this case you will need:
- hoop;
- beads;
- strong threads or easily bendable wire;
- nippers or scissors;
- spray;
- glue gun
You can use a hoop made of plastic, metal or wood. It is better to wrap it with fabric or ribbons in the color of the future chandelier. You can combine fabrics - this will only make it more original.

DIY elegant chandelier made of beads
You can buy the cheapest beads in the store or use old ones available in the house. It's okay if they are different color. Then you can use a spray to give them the desired color.
Beads are strung on threads or thin wire and then intertwined. The pattern may match that shown in the photo, or it may be made in a different style. A glue gun will help to secure the beads in the right places. The strung threads are attached to the hoop using thin wire. This is how a lamp design using beads is created. Other products can be additionally used in decoration, but this is up to the taste of the manufacturer.
Currently, many lovers of making chandeliers with their own hands use materials such as LEDs. LED strips are especially popular. The results are economical and very effective lamps.

LED strips for chandeliers
The following types of tapes are used:
- SMD 3528 with number of lamps 60, 120 and 240;
- SMD 5050 with number of lamps 30, 60 and 120.
LED strips are available in lengths of 5 m, with varying degrees of protection, which allows them to be used in rooms where humidity is high (IP44).
When creating a chandelier with your own hands from several colors, you must observe the polarity when soldering and install the controller. It will allow you to adjust the brightness and switch the light using the remote control.
Chandelier for children's room
Making a chandelier for a children's room is not difficult at all. We must remember that this room should have an atmosphere of childhood, and it is connected with the flora and fauna. Therefore, most often such a chandelier is made with your own hands with butterflies, fish, flowers, various plants, and also use fabrics with children's designs.
Original do-it-yourself chandeliers with butterflies
The work begins with thinking through the design. The photo shows what you need to have to make such lamps:
- frame;
- thin strong threads;
- white cardboard;
- pencil;
- scissors;
- sharp knife;
- butterfly stencils of different sizes;
- glue;
- screws for attaching the structure to the frame or ceiling.
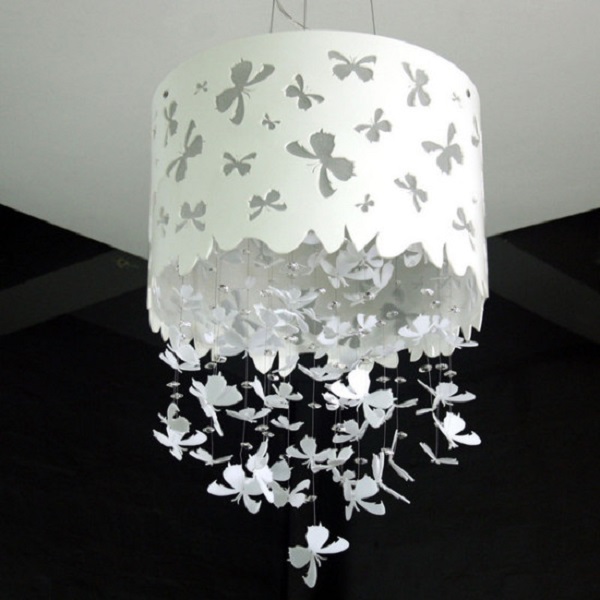
To make a white chandelier, you need to draw silhouettes of butterflies on cardboard of the appropriate length using stencils, cut them out and then connect them to the frame, glue them securely and fasten them. Inside the lamp different lengths hang butterflies on thin threads. If you add beads to these threads, the chandelier in the nursery will have a rather original design. When you turn on the light, moving shadows will be cast on the walls of the nursery, which kids really like.
A chandelier designed for a bedroom should have an unusual decor. The design of such a lamp should be conducive to coziness and comfort. The use of fabrics, napkins, threads, etc. is appropriate here. The photo shows a small chandelier for the bedroom, made by hand using lace napkins. The master class consists of the following steps:
- inflate the balloon to the required size;
- lubricate with Vaseline;
- then grease with PVA glue;
- apply napkins;
- allow the structure to dry;
- deflate the ball.
All that remains is to put the chandelier on the socket, insert a lamp into it, preferably an energy-saving or LED one, and run the wire from the switch.

Chandelier made from napkins for the bedroom
The photo shows a chandelier made of flowers, made by yourself. The manufacturing technology is similar to making a chandelier with butterflies. Only here it is necessary to make a more complex frame. This lamp looks great in the bedroom. Subdued light and reflections on the walls will create a unique atmosphere.

Lamp made of flowers for the bedroom
Chandelier for the kitchen
It is impossible to imagine a kitchen interior without an original lamp. Here the manufacturer’s flight of fancy depends on the materials used.

DIY twine chandelier for the kitchen
This original lamp is made of twine. Suitable for a country-style kitchen. Her master class on making it consists of the following steps:
- make a frame consisting of 3 hoops located at some distance from each other. Install partitions made of thick wire between them (it is best to weld them);
- then, taking the twine, wind it lengthwise and crosswise, as seen in the photo.
Making such a chandelier with your own hands will not take much time, and the cost of materials will be minimal. But with its design and originality it will outshine purchased copies.
Another type of kitchen lamp that you can make yourself deserves close attention.

DIY thread chandelier
The production of such a chandelier is described by many craftsmen in master classes posted on the Internet. The step by step steps are as follows:
- inflate a balloon;
- lubricate with Vaseline;
- grease with PVA glue;
- wind threads (you can use multi-colored ones);
- grease with PVA glue;
- let the product dry;
- release the air from the balloon and remove it.
All that remains is to insert the socket with the light bulb, hold it in Right place wiring and install a switch to make it convenient to turn the lamp on and off.
You can buy in the retail chain various chandeliers and lamps having standard dimensions. The handmade market offers a wide variety of ready-made modules. At home, by rummaging through old things, you can find materials and designs that are suitable for making chandeliers with your own hands. They are easy to assemble original design. Master classes that are easy to find in literature and on the Internet will help with this.
How to do it. Video
Video will be shared useful tips about how to make a high-quality chandelier with your own hands.
By adding your imagination, you can create an original, one-of-a-kind chandelier that will become an exclusive element of home design. The premises of an apartment, house, or cottage will be the personification of comfort and originality, and all thanks to chandeliers and lamps made by a craftsman with soul, in an atmosphere of creative inspiration.
Today, a chandelier is not just a source of lighting. It is one of the main elements of room decor. The most popular lamps are self made, because they personify the individuality of the homeowners and their extraordinary creative abilities.
Undoubtedly, handmade creativity is a rather difficult task, requiring a lot of patience and accuracy. However, doing something with your own hands is always quite exciting and educational. The topic of this review is how to make a chandelier with your own hands.

Choosing material for a homemade chandelier
In order to make a handmade lamp, a variety of materials are used:
- glass;
- tree;
- plastic.

In addition, sometimes very unusual things are used to make a chandelier at home:
- paper;
- cardboard;
- disks;
- straw;
- branches;
- wine bottles And so on.

When choosing this or that material, you need to take into account your own preferences and the style used in the design of the room.

In addition to the material, devices may differ in manufacturing techniques. The most common are:
- Japanese origami;
- macrame;
- weaving;
- thread;
- knitting;
- applique;
- embossing

Ideas for creating a chandelier with your own hands - step-by-step instructions
Nowadays, there are many unusual ideas on how to create a beautiful lamp for an apartment with your own hands. Let's look at those that are more popular.

Chandelier made of plastic spoons
Ordinary disposable plastic spoons are the simplest and most affordable type of material to make a chandelier. The advantages of such raw materials are:
- low cost;
- variety of color solutions;
- durability.

To make a lamp, you will need:
- 5 liter plastic bottle;
- disposable spoons;
- PVA glue;
- light bulb socket;

Procedure:
- Prepare the bottle. To do this, remove the label, cut off the bottom, wash the workpiece thoroughly and dry it.
- Prepare the spoons by cutting off the handles.
- Cover the entire bottle with scoops with the convex part facing out.
- Secure the cartridge in the made lampshade.
- Attach the chandelier to the ceiling and connect it.

Chandelier made from plastic bottles
An interesting solution from a decorative point of view would be a lamp assembled from plastic bottles.
- We take scissors and cut out different patterned shapes and unusual figures. We will assemble a chandelier from them.
- We attach several thin rods to the frame of the old lamp and connect them, removing the central one. At this stage, the lighting fixture takes on the shape of a hedgehog.
- We fix all the prepared figures and forms onto the frame of the chandelier. The product is ready!

Let's consider a particular example - the process of creating a lamp in the form of leaves:
- Cut small blanks from bottles that imitate leaves. Usually birch leaves are chosen.
- Using a soldering iron, slightly melt the sections of the leaves and draw out the veins - this way they will look more impressive.
- Make holes in the stem of each leaf using a heated thin needle.
- Use wire to form branches. Screw them to the frame of the future chandelier.
- Attach leaves to the branches. Ceiling lamp original design ready!

Chandelier with paper butterflies
A lamp with paper butterflies is also popular. This model looks very impressive and luxurious, although it is quite simple to manufacture.

Sequencing:
- The role of the base is played by the frame from an old lamp or a simple rim made of metal or wood.
- Take paper and cut out butterflies from it according to pre-prepared templates.
- Secure the cut insects to a fishing line or nylon thread.
- Attach the resulting threads to the frame of the future chandelier and decorate it.

Fabric chandelier
This type of lighting fixture is also based on a solid frame or thick wire. First of all, prepare the base, and only then can you start cutting out the material to create the lampshade.

The length of the finished product depends on your wishes, and the width must correspond to the size of the frame. After completing the pattern work, be sure to try it on. The next step is to sew the fabric to the base of the chandelier.

In order for the lampshade to retain its shape, you need to choose the material wisely. If you use light material, then the lower part of the lampshade should be weighted.

You can use fringe, braid or lace as decoration. But try not to overdo it with the decor.

Lamp made of threads and a balloon
To create such an original lampshade you will need to prepare:
- thick threads or rope about 1 m long;
- old cartridge;
- petrolatum;
- glue and brushes;
- air balloons– 1 – 2 pcs.

Manufacturing process:
- Inflate the balloon to the required volume, and use a felt-tip pen to mark the boundaries of thread winding.
- Coat the entire surface of the ball with Vaseline using a brush.
- Pour the glue into a wide container and begin to process the threads with it as you wind it around the ball.
- After you fill the ball with threads to the marked boundaries, it should be left to dry.
- After a day, burst the balloon and remove it.
- Cut a hole in the top for the cartridge and insert it. You also need to cut a hole at the bottom of the lampshade - this will make it easier to insert the light bulb. The product is ready!

Wine bottle chandelier
This chandelier is more labor-intensive to create than the options described above. It's quite difficult to make. This requires patience and attention. But the effort is worth it!

Necessary materials:
- wine bottle;
- cartridge;
- cable;
- sandpaper;
- base made of metal or wood.

The tools you will need are a glass cutter.
Manufacturing procedure:
- Preparatory stage. Wash and dry the bottle, remove the labels, mark with a marker a line along which to cut the bottom using a glass cutter.
- Sand the cut with sandpaper.
- Insert the wire through the neck of the bottle and attach the socket.
- Attach the bottle to a pre-prepared frame.

The number of shades for a chandelier depends on you - you can leave one or make five or six.

Chandeliers made from laser discs
If the apartment has accumulated a large number of old CDs - don’t rush to throw them away. They make a pretty creative lamp.

To make unusual accessory from laser discs you will need to prepare a couple of planks round shape. Their size should be slightly larger than the size of the disks. Also needed:
- fluorescent light bulb;
- steel or wooden racks;
- old magnetic starter;
- a lot of CDs.

Take a board that is thicker and make a hole in it for the starter. Connect everything to the lamp. Then start stringing CDs onto it while simultaneously mounting the racks. At the end, attach the second board. The work is completed.

Wooden chandeliers
Wood is the most common material for various types of crafts. The chandelier is no exception.

To make such a lamp, you need:
- wooden planks 0.4 m wide;
- glass jars with a volume of 1 liter for lampshades;
- sandpaper;
- self-tapping screws

Procedure of manipulations:
- Sand the slats with sandpaper.
- Make recesses in them on the back side for mounting the wire and three holes for the lampshades.
- Cover the planks with varnish.
- Attach the sockets, screw in the light bulbs.
- The lampshades will be ordinary liter jars painted white.

Choosing a lamp for a homemade chandelier
To make a chandelier made by you from scrap materials look even more attractive, you need to choose the right light bulbs for it. The following recommendations will help you:
- Choose a lamp of suitable power. Remember that overly powerful products can cause a fire.
- Look at the number of lumens. The larger it is, the more natural lighting.
- Consider whether the shape of the light bulb matches your device. Some chandelier models require bulbs of a strictly defined shape. Only then will they work efficiently and correctly reflect light rays.
- Be sure to look at the expiration date. If you plan to use the lamp frequently, then take a closer look at the lamps with the longest life expectancy.
- Ask what kind of light the lamp will glow - cold or warm. For your home, it is better to purchase an option with a warm shade of light. This will make the atmosphere seem more comfortable.
- Don't ignore the energy consumption of a light bulb. The optimal choice is considered to be products with low level energy consumption.
- Check for mercury in the lamp - this will determine how it is disposed of. Products containing mercury cannot simply be thrown into the trash. They must be handed over to special collection points.

Decorating the product
You can use a variety of things to decorate homemade chandeliers and lamps:
- paints and varnishes;
- lace;
- satin ribbons;
- fringe and braid;
- beads, beads, rhinestones, stones.

Good decorations include artificial or dried flowers, feathers, and butterflies cut from fabric. In general, what to decorate with ready product, depends only on you. You can use any available means that your imagination indicates.

In conclusion, we note that such a homemade lighting device as a chandelier will definitely bring a touch of freshness and style to the decor of the room. Your loved ones and guests will definitely note the originality of the accessory and your skill. In addition, a hand-made lamp is an excellent gift for a friend or colleague.
Original photo ideas for homemade chandeliers


The trend of making something, which is rapidly gaining momentum, cannot ignore such an interior item as a chandelier. It is not only a source of light, but also one of the main decorations of the room. Naturally, the eyes of the guests will be focused on the individual creation and the work will not go unnoticed. The abundance of available raw materials allows the use of a wide variety of materials. What can a chandelier be made from with your own hands?
DIY chandelier made of cardboard.
Cardboard is the most available material for the manufacture of various products.
Such a DIY chandelier will require cardboard of different colors, fabric or lace, and PVA glue. And then everything depends on the imagination of the manufacturer.
1. We cut the cardboard into circles of the same diameter and fold them into hexagons.
2. Cut out the inside of each hexagon round hole.
3. Cut the fabric into circles with a diameter larger than the holes in the cardboard.
4. Using glue, attach the fabric to the cardboard blanks so that it stretches well and covers the hole. We leave two unsealed circles so that the socket with the light bulb can be secured and there is an outlet for the heated air.
5. Glue the finished hexagons together using the bent edges. We place the unclosed blanks on opposite sides.
Attention: The paper burns very well! Install economy version light bulbs, they do not heat up much.


DIY pumpkin chandelier.
In this case, the flight of your imagination is limitless. A pumpkin that has been cleaned from the inside is itself a ready-made lampshade; you just have to cut out the desired pattern on it and insert the socket under the light bulb.
To make the pattern on the bark symmetrical and beautiful, before cutting, make a stencil out of paper and apply it to the workpiece using a pencil or marker. Then you can easily correct the image. A very delicate lace pattern or running deer on a sunny golden pumpkin background will please the eye on cold winter evenings. If such a lampshade is dried properly, it will serve you for more than a year.


Many people prefer to make their own items home interior. And this is good, because in this case not only the original creative abilities of a person are manifested, but also a home decorated with such objects becomes unique and original, emphasizing the taste and ingenuity of its inhabitant.
DIY chandelierfrom plastic bottles.
To make a chandelier with your own hands from plastic bottles we will need:
- The skeleton of an old chandelier. (You may still have an old chandelier).
- Lots of plastic bottles of different colors. (from white, milk, to dark beer bottles, including green, blue and clear).
- Several steel rods that can be purchased at any hardware store.
Manufacturing technology.
- We cut plastic bottles and cut out petals and flowers from them. You can also cut out various shapes or animals - it all depends on your imagination.
- To attach flowers and other figures to the frame of the old chandelier, we attach steel rods. We make a hedgehog from 5-7 steel rods, connecting the rods with the centers in turn with wire. We cut off the upper rod of the hedgehog with pliers, there will be a light bulb here.
- We carefully attach the cut out figures and flowers to the resulting structure.
- We insert our hedgehog into the frame of an old chandelier.
DIY chandelierfrom plastic bottles ready to go!


DIY chandelier made from laser discs.
In the era of computer technology, almost everyone has accumulated a lot of CDs and DVDs. What use can they find? - DIY chandelier made from laser discs! The design of the chandelier depends on your imagination and the number of disks accumulated in your house. Using wire, we connect them into various designs, not forgetting to leave a hole for the cartridge. You can make a ball, a bending cylinder, a cone and much more. With its shine and reflection of light, such a product will add extraordinary charm to the room.


DIY chandelier made of wood.
To make a wooden chandelier with your own hands we will need:
- Door trim strips, which are sold in hardware stores. 12 pieces approximately 30-45 centimeters each.
- 6 identical liter jars for lampshades.
- Tone paint to match the color of wood (oak or larch).
- Small wood screws.
- Seaming machine.
- White paint.
- Sandpaper.
- We process the planks with sandpaper so that they are perfectly smooth on all sides.
- On the back side of each plank we make a shallow groove for laying the electrical wire.
- On three strips on both sides we drill holes for attaching the lampshades.
- We paint our planks with tone paint to match the color of oak or larch.
- Using self-tapping screws, we fasten all the planks in pairs so that we get a regular hexagon.
- We make holes in the center of the metal lids of the cans and attach sockets with light bulbs.
- We roll up the jars with light bulbs using a seaming machine.
- We paint the lid and neck of the jar in the color of wood, and the shade in white or blue.
- Fastening wooden chandelier to the ceiling.


DIY chandelier from a headdress.
An old hat that has lost its shape, faded and gone out of fashion can also serve as a wonderful addition to your interior. With a little creativity, you can create a beautiful chandelier with your hat crabs. A design thought, as well as lace, ribbons, chiffon or organza, will turn an old, shabby item into a beautiful lampshade. For example, use thread to attach lace in the form of a veil to the brim of a hat, tie a beautiful bow on top and the lampshade is ready. The simplest and most original solution to the problem.


DIY chandelier from yarn.
To make a chandelier from yarn with your own hands, we need:
- Plastic bowl for making a lampshade.
- Yarn. Multi-colored threads.
- Bonding paste.
Step-by-step diagram for assembling a chandelier.
- Prepare a paste for securing the yarn on a plastic bowl. To do this, mix 0.5 cups of flour with 2 cups of water, then add another 2 cups of hot water to the resulting mixture, bring the solution to a boil and add another 3 tablespoons of sugar. Then mix thoroughly and let the paste cool.
- Soak yarn and woolen threads in the cooled paste for several hours.
- Lightly wring out the soaked yarn and wrap it tightly around a plastic bowl. Here you can show your creativity and design ideas. The yarn should especially be wound at the bottom of the bowl.
- After drying, after about a day, carefully remove the bowl from the resulting yarn lampshade.
- We attach a lampshade with an electrical wire to the bottom of the lampshade and hang the chandelier.
Important! A DIY chandelier made from scrap materials is not designed to more power lighting, therefore it is very important for fire safety reasons not to use incandescent light bulbs with a power of more than 60 Watts!


Are you tired of the ordinary look of the interior of your room or country house? This means the time has come for amazing changes. You can, of course, buy a bunch of new things in stores and replace old ones with them, but we suggest plunging into the creative process headlong and making something unique with your own hands. Unleash the designer in you and change the world, make it beautiful and unique.
Let's start with replacing the chandelier; this interior element will become the accent of your signature interior design. Original– it’s possible. If you do not take into account cost savings, then we can say with confidence that the positive emotions that will certainly arise during the process will be remembered for a lifetime. In addition, you will become the owner of a unique and exclusive item. Please be patient, time and the necessary materials.
The materials for making the lampshade can be different. The most forgotten and discarded items will be used, anything will do. Old kerosene lamps, an openwork canary cage, cups and saucers, burlap, grandma's lace, decorative feathers, beads and much more.
When inventing a new chandelier, you need to decide in advance what style the room will be decorated in. The romantic style of the room is suitable for a young girl; country or Provence style will create an unforgettable atmosphere in country house, - it's up to you to choose. It is also necessary to determine what lighting intensity you would like to achieve in the end. After that, start selecting necessary materials for making a chandelier.
DIY chandelier: photo tutorial on lampshade decor.
You will need:
- cartridge of the required diameter;
- electrical cord;
- frame of the future chandelier;
- decorative elements;
- nylon threads;
- hot glue gun;
- bulb.
With the help of your imagination, an old lampshade frame found in the attic will turn into an elegant and stylish thing. Many famous interior designers started their careers this way, making amazing things and putting them up for sale. Who knows, maybe your success is just around the corner?
So, measure the lampshade and make a pattern. When choosing fabric, pay attention to its density. It can be organza, chiffon or a denser fabric like burlap or linen. Sew the parts and, pulling the resulting cover onto the frame, secure the fabric with threads. Now decorate the lampshade with lace, beads and artificial flowers. Attach the socket to the finished lampshade and connect the wire, all that remains is to screw in the light bulb and the chandelier with your own hands (as in the photo) is ready.


An object of pride and admiration has appeared in your home. Now no one can stop you from creating new masterpieces!
DIY chandelier from rulers.
Children's rooms are the most pressing issue from a design point of view. Children grow up very quickly, and chandeliers in the shape of airplanes or other toys quickly lose their relevance. That is why we turn on our imagination and begin the creative process!
It’s easy to make a chandelier with your own hands from rulers! You need to decide on the shape and choose plastic or wood. The advantage of plastic is the good flexibility of the material, but at the same time it melts well, emitting an unpleasant odor, so low-incandescent light bulbs, preferably LED, are installed in such chandeliers. Using plastic rulers you can make round and semicircular lampshades.
But it’s best to take wooden rulers of the same length, two small hoops and wooden plank. Using self-tapping screws, we attach the rulers at equal distances to the hoops. We pass the bar inside one of the circles to install a socket with a light bulb on it. The rulers between the hoops can be fixed parallel or in the form of a lattice. This DIY chandelier will especially appeal to schoolchildren and will suit any interior.

DIY New Year's chandelier (photos attached).
If the peak of your creative activity occurred on the eve New Year's holidays, you can surprise your friends and family with a real work of art. A DIY New Year's chandelier (photos attached) made from bright Christmas balls can replace a Christmas tree and become the central decoration of the house.
You will need:
- ordinary plywood or plexiglass;
- coarse linen rope;
- blue, silver, green and gold balls;
- stapler;
- glass elements old chandelier.
Cut out a 50:50 cm square from plywood or plexiglass. Drill holes in a chaotic manner every 5 centimeters.


Using a wire staple, thread the linen thread into one hole and out of the adjacent hole. Cut the two ends to a length of 2 m. Fill all the holes in this way. Fix a square on the ceiling instead of a chandelier, and tie the balls at different distances from the floor, cutting off the excess length. Do this in the central part of the composition. Hang small glass pieces on shorter threads along the edges, giving the whole composition a pyramidal shape.


Stylish DIY chandelier, ready!
To make the look of your room unique, you can do many things with your own hands. Such items include chandeliers.
The most popular way to make a chandelier with your own hands is to wind it with threads. We take a regular balloon and inflate it. You will also need a lot of PVA glue and more than 100 meters of thread. It is advisable to use cotton threads, so the glue will not run together and will lie evenly. It is more convenient to pour the glue into some container and apply the glue to the threads with a brush. We wrap the ball with these glued threads, making sure that there are no large gaps. We wait until the glue dries. It’s better to wait more than a day than to start over again, but with different materials. When the glue has dried, untie the knot of the balloon and inflate it again. This is done so that the shape of the ball does not get lost and our DIY chandelier does not become oval. Now you need to burst the ball with a needle and carefully remove it from the cocoon of threads with something sharp. Cut a round hole at the top of ours and place a lamp in the ball, preferably with a matte finish. Attach the light bulb and the chandelier. You can compare the results obtained by looking at examples of photos of chandeliers or a video tutorial.
To make your DIY chandelier even more original and delicate, use thin lace instead of thread. Starch the lace and cover the ball in the same way. This lamp will fit perfectly into a country-style kitchen.
To make a sconce with your own hands, use the same method with thread or lace. You can also use thin strips of fabric or tulle. Just use a juice box instead of a round ball. Preferably from half a liter - this way the sconce will look more attractive. Before creating, look at the chandeliers photos to understand which sconce is right for you.
DIY chandelier from hangers.
Don't throw away old things. There is a use for everything. You can even create a DIY chandelier from clothes hangers. This is very comfortable material for creativity, and hangers, as a rule, are very durable. Just fasten them together with wire and give them any shape, decorating them with fabric, bows, paper or other available material. You can install not just one, but several LED bulbs or LED strip. A chandelier of this type characterizes the owner of the room as an extraordinary person who loves experiments.


There are also more extravagant examples of creating chandeliers with your own hands.
Well, here’s another idea on how to make a chandelier with your own hands from scrap materials.
For this chandelier model we will need a large plastic bottle and many disposable spoons.


Look at photos of DIY chandeliers and decide what you want to get. You can make an excellent DIY chandelier using an old lampshade. Need metal ceiling base with a lampshade. Cover the space around the light bulb with foil (be sure to use energy-saving!). Remove the fabric from the old lampshade and attach suitable paper to it. Cover the bottom of the lamp in contact with the lamp with baking paper, which will give our DIY chandelier a soft yellow light. Ready. It feels like the chandelier is hanging by itself without touching the ceiling.
If you have several embroidery hoops, use them to create beautiful lamps. Use a hoop or wire as a base to create the desired shape of the lamp. Cover the frame with fabric or look at the photo of chandeliers to correctly paint the base. Attach organza or transparent chiffon to the frame. For decoration, you can also put a single-color Christmas tree garland inside. Instead of fabric, you can use pendants: string beads onto a strong fishing line and attach the fishing line to the base. It will work out original chandelier with your own hands. It looks interesting if you hang several of these lamps nearby.
Looks unusual and homemade chandelier, made like this: carefully glue the kebab sticks together into a square shape, as you will see in the photo of the chandeliers. If desired, attach macarons to the edges of the chandelier as bows. As a decoration, place a ribbon of bright fabric between the sticks. You can create sconces in the same way.
A lamp made from disposable cups fastened together with a stapler looks intricate. Photos of chandeliers show how to do this correctly. And use fishing line to attach the chandelier to the ceiling.
A chandelier in a room is not only a lighting fixture. Without exaggeration, we can say that it is the main decoration of the room. Handmade items are considered especially valuable. This allows us to highlight the special taste of the owners of the home, as well as their extraordinary and creative mind. Undoubtedly, this type The work is quite complex and requires increased concentration. But at the same time, when creating decorations for your home, you can find many interesting and extraordinary solutions in it!
This article presents some ideas for decorating a chandelier with your own hands, as well as instructions for them. Everything is written so simply and clearly that anyone can do it at home.
In order to make a chandelier, sometimes the most unusual materials are used. For example, everyone is already familiar with glass or wood, plastic, and so on. But sometimes, when you want something completely “unusual,” wooden skewers, glass wine bottles, jars, all kinds of tree branches, cardboard, and even straw come into play. You need to choose depending on the idea of the creator and the wishes of the apartment owners. You also need to take into account the general interior of the room where the finished product is supposed to be placed.

Interesting idea for a chandelier made from plastic spoons
Plastic spoons for disposable meals are one of the simplest and most easily available materials for creating a chandelier for a room. Their advantages are low price, a variety of colors, and such material will last for quite a long time. To create such an extraordinary chandelier, you will need a minimum of investments, both physical and material.
Materials:
- empty bottle drinking water, volume 5 liters;
- plastic spoons (their number depends on the size of the bottle);
- glue for plastic;
- an old chandelier (or rather, a socket from it);
- sharpened knife.
Process of creation:
- First you need to prepare a plastic bottle for subsequent steps. Remove the label in advance, cut off the bottom, dry well.
- Then you need to remove the plastic spoons from the packaging and carefully cut off the unnecessary handles with a knife, leaving about 2-3 centimeters above the level of the “scoop”.
- You need to glue the scoop blanks to the base of the bottle. Apply a large amount of glue to the remaining “tail” and press it to the surface (with the convex side of the spoon facing out). It is necessary to cover the entire bottle in a circle until the entire perimeter is occupied by plastic “spoons”. It is advisable to arrange them in a checkerboard pattern and slightly move them together. This will leave fewer “free spots”.
- You need to remove the cartridge from the old unnecessary chandelier, and then place it in an already glued and dried bottle and fix it to the frame.
- A decorative bowl can also be made from plastic spoons: “scoops” are glued around the neck of the eggplant.
- Install and connect the chandelier, check its operation.

Note! The option of decorative painting or painting of spoons in absolutely any color is possible. Thus, your product will look even more beautiful and more original!


Chandelier made of plastic bottles in the form of leaves
Another unusual option in the interior would be a chandelier made in the shape of leaves. It is created from simple plastic bottles, the variety of colors of which allows you to work in the most unusual colors and embody the most daring ideas.
Process of creation:
- Cut plastic bottles into blanks shaped like future leaves.
- For each workpiece, the sheet shape is finally fixed.
- Using a soldering iron with a thick tip and a one-sided bevel, you need to slightly fuse the sections of each leaf in order to give the future product the greatest effect.
- In the same way, using a soldering iron, you need to give the workpieces a sheet structure. You need to act extremely carefully and accurately, because you can easily make a hole in the plastic. Such a leaf with outlined veins and slightly fused edges will look complete.
- Using a hot needle, you need to melt several holes at the “leg” of each leaf in order to attach them.
- Using thin wire, form branches and screw them to a steel wire frame.

It would also be a great idea to make new chandelier in the form of a lampshade for a floor lamp or a lamp for a table. Thus, it will be a great addition to the previous product!

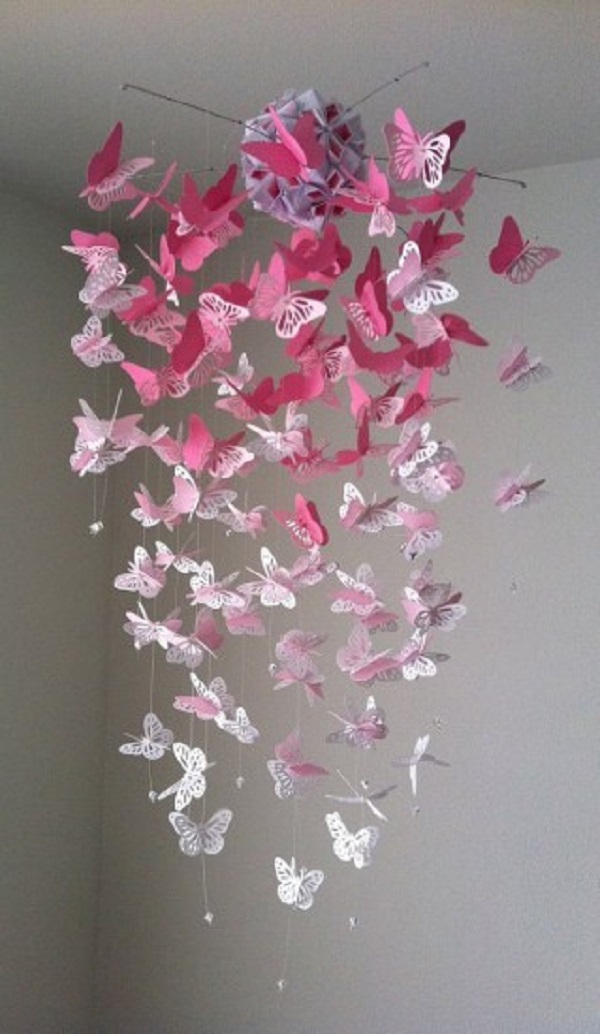
Chandelier with paper butterflies
The most common product option is a chandelier with butterflies. And this is not without reason. Let's start with the fact that this option looks luxurious and expensive, and secondly, its production does not require any special physical costs. Thus, even a child can participate in creating a chandelier.
Process of creation:
- It is based on either an old chandelier or a similar frame. If you don’t have one, then you can take the simplest wooden or metal rim. If such material is not available, then, as an option, you can take thick wire and make about 2-3 skeins, so that a circle is formed.
- Cut out butterflies from paper according to the template. You need to take the butterfly template and adjust it to the desired size. The option also looks very unusual when butterflies of several sizes are located on the chandelier (again, depending on desire). Transfer the outlines onto paper and carefully cut out, preferably with a sharp edge stationery knife, or small, non-rounded scissors. For the templates themselves, it is better to use a material that is dense, does not become very dirty and does not attract dust. For example, velvet paper is very poorly suited for the product, because in the future you will need to vacuum the chandelier quite often.
- Take a nylon thread or transparent fishing line and attach the butterflies to it. There are two types of fastening: either piercing the bodies of the butterflies, or gluing them with silicone glue.
- Next, we attach the threads with butterflies to the base of the frame and decorate it.
- You can also try a fun variation by making a wire ball! It should be based on a pendant from a chandelier and placed on it using glue gun several butterfly patterns.


Fabric chandelier
This chandelier is also based on a frame. As in the previous version, either old metal frames or thick wire are suitable for its manufacture.
After you have pre-prepared the base, start cutting out the fabric from which the lampshade will be made in the future. How long the finished product will be depends on your desire, but it is worth considering that the width of the fabric must be the same as the diameter of the frame! Once you finish the pattern, you need to do a fitting.
Another nuance is that the top of the fabric will need to be sewn directly on the frame, which means that it (the frame) must be solid. Otherwise, if it is possible to thread it directly into the fabric, then you should first bend the upper edge of the pattern and stitch it, and then iron it. Then we sew a seam on the side of the product.
To prevent the lampshade from losing its shape, you should pay due attention to the material. If the fabric is too light, “airy,” then the bottom of the product should be weighted. You can use cardboard or fishing line for this.
Carefully sewn fringe, lace or braid will look just as beautiful. But do not “overload” the product! The process of creating a fabric chandelier is similar to making a lace chandelier. So you can safely experiment with the materials that are placed on the frame.


Lamp made of threads and a balloon
Materials:
- dense threads, such as wool, cotton, or jute rope - at least 1 meter;
- cartridge;
- petrolatum;
- PVA glue;
- a brush for applying glue and Vaseline (it is advisable that the brush does not fade);
- 1 or 2 pieces of balloons (the first for working with it, and the second for checking the finished product, if desired);
Process of creation:
- Inflate the balloon to a certain size and secure it. Remember that the finished work will exactly follow the outline of the ball! Using a marker, draw a couple of circles at the top and bottom in order to determine the boundaries of thread winding.
- Using a brush, coat the entire perimeter of the ball with Vaseline.
- Pour PVA into a plastic container and thoroughly process the threads with it (It is not advisable to apply glue to the entire length of the threads at once! Process them as you wind them around the ball!).
- Taking into account the boundaries that you drew with a marker, wind the threads around the ball. Do not forget that the future appearance of the product depends on the density with which you wind it.
- After wrapping, you need to leave the product for a day until it is completely dry; After complete drying, you need to burst the ball and remove it through the holes.
- Cut a spot in the top and insert the cartridge.
- To be completely sure that the product is strong, you can insert a balloon into it and inflate it. In a similar way, you can check the flexibility and reliability of the lampshade.
Alternatively, you can paint the structure with a spray can or acrylic paint, attach all kinds of decorative ornaments, such as butterflies, artificial flowers or beads. Also, a great idea would be to arrange several balls in the form of a bunch of grapes and fasten them together.


Wine bottle chandelier
This version of the chandelier is a little more complex than the previous ones. Making a chandelier this way is quite difficult; the manufacturing process will require care and attention. However, you will like the result!
Materials:
- wine bottle;
- glass cutter;
- sandpaper for sanding edges;
- cartridge;
- electrical wire;
- metal or wooden frame, rim.
Process of creation:
- First you need to prepare the bottle itself for further manipulations with it. The first step is to draw a straight line around the perimeter at the level you need. This is required in order to cut off the bottom of the bottle using a glass cutter;
- To avoid cutting yourself on the glass, you need to sand the sharp edges with sandpaper;
- Pull the wire through the neck of the bottle and then connect the socket;
- Attach the bottle to the frame.
You can also decorate the bottle with all kinds of decorative items, or leave it in its original form. In any case, it will look original and impressive.
The number of products on the frame depends on your desire. You can either leave one bottle or secure four or more bottles at once.


Laserdisc chandelier idea
This idea is great for those who have a large number of laser discs left in the house, but don’t dare throw them away. It’s worth noting right away that manufacturing options and the result can be very different. It all depends on your imagination and creativity!
Materials:
- two round wooden planks different thicknesses, and which are slightly larger in diameter than disks;
- racks made of metal or wood;
- Fluorescent Lamp;
- magnetic switch;
- disks.
Process of creation:
- Make a hole in a thicker board and install a starter with a switch in it.
- Then connect it all to the lamp.
- String disks onto the lamp.
- Place the stands around the discs and secure the top.
The finished product will delight its owners for a long time, and it does not require special care. It is not advisable to place this type of chandelier in a child’s room so that the child cannot harm himself (only if the chandelier hangs out of reach).


Shabby chic chandelier
To create spectacular lighting in a room, you can also make a chandelier from fabric or beads. The result will be a kind of candelabra or lampshade in the “shabby chic” style.
Materials:
- a ready-made metal or wooden frame (or it can be made from an old hoop, garden basket, thick wire);
- socket and lamp;
- chains and threads for decoration;
- all kinds of beads and seed beads.
Working on such a lampshade is not difficult, but it is a very painstaking task. Such chandeliers usually consist of two or three levels of rings, which are located on top of each other. It all depends on the size of the chosen bases. If you take rings of the same diameter, the finished product will be made in the “modern” style.
One of important points is that before you start decorating the chandelier you need to paint and wrap the frames with decorative materials!
The approximate consumption of beads is:
- For the lower part of the lampshade - 16 mm beads, about 15-17 pieces per thread;
- For the upper part of the lampshade - 12 mm beads, about 35 pieces per thread.
Naturally, when stringing beads on a thread, you can increase or decrease their number or the degree of thread tension. But it is still advisable to stock up on materials in excess of the norm.
The essence of the work is to hang threads with beads in a “waterfall” or “cascade” so that they flow downward along the structure.
In order to create the effect of “muting” the light, you can sheathe the frame with thick fabric.

A DIY chandelier will definitely add a fresh touch, originality and beauty to your interior. You will immediately notice how the room will sparkle with new colors, and your guests will sincerely admire your creativity, hard work and original taste!
90 photos of DIY chandelier ideas


