Drywall sheets can:
- sheathe any surface;
- hide those places that spoil the interior for you, especially for toilets and baths;
- make drywall shelves and place various objects on them;
- install partitions, thereby creating a full-fledged room;
- mount niches for a TV or other structural elements.
For craftsmen who like to make their own hands and create comfort in their own home, drywall in combination with a metal profile has become simply an indispensable material, as it has amazing qualities:
- Ecologicaly clean.
- It makes it possible to change the space without the use of "wet" processes and quickly enough.
- Durable.
- Mounted on a frame made of wood or metal.
- Frameless installation available.
- Suitable for any facing material.
- Cuts easily.
- The design of plasterboard walls provides the opportunity to use various configurations in the interior.
- The cost of the material is low.
So, if you have a passionate desire to create a cozy atmosphere in your home, then you will certainly come in handy step-by-step instruction for the installation of certain structural elements.
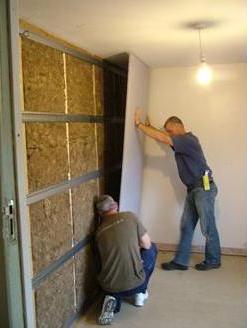
The device of the box of drywall and metal profile
Many of us want to close the pipes in the bathroom, hide the sewer in the toilet or get rid of the risers, which spoil the interior of the room with their appearance. The drywall construction, which is called the box, will cope well with this task.

This element makes it possible to get rid of the unattractive appearance of communication systems. No one sees a riser with hot or cold water, but it continues to perform its direct functions.
Depending on the wishes, potential and location of the highways, the riser can be closed:
- All over the wall.
- Only pipes.
In the first case, sewing up the entire plane, we shorten usable area, although you can mount shelves or niches for storing various items and things. In the second, we close only those sections where the pipes pass. This option is the most acceptable, since the installation takes place quite quickly and makes it possible to save money on the purchase of material.
Thinking about how to visually clean the system Maintenance communications, you must remember - in the event of a breakdown, you will have to break, if not the entire structure, then at least a part. And this will spoil the decoration of the room and you will have to redo the repair.
You can build a box in the toilet collapsible, this option is not used so often, or install small doors (hatches) for access to communication elements (valves, counter, fittings).

Remember that most often problems occur at the joints - the smaller their number, the easier it is to operate the pipeline. Before starting work, conduct a thorough inspection of the line. If there are defects, eliminate them, get rid of rust (if any).
You can not be afraid of leaks and calmly close soldered or welded joints. BUT threaded connections should be left open.
Materials and tools
If you need to close unattractive places yourself, you need to know how to make a pipe box in the bathroom and choose the right material. Since the bathroom is always high humidity, not all materials are suitable for work. They must meet the following requirements:
- be resistant to moisture;
- have a small weight;
- made from environmentally friendly components.
Let's say paper wallpaper in the bathroom you will have to change it after a couple of months, which means that tiles are best suited for cladding. And where to fix it, if there is no reason. It is best to use a metal profile, not wooden bars. The latter will begin to deteriorate over time, especially if they are in a humid environment. In this option, it is necessary to choose a rock that is resistant to decay and treat the surface with an antiseptic.
But with metal, nothing will happen. It will last a long time. Read more from technical specifications profiles can be found in the article "". Select fasteners according to the article "", they are produced according to GOST 11652-80, 10619-80.
For work, you will need products that are shown in the figure.

Prepare from tools and fixtures.
Structural sizing
It is necessary to determine the place in the room where the pipe box will be installed. All measurements are taken with a tape measure. First, we will make a drawing on paper, which will show the future design with all the elements and technological hatches. You need to know that in the places of their junction, you need to make reinforcements from the profiles. The future design must be reliable and strong.
box drawing
If you have to close the pipes that are located in the corner of the room, then the box will have two faces, and if the riser is sewn up in the middle of the wall - three.
On the drawing, mark all types of connections, indicate the scheme for mounting profiles. Now you can definitely purchase the necessary elements and correctly calculate the material for work.
The distance between the pipe and the box should not be less than 30 mm.
markup
Before you make a drywall box, you need to find the most protruding places of the riser, which will set the border future design, and mark them. From the base point on the ceiling, using a square, we draw perpendiculars to the walls. The resulting rectangle should cover all the protrusions of the riser. Further from the point we lower the plumb line and the touch mark shows the base mark on the floor. From it we draw perpendiculars to the walls.

Now let's connect the lines along the wall and get a straight line on which we will install the rack profile.
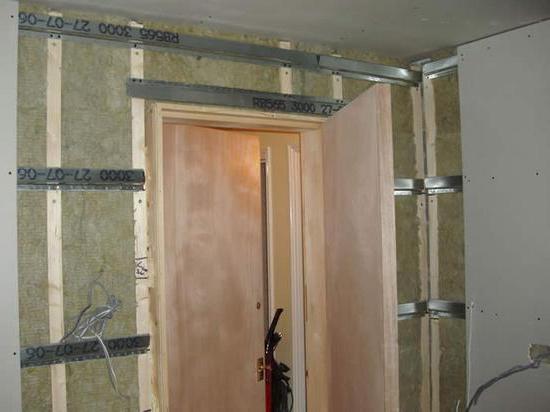
Frame installation
The profiles must be mounted to the wall, taking into account the finishing materials, so that they do not closely adhere to the pipes.
We drill holes with a drill, where we then hammer plastic dowels with a hammer. We fasten the rack profile (27x28) to the wall with screws, and the guide (27x60) to the ceiling and floor. Install the front edge of the box. It is obtained at the intersection of guide profiles along the ceiling and floor. This is done with a cutter or self-tapping screws.

If the width of the box is more than 250 mm or its height is more than 1500 mm, it is necessary to install transverse jumpers between the vertical posts. They are installed at a distance of no more than 1000 mm and serve as stiffeners for the structure. In addition, drywall sheets are then mounted on them.
All attachment points should be located on one straight line with the formation of a solid continuous plane for the edges of the structure, otherwise distortions are likely to occur.
A drywall box in the bathroom and toilet is assembled according to the same principle. Its installation is fast, the structure is compact, the distance from the profile to the pipe is not less than 50-60 mm.
Drywall installation
Before closing the pipes with drywall, it is necessary to cut the sheet so that the box is covered with strips, not pieces. Pre-cut off the side faces, their width is equal to the width of the frame. The sheet cannot protrude beyond the edge of the rack. To do this, you can use a peeling planer.

Now we measure Exact size the remaining edge and cut off a strip of drywall so that it is on the edges of the side strips. We fasten drywall to the profile with self-tapping screws (35-45 mm) every 150-250 mm to the main racks. Just don't forget about inspection hatches. You can buy them in the store, manufacturers offer big choice different sizes. And how to cut holes in drywall, you will learn in another section of the same article. This completes the installation of the box.
After you have made a drywall box with your own hands, you can start puttingtying it. And what Decoration Materials you use to create a pleasant interior - tiles, paint or plaster - you choose.
We make drywall shelves
When working with a drywall sheet, it is not always possible to avoid waste: they made a mistake in calculating the volumes or changed the project during the repair. There may be different reasons. Some stores are ready to accept large pieces, but not everyone is so lucky, this is rather an exception to the rule.
If you are a craftsman, do not rush to take the leftovers to the garage, but decorate the interior of your home. Make the environment more comfortable and get rid of old furniture. Believe me, a plasterboard shelf will definitely find its application in the living room, bedroom or hallway and can:
- be an element of decor in the room;
- a place to store things, books, interior accessories;
- pedestal for collectibles;

A plasterboard TV shelf is not a dream, but a reality. You just need to choose the right profile and use the sheet in two layers. However, modern TVs not so heavy and beautiful shelf can be an ideal place for a plasma panel.
We will tell you about how to make drywall shelves with your own hands in this section. The whole process consists of certain stages.
We need tools.
From the materials you will need:
- Drywall, preferably 12.5 mm thick. If you are planning to install a shelf in a room with high humidity, then you should take moisture resistant - GKLV (moisture resistant drywall).
- Metal profiles - guides and rack.
- Fasteners - screws, self-tapping screws, dowels, wedge anchors, special fasteners.
Drawing
Before starting work, you need to know exactly what functions the shelf will have to perform, whether it is worth reinforcing it with additional jumpers or not. If heavy objects stand on it, then the frame must be strong enough. Next, imagine how it will look like, and transfer your wishes to paper. Don't forget the exact dimensions.

This determines the amount of material used.
You need to start with more simple designs- from the manufacture of straight shelves. And in the future, already experiment with more complex configurations and projects.
markup
Having determined the place where the drywall shelf should be, we begin the markup. In work, use a tape measure, a square. Do not forget about the thickness of the lining of the finished product.

Unfortunately, modern apartments they cannot boast of smooth wall surfaces, horizontal floors and ceilings, and ideal angles. Therefore, the building level should be with you all the time.
The dimensions are set aside strictly according to the drawing. The quality of the future design depends on how the horizontal and vertical lines are drawn correctly. appearance and strength.
Shelf installation
According to the planned marking grid, you can already set the profile. The process itself depends on the design configuration. First mount horizontal or vertical parts. According to the plan, which is shown in the "Drawing" subsection, we begin to work with a vertical rack.
To do this, we drill a hole for the dowels, with their help we will fasten the rack profile (27x28) to the wall. There must be three or more of them per part. We check the position with a level and hammer the part with a 6x40 wedge anchor. We combine with each other with self-tapping screws or a cutter with a guide profile (27x60). On the right side, we fasten a strip of drywall in increments of 150-250 mm. The second sidewall, like all subsequent ones, is assembled in exactly the same way.
Next, we mount the frame between the vertical posts, for this we fasten the rack profile along the marked lines, and fix the guide, which is adjacent to the drywall sheet, with self-tapping screws along the edges, scrolling the gypsum and the back profile through to the profile. At the same time, in the frame of the part on which the sheet is fixed (namely, to which these screws are twisted), the profile must be laid in a horizontal position - as on the partition, but in this case it is used as the main part load-bearing structure shelves. So the shelves will hold securely and firmly, this will be facilitated by plasterboard blanks screwed to the frame from the second side.
In the end, the process of installing a drywall shelf will end with a design that you can see in the photo, or another that you come up with yourself.
Then you can putty the seams, close up the holes from the caps of the screws, prime the surface and veneer the shelf. If desired, it is ennobled with mirror panels, other materials are used, or simply covered with paint to match the color scheme of the room.
Screw profiles to brick, concrete and plastered surfaces using dowel nails or anchor wedges if it is a hard surface. If the wall is made of aerated concrete, then you need to use special fasteners, and if the surface is made of drywall, use other hardware, which can be found in the article "". When you have a wooden base, then for work you need to take wood screws.
Drywall shelves can be mounted in a room where repairs have already been made. True, in this case you have to work more carefully, especially with the markup, because corrections are fraught with the fact that the marks will be visible on the lining. Work is performed in the same order, only cutting drywall and profiles is better not in a renovated room. The installation process will go much easier if the work is done during the repair. In this option, you can follow all the rules of design, and new element harmoniously and effectively fit into the interior.
How and how to cut drywall

1. Gypsum core
2. Cardboard shell
As you can see in the picture, this is a sandwich consisting of a gypsum core and two layers of cardboard. Gypsum itself is a fragile material. But thanks to special additives and reinforcement on both sides with cardboard, which is impregnated special composition, the sheet is able to withstand sufficient loads. It is produced according to GOST 6266-97, with its characteristics and technical indicators can be found in the article "".
Working with this material is easy and interesting. Can:
- independently make a shelf or niche for a drywall TV;
- install a curly partition;
- hide what you don't really want to see;
- put on display the things you are proud of.
To create masterpieces that will decorate any home, you just need to have imagination, information on manufacturing and be able to handle drywall. As for the latter, the skill lies in knowing how and with what to cut it. Indeed, in the process of repair, you need to cut out broken lines, cut the sheet in a straight line or make holes.
To cut drywall, you need:
- pencil,
- roulette,
- ruler-corner,
- preferably reyshina,
- if there is a large amount of work to be done - a peeling planer.
With this material, it is better to use not a marker or a pen, but a pencil, its traces are not visible after puttying, which cannot be said about the listed items. A planer is needed to align the curved edges of the plasterboard. The surface for working with plasterboard should be flat - most often it is a stack of sheets, a floor, and ideally a large table.
Now about the tools. The blades must be sharp, they must be held perpendicular to the sheet, only in this case you will get a straight and smooth cut.
In a straight line
For this purpose, a special drywall knife or a regular construction knife (clerical) is useful. These tools are good because they have adjustable blade length. And this is required in order not to cut through the second layer of cardboard.

Before cutting the sheet, carefully measure with a tape measure or ruler. We put marks on the sheet with a pencil and connect them with a common line. Immediately, without removing the ruler, we draw a knife along the intended line. The depth of the cut should be such that the knife blade does not reach the second layer of cardboard.
It is enough to cut through only the cardboard, and the plaster will break along the cut line without effort.
Now we shift the sheet to the edge of the table and lightly tap the cut line with our fist. Gently bend, it breaks along the notch line, and the halves of the sheet are held by a whole layer of cardboard. On the back side of the sheet, we cut it with a knife, and with a peeling planer we clean the cut.
Curvilinear shapes
by the most practical tool for these works can be called a jigsaw. True, you can use a hacksaw or a knife, but the cuts will be rough, you will have to spend a lot of time to put them in order. The jigsaw will cope with any curvilinear shapes.

Preliminarily, the sheet is laid in such a way that the cut-out place is located on the weight or between two objects at a slight distance from each other.
When working, the blade of the tool should not interfere with anything.
We draw the contour of the figure with a pencil and, having previously put on personal protective equipment, since there will be a lot of dust in the process, we begin to cut the sheet. The cut lines are high-quality, even and smooth.
round shapes
Often you have to cut a circle in drywall. Of course, they can be cut with a jigsaw or a construction knife. But the end result is unlikely to please, and a lot of time and nerves will be spent on work. It is more convenient to make holes for sockets or light bulbs using a crown that is attached to an electric drill chuck. Such sets are sold at any hardware store and have different diameters.

First, we make the necessary markings on the sheet - the location of the future hole - and outline the center. We choose the size of the crown, fix it in the drill chuck. We place the drill in the center of the hole and start drilling.

To obtain quality work, should be cut into average speed slowly, gently pressing the drill. With strong pressure, the nozzle will get stuck in the plaster.
Rectangular shapes
Often, when working with drywall, you have to cut out in a sheet rectangular holes(under sockets, technical hatches). This is especially often necessary in the manufacture of boxes that cover risers and pipes. For this you will need a hacksaw.

Please note that to work with sheets of drywall, you need to take a sheet for metal. It has smaller teeth, so the work will be done faster and better.
We put the sheet on a support, we make necessary measurements and along the intended line, where it is required to cut drywall, we make cuts with a hacksaw. We start work from any angle and then cut out the desired shape.
No matter how hard we try, it is not always possible to make the edges of drywall smooth. This defect affects not only the aesthetic appearance, but also the quality of the work performed. Parts do not fit tightly to each other, violating the integrity of the structure.
For work with drywall, a peeling planer is useful. This professional tool worth buying for everyone who works with this material. It is inexpensive and is needed for high-quality processing of cut edges. It is carried out according to GOST 21445-84.

It is quite easy for them to work. It is necessary to put the sheet so that it is convenient to process its edge - end up, you can put it on its side. Set the planer on the cut of the sheet and draw it along the entire length. It is not worth pressing the handle much, because with strong pressure the tool will go deep into the drywall and you will have to remove a large cut or you will end up with an uneven end.
Movements should be as light as possible, in two or three passes. The surface of the planer must often be cleaned of plaster - turn the tool over and lightly tap the body with the palm of your hand.
We make a niche in the wall of drywall
Well-designed and well-installed niches in a drywall wall can replace a furniture set. They are performed:
- in horizontal or vertical execution;
- in floor version where it is possible to place decorative fireplace, a vase with flowers, decorative details over 1 m high;
- on the entire wall or only a small area;
- with and without illumination;
- closed or open.
This structural element can be different, its configuration depends on your imagination and wishes, and the design can be complemented by plastic or mirror material with decorative lamps.

In addition, a drywall niche is not only an element of decor, but also makes it possible to hide electrical wiring, utilities or remove objects from prying eyes that others do not need to know about. Sometimes the owners so skillfully use this privilege that they can safely recover on vacation without worrying about their jewelry. Or skillfully disguise technical systems life support at home.
Tools
In order to build a niche, you need to have the following tools to work.
Drawing
It is clear that not everyone graduated from a construction university or has experience working with drawings. But any drywall constructions that you plan to make with your own hands mean that they will be made strictly in size. So a drawing to scale is required. No need to master computer programs or call a draftsman from an architectural office. It is enough to sketch a diagram by hand, indicate all dimensions and design features. It is impossible to make a niche without a scheme. Let it be a simple drawing, but here the size of the wall, the location of the radiators, furniture, electrical sockets if necessary for the intended project. With a properly drawn up drawing, all cases of alteration of the structure are excluded.
Sketching thoughts on paper or "drawing"
Without spectacular lighting, a niche will give the impression of a dark hole. So you need to create a special background around it (mirrors, glossy ceramics) or install a backlight that will visually expand the niche space.
Think about the location of the lighting fixtures. All this must be taken into account in the drawing and when calculating the volume of materials. Specify the dimensions and depth of the niche. Be sure to consider the location of the furniture so that it does not block the opening.
When drawing up a drawing, be sure to consider the thickness of the profile. After all, its dimensions are an integral part of the dimensions of the future structure in height and width.
If you plan to install household appliances in a niche - pay attention to the dimensions of the structure. Design the space of such a niche a little larger than the size of the device - to cool the equipment with air and access to communications.
markup
It is carried out strictly in size and with the help of a building level. We mark the middle with a pencil on the wall and draw the entire drawing symmetrically from it with the length and width of the structure.
If you want to place a niche in the center of the wall, then strictly ensure that there is an equal distance along the edges. If the symmetry is broken, the niche will not fit into the interior of the room.
Having outlined the contours of the erected structure on the wall, you already know which lines you need to mount the profile guides.
The most detailed markup should be provided. On the wall, indicate all the marks for fastening the frame from a metal profile.
At this stage, consider the wiring and installation of sockets. Planning shelves with lighting - provide additional equipment.
Frame installation
Having cut the profiles to size, we begin to assemble the frame.
We check each installed profile with a level, because the slightest discrepancy will spoil the entire structure.
We fasten the guide profile with dowels along the perimeter of the drawing transferred to the wall, along the depth of our niche, on the floor and ceiling - 300-400 mm, strictly perpendicular to the wall. The pitch is 400-600 mm.
self-tapping screws or cutter. In places of future shelves, we install jumpers from the rack profile. Our do-it-yourself drywall niche should turn out with wide shelves, on which additional and basic equipment that we plan to place there can easily fit. The frame is strong enough, and the profile is reliable.
Drywall installation
Now you need to attach the sheets to the profile. We do this with self-tapping screws (35-45 mm) with a step of 250 mm. We embed the head of the fastener in the sheet by 1 mm. Less is impossible, because it will interfere with puttying, and more is also not recommended - the sheet may crack. The edge of the drywall sheet should be flush with the profile, the excess is removed.
The result is a drywall niche with backlight. The cost of beauty and comfort is always justified, because they are a long-term investment. Money. Therefore, we do not spare money. After sheathing the frame with drywall, putty and primer, the surface is ready for further finishing work.
A multi-level plasterboard ceiling is modern solution, which will give the room a style, make it interesting. This ceiling has its own undeniable advantages. It hides all the differences in the plates and irregularities, makes the ceiling perfectly smooth. All communications can be hidden under the plates, so there is no need to make strobes in the walls for electrical wiring and air-discharging elements of air conditioners. And if under the ceiling you place modern, light insulating materials, this will additionally warm the room and improve sound insulation. Such a ceiling can be given the most refined and elegant forms. You can easily install a variety of lamps - spot and pendant.
Work materials
Drywall is an environmentally friendly and non-combustible material. It consists of a gypsum board covered with a layer of cardboard. Ceiling drywall with a thickness of 8 mm, flexible and light enough, it is easy to cut with a construction knife. Install two-level ceiling even beginners can do it themselves.
For work, you will need metal profiles on which drywall plates are fixed. They are of two types - guide profiles and with stiffeners. You should also purchase special screws.
Choose a form

The drywall construction will "eat" the height of the ceilings. The first level lowers the surface by 3-5 cm, and the second by 10 cm.
If the ceilings are relatively flat, then they can serve as the first level on which curly drywall ledges can be fixed.
Smooth and rounded elements look very good on the ceiling, but strict geometric lines will also fit in quite harmoniously, for example, a protruding threshold around the entire perimeter of the ceiling, which even a beginner can handle. Drywall is easy to work with, and even a simple ledge can be rounded off at the corners, making it more attractive. For such a threshold, you can hide the cornice, and then the illusion of curtains falling from the ceiling will be created. It is possible to hide electrical wiring and install a number of spotlights over certain areas or around the entire perimeter.
The desired shape of the ceiling is first born on paper, in the form of a sketch. On which, in addition to the geometric figure, it is necessary to note the location uprights, at a distance of 30-40 cm. In rounded corners, the racks should be located more tightly. After the drawing is transferred to the ceiling.

The installation of the frame begins with more low level. From the guide profiles make the contours of the future ceiling. Rounded and smooth lines are obtained by cutting the profile at the bending points with metal scissors and bending it around the circumference. The guide profiles that define the shape are connected with racks with stiffeners of such a length that the second level of the ceiling should be lowered. It is better to immediately prepare all the rounded corners so that they are the same.
The frame is attached to the surface along a given contour on special hangers for drywall "crabs", with which you can adjust the height. Suspensions are placed at a distance of 40 cm. In the corners, the structure is fixed rigidly, additional supports can be added. The frame during installation must be measured by level. After fixing the main structure that defines the contour of our future ceiling, install rack profiles at a distance of 60 cm, which are fastened with transverse jumpers, also with a step of 60 cm.
Sometimes the transverse jumpers are not fixed, so that they can be moved, fitting drywall joints under the fastening.
Suspensions are attached to the ceiling using two dowels with a screw 8 * 80. The profiles are interconnected with self-tapping screws for metal 3.5 * 11.
Sheet installation

Once the frame is assembled and leveled, the cavities can be filled with insulating material, fiberglass, or foam sheets and the electrical wiring can be routed. Then the ceiling is mounted. Sheets should be pre-cut on the floor. It is convenient to immediately cut holes for spotlights. It is advisable to leave allowances of a few centimeters along the rounding line.
It is better to cut and remove the excess on the spot than to get an unwanted gap between the plates. To make it easier to bend drywall during installation, covering smooth and rounded elements, the part can be cut with reverse side transverse slots and break the material along them. Some advise for this purpose to simply pre-moisten the sheets a little.
We proceed to the installation of plates, using self-tapping screws with fine threads, you can take the size 3.5 * 25 and 3.5 * 32. The operation is best performed with a screwdriver. The self-tapping screw is screwed in, slightly sinking the hat into the surface.
It is unacceptable for it to pass through the sheet completely, if this happens, you need to step back a few centimeters and redo the mount.
The fastening pitch is 15 cm. The sheet can be released by fixing it with at least two self-tapping screws along each side. It is advisable to use whole sheets to get neat joints and cut less material. If two trimmed slabs fall on the joint, their edge from the front part needs to be slightly scraped obliquely with a knife in order to perfectly align the seam with plaster in the future. After the main array of the ceiling is fixed, the threshold sheathing begins. First, the elements of the side part are attached, and only then the lower plates.

When all the plates are installed, the ceiling is primed with a universal primer. After complete drying, all seams are glued with a sickle mounting tape, and all external corners are fixed and leveled with special corners. For straight lines metal corners are used, and for smooth and rounded ones - a special flexible plastic corner. The technique of its fastening is simple, a layer of plaster is smeared on the corner of the structure, into which the corner is sunk, and the excess solution that protrudes through the holes is removed with a spatula. After drying with a second layer of plaster, the corner is finally removed. You should also putty all the hats of the screws. Pre-check if there are any speakers, and twist them manually.
Plaster all seams flush with the slab. After all the leveling elements of the plaster have dried, putty the entire surface of the ceiling, you can immediately use the finishing mortar. The surfaces are allowed to dry and cleaned of unevenness and sagging of the plaster with a construction grinding fine-grained float. If holes for spotlights were not previously made in the slabs, they can be cut with a special glass drill desired diameter, electrical wiring wires are pulled into the holes.
At this stage, glue ceiling baguette on special glue or plaster. After that, the entire surface is primed, preparing for painting. Painting different levels of the ceiling in different colors, it is advisable to glue the joints with a special paper adhesive tape, which will eliminate paint smudges. First, the ceiling is painted, and then the baguettes. After completion of work, spotlights are mounted, and pendant lights are installed using special dowels or drywall mounts.

Video
This video will demonstrate the installation of a complex two-level ceiling.
Many owners of residential premises, carrying out repairs with their own hands, use drywall. With this material it is very easy to realize the most original ideas. GKL is very easy to process. With imagination, you can create various Walls, sheathed with this material, become perfectly flat and suitable for laying almost any finish coat. Next, we will analyze some of the features of the surface finish of the GKL.
General information
Using plasterboard structures on the walls (photos of some of them are presented in the article), you can significantly improve the appearance of the room. The use of such systems allows you to build arches, shelves, vaults, columns, partitions. Plasterboard constructions on the walls can be equipped. Thanks to well-chosen lamps, a cozy atmosphere is created in the room. As a rule, in frame structures spotlights are used. Also, pleasant and soft lighting is created using special LED strips.
Shelves and niches
In any room, over time, a lot of little things appear. As a rule, they are placed on shelves or in niches. Such plasterboard structures on the walls look very original and fit perfectly into the interior. Built-in or protruding shelves are equipped with lighting. It is quite possible to place books, small figurines and other decorative elements on them.
Often plasterboard structures on the walls are built to install a TV. Such an opportunity has appeared relatively recently. TVs have become thinner and lighter, which means they take up less space and do not require capital shelves. Plasterboard structures on the walls can withstand the weight of some items of equipment. The thicker the material, the stronger the whole system. Niches are very different. Structures can occupy the entire wall, their number and location varies.
Space zoning
Partitions are often used to separate rooms. In many living rooms, such additional plasterboard walls are installed. Often, when zoning space, all kinds of vaults, arches, semi-arches are used. may be very different. Drywall - the material is quite flexible, which allows you to give it a variety of shapes. Partitions can be solid, that is, occupy the entire space from floor to ceiling. The designs also provide for shelves, windows, patterned slots. They can also be illuminated. The undoubted advantage of partitions is their low weight in comparison with concrete or brick.
Surface cladding
Drywall walls meet the most high requirements environmental friendliness and hygiene. The fact is that natural raw materials are used in the manufacture of GKL. In particular, gypsum. As an addition to it, cardboard is used. Due to this, GKL does not cause allergic reactions in humans and is generally safe for the inhabitants of the room. The undoubted advantage of the material is its smooth surface. Frame structures perfectly hide the defects of the base. In addition, you can mask utilities, pipes, wires inside a plasterboard wall. The photos of the room below are proof of this. The images do not show any wires or any other communication elements.
Drywall installation
The work can be done in two ways. Installation of drywall on a wall with defects and irregularities is carried out using a supporting frame. As elements of the crate can be used wooden beam or If the surface is sufficiently even and does not have significant flaws, then the installation of drywall is carried out on glue. Let's explore these options in more detail.
Benefits of using a framework
Drywall walls (a photo of this surface cladding option is presented above) can be built using wooden or metal battens. Here it should be noted right away that the second option is more preferable if the base has serious irregularities. If the defects on the wall are insignificant, you can arrange a crate of wooden bars. However, assembly in this case will be more difficult. In addition, the frame elements should be dried well. Otherwise, after a while, cracks form on the surface. When using a metal profile, the design is more reliable and durable.

Adhesive method
This finishing option involves a more thorough preparation of the base than in the case of using crates. It is necessary to remove the previous coating from the surface, clean it from dirt and dust. Before installing drywall on the wall with glue, the base should be primed. The fixing solution is applied to the surface of the GKL sheet. After that, the element is tightly pressed against the wall surface. Correction of evenness must be carried out using a level. This option saves usable space rooms, but in this case there is no way to disguise communications as a structure.
Niche device
For the construction of such a structure, you do not need to have special knowledge or skills. It is enough to read some recommendations and follow them. For the device you will need:
- Metallic profile.
- Reinforcing tape.
- Glue.
- Bulgarian or scissors for metal.
- Putty.
- Electric drill.
- Pencil.
- Roulette.
- Plumb.
- Level.
- Putty knife.
- Self-tapping screws.
- Screwdriver.

Acquire expendable materials follows with a small margin. It is necessary in case of inaccuracies in the calculations or damage to the elements. To begin with, it is recommended to determine the location of the structure. Next, consider its configuration and size. Then you need to take measurements. Before constructing from drywall, it is advisable to draw up a layout of the future structure. The drawing shows all dimensions, as well as additional elements. In particular, this applies to wiring for fixtures. It should be borne in mind that the size includes the thickness of the plasterboard, as well as the width of the frame. If you plan to build a niche for household appliances, then you need to provide free space for air circulation.
markup
After the place for the future design has been prepared, the drawing can be transferred to the wall. To mark the location of the frame elements, you will need a plumb line, tape measure and pencil. The depth of the future niche is measured from the wall. The thickness of the sheet is added to the value obtained. Next, a line is marked along which the profile will be fastened. Similarly, markings are made on the ceiling. Installed along the marked lines

Further actions
At the next stage, the metal profile is cut into parts of the required length. The elements are attached to the frame racks using self-tapping screws. If necessary, connect the sections of the profile using jumpers, the evenness of the join should be checked with a level. After fixing all the elements of the frame, you can proceed to the sheathing. GKL sheets are fixed on the profile with self-tapping screws. First, the side surfaces are sheathed, then the rest. The joints are processed using a reinforcing mesh. Putty is applied in two layers. Then the caps of the self-tapping screws are masked and the entire surface is puttied. After the solution has dried, the structure is primed. Further, at your discretion, you can trim the niche with wallpaper, decorative plaster or just paint.
Additionally
If built-in lighting is supposed, then wiring is done after installing the frame. In sheets of plasterboard, it is necessary to drill holes according to the size of the fixtures. To create curved structures, the metal profile is slightly incised. Next, it is given the necessary form. In this case wooden frame won't fit. When used as elements of the crate of the bars, they should first be treated with antiseptic compounds.

Conclusion
Many homeowners note that drywall is a versatile material. With your imagination, you can create unique elements decor, multi-level structures, systems of non-standard configuration.
Attention is paid to the design of the ceiling, various solutions are used to implement the design ideas. Each of the selected options has advantages and disadvantages. Plasterboard ceiling with illumination is popular.
Plasterboard ceiling with illumination - in demand design solution. The use of a backlit plasterboard structure solves a lot of issues regarding the lighting of the room, direct adjustment of the light power.

The installation of structures made of gypsum boards with backlighting has a number of positive aspects:
- the acquisition of an even ceiling covering;
- preparation is not required before installing a plasterboard ceiling;
- easy to hide communications;
- multi-level structures with illumination are created;
- Properly selected lighting will emphasize the interior of the room;
- finishing the ceiling with plasterboard embodies a design of any complexity with lighting, built-in niches for lighting;
- excellent sound and heat insulation;
- plasterboard ceiling is installed in a dry way, which means that time is not spent on drying the solution.
The ceiling of the plasterboard has disadvantages:
- the ceiling will drop by 10 cm;
- installation of drywall sheet structures is simple, but requires experience with electricity.
Important! Electrical skills are a must. Since a properly made fastening of a drywall coating will protect the structure from unexpected short circuits, and therefore from fire.
When planning the construction of a backlit GKL structure, pay attention to the following points:
- lighting (backlight) is better done for some areas;
- think over to the smallest detail the orientation of the illumination;
- correctly located illumination will help to adjust the proportionality of the room. Thanks to the direction of light, you can visually expand the room;
- if there are different fully functional zones in the room, then it is better to install separate lighting fixtures;
- if the room is small in size, then you should not choose multi-level structures;
- Before fixing the ceiling from drywall sheets, make a clear design drawing.
Types of lighting fixtures
To make the right choice of lighting fixtures for illumination, you need to know their types.
Main types:
Spotlights. The popularity of this kind of lighting devices is growing every year. Spot lighting is a set of low power light fixtures.
Main advantages:
- if necessary, partial lighting;
- uniform lighting of the room;
- profitability;
- due to their compact dimensions, they will harmoniously fit into the interior;
- spotlights scatter light at a small angle;
- light quality;
- lifetime;
- excellent color palette of light supply;
- availability.
Spotlights also have a number of disadvantages:
- it is difficult to independently make the necessary design and direct organization;
- many types of spotlights require a special design;
- when the spotlight overheats, deformation of the flow is possible.
Fluorescent lamps are used for non-residential premises. The advantage of this kind of lighting fixtures is availability and ease of installation, long service life, cost-effectiveness.
Fiber optic lamps are an innovation in the world of lighting products. Thanks to them, it is possible to realize the bold design ideas: starry sky, moving overflows. The device of overlapping with such lamps is expensive and time-consuming.
LED strips are a common method of decorating a ceiling. The device of the LED strip provides for the installation of a niche from GKL. A niche is a kind of ledge on which lighting fixtures are mounted.

There are two types of LED strip:
- monochrome;
- full color.
LED strip has a number of positive aspects:
- is divided into segments;
Important! When cutting the tape, the functionality remains unchanged.
- reliability;
- profitability;
- durability;
- environmental friendliness;
- ease of operation and installation. The sticky layer fixes the tape on the surface.
How to choose the right LED strip?
Tape is used as indoors, and on the street: sealed and non-sealed LED strips are provided for this.
Important! Mounting this kind lighting fixture indoors with a high percentage humidity, choose sealed material. When such a tape is used for the purpose of decoration, a leaky one will do.
When choosing an LED strip, pay attention to whether it is waterproof or not.
Protrusion from drywall sheets
Floor equipment suspended structure from the GKL provides for work on lighting and illumination.
The overlap of sheets of drywall with illumination has a number of positive points:
- The thermal radiation of devices does not play a special role. Since the drywall and the profile used to create the skeleton are heat resistant.
- The stability of the structure allows you to install lighting fixtures to the profile of the frame.
- Thanks to the plasterboard coating, you can hide all the shortcomings of the room.
Important! Before installing the GKL coating, find out the exact location of all lighting fixtures.
Backlight location

Before installation, consider the location of the power supply LED backlight. Since this element has rather large dimensions, it is worth considering its heating. Based on this, it is necessary to fix the power supply in an easily accessible place.
Consider the desired nuance - heat dissipation. Before starting work, bring all electric wires to the power source.
Installation rules
- The base ceiling is sheathed with plasterboard.
- A second level is being constructed of the desired design for direct mounting of the backlight.
- The second tier is fastened to the guides through drywall. This nuance cannot be skipped, since the strength of the entire structure depends on it. Since drywall will not hold the second level of the structure without insurance.
- Make a mark on the wall. It is necessary for fastening a metal special profile. Deviate from the ceiling is relative to the size of the future building. If the markup is done correctly, you will end up with a regular rectangle.
Important! For marking, it is necessary to use a level and a tape measure in order to correctly outline the lines for the special profile from which the skeleton will be formed - the base for the ledge.
- Work on installing a frame for drywall must begin with a guide (ceiling) special profile. The profile is fastened with screws (step 30 - 40 cm). The profile shelves are guided from the floor down and parallel to the floor on the wall.

- Strictly observing the desired format, segments and racks are cut and fixed horizontally. For these purposes, a CD profile is used.
- Pieces of the main profile are attached to the starting special profile on the coating after 40-50 cm. When carrying out such work, it is worthwhile to clearly monitor that the footage of the pieces is a uniform distance from the ceiling to the baseline.
- The wall special profile must be connected to the hangers from the main profile;
- After mounting the necessary ceiling special profiles into the frame, the base will become rigid.
Facing the skeleton of the building with drywall
The lining of the central covering is made with sheets of drywall.
After the skeleton, on which the GKL coating will be attached, is installed, it is necessary to sheathe it with drywall:
- sheets are trimmed, acquiring the desired dimensions;
- finished drywall is attached to the skeleton with self-tapping screws;
- after fixing the GKL, the joints are glued with a special reinforcing tape.
- all joints and attachment points are puttied with self-tapping screws.

Important! When the installation is completed, you can proceed to laying the wiring. For safety, electrical wiring must be hidden in plastic boxes. The resulting boxes are fastened with self-tapping screws to the base coat.
After carrying out the necessary manipulations with the wiring, you can proceed to sheathing the protrusion with drywall. Facing begins with the installation of a drywall strip on a niche shelf. For these purposes, you will need self-tapping screws and a screwdriver. The lining of the base coat is made in most cases in one piece. The box is finished with narrow strips of drywall, which are fixed with self-tapping screws. After that, the vertical part of the structure is sheathed. The required section of the sheet is attached to the racks - hangers and a special profile guide on the ceiling. It is necessary to install drywall so that its joints are on the racks. After that, the horizontal part of the structure is sheathed. The final stage of installation is the installation of a side, the task of which is to hide the backlight. It should be noted that the side (its upper part) must be at least 50 mm from the ceiling.

final stage protrusion facings - putty of protrusions and seams formed from self-tapping screws. Existing joints must be sealed with reinforcing mesh. The necessary manipulations with the seams proceed in several stages. First, putty is applied in a small layer. After the putty dries, the surface is sanded. The procedure is repeated, but the finishing (smaller) putty is already applied.
After that, the structure is primed and painted.
Backlight setting

If the choice fell on an open ledge, then it is best to take an LED strip as a backlight. Since the tape is quite flexible and can take any shape.
Before proceeding to work on installing the LED strip, you need to prepare it:
- Cut off a piece of tape to the desired length. It is necessary to cut the tape only in special places, which are marked with additional markings.
- Pieces of tape can be connected into a single whole using special connectors. If there is no such device, all manipulations are done with a soldering iron. To do this, solder the tape contacts.
Important! If the sections are more than 7m, it is better to connect the tapes in parallel.
The backlight will be uniform if:
- when connecting LED strips, polarity is taken into account;
- when connecting a color ribbon, the correct controller is used.
Manufacturers apply self-adhesive backing to light fixtures to make them easier to install. Before purchasing devices, decide on the color, since the color palette is extensive. There are RGB strips. The advantage of such products is the color range, the ability to independently adjust the brightness of the glow. Minus - the cost.
Dimmers are used to transform the brightness of the glow. Dimmers should not be selected individually for the selected type of tape, as they are suitable for all types. Tapes are distinguished by the number of LEDs per meter. The higher the number, the more intense the glow.
Backlight connection

LED strips operate at a voltage of 12 V. If the lighting device is connected to a standard line, it will simply burn out.
To choose wisely desired block supply, do the calculations. The power of one meter of LED strip is indicated by the manufacturer. To calculate the specified power, multiply the footage of the LED strip. The resulting number corresponds to the required power supply.
Important! A correctly selected power supply will allow the lighting device to work for a long time and correctly.
Please note that the length of the LED strip should not exceed 5 m. If the length is longer, in this case, connect segments of 5 m in parallel to each other.
 LED illumination of the plasterboard ceiling - an interesting design technique
 Illuminated plasterboard ceiling coverings can be made independently. To do this, study the questions about the installation and installation of the backlight. A skillfully executed plasterboard ceiling will skillfully emphasize the interior.
A drywall niche on the ceiling is a prime example of the versatility of using GKL, which is used both for ceiling structures, and for niches with different functionality.
Varieties of plasterboard niches on the ceiling
A plasterboard ceiling with a built-in niche is mounted in any room.
It looks like a drywall niche on the ceiling
Ceiling niches are used to highlight any area, hidden curtain rods or for a stretch ceiling. But still in various rooms a niche in the ceiling can perform different functions.
Kitchen
With the help of a ceiling niche in the kitchen, you can hide laid communications, install hidden cornices, and expose spotlights. In some kitchen design projects, a niche can be used as an additional storage space for kitchen items, especially when it comes to rooms. small area, where each square meter on account.
Living room
Thanks to the installation of ceiling niches in the living room, you can radically change the geometry of the room and thereby implement any design idea.
 Drywall niche project on the ceiling in the living room
However, the main function of ceiling niches is not only visual effect but practicality and convenience. For example, niches can be assembled to illuminate the living room, to install spotlights and to distribute zones in the room. And also LED strips are often mounted in them. A drywall niche for curtains can be combined with a box around the perimeter of the room.
Bedroom
Niches in the bedroom are used mainly to emphasize the geometry of the ceiling, in the center of which, stretch ceiling. In the niche on the ceiling, installed around the perimeter of the room, lighting can be built in, hidden illuminated cornices are installed. The ceiling niche not only decorates the room, but also creates additional storage space, allows you to hide a lot of communications.
How to make a drywall box on the ceiling
Drywall and profiles for mounting the box in Petrovich - https://goo.gl/v22oWt How to make a drywall box on...
 Design of a niche on the ceiling in the bedroom
Design features: drawings and calculations
In order for a do-it-yourself drywall niche to turn out to be technically correct, aesthetic and convenient, you should prepare calculations and a preliminary design drawing. A niche drawing should be made based on its design and purpose. If this design is multifunctional, for example, with built-in lighting and a place for a TV, then such a design can be called a combined layout. In such drawings, all the features of the frame should be taken into account. If the niche is assembled in the form of a box under a stretch ceiling, then the installation of the canvas is taken into account in the drawings.
 Scheme and design drawing of a niche on the ceiling
In cases where the ceiling niche is used for a cornice and several lamps, the frame calculations do not require additional tricks. If a niche is being constructed for the eaves, on the frame of which there will be an additional load, then reinforcement can be added in the form of plywood or chipboard sheets.
As for design drawings, it all depends on the imagination of the master, since the metal profile and drywall sheets allow you to create various designs of any complexity. The video shows the process of installing a drywall niche on the ceiling.
Required material and tools
List of materials
- guide profile.
- Hanging profile.
- Connectors between profiles.
- Single-level connector "Crab".
- Metal hangers.
- Screws for metal.
- Dowel nails or anchor wedges.
- Insulation.
- Drywall in size from 9.5 to 12.5 millimeters.
List of tools
- Screwdriver.
- Perforator - allows you to easily make holes in concrete ceiling under the profile fasteners.
- Shears for metal - used for cutting profiles.
- Pliers - the tool allows you to connect two profiles without the use of hardware fasteners. Pincers can be replaced with self-tapping screws for the profile.
- A paint cord or a laser level - both devices serve to mark the frame.
 Design option for a plasterboard ceiling niche in the bedroom
Back to index
Preparatory work
Before you install a niche, you need to make markings of the room. First of all, you should decide what the niche is for. If its function is to hide ceiling cornice, then first of all you need to measure the distance of the niche to the batteries so that the curtains do not touch them later.
 Diagram of a niche device for a ceiling cornice
For a niche with lamps along the contour of the room, the desired distance from the wall should be noted. Next, with a chopping thread, beat off the horizontal stripes on the ceiling and, using a level, draw lines on the walls. The length of the vertical lines will depend on the thickness of the niche. For the lower part of the niche, markings are also made on the wall. They can be applied with a hydraulic level or laser level with horizon function
Carry out niche marking from concrete slabs the ceiling is not recommended, as significant differences can be observed, which will affect the evenness of the structure.
If a niche is planned along the contour of the room with the installation of fixtures, then the wiring should first be carried out in corrugated hoses attached to the ceiling with clamps. The output of the cable under the cartridges must be observed in equal steps.
The main stages of work on the creation of a drywall niche
After finishing preparatory work, and in particular markings for the installation of guides and ceiling profiles, you can proceed with the installation of the frame.
Installation of a metal profile
Stages of assembling a frame from a metal profile for a future niche:

Fixing plasterboard sheets and installing backlight
After the box is assembled, you can proceed with the installation of drywall sheets. First of all, the material should be cut and sheathed on the side parts of the niche. To do this, the gypsum board is attached to the ends of the structure and screwed with self-tapping screws. As for the lower part of the niche, the installation takes place in the same way, however, it should be noted that after installation it will be necessary to make holes for the reflectors of the lamps. Further, the wires of the lamps are brought out into the holes, after which the process of processing the ends of the box begins.
 Scheme of the device and installation of lighting and fastening drywall
In order to smooth out the protruding edges, you can use a clerical knife, carefully cutting off excess cardboard from the edges of the box.
After all the corners of the niche have been turned and acquired a symmetrical shape, you need to bring the cables through the holes and try to connect the lamps.
After a control check, fixtures can be connected to the wiring. But they should not be permanently fixed into the recess, since the box must be puttied without damaging the external reflectors of the lamps.
Niche finishing
The very first stage of execution finishing, this is the cutting of drywall at the junction with the wall and ceiling, as well as at the seams of the sheets. Next, the entire drywall structure must be primed with an antifungal solution and a roller. After that, at the joints of drywall with the ceiling and walls, you need to glue the sickle. And after pasting all the seams and joints on top of the sickle, you need to apply a layer of putty on the ceiling. And also you need to putty all the places where the screws are screwed.  next step there is a sticker of a perforated corner on the outer corners of the niche. This is done in order to simplify the finish and avoid cracks. Next, a base putty is applied over the corner. The second layer of putty is best applied after the first has dried, usually after 12 hours. Before application, remove excess mixture with a spatula. Then, you can apply the base putty with a wide spatula.
 An example of finishing a drywall niche on the ceiling
The last step will be the application of finishing putty. Before this, the surface must be cleaned of sagging and in one thin layer apply putty. After the putty has dried, the surface must be sanded, primed and glued on fiberglass, on top of which, it is applied finishing putty. After drying, the niche must be re-sanded with fine-grained sandpaper. Upon completion of all stages of finishing, you can start painting or wallpapering. Luminaires are inserted directly last step, when Painting works finished.
How to make a two-level plasterboard ceiling with your own hands: tips from the masters

Those who want to make a two-level plasterboard ceiling on their own will find in this article detailed description this process.
There are quite a few forms of two-level suspended ceilings, but at the same time their installation is almost the same. The main difference is the creation of rectilinear or curvilinear structures.
Carrying out preparatory work
You need to start the installation process only after all materials and tools have been purchased. You also need to check whether it is possible, with the existing ceiling height, to lower it by about 8-10 cm, but not less. AT standard apartments it is simply unrealistic to do so. But, there is a way out of this situation - as the upper tier it is necessary to use the base ceiling. It should be perfectly even, and if there are bumps on it, then they should be leveled. Only then will it be possible to proceed with the installation of a two-level ceiling.
Designing a two-level plasterboard ceiling
Without a detailed design drawing, it is best not to even start work. In case of single-level ceiling, its presence is not necessary, since there are no particularly complex calculations there. But, here it is almost impossible to make a two-level drywall ceiling without a drawing. The most optimal solution would be to create a 3D model of the future ceiling. This will help to simplify the work a little and decide on the shape of the ceiling.
When the project will fully satisfy all your requests and wishes, then you need to calculate the amount the right materials and start wiring.
Communications
Multi-tiered structures make it possible to insulate the ceiling and improve its sound insulation. But similar works must be carried out only after the frame has been installed. If we talk about electrical wiring, ventilation ducts and other communications, then their wiring must be dealt with before the installation of the ceiling begins.

The location of the fixtures and their models need to be thought out in advance. This also applies to the air conditioner or kitchen hood, in the event that the ceiling will be mounted in the kitchen.
Professionals should deal with such issues, because they will definitely be able to make the correct calculations and then do the installation. If errors are made in the calculations, then after the completion of the work they cannot be corrected.
Sometimes the customer can not immediately buy necessary appliances, which will need to be connected to the network under a false ceiling, for example, lamps. Then you need to rewrite their main parameters, among which are the power and dimensions of the mounting hardware (for recessed fixtures). As soon as this work is completed, it is necessary to sketch the wiring diagram and apply exact dimensions to it.
Mounting process
There are several options for mounting a two-level ceiling, and each specialist prefers one or another option. For example, some first completely make the frame of the upper tier, then veneer all its visible parts drywall sheets. Upon completion of these works, they proceed to the installation of the lower tier.

Other craftsmen do the opposite, in other words, the frame of the lower tier is first made, and then it is attached to the base ceiling.

It is impossible to say specifically which of the methods is better, and its choice depends directly on the design of the future ceiling and also on the area of \u200b\u200bthe second tier. For example, if the area of the lower level is much larger than the area of the upper level, then flat frame for the entire ceiling is not worth doing. First, this extra expenses metal profile and fasteners, and secondly, fastening to the base ceiling in such cases is much more reliable.
In the event that the upper level looks like a narrow box running along the perimeter, or if there is a protrusion in the center, then it is best to mount the two-level ceiling in the first way.
How to make a flat frame top level see installation article false ceiling from drywall. Now we will take a closer look at the installation of the frame for the lower level.
Mounting the frame for the lower level
- First of all, a design diagram should be applied to the ceiling in real size, draw horizontal lines on the walls, while you need to step back from the base ceiling to about the depth of the second level.
- Further along these lines, it is necessary to fix the guide profile (PNP 27x28). To create a smooth bend, you need to cut 2 adjacent walls of the profile, and then give the necessary shape. Then, with the help of each segment, you need to attach the profile to the ceiling.

- Next, under the guide profile, you need to make markings. According to this marking, a longitudinal ceiling profile (PP 60x27) will be attached. In this case, it is necessary to ensure that there is a distance of 40 cm between the axes.
- According to the markup, you need to draw perpendicular lines on the wall. These are projections of the profile axes. It is along these lines that it is required to fix the spring suspensions and keep a distance of 60 cm between them. Remember that in no case should you use dowel-nails. For this type of work, it is better to take anchor dowels.
 If there is a fire in the house, then the plastic dowels will not be able to hold the structure and it will collapse.
 - Cut out segments from the ceiling profile, the length of which corresponds to the depth of the second level. Then, in the same segments, you need to cut the side shelves, approximately to a height of 3 cm, and leave the base. Further, these jumpers are inserted with a flat side into the upper guide profile and screwed to it. If these are fastenings on a flat area, then a step of 60 cm must be observed, and 20-30 cm on curved ones. If you plan to place spotlights for plasterboard ceilings in a vertical wall, then before attaching the jumpers, you need to refer to the diagram.
- It is necessary to form a lower profile on the floor, repeating the figure on the ceiling. Make sure the profile is facing the wall. To form a bend, it is necessary to cut 2 parallel sides, but not adjacent.
- Next, the finished structure must be screwed to the jumpers. In this case, “the profile tongue must be superimposed on the basis of the profile.
- It is necessary to cut strips of drywall and screw them to the frame. Their width should correspond to the depth of the second level. Next, one side of the cardboard should be moistened with water and left for about an hour, but first, using a special needle roller, you need to make a perforation. This is necessary in order to bend the drywall strip.
- Now it's the turn of the longitudinal profile of the PP, which needs to be fixed between the guides. This is necessary to secure the second level. Each profile must be measured locally. Before proceeding with the installation, it is necessary to put “crabs” on the longitudinal PP profiles, which are necessary to connect them with the transverse ones.

- The transverse profiles must be installed in the paws of the "crabs", then fastened with small metal screws.
- Now it remains only to fix the longitudinal profiles on the suspensions and set them according to the level.

Top level frame installation
After you have completed the previous step, you will already know everything about how to make a two-level drywall ceiling.
A flat frame for the upper level must be assembled on direct suspensions, and all the nuances of the process are already known to you. It is also necessary to observe a distance of 40 cm between the axes, and fasten the jumpers at the junction of drywall sheets.
Plasterboard cladding
Before proceeding with the sheathing, you need to re-check the communication scheme, and if necessary, then in those places where heavy lamps will be attached, you need to strengthen the structure. After that, the ends of the wires must be lowered, and take care of the heat and sound insulation of the frame. Only after the completion of these works, you can proceed to the cladding.
And at the end of the article, I would like to note that where the drywall adjoins the walls, it is necessary to cut off the factory chamfer from it. The same must be done at the junction with the vertical step of the second level. In such places, the sheet is thinner, and this can lead to problems with the ceiling finish.