Butterflies decorate postcards, notebooks, photo albums, furniture and even just walls. Finished goods can be purchased at the store and simply stuck on Right place, or you can make it yourself, which is undoubtedly a more exciting activity. What can you make a butterfly from?
Let's look at several ways to make a paper butterfly.
Butterflies using quilling technique

The simplest, but no less beautiful decorative option is a paper butterfly. You can make it with your own hands in several ways.


And get a unique option every time. More complex options are a paper butterfly made from double-sided strips. This technique is called quilling and requires certain skills, tools and a lot of time. But the products turn out amazing.


Having made these kinds of insects of different sizes, you can hang them from the ceiling or chandelier using a very thin fishing line at different levels, which will create a wonderful weightless effect.


They can be used to decorate curtains and walls, cards and albums, and even as jewelry.
Openwork butterflies

Another option is a DIY paper butterfly using the weaving technique.


This technique is one of the types of folk decorative arts. Its essence consists of cutting out paper using scissors or special knives.


Works in this style can be simpler, or can reach the heights of grace.


Most often they decorate windows or mirrors and other glass surfaces. They are attached using a soap solution. They are also used in creating postcards.


To make such a decoration, they use paper butterfly templates, which they use to cut out their products. Figured butterflies can also be cut out using a plotter.


It's such special tool. Then you, of course, will spend much less effort and time on creating them, if you need a large number of decorating elements.
Simple garland of paper butterflies
Making a garland, the main element of which is a paper butterfly, is not difficult at all with your own hands.


Moreover, you will probably find everything you need at home. And everything you need to brighten up a dull room or decorate fun party, these are several sheets of multi-colored double-sided paper and decorative or regular wire. A ribbon or rope on which the garland will be attached will also come in handy.


For one butterfly you will need 2 squares measuring 15 x 15 cm. Fold each of them diagonally. You should get a triangle. Now fold both triangles towards each other, that is, from the edge to the center, like an accordion. The width of the fold should be no more than a centimeter.


Do the same with the second square. Then connect them together in the center and wrap them with wire, bending the edges in the form of antennae. That's all. Our paper butterfly is ready. Make as many of these as you need. Now all that remains is to attach them to the tape and hang them where you want them to be.
Butterfly using origami technique

Let's look at another way to make a paper butterfly. It cannot be called simple or complex. Rather, both options are present here.


Everything will depend on the paper butterfly pattern used. And, believe me, there are a huge number of them.


And all of different levels of difficulty. And, of course, the more complex and intricate the pattern, the more interesting the origami paper butterfly ultimately looks.


When folding your product, make sure each time that all folds are made perfectly and do not warp. If you choose a material with an interesting color or unusual texture, your origami paper butterfly will not disappoint you. Place the square of paper with the white side facing up. Fold it twice diagonally and once vertically.


By making a large number of these butterflies, you can miraculously decorate any room with their help.


You can make them in different sizes and use all the rainbow colors. After this, glue it to the original non-bulky driftwood, imitating color scheme rainbows. And nail a driftwood with butterflies to the wall, for example, in a children's room.
Butterflies on a paper wall

There are many ways to “settle” such wonderful insects as butterflies on your wall. One of them is a three-dimensional transparent painting, inside of which there is a dried butterfly of a rare species. It looks amazing, but not for those who are for the preservation of wildlife.


This exhibition is unlikely to please such people. Another, no less beautiful option would be butterflies made from feathers and wire. They often have variegated colors and look great on plain walls.


If you have walls with a pattern, then this option is unlikely to suit you, since such butterflies will get lost against this background. Or you can buy butterflies made from self-adhesive film and stick them wherever you want.
What can you do with your own hands?
You can create butterflies with your own hands not only from paper, but also from cardboard.


Perhaps the easiest option for decorating walls would be paper butterflies. Composition mounting options Made or purchased by you decorative insects can be attached to permanent place finding in different ways.
There are four mounting options in total.
1. Fastening with glue. The choice of adhesive material will depend both on what you are going to attach your element of the composition to, and on the material from which the attached object is made. If we are dealing with paper insects, then most often the number one choice is PVA glue. And the main thing here is not to get carried away. If you apply more than necessary, you risk not only smearing, but also distorting the color.

2. You can use the pin method. It is, of course, much neater than the adhesive one, but it will only work if there is space between the wall and the wallpaper.
3. Another mounting option is fixation with tape. You can use both flat and volumetric versions. The latter will add airiness and weightlessness to your composition.

4. And last but not least, and perhaps even more original way- using threads and transparent wire. This type of fastening is especially suitable for butterflies that have been folded using the origami technique. This type of fixation will affect your imagination to the maximum and will bring a lot of positive emotions during the work process.
Preparing to create paper decor
Although paper insects are the cheapest option for decoration, this method still gives you options that no other can give you.

When creating paper butterflies, you can make them flat or voluminous, smooth or textured, multi-layered and even openwork. Or even combine everything in one. The main thing is to approach this issue not only creatively, but also wisely. After all, your composition should improve the room as much as possible. Breathe life and dynamics into it, and not become an indicator of bad taste.

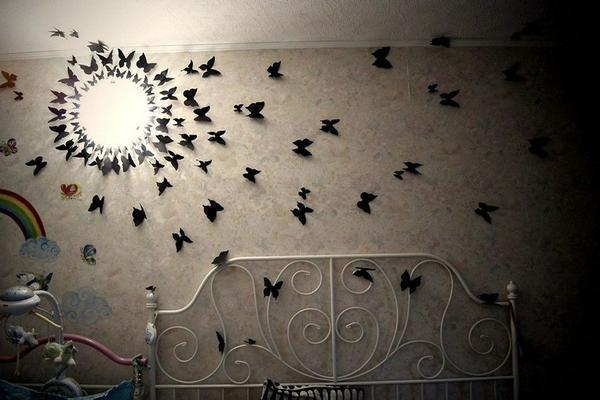
It should also be noted that the paper color range is not only very wide, but can easily be supplemented with all kinds of paints. Although in fairness it should be noted that the most win-win option is black monochromatic butterflies.

In general, before you get down to work, think through everything down to the smallest detail. Starting from shape and color and ending with methods of attaching the composition.
The process of creating a butterfly for a wall composition
In order to make a paper butterfly, which will become one of the elements of a future wall composition, you will need following materials and tools.
Firstly, it's paper and small decorative elements for decoration, if you want to use them. For example, it could be rhinestones. Secondly, scissors, glue, pencil and everything you need for fastening. Also use ready-made templates, according to which you will cut out insects for your composition.

So, let's look at how to make a paper butterfly. Cut the paper you will use into squares. The sizes of the figures depend on your idea.


Fold each square in half and carefully trace half of the sketch of your future butterfly on one side, working out all the details. Without unfolding the square, carefully cut out all the elements, and only then unfold it.
You will get a completely symmetrical insect. Once all the butterflies are cut out, decorate them as you intended and begin attaching them to the wall. On the surface that will be the basis of the composition, apply markings in advance so that you don’t end up with any unpleasant surprises.
Instructions for making butterflies with your own hands. Decor options with butterflies.
The butterfly is a cute insect that is associated with grace and sophistication. Butterfly hair clips are often used to decorate hair, clothes and bags. Jewelry and costume jewelry are also popular. Brooches in the shape of a butterfly will complement the most formal outfit.
How to make a beautiful three-dimensional butterfly from origami paper: templates for printing and cutting, photos
Origami is the art of paper folding that dates back to Ancient China. More recently, the origami technique has spread to European countries, that is, it has gone beyond China.
There is a certain set of symbols necessary to sketch the folding diagram of even the most complex product. Most of the conventional signs were introduced into practice in the mid-20th century by the famous Japanese master Akira Yoshizawa.
Classic origami requires the use of one square, evenly colored sheet of paper without glue or scissors. But now origami is closer to Ukrainian vytynanka, where beautiful figures are cut out of a piece of paper.
Below are diagrams for making an origami butterfly. To complete the work you will need small and very sharp scissors, as well as patience.

 templates for printing and cutting
 templates for printing and cutting
 templates for printing and cutting
Butterflies are often used in New Year's decor. They are tied to garlands, combined with cotton snowballs and artificial snow. In addition, such products are attached to the Christmas tree. Below you can find a butterfly stencil for decorating a New Year's room and Christmas tree.


How to make a flying butterfly out of paper?
A flying butterfly looks very interesting and harmonious. The main task is to produce an elegant insect that will be as close to the real thing as possible. After hanging it vertically on a thread, it should look like the insect is flying.
You can see how to make a flying butterfly in the video.
VIDEO: Flying paper butterfly
Basically, such applications are used to create paintings. Also, a paper butterfly will become excellent option for development fine motor skills children's hands preschool age. Depending on the age of the baby, the complexity of the application is selected. For kindergarten children, it is better to cut out the templates yourself. Kids only have to glue the parts. Below are several options for applications for children. of different ages. Usually, voluminous appliqués made using the lace technique look beautiful. Such techniques should be performed by children from 4 years old.


VIDEO: Paper butterfly applique
Butterflies are called winged flowers; they can add airiness and a certain frivolity to the room. Making panels from paper butterflies is very simple. The simplest option is a picture with glued paper butterflies.
Materials:
- Scissors
- Basis for panels
- Paper of the required color
Instructions:
- Decide on the size of the panel and the drawing itself. Also find out what kind of drawing you will create.
- After choosing a stencil, cut out butterflies from colored paper and glue them to the base canvas
- It is advisable to mark in advance with a pencil the line along which you should glue the butterflies


Such decorative elements are made of paper and can either be glued or hang over the wall. Such butterflies can be mounted on furniture, a wall, or hung on threads.
Butterfly decor options:
- Butterflies fluttering under the ceiling
- Butterflies on the wall or furniture
- Decoration of chandeliers and lamps with butterflies


Silhouettes on the wall can be either voluminous or flat. Initially, a base silhouette is selected. Most often, butterflies resemble a flock; sometimes small butterflies form a huge moth. It could be a cup with butterflies flying out or a watch. IN in this case butterflies symbolize the transience of time. A whirlwind of butterflies also looks harmonious and interesting.


Butterflies made of colored paper will be an excellent addition to the interior. They are made using origami or quilling techniques. These are insects made by folding and gluing pieces of paper. It turns out openwork butterflies. Looks very nice, especially if combined colored paper. Below are templates and photos of butterflies made from colored paper.


This kind of figurines are used to decorate a child's room. They look very gentle and unusual. Such butterflies are hung on threads and decorated with them. play areas. Such butterflies combine very nicely with bright and colored lighting. This can be side lighting or direct rays.


Large butterflies are used for wedding or holiday decor. Despite its cheapness and simplicity, such decor can significantly improve a room and make it festive. Usually thick paper is used that holds its shape well. This prevents the wings from bending. Such butterflies are suspended on ropes, fishing lines or threads. Large paper butterflies for hall decoration: templates, photos 


If you do not have such experience, then it is better to carry out such decoration on painted walls or non-woven wallpaper. In this case, if you don’t really like the result, you can remove the butterflies. It is best to attach the butterflies not with glue, but with double-sided tape. It comes off perfectly from wallpaper and painted walls. You should not use it in case of paper wallpaper.


Decorating a room with paper butterflies is quite simple. You need to stock up on patience and materials.
VIDEO: Paper butterflies
Nature is one of best places to find inspiration. Paper butterflies are one of the most popular shapes for interior decor because they are beautiful, delicate, bright and graceful, and are ideal for any interior decoration. There are many creative ways to make butterflies. Listed below are some of them that you can do yourself to decorate your home in your own unique style.
Whether you plan to decorate unique project yours workplace, decorating a child's room or simply creating cute details for the living room with your family, we invite you to consider unique design ideas. Be inspired by how colorful, airy and light the space of a kitchen-dining room, living room or hallway can become if it is complemented with such a creation. We'll show you detailed, illustrated, step-by-step instructions to create a variety of different, easy-to-make paper butterflies.
Butterfly chandeliers
 This nice chandelier self made perfect for any room, you can make it into suitable color and size. To work you will need:
- hoop;
- fishing line;
- paper;
- scissors;
- inspiration.
It will be much easier if you take ready stencil butterflies for cutting out of paper in templates: 
Or use the origami technique: 
Instead of paper you can use plastic bottles: Using the template, cut out the shape and paint it with nail polish. You will get a realistic butterfly from a magical forest.

Wall decoration with butterflies
 Why spend money on expensive wall decor when it's so incredibly easy to make these beautiful butterfly decorations by hand? With a minimum amount of materials and plain paper, you can come up with exciting results.
To make these beautiful butterflies you will need a lot paper sheets, a butterfly stencil, a pencil to draw the outline, and scissors to cut out the shape. Please note special soft options tape for the walls so as not to spoil the repair in case the decor needs to be removed in the future. Do this project with your kids - you can let them put up the finished pieces themselves to encourage their creativity.
Depending on what resources you have, you can use either ready-made cardboard (or thick paper) or regular White list with him further painting. Always use gouache or acrylic as paints - these two dyes give an intense color after drying. bright shade which will look especially attractive.
To get a matte finish, use gouache. For a glossy look, you'll need acrylic.
So, step by step guide:
- Prepare paper butterfly templates that you can print from this page or use your favorite butterfly shape.
- Cut out the outline and fold the shape in half, leaving the central part for fastening.
- Use soft tape or double-sided tape duct tape to mount free-form art on the wall.
Butterflies will add special atmosphere any part of the house, although this particular option will look most magical in the bedroom to let your imagination soar with them. 
In just a couple of hours, you can create several dozen ready-made figures - provided that the whole family is involved in the project. You can choose a monochrome pattern, using one color and creating some clever design with butterflies, or you can choose an unstructured collage - either way, you will be amazed at the results!
 The heart design pictured here is one of the favorites for the butterfly stencil, but you can also choose stars, flowers, or a favorite name.
Magic flying lantern
 Your kids will love this magical butterfly lantern idea. A lantern is a great way to create a cozy atmosphere and add depth and expression to a space, both indoors and out. In addition to providing illumination, it also helps delimit the space for a special mood. You can do this project with your children to game form experiment with shadows!
You will need:
- small glass jar capacity about liter;
- a piece of thin wire;
- scissors;
- paper;
- pencil;
- ruler;
- glue;
- a thread;
- candle-tablet;
- butterfly stencil.
Step by step guide:
- Draw silhouettes of butterflies on a piece of paper and cut them out.
- Wrap the paper around the jar and cut out the appropriate size, leaving about 1cm extra.
- Make a cylinder shape out of a piece of paper by gluing the edges, then glue the butterflies to it.
- Make it from wire curved shape and attach it with one side to the neck of the jar, and hang the butterflies on the other with a thread.
- Glue the butterfly cylinder to the jar.
- Place a candle at the bottom and your lantern is ready.
If you follow the instructions, your butterflies will dance!
When choosing a jar for crafting and the length of the wire, keep in mind that hanging butterflies too close to the candle flame can cause them to burn. If the sides of the paper are protected by glass, there will be no such protection on top, so make sure that they are at a safe distance from the fire.
Crepe paper cake decoration
 What could be more beautiful than bright butterflies fluttering around your cake? The trick to these easy to make paper shaped butterflies is that the paper's texture lends itself perfectly to creating these butterflies.
 Necessary materials:
- crepe paper;
- bamboo skewers;
- multi-colored wire;
- scissors;
- acrylic paints;
- brushes;
- permanent markers;
- hot glue gun.
 Step 1: Cut out butterflies from crepe paper by folding the paper in half. Be careful to cut the crepe paper from the side and not from the top or bottom. The butterflies shown in the picture are made in size about 8 cm on each side, and the diameter of the circle is approximately 5 cm.
Step 2: Crumple the crepe paper in the center of the circle using a back and forth motion with your fingers.
Step 3: Secure the center of the butterfly with wire. Cut off the ends.
Step 4: Spread, fluff and smooth the top and bottom wings.
Step 5: Decorate the wings using acrylic paint and markers. Let dry.
Step 6: Hot glue the butterflies onto the skewers.
Step 7: Insert into cake and serve!

 This craft option can be used as a gift decoration and in interior design. Here are ideas for inspiration with ruffled butterflies in your home:

How to make a paper butterfly is as easy as shelling pears. Look at this option for a children's room: butterflies on clothespins. This decor can be made even with the youngest children: just cut out a simplified butterfly shape with your child from crepe paper, and then fasten it in the middle with a regular wooden clothespin. The clothespin can be painted with gouache as in the photo or in another way. Such butterflies are attached to the wall or furniture with ordinary double-sided tape.
Paper butterfly garland
 This cute paper accordion butterfly is the easiest option out there, and you most likely have all the materials you need to make it. So if you need to brighten up a space or throw a party, just make these butterflies.
 For each butterfly you will need:
- 2 sheets of 15x15 cm double-sided colored paper. While double-sided color is best, use whatever you have or cut out squares from pretty gift wrap.
- Thread a thin wire 15 cm long into yarn, thin ribbon or rope.
How to do:

The garland is ready!
 Aren't they beautiful? They are very easy to make. you can use different colors paper to make colorful butterflies. Additionally, you can combine two colors to create one butterfly, making it unique. You can hang each paper butterfly individually to create a floating effect.
  Or combine them to make a beautiful and colorful garland. They are great for decorating a room, garden, and are also great for parties.
Paper butterflies for wall decor from cupcake baskets
 Here's a super cute idea for making a pretty butterfly out of cupcake baskets and clothespins. It's super easy and perfect for a kids craft. You can use these butterflies as stand-alone decorations for your home or as an addition to other decorative elements - for example, for hanging on curtains.
You will need:
- plain white cupcake baskets;
- wooden clothespins;
- dye;
- shine;
- ink;
- rhinestones.
Start by creating some colorful butterfly clips.
For big butterflies use 4 baskets, for small ones - two. 
Fold them in half. 
Fold in half again to make a quarter. 
Then glue them together at the corners and in overlapping pairs as shown in the picture. 
You can add shape to the wings by trimming the edges. 
Add definition and texture with colored ink on the outer edges. 
Decorate the clothespins with soft acrylic paints and sprinkle them with glitter. 
A piece of natural twine is perfect for antennae. 
Add a few drops of glue to the ends and dip them in glitter. 
Take dried clothespins, tendrils and some rhinestones to make the body of the butterfly. 
Be sure to glue the antennae to the top of the clothespin, as if you glue them from the back, they won't be visible under the clip. 
Glue a clothespin in the center between the wings. 
Instead of rhinestones, you can use a tiny ribbon flower in this place. 
All kinds of materials can be used for decoration. 

Make some baby butterflies using miniature clothespins and 2 mini baskets. 
You don't have to cut out the baskets, it looks fun too. 

Butterfly stencils
Having printable templates of any type is a big advantage for DIY enthusiasts. Home designers can save a good amount of time by having templates at arm's length. Just print them out and use them as you wish.
Create your own collection of elegant butterflies made from cardboard, fleece or plain paper, even in complex forms repeating patterns using our butterfly cutting stencils different sizes. Here we have a collection of amazing butterfly patterns that you can use in your projects.
Simple butterfly pattern

Beautiful butterfly pattern

Butterfly for cutting, template for printing


Butterfly wings pattern


Applique with butterfly

Butterfly patterns for coloring

Cute butterfly pattern

This butterfly outline is perfect for crafts at home.
Another butterfly pattern. 
This butterfly template displays a butterfly with its wings spread. She has heart shaped wings and a beautiful and mesmerizing design.
Pattern for dark butterfly
 Sketch of this template dark butterfly good and pleasant, even if it is not colored at all. It seems that the wings also have eyes that look directly at you.
Beautiful butterfly with stripes

Beautiful butterfly pattern

Simple dark butterfly pattern


Print out the butterfly template, color it and cut it out - and your idea for interior decoration is ready.
DIY origami butterflies - video
Quite often, residential renovations are carried out taking into account that it will last for several years, but many years of monotony can become boring or even begin to strain. What to do in such a situation? It is worth giving preference to updating the interior with the help of accessories or products such as a DIY butterfly panel.
A butterfly on the wall is a wonderful decoration, and there are no restrictions on exactly how it will look, what size or color. These are the types of decorations that began to be used modern designers, creating gentle and unusual interiors. Many people in childhood cut out butterflies from the most various materials. For example, from paper and fabric, napkins and even plasticine. At the moment they can be very different and even made from vinyl records.
The butterfly panel is a flight of fancy, as well as the opportunity to create your own unusual design, from which not only the owner of the house, but also the guests will be delighted.

You can use unusual materials, create a butterfly with openwork wings and decorate them with rhinestones and beads. With such decor, the room will be more comfortable and cozy, which is what every person needs. Will fit on the walls fairy creatures, magical and extraordinarily beautiful.
A panel of butterflies is a panel through which attention is focused in the room. Some designers use such products to disguise unevenness on the walls, or mistakes made during previously completed repairs. Naturally, the effect of the panel depends only on who creates it, for example, some prefer bright colors, while others want to make the house more calm and gentle.
DIY butterfly panel: do it yourself
A master class on creating paper butterflies is not difficult, you just need to pick up ideas and decide on what technique the panel will be created in.
There are several ways to form paper butterflies:
- Quilling;
- Origami;
- Stencil.

In addition to the technique, it is worth paying attention to the color of the panel. As a rule, it is a bright place in the room, but should look harmonious with common interior. The panel should not merge with the covering of the walls and ceiling.
There are also differences in the bending of butterfly wings. If the style of the room is classic, then the butterflies can have intricate curves, but for Art Nouveau they are the most ordinary.
Once the shape is determined, you need to work out sketches, the development of which is carried out using computer programs or using stencils. To make the panel bewitchingly beautiful, you need to create several sizes of butterflies. Most in a simple way It is considered the use of tracing paper to translate the drawing and reproduce it.
If the butterflies are not symmetrical and similar friend on a friend, then the panel will attract even more attention, and to be more precise, with its creativity and originality.

The next stage is the formation of an overall picture.
Making paper butterflies by hand is much easier and cheaper, thanks to the fact that the paper can be very different, for example:
- Color;
- White;
- Glyantseva;
- Matt;
- Velvet.
The choice is simply huge, both in types and shades, and therefore creating decor with your own hands is not a difficult process.
It is not uncommon to use brushes and paints, as well as a regular album sheet, to create a butterfly panel with your own hands.
All these materials are available and can be purchased at any store. Some people use wallpaper left over from renovations or even pieces of the material from which the curtains are sewn.
You need to cut the butterflies according to the template and using scissors. In order for the butterflies to be different in size, you need to use different templates. To speed up the process, you can prepare the squares in advance, put several pieces together, bend them in half, draw half of the body and wings of a butterfly, and cut out several insects at a time for decoration. This cutting is carried out using the same technology as preparing snowflakes.
Once all the previous steps have been completed, you can proceed to the formation of the drawing:
- It can be very different in appearance, for example, like a heart, like a spiral, a circle, an oval, or even a stream of insects.
- In order to clearly see exactly how the panel will look on the surface of the wall, you can lay out the picture on the floor. This is how you can correct mistakes in advance and eliminate unwanted defects.
Butterflies on the wall can be densely spaced, or they can have protruding wings. Cardboard butterflies can have their wings soaked so that they have a rounded shape, which is also very attractive.
Panel of paper butterflies: stylish decor
Creating the shape of a future panel is a special moment on which the effect the product will have on everyone who sees it depends. Naturally, doing this on your own is quite possible.
A fairly popular panel in the form of a whirlwind, numbers, flowers, or even a completely chaotic arrangement of paper insects.

Modern designers prefer to place butterflies on wallpaper with voluminous flowers, thereby creating an extraordinary decor. The ideal option would be to draw a sketch of the panel on the wall, for which you can use pencils or chalk, which can be easily erased from the wallpaper.
Where is the best place to place a butterfly panel?
The most acceptable option is the placement of butterflies on the surface of the wall, with the help of which flaws, irregularities and defects are hidden. It is worth noting that it is possible to place panels of butterflies on the curtains. Designer luxurious tulle decorated with butterflies with mirror wings is perfect option for decorating a kitchen or nursery.
You can find a huge number of places in the house where you can place panels.
For example:
- Chandeliers;
- Lamps;
- Floor lamps;
- Shelves.
Creation panel from butterflies (video)
A creative solution would be to embroider panels on furniture upholstery. Why not decorate your sofa and pillows with textile butterflies with movable wings? Why not give the chairs wings like butterflies? There may be a lot of ideas, but the most important thing is to maintain the harmony of the room.
Butterfly panel (photo)


