What to give for the holiday to the woman who has everything? Of course, the holiday atmosphere. And you need to start from the very beginning. We only give what we made especially for her. What woman wouldn’t want to start her holiday with a fragrant cup of coffee in bed? And only the closest people know the lady’s preferences - vintage luxury or expensive simplicity. Tray - simple detail, which can emphasize your attitude towards the woman you love.
What is a tray?
Of course, you can easily buy any tray in the store - expensive or not, for everyday use or special occasions. But making a tray with your own hands will be much more interesting. First, let's figure out what it is.
This is a surface on which you can place several objects and move them to another place. Trays must have sides. There are also products without them, but this does not add practicality to them. It is not advisable to serve a tray without sides in bed, since the unstable surface of the bed can cause liquid to spill on the linen, and this, you see, will upset any housewife. So, a tray is not just a board with handles, but always with sides.
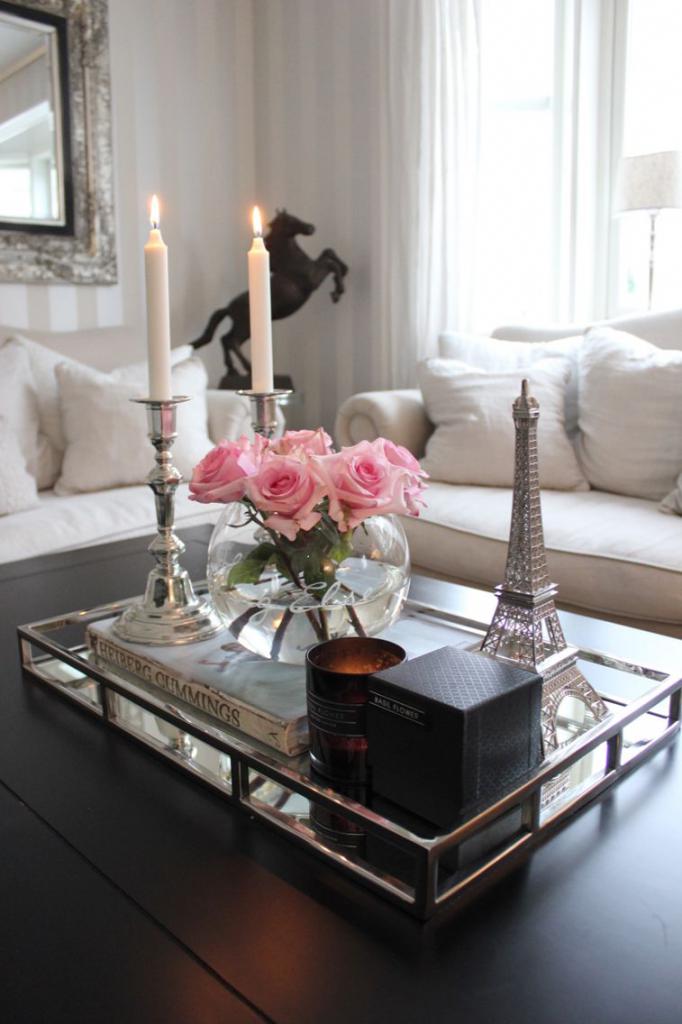
Photo frame tray
How to make a tray with your own hands? There are several ways. The simplest ones involve taking almost ready-made trays. For example, you can purchase cutting board without a handle. The board can be wooden, plastic, plywood. The main thing is that it does not bend under a slight weight and that it can be worked with.
Select a photo frame based on the size of the board. You shouldn’t skimp on glass, as you can hide any decor under it, for example, a photograph that for a long time will remind you of a pleasant day.
The frame should be screwed to the board with self-tapping screws or nailed. If the material does not lend itself to this method of fastening, you can glue it. To make it easier to take the tray, we attach furniture pieces on both sides. retractable handles. Everything can be pre-painted in the desired color or decorated in any way.
Old cabinet doors
Many craftsmen suggest not throwing away cabinet doors, but using them to create a tray with your own hands. To do this, take a door that has sides. We disconnect all the hanging fittings from it. We clean out existing irregularities and eliminate defects. If necessary, we rub the places where the hinges were screwed on with putty.
Don’t leave flaws in the hope that they will be covered up when decorating. It is better to eliminate them and not then sculpt decor where the hole or chip is. It is better to place decorative elements where the sense of beauty suggests. We decorate to taste. Next we screw on the handles. The tray is ready.
Old picture frame
If you have an old frame in your house that used to hold a mirror or store photographs, you can use it as a beautiful rim for a tray. Cut the bottom out of plywood to the size of the frame, decorate the resulting surface with a piece of fabric. The bottom can also be painted or decoupaged using patterned paper napkins.
If there is glass along with the frame, you can use it as an additional decoration. It is possible that a painting stored in a frame can be used to decorate a tray. You can screw the handles to the frame from the side so as not to disturb the design.
The frame itself can be updated with gold paint. Good decision will use varnish or resort to a burner to emphasize the beauty of the design.
Boards in action
If you want to make a tray with your own hands and get something original, you need to take a board and a lath. It's good to polish both. Cut the board with a saw or jigsaw into equal pieces. At the edges, connect them with a strip, nailing it to the end parts of the boards. You can stain or varnish, paint in any color or decorate to the taste of the future owner of the tray.
To make a wooden tray with your own hands, you don’t need any special skills. Next, we screw ready-made furniture handles or make them from thick ropes, having previously drilled holes in in the right places. If you make the rope handles longer, the tray can be used as a hanging shelf, and you can adjust the length of the handles from below using special clamps.
Beauty from plywood

You can make your own tray from plywood. It has long been known that plywood is a very malleable material. If you have skill, imagination and a minimal set of woodworking tools, you can make an amazingly beautiful tray with a unique design.
Of course, it won’t be easy to call it practical, but any housewife will definitely like it as a decoration for the kitchen. The main thing is patience and desire. You can think through the design yourself, or you can just look it up on the Internet and make something already invented by a real master.
Trays with legs
Some tray models require legs. Making a tray with legs with your own hands is not difficult. Currently, you can purchase ready-made legs, which you just need to attach to a homemade tray.

If you want to think through everything yourself, then in stores building materials can be found a large number of tubes that are suitable for a DIY table. In addition to the tubes themselves, there are all kinds of connectors that can act as decoration. If you have the skill, attaching them to the tray will be easy. If you don’t have the skill, you can simply watch a video in which masters share their best practices.
Decorating trays
Making the tray is half the battle. It needs to be decorated. Several ways to decorate trays:
The simplest one is to varnish it. If the tray is made of wood, its texture itself will become the most pleasant decoration. You can purchase a tint varnish that will add liveliness to the design.
If you are not interested in wood for decoration, you can decoupage it on a tray. Always original, fashionable and attractive. Plus it's quite easy to do. Choose the pictures you like, stick them to your liking, cover them with varnish - your unique tray is ready.
You can paint the tray using stencils.
Mosaic will also be a worthy solution. Only to implement this idea requires skills. If a lot of small coins have accumulated in the house, they can also be used to decorate the tray.
The main thing is to remember for whom the tray is being prepared and what the tastes of the person to whom it will be presented are.
Among the offers of modern furniture stores there are interesting coffee tables with a soft tabletop, if you can call it that. They look interesting in the interior, but they are never practical. Juice or coffee stains are not as easy to wipe off as with regular wooden or glass table top. For all owners of such a miracle and simply those who love breakfast in bed, we suggest making such a tray. It is stylish in appearance and not expensive in cost.
Materials
Before making a tray with your own hands, make sure you have:
- boards from a pallet or box;
- boards hardwood wood;
- white paints;
- polyurethane-based varnish;
- masking tape;
- saws;
- sandpaper;
- brushes;
- chisels;
- clamps;
- wood glue;
- roulette;
- self-tapping screws;
- drills;
- screwdriver or screwdriver;
- pencil.
Step 1. Decide on the dimensions of the tray and, based on this, cut the boards you have from the box or pallet to length. IN in this case I wanted the boards to look like one after gluing, without joints, seams or other irregularities. To do this, the boards had to be adjusted to each other and in thickness.

Step 2. Using clamps and wood glue, all the boards should be glued together, carefully pressing them together so that none of them gets out of line. After the workpiece has dried, all excess glue should be removed and the surfaces thoroughly sanded.


Step 3. You will need to make the sides of the tray from boards of light wood. In this case, poplar was taken.
When cutting wood, base it on the perimeter of the base and the height you want for the tray.
On the side edges, be sure to mark the cutouts for the handles. Also take into account the height at which the base will be attached so that the slots do not extend onto the bottom.

Step 4. After cutting out the holes, sand them thoroughly. They must be perfectly smooth.


Step 5. Using wood glue and clamps, glue the sides to the base.


Step 6. You can use self-tapping screws as additional fastenings.
Step 7. After the glue has dried, remove any excess. Cover the holes formed by the fasteners with wood putty. Let it dry and level the surface. sandpaper or a grinding machine.


Step 8. Bottom part seal the tray masking tape. Apply two layers of paint to the sides. After it dries, remove the tape and leave everything until the surface is completely dry.
This material is for romantics who like to arrange surprises and would not mind having breakfast in bed or just having a snack while sitting on the soft sofa. We have already talked about how from, and now it’s time to make serving tray– and this time made of wood. We have selected the easiest and most accessible methods, so you don’t need carpentry talent.
Master class No. 1. A tray from a photo frame in 1 evening
The easiest way to make a tray with your own hands is to convert an ordinary photo frame into it.
Buy or remove a wooden photo frame of the appropriate size from the wall. It’s good if you find a frame with a strong bottom and reliable fastenings, then you won’t have to change the backing and you can update the decor of the tray according to your mood.
So let's get started. Remove the cardboard backing, remove any excess and put the glass back in place.

Now you need to decorate the cardboard from the photo frame as you like. You can glue or simply apply decor from various materials. This could be: bright fabric, a piece of wallpaper, postcards, yellowed pages, a herbarium, etc. In our master class, the backing is simply covered with fabric and glued with a glue gun. Instead, you can use PVA or any other glue. After the decor is ready, place the backing on the glass and secure it (scroll the photo to the right).

And now you need to screw the beautiful ones furniture handles suitable size. You can screw them either on the side or on top of the frame. To do this you will need the actual handles, 4 screws, a drill with a small drill and, of course, a screwdriver. First you need to attach the handles to the frame, align them, then mark the holes with a pencil, drill them with a drill with a suitable drill bit and finally screw the handles onto the screws using a screwdriver as shown in the photo below.

Well, that's it, your serving tray is ready! Or... almost ready.
- For reliability and to add weight to our tray (so that it stands level on a soft surface), it is better to additionally strengthen it from below. To do this, you need to take plywood, place a frame on it, trace it along the contour and cut it out with a jigsaw. The resulting workpiece must be sanded along the edges and then painted suitable color(pre-primed). Once the plywood is dry, all you have to do is attach the plywood to the frame with small screws, nails, self-tapping screws, or a furniture stapler. This tray will withstand even the heaviest breakfast in bed.
Based on this master class, you can make beautiful trays with a wide variety of decor. For example, you can make a serving tray like this with a slate bottom, on which you can write romantic notes with chalk.
- The substrate can be painted either with slate paint or covered with chalk wallpaper.


Here are other decor ideas for both the frame itself and the backing. As you can see, you can come up with the most different designs- V vintage style like Provence or shabby chic, in classic style or in a modern way, using fabric, photographs, colored paper, wallpaper, pages from books (scroll the photo to the right).

This master class will also be useful for making interior trays for magazines or dressing tables, where candles and books, or jewelry, cosmetics and perfumes can find their place.


Master class No. 2. Tray from the kitchen door in 2 evenings

You can make a serving tray with your own hands not only from a photo frame, but also from an old door kitchen cabinet, chest of drawers, bedside tables and other furniture. This tray takes a little longer to make, but it will be much more reliable, practical, durable and will hold more breakfast goodies!
The procedure is as follows:
- Remove all loops.
- Remove the old coating with coarse sandpaper.
- At this point, the outside of the tray can be brushed with a wire brush if desired to remove the soft fibers from the wood.
- this technique will make the surface of the door even more “old” and rough, but, on the other hand, the effect of dilapidation in the shabby chic and Provence style can be achieved without it.
- We clean the door and remove it reverse side, fill the holes from the hinges with wood putty or polyester putty. We also sand the patches a little and clean the entire door again. In principle, this step is not necessary if the holes from the fasteners do not bother you.
- Coat a clean, dry door with wood primer in 1-2 layers. Each layer must dry thoroughly.
- Now you need to take the sandpaper again, but with a medium grit and walk it over the entire surface.

- Again we wipe the door clean and dry, and then we begin to paint our future tray. Using a small brush (non-fading!), cover the surface with 1 layer of paint. And here it is necessary to note a couple of nuances:
- if you want to make a tray or, then the first layer of paint should be dark, and the second and third should be light;
- if you want to paint the bottom of the tray with slate paint as in this master class, then before applying dark green paint, cover the outline of the bottom with masking tape (see photo above);
- If you don't have a brush, a clean cotton rag will do the job.
- When the first coat of paint is completely dry, coat the door with the finishing paint, the lighter one.
- To make a “chalk” tray at this stage (or after it), you need to apply the actual chalk paint first in 1 layer, giving it time to dry, and then in the 2nd layer. After the 2nd layer has dried, we again seal the edges of the slate bottom with tape and begin painting the door with finishing paint (you can do the opposite - first apply finishing paint, wait until it dries, and only then apply slate).
- And now the surfaces of the tray need to be sanded with fine-grained sandpaper, exposing a layer of dark paint in some places (again, if desired).
- And finally, we attach the handles: we mark the attachment points for them and tighten the screws. Woo-ala, the breakfast-in-bed serving tray is ready!
By the way, if you painted the bottom with slate paint as in this master class, then the resulting tray can be used not only as a serving tray with messages, but also as a board for menus and household notes.

Here are other ideas for making beautiful DIY trays from old wooden doors (scroll through!).
In this article I will talk about several simple techniques with which you can give a wooden surface a slightly aged look. This makes it convenient to process any soft wood products. We will practice using the example of a tray made of pine wood. This tray is convenient to use, looks good simply as an interior item, as a background when taking photographs, and simply lifts your spirits with its brightness! And extremely easy to make!
Necessary materials:
A board or piece of shield made of soft wood;
Wire brush / drill attachment + drill or screwdriver;
Brush to remove dust from the surface
stain
Artistic acrylic in several colors
Bristle brushes, flute
Palette or container for mixing paints
Container with water for washing brushes
Sandpaper (60 or 80)
Acrylic primer For wooden surfaces(or acrylic varnish diluted with water 1:1)
Acrylic varnish for finishing coating
Handles (for example, for furniture) and screws/screws for fastening them
A few words about the basis. Ideally, I would choose a board with interesting edges. But in winter time It’s difficult to find a nice board, but construction stores have furniture panels and there is free cutting with purchase. The disadvantage of the shield is that it is spliced from several bars and a single relief on the surface will not work. True, when painting, which will be discussed, this will not be noticeable on the finished product. However, if you cover the wood only with stain and refrain from painting, it will be visible. But this material is easily available at any time of the year. I chose a 30*2000 shield and sawed it right there into 4 pieces - 4 blanks for trays.
For the first stage we will need a brush / drill attachment + drill or screwdriver. At this stage, we will remove soft fibers from the wooden surface, revealing a natural relief. It is cheaper to buy a brush and use it - but this is quite a long physical work. You can buy an attachment for a drill or screwdriver; it works much more efficiently. When removing soft fibers, a lot of wood dust is produced, so I highly recommend not doing this indoors. It’s most convenient in the country: there, as a rule, there are no problems with electricity near the house and you can use a drill. In the city it is quite problematic to find electricity on the street, so I used a screwdriver. This is convenient, except that its battery charge is not enough to process the entire board and it has to be recharged. But the dusty part of the work can be done outside.
Both the brush and the nozzle need to work the same way - run along the grain, and not across it. Then the soft fibers will be thrown to the side, and the hard ones will remain in place. Exactly how much to rub is a matter of taste, I get to work quite diligently, as a result deep grooves are formed, the relief looks like old wood, as if the board had been left outside for several years. 

This is what the board looks like after processing 
Using sandpaper (or a sander - this is more effective) sand the edges of the board, this can give it a more finished look and protect the user of the tray from scratches that can be left by the sharp corners of the board: 
At the end of this stage, be sure to clean the board from wood dust with an elastic brush, cleaning it out of all the recesses. I use a slightly damp brush to avoid breathing in dust.
Now you can start painting. There are many options here, but in general the order is followed: the first step is to set the lowest, main color. The first layer must be laid with high quality and all the recesses must be painted over, it is in them that it will be visible on the finished product. I use a dark stain called "Old Wood" dark color will shine through and create an antique effect wooden base. In addition, the stain spreads very well over the fibers and fills all the cavities on its own, so you don’t have to worry about unpainted areas. Through testing and after a number of bottles of stains went into the trash, I chose Liberon stains. The most important advantage of these stains is their uniform distribution over the surface, without streaks or bald spots. I've come across stains that roll off the surface instead of absorbing into it and end up with unsightly stains that give away the color (when a good stain looks like the wood was that exact shade from the very beginning). There are hybrids of stain and varnish on sale; you can also use this option, in which case you can skip the next step (applying primer). I apply the stain with a flute brush (a wide bristled flat brush). 
Even if you use the best stain in the world, it is better to avoid streaking, this is a guarantee that the color will be applied evenly. 
A distinctive feature of good quality stains is that they exhibit the texture of wood, that is, soft fibers of the fabric, due to better absorption, are colored more strongly and become darker than denser, harder fibers. At the first stage, we created a relief, which is very successfully emphasized when painted. 
After drying, the painted surface looks like this: 
To be honest, every time I fight the temptation to varnish this beauty and not do anything else with it. But this is not sporting. Therefore, we continue before next step(color overlay) I recommend covering the entire surface with an acrylate primer (any company, most importantly suitable specifically for wooden surfaces). Because acrylic paints on water based, if you do not lay a layer of primer, the water will wash away the stain and the paint will turn dark, its brightness will disappear. The soil allows you to avoid this. 

This is what happened - it could have been left in this form! What could be more beautiful than the warmth of natural wood? 


But let's continue! For the next layer we will need acrylic paint and bristle brushes, as well as sandpaper. The whole principle of painting is a cycle of actions “paint - skin”, these actions must be repeated until you like the result. By adding new shades that are close to the previous ones, the color can be made more complex and voluminous, achieving the feeling that the board has been painted several times over many years and the lower layers of paint are visible through the rubbed areas in the upper layers.
I advise you to choose a color for painting that is present in your interior as a primary or secondary color (depending on the background on which this element will subsequently be located). This color needs to be divided into two or three tones (the color present in the interior and two colors, lighter and darker in tone than the first), you can select and subsequently perform a couple of bright strokes. It is better to apply the most first light shade. Acrylic paint, although opaque, but in some places thin layer the paint will still show through. And a color laid over white or light paint will look brighter than the same color laid over a dark base. Thus, by applying a light shade first, we prepare the basis for a bright and rich second and subsequent layers. A little about acrylic paints: these are very easy to use water-based paints. They are odorless, dry within an hour, depending on the thickness of the layer, which allows you to work with them without interruptions. They have bright, rich shades in palettes different manufacturers, which can also be mixed with each other to obtain any shades. Thickened paint can be diluted with water. Brushes should be washed immediately after use under running water. If the paint dries on the brush, it will not wash off. You can choose acrylic paints from any manufacturer, but it is best to take art acrylic - it has a dense consistency and is well applied to the surface. Interior paints that can be tinted are also suitable. I do not recommend using cheap acrylic from office supply stores for children's creativity, it often comes across as slimy and rolls off the surface, making it completely impossible to work with. In my arsenal I have acrylic paints from Maimeri Acrilico and art acrylic from Ladoga and Gamma. The light blue shade is already in the Maimeri Acrilico palette, it suits me quite well, so I’ll start with it. 
To work, I take a bristle brush with hard bristles. It is important not to wet the brush in water before work, otherwise the bristles will become soft and will follow any curve on the surface, when, as for me, it is important to preserve the darker, original color in the recesses of the relief. When painting a relief, hold the brush perpendicular to the stroke you are making (as in the photo); in this case, individual bristles will not fall into the recesses and, accordingly, paint them. The paint should be thick; if it is fresh, then there is definitely no need to dilute it with water. Squeeze out required amount paints on the palette, if necessary, mix several colors to obtain the desired shade. There should not be a lot of paint on the brush, it should be semi-dry. When applying paint, do not press hard on the brush; strokes should be made with light movements, lightly touching the bristles to the surface.
1st side of the board: 

2nd side of the board: 
Add acrylic colors as desired. We sand and paint as much as your soul and your taste require: 
A few strokes of white: 

After that I decide enough is enough. Finally, the board must be varnished - preferably acrylic too. They come in matte, semi-matte and glossy, and are sold both in art stores in small volumes and in hardware stores in liters. Acrylic varnishes do not change the shades of the base, also dry quickly and have no odor. I usually choose a matte or semi-matte polish.
After the varnish has dried, you will have to solve the most difficult question: which side will be the front. You can buy handles that can be easily screwed to the side of the board, and not through it, then you can turn the board over according to your mood. My version has a through mount, so it’s up to you to choose front side you have to think hard. 
A beautiful tray is a multifunctional thing, it is at least a stylish interior accessory and kitchen item for convenient transportation of food and drinks. Quality store-bought products, even if they are classic options, are expensive. But by spending a little time and effort, you can easily make a tray with your own hands, thereby obtaining an original product that can become a priceless family heirloom. Creating it is not as difficult as it might seem at first glance.
You can make a homemade tray from wood, plywood, glass and decorative elements. It is worth understanding that not every type of wood is suitable for making kitchen trays. Experts recommend using:
- birch;
- linden;
- cherry;
- mulberries;
- alder;
- maple;
Resinous tree species (pine, spruce) are not suitable for making kitchen utensils, as the food will quickly absorb the pine smell.
The tray is quite simple design. A flat bottom, framed on four sides by sides, can be easily made from old things, for example:
- picture frames;
- doors from a broken kitchen table;
- regular thick boards and slats.
Using plywood to make a tray is not always rational. On the one hand, the material is extremely malleable, allowing you to easily bring almost any idea to life, on the other hand, a tray made of plywood will not be particularly durable, and therefore impractical. Therefore, it is only suitable for interior decoration.
To make an accessory, you need to select the appropriate equipment. The number of tools depends on the complexity of the product. Before starting all the manipulations to create a tray, you need to prepare:
- jigsaw;
- screwdriver;
- glue gun with plastic rods;
- furniture stapler;
- sandpaper;
- a simple pencil;
- grinder saw;
- ruler.
All necessary tools conditionally divided into groups. Some are designed for taking measurements and drawing. Others are needed for drilling and sawing material. The third group of devices is required for fastening parts.

Drawing up a drawing
Before making any item, including a tray, a sketch is first drawn. There are two ways to create a project. In the first case, the master starts from the material at hand that he has available. In the second, an imaginary tray is depicted in the drawing, after which only the necessary raw materials are purchased.
The parameters of the future product are preliminarily measured. The tray should be comfortable and light. A structure that is too heavy will be difficult to move from the kitchen to the room. Next, you need to decide what functions the tray should perform. It can be equipped with removable or folding legs or have the form of a rectangular flat plate with sides. If necessary, this model can be used as a lightweight portable bedside table.
The implementation of an idea begins with design. Based on the sketch and selected dimensions, a exact drawing, which displays the necessary parameters and proposed fastening points. Drawings of plywood plates for transfer include:
- Thickness of materials (base, sides).
- Width, length of the base.
- Hardware attachment points.
Complex products are made of wood using various fastening units, legs, and parts that impart rigidity to the structure. The drawing must indicate:
- Thickness of all source materials.
- Places for attaching fittings and decorative elements.
- Attachment points for legs and docking units.
Drawings for such portable tables are drawn in three-dimensional projection.


Manufacturing stages based on the model
Make your own wooden tray using a drawn drawing. The master prepares fasteners and other joining elements. The simplest models, which are a flat board with sides and handles, are made according to a simplified design. To make them, it is enough:
- Cut out the base rectangular shape the right size.
- Prepare a frame that matches the dimensions of the base.
- Attach the handles to the frame.
- Decorate the bottom.
- Connect the base to the frame.
Complex portable mini-tables are made in the same way. The difference is that the attachment points for the legs are additionally fixed to the base. Holders and decorative handles are purchased at furniture stores. Decorate the product upon completion of work. The decoration method is chosen at the request of the master, based on general interior premises, the material from which the tray will be made. At the end of the work, the surface should be varnished or painted. A water-repellent coating will protect your portable device from liquids.
For breakfast in bed
It is quite difficult to make a model of a tray with legs for breakfast in bed; the master must at least be able to use the tools correctly. A portable mini-table can be created from a suitable rectangular piece of plywood or board. The list of materials depends on the model and design of the structure. To make a breakfast tray, you need to prepare:
- 40x70 cm board or thick plywood (any wood will do except pine and spruce);
- 4 metal tubes 1 meter long;
- corners with a diameter of 15 mm - 8 pieces;
- tees - 4 pieces;
- gaskets with a diameter of 15 mm - 4 pieces;
- varnish or stain.
The mini-table is convenient because it does not need to be placed on your knees; it is easily fixed on the surface of the bed. Detailed steps will tell you how to do useful thing on one's own:
- Metal tubes are cut into several pieces with a pipe cutter or grinder, the edges should remain smooth and without dents. In total you should get:
- 4 pieces of 25 cm;
- 2 pieces of 58 cm;
- 4 pieces of 19 cm each;
- 4 tubes 6 cm each.
- Install handles. Two tubes 25 cm long are connected at the ends with six-centimeter sections using corners and plastic glue. The finished handles are applied to the surface of the board and the attachment points are marked. In the designated areas, holes are drilled equal to the diameter of the tubes (16 mm). The surface of the board is sanded on both sides. After the surface of the wood becomes sufficiently smooth, it is covered with stain or varnished. O-rings are placed on the holes and secured plastic glue. The handles are inserted into the holes. The legs (stand) are attached to the prepared tabletop:
- using tees, connect 2 pipes of 58 cm each (located horizontally under the tray) and 4 racks of 19 cm each (legs);
- the upper sections of the legs are inserted into the holes and secured with mounting glue;
- using the remaining corners, connect the legs of the tray in pairs with two 25 cm tubes.
If these parts are not secured with glue, they will easily detach from the main fabric of the accessory. A tray with folding legs is made according to the same principle as that of clamshells. The elements themselves are attached to the base using rotary mechanisms, and stop them with hooks or loops.
Cut copper tubes
Install handles

Drill the board

Treat the wood surface
Apply silicone gaskets
Build a stand

Pin it to the board
From an old painting
It is very easy to make a wooden tray from an old painting. All that is needed for this is the picture itself in a frame and suitable tools. This tray does not require additional decor. To make kitchen utensils you will need:
- two decorative door handles;
- a piece of plywood;
- self-tapping screws;
- screwdriver
Door handles are screwed to the sides of the frame. The picture itself is taken out, and the base is cut out of plywood according to its size. The canvas with the image is glued to the surface of the prepared plywood. The decorated sheet of plywood is varnished on the front side, allowed to dry, then screwed to the frame with self-tapping screws. The tray is ready.

Any novice craftsman can make a tray from a photo frame. In the store, choose a frame of a suitable size with plywood base, if there is no such thing, you will have to remake the usual one with a cardboard bottom. The work is carried out like this:
- The cardboard base and glass are separated from the frame.
- Holes are drilled in the frame on both sides, and then furniture handles are attached to it with self-tapping screws.
- A plywood base is cut to the size of the cardboard.
- Cardboard can be decorated with any in an accessible way, then glue it to the plywood using PVA wood glue.
- The base and glass are attached to the frame with a furniture stapler.
The sides and bottom of the converted product are painted or decorated decorative elements. IN furniture store you can find a large number interesting details designed for decorating kitchen furniture. They decorate the resulting portable plate.

We take out the cardboard and leave only the glass

Finishing cardboard with fabric

Place the cardboard on the glass and secure it

We fasten furniture handles
With a slate board
On a tray with slate board you can write romantic messages to your loved one. Making such kitchen utensils is very simple. All you have to do is buy slate paint at the store and paint the bottom of the tray with it.
For this purpose, a purchased (glass, ceramic, metal) or home-made product is suitable. The main thing is that the bottom surface is suitable for painting.
Instead of slate paint It is advisable to use chalk wallpaper. Both manufacturing methods result in the same effect.


With mosaic
Creating a pattern on a tray using mosaic requires patience. However, wooden utensils decorated with similar patterns look extraordinarily beautiful. Classic mosaic is made from ceramic elements or glass pieces. In everyday life they use the most unexpected materials at hand.
A sketch is first drawn, on the basis of which a sketch is developed. Picture based on size finished product is also created in color. The mosaic is made from any suitable material:
- small colored shells;
- flat pieces of broken glass;
- colored pebbles;
- painted eggshells;
- tiles broken into small fragments;
- cut colored paper.
Each individual piece is glued to the wooden surface of the bottom of the tray. Transparent “Moment” is used as an adhesive. You can also use melted plastic. After the mosaic is ready, it is filled with transparent furniture varnish.


Craftsmen with basic drawing skills can paint the product to their own taste. The sides and bottom of the tray are covered with ornaments. Decorative drawing performed in any style and direction. Oil and acrylic painting is covered with a layer of varnish at the end of the work.
It is much easier and faster to decorate a tray using a photo from a magazine or a poster of a suitable size. The wooden bottom is pasted over with a picture, and then filled with several layers of varnish. The product is left to dry and only then used in everyday life.
A tray decorated with a photograph and rose petals looks interesting. A photo with a picture of a flower is glued to the bottom. life size. Then several petals are laid out on it so that they do not rise too much above the plane. The volumetric part can rise at the edges within 2-3 mm. Transparent and colored beads are poured around the flower and on its petals. The entire composition is filled with transparent varnish.
The most unexpected material can be chosen for decoration. The main thing is a little imagination and adherence to technology. The bottom of the tray is usually decorated with:
- mosaic of multi-colored flat buttons and woolen threads;
- applique of patches or golden coins;
- a collage of pieces of postcards;
- dry leaves, flowers;
- straw ornament;
- mat.
Handles for the tray can also be made unusual. For example, instead of ready-made store fittings, weave them from newspaper tubes, build them from glued wine corks or a wide piece leather belt. Alternatively, the simplest ones plastic handles wrap with thick twine. For decorative legs of a tray with your own hands, use a piece of PVC pipe painted in any desired color or a wooden dowel. With wood carving skills, this piece can be made into any shape.
It doesn’t matter which of the proposed options is chosen, a hand-made tray will in any case become a vivid embodiment of an individual artistic design. An experienced craftsman can create a complex multifunctional design, and novice home creators will at least be able to remake a boring picture or poster in a frame. 
Video