The car costs very little space to work. All you have to do is put something in and there is no room at all.
It was decided to install a compact table, but the table is still in the way. Ideal option became a folding table. Takes up minimal space.
Once upon a time I took apart the old one wardrobe. I didn’t raise my hand to take it to the trash, and for good reason.
For the table we need:
- chipboard;
- a pair of loops;
- wood screws;
- corners;
- furniture mortise nuts;
- block for legs;
- anchor bolts;
- block support.
First of all, mark the level of the table. We carry out markings using a level. Whether it's a regular construction one or a water one from a straw with water. I used the latter. I marked two points and, applying a block, marked a line along which I would screw.
Drilling through holes in the block and fasten it to the anchor bolts.
Next, we mark on the bars for the legs the places for installing the corners. The corners were also taken from an old cabinet. There are two holes on the corner. One is round, the other with a cut.
The round one will be attached to the table legs.

The corners will be screwed onto furniture nuts. The nuts were all unscrewed from the same old cabinet.

We drill holes and screw the nuts into the bars of the legs.

We mark the holes in the tabletop in the same way. Screw in the nuts.

We screw the loops to our bar. First we screw it onto the block, and then we attach the table top and screw the hinges to it.

This is what the screwed legs look like. To remove them, just turn the screws a couple of times and the legs will come off. The screws do not come out completely. The screws are from the same cabinet and have a countersunk head.

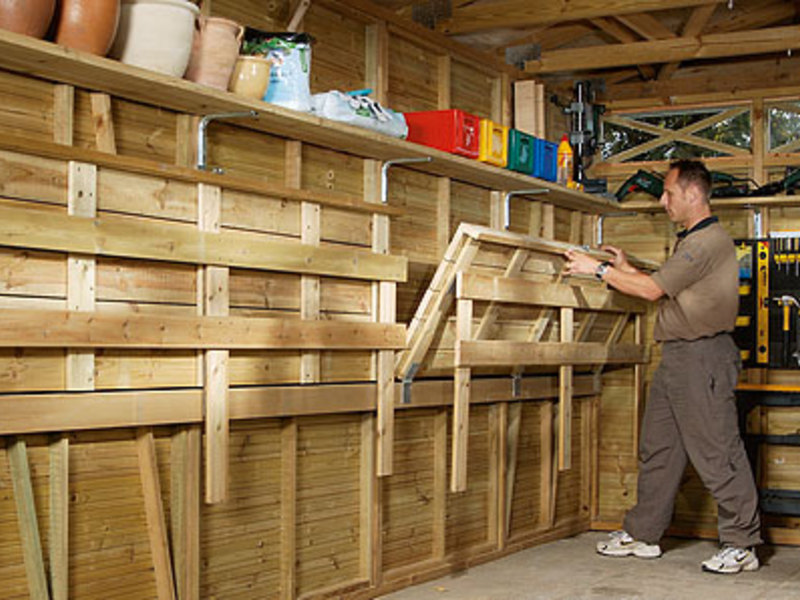
In order for our table to hold up when folded and not fall, we need to make a mount on the wall. To do this, take a small block. We mark holes on it and screw it to the wall.

We will have a regular latch as a holder.

This is how the table is held when folded and takes up virtually no work space in the garage.

The legs are removed and placed to the side.

This is what the table looks like when unfolded.

In conclusion, I will note. Almost all the main parts of the table were taken from an old cabinet. Which was not thrown out, but carefully stood in the corner and waited in the wings, now its time has come. The table can withstand a weight of about 85 kg, I think it can withstand a hundred)
Detailed assembly instructions, as always, can be viewed in the video:
Everyone needs a garage first and foremost to store their car. However, experienced, competent drivers use the technical inspection room, repair work, machine maintenance. And they know how to not only fill in oil, but even do some rather complex work from a technical point of view, repairing their favorite car. As a result, the garage turns from simple storage into a real workshop. And here you should already have all the equipment necessary for the work. In this case, a workbench in the garage is simply necessary.
Why is a workbench so useful, what is it? The fact is that a workbench is a special desktop with many functions. It allows you to effectively carry out electromechanical, installation and plumbing work in convenient conditions. This table is perfect for processing all kinds of materials. At the same time, everyone, if they approach the task responsibly, will be able to make a reliable workbench for the garage with their own hands.
Let's take a closer look at the workbench. It is often compared to a desk. It maximizes human capabilities because it provides an excellent opportunity to effectively use a durable surface for work. At the same time, there is also a sufficient number of sections for storing necessary items, tools and parts. It is this kind of real workbench, complemented by numerous shelves and drawers, that is most effective and convenient for working in the garage.
Let's list the main structural elements workbench.
- The frame with legs is a load-bearing base. It is this that becomes the base on which all the steel parts are already fixed.
- The countertop should be powerful, thick and durable. She will have to withstand severe mechanical loads, such as hammer blows. It is customary to make a tabletop from a thick wooden board or metal.
- Nightstands are usually located at the edges. It’s great when there are a lot of drawers and shelves. In such sections it is convenient to store the necessary parts, compact spare parts, and small tools.
- An additional shelf usually takes up space directly under the countertop. It is most logical to place there those objects, tools, parts that are most often used directly while working on the workbench. It will be very convenient to take them: everything you need will be in the free access area.
pay attention to important point. When you put a table in the garage, you need to take care of the light level. Consider alternative lighting in advance working area. For example, you can use different types lighting fixtures. Install an additional light source on the ceiling, and attach a rotating lamp with a directed beam of light to the wall or table. For more efficient work, as well as compliance with safety regulations, good lighting is necessary.
Types of workbenches
Before installing a specific workbench in the garage, it is worth understanding what types of such workbenches there are. It is customary to divide workbenches into metalworking and working ones.
The carpentry workbench has a wooden tabletop. The frame can be made of wood or metal. Of course, a wooden tabletop, no matter how thick it is, is still very vulnerable. It is inconvenient to work on such a workbench with metal parts. The surface of a wooden tabletop is damaged by metal shavings, and it is difficult to remove numerous traces of machine oil from it. Unfortunately, the service life of such workbenches is short.
A mechanic's workbench in the garage is more suitable. It attracts with its reliability, durability, increased wear resistance and versatility. Main secret– durable metal tabletop. You can comfortably work on it with parts made of any materials, in particular metal. They grind and cut, sharpen and saw on metalwork benches. The advantage of a workbench is also its stability, because when working with metal parts, a lot of pressure is sometimes placed on the tabletop. It is better to store tools on shelves and drawers of a workbench.
Materials: wood and metal competition
Do you want to make a workbench for your garage yourself? Then you will need to choose the main material: such tables are made of metal and wood. As a result, finished structures are distinguished by their level of reliability and stability. Of course, a metal workbench is more functional, stable, and durable.

Let's pay attention to the main features of workbenches made of different materials.
- In the process of making a workbench, it is easier to work, of course, with wood. It is enough to stock up on a hammer, jigsaws, screwdrivers and a grinder or hacksaw to quickly make a wooden workbench.
- It is much more difficult to make a metal work table, since you need to be able to process metal, as well as carry out welding work. Working with iron blanks is quite difficult. It is advisable to have at least minimal skills. In addition, special equipment will be required.
- When experts compare metal and wooden workbenches, they note: wooden table less durable, but metal is too heavy and not so convenient to use.
- The optimal solution is combined workbenches. You can make a wooden tabletop, and then additionally cover it with a metal layer. And then you can safely work with metal and use a vice.

Do you want to have your own workbench in the garage, want to make it yourself, but don't intend to use it very often? Then it will be for you the best option traditional wooden desk. Just make the tabletop thicker and more reliable. It is very important to ensure resistance to mechanical stress.
Preparatory process
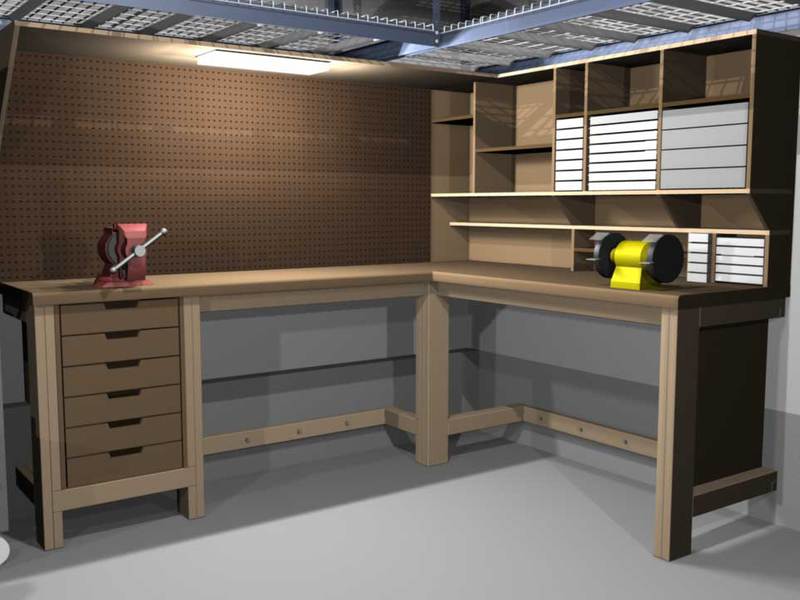
Let's learn how to make a workbench in the garage with your own hands. First you need to prepare for work. First of all, determine optimal design, size and shape of your future workbench. Let's say that sometimes the best option is to place a workbench in the corner of the garage. This will allow you to rationally use the space and create a comfortable work area.

- Choosing a place to install a workbench is one of the most important tasks. Great importance has the level of illumination here. Think about what it will be like daylight. The best option– when the light falls directly or from the left side. When it comes to artificial lighting, everything needs to be organized correctly. It is advisable to make an overhead light, as well as install an additional source of directional lighting for the work area.
- The productivity of work on a workbench and the level of comfort largely depend on the height of the tabletop. It is necessary to calculate the optimal height in advance. Just stand straight and bend your elbows. Imagine that you are leaning on a workbench. This is exactly the distance between your hands and the floor optimal height workbench.
- There is no need to make the width too large. It’s great if a person can freely reach the opposite edge of the tabletop. Good size– 50 cm wide. The length can be made much longer. How longer table, the more parts and large tools can be laid out on it.

A good solution is to equip a workbench the right tools. For example, they attach a jigsaw or a circular saw to the tabletop.
We select tools and materials
Let’s immediately clarify the list of materials and tools. To work you need a drill and welding machine, tape measure and level, grinder with electric jigsaw. Be sure to stock up on the following materials.
- Steel strip and angle. The thickness should be 4 mm.
- Anchor bolts, screws and self-tapping screws.
- Square pipe with a thickness of 2 mm.
- Steel sheet to make drawer holders and a tabletop. Optimal thickness– 2 mm.
- Need drawer guides.
- For the tabletop, you need to take a massive wooden board with a thickness of 50 mm.
- The walls of the drawers and tables are made of plywood with a thickness of 15 mm.
- To decorate and improve performance properties, you also need paint for wood and metal.
If you make a workbench from these materials, it will be very strong, durable and stable, easy to use.
We assemble a workbench for the garage with our own hands
Let's look at the algorithm for making a workbench for a garage.

- First take four supports. They are made from angle steel. The legs are fastened at the top by welding.
- Stiffening ribs are needed. At a distance of 12-15 cm from the floor level, small fragments of the corner should be welded.
- To secure drawers and shelves, additional racks are welded.
- Then it’s time to make the countertop. You can take Oak planks. They must be tightly secured to the frame. The best option is to make holes for bolts around the perimeter of the frame in advance.
- The boards also need to be drilled. The bolts should fit well into the holes.
- Already secured the lid? Now it's time to sheathe it with metal. It is advisable to use galvanized iron. It is fixed with self-tapping screws.
- File the edges of the metal.
- Make shelves and table tops separately.
- Assemble the entire workbench completely.
- On final stage wooden elements need to be treated special compounds to prevent the formation of fungus and mold, as well as fire retardants. You can further decorate your desktop using .
When you want the workbench to stand as securely as possible, you can attach it to the floor by welding metal corners to the legs.
If you approach the task as responsibly as possible, follow the technology and use useful tips, your workbench will be in no way inferior to ready-made workbenches from the store.
Video: learning the process of making a workbench for the garage
Do you want to see everything clearly? key points, algorithm of work in the manufacture of workbenches for the garage? Now you have a great opportunity to see everything useful information on video.
Here you will simply feel like a direct participant in the events! It will be possible to evaluate the complexity and order of work. The videos focus on all the most significant nuances. After watching, if you take the matter responsibly, you will be able to install such a functional desktop in the garage with your own hands.
Good luck to you! Have a reliable, efficient workbench in your garage. With him, work will turn into pleasure.
The functions of a garage often go beyond the banal parking of a car. At the same time it serves as a workshop. Repair or creative work requires a place equipped with tools and equipment. Let's look at how to make a workbench in the garage in a similar way.
Types of workbenches
The workbench vaguely resembles desk, only in large sizes. All structures are divided into two types - metalwork and carpentry. The main difference is in the material used to make the countertop. If it is wooden, the workbench in the garage belongs to the carpentry structure, metal surface automatically moves it to the plumbing equipment group.
Wooden surface The workbench is not designed for working with metal parts. Chips or sharp edges of objects will regularly scratch the wood, and machine oil will leave stains that cannot be removed. As a result, the table top of the carpentry workbench will quickly become unusable.
It is much more practical to make a metalwork structure in the garage, which is considered universal and suitable for all types of work. On it you can:
- to nag;
- sharpen;
- cut;
- grind.
The metal workbench frame is more durable and convenient when working with heavy objects. The design is more stable and will not sag under strong pressure on the tabletop. If the garage serves as the main place for spending time and there is enough free space, you can make two structures for work - metalwork and carpentry.
Comment! In the immediate vicinity of the workbench in the garage, shelves are usually equipped where numerous tools and other devices for repairs or favorite creative activities are stored.

Design options
The functionality of a garage workbench depends on its design. For convenience, it is equipped additional elements. Depending on the type of occupation, workplace in the garage includes:
- Frame with legs. Serves as a supporting element on which the remaining parts are supported.
- Tabletop. The surface chosen is powerful, capable of withstanding hammer blows and the weight of placed objects. Can be made from a thick board or sheet metal, the combined design is relevant.
- Nightstand. Equip one or two compartments along the edges of the workbench. Internal filling may consist of shelves and drawers designed to store small tools in the garage.
- Additional shelf. Located on the wall in front of the workbench, its function is also to store available tools.
Comment! High-quality lighting of the workplace is an indispensable condition when setting up a workbench in the garage.
For work, it is better to choose a table or wall lamp with the ability to adjust the direction of light. There must be an outlet near the desktop, which is designed not only to provide lighting, but also to operate all power tools.
The idea of making a folding workbench in the garage with your own hands is not very practical. primary goal folding design on two legs - to save free space in the garage. In this case, the tabletop will be attached to the wall and will be in a raised state when it is not needed. But the essence of a workbench is a well-equipped workplace, when everything you need is at hand. And with a folding tabletop, the space under it should be free; there can be no talk of any bedside tables or shelves. This option is acceptable for garage owners who have limited space and who rarely need a workbench.
Wood or metal, which is better?
There are several options for manufacturing a desktop regarding the choice of material:
- completely wooden model;
- the previous copy is supplemented with a metal sheet on top;
- the wooden frame is covered with a metal tabletop;
- The desktop is completely made of metal.
Each method has its own strengths and weaknesses. Let's look at the characteristics of individual models, and the garage owner will decide for himself which option is best for him:
- It is difficult to make a metal table with your own hands. Availability of a welding machine and experience welding work Necessarily.
- Metal construction is the most durable and durable, and has greater stability.
- Making a wooden table is somewhat easier; a jigsaw and a grinder are the main assistants. If they are absent, an ordinary hand hacksaw will save the situation.
- A carpenter's table is less practical when working with metal. Its service life is shorter.
As a conclusion - combine wooden structure with a metal sheet that will perfectly cope with the protective function of the table surface.
Preparatory process
After determining the material of manufacture and the installation location, they proceed to drawing up a drawing of the workbench, which will become the basis for arranging a functional workplace in the garage. To begin with, determine the dimensions:
- Length. Depends on the occupation of the garage owner and free space. Average values vary within 2 m.
- Width. If the workbench will be located near the wall, it is important to provide easy access to the tools on the shelf. Therefore, it is impractical to make the workbench wider than 0.6 m so that the hand can reach the necessary objects. Placing it in the center of the garage allows you to make the width larger if necessary.
- Height. The meaning is strictly individual. Depends on the height of the master and the position in which he is used to working. Standard height a table of 0.8 m is not enough for working in a standing position; your back will get tired quickly. Owners of workbenches often increase the height of the structure to 1 m.
A pose with your elbows bent will help you navigate the height of your work table in the garage. Mentally leaning on the future workbench, measure the distance between the floor and elbows.
Advice! In case the design is designed for a standing position, and sometimes you have to sit, stock up on a comfortable wooden stand, on which you can place a chair. A low wooden rack will be needed in cold weather to prevent your feet from freezing from the concrete floor of the garage.
One side of the workbench is intended for installing an electrical cutting tool. For easy fixation of a jigsaw or circular saw the edge of the tabletop should protrude beyond the frame by 0.2-0.3 m.
The set of materials and tools for making a workbench for the garage with your own hands depends on the chosen design. It is optimal to choose a sheet for the tabletop from stainless steel with a thickness of 1.5-2.0 mm. If this seems expensive for the garage owner, you can get by with 1.5 mm steel.
Making a wooden workbench
If you lack experience, it is better to choose a model of a wooden workbench for your garage to make with your own hands. Making a structure from timber using a drill and a jigsaw is much easier than welding a steel corner.
To assemble a wooden workbench for the garage you will need:
- Wooden beam. Pine and oak blanks are particularly durable. Depending on the design of the workbench, a length of 15 m should be sufficient. The cross section depends on the planned loads.
- Edged board for workbench table top. Select specimens 2-3 cm thick, without surface defects and knots.
- An additional shelf is often placed between the desktop cabinets in the garage. Sheet plywood with a thickness of 6-8 mm is suitable. It is better to take 3 sheets of 0.6x2 m.
- Self-tapping screws for woodworking and steel angles for assembling individual workbench elements.
To get straight lines of workpieces after cutting, use a circular cutter stationary saw, as a last resort, turn to the manual analogue. The edges of the boards or timber are cut with a jigsaw.
First you need to make a frame for a desktop in the garage, taking into account the dimensions included in the drawing. The timber is cut into pieces, it should look like this:
- 4 leg stands;
- 4 beams that will be located horizontally;
- 5 cross braces.
If the length of the workbench in the garage is no more than 2 m, a beam with 7 cm edges is suitable for work. As a result of cutting the vertical posts, you should get 2 blanks of 0.9 m each and 2 parts of 1.5 m each, which will be located near the wall of the garage. The difference of 0.6 m is intended for further fixation to the plywood screen supports for tool storage.
Horizontal beams connect the legs of a workbench in a garage. For fastening the support posts in the lower part, the length is 1.5 m. The tabletop is fixed with a beam 2.0 m long (according to the size of the workbench indicated in the drawing). Spacers 0.6 m long are prepared from the remaining timber. All parts are connected with steel angles and self-tapping screws.
When the frame of the desktop for the garage is ready, we begin to design the tabletop. For a carpentry-type workbench, it is assembled from boards and plywood sheets. The aligned and adjusted canvas is coated with wood glue, the two workpieces are clamped with clamps and held until the glue is completely dry and the canvas gains strength. Finally, the tabletop is fixed along the contour with self-tapping screws.
The wooden canvas is connected to the workbench frame with self-tapping screws, the surface is sanded using an electric drill equipped with an emery attachment. At the final stage, the screen is mounted and the structure is varnished. High humidity in the garage - an everyday occurrence, protective film varnish will prevent deformation of the wooden structure.
Comment! Fixing the rear pillars to the garage walls using anchor bolts will help add additional rigidity to the desktop.
Design of a steel angle structure
The design of a metal structure in a garage is done using a steel corner. The main assistants are a welding machine and a grinder.
Main process steps:
The corner guides need careful sanding or plastic strips. Such protection measures will prevent damage to the workbench drawers in the garage. Otherwise, after a short period of time, simple extension actions will require significant effort.
Upon completion of work welds thoroughly cleaned and coated with phosphate primer. Then the metal structure of the garage workbench is primed and painted. The working surface of the tabletop does not need to be painted; if desired, it can be treated with an acid stain or polished.
Conclusion
Make it into the garage convenient workbench- the task is feasible. Even if you purchase all the materials, its final cost will cost significantly less than installing a finished copy. The undeniable advantage of a DIY design is the ability to choose the optimal dimensions in accordance with the size of the garage and your own height.


The primary task of a workbench for a garage is to create an ergonomic workspace for metalwork and carpentry work. The article describes the types of desktops and the features of their designs. The material below contains information about the pros and cons of wooden and metal models and about the features of their configuration. You will become familiar with the criteria for selecting equipment and organizing the workplace.

Complete order in the workplace Source mcahamilton.org
About the types of workbenches
Car owners regularly face the need to perform a variety of repair work. For everyone who is involved in carpentry and plumbing (no matter at a professional or amateur level), proper equipment of the workplace helps to distribute energy and time more economically, and also ensures best result. For the role universal equipment, suitable for use in garage conditions, a workbench is suitable.
Initially, the workbench arose as a carpenter's workplace intended for processing wood. With the advent of various (including electrical) equipment and the division of professions, the workbench began to specialize. Today, in addition to carpentry, there are carpentry and metalworking workbenches, as well as combined varieties.

Great grandfather modern models Source pinterest.com
Basic equipment
A workbench in a garage is an equipped workbench consisting of various modular elements, which include:
Metal carcass(table). Its design is designed for a significant weight, from 70 to 300 kg (depending on the model). Tables designed for working with heavy and large parts (for example, wheels) are strengthened with additional diagonal connections.
Tabletop for carpentry and plumbing work. Depending on the functions performed, it can be made of galvanized or of stainless steel, chipboard, plywood. The safety margin of the tabletop is designed to withstand dynamic and shock loads, contact with chemically active compounds.
Accessories. The workbench serves not only as a work area, but also as a place to store tools, spare parts and other equipment. Therefore, the mandatory components of the design are cabinets, screens, drivers (drawers), shelves, and hanging holders.

Every thing has its place Source interstroy.info
Selection criteria: wood or metal
For many car enthusiasts, the garage is a second home, so they approach its arrangement with due attention. A particularly important point is the purchase of a workbench; the selection criterion may be the purpose for which it is intended. In most cases, such equipment is installed to perform the following work:
For regular inspection and state support car.
For minor plumbing work, minor repairs, correction of defects associated with the maintenance of the house and garden area.
If plumbing or carpentry is part of your hobby.
The first question that arises when choosing is the material of manufacture. There are wooden (most often homemade) and metal workbenches offered by various manufacturers, both domestic and foreign.

Workplace for the soul Source nw1ab.ru
Wooden workbenches
A wooden workbench for the garage, made entirely or partially from wood, is suitable for periodic and short-term work with simple parts; it is not well suited for machining complex metal components. The frame of such models is made of strong wood (beech or oak) and secured with self-tapping screws. The stability of the table is ensured by additional spacers, transverse or x-shaped. Wooden models, as a rule, are equipped with shelves or drawers for storage. Wooden table top the edge is trimmed with metal.
A common model is a design of two massive cabinets connected by a tabletop. This option looks quite practical, since it solves most of the problems associated with the placement of tools. Despite the relative cheapness and good (albeit somewhat limited) functionality, many believe that a workbench in a wooden garage has significant disadvantages:
Wooden bench not designed for heavy loads.
At increased exploitation the service life of the frame is significant is declining.

Wooden workbench Source whilesafe.blogspot.com
On our website you can find contacts construction companies who offer the service of installing metal structures. You can communicate directly with representatives by visiting the “Low-Rise Country” exhibition of houses.
Table area does not allow posting several types of equipment at the same time.
Wooden countertop surface exposed to chemical agents (paints, solvents) and metal dust deteriorates over time, and traces of oils remain forever.
Tree - flammable material; in combination with the adjacent collection chemical substances this property increases many times over.
Metal workbenches
To assemble a functional metal bench, you will need special equipment and skills in working with metal (the fragments are connected by welding). Metal models, assembled in workshop conditions, have a durable construction and modern design. Despite the higher price due to the cost of the metal and the more complex assembly process, metal equipment has many advantages, including:
Long service life. Stainless steel models boast an impeccable service life of 50 years.

Metal workbench Source shkaf-nsk.ru
Large selection of models and their configurations. Manufacturers offer both universal and highly specialized options.
Multifunctionality. You can perform any type of work, including turning, cutting, grinding.
Mobility and compactness. Many models can be disassembled (in whole or in part), and, if necessary, new tools (vises, clamps) can be added.
Light weight while maintaining strength. The tabletop is resistant to deformation and damage (scratches).
Minimal care. The design is characterized by increased resistance to corrosion processes and does not require painting. Cleaning metal dust and shavings from the surface of the countertop does not take much time.
Video description
About the review of workbenches in the following video:
Workbench options
To determine the size of the workbench, you need to understand how much space in the garage you are willing to allocate for a workplace. The choice of design for arranging a garage is based on several indicators:
Depth. Most garages have modest dimensions. Taking into account this limitation, for use at home, workbenches with a tabletop depth (width) not exceeding 0.5-0.6 m are preferable.
Length. Important parameter, which should not be reduced unless absolutely necessary. The longer the tabletop, the more convenient it is to perform plumbing work on it, install auxiliary tools. If you intend to use a circular saw or electric jigsaw, you will also have to allocate part of the countertop for this work. In practice, most garage owners prefer to install workbenches about 1.5-2 m long.

Compactness is one of the advantages Source koffkindom.ru
Workbench height in the garage. It is determined by the convenience of the owner and depends on his height. On average, the location of the tabletop at the level of the middle of the hands is considered convenient (if you stand next to each other).
Technical clearance. For high-quality cleaning, it is convenient for the lower part of the structure to be raised above the floor by 15 cm.
Strength. Welded structures with a supporting frame support of 6-8 legs have the necessary strength. Since most car maintenance work is metalworking, a metal workbench is the best choice.
Functionality. To make work comfortable, a spacious countertop is not enough. Racks, shelves and drawers are of great importance. All of them should be located at a convenient distance from the working area; It’s good when tools, power points, materials and containers for small items do not interfere with the work, but are always at hand.
Video description
About the metalwork bench in the following video:
Workplace organization
The average garage doesn't have a lot of free space. In addition to compactness, the criterion that influences the parameters of the desktop is the amount of work to which you are going to devote your time. If you expect that you will not only drill and hammer nails, but also do more complex manipulations, you should think about a larger table. It is more convenient to carry out periodic processing of parts or workpieces if the vice and the sharpening or drilling machine are in assembled condition. The garage owner will have to find a solution for several more problems:
Storage. Due to limited space, the workbench is assigned another important task - providing convenient storage conditions. The right workbench is used not only as a work desk, but also as a convenient container. Supplies, spare parts and tools.

When everything is at hand Source tr.pinterest.com
Selecting a location. A specific garage task is choosing a place for a workbench. Two conditions must be met. Firstly, the distance between the car and the workbench and shelves in the garage must be at least one meter. The second condition is that you must be comfortable working near the machine without the risk of damaging it.
Electrical connections. Electrification must be safe, taking into account the influence of dampness and aggressive liquids common in garage work. Electrical wiring must be laid in fireproof corrugation or hidden in grooves. If your electrical panel has a metal casing, it is mandatory must be grounded.

The car should not be a hindrance Source yasminroohi.com
Lighting. Considering that there are always shadow areas in the garage (from the car, shelves and racks), practical option will become combined system from several light sources designed for different tasks. Above the workbench, in the work area, it is convenient to install a bright turning lamp, protected by a lampshade. The lamp can be made removable; It is also convenient to build it into a workbench, rather than fixing it on the wall - if you want to move the table, there will be no problems with electrification.
Features of the models
Mass-produced workbenches are convenient in that their characteristics are set during production and correspond to their purpose. Depending on the technical conditions under which a particular workbench will operate, different models may have the following parameters:
Table top material. Moisture-resistant plywood or MDF coated with galvanized metal. The thickness of the tabletop varies between 24-30 mm.

Professional approach Source extxe.com
. Serial models allow a load of 300-350 kg. The reinforced series workbench is designed for 400 kg or more.- 20-30 kg, on a bench shelf - up to 40-50 kg.Protection. A lock, key or high security (pin) can be installed on the cabinet.
Accessories. A variety of shelves, holders, screens and hooks.
Factory-made workbenches are supplied unassembled; By design they can be divided into three groups:
Without pedestals. The ideal small workbench for a modest sized garage. The easy-to-assemble design is characterized by a sufficient size of the working surface, which can be folded if necessary (folding workbench). Stability is ensured adjustable legs. Baseless models can be additionally equipped with drawers on bearing guides.
Video description
About the organization of the workplace in the following video:
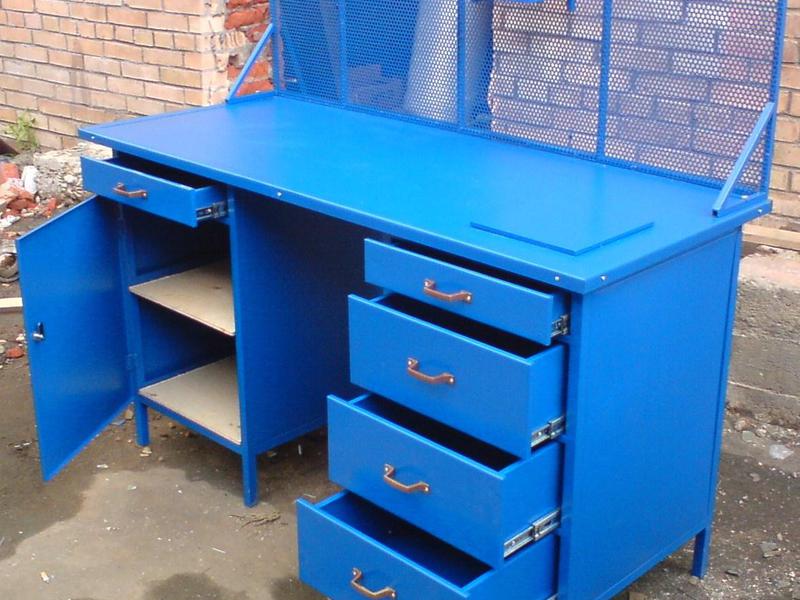
Single pedestal. Reliable prefabricated structure with a reinforced table top and a weight of 96-105 kg. This workbench is equipped with both a comfortable work surface and a cabinet with drivers (drawers on ball guides with different heights) or adjustable shelves. The drawers are locked with a central lock. Some models are equipped with a dashboard.
Double pedestal. The weight of such models is 100-115 kg; They are equipped with two drivers with drawers of different heights. Maximum permissible load for each box (if distributed evenly) is 30 kg. The kit may include a perforated screen - a panel designed to accommodate holders and hooks.

Combined workbench Source searsoutlet.com
Conclusion
Garage work table - variety industrial furniture, which should have increased wear resistance and be convenient for everyday use. These properties help the owner to fully concentrate on work, thereby reducing the risk of accidental injury. A workbench for a garage will be most effective if its characteristics (load capacity, dimensions, equipment) correspond to the tasks being solved.
Everyone knows that a garage is necessary in order to park a car in it. However, many car owners use this room as a warehouse for unnecessary things, and if space allows, they convert it into a small workshop. Consequently, appropriate equipment is installed in it - racks, shelves and a workbench. The latter is a multifunctional desktop used for processing various materials, carrying out plumbing, installation and electromechanical work. You can make workbenches for the garage yourself.
Garages have predominantly rectangular shape, therefore, when choosing a place for a workbench, you should take into account certain features of the use of the future workplace:
- If the width of the garage is sufficient, then the optimal place for the workbench will be one of the long walls of the building, as this will allow you to make a table of the required length and provide access to the workbench from three sides, which is very convenient, especially in the case of two people working simultaneously;
- If the workbench is installed at the end of the garage, you can move all the fasteners for the vice and other devices to the front of the table top, distributing the holes for clamps and other tools along the front longitudinal side of the table;
- Another option for the location of the workbench is by long wall with an emphasis on end wall, which makes it possible to approach the table from two sides.
Advice! If on the side of the workbench adjacent to the wall you strengthen vertical racks with cross bars, can be conveniently placed on hooks or other types of holders various instruments, which will always be in sight.
Your first experience in building garage equipment may be a simple wooden workbench or wooden workbench. The design of a table made of timber is more affordable to manufacture; working with a saw, jigsaw and drill is much simpler than cutting and welding a steel angle, from which professional-quality plumbing tools are usually made.

Building a wooden workbench for assembly work
To build a workbench, we will need:
- Wooden beam, preferably oak or pine, approximately 12-15 m, the cross-section of the material is selected individually, based on the expected load on the workbench;
- Planed edged board, 20-30 mm thick, smooth, without knots or surface defects;
- Sheet plywood, 6-8 mm thick, three sheets 200x60 cm;
- A set of wood screws and steel angles, shelf size 50 mm and length from 50 to 70 mm, at least 40 pieces.
Advice! All cutting work must be performed using a hand or stationary circular saw; trim the edges of timber or boards only with a jigsaw or similar power tool.
In this case, even in the absence of carpentry skills, the cut turns out smooth, and accordingly, the entire structure of the workbench will look like a factory one.

At the first stage, we make the frame of the workbench, while taking into account the dimensions of the space in the garage. To do this, you will need to cut four vertical posts, four horizontal beams and five horizontal short cross braces from the timber. If the dimensions of a wooden workbench for a garage do not exceed two meters, you can use a beam with a section of 70x70 mm.
We cut off four vertical posts - two 90 cm high, two 150 cm high. The latter are made 60 cm higher; after the assembly of the workbench is completed, a plywood screen will be installed on them for the tools stored in the garage.
Horizontal beams too different sizes. To bandage the support posts of the frame in the lower part of the workbench, we cut two sections of timber 150 cm long; to attach the table top, 200 cm long sections are needed. The last of the remaining material is cut into transverse struts 60 cm long.
We assemble the entire structure using steel angles and self-tapping screws, as shown in the diagram.

We assemble the tabletop by gluing together sheets of plywood and boards. After leveling and adjusting the dimensions, the boards and plywood, coated with PVA-M or wood glue, are assembled in clamps until they dry completely and gain strength. We sew the tabletop along the contour with self-tapping screws.

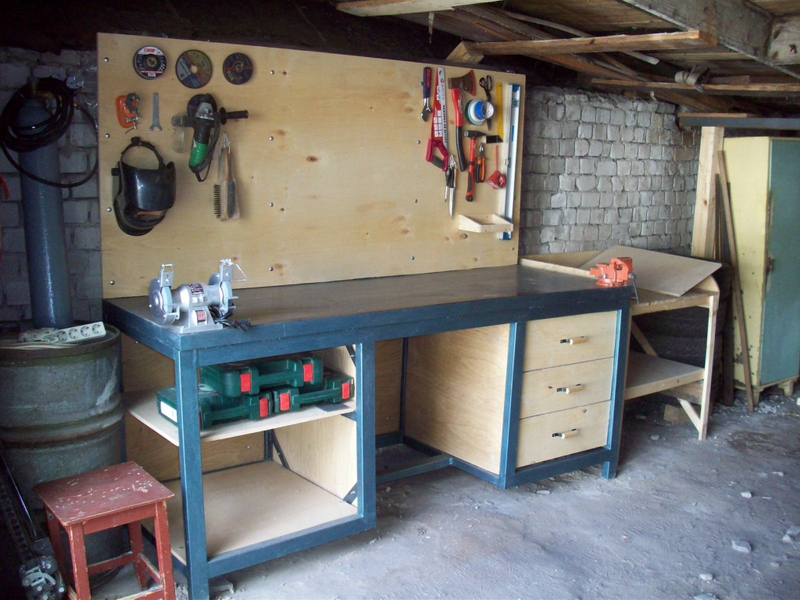
Lay the tabletop on finished frame and fasten it using self-tapping screws, after which the surface is carefully sanded with an emery attachment for an electric drill. Lastly, we install the screen and cover the entire structure with varnish so that in damp weather in the garage the wood of the workbench does not “sink.”

In appearance, the workbench for the garage turned out to be quite delicate, but in reality its strength is enough to withstand a load of more than one hundred kilograms. To increase rigidity, the rear pillars can be fixed anchorage to the walls of the garage.

Required tool:
- Grinder with a circle for cutting metal and a grinding disc.
- Welding machine and electrodes.
- Workwear and protective devices for welding work.
- Level.
- Roulette.
- Screwdriver.
- Jigsaw for cutting plywood.
- Drill.
Necessary materials:
- Angle 50 mm by 50 mm, thickness 4 mm, length 6.4 m.
- Square pipe 60 mm by 40 mm, thickness 2 mm, length 24 m.
- Angle 40 mm by 40 mm, thickness 4 mm, length 6.75 m.
- Steel strip 40 mm wide, 4 mm thick, 8 m long.
- Steel sheet for tabletop 2200 mm by 750 mm. Thickness 2 mm.
- Steel sheet for making drawer holders. Thickness 2 mm.
- Wooden boards for the table top. Thickness 50 mm.
- Plywood for making drawers and for the side and back walls of the table. Thickness 15 mm
- Guides for desk drawers.
- Screws for assembling plywood boxes.
- Self-tapping screws for metal.
- Anchor bolts.
- Paint for wood and metal.
The workbench, which will be made from these materials, has quite impressive dimensions: table length 220 cm, width 75 cm. The overall design and large table top allow you to place a vice and, for example, emery or other tools at different ends of the table.
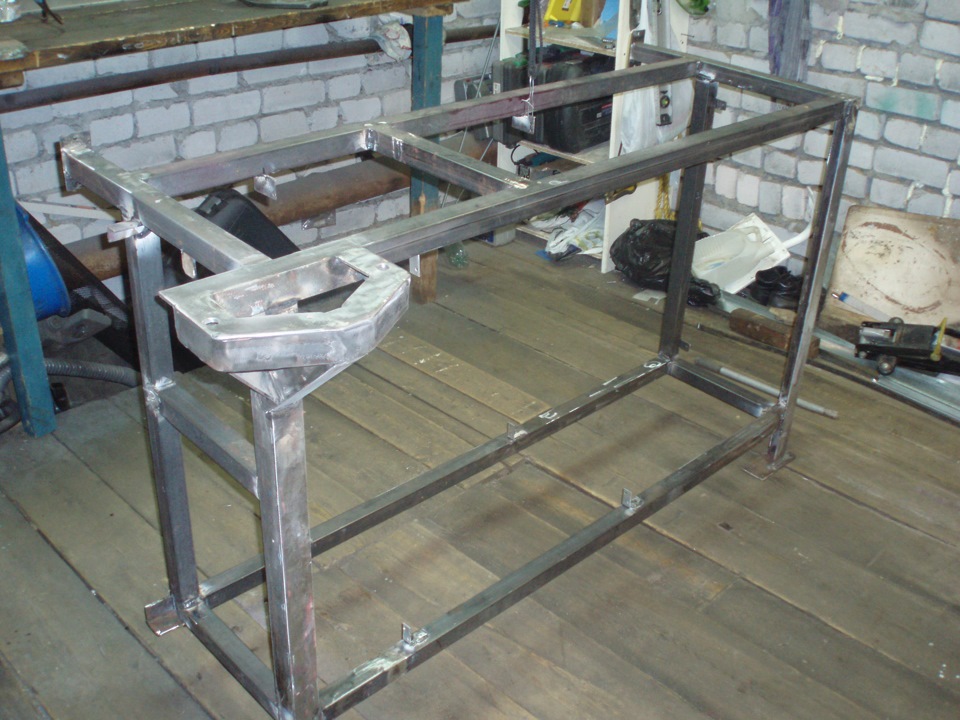
First step Making a workbench involves cutting the available material into elements. Profile pipe intended for the manufacture of frames. The steel angle is designed to create stiffeners. It is cut into pieces and a power frame is formed from it. Also, a steel corner is needed for edging the tabletop on which the boards will be laid. The steel strip is intended for the manufacture of guides on which the side panels will be attached. This material will also be used for brackets for fastening boxes and plywood. Table drawers are made of plywood.
Second step- welding of the load-bearing frame of the workbench. The tabletop elements are welded first - 2 pipes 2200 mm long and 2 pipes 750 mm each. The frame must be welded so that another frame of corners can be welded on top of it, into which the tabletop boards will be laid. To reinforce the tabletop, it is necessary to weld a few more after 40 cm steel pipes, which will serve as stiffeners.

Then 4 side legs are welded along the edges of the workbench. Their length is 900 mm. Power bridges are welded between the legs to strengthen the structure.

Once the basic frame is ready, you can begin welding the structure for the boxes. To do this, square frames are formed from steel pipes, which are welded to the tabletop on both sides of the table. The frames are reinforced with longitudinal stiffeners.
Third step- making a frame for the table top. Two steel angles, 2200 mm long, and two more angles, 750 mm long, are needed to make the frame. The structure is welded so that wooden boards fit inside it.

The angle frame is laid on a pipe frame and welded. The result is a reinforced tabletop, 8 cm high with internal stiffeners.

The metal frame of the workbench is almost ready, all that remains is to weld the panel sheathing for attaching the tool. This requires one metal corner 2200 mm long and 4 corners having a length of 950 mm. Two elements are attached to the sides of the structure and two in the middle for reinforcement. The tool panel is welded to the tabletop.

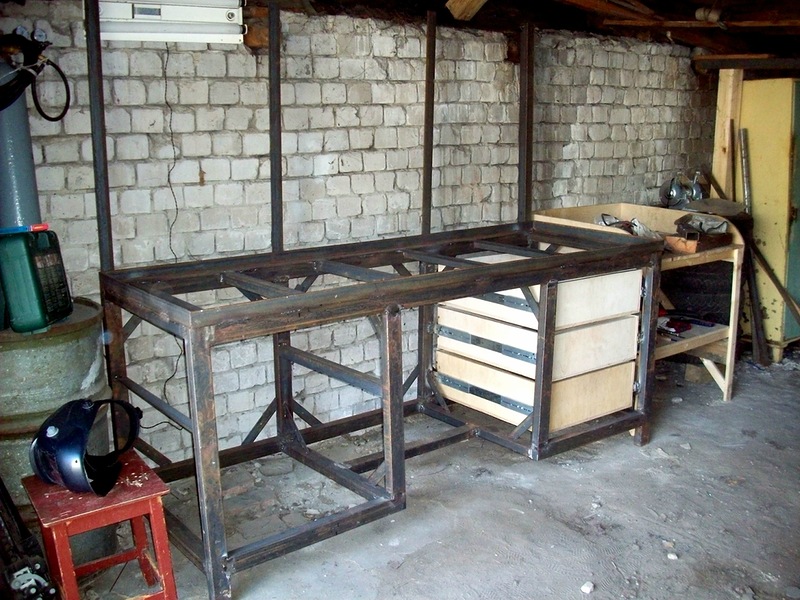
The frame of corners and pipes is ready. You can begin to strengthen the structure. Brackets are welded to the sides of the table, which are cut from a steel strip. A total of 24 parts are needed. A hole is drilled in the middle of each bracket. Using these holes, the side and back walls of the plywood table will be attached to metal frame workbench.


Fourth step- making desk drawers. Plywood is cut into blanks, which are screwed together with screws. The number of drawers depends on what will be stored in the table. If the parts are small, then you can build 3 drawers, if large, then 2. It all depends on personal preference.

You can place drawers on both sides of the table, you can mount retractable structures on one half, and regular open shelves on the other.
After the drawers are assembled, you need to weld metal strips with holes between the sides of the drawer compartments. To these holes with inside the slides for the drawer guides will be attached.

Fifth step- laying boards into the tabletop frame. Boards 50 mm thick are cut into pieces of a certain length. If you have a long board available, then you need three blanks with a width of 245 mm and a length of 2190 mm. If there are no long boards available, then you can lay the blanks across the table. For this purpose, wood 205 mm wide is cut into 10 pieces 740 mm long.
Before laying the wood into the table frame, it must be treated with an antiseptic solution. This will protect the material from rotting and damage by beetles.

Then it is imperative to paint the entire metal structure of the workbench. This will protect the metal from corrosion. It is best to use a weather-resistant and anti-corrosion coating option. Welding seams need to be painted especially carefully. Drops of metal and uneven surfaces are recommended to be thoroughly cleaned before painting. This can be done using an angle grinder with a metal grinding disc.


After the structure has dried, you can begin laying the boards on the countertop. They should not be driven too tightly into the frame. This is due to the fact that wood tends to expand and dry out when temperature and humidity change. It is better to leave a small gap of a few millimeters between the boards. The surface of the wood needs to be sanded, this will simplify installation metal sheet on top of the tree. The boards around the entire perimeter of the table are screwed to the frame with self-tapping screws.

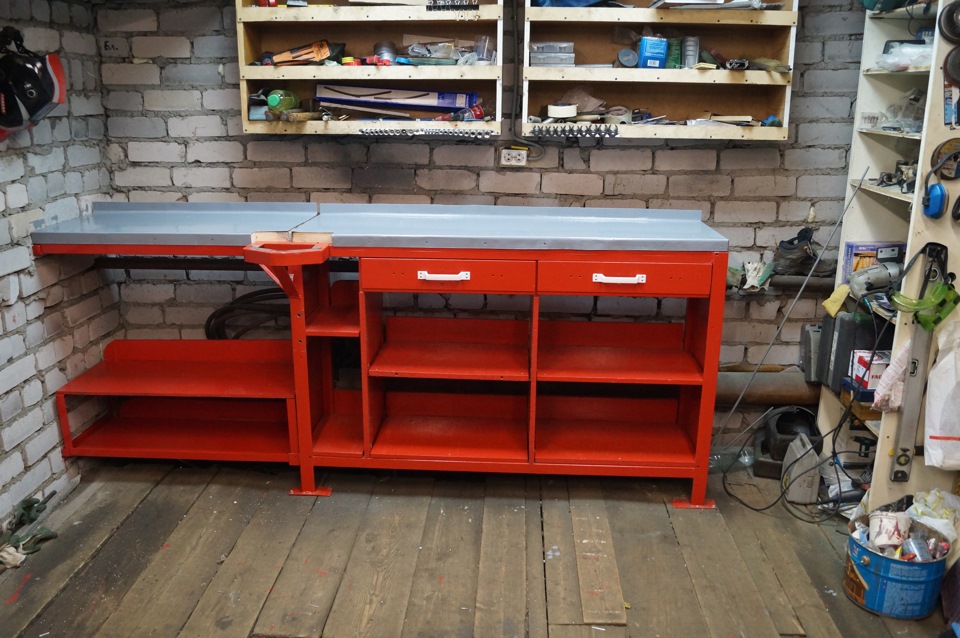
Sixth step- fastening the top steel sheet. It can be welded to the countertop, but there is wood inside the structure, which can ignite during the welding process. Therefore, it is best to attach steel sheet on hidden screws to wooden boards. The metal must first be painted on both sides with a rust converter. This covering material looks like transparent paintwork, is easily restored and reliably protects the metal from rust. You can also paint the metal tabletop with the same paint that was used to cover the frame. It will be beautiful, but over time the paint may scratch and the table will not look very new.


Final step- installation of drawers on guides and fastening of plywood to the side walls, shelves and power panel in front of the table. This work can be called finishing workbench. After work with plywood is completed, it must be coated with a composition that will protect the material from exposure environment. Also, do not forget about the design of a power shield for tools. You can attach special hooks or screws to it, from which the necessary things will be hung.
To make it convenient to work at a workbench, you can attach a special lamp with a bendable stand to the power panel. In this case, you can optionally direct the flow of light to the desired location.


A vice is an indispensable attribute mechanic's workbench. It is not recommended to attach a clamping tool that weighs several tens of kilograms to the tabletop itself. It is best to place a metal gasket 1 cm thick between the metal of the table and the tool. You need to drill holes in the gasket for the anchor bolts. Then, in the same places, drill holes of the same size in the tabletop. The entire structure is fastened with anchor bolts.
