An electric plane is one of the main tools for woodworking. Properly tuned, he indispensable assistant in the hands of a carpenter. If, over time, the tool settings have become lost, or you do not know how to prepare the electric planer for work, then it is advisable to obtain specialized advice, which we are ready to offer in this material. Otherwise, all the work when working with an unregulated plane will go down the drain, and there will be little pleasure from such miserable work.
Like any tool, the plane must be properly adjusted before work. And an electric plane imposes even more stringent adjustment requirements than hand tools. Therefore, the following steps should be carried out before each work with such equipment.
The only warning before inspecting the tool is to follow the safety tips. So to cutting parts The plane must be handled very carefully. After all, due to the fact that the cutters of this tool are extremely sharp, you can cut yourself on them even when the equipment is turned off, not to mention when the equipment is running. Otherwise, such equipment should be treated like any other power tool.
Procedure for preparing the plane for work
Electric planer engine
The first step is to check the operation of the electric planer motor. To do this, you just need to turn it on Idling. In this case, the drive should smoothly pick up speed, and when it reaches the nominal value, it should operate smoothly and without extraneous noise or rubbing. After which, it is advisable to check the work power unit and under load - when resting on the workpiece, it must gain momentum and hold it. In this case, no extraneous sounds should be observed.
Next, you should check the ventilation holes where the brushes are located. When the electric planer is running, there should be no sparks there. If there are sparks, then most likely the ventilation holes became clogged with small chips during operation. You should blow them with an air stream from a compressor or clean them with a brush. Considering the design and operating conditions of an electric planer, this procedure should be done constantly.
If the described actions did not lead to the desired result, then you need to check the brushes themselves. They may have worn off and need to be replaced. If this does not help, and the plane “sparks” when used, or, even worse, there is a burning smell from it, then you should stop working immediately. It needs to be taken to service. If everything is done on time, it will soon serve you flawlessly again.

Advice: when you want to choose an electric planer, first of all look at the power and number of engine revolutions. For long-term operation, the power must be at least 750 W, and the number of revolutions must be at least 12,000 per minute.
Electric planer knives
It is clear that the sharper the cutting edges of the knives, the easier it is for the tool to do its job. Knives should be inspected regularly and sharpened as needed. A sign that the knives are dull is that the plane is working harder than usual. It has to be constantly pushed when planing. At the same time, the engine wears out, making a characteristic sound of overload. This should not happen, because the smooth running of the tool is created by high power engine and high shaft speeds, and not due to the muscular strength of the operator.
Sharpening of plane knives, as well as ordinary knives, is carried out on any sharpening machine. The skill of sharpening is to ensure that the cutting edge is equally smooth along its entire length. Remember, if your model has several knives, and there can be from 1 to 3, then you should sharpen everything. When the instrument operates, they act as one whole. Differences in sharpening upset the balance of the knives and will immediately “come out” in the form of a poor-quality cut.
Advice: try to buy electric plane with thick knives. The knives on this model of electric planer are metal plates 20 mm in length (not to be confused with the width, which is usually 82 or 110 mm according to the standard). On inexpensive planes, the knives are no more than 5 mm, the difference is obvious, and such cutters, like the entire unit as a whole, will last much less.
Electric planer belt
Few people know that the design of an electric planer includes a special belt. It transmits movement from the motor armature to the shaft with knives. But, since it is hidden inside the tool (under its side cover), it is not visible and, accordingly, many underestimate its participation in the operation of the equipment. But in vain, because this unit is a closed belt with cut teeth. With the help of these teeth, motion is transmitted to the shaft. Over time, the belt becomes unusable and stretches. If you have performed all the above steps, the plane engine is running, but the blades are not under load, then most likely the problem is in the belt.

Tip: Buy a plane with a rubber belt. When you want to buy a plane, ask the seller what kind of belt it has: rubber or silicone. Rubber is of better quality and lasts longer.
Yes, the tips are simple, but the main thing is to have the will and patience to follow them. The quality of care for your instrument always affects the quality of the finished product. Remember this. Carry out preventive maintenance on time, and repair of the electric planer will not be necessary very soon.
How to use a jigsaw: everyday tips
How to use a hammer drill - basic recommendations
Analyzing: which screwdriver to choose
We answer the question of how to choose a drill
If you liked the material, I will be grateful if you recommend it to friends or leave a useful comment.

Table for manual electric planer video - Multi registration

DIY table for a circular saw

DIY combined tabletop
How to do garden shredder with your own hands


Circular table from a hand-held circular saw

How to make a circular saw from circular saw with your own hands
Homemade guides for a hand-held circular saw

DIY table for a hand-held circular saw drawings - Boilers for a bath drawing.

pobedpix.com / saw with a handsaw

Machine from manual circular saw with your own hands

Table for hand saw do it yourself video youtube

DIY table for a hand-held circular saw
Table for circular saw

Watch online Hand-held circular saw Interskol DP-1600-2000 video for free, without registration and without SMS - Fumble.

Do-it-yourself circular saw for a table

Table for circular table Do-it-yourself

Homemade woodworking machines from a circular hand saw - Multi registration

Do-it-yourself device for a hand-held circular saw

 For processing small crafts made of wood and plywood convenient tool can become a plane that is easy to make yourself.
Housing 1 (see figure) is cut out of copper or bronze 2 mm thick or sheet steel 1.5 mm thick.
A hole is cut out for the plane blade and four mounting holes are drilled. Clamp 2 for the blade and blade 3 itself are made of steel 2 mm thick; a hole with a thread for an M4 release bolt is drilled in the clamp head.
Repairing an old plane
Wooden handle 4 is cut from a pine block or board 32 mm thick and connected to the body using two screws through Ø3 mm holes or a solid pin (for this you need to make a through hole in the handle). The second holes in the plane body, Ø 4 mm, are intended for a support pin, which can be a nail of suitable thickness.


This mini-plane can easily process not only the edges of products, but also small surfaces.
ZAPRETILOV, Alexandrovka village, Vladimir region
Noticed a mistake? Select it and click Ctrl+Enter to let us know.
Small stationary electric hook
 A man in whose house many things are carried by his hands has in his arsenal a set special tools, among which, if he works with wood, are also small electrical planes that are suitable for planning.
Such a tool can be found in the catalog price-stroy.ru online store building materials"Price-Story" is your reliable assistant in construction and renovation. The electric plane is mobile, you can take it at any time, for example, to the dacha or in the garage, that is, wherever it is needed.
Unfortunately, this tool is not universal, for example, if you need to pull a small and narrow stick, you need to fully adjust the workpiece repair; this cannot be done manually because the tool is in the hands. In addition, it is inconvenient to use when working with a small part that is completely covered by the plane.
Electric planner, 100mm cutter width, equipped with tool, does not rotate the tool in the sleeping device, the above disadvantage can be avoided, the same 75mm roll blades, but this tool can be improvised by a small device plays the role of a console.
This will require a 20mm piece of plywood measuring 450 x 300mm on a pair of posts, each in two pieces, which are in four pieces, which can be made from 10mm plywood in a variety of configurations.
Video works Electric room Interskol
The parts are connected together in such a way that the bed in which the tool is fixed during operation has protrusions and recesses due to its shape.
To accurately determine the configuration of the rack components, you must first make a template from a poster plate that will fit snugly on the body planner, and then cut it from half of the rack, adjust cutting tool Edge, which is attached to an electric drill.
The remaining parts are fixed together with screws and duralumin corners and screwed onto the substrate.
The height of the stand is selected by calculation, so the center of gravity should be as low as possible, so the structure will be more stable. The distance between the tool body and its base is 20mm, and to ensure that the posts do not become detached, they can be fixed with a metal bracket.
- A set of power tools for wall repair. Power tools always need repairs on walls or hanging shelves, images.
When working on a wall surface, you need a range of power tools that every home should have.
- Airplane: the invention continues. Making airplanes is quite simple. The shoes consist of three parts of oak. The midsection of the shoe is 1.5mm wider than the gland to allow for lateral adjustment. on it at the desired angle
- Garden tools ORMIS-Ukraine company presents new brand- elite garden and parking tools Estate of the British company - manufacturer hand tools RemoColor Tools Limited.
The yard tool is beneficial
- Simple grinding system. At the first stage of tool grinding grinding wheel usually has a profile groove (Fig.
1). On the second, the edge of the blade is sharpened and filled. Leftovers and decks. In rotation
- Universal tongue and groove tool Shpuntubel is a carpentry tool that produces a narrow rectangular groove - a handle on the edge or on the plates, machined construction furniture Data at some distance from its edge. In progress
How to make an electric plane with your own hands?
You can purchase components that are not in the catalog to order. When purchasing a new part, you can check its performance. Each model has its own parts, so you should only buy a product that matches the characteristics, which you can select using the code stamped on the old spare part.
Your order will be processed and delivered anywhere in Russia and Ukraine.
We ship to anyone in a convenient way, not only in such big cities like Moscow, St. Petersburg, Novosibirsk, Yekaterinburg, Nizhny Novgorod, Kazan, Samara, Kiev, Kharkov, Dnepropetrovsk, Odessa, Donetsk, Zaporozhye and Lvov, and in any corner of Russia and Ukraine.
Leave a request and buy electric planers from a wide range of products from the Detaluga.com online store.
Select a brand of electric planer
An industrial design costs big money, so here we’ll try to figure out how to make jointer with your own hands using a household electric cylinder.
Various designs of jointing machines
Structurally, jointing equipment manufactured in industrial conditions, is very different from machines made independently. They differ in the materials used, technologies, auxiliary equipment etc. But this does not mean that it will not be in demand for home use homemade jointing machine from a simple electric planer. It is quite suitable for processing small parts in small quantities.
There are two main types of wood planing machines:
- Single-sided machines (the production of this option will be discussed). With such equipment, only one surface can be processed in one pass. Structurally, these are the simplest devices;
- Double-sided or two-spindle. Such a device can simultaneously process two adjacent surfaces of a part. It is quite difficult to make such equipment yourself.
In addition to the above types, you can also add that machines can be both stationary and mobile.
main idea
Yes, such a homemade jointing machine, unlike serious industrial designs, has a number of disadvantages, namely:
- Cannot boast of high processing accuracy;
- The width of the workpiece is very small - only 110 mm;
- Lightweight is a disadvantage, since a heavy massive base always gives the device stability and, as a result, ease of use, which ultimately improves the quality of the result.
- Low power, limited by the power of a household electric planer;
- The body material is wood, that is, not durable;
However, he also has undeniable advantages, which make it very useful for achieving certain goals and performing a number of tasks, since it has the following advantages:
- Low cost - serious jointing machines cost tens and hundreds of thousands of rubles, and the cost of this homemade jointing machine consists of the cost of the plane and materials;
- Compact and portable - it can easily be stored anywhere in the workshop and can be deployed for work in a matter of minutes.
- The simplicity of the design affects its reliability and maintainability.
- The ability to make the necessary dimensions of the machine “to suit you”, for example, you can increase the length of the work table or change the height.
Preparing the necessary accessories for work
To make a jointing machine with your own hands, you will need materials, equipment and tools, namely:
- Manual electric planer. Will be used as a woodworking tool. It is best to use high-quality, branded Makita or Bosh power tools - this is an additional guarantee of productive, long-term work;
- With . Alternatively, you can use a regular hand jigsaw, since we will only need it once to make one part;
- co or drill;
- or any other . Alternatively, you can use a simple handsaw;
- Wood screws (3.5x40 or 3.5x45);
- 10-15mm, for tables and other small parts, 18-20mm - for the side wall of the bed. Alternatively, you can use or, but this is an extremely undesirable option;
- Solid wood, for manufacturing side stop, approximately 15-20mm thick.
This is an indicative set of what you might need to make a homemade jointing machine.
Machine parts
Let's look at the main ones structural elements:
| Name | Description and purpose |
| Machine base | The bottom part of the machine where everything is mounted. |
| Side wall | The supporting structure of the machine, which serves to mount the electric planer and both tables. |
| Rear table (fixed) | Together with the front table it forms the plane of movement of the workpiece. Attached to the side wall. |
| Front table (adjustable height) | Together with the back table it forms the plane of movement of the workpiece. Attached to the side wall. |
| Fixed on the back table. Used to give direction to the movement of the workpiece. | |
| Spacer corners (stiffening ribs) | They serve for general strengthening of the structure, as well as to support a given 90-degree angle. |
| Electric planer | The main element of workpiece processing. |
Making a homemade jointing machine
Side wall
First of all, we will make a side wall, for this we use plywood 18-20mm thick with dimensions 150x480mm. By cutting out a place in the workpiece in which the electric planer will be fixed. This should be done using an electric or hand jigsaw, since the sampling form has a complex configuration.


Front movable table
The front table, which must be adjusted in height, is made of two rectangular parts, fastened at an angle of 90 degrees. For greater structural strength, you need to make triangular stops between them. IN in this example everything is attached with self-tapping screws, however, it is recommended to coat the joints with wood glue for greater strength. The end result should be a design like this.

At a distance of 70 mm from each other you need to make two through holes with a diameter of 8-10 mm and hammer furniture drive nuts into them. It is better to do this before assembling the base.

Installation of the movable table is done using two screws on the back of the side wall. For convenience, you can use bandages with a winged head or make homemade holder mounts. The installation should be carried out so that the plane of the moving part of the “sole” of the electric planer is in the same plane as the movable table of the jointer.

The side stop is needed to ensure smooth and parallel movement of the workpiece, as well as to establish an exact 90-degree angle between the work table and the stop plane. The stop is made simply - from two parts, which can be made from either plywood or solid wood. IN in this case array used.

A do-it-yourself jointing machine made from an electric planer is ready for use.
Planing machine drawings
Here are the drawings of the proposed device.


Safety when working with homemade equipment
When working with any tool, you must follow safety precautions, as ignoring them can cause various injuries. We will briefly list the recommended measures to ensure the safety of the master’s work on this machine.
- It is recommended to remove sharp chamfers and sand all manufactured parts to eliminate the possibility of hand injury (splinters, etc.)
- When working, you must use a chip extractor or a special vacuum cleaner, for example, cyclone type to remove sawdust and dust from the sawing area, which can cause the following harm:

Video
An electric plane is a power tool designed for planing lumber, chamfering workpieces, cutting quarters wooden parts. His practical use increases labor efficiency. Using this tool, specialists also perform other operations related to wood processing. Modern ones, especially professional models, have extended functionality. At correct handling they are safe to work with. But it is not always possible to purchase a factory tool. In this case, you can make an electric planer with your own hands. This will require available parts and materials.
Electric planers appeared in the mid-20th century and became widespread. They have practically supplanted their manual counterparts. Thanks to their use, painstaking work has turned into more productive work. At the same time, the final quality of processing is high if this power tool is used correctly.
Factory products are represented by a wide variety of models, which, despite the different appearance, consist of structural units common to all. These electric planes work in two ways:
- using them as portable hand power tools;
- secured on a table or workbench in a stationary position (upside down - with the drum facing up).

The creation of a permanently fixed electric planer is considered the most suitable (simple) for independent practical implementation. The assembled device will have structural elements common to factory-produced products, such as:
- electric motor, which is the driving mechanism homemade device;
- protective cover, protecting the worker’s hands from moving blades;
- on/off button;
- a drum with knives mounted on it, intended for planing wood;
- a transmission mechanism by which the movement of the electric motor shaft is transmitted to the drum with blades.
Role homemade device soles will be performed by a slab with a flat surface, for example, made of metal, plywood or boards, or a table (workbench). In the latter case, you will not need to make legs for the machine. If the drum is attached to the stove, you will need to make a frame. It must be of a suitable height: match the height of the craftsman working with wood to ensure comfortable work.
Required materials and tools
Let's consider making simplest design, designed for planing depths up to 1.2 mm and width of processed wooden blanks up to 120 mm. To assemble such an electric plane with your own hands, you will need following materials and details:
- bearings;
- steel strips;
- pressure plates;
- M6 and M8 screws with nuts;
- spring washers;
- metal corners (20x20x3 mm);
- staples;
- sheet of plywood (10 mm) or metal (3-5 mm thick);
- belt drive pulleys installed on the shaft of the electric motor and drum;
- a drum (with one or two knives) from an old planer or electric planer, on which you can change cutting attachments;
- a working electric motor from a grinder, an old electric plane or a planer;
- belt;
- button (switch) to turn the electric planer on and off;
- wires and cord with plug;
- residual current device (RCD);
- capacitors (if the electric motor used is three-phase).
Installation separate RCD for an electric plane in the panel (even directly on the machine) will increase electrical safety when working with equipment. Protection is selected according to the power of the working engine. The cord and wires must be of a suitable cross-section, taking into account the power of the installed electric motor.

Must be connected in parallel. In this case, the required total capacity is determined by the power of the installed electric motor: approximately 100 µF per 1 kW. Capacitors must be designed for mains voltage.

To implement the project you will need the following tools:
- some wrenches designed for tightening nuts on bolts;
- roulette;
- building level;
- marker or pencil;
- welding machine with electrodes;
- an electric drill with drills and a circle of small diameter intended for cutting;
- a jigsaw with files for it for wood and metal or hand saws for a similar purpose;
- corner Grinder complete with circles for cutting metal.
Construction drawings
Drawings of the frame to which all the parts of the structure being created will be attached are given below.

The part being processed will rest on slab surface, secured with 10 bolts to a frame welded from steel corners. There is a groove cut in it for a drum with knives. To guide the workpieces and prevent their lateral movement, a square is also attached to the base plate with M8 screws.
Shaft with knives(slave drum) will be attached under the table top with M6 screws. To do this, bearings will be placed at its ends, which will be fixed to the plate with special fasteners. The movement from the electric motor to the working drum will be carried out due to a belt drive.
Motor is installed inside the frame on a shelf made of two steel strips, with holes drilled in them of the appropriate diameter for the frame fastening bolts.
It should be taken into account that the slots for the engine mounts (mounting grooves) need to be made several centimeters wide (2-3) in order to be able to tension the transmission belt.
casing, fixed with M6 screws with spring washers to the corner, close the belt drive. The power button is installed in convenient location on the body of the electric plane.
When working with an angle grinder and drilling, you must put on glasses— they will protect your eyes from metal shavings. In general, when working with any tool, you should follow safety rules and use personal protective equipment.

Algorithm for making an electric planer
You assemble an electric planer with your own hands by performing the steps in the following sequence.
- Prepare the base plate. To do this, cut out a rectangle from metal the right size, according to preliminary markings, they make a slot in it for the drum, and also drill holes to secure it.
- Along the perimeter of the slab, steel corners are screwed using screws, which are then welded at the joints with each other.
- Cut 4 blanks of the appropriate length from the same corners for the legs of the equipment.
- Weld the cut posts to the corners fixed to the plate.
- They make from strips of steel at the bottom of the frame (taking into account the length of the belt), a shelf for the electric motor, with drilled holes to secure it and adjust its position.
- Cleaning up welds.
- Remove the stove.
- Boil the upper joints of the corners that were located directly under the stove so that there are no gaps between them.
- The resulting seams are compared with the upper plane of the frame using a grinder or a file.
- Place the plate in place.
- Fix the drum on the bearings under the slot using clamps or brackets.
- Install the electric motor so that its shaft extends beyond the edge of the table;
- The pulleys are placed on the shaft of the electric motor and the drum.
- Install a belt drive.
- Adjust the position of the electric motor so that the belt is tensioned sufficiently.
- The casing is made from plywood or tin. It is fixed to the corners of the frame with screws, covering the belt drive and protecting the electric motor from debris, dust, and moisture.
- Sheathe the frame with plywood on the side where the start button is mounted and mount it.
- If necessary, attach a capacitor unit to the housing wall.
- Perform assembly electrical diagram: connect the power cord, control button, circuit breaker and capacitors (if required).
- Conduct a test run of the equipment.
When starting a power tool, its drum must rotate in the direction from which the processed lumber will be fed.
The metal for the stove is cut with a grinder or jigsaw. To cut a groove, it is convenient to use electric jigsaw , having previously drilled a hole for its file in the slab, or with an electric drill with an appropriate attachment. The edges of the slot are processed with a file so as not to get injured by them later.
You can secure the metal base plate with flat head screws (so that they do not interfere with work) or by welding it. The first option is preferable because, if necessary, the electric plane is easy to disassemble.

Before installing the drum, it is recommended to check the quality of sharpening of his knives. If it is bad, then it is better to sharpen the blades immediately, using, for example, a regular grindstone. It is necessary to constantly ensure that the cutting attachments are well secured without distortion.
Basis for self-made knives are steel plates or hacksaw blades for metal, sharpened at an angle of 30 degrees.

Hacksaw blade
The sequence of making an electric plane from a grinder with the working drum placed in a vertical position is demonstrated in the videos below. Also shown there possible mistakes when assembling homemade products.
Another option for creating a homemade electric planer from an old, non-working model is shown step by step in the video below.
Using the made power tool, you can process boards, beams and other workpieces. An electric planer assembled with your own hands must be used, always observing safety requirements. The parts must be fed correctly to avoid getting your fingers caught in the drum.
There are many options for homemade electric planes. They have varying degrees of complexity, as well as different functionality. In this regard, the limitations are mainly related to the technical thinking of the inventors and the parts and materials available “at hand”. If necessary, the manufactured equipment can also be equipped with automation equipment.
Drawing of a manual wooden plane, consists of five components:
block
clamping wedge
front handle
rear handle
knife
metal baize
Details about every detail
Reference: for the manufacture of wooden parts, birch, pear, ash, maple, beech, and hornbeam wood is used; the wood must be healthy, straight-grained, fibers directed along the longitudinal axis, humidity no more than twelve percent; preference is given to the swampy part of the trunk.
BLOCK


When making the pads, it is necessary to pay Special attention on the:
1. The plane of the taphole bed on which the knife lies must be flat, made at an angle of 45...50˚.
2. The knife should fit freely into the tap hole. The width of the tap hole should be 1.0...1.5 (mm) greater than the width of the knife.
3. It is necessary to achieve a perfectly flat surface of the sole.

To do this, take thick glass (12...15mm), check its flatness by placing a metal ruler on the surface; if there are no gaps, then the glass surface is ideal and you can move on.
Glue sheets of paper with different grain sizes (100...320) onto the glass.

We start with the coarsest grit and end with the fine one.
To check surface readiness wooden block using a hand plane, draw four lines on it: one at the beginning of the nose; one at the end of the heel; one in front of the slot; one after the slot. If the marker disappears evenly along all four lines during grinding, then the surface of the pad sole is ready.
4. The shoulders serve as support for the wedge. From the top width they taper to the bottom point and have zero width.
CLAMPING WEDGE

The angle of the wedge and the angle of the cheeks should be the same. This is necessary for good pressure on the knife.
FRONT HANDLE

The shape can be any convenient for the hand to grip.
REAR HANDLE

On the one hand, it must contain a plane that is parallel to the bed of the tap hole and is its continuation.
On the other hand, it should contain a circular pa for easy grip by hand.
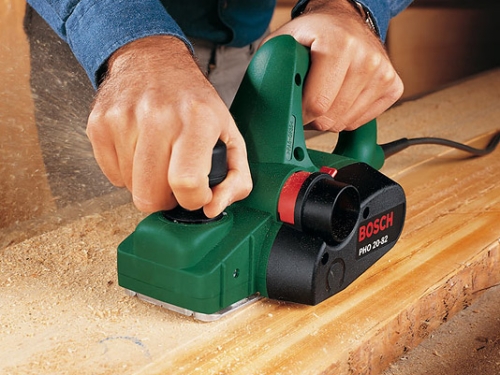
For many people, working with wood brings great pleasure. It’s nice to make a table for the veranda with your own hands, assemble garden bench or change a leaky board. Only the joys of creativity are overshadowed by routine physical work, which electric planes are designed to combat. Work manual electric planer Anyone can do it, even a beginner.
The purpose of the electric planer
The plane is the oldest tool for wood processing after the axe. Any professional treats him with special respect. The painstaking work of the designers and electricity made the plane even more perfect and efficient. Thus, modern electric planers outwardly resemble their mechanical counterparts, but new designs are several times more productive than manual labor.
The electric planer is intended for processing wood, reducing the thickness of wood products, preliminary planing, fitting, processing boards on a bed, beveling edges and creating an extended recess in products various shapes(chamfers, quarters, tongues). All this is called by one term - planing. This tool is not suitable for processing a larger area, but for small volumes it makes the work easier for a frequent repairman or a professional when handling wood.

The main function for a plane is to level wooden surface, which was previously roughly processed. After leveling the product with a plane, all irregularities and defects disappear from the surface, and it becomes extremely smooth. Finishing wood is usually done with a sanding plane. An electric plane can also be used to make a chamfer or groove in a workpiece.
Electric planer design
The design of an electric planer is quite simple. Let's take a closer look at the electric planer circuit and its constituent elements.
Rotating drum
In the body of the electric planer, on the base plate, there is the main working element - a rotating drum on which the knives are attached. As a rule, in the “knife drum” there are two, less often three or one, knives, which cut the upper surface of the wood being planed. The knife shaft is much more technologically advanced than a conventional cutter, and the power of the tool allows you to work without any additional effort.
Knives are made from tungsten, hardened steel or carbide. According to the number of knives that are fixed on the drum, electric planers are “two-legged” and “one-legged.” The first type of tool works only with precise alignment, otherwise only one knife will work, the second is simple and productive. Electric planers with a knife mounted obliquely on the drum are capable of making a specific “spiral” cut for high-quality planing of the board.

Over time, knives wear out. There are reusable knives that need to be sharpened, or disposable knives that need to be changed. The frequency of these procedures is determined largely by operational loads: the type of wooden surface and the time of their processing.
To remove the knife, slightly loosen the bolts that hold the knife holders in place. They are easily removed from the drum grooves. After sharpening, the knives are put in place, aligned in height with each other, as in the video about the electric planer.
Straight carbide knives, thanks to the presence of a centering groove, are easily mounted in their place in holders, which are in turn inserted into the grooves of the drum. Sharpened steel knives require more careful alignment in height.
Electric planer sole
The sole of the electric planer is made of cast aluminum and is divided into 2 parts relative to the drum - front and rear. The rear part is fixed, and the height of the front part, which can move on untreated wood, can be adjusted using a knob or button. The position of the front part primarily determines the depth of planing or, in other words, the thickness of the chips.

The sole influences the stability of the electric planer. In any case, this element should not interfere with work and be smooth. The soles, which are produced by some manufacturers, have several V-shaped grooves in their surface, which are needed for chamfering the corners of the workpiece.
Electrical part
The rotating drum is connected to an electric motor using a drive belt, which is responsible for transmission rotational movement. The drive belt needs to be changed from time to time. But this task is not at all troublesome, because belts are sold in all tool stores. You can remove the old belt yourself. To facilitate this operation, the manufacturers made the protective cover removable.

The electric motor has a power of 580 - 900 W, its rotation speed reaches 1000 rpm. The quality of the treated surface largely depends on the engine power. The electric planer contains a switch with a lock and a cord with a plug, as well as various electronic components: changing or stabilizing speed, soft start, drum balancing, overload protection and even electronic brake.
Tool handles
To move along the working surface of the electric planer, two handles are used. The rear one allows you to push the tool; there is a start/stop trigger with a double safety system. Using the front additional handle, they only direct the movement of the electric planer; the same handle allows you to work “in a big way.” If you press firmly on the front handle, you can remove a large layer of wood at the end of the material being processed.

Since the adjustment handle is sometimes used as a second handle, it is often made with internal notches so that it can be raised when switching, otherwise it is possible to accidentally knock down the specified chip thickness during operation. A handle without such notches can adjust this parameter on the go, but this does not allow you to get rid of unwanted switching.
The switching step is usually 0.1 millimeter, but each electric planer has its own differences. The cutting depth can be set by turning the knob. At the same time, the front part of the sole lowers or rises, opening the drum with knives less or more.
Knife protection
Two varieties protective devices protect the surface being processed and fingers from below and on the sides from contact with knives. At the bottom of the sole there is a leg, like in the photo of an electric plane, which is automatically thrown out, slightly lifting the back of the sole. The movable safety leg will fold back when the electric plane is not working and protect the workpiece from contact with the knives. You can also place the plane on its side, with the drive belt cover down.

A protective plate on the side on a spring covers the edge of the knife drum and is raised as far as the plane will go deeper into the wood when selecting a quarter. The side edge of the knife drum, which allows you to select a quarter, is hidden under a rotating plate.
Chip ejection
The procedure of direct ejection of chips relieves the electric plane from clogging and occurs in three ways. In the first case, no technical frills are required; the shavings will scatter throughout the room, however working surface will not clog.
The ability to direct the ejection bell in some models makes it easier to remove chips; this is where the second option for ejecting chips lies. The bag holds large volume shavings, although not too bulky. If you need a bag, you should ask whether it is included in the set and whether it is possible to purchase it in addition.

A good solution to the problem is to connect it to a vacuum cleaner using a corrugated hose, but it will not completely rid you of debris. Depending on the location of the operating electric plane, it is convenient to direct the ejection of chips in a certain direction.
To do this, you just need to switch the key to the desired position. The method is simple, but is inconvenient in some cases, because the hose and cord limit the maneuverability of the structure.
Accessories for electric planer
There are many different accessories for the tool, regardless of the price of electric planers. For example, wavy knives made of hardened steel, different overall dimensions, which are used for roughing, as well as equipment that allows you to install the plane motionlessly and turn it into planer and automatic jointer at the same time.
The side stop, together with the depth gauge, is able to accurately set the width and thickness of the chips being removed. To cut a corner, it is customary to tilt some stops from 0 to 45 degrees. When planing a thin edge, the side stop will help give the plane the necessary balance. Of all the possible accessories described above, they must be included in the kit.
Specifications
The power of an electric planer is 0.4 - 2 kW. An electric plane with a power of 500 - 900 W is suitable for use at home and for DIY repairs. An electric plane is suitable for simple and short-term work. household class or homemade electric planer low power. And for real masters, you will only need a professional powerful tool.
The rotation speed of the cutter can influence the surface finish and is 10 - 18 thousand revolutions per minute. In some models, the rotation speed can be changed. It can also be maintained at a constant level by electronics, which is very convenient when working with hardwood.

The planing width is 82 millimeters or more. This indicator is important when you spend most of your time processing boards. For many companies, the planing width of wood usually does not exceed 82 mm, but there are companies on the market, for example, Interskol, which have increased the planing width to approximately 102 millimeters.
You can set the planing depth within 0 - 4 millimeters. It can be smooth and step-by-step. The cutting depth of the edge ranges from 0 to 25 millimeters, respectively.
Making an electric planer with your own hands
The electric plane that you will be making is designed to process wood in one pass, which has a width of up to 120 millimeters and a cutting depth of up to 1.2 millimeters. The workpiece will rest on a plate with a hole for the knife shaft. The guide square is mounted on the base plate using 2 M8 screws that have plastic heads; it prevents lateral movement of the product during processing.
They are attached to the base plate from below with M6 screws, which have countersunk heads, bearing supports for the blade rotating shaft. Outside the base plate, it is customary to install a V-belt pulley at the end of the cutter shaft. The plate is secured with 10 screws to the body of the electric planer, which is welded from a steel angle measuring 20 by 20 by 3 millimeters.
The safety casing is connected to the body with three M6 cylindrical head screws above the V-belt drive through spring washers. The electric motor of the tool is located inside the housing and is connected to it using 2 supports in the form of steel strips. They have 2 holes with a diameter of approximately 6.5 millimeters, which are intended for mounting on the body of the electric planer with your own hands, as well as 2 grooves each, allowing for installation and adjustment of the position of the electric motor for belt tension.

The electric motor of the device is controlled from a remote control located on the front of the body. Under the U-shaped bracket inside the remote control there are 2 phase-shifting capacitors, which are mounted in parallel and have a capacity of 4 µF. The switch is mounted externally on the remote control. The motor is protected from direct contact with dust and chips by a casing.
First of all, make the base plate. The most labor-intensive operation is considered to be making a shaped slot in the plate, which is intended for the knives to come out. For this purpose, use an electric drill with a cutting wheel of small diameter or drill along the contour of the hole, and then file the slot. After drilling the mounting holes in the base plate, threaded holes are made along them in the 4 upper corners of the electric planer body.
Before welding, the upper corners are attached to the base plate with 10 screws, and the remaining corners of the body are secured to them by welding. Then the base plate is removed, and the body is finally welded along the contour, cleaning the welds. Particular care is taken to clean the plane in which the housing is adjacent to the base plate. In this case, gaps are unacceptable, because they provoke vibration during operation of the electric planer. Keep this in mind before making your own electric planer.

After completing assembly, make sure that the cutter shaft will rotate counterclockwise - in the direction of feed, as measured from the control panel. This feature has great importance, because the method of fastening to the knife shaft V-belt pulley does not allow it to move in reverse side. Before starting work, secure the plane body without gaps with 4 M6 screws.
The knife shaft for cutting grooves is equipped with 2 knives that have a width of 120 millimeters, or one knife. In the latter case, a counterweight is installed on the opposite side of the shaft to eliminate imbalance and vibration. Each knife is secured using pressure plates and 3 M8 screws, which are screwed into the through threaded holes of the rotating knife shaft.
For knives, the most affordable workpiece is the spent blade of hacksaw saws for metal, which has a thickness of about 3 millimeters. Sharpening angle cutting edge knives should be within 30 - 40 degrees. With figured sharpening, you can get a relief surface for artistic frames or platbands.
Narrow and thin profile slats that are less than 10 millimeters wide can be prepared using longitudinal cut more wide board. When working with narrow knives (less than 12 millimeters), it is not recommended to process grooves that have a depth of 8 millimeters, due to the lack of strength of the tool.
Now you know how to make an electric planer, all that remains is to find out how to properly sharpen the knives for it. We'll talk about this in the next article.