Takes ~3 minutes to read
The functional purpose of shelves in everyday life is to place various items: large, heavy or decorative, fragile. The choice is made in their favor if the installation of furniture elements is undesirable for design reasons. The use of wall-mounted shelves in the interior allows you to create a feeling of lightness of space - to expand it visual perception. Although at the same time they perform a very specific load-bearing function.

Save
Therefore, it is important that each shelf is securely fastened taking into account the strength of the wall (whether it is a brick wall, concrete wall, plasterboard partition or wooden wall), its material and planned load. Then the question arises of choosing a fastening method, which is determined depending on several factors:
- Using a shelf as an interior element,
- Manufacturing material,
- The strength of the surface of the wall or partition on which it will be attached.
Let's consider possible types fasteners and their choice depending on the style of interior design.
Types of fastenings
Hidden

Save
The choice of hidden shelves is usually determined by the style of the room. Since this method is quite labor-intensive, preference is given only in cases of urgent need. This type of installation creates a feeling of lightness of the structure, expanding the space of the room. It is often used as an interior element in minimalist, ethnic Asian (Japanese, Chinese, Thai), modern, and high-tech styles.

Save
Hidden hinges
They can be used for wooden shelves, from laminated chipboard, plywood. The hinges are attached to the back of the shelf with self-tapping screws according to the markings. If this product self-made, then it is better to make indentations (cuts) in size and thickness in the places where the hinges are attached fastening fittings so that the hinges are flush with the edge of the product and tightly adjacent to the wall. Now you can hang it on the wall using screws screwed into it in advance.

Save
Cantilever mount
In this section, we need to consider several types of mounting parts:
Metal rods

Save
There is currently on the market big choice console mounts, you can choose ready-made shelves of various sizes to complete with them. The design includes a hidden mensolo holder for wooden shelf, bracket for attaching the mensolo holder to the wall.

Save
This method provides for the presence of holes in the shelf into which they will be inserted. metal rods furniture fittings, and the rod should be 2-5 cm shorter than the product itself.
At home, you can construct such a cantilever mount yourself, using pieces of reinforcement and threaded rods complete with drive-in anchors as metal rods. And in the shelf itself, you need to drill holes in the size corresponding to the rods, observing the rule that they should be at least 2-5 cm shorter than the width of the product. In this case, the thickness of the rods ranges from 10 to 18 mm, depending on the weight of the future filling.
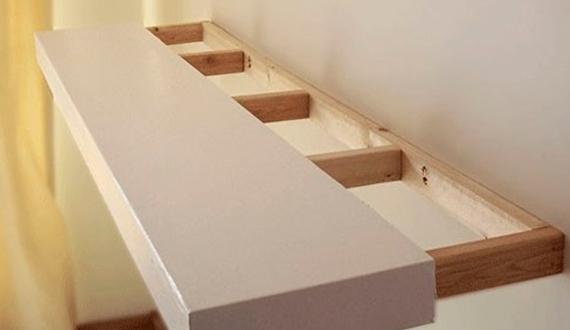
Wooden blocks
This method of fastening involves installing a frame made of wooden blocks, most often square or rectangular section, and then stringing a shelf on them, which is a hollow structure (box). For reliability, the parts are secured with self-tapping screws; additional elements can be attached with glue.

Save
Brackets, fasteners, corners
When choosing fastening with brackets, you must keep in mind that the fastening elements will always be visible. AND this method It may well become a decorative element in the interior.

Save
After all, there is a wide variety of shapes, styles, and materials for making brackets. And that’s why shelves on brackets are used in classic, rustic, modern styles, modern styles, shabby chic, loft and others.

Save
The choice in favor of such fasteners can be made not only because of their decorative appeal, they can provide reliability under significant loads - up to 30-50 kg.

Save
Models and designs of brackets, materials for their manufacture and materials for shelves for which they can be used are quite diverse. Therefore, it will not be possible to give general recommendations on how to attach them.

Save
Although the method of attachment glass shelves is a type of fastening using brackets, we will consider it as a separate issue. After all, the material used to make such products allows one to achieve interesting decorative effects.

Save
Glass products can be:
- Thin or thick (manufacturers release models on the market with thicknesses from 4 to 12 mm).
- Shelves are made of triplex with fogging between the layers of pattern elements (they have a significant own weight).
- Transparent and matte.
- Made from colored or black glass.
- Their shelves are stained glass.
- Frosted glass with LED backlight(can be an independent decorative element in the interior).

Save
Brackets for glass shelves are offered in design and size:
- Minimum sizes for small and light shelves.
- Large sized brackets, so-called pelicans.
- Brackets with suction cups (bottom only), which makes the upper surface of the shelf open.

Save
Since glass is a fragile material, this is taken into account in the design of the mounting brackets - they use silicone or rubber gaskets that protect the surface of the shelves both above and below
Rules for fastening shelves and necessary tools
Tools
- Pencil or marker;
- Building level;
- Tape measure or ruler;
- Drill or hammer drill (depending on the type of wall);
- Screwdriver or screwdriver;
- A mallet, preferably a rubber one.
Installation rules
Main and general condition The reliability of a fixed shelf is the correct calculation of the reliability of fastening depending on the planned load. The longer and the greater its mass with potential filling, the more support points there should be (metal rods, wooden blocks or hinges).
To correctly fix the prepared shelf on the wall in the intended place, the following rules must be observed:
- Perform orientation marking using building level, which will ensure a strictly horizontal position of the shelf. Horizontal line mark on the wall with a pencil or marker;
- Use a tape measure to mark the locations for attaching the screws. To do this, measure the distance between the centers of the holes of hidden hinges, the centers of brackets, and corners. Mark this distance on the already drawn horizontal line.
- In these places, drill holes corresponding in diameter and length to the dowels and screws selected in the kit. To do this, you need to choose the right drill size. Then in drilled holes use a mallet to drive in the dowels and screw in the screws as an independent suspension (if using hidden loops) or by securing fittings (metal rods or brackets).
- Now you can safely hang the shelf! If at the same time it is necessary to use additional fasteners with self-tapping screws or glue according to the technology, it is important not to forget this.
Features of fastening shelvesdepending on the type of wall
Concrete wall
The nuance of working indoors with concrete walls consists in choosing a drilling tool and a drill bit. This should be a hammer drill and a special concrete drill made of hard alloys. The size of the drill, its diameter and length, is selected depending on the specific fastening hardware.
Plasterboard wall
If you plan to hang a shelf on a plasterboard wall that will serve a decorative role (for souvenirs, figurines or vases), then you can safely use a TNF/-W butterfly dowel to mount it.

Save
To secure it in drywall, you need to drill a hole of the appropriate size and drive a dowel into it. When screwing a self-tapping screw into such a dowel, it opens itself, forming plasterboard sheet a reliable stop, and a special cuff on the dowel does not allow it to rotate. Attaching a light shelf made of glass, thin plywood or other lightweight material this way will be quite reliable.
To install heavier shelves, more labor-intensive work will have to be done. At the stage of constructing plasterboard partitions, in the places where the shelves are planned to be attached, it is necessary to install additional transverse aluminum profiles or bars of the appropriate section. It is in them that holes will be drilled through the drywall, dowels will be installed and brackets will be attached.
If such additional structures were not provided for at the stage of constructing plasterboard walls, then a solution can be found. Already by outside plasterboard partition you can attach the cross bar to vertical profiles, located inside the plasterboard partition (in this case, their location must be known or determined, for example, by tapping or more technologically advanced methods). But in this case, the main task will be to make the bar invisible - for example, by hanging one long or several shelves in a row along the entire length of the bar. Or make it a decorative element.
Only part of the widespread methods and most common methods of attaching shelves in rooms has been described here. In addition to them, everyone’s imagination and experience can suggest other devices, designs and design solutions.
Home improvement is not always a matter of several weeks, and quite often, additional elements such as shelves, racks and other decorations are hung on the wall after everything is finished renovation work in the house. Therefore, almost everyone faces the question of how to hang a shelf on the wall without damaging the finish.
Everyone, even those who have never encountered such a task, knows that attaching a shelf to a wall can only be done with the help of fasteners. In stores and along with shelves you can find dozens of types of fasteners, which may differ in both appearance and design. But they can be divided into two main types, with hidden fastening and external.

In addition, the shelf mounting itself can also serve a decorative role, creating the desired design effect.
The shelves themselves are also very diverse both in their appearance and in the material from which they are made, and they also do not have a clear classification; they can be single-tiered or multi-tiered and intended for any room. The type and material of the shelf depends only on your needs or tastes. If you wish, you can even make a homemade shelf.

Where are shelves most often used?
The main place where you simply cannot do without a shelf is the bathroom. This is where shelves are a must-have attribute, as they allow you to conveniently store bathroom accessories. In most cases, even several shelves are used, but fixing a shelf in the bathroom is the most difficult, since the wall covering here is ceramic tile, which must be handled very carefully.

You can’t do without a shelf in the kitchen, since it greatly increases practicality and you can place on it all the accessories that the housewife constantly needs at hand.
The hidden shelf is a decorative accent that creates the illusion. The shelf seems to “float” on the wall. By adding such furniture to the interior of your living room, bathroom, kitchen, bedroom, you can solve the problems of storing books, necessary accessories or souvenirs. Such furniture is often required to decorate children's rooms, which have a lot of tiny cars, dolls or other toys. “Floating” shelves are cheap, beautiful, keep everything safe on them, and it takes little time to make such furniture.
Types of fastenings
The inconspicuous fastening that supports the shelf has a wide range of varieties:
- Alcoves and niches - comfortable spot for mounting shelves, because they are easily attached directly to three walls.
- The hidden bracket with two slots is convenient because it can be used anywhere.
- Invisible fastener made from durable metal, with alloy steel connecting screws, creates tension between the posts. This gives them impressive support ability. If a longer shelf is needed, additional supports are added. Invisible fastenings can be used to create floating shelves with heavy loads.
Rustic Bathroom Shelves
If the time has come to modernize the interior, shelves with hidden fastening in the Provence style - perfect decor. She creates exclusively her own, unique home comfort. And at the same time it seems to be floating in the air! Its artsy and simple at the same time appearance Will decorate the bathroom and any nook that needs storage space.
This model The shelf is installed as a "float" and reinforced for added strength, it is amazing for collectibles, photos, gifts and glassware. The design is inexpensive and requires very few materials.
Tools:
- level,
- measuring tape,
- saw,
- drill.
Consumables:
- tree,
- screws,
- optional finish.
Advice. You should avoid last-minute shopping trips; it is better to prepare materials in advance.

Creation algorithm
- To make hidden shelves with your own hands, first draw a sketch; this will help you understand the design and find out what type and size of wood is needed. The step also includes measuring the width of the space from wall to wall.
- The next step is to create a special frame. You can use liquid nails to glue the frame together first, and then use screws and angle iron to hold all the pieces together.
- Next, the boards are painted or painted, which will then be fixed to the frame. You can use the same paint or varnish that has already been used on other furniture. It's nice that today there are varnishes on sale that will make wood look old in a matter of minutes and highlight its texture, this finish is great for rustic style.
- The desired height of future shelves is measured and support frames are attached to the wall. Before drilling, the wall is checked using a detector for the presence of wires and pipes.
- Next, you need to make sure that the invisible shelf is level. It's pretty hard to find beautiful boards, which will be quite straight. If it turns out that the boards are uneven, proceed to step 6.
- Spacers are added to level the shelf. This step is repeated for the top and bottom boards.
- Then the top board is glued to the frame using liquid nails.
- The bottom board is much more difficult to secure liquid nails, so it is better to secure it with screws.
- The front part of the shelf is glued last.
Attention! The walls of the room are painted before attaching the shelves. Instead of boards, you can use MDF.
Hidden shelves from old drawers
These shelves are made from 2-8 drawers, not necessarily matching in color, shape or size.
- Boxes are cleaned and removed unnecessary details. Surfaces are sanded.
- Then the protruding edges of the cladding are cut off so that the entire side of the bottom fits tightly against the wall.
- The inside of the drawers is painted to match the color of the wall. This will create the illusion of floating shelves.
- Next, the boxes are laid out on the floor to find beautiful compositions to determine the places where they will be attached. The composition you like is photographed; this photograph will replace the sketch.
- According to the plan, they are mounted on the wall wooden supports. Make sure they are level.
- The boxes are placed on supports and secured with screws (the screws are painted over if they need to be hidden).
Decorative handles or accessories can be added if desired. Another idea is to attach a decorative "sticky note" to inside drawers, which became full-fledged regiments.
Shelves-tubes for toys

- Buckets are cleaned, labels are removed, the top is cut off (use manual or electric saw).
- Future shelves are painted on the outside with plastic paint.
- Then two holes are made for the screws.
- The structure is fixed on the wall.
And, voila, the furniture is ready! This DIY shelf is an economical idea for creating storage space for small items.
Specialization: professional in the field of construction and repair (full cycle of finishing works, both internal and external, from sewerage to electrical and finishing works), installation of window structures. Hobbies: see the column "SPECIALIZATION AND SKILLS"
The question of how to hang a shelf on a plasterboard wall has several possible correct answers. It all depends on what load the structure will place on the gypsum plasterboard sheathing, and what materials we will have at our disposal.
I will tell you how you can hang lightweight shelves with minimal labor, and also describe the technology for installing heavier structures.
For lightweight structures
Method 1. Adhesive installation
After completing the paneling and finishing, we may be wondering how to attach the shelf to plasterboard wall. The problem is that drywall is a rather fragile material, and therefore it will crumble under load. This means that when hanging shelves we will have to use a variety of devices that will allow us to compensate for this shortcoming of drywall.

The choice of fastening method directly depends on two parameters:
- The weight of the shelf itself.
- The planned load on it.
We will build on them when planning our work.

For decorative shelves, stands for small photographs or keys in the corridor, you can use adhesive installation. This method is the easiest to implement:
- We apply markings on the wall for installing a decorative object.
- According to the markings, we apply to the surface lined with gypsum board thin layer contact glue.
- Apply the same layer of glue to the back of the shelf.
- Let the glue sit for some time (depending on the type of composition) and press the shelf against the wall. The pressure should be tight, but not too tight: it is advisable to dose the force so as not to crush the drywall.

The described method requires virtually no labor costs, but its reliability is low.
Method 2. Fastening with screws
If we are dealing with a structure whose mass is small, but does not allow the use of the adhesive method, we can simply fasten the shelf with self-tapping screws. The choice of fasteners depends on where we will carry out the work:

- if the shelf will be installed simply in drywall or in wooden element frame, then we use wood screws (black);

- if the position of the shelf can be adjusted so that the fasteners fit into metallic profile under the casing - take it screws for metal with a drill.
The length of the self-tapping screw must be sufficient to completely pass through the plasterboard and penetrate into wooden beam or steel profile. For single-layer sheathing, it is advisable to use elements from 25–35 mm.
The instructions for performing the work are extremely simple:

- Select the installation location. As I noted above, it is desirable that the fasteners fall either into vertical racks frame, or into horizontal cross members.
- We put marks on the wall.
- Place the shelf against the wall and tighten the screws according to the marks. It is advisable to use a screwdriver: this way the hole will not “break”.

If tightened too tightly, the reliability of the fastening may decrease due to the integrity of the cardboard layer. And it is also undesirable to unscrew the screws and re-tighten them back: the thread destroys the plaster, and when re-attached it will hold much worse.
For heavier shelves
Method 3. Expansion and drop-down dowels
Now let's figure out how to hang a heavy shelf. Here, ordinary self-tapping screws are not enough - it is advisable to either use special dowels or solve the problem in other ways.
Let's start with a description of special fasteners - fortunately, they are present on the market in a fairly wide range:
| Illustration | Name and operating principle | |
 |
6–12 | Butterfly.
A lightweight, two-blade dowel that fits into a pre-drilled hole. When the locking screw is tightened, the blades open and are pressed against the skin from the inside. |
 |
20–30 | Driva
Plastic or metal dowel with deep thread. Installed by screwing it into drywall along a starting hole with a diameter of 5–6 mm. Fixation is ensured by spiral blades, which, when the locking screw is screwed in, expand inside the plaster layer. |
 |
15–16 | Fischer Pd
It is made of plastic, consists of a sleeve with a massive end. When tightening the fastener, the end stop is pressed into the sleeve, opening it and pushing it apart into the drywall. |
 |
Up to 50 | Molly
Probably the most popular look fasteners It is installed in a hole with a diameter of 8–10 mm, while the teeth on the neck are stuck into the drywall. When the locking screw is tightened, the inside of the dowel opens, pressing tightly against the gypsum board and distributing the load from the hung shelf over a sufficiently large area. |
Perhaps the described mounts have one significant drawback - quite high price. But if we consider that to hang a shelf we need only a few of these dowels, then this drawback can be considered insignificant.

Method 4. Through anchor
However, sometimes you have to decide how to screw a shelf to drywall if the load on it is high, and it’s not possible to use a special dowel. This situation arises, for example, when there is a minimum gap between the sheathing and the wall, which does not allow the installation of a spacer sleeve.

Here you can do it like this:
- First, using a drill or screwdriver with a drill bit installed, we make holes in the plasterboard sheathing. The diameter of the holes must be equal to the diameter of the fasteners used.
Here the rigidity of the entire system comes to the fore, so I recommend working with dowels 8–12 mm or more, even if a thinner product is sufficient for reliable fixation. The thing is that a thick dowel will not bend under the weight of the shelf, and the load on the edge of the hole in the gypsum board will be minimal.

- Then we replace the drill with a hammer drill and use a drill to make a socket for the anchor sleeve in the load-bearing wall. The depth of the nest should not be less distance from load-bearing wall before outer surface GKL.
- We insert an anchor sleeve made of durable plastic or metal into the drilled hole.

- We fix the sleeve with a locking screw with a head or hook. When screwed, the sleeve will gradually open, and most of the load will fall on the main wall.

When implementing this method with your own hands, it is worth keeping in mind that both when drilling a nest with a hammer drill and when hanging a shelf, the hole in the gypsum board will increase slightly. So it’s worth installing fasteners in advance - then at the finishing stage we will be able to mask any defects that have arisen.
Method 5. Mortgage
And finally, a universal answer to the question of how to fix a shelf on drywall . If you want the suspended structure to hold tightly, it is better to provide for its installation in advance:

- When installing the frame for gypsum board sheathing, we select a place on the wall for installing a shelf.
- At the selected location with anchors to main wall We fasten a wooden beam or a thick board. We select the thickness of the element in such a way that the gap between its surface and the back plasterboard sheathing was minimal.
Tip: be sure to place marks at the level of installation of the mortgage on the adjacent walls, floor and ceiling. This will make your job of finding it easier!

- After sheathing, we find the mortgage (using marks or tapping the drywall). We hang the shelf on ordinary self-tapping screws, screwing them through the gypsum board into the wood to a depth of at least 40 mm.
- If the shelf is heavy, we use the method described in the previous section. The use of an embedded beam will not only not interfere with the installation of through anchors, but will also strengthen the fastening unit.

How to attach a shelf to a wall: possible methods
A shelf on the wall is a decoration for any interior. Every person wants to mount a shelf on the wall so that it fits perfectly into the overall design of the room. This problem is not at all difficult to solve. Absolutely anyone who has available can nail a shelf to the wall. free time and a set of necessary tools.
The nuances of fastening shelves
As the main support for the shelf, you can choose an anchor bolt, thanks to which you can reliable fastening interior item.
Its dimensions are as follows:
- diameter up to 12 mm,
- length – 180 mm.
There must be a thread on one end of the anchor bolt in order to screw the anchor into wooden surface, and on the other hand, to screw it into a metal coupling.
In order to attach the shelf to the wall correctly, it is important to follow the recommendations of experts
As a base for the shelf, you can take a piece of board from a window sill with artificial turf.
The dimensions are as follows:
- thickness – 25 mm,
- width – up to 200 mm.
There are only two options for mounting:
- classic,
- hidden.
A hidden option for fastening shelves is needed in cases where decorative elements Absolutely incompatible with protruding fasteners. Attaching shelves in this version is just as easy as in the traditional one.
Depending on the type of fastening of the shelf, the options for its installation and types of fasteners varyWhen working with anchor bolts, a clear sequence of actions should be followed
A shelf with hidden fasteners looks neater
Sequence of work
Before you attach the shelf to the wall, you need to know that the thicker the shelf, the thicker the support should be. A hole is drilled in the end part an average of 5 mm below the surface. All holes for shelves in the wall must match, otherwise attaching them will be quite problematic.
Metal corner - the most reliable fastening for a wooden shelfUsing anchor bolts, you can use special brackets
Invisible fastening of shelves is carried out in a hidden wayUsing your imagination, you can create a unique shelf fastener
Attaching the shelf to the wall:
- A strip of the required length is considered a template. It is applied to the end of the shelf and a hole is made required diameter, and then applied to the wall.
- The next step will be drilling, which must be done with maximum precision.
To attach the shelf you will need:
- electric drill,
- threaded coupling,
- brackets,
- lath - template,
- carpentry glue,
- screws.
Installation of a corner shelf (video)
Store shelf mounts
A shelf that you bought at a hardware store can be very difficult to attach to the wall. Be sure to read the instructions that came with it. Most likely, everyone will be in it necessary recommendations about how to screw the product onto the wall.
Next you need to understand what type of fastening the shelf has. Usually, complete with a shelf and instructions, it also includes elements that are used to fasten the product. It is also necessary to select brackets, thanks to which the shelf will be secured.
Pelican mount is most often used for glass shelves
Bracket options may vary:
- fastenings that do not extend beyond the shelves;
- flat brackets with pear-shaped holes at the end.
To fasten a shelf from a store to the wall, first take careful measurements, which were given above.
Steps to attach the shelf to the wall:
- Based on the possible dimensions of the shelf, you will need to decide on the place where the fastening will be made. Choose the right place so that other furniture in the room does not interfere.
- Using a building level, you need to control the position of the product.
- Nests are first created in the walls so that after this procedure the shelves can be safely attached. These nests are made with a puncher or drill, and then dowels are driven into the resulting holes.
- After this, the shelf is mounted on the wall.
- The final stage is screwing the fastening elements into the holes.
How to hang shelves on the wall (video)
Thus, it was clearly shown how to attach any shelves to the wall. The fastening is carefully planned and only after the plan has been developed, work begins.