PVC panels (polyvinyl chloride) are a surface finishing material used in the interior of bathrooms and toilets, kitchens, hallways, and balconies. Its popularity is due to the low cost and simplicity of cladding - covering walls with plastic panels is accessible even to a non-professional.


Polyvinyl chloride is resistant to humidity, temperature changes and aggressive cleaning agents. The material is quite flexible and, unlike MDF panels, is suitable for finishing arched openings.
In addition to the variety of colors, patterns and textures, plastic panels are divided into ceiling and wall (more rigid). The width of the plastic material is determined by the following standards:
- sheet (800-2003 mm);
- lamella with tongue-and-groove lock (100-125 mm);
- panel without lock (250-500 mm).
All panels have internal stiffeners that form cells that provide good performance moisture and sound insulation.
The strength of the plastic panel must be checked by pressing your finger - if a trace of deflection remains on the surface, then this plastic will not last long.
You should refuse to purchase PVC panels if: there are scratches or cracks on the surface; color tones inside the package vary; the drawing is not clearly printed; Damage and distortion of the stiffeners are observed.
 All panels have internal stiffeners that form cells that provide good moisture and sound insulation.
 Necessary tools and materials for installing plastic panels
Main tool:
- Hammer/electric drill – for mounting the frame;
- screwdriver;
- jigsaw, Circular Saw or a hacksaw for metal with medium-sized teeth;
- construction stapler - for installing wooden sheathing;
- rubber hammer - to correct the panel wedge.
Supporting materials:
- Level – for measuring geometric deviations of the surface;
- yardstick;
- pencil - for marks on panels;
- fasteners - self-tapping screws, dowels, clamps.
 Necessary tools and materials for installation plastic panels.
The process of installing plastic panels on walls with your own hands
In rooms with high humidity The seams between the panels are rubbed with sealant using a spatula. It is recommended to add an antiseptic to the mixture to prevent the formation of fungal mold.
 In rooms with high humidity, the seams between the panels are rubbed with sealant using a spatula.
 Preparing the base
Wall finishing with plastic material is possible both with and without preliminary installation of lathing. The latter method will require careful alignment of the wall geometry.
In both cases, the walls must be cleaned of the previous finish, the cracks filled with putty, and treated with an antiseptic against fungi. This way, mold will not grow under the new finish, and a healthy microclimate will remain in the room.
 The walls must be cleaned of the previous finish, the cracks filled with putty, and treated with an antiseptic against fungi.
 Marking
Since the frame must be without distortions, preliminary markings are needed:
- Make a mark above the floor at a distance of 2 centimeters, use a level to draw a horizontal line along the length of the walls of the room to be finished.
- Also draw a line 2 cm below the ceiling.
- From the bottom horizontal to the top, place marks (beacons) every 35-45 cm. Draw horizontal lines from them - they should be parallel.
If the panels will be mounted horizontally, then the markings must be made perpendicular to them - vertically. The starting line is drawn from the ceiling to the floor, aligned with a plumb line, the next line is drawn in the second corner of the wall being finished. Between them, vertical lines are drawn every half meter.
 If the panels will be mounted horizontally, then the markings must be made perpendicular to them - vertically.
 Sheathing device
For lathing under plastic panels, wooden slats, metal or plastic profiles are used.
On the previously marked lines with a distance of 50-60 centimeters, holes are drilled and dowels are driven in. The slats of the wooden sheathing are primed with an antifungal antiseptic, then fixed to the wall with self-tapping screws. Uneven walls under the slats are filled with wooden wedges.
 The slats of the wooden sheathing are primed with an antifungal antiseptic.
 In rooms with high percentage humidity, install a galvanized metal sheathing. An initial profile is installed in the corners, along the ceiling, and floor. Guides are inserted into it, to which PVC panels are attached. Metal lathing is durable, supporting panels of any weight.
 In rooms with a high percentage of humidity, galvanized metal sheathing is installed.
 The plastic lathing is designed specifically for installing PVC panels. It is mounted similarly to metal. IN plastic construction There are grooves for fixing the panels with clips. Snap fasteners speed up the cladding process and also make it easier to dismantle. The technology of fixing fasteners ensures that there is no necessary click when the panels are installed incorrectly. In this case, the design needs to be redone.
 Snap fasteners speed up the cladding process and also make it easier to dismantle.
 The wiring should not protrude above the frame. It must be attached to the wall with clamps, having previously taken measurements and drilled holes.
Base part of split ceiling plinth installed during installation of the sheathing. The cornice part is attached with self-tapping screws in the same way as the frame elements - with strict horizontal alignment. If the interior of the room involves a canopy of cabinets, mirrors, etc., then at these points you should embed wooden blocks the same thickness as the sheathing.
Calculation of material for frame sheathing:
- Measure the height from floor to ceiling. Count the number of tiers of the frame.
- Multiply the perimeter of the room by the number of tiers of the sheathing.
- Divide the resulting number by the length of one frame profile, round up.
Example
- It is necessary to cover a room of 3.8×5 m, the height of the walls is 2.7 m. The number of lathing tiers is 7.
- The perimeter of the room is 19. Multiply by 7 = 133 m - the length of all sheathing plinths.
- The length of the selected profile for the sheathing is 3 m. 133:3 = 44.33≈50 units of sheathing material.
 The wiring should not protrude above the frame.
 Installation process of plastic panels
Frame installation:
- Install internal panel profiles in the corners of the room. Pre-cut the PVC corner element to its height and attach it to the frame using the chosen method (liquid nails, stapler, etc.).
- The first finishing panel is installed in the corner farthest from the entrance. Place the comb of the lamella under corner profile, push in. Use a level to make sure that it is in a strictly vertical position. Fix the lamella on the wooden sheathing with brackets (on the metal sheathing - with self-tapping screws), installing the fasteners in the area of the free ridge.
- Mount the remaining slats in a similar way, reaching the second corner of the wall.
- Measure the width of the remaining gap. Saw off the extra centimeters of the lamella. Place it under the corner profile, then slide it into the groove of the previous panel. There is no need to fix it.
- Having covered all the walls, install external panel corner profiles, cornices, plinths, caps.
The ridges of the lamellas can be lubricated with silicone before installation - this will ensure their sealed joint.
 The first finishing panel is installed in the corner farthest from the entrance.
 Adhesive installation
If the walls have a clear geometry, then the frame under the PVC panels does not need to be mounted. It is enough to measure the walls with a level and putty the unevenness.
- Clean the surface of the walls from the previous finish.
- Cover with antibacterial primer or putty material. This will protect against mold, mildew, etc. Let dry.
- Prepare glue solution. The composition of the adhesive should not contain plastic-dissolving substances. For adhesive installation plastic panels use non-expanding polyurethane foam sealants or liquid nails.
- Based on the consistency of the glue, choose a tool - a spatula, a brush, a roller.
- Attach the corner panel profile in the corner farthest from the door. Apply the adhesive composition to the back side of the panel in dots, in increments of 25-30 cm.
- Apply glue to the lamella and insert into the corner profile. Use a level to make sure it is vertical. Press the panel for a while to bond the wall with the glue.
- Glue the remaining slats in the same way.
- Glue the fittings - cornices, baseboards, plugs, etc.
- Treat joints with sealant.
 If the walls have a clear geometry, then the frame under the PVC panels does not need to be mounted.
 Calculation of the required number of plastic panels:
- Calculate the perimeter of the room by measuring the length and width of the floor.
- Measure doors and windows and calculate their perimeter.
- Subtract from total area premises the sum of the area of the window and door.
- Divide the remainder by the width of one lamella and round up.
You should add a couple of units of material to your panel cost estimate. A supply will be required in case of inaccurate cutting for sockets.
Example
- It is necessary to cover a room of 3.8×5 m, the perimeter of the room is 19 m.
- Window size 1.3×1.35 meters, area – 1.755 m. Door – 1.9×0.6 m=1.14 m. Area free from cladding 1.755+1.14= 2.895 m.
- 19-2,895=16,105.
- The width of the selected panels is 0.25 m. 16.105:0.25=64.42≈50 panel units.
 You should add a couple of units of material to your panel cost estimate.
 When choosing plastic panels, you need to consider the following:
- Appearance. Pay attention to the smoothness of the surface and uniform coloring. If internal stiffening ribs are visible from the front side of the material, the panel will not last long.
- Thickness. The thicker the “face” of the lamella, the more durable it is. A thin surface is subject not only to deformation, but also to moisture. It creates a favorable climate for the growth of fungi and mold.
- Number of ribs. A large number of hard ribs indicates the strength of the material. On average there are 20 of them in one lamella, and the more, the stronger.
- Quality of ribs. It is worth looking at the end of the purchased panels. The quality of the material can be judged by the evenness, uniformity of thickness and perpendicularity of the ribs.
- Groove connections. The seller must clearly demonstrate that the panels fit together tightly, without gaps.
- Weights. The lighter the PVC panel, the thinner its walls and fewer ribs, which reduces its service life.
- Flexibility. Bend the panel approximately 30. If the consequences are not visible on it (wrinkles, dents), buy without a doubt.
 A large number of hard ribs indicates the strength of the material.
 How to decorate a ceiling with PVC panels
Cladding the ceiling with panel plastic is similar to installation wall panels, however, there are several nuances here:
- In rooms with high humidity (kitchen, bathroom), galvanized metal or plastic sheathing is recommended.
- The slats are cut to create a gap of 4-5 mm to the walls on each side.
- It is not permissible to fasten panels with staples.
- For fastening it is necessary to use glue or self-tapping screws.
 In rooms with high humidity (kitchen, bathroom), galvanized metal or plastic sheathing is recommended.
 Tips from the experts:
- Plastic material is unpacked at temperatures above +10 C.
- It is unacceptable to remove panels from packaging. To avoid scratching or bending the lining, you must completely remove the packaging.
- The panels are installed at temperatures above 0 C.
- Plastic panels must be cut from the front side.
- Metal fasteners must be galvanized, which is especially important in rooms with high humidity.
- When wiping plastic, avoid caustic cleaners or abrasive powders.
- Upon completion of work, the cladding should be wiped with an antistatic agent.
 The panels are installed at temperatures above 0 C.
 Plastic ceiling panels are lighter in weight than wall panels, which simplifies their installation.
Video: Restoration of a wall with PVC panels
10 minutes to read.
Wall panels are one of the most profitable finishing options. With their help, you can quickly and without spending a lot of money bring an aesthetic appearance to even a surface that is not perfectly flat. At the same time, a wide selection of materials, colors, textures and imitations allows you to choose an option both for an office or public space, and for a residential building or apartment.
Advantages and disadvantages of wall paneling
Before you start choosing finishing materials, you need to find out all the pros and cons of specific options. In the case of wall panels the benefits will be:
- wide selection of panels in the budget segment;
- durability and strength of most options;
- ease of installation and replacement of damaged fragments with new ones;
- ease of care without the use of special products;
- heat and sound insulation properties (especially in combination with additional insulating materials);
- Possibility of installation without preliminary leveling of the surface;
- the ability to hide various wires, pipes, etc. behind panels.
Of the disadvantages of panels for wall decoration, repair specialists note only one - their ability to reduce the footage of the room by several centimeters. The fact is that in addition to the thickness of the material itself, it is necessary to take into account the depth for its fastening, especially in cases where the walls initially have significant unevenness. For a balcony or loggia, corridor or storage room, this nuance can become decisive factor when choosing a finish.
Types of panels for interior decoration
One of the main advantages of wall panels is big choice models made of different materials and with different appearance. This makes it possible to use inexpensive option finishing even for modern design projects. Let's take a closer look at what types of wall panels exist, what their features are, and in what cases it is best to use them.
Some types of panels are made to imitate various natural materials: stone or brickwork, wood. These types include PVC, MDF, gypsum boards.
PVC panels

Plastic panels are perhaps the most popular option for quick and inexpensive finishing. They are used for non-residential and residential premises. Of course, such material will not be suitable for a bedroom or kitchen, but for a hallway or bathroom it is just right.

Advantages of plastic panels:
- durability;
- moisture resistance;
- ease of installation;
- environmental friendliness;
- Not high price.
Such panels can imitate any surface - stone, brick, wood. Color palette Most manufacturers also have a wide range.

One of the disadvantages is that over time the paint of such material can fade. This is especially true for panels that are constantly under direct sun rays– on the balcony or loggia, veranda.
It is worth clarifying that there are several types of plastic panels: lining, panels themselves, sheets. Each of them is used in accordance with the characteristics of the room.
 PVC lining 10x100x3000
Current prices for your city:
MDF panels

MDF is a board made of wood pressed under high temperatures. wood shavings. A special manufacturing technology helps eliminate some toxic substances such as phenol and epoxy resin. This means that MDF panels can be used even in residential premises.
 Decorating the hallway with MDF panels
Lamination adds aesthetic appeal to such panels. Most often, the film pattern imitates the structure natural wood or stone, but some manufacturers also have more original color options.
 Wood-effect MDF wall panels
Advantages of MDF panels:
- strength and durability;
- moisture resistance;
- ease of care;
- relatively low cost;
- ease of installation.
Read also: We cover the balcony with a block house inside
Another option for the external design of such panels is veneering with valuable wood species. In this case, the price of the material will be higher, but the quality of the finish will be better.

Gypsum vinyl panels

A new trend in renovation is the use of gypsum vinyl panels. They represent plasterboard sheets with a decorative film coating on the front side.
This material allows you to significantly reduce the time for finishing walls with plasterboard - finishing layer already applied to the panel. The designer only needs to choose the appropriate color and surface texture.

The advantages of this type of finishing are the same as those of conventional gypsum boards with various additional properties (fire-resistant, moisture-resistant, etc.). Added to this is simplified maintenance and the aesthetic appeal of the material.

Gypsum panels
3D gypsum panels are a good option for decorative finishing residential premises. The material is completely environmentally friendly and non-flammable.
 Gypsum 3D panels
There are two options for this finishing material:
- Made from gypsum diluted with water - used exclusively for cladding walls in dry rooms;
- Made of gypsum with the addition of water-repellent particles - for rooms with high humidity.
The second option is more suitable for kitchens, bathrooms, balconies and loggias. Such panels are more expensive, but they are decorative properties high. Plaster panels can be made with both abstract reliefs and imitation of natural materials.

Gypsum requires finishing - paint and varnish.

Bamboo panels

Among wood panels It is worth highlighting bamboo separately. This is a more expensive finishing option with an original appearance and unique properties.

Pros of bamboo wall panels:
- a light weight;
- 100% environmentally friendly;
- adaptability to different air humidity;
- resistance to temperature changes.
This material is ideal for decorating residential premises in ethnic styles and for lovers of environmentally friendly, natural materials.

Cork panels

Another natural material, suitable for wall decoration - cork. The final result of the finishing will not only be aesthetically attractive, but will also delight the owners of the apartment or office with the following characteristics:
- heat and sound insulation;
- durability and strength;
- resistance to fungi and mold.

This material does not attract dust and hair, which means it is very easy to care for. The porous structure of cork panels creates the correct microclimate in the room - a big plus over artificial finishing.

Decorative panels
Panels made from non-standard materials are often used as a decorative addition to wall decoration. These include glass and mirror varieties.
Glass panels are most often used in kitchens and bathrooms. An apron or wall adjacent to the shower, made of glass, looks as impressive as possible, while being resistant to moisture. The surface is easy to care for.

But the fragility of the material creates some restrictions for the use of the finished wall - you cannot knock on it, you cannot lean heavy objects against it, etc. In an apartment with small children and large pets, it is worth taking care of safety.
There is a technology for photo printing on glass - in this case, the panel acquires the necessary pattern. It could be an abstract motif, a natural landscape, or even a photograph. The material remains translucent.

Mirror panels are used as accent pieces on the walls. Fully mirror surface suitable only for specific premises (for example, a dance hall).

Methods of fastening wall panels
Exist different ways fastening panels to walls. Some of them are suitable for almost all varieties. Namely:

When choosing the lathing material, there are also some nuances. For damp and cold rooms, a metal profile is more suitable, since it is not influenced by these factors. The only caveat is the appearance of corrosion in those places where moisture comes into contact with the sheathing. Paintwork will solve the problem.
How to independently attach plastic panels to the wall when decorating an interior, what you need to know for this, what tools to use and what is the sequence of work - all this is not difficult to learn today. The modern generation of plastic panels, from traditional lining, 6-10 cm wide, to solid panels 25-30 cm wide, are increasingly used not only in conventional, standard solutions for covering walls “from ceiling to floor”, but also in options that claim to to be called truly interesting interior solutions that you can implement yourself.
Features of interior solutions for the use of plastic panels
Today, plastic is experiencing a new era of development. Thanks to more advanced production technologies, manufacturers have moved away from the use of many harmful components. The current generation of this material is more environmentally friendly and safe. In addition to this, new aesthetic solutions have appeared in the design of panels - monochrome, with an unnatural bright colors, strips of plastic have given way to new, more interesting models. Today, in accordance with the demands of fashion, panels with imitation of valuable wood species, having a rough texture similar to natural wood, connecting to each other without traces of joining, are becoming increasingly popular.
Following such a rapid increase in the quality of plastic products, new solutions immediately began to appear, making it possible to use plastic panels in interior design - from traditional office premises to individual corners of modern houses.
Popular today is the use of combined combinations of plastic and other textures, for example, decorative plaster, in cladding balconies and loggias, creating panels from various textures and colors.
Design features of panels
At the same time, self-creation such original solutions interior design is not something special today, because working with plastic does not require special skills or expensive tools, and the panels themselves, like most modern building materials for finishing, are attached very simply.
One of the factors influencing the choice of this particular material is design features panels that allow you to create smooth, seamless surfaces. Various projections, niches and cornices are not an obstacle. Indeed, unlike wooden panels, in addition to the main type of flat panels or strips of plastic with locking connections on the sides, there are also other shaped elements that make it possible to simply and reliably enclose edges, internal and external corners, and create reliable protection for the cut end.
An additional convenience is the ease of installation and installation of all necessary communications. Sockets, switches, and ventilation outlets are easily installed in the coating and do not require additional costs for moving to another location.
The main types of panels are mounted in both vertical and horizontal positions. And due to their light weight, they do not require a large amount of fastening materials. Therefore the process self-mounting plastic panels to the wall is extremely simple.
Preparatory work. What to pay attention to
Getting started practical implementation project, that is, when installing PVC panels with your own hands, you should first carry out a series preparatory work:
- clear workplace– fitting plastic panels requires a lot of free space;
- It is strongly recommended to clean the walls planned for covering from dust, old coatings, such as wallpaper, and treat them with a primer deep penetration with mandatory antifungal effect;
- a long rule or building level check the correctness of the wall plane and determine the greatest irregularities - depressions, bulges, distortions;
Important! Before starting the sheathing, you need to bring the plastic panels into the room so that they adapt to the temperature and humidity.
The preparatory stage is really important because it allows you to prepare the surface for further work and avoid mistakes that will be visible almost immediately. A special feature of modern plastic panels is their ability to show even small irregularities - the glossy surface will immediately demonstrate where a mistake was made.
Fastening technology
For self-assembly of plastic panels to the wall, two main methods are used today. The first, most common, is using prepared mounting rails. This is the most common fastening method today, although there are variations of this method, for example, installing panels first on a frame base, and then attaching them to the wall. But basically this is the traditional installation of guide rails to the load-bearing surface, and only then the plastic itself.
The second, less common option is to use assembly adhesive as a means of installing PVC panels. This is a somewhat unconventional approach, since it requires a well-prepared wall surface, selection of the appropriate adhesive composition, and careful preparation of the glued surface of the plastic itself. However, this saves space, since there are no slats and the risk of insects colonizing the cavities is minimized. However, this is a very labor-intensive and costly installation method, both in terms of time and cost.
Attention! Plastic panels can only be attached with glue to pre-leveled walls.

Fastening the sheathing
Sequence of work on self-installation plastic lining, taking into account the conditions of each specific room, can be arranged in the following algorithm of actions:
- preparatory stage - removing unnecessary things and furniture, cleaning the surface of the walls from wallpaper and priming them;
- marking walls for sheathing, taking into account the passage of communications and the features of the interior solution for laying panels;
- installation of sheathing;
- installation of the starting ceiling profile, plinth, first corner profile;
- installation of panel strips;
- installation of external elements engineering communications– switches, sockets, air ducts, heating pipes, water pipes, gas pipes;

The most important point, in addition to installing the panel strips, is fastening the sheathing, which acts as a frame for the plastic. Sheathing strips can be wooden or plastic. Traditionally, wooden slats are used, as they help support the structure and give rigidity to the panels. Wood allows you to eliminate unevenness in the wall and thereby ensure a smooth surface of the plastic. Of the minuses wooden planks as a frame is that such planks are prone to rotting, and the space between the wall and the plastic increases by up to 2 cm.
Plastic guides make it possible to reduce the gap between the wall and the panel to a minimum; they do not rot, but require a perfectly flat wall surface and the use of special panel holder brackets - clamps - as fasteners.
When choosing a way to independently attach plastic panels to the wall, you need to take into account one more feature of plastic - it reacts to temperature and expands when it rises, so for reliable fixation you need to take into account the lathing pitch - 30-50 cm. This step is enough to hold panels.
The sheathing slats are arranged perpendicular to the direction of the panel strips, the lower rail is mounted at a height of 5-10 cm from the floor, the upper one at the same distance from the ceiling, in the case of installing panels at the full height of the wall.

To install the slats you will need:
- hammer drill with a set of drills;
- screwdriver with a set of bits;
- wood saw;
- jigsaw;
- assembly saw;
- drill with a set of drills;
- screwdrivers;
- hammer;
The slats are attached using quick installation nails in through holes, it is preferable to use quick installation systems with 80 mm long dowels for wooden slats and 60 mm for a plastic tire. Nails are installed at least every 80 cm.
For a plastic guide, the fastening points correspond to the technological holes.
Installation of plastic panels
Installation begins with the installation of the lower guide profile (plinth) and the upper ceiling starting profile from shaped elements. It is preferable that the profile be selected along the length of the entire room. The first bar, adjusted in height (it needs to be made slightly smaller by 5-7 mm), is attached to the corner profile. Installation is carried out vertically in level (or at an angle if the design solution requires an angle of inclination). The first strip is secured with staples, small nails or clamps.
The second and subsequent strips are attached after the locking connection is tightly fitted. It is allowed to use a wooden block and a mallet for a tighter fixation - the block is placed at the end of the plastic panel and the panel is put in place with light blows of the mallet.

To work with plastic you will need:
- tape measure, ruler, corner, marker, and possibly a protractor;
- level or plumb line;
- glue gun and assembly adhesive(for gluing ceiling plinth);
- hammer;
- assembly saw with a disk for finishing cuts (a disk with small or very small teeth);
- miter box, at least with angles of 45 and 90 degrees.
A special feature of this stage is the need to correctly adjust the panel to size, and it is recommended to make the cut with a jigsaw or mounting saw. The cut should be smooth, at an angle of 90 degrees. It is preferable to use a saw with small teeth, which results in a more accurate cut. Before installation in the guides, you need to thoroughly clean the sections from sawdust and sintered plastic, and also smooth out any unevenness.
In rooms where air temperature fluctuations are small and the plastic will not be subject to frequent expansion and contraction, it is recommended to fasten the plastic panels to the sheathing using a construction stapler.
Gradually covering the entire surface of the wall with panels, the outer panel is cut according to size, taking into account the size of the corner profile. The dressed corner profile with the outermost strip of plastic is secured with clamps on the adjacent wall. Thus, all panels in the room are installed.
The edge panel, cut to size, is mounted in the groove of the lock, first at the bottom, in the wall panel, and then gradually, using a plaster spatula 90-100 mm wide, carefully bending the edges of the plinth and corner, inserted further, going up.
The bent edges of the corner panel and ceiling profile will fall into place over time, without visible signs of deformation.
In fact, attaching plastic panels to the wall yourself is much easier than it seems. Follow the recommendations described above and you will succeed. Good luck!
Plastic panels are an excellent material that is widely used to give surfaces various decor. Conveniently, this product can be used in almost any room. There is an opportunity to create a truly unique interior. And decorating walls with plastic panels is a fairly simple undertaking that does not require construction experience. Although you still need to know how to do everything most correctly.
Plastic panels (lining) have another name - PVC. This is an abbreviated name for the main ingredient of the material - polyvinyl chloride. The production is quite simple and involves passing the molten substance through special molds. This creates a strip that is cooled and cut into right size. It turns out great finishing material, withstanding almost any temperature (within residential premises).

Wall panels vary in size:
- There are two types of thickness - five and ten (eight) millimeters. The second indicator is combined into one; there are identical additional elements.
- The width varies, ranging from twenty to thirty-seven centimeters.
- There are three main sizes in terms of height – 2.6 m; 2.7 m; 3m.
Of course, there are many more sizes. Thus, the width of the plastic lining reaches 120 cm. You can also make any desired non-standard to order.
Advantages and disadvantages
It is impossible to imagine the finishing and construction material, which would not have its pros and cons.

Wall panels have the following advantages:
- The service life is practically unlimited.
- Excellent moisture resistance. When connected correctly, the seams create a complete seal.
- The material protects the room from extraneous noise.
- Reliability and good resistance to abrasion.
- The cellular structure provides additional thermal insulation. When covering walls with your own hands using lathing, it appears extra bed for the insulating layer.
- Modern technologies make it possible to create various types of decor. More recently, the choice was quite limited, if not primitive.
- Easy to install. No complex tools required.
- Low price compared to other products.
- Environmental friendliness.
Flaws:
- Inability to withstand constant temperature changes. This does not apply to seasonal phenomena.
- When a fire occurs, plastic elements release corrosive substances.
- Incorrect installation - brings many positive traits to zero.
 Like any other plastic, PVC panels are “afraid” of high temperatures, and when ignited they release harmful substances
 On a note! Currently, there are panels that are distinguished by their ability to withstand high temperatures. But they must have special markings.
Material selection
Naturally, you want to quickly cover the walls with plastic panels, but you need to select them first. And this should be approached with the utmost care. After all, the final result depends on the correct choice. The following rules are taken into account:
- For bathrooms and shower rooms, as well as for all types of wet rooms, panels that are moisture resistant and have no relief are suitable.
- For corridors and balconies (loggias), it is better to choose products that are resistant to mechanical damage.
- Wall finishing with wall panels in living rooms is carried out PVC coatings, which have different relief and patterns. They also imitate natural materials.

When purchasing, you need to pay attention to the following indicators:
- Appearance of the packaging. It must be intact, without damage. It is important to choose material from the same batch.
- Number of cells. The bigger, the better. You can also navigate by weight. Light products are a sign of deficiency.
- Lock. To do this, check the two selected panels for connection - it must be reliable.
- Price. Products that are too cheap are most likely a fake.
Additionally, we suggest watching a video that explains how to select and attach wall panels.
Calculations
Covering walls with PVC panels requires preliminary calculations. They concern all stages of work. This helps to avoid problems in the future, as well as significantly save money and time.
Frame:
- The location of the profiles is taken into account. It can be vertical or horizontal. This depends on the installation of plastic panels. In any case, they are always perpendicular to the sheathing posts.
- The distance between them is also taken into account, which is 30 - 45 cm. From everything, the required number of frame parts is calculated (+ two profiles at the edges of the wall).
Fasteners:
- The number of dowel nails is taken into account in increments of 35-50 cm.
- There are 20-25 clasps per square meter.
Panels:
- The size of the wall and the selected panel is measured. One indicator is divided by the other, and the required amount is obtained.
- The material in the form of tiles is calculated based on square meters.
This group includes all other parts and moldings. For calculations, measure the entire perimeter of the room. The number of external and internal corners is taken into account.

On a note! All calculations are made with a margin of 10%. Such a reserve is due to the fact that various damage to products or other unforeseen circumstances are possible. Door and window openings are also taken into account.
Frame methods of wall finishing
Do-it-yourself wall cladding with plastic panels can be done in various ways. But, before choosing the most suitable one, you should prepare necessary tool and purchase material.
To work you will need:
- Hammer and set of drills.
- Drill and drill bits.
- Screwdriver or set of screwdrivers.
- Caulk gun.
- Level and construction knife.
- Hardware and other consumables.
- Stapler.
- Hammer.
- Necessary material and additional elements.
Preparation
After calculations, it is necessary to prepare the surface for cladding with plastic panels. This is done based on the chosen method.

- Whatever options are made necessary calculations and all sizes are taken.
- The racks for the frame are marked and cut - they are numbered in order.
- Everything unnecessary is removed from the walls. If there is damage in the form of cracks, they are puttied.
- The surface is coated with an antiseptic. It is better to use two in one - a primer with the addition of substances against fungus and mold.
- If it is assumed that the surface will be covered with PVC, then it must first be leveled.
- Usage wooden elements must begin with their impregnation. This is done with antifungal compounds.

On a note! The primer is applied in two layers. The first strengthens the surface, the second fixes the result. Wait for them to dry completely, this takes at least 6-12 hours.
Lathing and its installation
The frame is made when there are large surface imperfections, and too much effort will have to be made to correct them. Finishing with PVC panels on the sheathing helps to hide all the unevenness of the walls. This method has two more noticeable advantages: it is possible to install additional insulation elements and hide communications. To achieve the desired result, use different materials, which do not differ much in the mounting method.
Creating a wooden frame

- For this purpose, wooden blocks are used, which have a cross-section of 40*40 (40*30) mm. Fastening is done using dowels to concrete bases and self-tapping screws to wooden bases.
- When paneling a room is done vertically, installation begins from the edges. Namely, they screw in the two initial guides. Next, calculate the same distance and install the remaining racks.
- Cross members are attached between them.
- If it is necessary to achieve greater rigidity, then additional vertical slats are installed.
- It must be taken into account that each part is checked for level. If it is necessary to level, then use linings from the remains of the timber. They are pre-attached to the wall.
- For greater effect, the joints of the posts and crossbars are coated with silicone sealant.
Advice! Wooden cladding material is best used for dry rooms with a moderate internal climate.
Lathing made of metal profiles

This option literally repeats the installation of gypsum board slabs. After such work, a lot of scraps remain, which, if desired, can be used for cladding. PVC walls panels.
This method is not used as often as others. The fact is that the cost of such a frame is very high.
- First, secure the upper and lower guides. This is done respectively to the floor and ceiling. They are first aligned with each other.
- Now comes the turn of the vertical guides. They are aligned with each other and fixed to the wall. This happens due to U-shaped brackets.
- Horizontal crossbars are attached at equal intervals. In general, this is not necessary; the metal profile already creates sufficient rigidity.
When you have to go around doorways, then vertical racks pre-strengthened with wooden beams.
Use of plastic profiles
 Plastic profiles for installing PVC lining
 Finishing with plastic panels using this method is one of the most modern. It is in many ways superior to all the types described above, but its popularity is not yet so high. This is explained by both cost and increased requirements for the surface. But plastic sheathing not afraid of moisture and mold.
- Installation of such a structure on the wall occurs in a very short time. This is done using dowels. Often such guides are already drilled, which makes the process much easier.
- They are attached in small increments of thirty centimeters. This is done in order to give the greatest rigidity.
- In principle, when working with such elements, nothing more is required. But it is very important to maintain thorough perpendicularity. This is the only way to ensure correct cladding PVC panels.
 1 – fastening plastic profiles to the wall; 2 – installation of a corner element; 3 – installation of plastic panels, fastening to profiles using clamps; 4 - installation of the upper plinth.
 On a note! Plastic profiles are excellent for interior walls of bath complexes.
Installation of plastic panels
When the frame is finally ready and checked for level, the main process begins. It gives a complete understanding of how to cover walls with plastic panels.

Wall cladding with panels when used plastic profile happens much faster. It already has grooves into which the clamps are attached. They securely fix each element. They also make it possible to disassemble the entire structure without damage.
Glue mounting
If the walls are fairly smooth, then work can be carried out without using a frame. Liquid nails are used as fasteners.
When choosing an adhesive, you need to pay attention to its composition. It must not contain solvent. Otherwise, the lining will simply collapse.
Preparation
When decorating walls with PVC panels with your own hands is done using the adhesive option, then the preparation of the walls is approached most carefully. It will not be enough to simply remove excess - you need to completely clean the surface. And in some cases, create a new layer of putty. And be sure to apply an antibacterial primer.

On a note! Currently, there are types of putty that include antifungal substances.
Pasting
The whole process must happen quickly enough, and all movements must be verified. The fact is that it will be almost impossible to correct the shortcomings. That is why this method requires some skills.

So:
- The primer layer should dry well. After all, finishing with plastic cannot be carried out according to wet wall. Nothing will stick.
- The glue is prepared according to the instructions. When canned formulations are used, they are thoroughly mixed beforehand.
- For work, use a special gun, roller or brush. Application area adhesive composition should not exceed two structural elements.
- The corner element is installed first. The lining is inserted behind it and pressed against the wall. This needs to be done without extra effort, and even more so without precise pressure. It is very easy to damage the cellular structure of the material.
- So, sequentially, they cover the entire area with plastic with their own hands. At the end, the finishing moldings are secured.
- Now comes the turn of decorative elements.
Finishing with wall panels can also take place on duct tape. This method It's not sealed yet, so you shouldn't trust it. And the point is precisely in the tape used. Its quality does not always meet the required parameters.
Of course, each master can offer his own variations, which certainly deserve respect. But, when real experience is insignificant or completely absent, then it is better to go along the proven path, even if it takes a little longer. After the first success, it will become extremely clear: how to cover the walls with plastic.
Finishing the bathroom with plastic panels is not best method solutions to the problem, but due to its low cost and simplicity it is often used.
Today, there are panels for bathrooms that imitate, with various patterns, etc. The cost of these materials is almost the same as tiles, and the savings are achieved due to the low cost of installation.
Plastic panels can be mounted in various ways; the specific choice depends on the wishes and capabilities of the customer. In this article we will give step-by-step instructions for all options for finishing walls and ceilings.
Before starting work, you need to purchase materials, and this is where inexperienced builders make mistakes.
We do not touch on design issues; this is the topic of the following articles. Let's talk only about construction aspects.
- Check mechanical strength. The stronger the panels, the more durable and better quality cladding. Check them before buying, squeeze them with your fingers at the end. You'll be surprised how different the materials are, regardless of price. There are cheap and durable PVC panels, and vice versa, expensive, but similar in strength to cotton wool. The quality of the panels depends on the raw materials used, equipment and production technology. Never buy soft panels; if damaged, it is almost impossible to replace them.
- Check the patterns to match. They sin very often domestic producers. Complex multi-color patterns on panels require maximum responsibility from manufacturers. Applying patterns is not a simple process; quality control must be carried out at all stages of production. Installation of low-quality panels leads to individual elements on the slats do not match. If this happens with ceramic tiles, then by slightly adjusting the gaps the situation can be corrected; this cannot be done with panels. We understand that it is difficult to check in a store. Warn the seller that such a check will be done by you at home, be sure to take a receipt. At home, lay the panels out on a flat surface and carefully inspect all the joints, pay attention to how the lines of the pattern or design move from one panel to another.
- Pay attention to the joints; there should be no gaps. Unfortunately, some manufacturers manage not only to leave gaps, but also to make them uneven in width. The reason is low-quality raw materials, old machines and the human factor. The marriage becomes even more noticeable if the bathroom has a modern spot lighting, the cracks cast a shadow, the appearance of the walls and ceilings will upset even very undemanding clients.
- The thickness of the panels over the entire area must be absolutely the same. Connect the two lamellas and see if the joints lie in the same plane. If there is a slight difference in height, then this is a defect. When the room is illuminated, shadows of varying widths are formed in these places, appearance the walls will be irrevocably damaged.
- Check the material for ductility. If the panels are made of recycled PVC, it will crack during fixation. This is a significant defect; the strength of the fastening is significantly reduced. Recycled PVC is obtained after processing products from primary PVC. The cost of raw materials is much cheaper, which tempts unscrupulous manufacturers.
High-quality panels do not crack when bent
Use the information when purchasing materials, do not create additional problems. Remember that high cost does not always guarantee the same quality.
Equipment and additional elements
We will discuss how to calculate the number of panels and additional elements below, but now we will tell you what is included in the package for finishing walls with PVC panels. Select the appearance and specific dimensions taking into account the parameters of the panels.
| Name | Brief description and purpose |
|---|---|
| It looks like a plate bent at an angle of 90°. Used for finishing internal and external corners of the room. | |
| Complex profile, part is installed under the panels, the outer side hides uneven cuts or surfaces. | |
| Consists of a corner, the inner part is wider than the outer. Hides unevenness of the outer corner. | |
| Differs from the external one in the width of the sides. The wide one is installed under the slats, the outer narrow one hides the unevenness of the inner corner. | |
| Allows you to connect lamellas without a lock, used if the length of the lamellas is insufficient for finishing the surface | |
| Installed first and last, sometimes can be used instead of a universal or special corner. | |
| Installed at junctions, can be used as a platband. | |
| The supporting element of the frame can be plastic or made of metal profiles. | |
| Made of metal, it presses the panel to the mounting plate. Allows you to dismantle panels without losing factory quality. |
pvc panels for bathroom
The panels are fixed with self-tapping screws with a press washer, staples using a stapler, clamps or liquid nails. The choice of method depends on the materials used to manufacture the supporting frame and the quality of the walls and ceilings.
How to process the material
One of the advantages of PVC panels is manufacturability. You can cut the material in one of three ways simple ways in two directions.
Method 1. With a mounting knife. Use only new inserts, the tip should be as sharp as possible.
| Cutting direction | Execution method |
|---|---|
| Along the panels | Place the panel on a flat place and mark the cut location. When cutting, you need to use a long, level blade. Press it firmly against the surface of the panel and use the end of a knife to cut the lamella on one side along the entire length. Then turn the panel over and bend the cut area. Cut the remaining plane in a bent position. |
| Across the panels | More difficult case, requires certain skills. Mark the location of the cut. Using the tip of a knife, carefully cut the jumpers between the planes one by one. After the entire width has been passed under the ruler, make a continuous cut of one plane. Bend the cut part and cut the second plane from the opposite side. |
Method 2. Bulgarian. You need to work with a disk for cutting metals. The disc thickness is minimal. Cutting is very easy and quick; the only requirement is that you have minimal experience working with an angle grinder. Be sure to follow all safety rules; injuries from an angle grinder are very dangerous. The burrs on the opposite side of the cut break off easily after cooling.
Method 3. Hacksaw for metal. Undesirable option, work is difficult and long. But in extreme cases you can use it.
With a jigsaw you can make any cut on a plastic panel
The quality of the cut depends on practical skills. But don’t be upset if the cut edge is not very smooth; additional elements allow you to hide problems up to one centimeter in width. The cut can rarely be worse, the panel will be suitable for installation.
How to cut several PVC panels at once
How to calculate the number of panels and additional elements
The bathroom has small area and many different transitions and angles. Exactly because of this reason professional builders they don’t really want to finish these rooms; it takes a lot of time to take measurements, install sheathing and adjust panels, and the output is limited in square meters. Builders are paid by the square footage, not by the time, so they choose large premises.
The more corners and transitions, the more unproductive waste there will be. Their number increases if panels with decorative patterns or asymmetrical patterns are selected. Such material does not allow the use of segments in other places. For ordinary panels, the quantity should be increased by 10% of the area of the surfaces to be finished. In bathrooms, the supply should increase to 15%. Moreover, if there is complex drawings, then the panels will have to be counted piece by piece, taking into account the location of the pattern.
Measure the total length of the internal and external corners, the length of the baseboards on the floor and ceiling. Decide how much starting profile you will need, whether you need connection profile, what elements will you use to decorate the corners (simple or complex). If you have the skills to work with PVC panels, you can use simple corners, if not, buy complex ones. They allow you to hide errors during cutting or taking measurements. Take your time, think through everything carefully, and always buy with a reserve. It’s very annoying to go to the store again for a meter or two corner, and time is wasted. Additional elements cost pennies, so don’t skimp on them.
When counting the number of slats or mounting strips, keep in mind that the distance between them should not exceed 50 cm. In addition, they must be mounted at the junction of the floor and the flow as close as possible to all corners, window and door openings. The slats in these places are installed regardless of location last row. Measurements and calculations can take several hours, use them wisely. It will never be possible to accurately count the number of clamps or screws. Buy them in packs; the seller will tell you the approximate number of pieces, taking into account the width of the PVC panels.
General requirements for surfaces
One of the advantages of the technology of finishing walls with plastic lining is low requirements for surfaces. There is no need to specially plaster or level the walls with putty, they are only sealed large cracks. The height of the unevenness can be up to 1–1.5 centimeters; anything larger needs to be cut down.
The climatic parameters between the wall and the cladding are the most favorable for the growth of fungi and other microorganisms; it is then impossible to destroy them. You will have to remove the casing, do disinfection and vapor protection. Only after such events can you begin to install plastic panels. No matter how carefully you remove the skin, you cannot do without damaging the materials. If you manage to buy the missing ones with the same characteristics, great. If not, you will have to buy new materials for the entire scope of work.
Installation of panels on walls on wooden lathing
We will give step-by-step instructions for the vertical arrangement of the panels. In the future, we will talk about the technological differences between vertical and horizontal placement.
Step 1. Calculate the surface area of the walls minus window and door openings.
Make a reserve taking into account the above notes. We will fix the slats with a stapler and staples; this is the fastest and fairly reliable option. Self-tapping screws take a long time, self-tapping clamps take even longer, and liquid glue will not allow you to replace a damaged panel if necessary. The lathing is fixed to the wall with dowels. If you have special plastic mounting strips, then the lamellas are attached to them only with clamps; they are inserted into special grooves. The advantages of clamps are that the fixation area increases and the lower mounting plate of the panel is not damaged. Due to this, the strength of the fastening increases; it is recommended to use clamps when covering the ceiling with spot lighting. They allow you to withstand the increased weight of the structure.
Step 2. Clean the wall from large uneven areas and seal any cracks.
To check the surface, use a large, flat rod, apply it in different places and check the clearance. At the same time, check the horizontal position; if the deviation is more than a centimeter, you will have to plaster. If the spread is smaller, then the position of the slats is adjusted by various pads.
Step 3. Saturate the surface with an antiseptic, make steam and waterproofing. You can use aluminum foil or plastic wrap. It is possible to impregnate walls with liquid insulators, just make sure that they are for indoor use. Wood slats also need to be treated with solutions.
Step 4. To speed up the work, mark the position of the slats and use a rope with blue to beat off horizontal lines at the required distance.
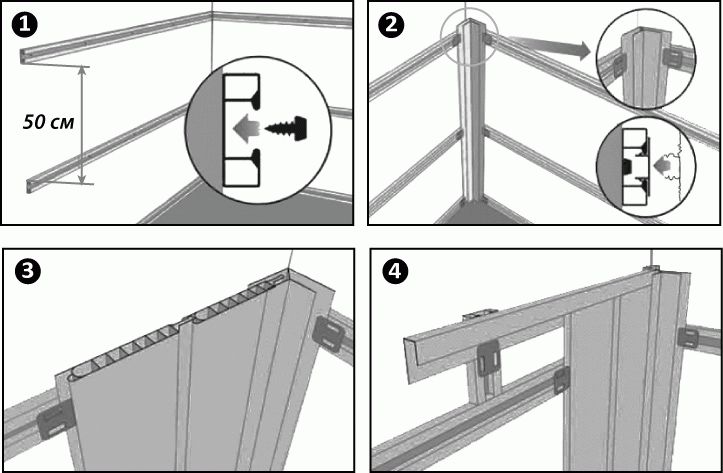
Step 5. Fix the first rail at a distance of no more than 10 cm from the ceiling. Check its position carefully with a level. Use wedges if necessary. The rail is secured with dowels. First make a hole on one side and secure the dowel, and then on the other. Next, dowels are installed along the entire length, the distance between them is approximately 20–30 cm. Secure the rail near the floor in the same way.
Step 6. Stretch ropes between them, two at the ends and one in the middle. The ropes serve as beacons; you use them to install all the other slats. Be sure to frame around window and door openings. Check the position of all slats again and make sure that the sheathing around the openings is installed correctly. If the slats are not in the same plane, this will have a negative impact on the panels; the backlight will reveal their incorrect position. To correct the defect, you will have to dismantle the slats and repeat the installation from the beginning.
Step 7 Secure the corner in the corner, start covering from the far corner of the room. Fix the corner with a stapler, staple length 6 mm. During fixation, carefully control its verticality along two edges. Not only the quality of work, but also the speed of installation depends on the correct position of the corner. If the angle is not 90°, then you will have to adjust the size of each panel, which will take a very long time.
Step 8 Measure the width and height of the wall in several places. The parameters must be the same. If the spread is less than a centimeter, then all workpieces can be cut to the same size. Count the number of panels, measure the required length and cut off the excess. This will be a template; use it to make marks on the remaining slats.
Step 9. Insert one edge of the lamella into the corner and secure it to the sheathing on the back side. Don't forget to check the position. The first panel is installed - continue installation in the same way to the opposite corner of the room.
Step 10 The last panel needs to be cut to width depending on the remaining space. Make it about 1 cm narrower, this will make installation easier. First install the last lamella in the corner, and then move it towards the penultimate one until the lock snaps into place.
Use the same algorithm to finish all wall surfaces. A little more work around the openings; in these places you need to measure and cut each element separately.
Installation of a metal frame
Advantage metal frame from profiles - it allows you to accurately align the position of the slats, regardless of the unevenness of the wall. How is it attached?
Step 1. On the wall, draw lines for the placement of U-shaped hangers. The algorithm of work is the same as for wooden slats.
Step 3. Cut the U-shaped supporting profiles to length and count their number.
Step 4. Start installing the supporting profiles. The vertical position is adjusted using holes in the hangers or by slightly extending the profiles. If they do not allow you to accurately install the sheathing, then straighten the hangers. Such actions do not worsen the load-bearing performance of the elements. The loads from the lamellas act perpendicular to the bending. The elements are fixed together with self-tapping screws.
Important. If significant errors were made during the installation of the sheathing, they can only be corrected after dismantling the PVC panels. It is not only expensive, but also time consuming. Do not forget to constantly monitor the position of the load-bearing elements. Remember that the most accurate instrument for measuring vertical position is an ordinary plumb line. You can buy it or make it yourself. The level can distort readings by up to 2 mm per meter. And if it fell from a great height, then it is impossible to install a sheathing on it.
What is the difference between vertical and horizontal laying
The only difference is that for horizontal laying of panels, the frame must be vertical and vice versa. For bathrooms horizontal laying panels is strictly not recommended. Water easily gets into the locks and then penetrates into the space between the panels and the wall. If there is a lot of it there and it is constantly there, then no amount of steam or moisture protection will help. The appearance of mold and mildew cannot be avoided. To destroy them, you will have to completely dismantle the wall covering, carry out a set of special preventive and construction measures, and re-cover the walls. Such work costs approximately twice as much as correct cladding walls
Practical advice. Don’t invent a bicycle, don’t create problems for yourself with your own money. In bathrooms, install PVC panels only in a vertical position.
Installation of panels on a rough ceiling
For example, let's take panels that imitate a slatted ceiling. The rough ceiling does not require any preparatory work.
Step 1. Saturate the rough ceiling antiseptics, give them time to absorb and dry. It is advisable to make a vapor barrier with aluminum foil or plastic film. Fix the material with a stapler, and carefully seal the joints with tape.
Tape the joints with tape
Step 2. Measure the distance between opposite walls room and cut the baseboard, making a 45° connection in the corners.
Practical advice. Do not attach the baseboard to the wall with self-tapping screws. Under the weight of the panels, it will sag a little, and gaps will form between it and the wall finishing. In addition, this method of fixation requires perfectly flat planes. Self-tapping screws press the baseboard against the depressions, it bends, and the appearance deteriorates significantly.
Attach the elements to the wall using liquid glue, remove excess material immediately. Fix only three skirting boards, the fourth is installed after laying the panels. To guarantee, you can additionally fix the back part of the element to the ceiling with a stapler. Wait 2-3 hours for the glue to dry completely.
Step 3. Ceiling panels should be several millimeters thinner than wall panels. Keep in mind that the panel can extend two centimeters into each baseboard. Measure the length of the ceiling from edge to edge of the plinth and add 1.5 cm to this value, the remaining 0.5 cm is left to facilitate installation. It is better to measure and cut each panel separately, this minimizes the likelihood of error.
Step 4. Double-check the dimensions and geometry of the ceiling. If there are minor deviations, they will have to be gradually eliminated by changing the width of the gaps between the lamellas. The magnitude of the changes should not exceed two millimeters, otherwise the adjustment will become noticeable. If allowed architectural features ceiling, then align the panels in invisible places. Open areas will already have smooth joints.
Step 5. Insert the end of the panel into one plinth, bend it slightly and insert the other end into the opposite one. Align the panel and tuck the long edge into the third baseboard.
Practical advice. What to do if the ceiling plane resembles a rhombus? Such cases happen among hack builders, but this can be corrected. Install ceiling panels diagonally. There is nothing complicated, you just need to cut the end of each panel at an angle. We will tell you how this is done below. Negative consequences crooked ceiling - the amount of panel waste increases significantly.
Step 6. Press the panels tightly against each other and secure them with a stapler. The closer the locks come together, the stronger the connection. If the ceiling is not very level, then when attaching the panel at the end, a gap may appear between it and the baseboard. To prevent this from happening, push plastic scraps into these places and only then fix them. Under force, the plastic will compress to the required thickness, and the gap will close. There are difficulties with bending short slats. In such cases, make them another centimeter shorter; the width of the skirting boards allows this. The best option is to immediately lay the panels on the wider side of the ceiling. During installation, do not use excessive force, do not damage the baseboard, scratch the walls, or break the panel.
Step 7 Once all the intact panels are installed, measure the width of the remaining uncovered ceiling. To these dimensions, cut the material using one of the possible methods.
Step 8 Using the method described above, insert the panel into two skirting boards, connecting one edge into a lock. The rest will have to be recorded separately. There are two options. The first is to lubricate before installation. reverse side liquid nails and glue. The second is to drill a hole in one plane to the diameter of the self-tapping screw and use it to screw the second plane to the ceiling.
Step 9 Cut the base part from the fourth ceiling plinth. Spread the remaining surface with liquid glue and attach it to the wall in the right place.
That's it for the montage. ceiling panels finished. Of course, during work you need to leave space for electrical wiring, ordinary or spotlights. If after installation there are visible gaps in some places, they can be sealed with sealant of the appropriate color.
Installation of panels to the ceiling on a metal frame
Step 1. Mark a line for installing supporting profiles around the perimeter of the room, making sure that the ceiling is horizontal. At a distance of approximately 50–60 cm, fix the remaining profiles. If the ceiling is very uneven, then use hangers. They are fixed and adjusted in the same way as on the wall. The difference is that ceiling frame It’s more difficult to check the level: it’s harder to work, your arms are raised up and you get tired quickly.
Frame for PVC panels
Step 2. Liquid nails Glue three skirting boards and file them at 45° at the corners. If the ceiling plane does not have right angles, then each cut will have to be adjusted. Glue the plinth both to the wall and to metal profile. When gluing, follow the technology. After the plinth is attached, remove it and wait 2-3 minutes, then press the element again. Check its position with a rule or level. The rule is applied to the lower edge of the baseboard. If there are gaps, then use your hand to carefully move the baseboard down until it stops with a straight edge. Give it time to harden. The cracks in the corners are sealed liquid sealant, but for professionals the fit should be tight right away. The bathroom ceiling is very hot and humid. You can be sure that the sealant will peel off in 4-5 years and will have to be removed and the cracks re-sealed.
Practical advice. Sometimes when the glue hardens, the baseboards in the corners move a little, they end up on various levels. To prevent this from happening, insert trimmings into the corners; they will constantly hold the two elements at the same level.
Step 3. Insert one end of the slats into the baseboard, bend it slightly and push the other end into the opposite baseboard. Align the panel and slide it into the third baseboard. We have already mentioned that you should check the exact dimensions of the ceiling before installation. If one side is longer than the other, then the difference must be gradually leveled by adjusting the gap between the slats. The method, of course, is not ideal, but there is no better one. Always install panels along the long side of the ceiling. Due to this, it will be possible to reduce the number of cuts and make it easier to bend the lamellas during installation.
Panel fastening
Constantly check the position of the slats. To prevent a screwdriver that comes off from damaging the end of the panel, place a clean, wide metal spatula between them while screwing; it serves as reliable protection. It is not necessary to twist the press washers into the tail of the panel, this is difficult and increases the risk of damage, the main thing is that the head presses it against the profile.
Step 5. The last panel needs to be cut to fit the remaining gap. To make installation easier, make a gap of about 1–1.5 cm; it will then hide in the baseboards.
Step 6. Cut off the back plate of the plinth, coat the remaining surfaces with glue and glue it into the wall. Do not forget that gluing must be done in two stages. If the plinth creeps down under its own weight, then hold it for a few minutes or come up with any temporary stop.
At this point the work is completed, installation can begin. lighting fixtures. Before you start finishing, you should know the type of appliances and where they will be installed; cut holes of the appropriate diameters in the panels in advance.
- Draw a hole on the panel required diameter and at the chosen location.
- Insert the drill bit into the drill and adjust it to high speed.
- If you have an assistant, great, he will place the panel on its edge and hold it firmly. If you have to work yourself, then hold the panel with one hand and use the drill with the other. This is inconvenient and difficult, the hole will turn out uneven.
- Drill a hole on the circle line, press the drill against the line and move it around the circle. Friction will melt the plastic, and the drill will “cut” a hole in it.
That's it, remove the burrs and the hole is ready.
What are the features of installing panels on the ceiling under spotlights? No matter how light the lamps are, a large number of them creates additional load on the panels; over time, the ceiling may sag a little. To prevent such consequences, you need to install intermediate jumpers more often; professionals recommend making the distance between them no more than 30 cm. In addition, choose durable lamellas for the ceiling, pay special attention to the characteristics of the locks, they are the ones that hold the weight.
Can dismantled panels be reused? A lot depends on how you shoot them. Cheap materials can cause long longitudinal cracks when the fixation points are torn off. To prevent this phenomenon, use the sharp end of a mounting knife to cut the junction of the lamellas with the frame along the entire perimeter of the hardware. Before re-laying, you will have to move the supporting frame a few centimeters in any direction so that the fixation is done on undamaged areas.
Video - Vertical laying of panels on walls