Stretch ceilings made of fabric look stylish, original and environmentally friendly. Such decoration will tell about the subtle taste of the owner, emphasize the overall style and color scheme rooms, will give a piece of originality and authenticity. However, in addition to its main advantages, environmental friendliness and beauty, such a ceiling also has others. Read about them - ease of installation, possibilities of draping with natural fabrics and special design methods - in the article.
Fabric ceiling on the terrace 
Decorating the ceiling with burgundy fabric
A little history: a ceiling made of fabric, or where it came from
The masters of ancient Armenia worked with canvas, which decorated not only the walls of houses, but also the ceiling. At that time, the color of the walls and the “sky above” was the same, so thin cotton fabric was soaked in chalk and stretched over the frame. The result is a perfectly smooth and even surface, distinguishing rich houses.

Ceiling decorated with fabric ribbons
Professionals in Egypt, Greece and Rome worked in almost the same way, using silk fabric. Monochrome was no longer valued here, but fabric with an ornament or ornate pattern was chosen. It looked practical, beautiful and unique.

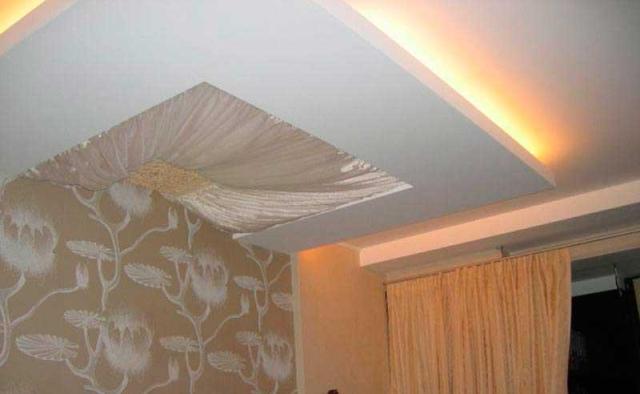
White two-level fabric ceiling in the living room
Humanity, having forgotten about stretch ceilings for some time, returned to them again with the help of modern technologies. In 1967, the French perfected the composition and method of producing PVC film for ceilings, and then began working on fabric ceilings. That is why stretch ceilings today are often called “French ceilings”.
The Swedes claim that they were the first to introduce PVC fabric to the world for suspended ceilings. This fact is unknown for certain.

White fabric ceiling in a classic interior 
Gray and white fabric ceiling 
Beige-brown fabric ceiling 
Decorating the bedroom ceiling with fabric 
Decorating a room for a celebration with colored ribbons
Fabric ceiling: TOP 5 features and advantages
High-quality suspended ceilings made of fabric are, in fact, a canvas impregnated on both sides with polymers. This “device” allows fabric ceilings to have significant advantages over PVC canvas. Take a closer look at them and make sure you make the right choice!

White and brown fabric ceiling in the living room

Fabric ceiling With round element in the living room
Installation of a stretch ceiling made of fabric occurs using one of two methods: clip or glazing bead. The first option is more advanced and reliable, the second is easier for self-installation. However, both methods of tensioning the fabric have a clear advantage over installing polyvinyl chloride fabric - they are silent, lack of a temperature component, clean and tidy. And you don't have to worry about cleaning up after the professionals leave!

Fabric ceiling in an antique interior
Attention: fabric sheet for indoor installation large area will require additional connecting profile. A seam on such a fabric is impossible, so the installation will consist of two pieces of fabric.
Fabric beautiful ceiling in a bright room
Stretch fabric ceiling with flowers
Unusual ceiling with fabric decor
Decorating the ceiling with white light fabricColor and texture of stretched fabrics: endless perfection
A modern fabric ceiling is a matte surface made in more than 40 shades. In this case, a completely white ceiling will simply look whitewashed, but bright colors, terracotta and orange, lilac and burgundy, olive and blue will create a play of color, intrigue, and a special mood, despite the fact that the matte surface will not “steal” attention, allowing the ceiling to be only a background. A backdrop against which original and bright interior items will look great!
White fabric ceiling in a minimalist living roomIt is worth noting that manufacturers delight their customers with new products, offering them:
- satin fabric. Due to the finely dispersed relief, it has a pearlescent sheen, which is optimal for the hall, hallway and living room;
- textured version, consisting of a mesh fabric and a fabric sheet with an embossed pattern. Interesting, stylish and non-trivial!;
- suede ceiling or canvas imitating leather, velvet and even stone. Such a ceiling will easily become part of the interior in any style: national, modern or natural.
Fabric ceiling with lighting in the living roomAttention: when choosing a ceiling, pay attention to the manufacturer. This choice will determine the lifespan of your ceiling, color fastness and fabric strength.
Contrasting fabric ceiling in the bedroom
Fabric ceiling in a blue and white bedroom
Decorating the ceiling with fabric in a relaxation room
Large room with red fabric ceilingNatural canvas, or draping the ceiling with fabric
Do you want something unusual in the area? country house or eclectic style apartments? This could be draping the ceiling with fabric, which will bring a touch of play, sensuality, romance into the room and awaken the imagination. It is worth noting that this method of decorating the ceiling is only good for a while, for an official event or a special celebration. In any other case, it is troublesome, too expensive and impractical.
Fabric ceiling in the nurseryDraping the ceiling with fabric is possible with my own hands. You just need to choose one of the ways to secure the canvas, which can be easily removed after the event. At the same time, linen, brocade, and chiffon should be chosen in the color and pattern that will emphasize the overall stylistic component of the celebration and its theme. At the same time, the chosen color should be optimal in psycho-emotional terms for each guest, and should not worry, oppress or oppress.
Fabric ceiling in the hallwayThe choice of decoration is yours. This can be a tent shape, implying that the canvas falls from the center of the ceiling and further along the walls. Decorating a room of this type will significantly reduce the space, so pay attention to the area of the room. The wavy surface created using transparent and lightweight chiffon will look great in a room dominated by daylight. This design will give the room lightness, volume and, therefore, solemnity. In a word, the choice of ceiling decoration is yours!
Fabric for the ceiling
Decorating a bedroom with fabric and drapery
Fabric stretch ceiling with chamomile
White stretch ceiling in a minimalist bedroom
Decorating the bedroom ceiling with beige fabric
Decorating the ceiling with white transparent fabric
Photo gallery (30 photos)
Reading time ≈ 3 minutes
At the stage of finishing the ceiling, you need to focus on finding the best one, optimal for you, from the many options. This choice may well be a fabric ceiling created by yourself. This modern alternative has many advantages that justify its popularity.
How practical can a fabric ceiling be?
This question worries many. To understand the difference and the main advantages you need to know the main thing about it:
- it withstands temperature well;
- satisfactory strength;
- simple installation that requires a minimum of time (see video);
- and, of course, excellent appearance.
Types of fabric ceiling installation
This is the one important point, which you should be careful with. After all, when choosing fabric stretch ceilings, you need to consider that you will need to install them yourself. Therefore, you need to realistically assess your capabilities. For example, U-shaped profile Installs much faster and easier than a clip-on one. It all depends on desire, abilities, and talents.
If you decide on a simple option, then you will need:
- Bead;
- Wedge;
- Decorative insert.
We must not forget that this particular type, although easy to install, is not as strong and durable as the clip type.
If your choice is the second type of profile, keep in mind that the structure and system are different. In the photo materials you can see the main differences between the two installation systems.
Let's get straight to work
First of all, let's proceed to the first task - determining the horizontal level. To do this, we use any type of special meter (laser/water level).
The next stage is to measure the corners of the room to accurately install our clip profile system.
We fix the baguette and stretch the fabric according to the principle: from a fixed angle to the sides. Now we proceed to install the second opposite corner. This way you should have two base points already secured, which is essentially half the job.
Next, one by one and slowly fasten the fabric sheet between the insert and the profile. Thus, we stretch the fabric base over the entire ceiling area. Your activity can be considered completed, the only thing left is to record decorative elements, install lighting fixtures. The practical part of our task can be considered completed.
Fundamentally important points
During the installation of the fabric ceiling, you will need an assistant who will be able to perform additional work in parallel with you (hold the fabric, fix the corners, stretch and fasten the fabric).
It should be noted that by doing the work correctly, following all the tips and tricks, in just a couple of hours, your room will have an unsurpassed look, which largely depends on the type of ceiling and its structure.
Video of installing a fabric stretch ceiling with your own hands
Draping the ceiling with fabric - fashionable solution, stylish, sophisticated design. You can invite a specialist to do this work, or you can do everything yourself if you want to try, learn something new, and gain interesting life experience. It's easier than it seems.
Which fabric is better to choose?
Regardless of whether the ceiling will be upholstered with fabric yourself or a professional will take on the work, the first thing you need to do is choose the fabric.
The most popular options are:
- velvet;
- silk;
- atlas;
- organza;
- chiffon.
Velvet, silk, satin look luxurious, ideal for decorating the ceiling in the living room, bedroom, nursery, even hallway. Linen, organza, chiffon create a different effect. Silk and satin reflect light. The flickering is captivating - in the twilight, in bright light.
Silk clothing suits both women and men. The silkworm butterfly weaves its spindle day and night so that a person can decorate his home with this material. She gives a miracle, a fairy tale, and will protect the house invisibly.
Velvet seems to absorb light. At the same time it radiates. It symbolizes mystery, riddle, and intrigue. I just want to touch him, at least with a glance.
Draping the ceiling with velvet allows you to create an atmosphere of ease, romance, and encourages dialogue.
Linen is simple and light. This durable material, evokes pleasant associations. Reliability, practicality, rationality, optimism - this is about him. It is easy to work with when decorating the ceiling, it is not a easily soiled material, and is easy to care for.
Organza and chiffon are full of coquetry. They will help to revive the wonderful story of Scheherazade, Princess Jasmine, the daring Aladdin, and the Genie who grants every wish.
If you choose a golden color, coffee, beige, silver, orange, burgundy, and lay luxurious carpets in the room, the story of Cleopatra will come to life. Chests, chests of drawers, dressing table, coffee table made of solid wood will complement the interior. Wooden furniture in general will come in handy.
You can choose neon colors and another illusion will be born. Shades of green combined with sky blue will fill the space with lightness and freshness. Such decor will contribute to the revival of strength and restoration of harmony. Photos of fabric ceilings beckon to a world where everything is possible.
For centuries, fabric has been used to decorate rooms, ceilings, and walls. IN small apartments its use is also appropriate, although it is not the most popular solution. Many other options have been invented, but this one is the most delicate and sophisticated. A lot depends on the color.
Natural colors and a play of black and white are in fashion. However, modern suspended ceilings can be anything - there are no restrictions, all prohibitions have been lifted.
If we are talking about a living room or hallway, it is of course better to choose colors that are suitable for the epithet “restrained”, “unobtrusive”, “polite”.
There are special fabrics for decorating the ceiling - they have a denser base and are resistant to dust settling and fading. They can not only be draped, but also glued. If you plan to create a frame, any material will do.
Classic mounting option
Fabric ceiling covering - unique technology. The work is carried out almost silently. If you invite neighbors to visit, when new design will be created, for them the changes will be an absolute surprise.
You won’t have to clean the apartment for long after installation either. Construction waste there will be practically none. This is definitely a plus.
Before you go to the store for fabric, you should draw a sketch, calculate the footage of the fabric, and take into account the reserve for drapery. In addition to the fabric, you will need to purchase beams for the frame with a small cross-section and dowels. You will need a construction stapler.
The beams are nailed along the entire perimeter of the ceiling and around the chandelier. The fabric is attached to them using construction stapler- from one edge of the wall to the other, then to opposite wall.
The ceiling is completely closed in length, let's assume. In width, the material should be attached a little differently - start from the middle of the wall, move towards the corners, controlling the tension.
All that remains is to rip off the staples by gluing the tape. The ceiling is ready. It's not the only one possible variant fastenings
Movable frame
It is permissible to create a frame, tension the fabric and use this structure as a movable element.
The new ceiling can be attached at a distance from original surface, at an angle, adjusting the height if necessary. Such additional features, of course, they may be of interest.
This is a more complex option, since the mechanism for fixing and adjusting the height must be carefully thought out. Creating ceilings with your own hands is still a difficult task.
A specialist, of course, will make any dream come true. It’s good if you know a mechanic or have a personal interest in devices and simple mechanisms like levers. In this case, the decor will be created and the structure will be safe.
Incredible comfort
Perhaps the most convenient option for fastening fabric is Velcro fastening for clothing. They are glued to the slats and sewn to the edges of the fabric. The material is securely fixed and additionally sewn if large, solid fabrics are used. They can be removed at any time without much difficulty or excessive effort, cleaned of dirt or replaced.
It is not recommended to install a fabric ceiling only in the kitchen and bathroom and toilet. In other premises it is guaranteed to last for at least five years, and if desired and cared for, longer.
Photo of a fabric ceiling
People have been decorating and decorating their homes with fabric for a very, very long time. They decorated the walls, covered the windows and draped the ceilings. This design of walls or ceiling surfaces gives the room coziness and creates an atmosphere of relaxation and peace. At the same time, draping the ceiling with fabric can become an excellent alternative everyone traditional ways registration, and you can do everything yourself, without the involvement of outside specialists.
Types of draperies
The textile covering can be fixed to the ceiling in different ways. The chosen method of fixation will depend on general mood, as well as compliance with the rest of the interior. Therefore, it is worth studying everything possible methods to choose the most suitable one.
Tent
Draping the ceiling with fabric, as in the photo above, can be used without decorating the walls in the same way. It works well on its own as well. It must be taken into account that with this design the height of the room along the perimeter is significantly reduced, so this type of decoration is not suitable for every room.
Waves
Making a wavy surface is not too difficult. You will need to secure several hanging elements and fix the material on them, forming waves the right size. Any material is suitable, but translucent and not too heavy varieties look best.
From the walls to the center
In this method of fastening, there is a lot different variations. Can be placed soft covering with sagging, you can pull it tighter, creating many flat folds - there are a huge number of options. The method differs from the “tent” scheme in that the covering does not fall so much at the edges. This allows you to use such drapery in rooms with not very high ceilings.
It is very convenient to place a chandelier in the center of such a composition. It will become a semantic center and can act as an additional part of it. In addition, using a decorative rosette, you can hide the place where the material is attached.
Decorative insert
An equally effective method of using textiles in decoration is decorative inserts in the ceiling surface. You can vary both the size of the inserts and the materials from which they are made. This design detail looks very interesting, and the bare minimum of materials is required.
Particularly interesting is the insert with the cover located behind it. lighting device. If you use translucent materials, you can make it look like a large built-in lamp.
What kind of fabric can be used
Almost any of the available ones is suitable for such a finish. Here you should be guided only by the practicality of the solution - some types of materials very strongly “collect” all the pollution. These types of textiles should not be used. To make the selection process easier, you need to take into account several basic requirements that the material intended for such finishing must meet:
- Withstand exposure to sunlight and will not fade.
- It can withstand repeated washing without losing its appearance.
- It is advisable to choose types that do not wrinkle too much.
- The selected material must be elastic
If the textile fabric that was chosen for decoration still collects dust, then you can use special antistatic agents that are used for clothing. It is better to choose those varieties that are sold in aerosol packaging. From the bottle, you can apply the product directly to the fixed drapery without removing it for treatment. After this procedure, the ceilings will not attract dust.
How to secure drapery
When draping the ceiling with fabric is done with your own hands, you need to know how to secure it to the ceiling plane. The most interesting thing about this is that you can attach such a finish in any way you like. That is, of course, there are several basic methods of fixation, but if none of them suits you, you can come up with your own fastening option. As a rule, all independently invented options are modifications of the most popular fastening methods.
- Frame
With this fastening option, the material will be pulled over the structure, which must first be assembled. Typically, the frame is made of wooden blocks or plastic. The material is stretched onto a pre-assembled base and attached to the ceiling at the desired height.
In this way you can collect not only flat designs, but also compositions in which the coating sags a little.
- Clip version
This method differs from others in that in order to fix the canvas, you first need to secure special baguettes in the places where it will be attached to the surface of the ceiling. The covering itself is inserted over the edges of the attached baguette and secured.
This fixation method is more suitable for creating volumetric and airy compositions.
- Velcro
The simplest fastening method. All you need is a few meters of textile Velcro fastener. One of the parts is glued or fixed in another way in places where the coating should touch the ceiling surface. The second, counter part, is sewn directly onto the fabric itself. Both fixing and removing the canvas secured in this way will be very easy.
The method is only suitable for fairly light compositions. For heavier types of textiles, Velcro may not hold up.
- Glue method
In this case, fastening the canvas over the entire ceiling area on adhesive composition. Before starting work, you must make sure that the selected the composition is suitable for fabrics. The surface of the ceiling is smeared with glue and the selected textile covering is applied over the entire area, after which it is smoothed with a roller or rubber spatula.
Europe became acquainted with stretch ceilings in the second half of the twentieth century.
In the late 90s, similar technology came to the taste of countries former USSR. Since then, suspended ceilings have confirmed their status every year better design ceiling space.
Selection of suspended ceilings
The popularity of suspended ceilings among consumers is due to the numerous advantages of the product, including:
However, when talking about stretch ceilings, you should not rely only on positive characteristics.
Of course, there are also disadvantages, which we will talk about:
- high price, compared to other types of ceilings;
- Not robust design suspended ceilings - they are afraid of damage from sharp objects and chemicals;
- installation individual species suspended ceilings are complex and require special skills. It is also worth mentioning here about bulky or scarce equipment;
- not all types of suspended ceilings are suitable for unheated rooms.
Attention: Installation difficulties and fear of temperature changes apply only to PVC (polyvinyl chloride) ceilings. Quite often you can come across judgments that they begin to sag some time after installation. With the right choice of material for ceilings, as well as following installation technologies, such problems are unlikely to bother the home owner.
Do-it-yourself fabric ceiling and its advantages
There are two types of suspended ceilings - PVC ceilings and fabric (seamless) ceilings. Comparing the installation of similar structures, it should be noted that PVC installation ceilings are distinguished by their complexity. Do-it-yourself fabric ceilings are a relatively easy task. Similar designs occupy about a third of the construction market for suspended ceilings. Of course, this is not accidental.
Let's talk about the benefits fabric ceilings:
Ceiling installation: materials and tools
- construction stapler;
- drill or hammer drill - based on the wall material;
- drills (full set);
- spatula for fabric ceilings (fins);
- construction knife;
- scissors;
- levels – laser or water.
Materials required for installation:
- calico – quantity, not less than the size of the room + 20 cm (additionally) on each side;
- wooden blocks or glazing beads - their dimensions are 40x50 or 50x50 mm. The amount of material must match the perimeter of the room;
- anchors - the same number as wooden blocks. The size and type of anchors are related to the thickness and strength of the material from which the walls are made;
- assembly adhesive ( best option buy a shoemaker);
- tracing paper;
- glue for tracing paper;
- PVA glue);
- primer for calico;
- dyeing agent for coloring calico - recommended to use acrylic paint or water emulsion;
- plinth for the ceiling (baguette) – the quantity must match the perimeter of the room to hide the ceiling attachment points.
Attention: The article does not talk about the availability sewing machine and a set of tools necessary for making the canvas. This is the task of the cutter, seamstress-motor operator and ironer. All you have to do is contact specialized workshops, which will do all the work for you in the shortest possible time and at an affordable price.
Installation of fabric stretch ceiling, watch the video:
DIY ceiling decoration with fabric
Stage 1. Marking the ceiling
Very responsible and important stage from the entire scale of work. The correct marking will completely affect the quality and correct installation of the ceiling structure. The first mark is fixed at a height of 5 cm from the ceiling, and then it is projected onto all the walls of the room. Based on the marking results, all walls of the room should have parts of a horizontal line.
Tip: The first mark will help eliminate unevenness and slopes of the ceiling and walls in the room. A special level must be used to designate it.
Stage 2. Install bars around the perimeter of the room
Installing glazing beads: drill a hole in the wall for the anchors. First of all, the glazing beads are numbered and receive their serial number for installation. Next, a hole must be drilled in all the bars for attaching the anchor. Attach all the bars in order to the line marked on the wall. Then, based on drilled holes, project the marks onto the wall. This technique will help match the holes on the bars and walls. Install the selected type of anchors, and then fix the glazing beads on them.
Helpful information: You may be faced with the option of attaching glazing beads to a special profile for suspended ceilings. It should be remembered that in in this case The glazing beads are fastened not end-to-end, but every 10 cm.
Stage 3. The process of securing the canvas
The stage requires at least two people. The need is due to securing the canvas without distortions. Installation work will not do without using a construction stapler and mounting adhesive. The glazing bead is covered with a layer of glue, after which a canvas is applied to it and pressed with a flipper at the corner where the bar meets the wall. Next, pull the blade by the free part, while holding the fin. As a result, the panel will stretch and it will be possible to fix it with a stapler. First of all, the canvas is fixed on the long wall rooms (from the middle to the edges). Next, you can move to the opposite wall. Make sure that dropped ceilings the fabric ones had no folds. Finally, the canvas is fixed on a narrow part of the room according to a similar principle: from the middle to the edges. If there are any excess edges of the attached fabric, just cut them off.
Stage 4. Tracing paper
Tracing paper hides the connecting seams of the calico fabric. In the absence of such measures, the paint will not be applied evenly, but will hang out in bubbles. Ultimately, all the work will go down the drain, because the room will lose its aesthetic appeal. This stage of work is responsible and requires careful and thoughtful actions.
First of all, prepare special glue. Recipe: cook a paste (based on flour) and add PVA glue to it (30% of the mass of the paste). Next, the mass is diluted with water until thick and filtered. Applying glue - simultaneously on the canvas and on the tracing paper. It is best to bend the edges of the tracing paper and the overlaps - this will prevent them from sticking to each other. After the glue has dried, tear off the folded edges of the tracing paper. Moreover, in places where it is torn off, the tracing paper should become as thin as possible - as a result of which the seams will become invisible. Some experts recommend treating the seams sandpaper and PVA glue.
Stage 5. DIY fabric ceilings: chic and beauty
After waiting for the PVA glue to dry, we begin to prime the entire surface. After two hours, you can fix the baguette. After this, the ceiling is painted with 3 layers of paint.