You can make a model railway with your own hands, but this will require extensive preparation. When building a model, knowledge in the field of design and operation is required railway, you can read about this in books that are used for teaching in higher education educational institutions, technical schools, as well as in instructions such as “Rules technical operation railway", "Instructions for railway signaling". There are periodicals such as “Lokotrans”, “Semaphore”, “Railway Business”. In these magazines you can find useful information about the railways of Russia and the world, and in some publications there are sections devoted to railway modeling. There you can find descriptions of technologies, working methods, patterns of rolling stock models, and expert advice.
When building a model with your own hands, you need skills in working with various tools: for working with wood - work with a jigsaw, files, for measurements and markings - the ability to use a square, ruler, caliper. To work with electronic devices - correctly mold parts, connect wires, solder, measure current and voltage. If you don’t have the skills to do the job, then it’s worth studying the technique and practicing before starting to build a model railroad. For training you can purchase cheap material and tools, and during the construction of the model, use high-quality raw materials and tools.
The construction of a model begins with the creation of a work plan, a route diagram, an approximate map of the terrain - with the planning and design of a railway line with your own hands. After the project is ready, the first step is to build a base for the model - a sub-model. In the future, a layout will be located on it, and it will be used as an external surface on which tracks, stations, depots, forests, mountains, rivers will be located, but also the internal part for wires, various devices, which ensure the layout works.
Paths are laid on the sub-model. Railway rails and sleepers can be bought in a store, but using special machines you can make them yourself. Few modellers are involved in such production. After laying the tracks, connecting the electrical part of the model, relief and vegetation are created, models are installed residential buildings, factories, train stations.
There are some details on the model, objects you can make with your own hands, or you can buy them in stores. If purchased models do not suit your appearance or do not have sufficient detail, then they can be modified independently. Some modellers use this technique.
Models of houses, plants, lighting poles, traffic lights - all these layout elements can be made independently, at home. You can find more information about how this is done in the articles in the “Layouts and Modules” section of the site.
In addition, the construction of a model is not only the production of individual railway infrastructure objects, it is the unification of all components of the model using a single, identical scale, era, theme of the model and time of year.
Have you thought about how to make a model railway with your own hands? To implement such an idea, you will need to stock up on a huge amount of patience, since such work cannot be rushed. In addition, before construction you will have to study a lot theoretical information and make competent drawings. Read more about all these nuances in our article. Be sure that very soon you will be able to build your own railway to decorate your apartment.
Main types and features of modeling
A miniature railway is a piece of furniture that will delight the eyes of not only children, but also adults. If you are interested in making your own railroad tracks, it means that most likely you had a similar toy as a child and you decided to bring your memories to life. Or do you just want to please your family members? unusual decoration made by hand. Be that as it may, in the following sections you will find detailed instructions, which describes each stage of work on the layout in detail.
To make a truly beautiful layout, you will need to work quite a lot, because even the smallest detail of the composition requires close attention. If you have ever studied the structure of real railways, then it will be much easier for you to realize your idea. However, do not be discouraged if you do not have the necessary skills, because all necessary information can be found on the Internet without much difficulty. For example, our article will present several original ideas, which will allow you to make a high-quality and unusual layout for your home.
As for the main types of layouts, they are quite difficult to classify. If we talk about scale, you can find small, medium and huge layouts that fill almost the entire space of the room. Some compositions are used to have a toy train ride on them. Others serve as part of the interior. Quite often on layouts you can find various elements nature: rivers, mountains, forests and fields, and sometimes they may simply be absent, and the railway itself is located on a regular plane. In general, there are quite a few options for making a layout, especially for a person who will be doing this for the first time.
What materials will be needed for the job?
Have you decided to make a model railway at home with your own hands? First you need to decide on the materials that you will use during the construction process. This can only be done if you carefully study the options for ready-made layouts, photographs of which are presented in our article. In this list you can find the most commonly used materials in construction and their purpose:

- plywood sheet - suitable as the main plane for the layout;
- construction foam - perfect option to create mountains with a tunnel;
- boards and cardboard - suitable for creating decorative objects.
It is worth noting that the possibility of using various materials limited only by the skill and imagination of the master himself. For example, if you are good with plaster, you can easily make several objects out of it for a model. Do you know how to design bridges? Why not add such a design to your composition. What about real water in the model, which will symbolize the river?
Also, we should not forget that some elements can be purchased in stores rather than made by hand. For example, it will be quite difficult for a novice designer to make a figurine of a person from scrap materials, but such an element can be ordered on the Internet at a very modest price. Or you can display your collection of sports cars on the layout so that it no longer collects dust on the shelf, but pleases the eyes of your guests and family members.
List of required tools
We have already said that the easiest way to make a base for a model railway with your own hands is from large sheet plywood. You can purchase such material at furniture store or remove from an old unnecessary bed. However, what tools might a designer need during his work? As a rule, they directly depend on the materials you decide to use. Although in the list below you will find the most commonly used tools, as well as their “scope of activity”.
- An electric jigsaw is indispensable for working with plywood sheets and wood.
- Construction adhesive is ideal for attaching small parts.
- Sandpaper - suitable for processing uneven surfaces.
You will need quite a lot more as you work. various instruments, which are related to materials for work. For example, if you want to color the layout different colors, then you will need brushes of varying fineness. Decided to add a couple of metal parts? Don't forget to get a grinder with discs and welding machine with electrodes.
As you can see, the list of tools for work can be quite extensive, so it is recommended to find everything you need in advance so that you don’t have to be distracted by anything during the work process. If you don’t have a tool at home, you can ask your friends for it, but under no circumstances resort to alternative options(instead of nails - screws). Making a layout is very fine work, which requires compliance certain rules.
Design or drawing
How to make a model of a railway at home step by step and with your own hands? In the following sections you will find detailed information on this occasion. However, before you start building anything with your own hands, you need to correctly draw up drawings of the future product that would take into account all the features of the composition.
First of all, you need to decide on the dimensions of the layout. It is worth understanding that the larger the area of the product, the more small parts you will have to add to it. A beginner designer should first learn how to make small layouts, and only then move on to larger compositions. Although if you are confident in your abilities or work under the guidance of a real professional, then you can forget about this rule.
However, we should not forget that not only the quality depends on a correctly drawn up drawing. future design, but also her decorative look. As a rule, people start making mock-ups when they already have a specific idea. For example, a master wants to include in the composition several mountains with a tunnel, a river, a bridge, and also a small village in the middle. Such a layout may require quite a lot of details, but it will look quite decent.
We make a sub-model
We make a model of the railway with our own hands. The first stage will be the manufacture of a sub-model on which all the main elements will be placed. It is highly recommended to use a sheet of plywood as a building material, since it has fairly good strength and is light in weight, which will allow you to drag the layout even alone. You can purchase such a product at any furniture store, but if you want to save money, then go to a construction base, where a sheet of plywood will be sawed off right in front of the buyer required sizes.

Once the plywood sheet is ready, it must be carefully processed so as not to be damaged by sharp edges during operation. For this purpose you can use electric jigsaw with a special attachment or medium-grit sandpaper. Try to process the plywood as carefully as possible, since this may not be possible later. In addition, on smooth surface it is much easier to apply paint and glue small parts. And if you want to cover the layout with a water-repellent coating, then sanding the sheet of plywood is a must.
Working with landscape
The next step Making a model railroad with your own hands from plywood involves working on the landscape. This stage can be called the most difficult, since the quality of the future design depends on its correct implementation. If you cannot implement your idea the first time, then do not despair. At any time, you can throw away the plywood sheet and buy another one. Luckily they are quite inexpensive.

To work on the landscape, you can use the most various methods. For example, mountains can be made from ordinary construction foam by releasing it from a can in the right amount. If you mean that through such natural element will pass through a tunnel, you should take this into account in advance by placing a plastic or cardboard pipe on the model. Once you use the foam, you won't even need to take it out. Let it lie inside the mountains, and the seams can be disguised with almost anything.
Another indispensable material for landscape work is gypsum or construction putty. Unlike foam, such material is much easier to modify to suit the required form, however, it is most often used as a decorative element rather than the main one. Firstly, gypsum weighs quite a lot, so you shouldn’t make large objects out of it. Secondly, over time, the putty may crack, especially if a water-repellent mixture is not used during construction. In general, there are a huge number of options for working on the landscape, so you should approach their choice wisely.
Sanding and painting work
The next stage of building a model railway with your own hands is sanding and painting work. If you used wood for construction, then all unevenness can be eliminated using ordinary sandpaper. Withered construction foam The easiest way to trim is with putty, applying it to all uneven areas. After this, the mountains will become quite smooth. If you're not happy with this, don't be afraid to chip off a couple of pieces of putty to give the natural formation a more natural look.

As soon as the landscape takes the desired shape, open several cans of acrylic paints, pick up brushes and begin to create. It is best to have before your eyes an image of real mountains with vegetation in order to better understand which colors from the palette should be used first. Don't be afraid to apply several layers of paint, as this will only give the future composition a natural look. For example, you can paint stones in grey colour, then add a little white paint on top, thereby depicting snow on the top.
Laying the railway
We are still making a model of the railway with our own hands and are gradually approaching the longest stage of construction - laying the railway track. As a rule, most craftsmen prefer to purchase already ready material in toy stores, because for the production of the railway with my own hands It can take an unrealistically long time. In addition, plastic parts are quite cheap and you won’t mind breaking them if used carelessly. This is especially true for those people who have children in their family.

The railway is attached to the model using ordinary construction glue. You should not use too long parts during work, as this can give the road an unnatural straightness. It is best to make it have more turns and elevations. Remember not to use too much glue to attach parts to the surface. Also on any tube you will find information that for good fixation, a huge role is played by the force of pressing the part to the surface, and not long time pressing down.
Creation of scenery
Once the main element of our layout is done, we can start creating various decorative elements. You can purchase such parts in toy stores or make your own from building materials, if you have a talent for it. For example, on some layouts you can see ordinary medical cotton wool, which plays the role of snow, although most professional designers still prefer to use special mixture, which is sold in small cans in Christmas shops.

The same applies to the remaining elements of the composition. You can make your own lanterns for a railroad model from ordinary plasticine or buy ready-made decorations in a store. By the way, if you are planning to make a model for Christmas, then replacing the standard one would be a very good idea. street lighting on New Year's garlands, however, such a solution should be provided for in advance by cutting several dozen holes in the plywood for light bulbs - this way the wires will be at the bottom, attached with electrical tape.
Video and conclusion
We hope you now have a better understanding of what it takes to make a mini-model railroad with your own hands. If the information from our article seemed not enough to you, or you still have some questions, then we recommend watching a short video in which a master demonstrates the entire process of making a landscape with his own hands. Such video material will be useful both for a novice designer and for a true master of his craft. If you watch it in its entirety, you will certainly learn how to make beautiful mountains and other natural objects using scrap materials.

An artistic railway is the dream of almost every child. Just watch how children “stick” to exhibition stands and museum exhibits simulating a railroad. It is very interesting to see trains and carriages that are smaller copies of the real ones. The trains can be controlled, they stop at stations, sound signals, pass through tunnels and enter the depot. This is a very beautiful sight, but doing all this is not at all easy.
In order to assemble a road model, you need a lot of time, skills, materials and financial costs. A child cannot do this. But many adults are ready to spend time, effort and money on creating their own model railroad. This is very exciting activity, and the reward will be a layout that can be developed, improved, added rolling stock and landscape details.
The history of the appearance of layouts
The areas of modeling that fans of layouts are interested in are different:
- Collecting rolling stock, rails, trailers.
- Collecting full-fledged railway models.
- Making miniature roads.
- Making copies of real existing trains and compositions.
- Creation of park models in the open air.
The first models appeared in Germany in the second half of the 19th century, and subsequently the scale in which they were produced was adopted as a basis by other manufacturers.
 Layouts that copy shapes and sizes real trains, are very different from children's toy roads with trains. Almost a century has passed since modeling became an exciting activity for adults. This forced many companies to begin producing improved models of trains and rails, producing houses, switches, traffic lights and semaphores, and landscape details.
Miniature roads are available in digital and analogue versions. Managing an analog railway comes down to controlling the movement of trains. With digital control, the functions are significantly expanded. Using the remote control, you can turn on the lights in carriages and locomotives, sound signals, and move switches. This is very interesting process, but it’s no less interesting to create such layouts yourself.
How to make a layout yourself
You should start by collecting information. Many people are passionate about model building and share their experiences, give advice, and post photographs and videos on Internet pages showing the models they have assembled. You can purchase various structural elements and assemble them. First of all it's worth identify with I have space for a layout. This should be free space. A table measuring approximately two by one and a half meters may be suitable. There are ways to arrange a layout on a folding or retractable tabletop. Then you need to select the scale of the layout. There are five main scales:
- HO, 16.5 mm gauge (1:87).
- TT, 12 mm gauge (1:120).
- N, 9 mm gauge (1:160).
- Z, track 6.5 mm (1:220).
- G (1:28 or 1:22.5) - garden or street scale.
Road scale is very common. It has dimensions that allow you to place the layout in the house, and consists of fairly large elements that are convenient to work and play with. It is also interesting to be able to use smoke generator, a sound decoder, for reproducing noise during the movement of trains, and security systems.
 For another common TT scale, many German companies produce models and accessories, for example, Tillig, Berliner T. T. Bahnen. Such models are also produced by other European companies Piko and Roco, and Russian manufacturers TT-model and Peresvet.
The choice of scale depends on the space allocated for the road. Z - the scale is too small and the layout will be difficult to assemble and work with. The most commonly used are TT and H0. When choosing a scale, you need to take into account minimum radius crooked. For scale rails (1:87) it is 380 mm. When passing large locomotives with five axles and long cars, this minimum radius must be increased by 1.5-2 times.
Based on this, you need to calculate the required space to accommodate the rail track. At a scale (1:87) it will be three by one and a half meters. You can select a smaller scale (1:120). The minimum radius will be 275 mm and a width of one meter will be enough.
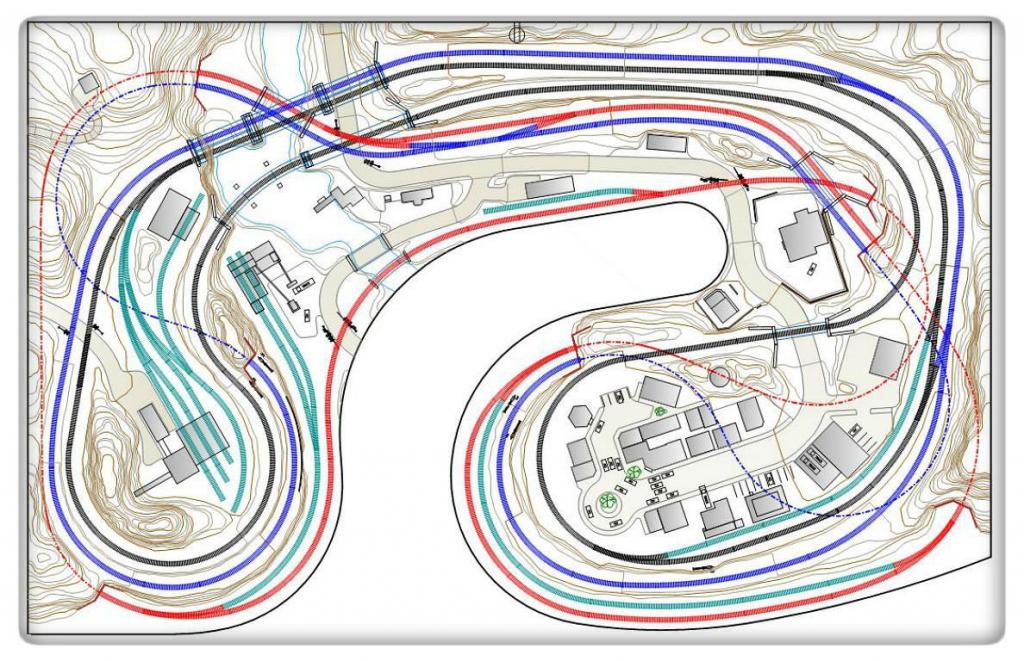
 You need to start building a layout by creating a diagram. At first it can be simple, one circle with the composition. New branches, arrows, semaphores, houses and other elements will be gradually added.
Making a children's railway
Having determined the dimensions and drawn a diagram, you can begin making the layout:
- You need to start by making a sub-model of the selected size. This could be a countertop or just a sheet of thick plywood. Next, you should transfer the diagram to the sub-model, drawing the rail tracks, the installation locations of switches and semaphores, the location of the houses, depots and station buildings. The complex arrangement of paths is designed in a special application on a computer.
- After drawing the diagram, you need to lay the rails. They are glued or nailed. Rails can be purchased or made yourself from copper wire. In this case, they need to be given rectangular shape by rolling method on a machine. Sleepers are also made on a machine. They look like thin bars.
- An electrical circuit is required for rolling stock. The power supply can be homemade or purchased with a voltage of no more than 16 V. As an electric motor for a locomotive, you can use a motor taken from a toy or purchased in a store. The trains will be powered through the rails. You need to connect the leads from the power supply to them. Electrical wiring should be done using copper wires and connectors. It must take into account all the places where there will be traffic lights, semaphores, and lanterns.
- In order for the rail tracks to have a realistic look, it is necessary to add ballast. To do this, you can use aquarium soils or special model gravel.
- To give the model a finished look, you need to think through and create the landscape, make mountains, tunnels, build roads, put up houses and figures of people. You can buy soil powder for grass, trees, or make a mountain and a tunnel using polyurethane foam and paint with acrylic paint. Good use can find papier-mâché, paper, wood, plaster, cardboard and other materials.
- Very interesting models trains and carriages can be made from paper. To do this, you need to download the diagrams from the Internet and print them. They need to be folded along the fold lines and glued. This is an easy way to fill your layout with new interesting models.
Do-it-yourself modeling is an exciting activity and continuous creative process. It takes a lot of imagination and skillful hands to bring your plans to life. It will be doubly interesting to make a layout together with your child. This is a good reason to instill in him manual skills and show how interesting the process of designing and making models can be. Collaborative creativity brings closer and enriches.
Attention, TODAY only!
The text of the work is posted without images and formulas.
Full version work is available in the "Work Files" tab in PDF format
Introduction 3
Chapter 1. General information about railway modeling 5
Chapter 2. Construction of a railway model 6
2.2 My experience in creating a railway model at home 7
2.3 Sociological survey “Railway modeling” 8
Conclusion 9
List of sources and literature 10
Applications 11
Introduction
Do you like to meet and see off trains? Perhaps you are delighted and admired by a train passing by, or amazed by the power and strength of the locomotive, which pulls loaded cars behind it. However, you do not yet have the opportunity to connect your profession and life with the railway. Then you will be interested to know that there is such a hobby that will allow you to have your own train with cars, stations, rails and the surrounding world. This is railway modelling.
Railway model making is not such a simple hobby as it might seem at first glance. In order for the result from practicing railway model making to be pleasing, it is necessary to have sufficient knowledge in general issues of railway technology, strive to acquire new knowledge in this area, apply various techniques and technologies, choose material for creating mock-up or model objects, be able to use the tool correctly and, Of course, do not forget about safety precautions.
In our work, we want to collect such information and offer our own version of the railway layout.
We believe that our research will help arouse interest in technology, will contribute to the development of imagination and fantasy in children, and perhaps will help someone decide on the choice of a future profession.
Research problem: find out how to organize the work of creating a railroad model at home.
Object of study: model of the railway.
Subject of study: conditions and technologies for creating elements of a railway layout.
Purpose of the study: describe creating a model railroad at home.
Research objectives: study literature on this topic; research modern methods and technologies for constructing a railway model; describe a model of a railway created at home.
Research hypothesis: it is assumed that if you execute certain conditions when creating a railway model, this will make the model as realistic as possible.
Theoretical significance We see the work in the fact that the research conducted will contribute to the development of students’ interest in technology in general and in railway modeling in particular.
Practical significance of this work is that collected materials can be used by teachers and students in additional classes on the surrounding world and technology. Also, the research materials may be of interest to those who want to get into railway modeling.
Research methods: study of specialized literature; generalization and systematization of material; observation and recording of results, photographing.
Brief overview of the literature and sources used. A huge number of practical and theoretical manuals, catalogues, reference books and periodicals are devoted to the topic of railway modeling. We have at our disposal a selection of the periodical “Railroad in Miniature”, which describes in detail instructions for creating model objects. Lots of general information about railway modeling (history, development, modern achievements, the most famous models and technologies for making models) are collected in the three-volume edition “The Art of Railway Modeling”. “Models of Railways” edited by Barkovskova B.V. is one of the first domestic publications about railway modeling, this book is very popular in our country, it is not without reason that it is called the “Bible of Modeling”. Here you can find general information about this hobby, its types, production technology and storage of layouts and models. This topic is also widely discussed in Internet communities and forums.
Chapter 1. General information about railway modeling
“Modelism” is the making of a model that reproduces geometric shapes nature, linearly reduced in all planes and repeating the texture of the outer surfaces of the original. The word “model” itself is French and means the likeness of some object in a reduced form. Thus, modeling is usually called a large-scale reproduction of an existing or pre-existing object.
Today no one can confidently say what happened in the beginning: a real locomotive or its model. According to some reports, the English engineer Richard Trevithick, before building his first locomotive, tested a smaller copy of it. In any case, it remains certain historical fact that at the beginning of the nineteenth century the railway model came to our world almost in parallel with the real railway.
The development of railway transport in Russia contributed to the development of railway modeling in the world. The construction of the Trans-Siberian Railway at the beginning of the 20th century became a worldwide phenomenon. At an exhibition in Paris in 1900 gold medal received the Siberian Express model, which is a classic example of a large-scale form model.
Today, model railroading ranks high among the most popular hobbies around the world. People different ages and professions are keen on creating copies of rolling stock and entire railway complexes - models.
In the first half of the 20th century, three development paths for railway modeling emerged. The first of them is large-scale, includes high-class museum and exhibition models made by professional layout designers; the second is student’s, which is popular in our country and has great educational significance; the third way is small-scale amateur.
Student model making introduces students to railway technology. This type of modeling does not aim at strict large-scale reproduction of rolling stock and other elements of the railway. The main ones features- This big choice scale of models and their arbitrary shape.
Amateur small-scale modeling includes the construction of miniature replica models of railway rolling stock, as well as the construction of model complexes for these models, reproducing, as it were, the railway as a whole. This type of modeling can be home or club, i.e. individual or collective.
Chapter 2. Construction of a railway layout 2.1 General recommendations to create a railway model
A railway model is a model that recreates railway objects in miniature. The layout may contain a model of a railway station, parts of a stage, access roads, a locomotive or carriage depot, urban infrastructure with railway tracks, natural objects along which the railway line runs.
The first thing we must decide on when deciding to create a model railroad is scale. In railway modeling, the concept of scale is closely related to standard size. The standard size is characterized by a scale reduction and model track width. There are several main standard sizes of model railways; you can get acquainted with the main ones in the appendix (Appendix 1).
Having studied in the literature various instructions on creating model railways, we have compiled an approximate sequence of work for making a model railway at home.
Make a sub-layout, a platform on which all the elements of the layout are attached and the rail track is placed. For a simple layout, you can get by with a plywood sheet of the required size.
Mark paths, roads, locations of buildings, etc.
Place substrates to simulate a ballast prism.
Lay the rails. Before this, you need to buy a sufficient amount of rail material.
Develop electrical diagram and mount it on the breadboard.
Dump the ballast. Imitation of ballast - required element layout. Ballast can be selected according to size among aquarium soils or other household bulk materials similar type.
Create a relief (hills, mountains, river valleys, etc.).
Paint the bases to match various landscape elements (grass, sand, forest soil).
Label roads.
Fabricate and install buildings.
Apply grass cover and other vegetation.
Place figures of people and vehicles on the layout.
Having decided to create our own model railroad, my dad and I subscribed to the magazine “Railroad in Miniature” (Appendix 2).
Since we decided to create a simple layout, we settled on wall version. For the baseboard we used strips of plywood 30 cm wide. Using wooden blocks, we attached them to the wall with self-tapping screws.
My dad and I bought rails and switches from an online store. They were nailed to the model with small nails (Appendix 3).
To simulate ballast dumping, we used screened river sand. Dad applied glue, and I poured sand (Appendix 4).
We made grass from sawdust painted with green gouache and glued it to the model (Appendix 5).
The station building is flat - dad cut it out of a piece of plywood, and I painted it and drew the windows (Appendix 6).
The station building is voluminous. I worked as a burner, a screwdriver, a chisel, a hammer and stationery knife. The walls, floor and ceiling are plywood pieces held together with toothpicks. To make it look more realistic, the roof was covered with black paper (Appendix 7).
We also bought traffic lights and glued them onto the layout. Dad connected the wires, we placed locomotives with cars on the model, and I checked how it all worked (Appendix 8, 9).
The layout is ready, but this does not mean that nothing else will change in it. We are planning a lot of all sorts of improvements and improvements. So there is a lot of work ahead! (Appendix 10)
2.3 Sociological survey “Railway modeling”
I was wondering if my classmates, friends and acquaintances were familiar with this activity? Do they want to get interested in railway modeling and will they be interested in my work? I conducted a survey (Appendix 11) and received the following results:
Conclusions: Interviewing boys and girls aged 6 to 9 years, I found that:
A lot of people (74%) like trains.
Few currently have a railway (31%), but the majority would like to have their own railway (58%).
Few people are familiar with the concept of “modeling” (21%).
Respondents want to know how to create their own model railway (63%).
Consequently, the research topic is really interesting and relevant for most of my classmates, friends and acquaintances. I will definitely introduce them to my research and share practical recommendations.
Conclusion
In our research work We formulated the problem - to figure out how to organize the work of creating a railroad model at home. During the research process, we considered general issues, principles, possibilities and methods for building model railways at home.
Our observations helped us verify the correctness of the hypothesis put forward: if certain conditions are met when creating a railway model, this will make it possible to make the model as realistic as possible. Our layout is small world railway.
The sociological survey conducted helped to verify the necessity and relevance of the topic presented in the study. We hope that our recommendations will help you create your first model railway, and you will feel the magic and wonder of the world of small model railways.
List of sources and literature
Barkovskov B.V., Prokhazka K.I., Ragozin L.N. Models of railways / Ed. Barkovskova B.V., - M.: Transport, 1989
The railway in miniature - M.: Eaglemoss Editions LLC, a selection of magazines for 2014-2016.
Moskalev L.M. The art of railway model making. [In 3 vols. T. 1]: History. Initial skills / Moskalev L.M., Myasnikov A.G., Ragozin L.N. - M.: Zheleznodorozhnoe delo, 2011. - 256 p.
www.railmodel.ru/-site about creating a home railway.
ANNEX 1
|
Symbol standard size |
Main scale |
Scale meter size, mm |
Width gauge, mm |
APPENDIX 2
APPENDIX 3
APPENDIX 4
APPENDIX 5
APPENDIX 6
APPENDIX 7
APPENDIX 8
APPENDIX 9
APPENDIX 10
APPENDIX 11
Research paper questionnaire
Maksimenko Dima
How old are you? ______________
Do you like trains? Not really.
Do you have a toy train? Not really.
Do you know what “Modelism” is? Not really.
Do you want to have your own railway with small trains, stations, houses, trees, tunnels, cars, tractors, people? Not really.
Do you want to learn how to make a model railroad with your own hands? Not really.
If you and your child are planning to make a toy with your own hands, then try building your own railroad. Children love toys with many details. A railroad set together with an adult can become a favorite toy. To make it you will need very few items that can be found in any home. And in the end you will get a unique and bright thing that will delight your child and remind you of the time spent with you. If you don't know how to make a railroad yourself, but want to try, then it's time to learn.
Tools and materials
- Sheets of thick cardboard
- Ruler
- Simple pencil
- Paper scissors
- Stationery knife
- PVA glue
- Acrylic paints
Step-by-step instruction
There are several ways to make a toy railroad, but it’s best to start with the simplest one.
- Determine the approximate size of the future railway. The length of the rails will depend on it. The rails need to be cut out of thick cardboard. You can use boxes from shoes, furniture or equipment. Lay a sheet of cardboard on the floor and draw stripes of the selected length on it. Surely, your railway will have bends, so you will need not only straight, but also curved strips for turns. Thus, you can make a ring road, which is much more interesting to play with.
- Paint the future rails with gray paint, as it looks most like metal. Choose acrylic paints, since they are not washed off from the surface of the paper.
- Prepare the sleepers. To do this, you need to cut a sufficient number of small strips of cardboard. At both ends of the sleepers you need to mark the points where the rails will be laid. It is best to coat the sleepers with brown or red paint, since they are made of wood.
- Place the painted rail blanks in in the right order and turn it over bottom side up. On this side you need to glue the prepared sleepers at the same distance from each other.
- Now it's time to move on to making the train. For carriages and locomotives, it is most convenient to use small cardboard juice or milk boxes. If there are no such boxes, then you can glue them together from pieces of cardboard yourself. For the locomotive you will need two boxes, which need to be glued together so that one box is located vertically and the other horizontally.
- The locomotive and carriages are usually painted the same color, but you can use any colors or designs you like. After the paint has dried, don't forget to paint the windows.
- Painted wheels need to be glued to the cars, and the cars themselves need to be connected to each other with strips of cardboard. The train is now ready to be placed on the railway.
- To make the toy even more interesting, make it cardboard box station or several stations. They can be painted realistically. From leftover cardboard you can cut out silhouettes of people, trees, houses, roadside posts and color them with felt-tip pens and paints.
How to distribute roles
Now you know how to make a railway with your child. Let him actively participate in the process. The child can be entrusted with coloring the parts and gluing the parts of the railway together. And it is better to do all operations with scissors and a stationery knife yourself so that the child does not cut himself. If you want to trust your child to cut out some of the pieces, give him or her scissors with rounded ends that are designed for small children.