Invented by the architects of ancient Mesopotamia, the arch was and remains one of the most beautiful elements landscape art. The variety of decor is very wide, so owners of country estates often wonder how to decorate a garden arch so that it becomes the center of attention. Of course, it is somewhat difficult to build a Gothic version from stone blocks or an openwork semicircle in the Rococo style, but this is not a reason to give up the idea of creating a beautiful point accent in your garden.
Three rules for successful solution of arched structures
The arch fits perfectly into any garden composition if you follow the simple rules of its design.
Rule 1. Unity of style and material. The arch should be in harmony with the fence and flower beds, emphasizing the color of the chosen style and the artistic taste of the owners of the site. For example, if a property is built around metal fence, then the arched design of the gate cannot be made of wood. And if the garden is arranged in chinese style, there will be inappropriate allusions to Victorian England.
Rule 2. Competent selection of jewelry. It depends on the length of time during which the arch should remain decorative. It should be remembered that annuals will have to be replaced fairly soon, lamps will have to be protected from moisture, and furniture will have to be put away for the winter.

Traditional roses create a cozy old-world scent in the garden
Rule 3. Sense of proportion. You should not overload the arch with a large number of parts; it is enough to choose two or three original ones that go well with each other.
Materials for decorating arches and design options
Before starting work, it is recommended to photograph the existing structure against the backdrop of the garden or the area where it is planned to be installed. You can draw the planned decorations for the garden arch with your own hands directly on this photo. This approach will avoid unnecessary expenses and save time.
For decoration you can use any available materials and suitable items: wood, stones, ceramics, castings, lamps, figurines, driftwood and, of course, climbing plants. It is undesirable to choose plastic, as it will very quickly become unusable, and metal unprotected from corrosion. As for plants, they need to be selected taking into account the climatic characteristics of a particular area and the degree of shading.

Even one small detail brings new notes to the decoration of the arch
Permanent exhibition of arched decor
Most often, the arch is designed in such a way as to delight with its appearance throughout the season or even the whole year. In this case, its stylistic unity with general decision garden and the durability of the selected decorations. The options offered below can and should be modified based on taste preferences and budget.
- the romance of flower frames is a win-win way to give an arch an unobtrusive summer charm. Range suitable plants wide enough: bindweed, morning glory, and nasturtium are suitable for quick gardening; long-term decoration will be created by climbing roses, clematis, wisteria, hops, and virgin grapes;
- good old country - a freshly painted picket fence, honeysuckle over the gate, a pair of flowerpots with petunias will evoke associations with the European province. Will help enhance the impression wooden decoration near the gate: a birdhouse or a stylized mailbox;
- a quiet corner for relaxation is simply necessary for those who come to the dacha to recover after tiring work. To create a cozy place in the arch opening, you can install garden bench, tea table or swing, hang a lamp. You can place a large stone or ceramic jug nearby.

The skillful selection of materials and details makes you want to come back here again and again
Transformation of the arch for the holiday
Sometimes you need to decorate a garden arch with your own hands for just one or two days, for example, for a certain holiday. In this case, it is important to choose materials that emphasize the color of the upcoming celebration.
TO children's day birth arch can be covered bright colors and animal figures made from balloons using twisting technique. To meet the newlyweds a good decision are white organza draperies and rose bouquets. New Year's decoration of the arch may include fir branches and noticeable unbreakable balls.
If you plan to spend part of the holiday near the arch at night, then homemade lanterns will come in handy. They are made as follows: a candle from an aroma lamp is placed in a small jar, which is secured to the arch using a wire handle.

A dense bouquet-ball against a background of translucent fabric emphasizes the celebration of the wedding ceremony
It’s not difficult to decorate a garden arch yourself, but if you have any difficulties, you can contact a landscape design specialist who will suggest the right solution, skillfully combining the features of a particular site, your imagination and the financial capabilities of the owners.
No matter what style your country cottage area, the garden arch will become one of the main decorations. The airy structure, entwined with greenery and flowers, is impossible not to notice. In addition to its main task - to provide support for climbing vines, this element is extremely decorative. The arch brings a touch of romance and lightness to the landscape design; its smooth shapes soften the overall outlines of the garden. Therefore, gardeners are increasingly choosing this type of decoration for their plots.
Green gate to a beautiful garden
Integrated into the design of the dacha, garden arches attract with their mystery. It seems that some special fairy-tale world is hidden behind the green passage. With your own hands, you can create any design of a country arch that will highlight the features of your site.
Decorative arches are convenient to designate functional areas garden For example, a relaxation corner, the passage to which is covered with lush greenery, will become even more comfortable. The entrance to the summer cottage, decorated with an arch, looks very advantageous. In this case, the design should be as high-quality and thoughtful as possible, because, in fact, it is the face of the entire farmstead.

Arch at the entrance
An interesting design move is several arches installed along the garden droshky. Over time, the overgrown plants will create a real green tunnel, which is a pleasure to walk through.
When choosing options for garden arches, it is necessary to take into account that their dimensions should allow the passage of the tallest members of the family, as well as leave freedom of maneuver for household wheelbarrows and other things. garden tools. It is permissible to erect small narrow arches only in decorative purposes, away from gates and paths.
An important role is played by the design of the arch itself, without taking into account the plants. If in summer, behind the lush greenery, a flaw in the design is not visible, then in winter, an unattractively made arch can ruin the entire landscape. Therefore, it is necessary to try to make the support as aesthetic as possible.

Openwork support
Garden arch options
Studying photos of garden arches, it is easy to notice that they are made of a wide variety of materials. Most often you can find wooden and iron structures, but the imagination of gardeners knows no bounds.
Air structures made of metal
One of the most common materials for building an arch in a summer cottage is metal fittings. Arches welded from metal are strong and durable, but for all their solidity, they look almost weightless.
The simplest option iron arch for a summer residence - these are arched pieces of reinforcement, fixed directly to the ground or on support posts. However, this design is not very aesthetically pleasing and is quite unstable. More often they use supports made of two metal arcs connected to each other by short pieces of reinforcement or thick wire.
The most sophisticated option - forged structures. It’s unlikely that you’ll be able to make such a garden arch with your own hands; you can see from the photo that it’s so complex designs Only masters can do it. If you decide to order a forged arch in a workshop, you will get a unique decoration for the site.

flower tunnel
The only drawback of metal flower supports is their susceptibility to corrosion. To prevent iron from rusting for as long as possible, it is coated with special anti-corrosion compounds or painted every year.
Available in wood
The easiest way to make an arch at your dacha with your own hands is from wood. In every household there are unnecessary bars and planks. By using skillful hands they can turn into beautiful flower support.
The main difficulty during construction wooden arch is that it is very difficult to create a dome-shaped top from boards. That's why wooden structures most often have the shape of the letter P or triangle.
The simplest wooden arch consists of two vertical supports and an upper horizontal crossbar. More complex options include a combination of two or more basic designs. An arch with an additional crossbar at the bottom that acts as a bench looks very unusual.

Wooden arch
Despite the fact that all stages of constructing a wooden garden arch are not difficult, this design has certain disadvantages. The main one is fragility. Wood quickly rots and cracks under the influence of the external environment. To slow down the process of destruction, the boards are impregnated with anti-rotting compounds, covered with stain, varnish or painted.
Modern support made of plastic pipes
With the advent of modern building materials increasingly you can find garden arches made of plastic water pipes. Such supports are strong, not subject to corrosion, and durable. If you have experience working with this material, do plastic arch at the dacha it’s not at all difficult.
It is made according to the principle of an iron arch, using small-diameter plastic pipes instead of fittings. The plastic is very pliable, so bending a semicircle is not difficult. The pipe sections are connected using plastic bends and a special welding machine for plastic. It is also easy to find ready-made plastic arches on sale - inexpensive, lightweight and practical.

Finished plastic arch
Unusual arches made from unexpected materials
Look at the photos of unusual garden arches, perhaps you can create something similar with your own hands. The materials used are brick, stones, and intricately curved roots. A lantern can serve as a support for a non-standard arch, garden sculpture, tree trunks.
You can play with the shape of the structure. Round or twisted arches look fresh and unusual. The supports with a figured dome look interesting. To make your garden stand out from others, be inspired by photographs of a variety of custom arches created by masters of landscape art.

Gateway to a fairy tale
Step-by-Step Guide to Building Plant Supports
To ensure that the structure lasts as long as possible, use it when building a garden arch. step by step instructions on its creation. Algorithm for different types arches are somewhat different, so we will consider several options in detail.
Instructions for creating an iron arch
A simple iron arched structure consists of two arched pieces of reinforcement connected by pieces of thick wire.
Stages of constructing a garden arch from rebar:
- Based on the desired dimensions of the arch, the length of the reinforcement is calculated. For a support 2 m high and 1.8 m wide, you will need two pieces of reinforcement approximately 6 m each. With a distance between the arcs of 30–40 cm, prepare required amount transverse connecting sections of thick wire of appropriate length.
- Bend the reinforcement. To do this, draw an arc template on the ground using a peg and a rope, the length of which is 90 cm. Using the template, bend two arches.
- The arcs are connected to each other by welding short sections between them. The simplest option is to weld them in the shape of a ladder, but you can do this with rhombuses or other shapes. For convenience, the elements are first connected at the edges and in the middle, and then the remaining space is filled with crossbars.
- At the site of the future arch, points are marked on the site where the supports touch the ground. Dig a hole at these points and install segments there metal pipes, commensurate with the diameter of the reinforcement, after which the holes are filled with concrete. The tubes must rise above the ground and exactly coincide with the arched supports.
- After the concrete has hardened, the ends of the arched structure are inserted into the holes of the tubes. If the arch is not supposed to be removed for the winter, the fittings are welded to the tubes. To make a collapsible arch, the connection is not welded, but fixed with wooden wedges. Ready-made building paint.

Clematis on an iron support
DIY wooden arch
Making a wooden arch in a summer cottage is much easier than making a metal one. Even a quick glance at a photo of garden arches is enough to understand the principle of operation.
Step-by-step instructions for building a simple wooden arch at your dacha with your own hands:
- Prepare three square bars. The thickness of the bars depends on the size of the structure, as well as on the plants that will climb along it. For annuals, a thickness of 5–6 cm is sufficient, while for thick perennial vines, beams with a cross section of 8–10 cm are required.
- For a two-meter arch, take two support beams 2.4 m high and one transverse beam, equal in length to the width of the structure.
- All three beams are connected with self-tapping screws in the shape of the letter P. To increase strength in the corners, additional oblique crossbars can be made from thinner planks.
- Mark the location of the arched supports on the ground and dig a hole 40 cm deep in these places.
- That part of the beams that will be underground is impregnated with waste machine oil or special anti-rotting solutions. Additionally, you can wrap the wood with roofing felt or film.
- Place the arch in place. Large pieces are placed in the holes broken bricks or stones and filled with concrete. Fix the structure with spacers until the concrete hardens. The finished arch is painted or varnished.

Blooming splendor
Now you know how to make a garden arch with your own hands. Thanks to the efforts caring owner, your summer cottage will become even more comfortable and attractive.
All gardeners know that it is almost impossible to grow climbing flowers without support. For this purpose, any supports are chosen: stretched ropes, fences, posts, etc. But to create a spectacular spectacle, the use of such materials will not be enough. To make your garden beautiful and captivating, use special architectural elements.
The most popular of them is an arched building on two supports or an arch. Despite the fact that it has the highest decorative qualities, the design itself is quite primitive. Therefore, anyone can build it. You just have to find out what types there are, how they differ and what is needed for the job. This article is about how to make a garden arch with your own hands from various materials(made of metal, wood, plastic pipes).
Selecting the type of structure
Today there is a large assortment various garden arches. They all differ in their shape and material. Such designs can be:
- metal;
- wooden;
- plastic;
- trellis.
They are all similar in purpose. There are special arches for grapes, decorative arches for climbing plants, as well as arches for the recreation area. There are a lot of purposes – the choice is yours.
Making a metal structure

The classic and most popular is a metal arch. let's consider simple model, having a height of 2130 mm and a width of 1830 mm. It is made from two reinforcement rods that will be bent into arcs. They will be connected by metal rings. The peculiarity of this design is that it can be performed without using welding machine, all parts will be connected with thin wire.
The distance between the arched sections is 31–32 cm. In order for the arch to be held in place, it must be dug into the ground at least 40–50 cm. The connecting cross-ring rings should have a diameter of 30 cm, and the distance between them should be 15 cm.
List of required materials

To carry out the work, first prepare following materials:
- reinforcement rod, diameter (this icon will be used later in the text - Ø) 10 mm, length 6 m - 2 pcs.;
- reinforcement rod (Ø mm), length 0.94 m – 9 pcs.;
- strong wire, soft;
- enamel for painting and primer;
- reinforcement (Ø 10 mm), 0.25 m long, as pins for a template - 10 pcs.;
- rope 1 m long.
Step-by-step instruction
First you need to bend the reinforcement bars d=10 mm so as to get an ideal arched opening. To do this, use a simple rebar pin template. Stick 0.25 m long pins into the ground so as to obtain the calculated contour of the arch.

The outline must be drawn directly on the ground. To execute perfect circle, drive a rod into the ground and tie a rope to it. Take the free end in your hand and draw a semicircle with chalk or paint. Then drive the pins into the ground starting from the highest point of the semicircle. Now you have a template that is easy to use. All that remains is to bend the reinforcement bars, giving them a semicircular shape. It will be difficult to do this yourself, so ask a friend or neighbor to help you. Directed efforts are needed on both sides to create an ideally shaped arched opening.
Be especially careful when performing this step. The reinforcement rod may come off, causing injury to you or your assistant.
For this arch model, metal rings will serve as connections between the reinforcement sections. They are made from thin reinforcement Ø 6 mm. To do this, you need to cut 9 pieces of reinforcing bars 94 cm long. Using a pipe bender, you need to form rings from them.

If you do not have this tool or simply do not want to complicate the work, the design can be simplified: instead of rings, use straight rods. Such an arch will look simpler, but will not be inferior in functionality to the original version.
The finished main sections need to be installed in the ground. To do this, the ends of the reinforcement should be deepened inward by 40–50 cm. Measure 40 cm from the end of the reinforcement that you will be deepening into the ground and wrap this place with electrical tape. Do this for all 4 ends. This way, you will know when to stop.
We connect the main frames using rings. Measure 61 cm from the bottom of the arch and fasten the first ring. To keep it in place, you can use a construction clamp. Now wrap the connections with flexible wire so that the ring is securely fixed and holds the structure. We fasten the next rings using the same method, maintaining a distance of 15–20 cm.
After finishing work, coat all metal parts with primer. After it dries, apply a layer oil paint. That's it, your arch is ready for use.
Other types of arches

Other arches are made using exactly the same principle. For example, wooden arches are made from timber. It's simple and inexpensive construction. Thanks to natural material, it fits well into the design of any garden. To build such an arch, you need 2 vertical frames, 2 inclined and 1 horizontal part. All this is connected by wooden crossbars using nails. The finished structure is dug into the ground, primed and varnished.
Plastic arches are a structure made of plastic pipes. Such arches are considered the simplest to manufacture; they are easy to assemble and disassemble. If you want to make yourself a structure of this type, then you need to take into account that plastic is not capable of carrying low temperatures, therefore such structures are often made collapsible. Such an arch is decorated with annual plants.
Forged arched structures and pergolas are very popular. Such arches look very elegant and will decorate your summer cottage all year round. Moreover, they are durable and resistant to various weather conditions. To make your stay in the garden more comfortable, you can make an arch with a bench. In this case, you can enjoy the beauty of your garden while sitting under the arch. As you can see, there are a lot of options, you just need to put in the effort and imagination, then your garden will look like a real embodiment of your ideas.
You may be interested in answers to other questions discussed on our website:
Video
You can learn how to make a strong arch for a rose by watching the video we offer:
Photo


Garden arches often used to frame a path, as in this case, or it can be used to decorate the entrance to the garden. Installed alternately, the arches emphasize the calm and comfort of the alley. Of course, if the size allows. Sometimes these structures serve as symbolic boundaries of plots. If the arch is not passable, a bench installed under the arch will look very cozy. Here you can relax pleasantly, especially under the shade of blooming greenery.
Arches are made from different materials, from solid stone and brick to simple air structures from reinforcement bars. Let's look at the last option.
Rebar arch
In general, you take the mesh, cut the canvas to size and secure the edges with wire. The most modern and convenient way, is to secure the edges with a wire spiral with locking pins.
We need a combined gabion, which will consist of three parts. Two standard boxes and a smaller one between them (the support will be attached there). But you can make one large gabion with a recess.
For the arch itself we will need 4 two-meter beams, two 80cm cross beams, slats for the grooves and two sheets of galvanized mesh, two meters long and half a meter wide.
Now in order:
- Using a router we make slots for the trellis mesh in the cross beams
- Screws to cross beams attach vertical posts
- For strength, we fix the crossbar and rack with triangular brackets
- Along the supports we attach two slats with a distance of 4 - 5 mm, this gap will be a groove for attaching the mesh
- Installing the mesh in the grooves
- We fill the boxes with stones so that the support posts are securely fixed.
- We secure the mesh sheets to the dome with wire.
The arch is created for climbing plants, no matter what you make it from, so you don’t have to worry too much if the design turns out to be less than ideal. Then all you have to do is choose plants for the arch.

The simplest and most maintenance-free are ivy and grapes. Ivy, this evergreen, unpretentious and frost-resistant, so it will decorate your arch all year round. True, ivy grows quite slowly, so only after a few years it will be possible to admire the result. If you don't want to wait, plant grapes, there are plenty decorative varieties, for example, girlish, its leaves are very beautiful in autumn or Coignier, with beautiful carved leaves.
Regardless of the design option for your site, a garden arch will be one of the main elements of its decoration. Despite the fact that this kind of structure is designed to support climbing plants and emphasize their beauty, the arch itself is an excellent tool landscape design. Light, openwork structures that rise above the surrounding environment cannot fail to attract attention. Let's discuss how to build a garden arch with your own hands.
Garden arch - worthy decoration any gardenBusiness card of your site
To decorate the arch garden plot, it is important to choose the location for its installation wisely. Similar design You can designate a separate area of the yard. For example, install an arch for climbing plants over the path between the utility area and the general area of the site, as in the photo.
The arch at the entrance to the courtyard looks interesting, welcoming everyone. This type of design must be made with high quality and worthy design, as it will act as the calling card of the entire courtyard. Forged construction may be quite appropriate for such a case.

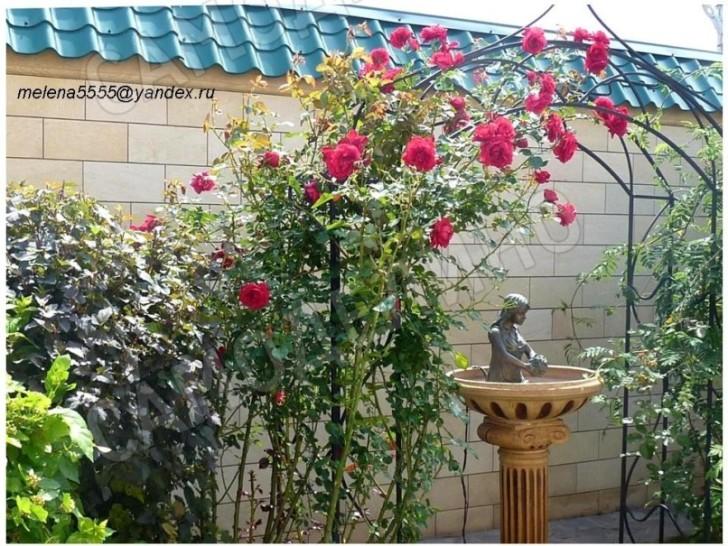 An elegant metal arch supports roses above the fountain sculpture
 Somewhere in the depths of the garden there may be an arch, the main purpose of which will be to support climbing roses or grapes. It can be made from reinforcement or wood.
Designers propose to make a kind of enfilade of several flower arches standing behind each other. When the climbing plants completely entwine the frame, you will get a tunnel leading to a gazebo in the garden or to a waterfall with a lake. They can be used as supports for grapes, climbing roses, other colors.
There is one more point that is important to pay attention to - the accuracy of the design. It can be assumed that the plants will hide asymmetrical support elements, protruding or uneven parts of the reinforcement from prying eyes. However, in winter period And in early spring, when the plants have not yet woken up, the arch will stand without shelter. It is worth thinking about how the quality of the design will affect the appearance yard

 This arch separates the vegetable garden and the general area of the site
 Types of arches
It is easy to assume that such supports are most often metal, including forged or wooden. Practice shows that in fact, garden supports can be made from a wide variety of materials. Let's look at the most current options.
Lightweight heavy metal structures
Steel reinforcement is used quite often when creating arches. The steel supports are quite strong - they can withstand the significant weight of plants with flowers or grapes, as well as gusts of wind. At the same time, welded structures have an impressive appearance - they do not clutter up the space, and from the outside they appear openwork and light.
 A mesh arch filled with soil: very interesting!
 Metal arches can be made in various options. The simplest method is an arc made of a metal rod, the ends of which are fixed in the ground or attached to separate supports. Such an arch is unstable and difficult to make accurately. A slightly more complicated version looks more effective similar product: two arcs of the same type that are connected to each other. As a connector, pieces of rod welded to reinforcement arcs or wire can be used.
The most complex option, but also quite aesthetically pleasing, is forged structures. However, it will not be possible to make such a support with your own hands if you do not have experience and tools. It is best to order such work from a professional.

 The forged arch is spectacular even in winter time
 U metal structures there is one significant drawback - they begin to rust over time. To avoid corrosion, it is necessary to use a frame with a special coating or paint the arch, but this will have to be done annually.
The accessible charm of warm wood
Wood is also a popular material for creating an arch. It is from this that it is easiest to create a structure yourself. The main obstacle when working with wood is the difficulty in creating an arched top. Due to this wooden supports do U-shaped, or in the form of a triangle.
The simplest version of a wooden arch is two supports, between which a crossbar is fixed. More complex options are a combination of two or more simple designs.
The tree has a well-known drawback: it is susceptible to rotting. You can combat this feature by covering the boards with stain and painting them different colors, coated with varnish. There are also special antiseptic compounds that prevent rotting.
 A wooden arch divides the area into zones
 Convenient and modern plastic pipes
Today, garden arches made from plastic pipes, which are used for plumbing, are often used in private gardens. This durable material– it is not subject to rotting or corrosion. Craftsmen make such structures on their own, especially if they have experience working with plastic.
An arch is made according to the same principle as from metal. The plastic is quite easy to bend into in the right place, and a special welding machine is used to connect the parts. Finished goods relatively durable, and also successfully perform their functions. Can be purchased now ready-made designs made of plastic.
Flight of fancy and other materials
Creative people have learned to use the most different materials for creating garden arches. Sometimes you can see brick supports, arches formed from powerful roots, lamp posts, sculptural compositions, tree trunks entwined with roses. Arches are also popular today unusual shape– round, domed, twisted. All this can be done with your own hands if you show imagination and put in a little effort.
Master class on making a wooden arch

 DIY wooden arch
 The garden arch that you see in the photo is a connecting element of the overall structure with a pergola and trellis. The entire structure divides the yard into common and utility zones. The arch itself also serves as a support for the climbing roses. 
 To build the wooden arch I used the following materials:
- timber with a section of 60X40mm;
-shanks for shovels with a diameter of 40mm;
-wood screws 4.2x76mm (black, rare pitch);
- impregnation for wood “Pinotex”;
- yacht varnish;
- galvanized box with a section of 60X60mm;
-cement and sand.
 View of the arch from reverse side
 The design has following parameters: height 2m, width 2m, depth 0.8m. All parts were coated with impregnation and two layers of varnish before assembly. Four seasons of the arch's life have shown that the arch has to be varnished once every two years. Sometimes it is necessary to sand the darkened wood and re-coat it with Pinotex before varnishing. Then the entire structure always looks like new.
To install the supports, I dug four holes 0.4 m deep. At the ends of the 4 beams that will be in concrete, I put pieces of galvanized profile 60x60mm (I bought one fence post) and secured them with self-tapping screws. Since the timber is thinner, we had to fill the gap with a 10mm thick strip of plywood. It is easier to use special galvanized thrust bearings, but it was not possible to acquire them quickly. I set four beams vertically and in height using a level, temporarily fastened them with slats and screws, and concreted them.
 This is what a support in the ground looks like
 After the solution hardened, I connected the top of the supports first with transverse and then longitudinal beams. I wanted to provide a higher passage, so I added one more longitudinal beam on each side of the arch. All connections were made with self-tapping screws. In order not to load the screwdriver too often, the beam closest to the screw was pre-drilled with a diameter of 4 mm.

 Installation of longitudinal beam
 I attached two more to the “roof” of the arch (four in total) cross beams. Then he tied them together with several crossbars. This way the design looks more interesting, and the long beams will not “sink” from moisture.

 Arch top design
 All that remains is to cut and secure the ladder of shovels on the side walls of the trellis. Of course, you first need to mark with a ruler and pencil. I was diligent enough to treat all the ends of the parts with impregnation before installing them. But the places where the parts are joined do not “lose their face” over time, and the wood does not deteriorate.

 Sidewall design
 To cut the cuttings at the same angle, I first drew a template on a board and was guided by it when cutting. For these purposes, you can use a miter box.

 Fastening the cross members
 The result was a fairly rigid structure and no drawings were required. In any case, the roses like it.
DIY metal arch

 DIY rebar arch
 We propose to build a support consisting of two pieces of reinforcement bent in the shape of an arc. We will connect both lines of arcs with rigid wire. We present step-by-step instructions for constructing the structure:
- First you should think about what the dimensions of the finished support should be. From practice, for an arch 200 cm high you will need 2 rods about 6 meters long. In this case, the width of the structure is assumed to be approximately 1.8 meters. The step between the arcs will be 30-50cm. To fasten them together you will need pieces of wire of the same size.
- To bend the rods correctly, you need to prepare a template. The drawing is drawn directly on the ground using a peg and cord. The twine is tied to a peg, the required length is measured and an arc is drawn.
- Next, the already bent pieces of the frame should be connected to each other with pieces of wire or reinforcement. They can be welded in a simple way in the form of a ladder, or make them intersect, forming rhombuses or other shapes. First, they are welded along the edges of the frame (at the edges of the arcs and in the center), then the remaining space is filled with segments.
- Mark the place where the support will be installed. At those points where the “legs” of the structure should be, holes are dug. Pipes are inserted into them, the diameter of which will allow the ends of the arcs to be placed inside. The pipes are then filled with concrete. After the solution has hardened, you can install the arch.
If the structure will spend the winter on the site, it is welded to the pipes. If the arch must be removable, its lower parts are fixed in the pipes using wedges. After installation is completed, the arch is coated with paint.

 Green color arches camouflage the structure among plants
 As you can see, almost all the garden arches that are presented in our article can be made independently. We talked about the principles of working with metal, but you can make an arch from plastic pipes, or build it from stone or brick.