The creaking of floorboards is the most common problem in houses with wooden floors. Its appearance can be caused by various reasons, and it occurs not only in old houses, but also in new buildings. To get rid of annoying sound, it is not at all necessary to undertake large-scale repairs: there are several simple ways who will help quickly and with minimal costs eliminate any squeaks. First you need to establish exactly why the boards are being held together, and only then choose a way to strengthen them wooden floor.
In new floors, creaking usually appears due to violations of installation technology or the use of low-quality wood for joists and flooring.

Old floors usually begin to creak due to wear and tear. individual elements structure, shrinkage of wood or the base itself.

The most common reasons are:
- weak fastening of boards– if nails or screws of a smaller size than necessary are used, very soon such fixation weakens and the boards come off the joists. In addition, metal fasteners rust, become thinner, and their caps come off;
- no gap around the perimeter of the room– fluctuations in temperature and humidity cause expansion of the material, and if the boards are laid without a gap from the wall, they swell in waves, begin to rub against each other and creak;
- drying out of the tree– over time, the boards dry out and move freely on the nails, making squeaks. The joists also dry out, the gaps between them and the boards increase, the floor begins to sag;
- logs are not leveled– due to differences in height when laying the covering, deflections are formed and, as a result, the floor creaks underfoot. The same thing happens if leveling pads made of soft materials. Under loads, such pads are compressed, decrease in size and lead to subsidence of the structure;
- raw wood– drying of the material after installation leads to deformation of the joists and boards, loosening of fasteners, and friction between floor elements.


Old buildings creak wooden floors may appear due to subsidence of the foundation, which affects all elements of the structure. In such situations, simply strengthening the boards is not enough, and the only the right decision is a major overhaul.

How to identify the cause of a squeak
To effectively eliminate the problem, you must correctly determine the cause of creaking floors. To do this, you need to inspect the places where creaking is heard, check the tightness of the connections by pressing hard. If there is movement of the nails or individual floorboards are “walking,” the problem lies in loose fasteners. If the boards are firmly knocked down, but the flooring sags when pressed, this indicates deformation of the joists or subsidence of the soil under the base.

Find problem area will help building level or rule: creaking usually occurs in places of greatest differences in height. In this case, it is best to remove a couple of floorboards and look under the flooring: this way you can accurately assess the condition of the joists, the degree of their wear, and the quality of the rough foundation.

Creaks near the wall are often caused by incorrectly fastened or dried out skirting boards. Inspect them carefully, pressing your hand in several places, check whether nails come out of them when pressed, and whether there are cracks in the material. To make sure there is a gap between the boards and the wall, you should carefully remove one of the plinth fragments.

Methods for eliminating squeaks
So, when the reason is determined, you can choose the optimal method of strengthening the floor. There are a few effective ways, long tested in practice by home craftsmen.
| Ways to strengthen the structure | Causes of squeaking | Peculiarities |
|---|---|---|
| Small gaps in the flooring, loose end connections | Minimum labor costs and financial investments with high efficiency |
| Gaps between the subfloor and joists | The method is expensive, but very reliable |
| Loose connection of floorboards to joists | Economical and quick method, no need to spend a lot of effort |
| Worn material, drying out of floorboards, presence of large cracks and other damage | The method is time-consuming and labor-intensive, but it allows you to effectively eliminate squeaks and other defects |
| The presence of wide cracks in the flooring as a result of drying out | The method is effective and durable, but requires some experience and physical effort |
| Small gaps in the floor, loose fit of elements | Expensive, but quick and easy. The method allows you to remove squeaking for a maximum of 3 years |
| Deflections of boards due to large distances between joists | Easy to implement, but not suitable for high traffic areas |


We strengthen the floor with our own hands
You can strengthen the floor using any of the above methods yourself, since special knowledge This does not require and is sufficient to be able to handle tools. Let's look at popular strengthening options in detail.
Using dowels or wedges
This method is great for cases where the flooring is still strong and smooth, but small gaps have appeared between the floorboards. There are two options to solve the problem.
Reinforcement with wedges. From wooden slats cut wedges to fit the gaps in the floor. Use a knife or spatula blade to clear the cracks of debris and vacuum them. Wet cleaning This cannot be done - the tree must be absolutely dry. The wedges are coated with wood glue on all sides and driven tightly into the cracks. If there are gaps or small depressions at the edges, they need to be filled with glue mixed with sawdust in a ratio of 1:4. Now you need to wait until the glue dries, remove all excess with a plane, and thoroughly sand the surface. Finally, apply a water-repellent primer and repaint the floor.


Reinforcement with dowels. At the joints of the floorboards, in the place of the gap, holes are drilled through both boards at an angle of 45 degrees. The drill is selected according to the diameter of the dowels. The resulting dust and shavings are removed, the dowels are covered with glue and driven into the holes until they stop. After drying, the protruding parts of the dowels are cut off, the repaired areas are cleaned and smoothed with wood putty.

Anchors
If the creaking appears due to a loose connection of the joists to the rough base, optimal solution is to strengthen the structure with anchors. To do this you will need:
- roulette;
- drill with a crown and a wood drill bit;
- anchor bolts and key;
- putty.
Step 1. In the room, remove the baseboards and sweep away dust and debris.

Find areas where the floor sags. Now you need to determine the location of the logs under the boards and measure the distance to the concrete screed. The joists are easy to find by looking at the nails - they run in rows across the floorboards. Having stepped back about 5 cm to the side, a small hole is drilled into the board. through hole and insert a piece of wire there until its end rests on the concrete. Measure the length of the wire and add 3-4 cm to the result.

Advice. If the nails are hidden under putty and a layer of paint, a regular magnet will help you find them. By running a magnet across the floor surface, you can easily identify a row of fasteners and establish the location of the joist.
Step 2. Along the nail fastening line, drill through the joist through the floorboard in several places and deepen it into the screed by 35-40 mm. The holes are made according to the diameter of the anchor bolt.
Step 3. Place a bit on the drill and drill a hole in the floorboard for the head of the bolt, clean it of dust.
Step 4. The bolts are inserted and tightened with a wrench until they stop, tightly tightening the floorboard and joist to the base.

Step 5. Small cracks in the boards are sealed glue mixture with sawdust, recesses for bolt heads - with wood putty.
As a rule, such strengthening helps to permanently remove creaks and sagging of the floor. On top of the boards you can lay chipboard, OSB, plywood or lay linoleum.
Pulling the floor with self-tapping screws
To tightly connect the flooring with the joists, you need to use self-tapping screws slightly shorter than the total thickness of the floorboard and joists. To determine this thickness, you should dismantle part of the plinth and take measurements through the gap. It’s even more convenient to do this through a hole in the floor by removing one of the boards. Measurements are taken from the surface of the flooring to the rough foundation on which the joists rest.
To work you will need:
- screwdriver or drill;
- wood screws with a diameter of 3.5 mm;
- waterproof putty;
- tape measure and pencil;
- hammer.
Advice. For quality connection you need to choose self-tapping screws whose threads do not reach the head. Such fasteners allow you to tightly tighten logs and boards together, unlike standard self-tapping screws.

Step 1. In areas where the flooring walks underfoot, the location of the joists is determined by the nails. If the boards are covered with plywood or chipboard on top, you need to remove the baseboard from one of the walls to see the ends of the joists and mark lines on the floor surface. If the logs are not visible from under the boards, you should do it differently.
Since the boards are laid perpendicular to the joists, you need to look at which side the ends of the floorboards are on, step back a few centimeters and drill a through hole. If the drill easily passed through the floorboard, make several more holes, moving further and further from the wall in a straight line until the tool rests on the joist. Mark this point with a pencil, then determine the location of the adjacent log in the same way. As a rule, they are laid in increments of 40-60 cm. Having found it, they put another mark and measure the distance between them. Once you know the installation step, finding the remaining logs will not be difficult.

Step 2. Along each joist you need to drill holes every 10-15 cm. In order not to get lost and miss the beam, it is best to mark it. Having found the location of the extreme log at one end of the room, determine it in the same way at opposite wall, and then connect the marks with a straight line. The remaining lines are drawn parallel to the first at the required distance.

The drill should not be placed perpendicular to the board, but at an angle, and it should enter through the floorboard into the joist to about ¾ of its thickness. To prevent the fasteners from coming loose in a short time, the diameter of the drill must be smaller than the diameter of the screws.
Step 3. The holes are cleaned of wood dust and self-tapping screws are screwed in, deepening their heads into the floorboards by 1-2 mm. There is no need to remove old nails if they are held tight enough. The caps protruding above the floorboards should be hammered in with a hammer and sunk into the wood using a hammer. Loose or rusted nails must be removed, and a self-tapping screw must be screwed in nearby.

Step 4. Take wood putty and carefully apply it to the boards with a spatula, covering the recesses from the fasteners. After drying, these areas are sanded with sandpaper, dusted, and primed. Now all that remains is to paint the floor or lay the finishing coat.

Video - Quick floor repair
If the floor creaks due to wear and tear, the methods described above will not have any effect. More are needed here radical measures, that is, the floor bulkhead. For work you will need standard set tools: tape measure, level, nail puller, hammer, drill, screwdriver.
Step 1. The baseboards are dismantled first, then the boards are removed one by one using a nail puller. To prevent the tool from leaving dents on the floorboards, it is recommended to use small wooden pads. Since most of the boards will be laid back, for convenience you should number them on the back. Each floorboard is carefully inspected, all nails are removed, and carefully stacked on top of each other. Severely damaged boards are discarded; there is no point in putting them back in place.


Step 2. After dismantling the flooring, they begin to check the joists and rough foundation. If there are cracks in the screed, they need to be opened and sealed with fresh mortar. Dry or rotten joists are removed, the rest are checked with a level and, if necessary, leveled with pads.
Step 3. After removing debris and dust, proceed to installation of the coating. The floorboards are laid one by one on the joists, guided by the numbers indicated. A 10-15 mm wide indentation must be made from the wall. Self-tapping screws can be screwed into holes left by nails, but only if they are not broken. Screw in the fasteners at an angle to the board, so the connection will be more reliable.


Lay the floorboards, hammer them down with a mallet, and secure them with self-tapping screws


Step 4. If the paint on the floorboards has worn off in places and appearance The coating leaves much to be desired, you can treat the surface with a sander. The treatment is carried out at least twice, first using sandpaper with large grains, then with small grains. This will allow you to achieve maximum smoothness of the coating and refresh it.
Step 5. After sanding, the floor must be vacuumed and a layer of protective primer with antiseptic properties must be applied. Now the surface can be painted or varnished.
Video - How to varnish a wooden floor
Often the boards dry out so that wide gaps form between them. At the same time, the floorboards still remain quite strong and even, and there is no particular need to change them. In such a situation, you need to compact the flooring by fitting the old boards to each other and adding a few new ones. You can connect boards in different ways; we will look at one of the most accessible and simple methods.
To work you will need:
- screwdriver;
- mallet;
- several wedges carved from wood;
- tablet;
- small trim timber;
- wood screws.
Step 1. Carefully dismantle the baseboards and remove the nails from the floorboards. Deformed or cracked boards are discarded, as they can break into pieces when being pulled together.
Step 2. The outermost board from the wall is laid on the joists, leaving a mandatory gap of 10 mm. Secure the floorboard by screwing in the screws at an angle to the surface. You can use nail holes if they are not broken.
Step 3. Several more floorboards are laid using the tongue-and-groove joining method.

Step 4. Take a wedge, place the narrow side against the floorboard, and press it on the side with a piece of wood. The block should lie on the joist. After making sure that the wedge is tightly adjacent to the board, the block is secured to the joist with two wood cutters.

Step 5. The wedges are secured in two or three places, depending on the length of the board. Make the distance between the wedges as equal as possible so that the flooring is fused evenly. Next, take a plank, place it against the end of the wedge and hammer it with a mallet. Having finished with one wedge, move on to the second and so on.


Step 6. Having completed the tamping, take a screwdriver and fix all the laid floorboards to the joists with self-tapping screws - 2 on each joist.


Step 7 Continue laying the flooring. Carefully unscrew the screws from the support block, remove the wedge, and lay the next 5-7 floorboards. Again, apply the wedge to the outer board, secure it with a block and repeat the steps described above.

When all the boards are laid and joined together, there will be a wide gap between the flooring and the wall, into which 2-3 more floorboards will fit. They are laid in the same way, having previously been adjusted to size, and screwed to the joists with self-tapping screws.
Video - Method of tightening floor boards
Foam filling
If the coating does not need serious repairs and the boards are not held together tightly, you can use foam. Everything is very simple here:
- the floor is cleaned of debris and dust, the gaps between the boards are cleared;
- take a balloon with polyurethane foam, insert the end of the tube into the slot and blow it out;
- Having filled all the gaps, allow the foam to dry, after which the excess is carefully cut off flush with the surface.
If plywood is laid on top of the boards, the areas where creaking is heard are drilled through in several places and blown out in the same way. After cutting off the dried foam, the treated areas are cleaned and wiped from dust. After this, all that remains is to paint the floor or lay the finishing coating.


Prices for polyurethane foam "Macroflex"
macroflex polyurethane foam
Screw supports
The easiest way to strengthen sagging boards is with self-tapping screws, but only on the condition that the load on the floor is not intense. It should be noted that this method of strengthening is only suitable for floors on concrete screed. If the logs are installed on the ground, the screws will not be able to serve as reliable support for the boards, as they will fail and the creaking will only intensify.
How is strengthening performed:
- identify sagging boards;
- using the heads of the nails as a guide, mark the location of the joists with chalk;
- drill a hole in the center of the deflection at the same distance from both lags;
- screw in the self-tapping screw and cover the recess from the head with putty.

The number of screws per deflection depends on the distance between the lags: up to 40 cm, one fastener is enough, from 40 to 50 cm - 2 screws, more than 60 cm - 3 screws. It is better to cut off the sharp ends of the hardware with a grinder so that under load they rub less on the concrete.
Video - How to strengthen a wooden floor so it doesn't creak
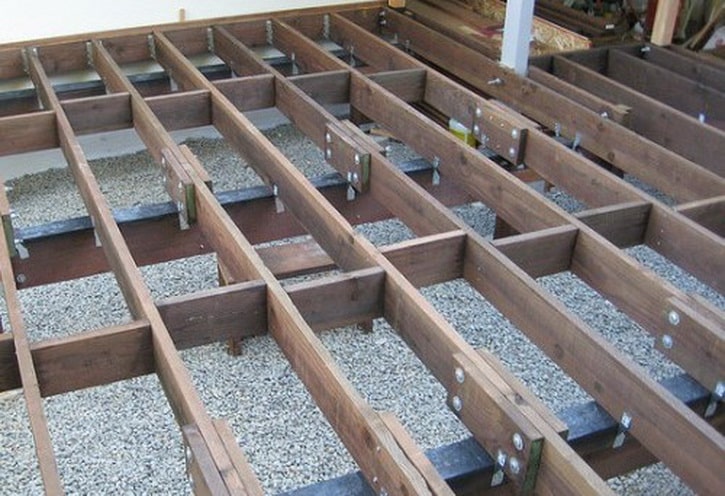
One of the main structural elements used for the construction of floors in attics or second-floor rooms, mainly in low-rise buildings individual construction, is wooden or metal beam, which simultaneously serves as a floor joist and a base for fastening ceiling coverings. Widespread beam floors contributed to the low cost of the initial building materials and the possibility of constructing floors without the use of lifting mechanisms.
Lag deflection

When entering some, especially old, houses, even with the naked eye you can notice the deflection of the ceilings of the second, or, less often, the floor of the first floor, which is a consequence of incorrect calculation bearing capacity lags or excesses permissible load on the floors. As the practice of operating multi-storey buildings built in the first half of the 50s of the twentieth century, where wooden interfloor ceilings were used, suggests, by the year 2000 the ceiling deflection ranged from 70 to 100 mm, which led to the need for major repairs buildings with reinforcement of load-bearing floor elements. And this is provided that an accurate engineering calculation of loads and lag sections is carried out at the design stage. And what can we say about individual development, when the calculation of the load-bearing capacity of the logs was carried out “by eye” on the advice of “competent” specialists.
Very often, the quality of the material used also influences the amount of deflection of the logs, excess humidity wood, insufficient thickness of the rolled metal from which the beam is made, and many other different reasons leading to sagging, for example, of the second floor floor under load. An incorrect calculation of the load-bearing capacity can lead not only to the deflection of the log, but also to the complete destruction of the structure and the collapse of the floor downwards, and when no one expects this.
When is it necessary to strengthen the logs?

If the owner of the house notices sagging top floor, then the first thing that needs to be done is to carry out simple measurements and assess the condition of the structures, the magnitude of the static load, in order to determine the amount of sagging of the ceiling or changes in the curvature of the floor in order to decide on the need to strengthen the logs.
Any ceilings, under the influence of their own weight, the static load of structures and objects installed on them, sag over time. The permissible sagging value is taken to be 1:300, that is, if a three-meter beam sagged by 10 mm, there is no cause for concern, but if this value is greater, then measures must be taken to eliminate the deformation and strengthen the structure.
Strengthening metal structures
Metal structures used as beams interfloor covering, can be strengthened with additional rolled metal products using welding or bolting. To do this, the surface of the floor or ceiling is dismantled, if necessary, adjustable supports are placed under the floor beams to eliminate deformation, and the structure is reinforced with standard rolled metal products of the required cross-section, the calculation of which is carried out using special tables and methods.
Strengthening wooden elements

Existing structural elements wooden floor Depending on their condition, they can be strengthened in several ways:
- Using timber overlays, performing a simple mathematical calculation, when the width of the existing beam is subtracted from the table value of the cross-section of the required floor beam. The timber and the beam are fastened using bolts with metal plates that prevent the destruction of the wood at the fastening point and weakening of the structure. The existing beam is raised with jacks until a level floor surface is obtained, after which the overlay and the beam are fastened together;
- Using metal strips 10 mm thick and 10-20% wide as overlays less height timber. To prevent the strip from deforming and reducing strength, the number of fastening bolts should be increased by 25% compared to wooden elements. Overlays are installed on one or both sides of the beam, depending on the load on the load-bearing elements of the floor of the upper floor;
- Wooden floor beams damaged by insects or putrefactive bacteria can be strengthened using prosthetics welded from a rod in the form of a spatial truss, or using a channel of the required size. The channel installed as a prosthesis is selected from a standard range of rolled metal, and to manufacture a spatial rod truss it is necessary to perform a rather complex strength calculation, which only a qualified specialist can do.
- Strengthening load-bearing capacity interfloor structures can be done by installing additional beams, but this work requires making holes in load-bearing walls, which in some cases is difficult to accomplish.

Using metal elements To strengthen the load-bearing interfloor structures, especially for destroyed parts that need to be removed, it is necessary to provide for the installation of elements on which the floorboards of the upper floor will be fixed. The fastening must be reliable and durable, eliminating the possibility of loosening and squeaks.
Reinforced different ways logs allow you to increase the load-bearing capacity of interfloor structures and general security operation of existing buildings without significant capital investments and a large volume of construction work.
For modern technologies In the construction and renovation of low-rise buildings, the use of techniques for strengthening second-floor structures is used quite often. Thanks to the accumulated experience and the use of new materials and technologies, many works, including strengthening the second floor joists, have become one of the ordinary operations of repair and restoration work. However, even with this seemingly emerging simplicity, the process requires detailed study and calculation of literally all parameters and operations and selection of the optimal method of carrying out the work.
Beams and logs: what is common and what is the difference between these concepts
In private low-rise housing construction two-story houses are quite widespread. As a rule, these are houses of separate two- and three-story projects and buildings converted by arrangement attic floor. In any case, such houses are equipped with an interfloor ceiling and flooring on the second floor.
For houses built using frame-panel technology, and, in fact, all other buildings, except those where reinforced concrete slabs, the basis of the structure is made up of beams and floor joists.
Beams used as load-bearing structures ceiling , the ceiling itself and the base for installing the floor joists. And here lags- these are nothing more than beams of reduced size on which the plank flooring and the finished floor of the second floor or attic itself are attached.
Floor beams are usually installed perpendicular to the internal load-bearing wall; the beams are supported by the external load-bearing wall of the house and the internal load-bearing wall or pier.
The second floor joists are laid perpendicular to the interfloor floor beams. They can be laid directly on beams or have an additional structure that forms an additional volume of interfloor flooring.
As beams usually used:
- Solid wooden beams;
- Wooden beams;
- Metal beams made of T-beams, channels, pipes or I-beams;
- Metal beams in the form of composite trusses;
- Reinforced concrete beams from structures of different profiles;
As lag floors are usually used:
- Wooden beams;
- Beams made of glued laminated structures;
- Combined structures made of metal and wood;
Thus, despite the general similarity and the same principle of use in the construction of a building, beams and logs have different purposes, sizes and, accordingly, different, although in many ways similar, methods of amplification.
IN classic case using interfloor beams and floor joists on the second floor, the design will look like this:
- Solid wood floor beams, rectangular shape, without joints (the cross-section depends on the length of the span - the width of the room) are the basis for the design of the interfloor ceiling;
- The ends of the beams are fixed into an array of opposite load-bearing walls and fixed with metal studs or with self-tapping screws and metal perforated fasteners;
- The second floor floor joists are installed on top of the beams. They are installed perpendicular to the beams at the same distance and have a shape and cross-section that ensure reliable fastening finished floor boards;
- The space between the beams and joists is filled with insulation for noise and heat insulation of the premises.

Interfloor slab design
In this design, designed for a payload of 400-450 kg per 1 square meter, a deflection deformation of 1/300 of the beam length is considered natural. Simply put, with a beam length of 6 meters, the maximum deflection of the beam can be about 2 cm . If the beam bends to a greater extent, the structure requires additional reinforcement and strengthening.
The beams themselves can withstand two types of load: the first is the static load from the weight of the remaining floor elements and the furniture and equipment installed on them. The second - dynamic load - arises from the movement of people along the floor surface of the second floor and the temporary installation of furniture in the central part, when beams and joists have the greatest load.
Withstand different kinds correctly selected materials, their quality, and installation method, including the distance between beams and joists, help the interfloor structure to resist loads and not succumb to deformation.

Dependence (in millimeters) of joist sections and steps between them on the thickness of the floorboards
Considered optimal I-beam shape of composite joists for floor and composite form of beams for interfloor coverings. At the same time, for any types of logs and beams, the main type of deformation affecting the entire structure of the house is the deflection in the central part. And that is why beams and joists located in the center are most often reinforced.
When it is necessary to strengthen the logs
In construction practice, reinforcement of second floor joists is used in several cases, most often at the stage of construction and reconstruction of a building. At the construction stage, it is easier and more convenient to do reinforcement, especially since several methods can be used for this, choosing the most suitable one. During reconstruction, reinforcement can be done after complete or partial dismantling of the floor covering and insulation, while there are very few methods for installing additional structures.
Strengthening work is usually carried out:
- To prevent deformation interfloor beams and floors of the second floor during construction;
- To correct defects made during the construction process and identified during the construction of the building;
- To replace wooden building structures that are deformed or damaged by natural pests or structures made of other materials as a result of exposure to third-party factors.
- To strengthen the joists when repairing the floor.
Methods and methods for strengthening the structure in such cases are selected depending on the volume of work and the degree of deformation of the floor and the interfloor ceiling itself. In some cases, simply strengthening the joists will not have the desired effect without significant work to restore the beams, because, having leveled the floor of the second floor, sooner or later the ceiling of the first floor will have to be leveled.
When assessing the floor, you need to objectively assess its condition, because in many cases it is necessary to replace deformed floor boards or level them, rather than strengthen the joists.
This method is applicable for strengthening the floor structure of the second floor, when the beams do not have a deflection, and the logs themselves, based on calculations, can withstand the design load. The essence of this method is to install additional logs in the central part of the room, thus ensuring the distribution of the load more evenly, over a larger number of supports.

Most often, installation of additional logs is carried out in the center of the room by reducing the distance between the logs by 25-30%. So, if it is necessary to install logs every 0.5 meters, in the central part the distance is reduced to 0.4 - 0.35 meters.
For reinforcement, standard logs used in the structure are used. For strength, additional spacers are installed between the lags from solid sections of boards or metal rod prostheses installed crosswise.

Rod metal prostheses for strengthening joists
The method of installing additional overlays and reinforcing the joists is possible both at the construction stage and during repair work. For timber logs, reinforcement is most often used with wooden overlays and plywood overlays or OSB boards.
Wooden overlays are used:
- To strengthen mechanically damaged areas of lag;
- To strengthen the joint or joint of the log;
- To create additional strength along the entire length of the joist.

a, b, c - reinforcement of joists with wooden overlays on bolts, d - reinforcement with rod prosthesis
Overlays made of OSB boards and plywood are mainly used at the places where sections join each other and in places where defects are visible or there are minor mechanical damages.
Metal plates can be applied to areas of damage and joints as a method of local solution to the problem.
Full reinforcement with overlays
Installation of overlays on joists along the entire length is carried out using a bolted connection through the body of the overlays and the joist, using self-tapping screws along the entire length or using a bundle with several bundles of mounting wire.
Installation of the linings is carried out alternately with temporary fixation of the linings using clamps or self-tapping screws to the body of the log.

Holes are drilled along one line. The distance between the connection holes is usually no less than ¼ of the log length. The holes are drilled like this: one in the center, and from the edges at a distance of 1/3 of the log height from the edges of the log. This arrangement of holes will not allow beams and joists to split along their length. Bolts must have washers on both sides - both under the bolt head and under the nut. The tightening is carried out gradually, until the wood has significant resistance, and the final tightening is done one by one, starting with the outer bolts. In this case, the tightening is done evenly by ¼ turn.

If the logs have edges fixed in brick wall, a hole must be made so that the edges of the beams are also fixed in the wall. Additional beams are treated with an antiseptic before installation on the joists.
If it is necessary to straighten sagging joists, use wooden wedges or a regular car hydraulic jack, pressing the lag to the desired level.
Local reinforcement of joist structures is used mainly at joints or joints of joists. To strengthen these areas, the method of installing overlays on one side or installing overlays on both sides of the beams is used. For the one-sided method, wood without knots and visible damage is used, in which case the width and height of the additional element must be equal to the width and height of the log itself.
Partial reinforcement of joists (on both sides) at joist joints
Fixation is carried out using bolts, screws and nails. The length of the element must not be less distance between two floor beams. Bolted connections are made through, the washers should be 3 times wider than the nut and bolt head.

Reinforcing the joists with a wooden overlay
To fix the joint of the joists with double-sided overlays, it is allowed to use a beam narrower than the joist. Typically, boards 1/2 the width of the joist are used for this. The length of the overlays is usually taken to be at least 1 meter. The screed is also done using bolts or self-tapping screws.
For logs made of glued material or structural wooden I-beams, overlays made of plywood or OSB boards are most often used. Such overlays are also installed in the form of double-sided overlays or one-sided lag reinforcement. This connection is fixed using self-tapping screws. The thickness of the plywood element or OSB board element should be no less than 10-12 mm. The size of the overlay for a structural I-beam must correspond to the height of the central part.

Reinforcing joists with plywood
Fixation with self-tapping screws is done on both sides of the linings. It is important that the screws pass through the thickness of all elements being fastened.
Metal linings used to strengthen the joists of second-floor houses can be:
- Piece elements made of perforated sheet metal thickness of at least 5 mm;
- Made from metal strips of various widths with a thickness of at least 5 mm;
- From a shaped pipe, square or rectangular section with perforation or welded fasteners;
- From a corner or brand.
Piece elements made of sheet metal are used to reinforce joist joints. The dimensions of such overlays can be either standard or selected depending on the specific connection case. Fixation for beam joints small height is carried out using self-tapping screws, and if the logs have a height of more than 10 m, then using a bolted connection. Metal plates are used for double-sided installation.

Reinforcement of logs with steel sheets
Metal strip usually reinforces long logs, and if the width of the strip used for installation is greater than or equal to 50 mm, then fixation can be either using self-tapping screws or bolts.

Reinforcement of logs with metal strips and channels on both sides
For logs that need to be strengthened along the entire length, they are used as structural elements. shaped metal pipes square or rectangular section. The installation location for such elements is the central joists of the premises, where the defects are most pronounced. The pipes are simply fixed to the joists along their entire length on one or both sides. Bolts are used to tighten reinforcement beams with a height of 80 millimeters or more. For smaller lags, fixation is carried out using self-tapping screws.

Shaped metal pipes can be used for reinforcement wooden logs
Corners most often used for installation at the bottom of the log, strengthening it from deflection with bottom side. To do this, corners measuring 30*30, 45*45 or 60*60 mm are inserted under the joists from below and fastened with self-tapping screws into holes drilled in the corner.

Reinforcing joists with corners
Taurus of various sizes can be attached both to the side and to the bottom of the joist. The fastening method depends on the width and height of the joist.

The use of metal for installing logs has found its application relatively recently. Mostly metal constructions V low-rise construction used as interfloor floor beams. At the same time, tee, channel and I-beam are quite often used as a base for fastening wooden elements and serve as excellent joists for finished floors.
The nature of changes and deformations in such structures, as a rule, does not differ from wooden logs - deflection in the central part of the room is also typical for metal elements.
Methods for strengthening such structures depend on how much space can be used for installation additional elements. If there are interfloor beams under the metal joists, then the following methods can be used:
- Installation of additional structures in the form of trusses;
- Raising the sagging area and installing an additional support stand under it;
- Installation of additional logs from a more stable form of rolled metal.
Installation additional design in the form trusses made of pipes, angles or fittings will ensure the rigidity and reliability of the lag. For this purpose, triangular or rectangular trusses with diagonal stiffeners are used.

If it is possible to strengthen the place of deformation with a stand under the place of greatest deflection additional rack supported by an interfloor beam, then this method will provide the simplest and most effective method of reinforcement. True, it must be borne in mind that the floor beams must withstand the loads from such reinforcement.
How can you strengthen the second floor logs?
One of the main structural elements used to construct the floors of attics or second-floor rooms, mainly in low-rise individual construction, is a wooden or metal beam, which simultaneously serves as a floor joist and a base for attaching ceiling coverings. The widespread use of beam floors was facilitated by the low cost of initial building materials and the possibility of constructing floors without the use of lifting mechanisms.
Lag deflection
Often the degree of deflection of the joists depends on the installation technology and the quality of the material.Entering some, especially old, houses, even with the naked eye you can notice the deflection of the ceilings of the second floor, or, more rarely, the floor of the first floor, which is a consequence of incorrect calculation of the load-bearing capacity of the logs or exceeding the permissible load on the floors. As the practice of operating multi-storey buildings built in the first half of the 50s of the twentieth century, where wooden interfloor ceilings were used, suggests, by the year 2000, the amount of deflection of the ceilings ranged from 70 to 100 mm, which led to the need for major repairs of the building with strengthening of the load-bearing elements of the floors . And this is provided that an accurate engineering calculation of loads and lag sections is carried out at the design stage. And what can we say about individual development, when the calculation of the load-bearing capacity of the logs was carried out “by eye” on the advice of “competent” specialists.
Very often, the amount of deflection of the joists is influenced by the quality of the material used, excessive moisture in the wood, insufficient thickness of the rolled metal from which the beam is made, and many other different reasons that lead to sagging, for example, the ceiling of the second floor under load. An incorrect calculation of the load-bearing capacity can lead not only to the deflection of the log, but also to the complete destruction of the structure and the collapse of the floor downwards, and when no one expects this.
When is it necessary to strengthen the logs?
 Scheme of interfloor wooden floor arrangement
 If the owner of the house notices sagging of the upper floor, then the first thing that needs to be done is to take simple measurements and assess the condition of the structures, the magnitude of the static load in order to determine the amount of sagging of the ceiling or changes in the curvature of the floor to decide on the need to strengthen the logs.
Any ceilings, under the influence of their own weight, the static load of structures and objects installed on them, sag over time. The permissible sagging value is taken to be 1:300, that is, if a three-meter beam sagged by 10 mm, there is no cause for concern, but if this value is greater, then measures must be taken to eliminate the deformation and strengthen the structure.
Strengthening metal structures
Metal structures used as interfloor beams can be strengthened with additional rolled metal products using welding or bolting. To do this, the surface of the floor or ceiling is dismantled, if necessary, adjustable supports are placed under the floor beams to eliminate deformation, and the structure is reinforced with standard rolled metal products of the required cross-section, the calculation of which is carried out using special tables and methods.
Strengthening wooden elements
 An example of reinforcing a joist with a wooden overlay
 Depending on their condition, existing structural elements of a wooden floor can be strengthened in several ways:
- Using timber overlays, performing a simple mathematical calculation, when the width of the existing beam is subtracted from the table value of the cross-section of the required floor beam. The timber and the beam are fastened using bolts with metal plates that prevent the destruction of the wood at the fastening point and weakening of the structure. The existing beam is raised with jacks until a level floor surface is obtained, after which the overlay and the beam are fastened together;
- Using metal strips with a thickness of 10 mm and a width 10-20% less than the height of the beam as overlays. To prevent the strip from deforming and reducing strength, the number of fastening bolts should be increased by 25% compared to wooden elements. Overlays are installed on one or both sides of the beam, depending on the load on the load-bearing elements of the floor of the upper floor;
- Wooden floor beams damaged by insects or putrefactive bacteria can be strengthened using prosthetics welded from a rod in the form of a spatial truss, or using a channel of the required size. The channel installed as a prosthesis is selected from a standard range of rolled metal, and to manufacture a spatial rod truss it is necessary to perform a rather complex strength calculation, which only a qualified specialist can do.
- Strengthening the load-bearing capacity of interfloor structures can be done by installing an additional number of beams, but this work requires making holes in the load-bearing walls, which in some cases is difficult to do.
 Reinforcement of logs with metal strips
 When using metal elements to strengthen load-bearing interfloor structures, especially for destroyed parts that need to be removed, it is necessary to provide for the installation of elements on which the floorboards of the upper floor will be fixed. The fastening must be reliable and durable, eliminating the possibility of loosening and squeaks.
Logs reinforced in various ways make it possible to increase the load-bearing capacity of load-bearing interfloor structures and the overall safety of operation of existing buildings without significant investment and a large amount of construction work.
When organizing wooden floors, logs are often used, especially for rooms located on the 1st floor. They can be made of wood, reinforced concrete, metal, etc.
What are wooden joists
The logs represent cross beams, which are installed on bricks or reinforced concrete base. Made from solid wooden beam square or round section. To save money, some owners make them from spliced boards mounted on edge.
Floors organized on logs
Advantages of using decking on joists
- At the same lifting height, floors organized using joists have a much lower structural weight, for example, compared to reinforced concrete ones.
- The floor, organized in this way, is well ventilated.
- Hidden communications can be installed between the flooring beams.
- The floor, which has free space under the flooring, can be additionally insulated and soundproofed.
- Such floors can be leveled even if they have a large difference in height.
- A floor that has this design can be easily dismantled for restoration.
In order for the floors to be reliable and last a long time, the cross-section of the beams must be correctly calculated. To do this, you can use special tables.
 Beam section calculation table
 However, situations arise when floors need to be reinforced. This happens in the following cases:
- the load on the floor increases, for example, due to the conversion of an attic into an attic;
- damage to the load-bearing wooden elements from which the floor was made by fungal diseases or due to damage by rodents;
- exceeding the load-bearing capacity for which the floor was originally designed;
- initial incorrect calculation sections of wooden elements, etc.
Attention! It is allowed for the floor to have a deflection of 1:300. That is, if the beam is 3 meters long and the deflection is 10 mm, then this is an acceptable value and no reinforcement is required.
There are several ways to strengthen the lag. Let's look at some of them.
We strengthen the floor by reinforcing wooden structures with overlays
Executed if wooden structures Cracks are found or the floor has begun to sag significantly.
Before carrying out work, it is necessary to unload the floors, and it may also be necessary to dismantle the covering. Unloading the structure is carried out by installing temporary racks made of logs, timber or jacks. The number of racks and their cross-section depend on the length of the span of the structure and the load.
If the logs are made of solid log, it is allowed to install a single post at the point of deflection. If the structures are composite, then you need to install several racks. In the place where the floors sag, install a jack, and with its help bring the system into a horizontal position.
If the floor sagged due to the fact that a beam of a smaller diameter than required was initially used, then, using the table, calculate the required diameter. Next from desired value subtract the diameter of the beam. The resulting value will give us minimum thickness overlay, which is used to build up the beam.
The overlay is installed on one or both sides and stitched together old design using bolts with metal backings. They are needed to prevent the wood from collapsing under load at the attachment point.
To strengthen the floor, you can use metal overlays instead of wooden ones. In this case, metal strips with a thickness of 10 mm and a width 10–20% less than the width of the log are used. As with wooden overlays, metal ones are installed on one or both sides structural element, only the number of fasteners is increased by approximately 25%. The metal is treated with anti-corrosion compounds before installation.
If reinforcement is performed when the beam is damaged, then it is necessary to install a support, remove the damaged area, and treat this area with antifungal compounds. The linings themselves are also treated with an antifungal compound.
 Reinforcing beams with wooden overlays
 Reinforcement can be done using carbon fiber, which is used if the beam is not damaged by fungus, but cracks have appeared in it.
In this case, the damaged part is wrapped in carbon fiber, which is fixed using a special adhesive composition made on the basis epoxy resin. This material allows you to strengthen the structure without increasing the thickness of the reinforced element. On Right place a layer of carbon fiber of 1–5 mm is wound, depending on the expected load and condition of the beam.
Once finished renovation work, the supports are removed.
Strengthening wooden beams using prosthetics
If the timber is damaged by fungus or insects, then the floors can be repaired by strengthening the structure with the help of prosthetics. The prosthesis is a special small metal truss that is installed in place of the damaged area.
Prostheses are made from channel bars or welded using metal rods. For repairs on your own, in this case it is better to use a channel, since it is produced standard sizes, and you just need to choose a suitable prosthesis. Thanks to its shape, the channel perfectly withstands existing floor loads.
Attention! To make a prosthesis from metal rods, it is necessary to perform a rather complex strength calculation, and therefore it is better to entrust this matter to a specialist.
 To strengthen the floors, prosthetics made from channel or metal rods are used
 Damage often occurs in the part of the beam that rests on the wall, since it is in this place that the logs are exposed to sudden temperature fluctuations and high humidity. If this part of the structure is damaged, then a system of wooden and metal prostheses is used to strengthen the floors.
Before starting work to strengthen the structure, the damaged element is supported with supports. The damaged area is cut out. The cut is treated with antibacterial compounds.
Next, wooden overlays are selected so that the total thickness of the structure is slightly greater than the thickness of the original structure. An insert is inserted between the pads. The liner is fixed to the linings using nails.
 Strengthening the structure with a wooden prosthesis
 We strengthen the floors between floors
To strengthen the floors that are located between floors, you can install additional supports from below, which will take part of the load upon themselves. In this case, the floors will be able to bear a greater load.
- If possible, additional intermediate beams can be installed. This will also strengthen the floors.
- If possible, you can install additional intermediate logs.
If it is not possible to strengthen the beam using the above methods, then you can unload the structures by redistributing the load to additionally installed elements.