This article provides step-by-step instruction on creating a folding attic ladder. You will learn how to correctly assemble the main hinge element, what to make the staircase sections from, and how to securely fasten the structure in its installation position. The article contains diagrams and drawings.
An inventory factory staircase to the attic is a fairly common product that can be purchased at many hardware stores. However budget options They are not always reliable, but strong branded products cost accordingly. Making a necessary item or device with your own hands from scrap materials is very popular among home craftsmen. The attic staircase is no exception.
Material for work
To assemble an analogue of a factory product, you will need high-quality materials that may be available, especially during construction:
- Bar 50x50 (pine) 1st grade - 20 linear. m. The frame of the lid and opening will be made from it.
- Plywood 8-10 mm - 2 sq. m. Needed for covering the lid.
- Board 100x25-30 mm - 15 linear. m. Will go on steps and bowstrings.
- Steel strip 3-4x20 mm - for movable fastening of knees.
- Angle and plate 3-4 mm - for the main mechanical element.
- Bolts, nuts, washers, bolts M12-M14.
- Self-tapping screws.
Tool:
- Plotnitsky - saw, screwdriver, protractor.
- Locksmith - welding machine, electrodes 3-4, grinder.
- Workbench and clamps.
Operating procedure
First of all, you need to choose a place for the stairs and make an opening. If necessary, trim and install intermediate beams in the ceiling - 6-7 mm larger than the size of the intended cover. Next, according to the size of the hatch, you need to assemble the cover itself - from a block and plywood. The design can be arbitrary, but it must be reliable (it is better to glue the connections). The block on one of the short sides should be rounded so as not to interfere with the lid opening.

Assembling the hinge mechanism
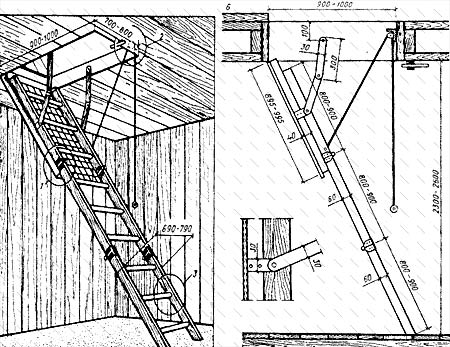
This is the most critical element of the design. To make it you will need: a steel corner, a plate and strips with a thickness of at least 3 mm. The shape of the parts is clear from the diagram, but the dimensions of the drilling site should be determined individually, based on the local situation. Manufactured parts must be of high quality; they must be cleaned and edges processed.
 1 - thrust plate; 2 - corner, top view; 3 - short slide; 4 - long drawstring
The key point is determining the opening angle. This angle is very important and figures into the production of the plate. In order to set it correctly, project the future march on the ground - stretch the thread and set the desired angle experimentally (by selecting the best position). Securely attach it to the protractor - it will be needed when making steps.
The resulting angle must be transferred to the part, namely to the plate. To do this, set the mechanism to its original position, attach the inclinometer and move until the corners of the corner flange and the inclinometer coincide. Then mark the plate along the resulting trajectory and cut out the area where the part moves.
Holes should be pre-drilled in the plate for mounting to the beam. We assemble the mechanism with bolts and washers.

After rough assembly, you need to try the unit in place, attach it and accurately reproduce the procedure for opening and closing the hatch. If any movement defects are found, correct them.
Then you need to make a response mechanism. It should completely repeat the first one, but in a mirror form. Use clamps and a workbench - by clamping the parts together, you will achieve complete identical dimensions.


Make adjustments and final installation experimentally. Cover in open position should exactly follow the angle projected by the cord.
Manufacturing of sections
Calculation of the length of each section:
- 1st - opening length minus 10%
- 2nd - length of the first minus 10%
- 3rd - march length minus the sum of the first two
Let's assume that the flight length is 2500 mm. Based on the opening length of 1200 mm:
- 1st - 1080 mm
- 2nd - 972 mm
- 3rd - 448 mm
We mark the entire boards according to the calculation and transfer the angle of the march to the bowstrings.
Attention! Bowstrings must be installed in a mirror manner! Take this into account when marking and drilling.
At the joints of the sections we drill holes Ø 25 - mirror through one.

All parts must be processed with high quality sanding belt, chamfers must be rounded in order to bring the quality as close as possible to the factory one.
Then we cut grooves for the steps according to the markings. We select wood with a chisel.

The design of individual sections is assembled using 65 mm self-tapping screws with a press washer using D-3 wood glue.

The hinges for the knees can be made from the same strip as the opening mechanism. To do this, cut 4 strips of 160 mm and 4 of 120 mm, rounding the ends. We weld legs to four of them to a length of 160 mm with a hole of 8 mm. You should end up with 8 pieces of equal length, but 4 of them with a step.
Assemble the individual plates into hinges using bolts.

Assembly of sections and installation of stairs
Lay it out on a flat surface and install the finished sectional hinges so that the fastening bolts fit into the holes in the wood. Install the hinges with M8-10 bolts.
After assembling the first bend, check the system for functionality. If necessary, correct any distortions.
Then attach the lower short elbow and test the system.

Now all that remains is to mount the ladder in its designed position - on the manhole cover. For installation, use bolts (self-tapping screws are not reliable). If after installation and testing everything works without distortions, the structure can be dismantled for painting. Use varnishes and spray paint for metal.
Subsequently, the design can be complicated and made more convenient by adding to it:
- Additional hinges to eliminate play.
- A spring to support the structure to make opening easier.
- Locking lock.
- Handrails.
- Use decorative finishing and additional insulation.
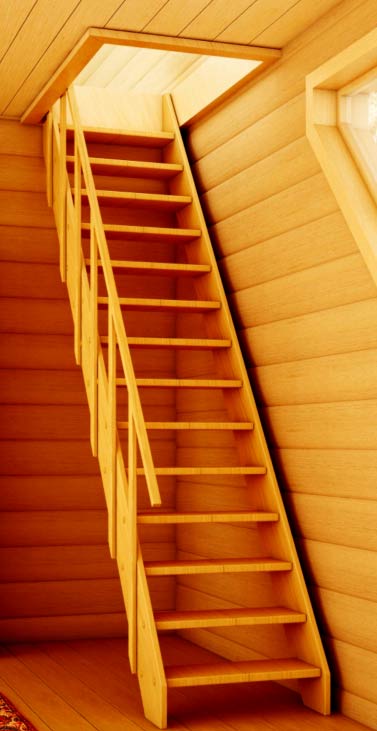
Finished view of the staircase:

The issue of finishing and insulation is decided locally, based on needs. The lid can be finished with any material that fits into the ceiling. Basically it is plastic - lightweight, inexpensive and has an additional layer of air. The difference in price between the “home” and “store” versions of a folding ladder is about 90% (80-150 USD). The work required only a few new boards, covering them and hardware.
The attic is a traditional room in almost every country house. Its functionality is unusually wide. For example, this room is used as a storage room or workshop; some homeowners even decorate the attic as a living room or bedroom. In fact, the functional purpose of such a room depends solely on your own imagination, as well as financial capabilities. However, despite the wide variety of design options attic space, it is worth knowing that the attic ladder with a hatch is an integral part of it. If you don't build this design, then you simply won’t be able to get into this room. Creating an attic staircase is a fairly simple matter, for which you don’t even have to turn to professionals in the construction industry.
Classification of structures
Actually, the most labor-intensive process in the organization of the attic space is the design of the staircase segment. Before creating a project for a specific staircase for your home, you must first decide on the design category. The following options exist:
- foldable;
- stationary;
- portable.
Temporary solution
Portable models will be placed in a separate category, however, it is quite extensive. The variety of portable products is incredible. Meanwhile, we should not forget that the daily use of such a product can never become safe or comfortable enough, and the staircase itself is not able to compete with stationary and folding models in terms of operational and technical characteristics. 
Selection of building materials
In the process of creating an attic staircase with your own hands, namely its preliminary drawing, it is worth paying attention to what building materials are usually used in this matter. Despite all the variety of products in the building materials segment, any experienced builder will tell you what it is certain types goods that the best way show themselves during operation. As a rule, all main structural parts are made primarily of wood, while fastening and fixing elements are made of metals. Thanks to the competent selection of materials, a do-it-yourself attic ladder, the drawing of which was made by a non-professional, will be much stronger and more reliable. 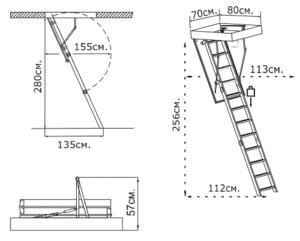
How to make your choice?
Due to the fact that building materials for folding stairs to the attic are presented in a variety price segments, source material and characteristics, it’s quite easy to drown in a sea of information about them. To minimize the time spent searching and selecting the best options, you should follow a number of rules:
- Specify the type functional purpose design, as well as its main parameters, including design features, sectionality, width, etc.
- Choose building materials in strict accordance with how actively the product will be used and under what conditions.
- Identify negative factors that can reduce the service life of the product.
The main thing is to correctly define the function
Any specialist who has the required level of qualifications and experience in working with these types of objects will tell you that the final result of construction work on constructing a staircase to the attic with your own hands largely depends on the competent determination of the functional purpose of the product. This parameter allows you to calculate the permissible load on each step of the product. Standard value this indicator for a metal product reads about 250 kGs, but wooden models designed only for 150 kGs. In addition, it is worth considering that the above indicators are valid for products made by professionals, while home-made objects have slightly lower parameters. Overall, the indicator permissible pressure one step does not mean that she cannot bear more stress. However, if you overload the structure too often, it will become unusable within a sufficient period of time. short term. 
So, the main criteria by which the choice is made optimal option, are:
- area of free space in the room;
- functional purpose of the object;
- required angle tilt of the product.
Figure 9.
What to consider when designing?
Most General requirements regulatory and technical documentation can be reduced to a number of simple and understandable conditions:
- the ergonomic range of product width is from 60 to 100 centimeters;
- the best height is three and a half meters;
- maximum number of steps – 15 pieces;
- the distance between adjacent steps should be about 20 centimeters;
- a comfortable step height for a person reaches about 20 centimeters, a deviation of 2 centimeters is allowed;
- if we are talking about a folding structure, then when creating the project, take permissible load 15 kilograms.
Tools
Deciding to independent implementation construction work, it is very important to stock up on a certain set of equipment so that in the process of implementing the product project you do not stop due to the banal lack of a screwdriver or tape measure. So, standard set tools consists of the following items:
- polyurethane foam;
- bars;
- self-tapping screws;
- electric screwdriver;
- hacksaw;
- yardstick;
- anchors;
- screwdrivers.
 Building a staircase is not a difficult task
 Location Features
All the nuances of the location of the object in the room will become visible during the construction process. This is especially true if you are involved in the creation and subsequent implementation of the project yourself. Remember that the product cannot in any way reduce the comfort of the room. That is why stairs with hatches are not located in bedrooms, living rooms and kitchens. However, if necessary, you can diversify your staircase design interesting design. Thanks to this, the product can harmoniously fit into general interior premises.
Project implementation technology
By following a certain technology, you can quickly and efficiently implement even a complex project. So, if you have chosen metal as the main material, then remember that the following steps are carried out:
- the drawing is applied to sheets of cardboard;
- cardboard elements of the future product are cut out;
- the hinge is marked on metal strips and special holes are prepared;
- the prepared parts are fixed together;
- the required angle is measured and the structure is moved apart in accordance with the obtained parameters;
- on metal sheets markings are applied to those places that will subsequently be covered with corners;
- by using special tool elements are cut out;
- gives an aesthetic appearance to the object;
- existing corners are rounded;
- The workpieces are fastened in pairs.
As you can see, the technology for implementing a staircase project with your own hands is quite simple. It applies not only to metal objects, but also to wooden products.
In order for the appearance of the attic staircase to be as attractive as possible, do not be too lazy to implement preparatory work on the surface building material. We are talking, for example, about applying a special primer before covering the surface with a paint.
Do not be afraid of difficulties, because the technology for constructing stairs may seem problematic to you only at first glance and require experience in the construction industry. Applying the optimal amount of effort will help you achieve maximum results.
An attic ladder with a hatch consists of the following main parts:
- bowstring or stringer;
- tread;
- riser
The string is the main load-bearing element of the staircase to which the steps are attached. Kosour is one of the types of bowstring. A step consists of a tread (horizontal part) and a riser (vertical part). For attic stairs, the most common choice is to join the steps without risers into the grooves of the bowstring (stringer).
Types of stairs to the attic
According to the sliding mechanism, folding stairs with a hatch are:
- Folding (hinged, folding). They consist of 2-4 parts. The first one is rigidly attached to the hatch cover, the additional ones are connected to each other by hinges, hinges, etc. When unfolded, they form flight of stairs;

- Scissor. Their sliding mechanism resembles an “accordion”. To protect against spontaneous folding of the bowstring, the attic ladder is additionally fixed with a spring stop. Usually the entire structure is made of metal, which seriously increases its price. Due to its particularly compact folded size, this mechanism can be installed on a minimum-sized attic hatch cover;

- Retractable (telescopic). They are most often made of aluminum and are a structure of several retractable sections that are placed one inside the other and attached to the attic hatch cover.

There is another type of sliding mechanism. It does not require the installation of an attic ladder or hatch. The photo shows that when folded, the structure is “recessed” into the wall and secured to it. The steps are connected using card loops in the bowstring. This option is suitable for those who like to do things with their own hands. It is unlikely that you will be able to buy one.

Hatch opening mechanism
The attic hatch opening mechanism can be:
- manual;
- auto.
The manual mechanism is activated by a special pole, which opens the lock holding the attic hatch cover. You can make it yourself. The automatic mechanism works using an electric motor. The price of attic stairs with such a mechanism is higher.
What are attic stairs made of?
The materials most often used for the manufacture of folding stairs with a hatch are wood, metal, chipboard, fiberboard and MDF. Right choice depends on the expected load. If the stairs will be used frequently, it is better to buy a metal one. It can withstand loads of up to 250 kg. The most commonly used is galvanized steel. High price in this case justified. The disadvantage of this material is that it requires regular lubrication, otherwise creaking will occur.

If the attic is used only from time to time, wood is preferable as a material for stairs. The following breeds are recommended:
- larch.
Some elements can be made from:
- pine trees;
- cedar;
- ash
Oak is used for the manufacture of all structural elements of the attic staircase. This tree has high wear resistance, strength and flexibility. The price of oak stairs is relatively high; ash is often used as a substitute. Its wood is very close in its characteristics to oak, it can withstand heavy loads well, but is unsuitable for treads.
Beech is the strongest type of wood. The only negative is increased hygroscopicity (tendency to absorb moisture, including from the air). If attic staircase with a beech hatch are made with your own hands, it is recommended to pre-treat the wood special composition, preventing the absorption of moisture.
All conifers, due to their increased resin content, are especially resistant to decay. Larch has the greatest strength among coniferous species tree. When working with it, you need to take into account that nitrocellulose varnishes cannot be used to coat it. Pine is used to make bowstrings and risers. Due to its softness, this type of wood is not suitable for treads. The same can be said about cedar. Spruce has a big disadvantage - availability large quantity knots that tend to fall out when the tree dries out. Price for attic stairs from coniferous species the lowest (if we are not talking about larch), but it is due to the fragility of products made from these materials.
Features to look for when purchasing
A high-quality attic ladder with a hatch must meet the following requirements:


When purchasing or making your own attic ladder, you need to pay attention to the following useful additions:
- thermal insulation of the hatch cover;
- insulating box;
- opening fencing;
- metal handrails;
- plastic tips on the legs to prevent scratches on the floor;
- the ability to adjust the height (by connecting additional steps or sections);
- burglary protection (special locking mechanisms) on the hatch cover;
- fire protection (in the event of a fire, it will delay the spread of fire);
- anti-slip grooves on the steps.
Dimensions of attic stairs
Standard attic stairs with a hatch have the following dimensions:
- height 2.7-3.5 m, if it is higher, the risk of injury from a fall is high, the strength of the structure is reduced, and use becomes inconvenient;
- width 50-110 cm (optimally 60-70 cm);
- the distance between steps is no more than 25 cm;
- the width and length of the step is at least 8 x 34 cm;
- tilt angle 50 - 75 degrees;
- step thickness from 18 mm.
These numbers are not law. But you need to be guided by them when purchasing or designing a future ladder and manhole cover, made by yourself, in order to avoid serious mistakes.
Important! The dimensions of the attic hatch must correspond to the dimensions of the stairs. If the opening is too wide, it will lead to heat loss. A hatch that is too narrow is inconvenient to use. The side parts of the stairs will touch the opening and will quickly fail due to friction.
The width and length of the opening are usually 50–70 cm by 70–130 cm, respectively. A larger size is undesirable, as it will contribute to heat loss.
Self-production of an attic ladder with a hatch
If there is a need for an attic ladder with a hatch, it is best to buy a ready-made, factory-made one. The price of a quality product is quite high. Therefore, those who have minimal skills in working with wood and metal can try making this device with their own hands.

Operating procedure:
- froze;
- drawing up a diagram;
- calculation and purchase required quantity materials and tools;
- production of attic hatch covers;
- manufacturing of the opening mechanism;
- production of sections;
- making loops;
- assembly and final finishing.
Measuring and drawing up a diagram
To draw up a diagram and calculate the future attic staircase, you will need to measure the height from floor to ceiling and the dimensions of the opening for the hatch. Based on the results of measurements, either by hand or on a computer, a diagram is drawn up. It should indicate:
- length of the stairs;
- ceiling height;
- tilt angle;
- opening dimensions;
- dimensions of the attic hatch cover;
- width of the stairs;
- the number of sections and the length of each of them;
- sizes and number of steps.
Calculation
The procedure and example of calculating a folding ladder with a hatch:
- The length of the attic staircase can be calculated using the formula: C = A/sin α, where A is the height of the flight (from floor to ceiling), α is the angle of inclination. For example, A = 2.8 m and it is supposed to make the angle of inclination of the stairs about 60 degrees. This means that the length of the product will be: 2.8/0.867 = 3.23 m. The result obtained is not exact size, but is needed to calculate the required amount of material. It is better to add a small margin to the resulting figure and trim the product during installation, if necessary.
- To freely open the attic hatch cover, you need to leave 6-7 mm gaps on each side of the opening. That is, if the dimensions of the opening are 60 x 110 cm, then the dimensions of the lid will be 58.6 x 108.6 cm (you need to subtract 12-14 mm from each value).
- The width of the stairs should be less than the width of the hatch. In the proposed example, you can plan 50 cm.
- The length of the sections can be calculated as follows: first - the length of the opening (120 cm) minus 10%; second - the length of the first section minus 10%; the third is the height of the march (2.8 m) minus the sum of the lengths of the first two sections. In the case when the third section turns out to be larger than the second, they are simply swapped. As a result, the first section is 99 cm, the second 91.9, the third 89.1.
- On the resulting diagram, mark the steps at equal distances from each other and calculate their number. Their sizes are determined arbitrarily, depending on the chosen design. The length of the steps is limited by the width of the stairs and the thickness of the string, and their width is linked to the width of the string.
Materials and tools
Tools (or their substitutes) that you will need to make an attic ladder with a hatch with your own hands:
- hacksaw;
- screwdriver;
- carpenter's protractor;
- workbench (or table);
- clamps;
- welding machine;
- electrodes 3-4;
- chisel;
- masking tape;
- Grinder;
- wood glue.
Materials you will need to buy:
- bars measuring 50x50 mm for the hatch cover and finishing the opening;
- board 100 x 25 mm for steps and bowstring;
- plywood 8-10 mm thick for the hatch cover;
- steel strip 3-4 x 20 mm for hinges;
- corner and plate 3-4 mm - for the hatch opening mechanism;
- hardware - bolts, nuts, washers, grommets, self-tapping screws.
Calculation example:
- The minimum standard length of the bar is 1 m. The following dimensions are 1.25 and 1.5 m. That is, if the dimensions of the opening are 60 x 110 cm, 4 bars of 1.25 m each and 4 bars of 1 m each will be needed for the work. If the width of the opening is 50 cm, then instead of 4 bars of 1 m each, you can buy 2 of 1.25 m each and cut them in half.
- The minimum size of a plywood sheet is 1525 x 1525 mm, that is, 1 sheet is enough. The price of plywood products is the lowest. If possible, you can use more expensive material to make the hatch cover.
- For the bowstring you need to buy 2 boards 25x100 mm long, equal to length future product with a small margin.
- The length of one step must be multiplied by their number. The result will be the length of the board required for their manufacture. For example, this size is 4 m. You can buy a whole edged board and cut it on the spot or take several boards, so that 2-3 steps come out of each (with a margin). Here you will need, based on the planned length of the step, to take into account the percentage of waste, which will be smaller the longer the board.
Making a cover and mechanism for the hatch
The work of making an attic ladder with your own hands must begin with the hatch cover. Four bars, pre-cut to the required size, are nailed to a sheet of plywood. On the short block that will be installed on the side of the lock, you need to round off one of the edges so that it does not interfere with free opening and closing. To ensure that the hatch lid closes securely, you can install a door latch on it.


For the hatch you will need two mechanisms (left and right), such as those shown in the photo or similar:

If you can’t buy ready-made ones, you can try to make such mechanisms yourself. To do this you will need a steel strip 3-4 x 20 mm, a corner and a plate 3-4 mm. The drawing shows the details of the mechanism for the left side of the hatch cover:

- stop plate;
- corner (top view).
For the right side of the hatch cover you will need the same set of parts, but the plate and corner must be made in a mirror image. The dimensions on the stop plate are given as an example. To calculate them correctly, you will need to take into account the angle of inclination of the stairs. It is 50-75 degrees. The smaller this angle, the more space the ladder takes up when unfolded, and the larger the hatch will be needed. You can choose a comfortable slope using a thread that needs to be stretched from the opening to the floor. The resulting angle can be measured with a protractor and transferred to the drawing. The result should be this:

You cannot attach the mechanism immediately after assembly. First you need to check its operation. You may need to adjust the drill locations for the fasteners or the angle on the stop plate. If everything is in order, you can start next stage work.

Manufacturing of attic staircase parts
You need to start with the bowstring. When working with it, you need to remember that paired parts must be made in a mirror image. Operating procedure:
- Mark the prepared boards with a pencil according to the calculations.
- Press both boards tightly against each other at the ends and secure with masking tape.
- At the junction of the first and second sections, make a hole with a diameter of 25 mm for the hinge hinge.
- Remove the tape, turn the boards up the other side and, fastening them again, make the same hole at the junction of the second and third sections. (The holes on each section will need to be on opposite ends of the board).
- Cut the strings into pieces according to the markings and use a chisel to make indentations for the steps. The depth of the grooves must be at least 5 mm. The strings of the lower section should end with a bevel corresponding to the angle of inclination of the stairs.
- Cut the steps and carefully sand all the parts.
- Attach steps to the right string of each part using glue and self-tapping screws. Fasten the entire structure with the left bowstring.
Making hinges and installing them
For the hinges that ensure the folding of the attic ladder, you can use the remains of the metal strip from which parts of the hatch opening mechanism were made. If the product consists of three sections, then eight strips will be needed. To four of them you will need to weld small sections of the same strip. In each part you need to drill two holes for attaching to the bowstring and one for the hinge. This is what you should get:
Pressing the first and second sections tightly together, screw the loops so that the hinge fits exactly into the notch at the joint, and the ends of the loops are located on the edge of the bowstring. Having secured the hinges, check the mechanism for folding and unfolding. If everything is in order, you need to secure the hinges between the second and third sections in the same way.

Assembly and finishing of the product
The procedure for assembling and finishing the stairs:
- After installing the hinges, screw the first section to the hatch cover.
- Insert the finished product into the opening and make sure that the ladder is assembled correctly, nothing interferes with the free opening and closing of the hatch, the sections fold and unfold without hindrance.
- If no defects are found, the structure must be disassembled and its wooden parts coated with varnish, and the metal parts with an anti-corrosion compound or paint.
- After the varnish has dried, reassemble the product and install it in the opening.
Every home has a need for additional area. When all the rooms are functionally occupied, the home owner begins to look for free space outside of them. This is where a folding staircase to the attic comes in handy. It will allow you to equip a workshop, a children's room, put a billiard table and a bar counter there. Concerned about this idea, the owner begins to think about whether to buy a staircase structure in finished form or make it yourself.
An example of a folding metal staircase to the attic
But first he must familiarize himself with its various options in order to choose the right one.

Depending on the location of installation, attic entrances can be internal or external. Folding attic stairs are usually not installed outside. A stationary design installed outside is not entirely comfortable in winter, but it does not take up a single meter of usable living space; Another option is insulated.
To prevent metal parts from being exposed to the destructive effects of precipitation, they are most often made of galvanized metal or painted with special paint.
Attic stairs are made of wood and metal. Both options are quite durable devices. However, they may squeak or rumble, although not everyone finds these sounds annoying. In addition, they can be eliminated or at least muffled if you use various floor mats or anti-slip pads. Wood and metal are often combined to create very attractive multi-stage structures.
Stationary
A monolithic structure with steps, usually made of wood, with handrails and railings is installed on. During active daily use of the attic space, it is complemented by a door. You can’t do without it when it is equipped as a comfortable room in the house for adults, a relaxation room, or a workshop that you have to visit every day.

Option for installing a stationary wooden staircase to the attic
A separate area is sometimes allocated for a stationary device - a staircase.
Folding attic ladders
You can also buy them or make them yourself. They are installed in rooms with limited space, when it is impossible to build a monolithic staircase structure. Folding attic ladders have several varieties, but all of them are not bulky, but light, but weight does not limit strength, because they use hardwood and aluminum for manufacturing.
Scissor
Such retractable design It is attached to the hatch cover and unfolds all the way to the floor according to the principle of a tram current collector or accordion. This design is only metal, so over time it begins to creak without proper lubrication. Used in private homes for light use of the attic.

Working diagram of a scissor ladder to the attic
The carrying capacity is small, but it can reliably support the weight of an adult.
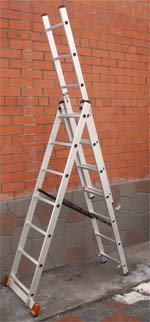
Telescopic
A ladder made of several sections that are packed one into another is called telescopic. It is usually made of aluminum, so it is lightweight and durable. But such folding stairs to the attic are not very popular among consumers. More often they are used on construction work in the form of stepladders. When packed they are so compact that their dimensions allow them to be transported in the trunk of a car.
Folding
This is one of the types of folding ladder devices, usually consisting of two sections. The first is rigidly attached to the base of the hatch. A second one is attached to it from below with special hinges that allow it to fold forward.
Drawing with dimensions of a folding ladder
When there is no need for it, and the entrance to the attic is closed, then folding design is in attic. If you open it, it reclines and falls to the floor.
Retractable
If there is not enough space, install retractable ladder to the attic. It can be made of wood or metal. Pulls out from the hatch, which opens manually or electrically.
The main requirements for such a design are compactness, strength, and low weight. To achieve this, durable wood and lightweight metal are combined in manufacturing.
Screw
It requires more space than folding devices. May be with or without railings. It looks very light, regardless of whether it is made of wood or metal. Original design, but the ascents and descents are difficult and sometimes risky, especially for elderly residents of the house. 
Such attic stairs are used in houses in which the attic is not used so intensively. They can be arranged so that all the steps are attached to a pole, which is located in the center of the system. There are also staircase spirals in which the steps are held by curved load-bearing bowstring beams.
They are folding and can be bought without any problems at a building materials store that sells pine, oak, and also metal ones, usually made of aluminum. The cheapest product is made from pine, but is not inferior in strength to other materials.
We should not forget that a staircase purchased ready-made needs proper care, which includes processing wooden surfaces fire-resistant impregnation, varnish or paint coating.
Metal parts, hinges, rollers must be lubricated with machine oil. 
But it is not always possible to find a suitable staircase structure on the market. Then best option- a do-it-yourself attic ladder, which you can make in accordance with your own wishes and tastes. How to do it? Today there is no shortage of relevant information on the World Wide Web. All you need is desire necessary materials, tools and creative enthusiasm.
Primary requirements
The attic staircase is a risk area, so it must meet the following requirements:

Staircase details
A home craftsman who has decided to build a staircase structure on his own should familiarize himself with its components.

Elements of the design of the staircase to the attic floor
Then he will have a better understanding of the question of how to make the stairs to the attic in the best way.
Any attic staircase consists of parts, the names of some of which may not have been previously known to the home craftsman. It would be nice to get a drawing on which they are depicted and signed.
These include:
- Beams, which are called bowstrings and stringers;
- Railings, safety handrails;
- The edges of the steps, which also have their own name: horizontal - tread, and vertical - riser;
- Flight of stairs.
Kosour
This is a strong beam in which cutouts are made to attach the steps from above, so that their ends are visible from the side. There are staircase structures in which there is one in the middle, and wooden planks are horizontally attached to it. But more often, the installation of an attic ladder for greater strength is done on two stringers.
Then, even visually, the entire structure looks durable, capable of withstanding heavy loads. The metal support is often made not straight, but in a stepped shape. Making it at home is very problematic; it’s easier to buy it ready-made.
Bowstring
This is the name given to a load-bearing inclined beam, and it differs from a stringer beam in that it hides the ends, and the steps are attached to it using special grooves. Therefore, there must be two of them - on both sides of the staircase. Even a folding staircase to the attic cannot do without these beams if it is made of wood. 
With them, the stationary structure looks massive and solid, while on stringers it seems visually light and spacious.
Railings and handrails
You should figure out whether there is a difference between these concepts. Railings - fencing outside flight of stairs. They are connected at the top by handrails - this component a fence on which one rests one's hands. Together they ensure safe movement. These elements can be metal, wood, even glass. They look very attractive if they are made of stainless steel: no protective equipment is required, much less painting, and their service life is almost unlimited. But not every consumer will decide to buy them because of the high price.
Option for installing stair railings on the attic floor
The railings need good quality, reliable. If the attic ladder has a hatch, then they should end at the very base and not interfere with the functioning of its cover.
There are also some mandatory requirements for handrails:
- The width should allow a person to wrap their hand around them to hold on tighter;
- Height - at the level of an adult’s waist, not lower;
- To avoid injury there should be no sharp corners at their ends;
- In appearance, they should form a single, harmonious ensemble with the entire staircase, decorating the house.
Steps and treads
The vertical part of each step is the riser. It closes the space between adjacent steps and also provides additional support for them. Such steps are called closed, and open ones will be those that consist only of horizontal planks for the feet - the so-called treads. Folding stairs to the attic are also equipped with these parts.
Flight of stairs
This is the element that connects all the components into a single structure. Has a maximum of 18 steps mounted on load-bearing beams- bowstring or stringer. There are single-flight stationary systems without turns from the floor to the entrance to the attic and multi-flight systems with several spans. They must meet the same requirements that apply to all staircase parts: strength, convenience, safety.
Design of a flight of stairs
The useful width of the march is determined by the distance from the wall with the finishing to inside handrail
Long gone are the days when home owners had to climb a cumbersome ladder to get to the attic. Modern options for the attic are good because they take up minimal space both when folded and unfolded, and it is difficult even for an attentive person to guess the presence of such a design behind a beautifully finished attic hatch.
And such a wonderful alternative is definitely pleasing to the eye. screw structures and stepladders, like a folding attic ladder - you can make it with your own hands with correct fastenings, with a strong spring mechanism and no worse than modern expensive market products. And even better!
Advantages and disadvantages of folding stairs
A folding attic ladder should be easy to hide and fold under the ceiling, and therefore it is customary to make it shorter, with a small number of sections. After all, every extra step in this regard means additional weight and volume.
Such stairs are good primarily because they allow you to significantly save space. At the same time, they do not spoil the ceiling of the living space at all. After all, the entrance to the attic is often located in one of the habitable rooms of the house. At the same time, such stairs are quite functional, durable and compact. And using them is as easy as shelling pears: just pick up a special rod with a hook at the end and hook onto the ring.
Next, with your left hand, you easily reach the bottom step of the outermost section, reach the floor and straighten all the other components of the ladder. In the same way, by doing everything in reverse order, you can easily fold the ladder back and put it into the ceiling. Moreover, many modern attic ladders also fold and unfold using an electric drive, which is generally incredibly convenient:

Another advantage is safety. Going up and down such a ladder is much safer than using an extension ladder: it will not break under your feet and your legs will not unexpectedly “leave away.”
And finally, lightness. The lightest folding attic ladders are made from of stainless steel and aluminum, thanks to which attic floor there are no serious loads. As you understand, due to the design features, such a staircase can only be made of metal.

Why is it better to make the stairs yourself?
Ready-made industrial stairs, which the market is actively offering today, are quite convenient, as far as can be judged from the available reviews on them. But we do not recommend placing them in attics that you often have to climb into (for example, our workshop or mini-library is located there).
Why? Because such stairs often turn out to be quite flimsy in practice - this is not hand-made production, but mass production, and no manufacturer needs to make them too strong. For any product, the maximum limit load is always calculated, which often does not take into account many factors and force majeure. And this is the same case when you, in a calm state and with almost no additional weight in your hands, carefully descend or ascend. You slip, fall, or a fairly overweight relative decides to take you up to the attic. heavy box- expect trouble.
And such stairs are often quite steep, and it is inconvenient to go down them with something in your hands - you need to stick to one. And go down only backwards. Therefore, it is quite natural that many home craftsmen who built their own house or bathhouse do not see any point in buying fragile and expensive folding stairs to the attic. Why, if you can make them yourself, and of excellent quality and much greater reliability?
Moreover, in this case, you have much more choice both in terms of the material for making the stairs and the fasteners themselves. The main thing is to calculate the dimensions correctly future design so that later it can be easily and compactly folded over the hatch, nothing will touch the opening and create a problem.


Another one common reason the reason that many undertake to build such stairs on their own is that most industrial options Usually the steps are very thin and fragile - they literally creak underfoot.
So, in order to make such a ladder for the roof with your own hands, you will need wooden scraps. First decide on the dimensions of the future attic opening, and the second step is to make the hatch cover and frame. You will then attach the ladder to it. It is advisable to leave gaps of 7-8 millimeters on each side. The technical parameters are as follows:

So, now let’s figure out what types of attic folding stairs there are.
Design #1 – sliding stairs
Sliding ladders usually consist of two sections, one of which is attached directly to the hatch cover, and the second is extended vertically using special guides. When you fold such a ladder, one section seems to creep onto the other, which is quite convenient. The only negative is the bulkiness of the entire structure, which requires a wide opening in the attic floor.

Design #2 – folding with a spring mechanism
The most popular today - folding stairs, otherwise called sectional. These consist of three or four sections that can easily be straightened into a flight of stairs. They are connected to each other by a special spring mechanism.
Folding structures are considered the most complex in their design, since they have many fasteners and must be correctly attached to the hatch opening. Such stairs are made of both wood and metal.

Design #3 – telescopic ladders
The next type is a telescopic design. It performs remarkably well in cases where the attic is visited quite often. For example, when it was specially insulated to make it residential, although it had not yet reached a full-fledged attic. That is, we are talking about a technical attic, like a dressing room or a workshop, but in this case it is better to install a residential attic spiral staircase made of wood or metal and always with railings.
In a telescopic design, the blocks are pulled out one by one, taking up as much space as possible. less space. And such stairs are especially good because they can be extended to almost any length, which is especially valuable for high ceilings. But such devices are not suitable for children and the older generation in the house, for whom it is quite difficult to reach the lower section and generally cope with the entire structure.

Design #4 – simplified folding stairs
These types of folding ladders do not hide behind an attic hatch, but they can easily be tucked into a corner or behind interior decoration. For example, this rarer species, which is usually made independently, also has the right to life:

And these options for folding stairs are quite popular abroad:

But both of these options have considerable disadvantages, some of which can bring discomfort to the interior of the living space, from where there is access to the attic, and after a month or two, such designs already bore the owners with their stupidity to the point of setting their teeth on edge. And therefore, we still suggest that you take a closer look at the more practical folding ladders, which can be easily folded and hidden behind a hatch cover.
How to determine the parameters of the future staircase?
So, we will give you some tips on choosing an attic ladder.
- Tip #1. When you choose the parameters for a future staircase, consider the mechanism of the hatch: when it is opened and closed, it can move slightly forward and backward.
- Tip #2. If the ceiling in the room is high enough, and exceeds 3.5 meters, it is better to install a marching or attached structure, or a spiral staircase, which will be safer in this case.
- Tip #3. When making a hatch, keep in mind that the larger the opening, the more heat will escape into the attic.
- Tip #4. Another point you should pay attention to is how the hatch will open. For example, in ready-made market versions, most often it opens slowly, thanks to special springs, and certainly does not fall on anyone’s head. Be sure to work on this point, especially since special parts are not difficult to purchase today.
- Tip #5. The steepness of a staircase is always determined only by its angle. The larger the protrusion of the step, the greater the number of these steps and the smaller their height. But this does not mean at all that it will be convenient for you to climb and descend such stairs. Therefore, we will call the most convenient step height 20 centimeters, which is most suitable for a standard human foot.
Here is a very useful video that will help you avoid many mistakes when installing such a staircase:
What fasteners and materials are needed?
As for the main material, the most accessible will be wooden staircase, but it's important here Special attention pay attention to the strength of the fasteners. To make such a ladder, you will need two long and two short bars, as well as a piece of plywood 10 millimeters thick.
Let's take a closer look at this point. All designs that help open a staircase with a hatch at the bottom differ only in the presence of additional mechanisms and shock absorption. The shock absorption, in turn, makes it easier to close and open the stairs. And you can buy all the necessary hinge elements at any store. But simple metal strips drilled in several places are quite suitable for constructing such a staircase, and the most expensive thing for arranging a staircase is an aluminum sliding system.
Simple and practical fastening:

More a complex system:

But what are the requirements for fastening the entire staircase? The first is the ability to withstand the weight of the entire structure, as well as the weight of the person who will climb and descend along it. And not only the static loads of a person standing on it with his certain weight, but also dynamic ones, which are much greater than static ones. For example, a person stumbled and suddenly stood on a lower step, or staggered and leaned on the stairs with all his weight, but abruptly and suddenly.
And finally, we note the ability to easily control the structure. As you understand, such a ladder weighs a fair amount and it is important that you then make sure it is easy to open. And when closing, you will have to lift all the weight at once, so provide special springs that will make the whole process easier for you over time - you will be grateful for this trick.

Instructions for making a folding ladder
So, let's figure out step by step how to make a folding ladder for your attic. You will need the following tools: a hacksaw, a ladder, hinges, two timbers, bolts, self-tapping screws, a screwdriver and a metal hook.
The process itself can be divided into several steps:
- Step 1: Secure top beam to the opening using hinges, and the bottom one using self-tapping screws. The fastener itself should be with reverse side stairs.
- Step 2. Now we connect everything using the most ordinary bolts, with a diameter of 6 or 8 millimeters. A smaller diameter may not withstand the load, a larger one is simply not needed. Remember that self-tapping screws cannot be used here at all - they will not withstand the load and on a certain day they will simply tear out the entire fastening of the system.
- Step 3. Now we divide the stairs into three parts, measure 2/3 and make a cut, just between the steps.
- Step 4. We connect the sawn parts again, but with loops.
- Step 5. Nail longer bars on the back side so that they turn out diagonally for strength.
- Step 6. Now the ladder itself is delivered under the hatch and is pressed against the wall with the top bar. Secure this block with bolts.


Believe me, in practice everything will be much easier!