When building private houses, the least expensive method of arrangement is concreting the floor on the ground. In the process of performing this work, a reinforced screed is poured onto the compacted soil, a waterproofing layer is laid, and thermal insulation is performed.
If all technological details are correctly observed, a solid rough base is formed on which any type of flooring can be laid. Moreover, in in this case there is no release of radon into the environment. Concreting on the ground is not particularly difficult; this work can be done with your own hands, you just need to know how to do it correctly.
Concrete flooring in a private house on the ground is quite popularScheme and conditions for pouring a concrete floor in a private house on the ground
In order to properly install concrete floors in a private home, certain conditions must be met. These include the following circumstances:
- the need to form a continuous base for installation of the finishing coating;
- There should be no contact between the floating screed and the walls.
The floating screed is supported by well-compacted soil, so it is not at risk of deformation as a result of subsidence or swelling.
In addition, there is no need for underground ventilation, radon does not accumulate, and heat loss is reduced. Also excluded financial expenses for the construction of formwork, since the soil acts as its lower part. Schematically, a concrete floor on the ground is made as follows:
- the upper part of the soil, which is a fertile layer that is difficult to compact, is removed and the base is compacted;
- leveling is ensured with an underlying layer of up to 40 centimeters of sand or gravel;
- to prevent damage to the waterproofing layer, it is carried out under concrete screed;
- then the waterproofing material is laid;
- on top of it - insulation;
- then a concrete solution is poured onto the reinforcing mesh;
- to prevent contact with the walls, a damping layer is laid around the perimeter;
- An expansion joint is made using special corners.
 Layout of a concrete floor on the ground
 This do-it-yourself floor pouring scheme allows you to ensure high performance qualities of a concrete floor poured onto the ground. Trying to save money on its arrangement, some owners of private houses exclude the implementation of individual elements preparation of the concrete screed, which leads to the risk of its damage in the future.
When performing work, you need to understand that a floating concrete screed is not a load-bearing element, therefore, for separately located structures with significant weight, a fundamental foundation is made.
Step-by-step technology for concreting a floor with your own hands
Before you start concreting, you should mark zero level floor. Then you need to thoroughly prepare the base, not forgetting about engineering Communication. Next, a cushion is installed by filling it with crushed stone and sand, and an underlying layer is laid on it.
Next comes waterproofing, insulation and reinforcement of the structure. The formwork and guides are installed, the concrete solution is prepared, and it is poured. A separate foundation is provided for junction units, partitions, walls and stairs.
 An example of the stages of laying a concrete floor on the ground
 The concrete floor should be poured along the beacons. It should be understood that it is necessary to install a concrete floor on the ground only if a private house is regularly heated, otherwise deformation and destruction of the coating will occur due to freezing of the soil.
Advantage similar design is the ease of installation work, the strength and reliability of the base, high stability to influence negative temperatures environment. An important circumstance is the low cost of money compared to the installation of traditional floors.
First we mark the “zero” floor level
In order to mark the zero level of the floor, the following steps are performed. At a height of one meter from the future floor surface on door jamb and all corners of the room at the same level are marked, which are connected by a common line. Now, in order to set the floor level, you should step back from the markings downwards, based on the level of the highest point of the prepared base, where another line is drawn indicating the zero level of the floor.
 Zero-level marking scheme for arranging a concrete floor on the ground
 The concrete mixture will be poured along it. The required coating thickness is achieved by moving the markings to the appropriate distance. It makes these manipulations much easier to use laser level. Nothing prevents you from setting the correct level using a conventional hydraulic level in the form of a tube with water.
Then we prepare the base
To prepare the base for pouring concrete mortar its surface is cleared of various kinds garbage. Then the arable layer is removed, since it always contains organic compounds, which, when decomposed, will lead to subsidence of the concrete screed if left in the base. Soil is removed to a depth of approximately thirty-five centimeters from the zero floor level, this is the total thickness of all layers of the concrete floor.
Then the soil is compacted. It is best to use a vibrating plate for this, but if it is not available, an ordinary meter-long log can be used to perform this work. To do this, a board is nailed to its lower part, and a rail is attached to the top as a handle.
 This is what manual soil compaction looks like
 Using such a tool requires significant physical effort. After compacting the soil in one way or another, a dense base is formed, when moving on which there should be no prints of work boots.
Don't forget about communications
When carrying out concreting on the ground, one should not forget about engineering communications. Repairing network entry points in a floating concrete screed is not possible, so water and sewer pipes are placed in larger diameter pipes so that they can be removed and replaced if necessary.
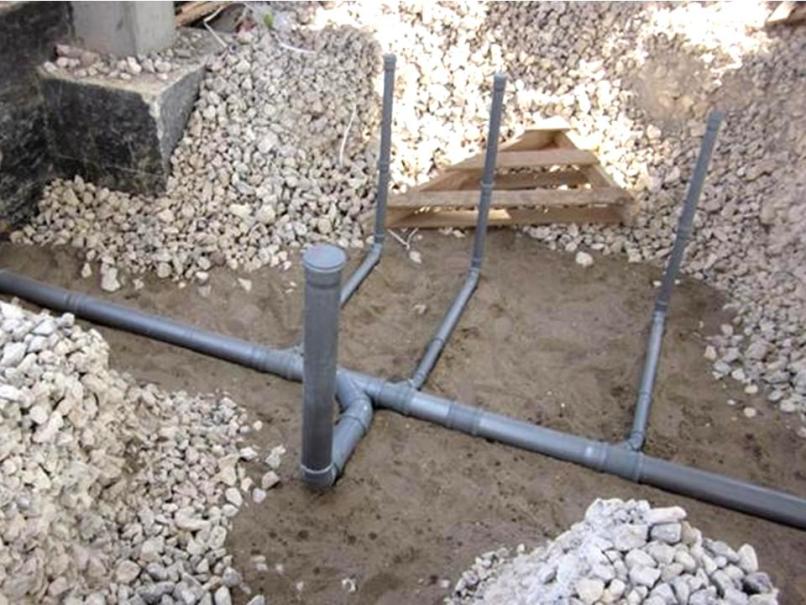 Obviously: drainage must be laid before concrete is poured
 The ground under a heated house does not freeze, so the water lines are buried about one and a half meters, and one meter is enough for sewer networks, since the wastewater is quite warm. Power electrical cable laid under the house at a depth of fifty centimeters.
Now you need to make a pillow from crushed stone and sand
A cushion consisting of about eight centimeters of crushed stone and sand is laid on the compacted soil. It protects the structure from the effects of soil waters that rise during rains and melting snow. In addition, the arrangement of the pillow allows you to better level the base.
 Once the sand has been properly compacted, the builder's shoes should not leave marks on it.
 First, a layer of sand is poured, moistened with water and compacted, followed by a layer of crushed stone, consisting of fractions with a diameter of about five centimeters. The sharp edges sticking out are sprinkled with sand, and the pillow is leveled.
Base layer required
Support floating concrete base serves as an underlying layer. The underlying layer is compacted in layers of fifteen centimeters.
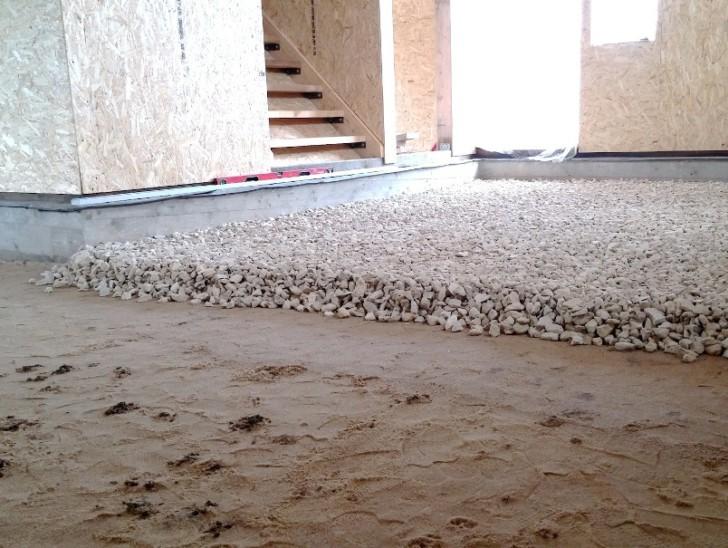 An example of arranging an underlying layer of crushed stone
 Sand can be used for its manufacture only when the groundwater level is low, since it has a good ability to absorb moisture. In soils with high level humidity, crushed stone should be used, since in this material the rise of water through capillaries is impossible.
We arrange insulation and waterproofing
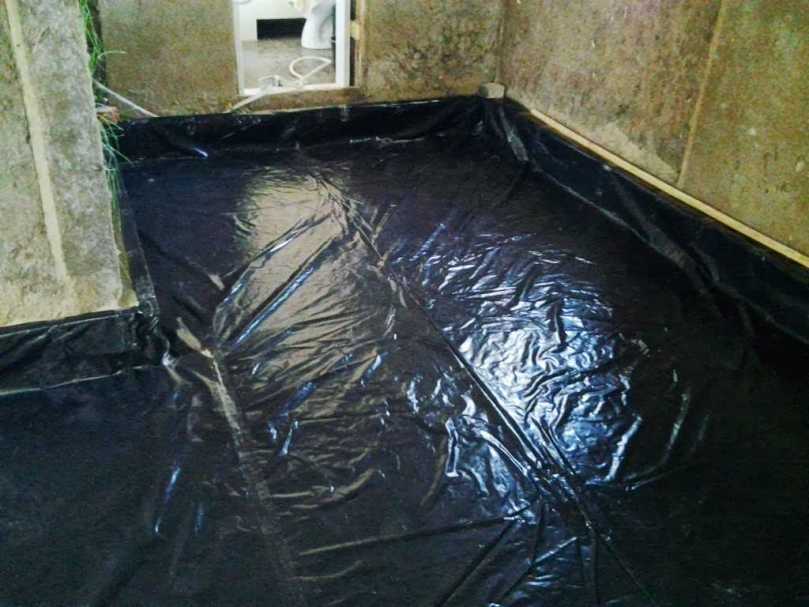 Waterproofing can be done, for example, using polyethylene film
 Insulation can be carried out using a wide variety of materials. Foam plastic, mineral wool or expanded clay are most often used for these purposes. Installation of the selected insulation is carried out in accordance with the recommendations of the manufacturer of this type of product.
 Penoplex was used as thermal insulation
 Reinforcement of the structure and installation of a “warm floor”
Reinforcement of the structure is carried out using a mesh made of metal or plastic. Place it on pre-made stands, the height of which is approximately 2.5 centimeters. This is done so that when the poured concrete hardens, the reinforcing mesh is inside it, providing the required strength characteristics.
 Plastic fittings for the floor are quite appropriate, linings are a must!
 In the event that significant loads on the base are expected, reinforcement is made from reinforcement rods up to one and a half centimeters thick. The installation of a heated floor is ensured by a 2-centimeter thermal gap between the floating concrete screed and the wall ceilings. Cracking and damage to the concrete can occur if a gap is not left.
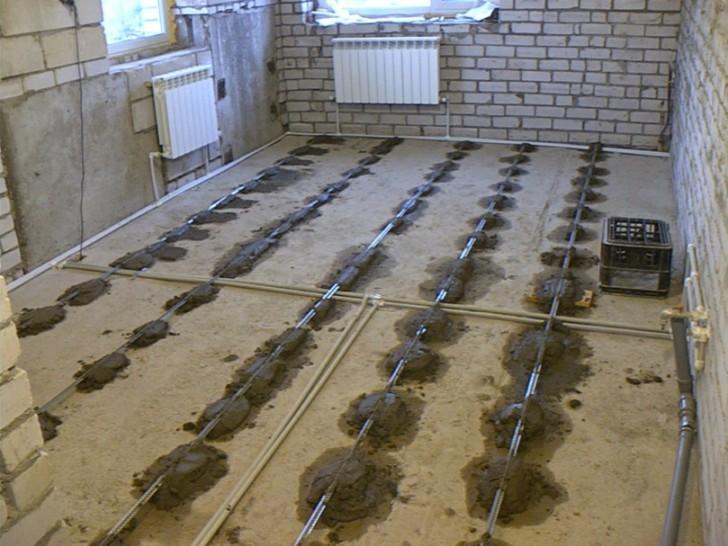
 An example of installing a water heated floor after insulation and fittings
 Installation of formwork and guides
The surface on which the concrete mixture will be poured is divided by guides made of wooden blocks or metal profile into cells with a side of about two meters. They should be firmly fixed with a thickly mixed solution and be sure to be placed at the same level, since they act as beacons for leveling the surface. The guides are laid according to a pre-designed scheme.
 The beacons are exposed and concreting can begin
 To ensure that the concrete layer is divided into fragments, formwork made from boards or moisture-resistant plywood is placed as guides. The entire structure is carefully leveled using a building level, under the formwork elements in in the right places wooden blocks or boards are placed, which are hemmed together at the top. To make it easier to remove the formwork after pouring the mixture, it is lubricated with oil.
Preparing the solution and pouring
The solution is prepared from 1 part cement, 2 parts sand, 4 parts crushed stone and 1/2 part water. The composition is thoroughly mixed to the desired consistency and first poured into the cells furthest from the entrance in order to avoid walking on the concrete mixture until it is completely cured. Of course, before pouring the floor, you need to remember to insulate it.
 Laying concrete along beacons
 Having filled several cells, the surface is leveled using reciprocating movements of the rule. Having poured the solution over the entire area of the base, you need to give it time to completely cure, covering it with a waterproof film during this period. To prevent cracking of the surface, it should be periodically sprayed with water.
Junction nodes, partitions, walls and stairs
To reduce heat loss, a single layer of heat-insulating material is laid at the junction points. Partitions, walls and stairs exert significant local pressure on the floating screed, which is not a load-bearing element of the structure, so a separate foundation is built for them. You can do things differently and increase the thickness of concreting in the right places to the required level.
 Penoplex is laid at the junction of concrete and walls
 Arrangement of the floor in a wooden house with an underground
To install a concrete floor in a wooden house with an underground space, you must first of all prepare the base thoroughly. Then the supports are installed and the logs are secured. Next, the solution is poured onto the finished flooring.
In this case, there is a gap filled with air between the floor and the soil, and in regions with harsh winters this helps conserve heat. In addition, the concrete structure is prevented from being washed away by groundwater located close to the surface.
When preparing the base, it is removed from the surface of the earth. fertile soil. Instead, a layer of 15 cm of ordinary soil is placed and compacted. This manipulation is repeated with gravel poured on top.
 Preparing the subfloor
 The prepared base is covered with a mixture of limestone and crushed stone, which can be replaced with crushed brick. An additional layer of waterproofing should be laid on top of the compacted soil.
Arrangement of supports
The supports for the logs are made of red brick and consist of columns reinforced on top wooden blocks, treated with an antiseptic composition approximately three centimeters thick. They are placed evenly over the entire area of the base at a distance of 70 cm to one meter between the posts. To prevent the aggressive effects of water, the supports are wrapped in sheet waterproofing material.
 The supports are ready for laying the logs
 We fasten the logs
The supports are supported by logs made from logs cut in half and treated with a compound that prevents the development of pathogenic microflora in them. The joints should be placed above the supports, while maintaining a gap between the joists and the walls of approximately 3 cm. The manufactured structure must be carefully leveled using a building level, and the maximum height difference should not exceed 3 cm.
We arrange the flooring and pour concrete
The most reliable arrangement of the flooring is made of uncut boards tightly nailed to the joists, a laid layer of waterproofing and subfloor boards fixed on top. The mixture is poured onto the flooring in the usual manner. In the corners of the underground there are square ventilation holes with a side of ten centimeters, covered with a mesh made of metal.
At self-construction country house or bathhouses on a strip foundation; in areas with a low groundwater level, it makes sense to make a concrete floor on the ground with your own hands . This technology is the fastest, most economical and allows you to do without the use of special equipment.
In addition, this floor design is more reliable and durable than ground floors without concrete, and does not require additional maintenance during operation.
Features of laying floors on the ground
In order to study this issue in detail, this article will consider the construction of a concrete floor on the ground in residential buildings with strip foundation.
In addition, the reader will be offered detailed instructions, which presents the technology of a concrete floor on the ground with step by step description implementation of all technological stages of construction.

Stage 1: preparatory work
It is recommended to begin work on the flooring after the walls of the building have been erected, window and door openings have been closed and the roof has been installed, and the average daily ambient temperature does not fall below +5°C.
Before pouring the concrete floor onto the ground, it is necessary to make a sand and gravel cushion:
- Clear the area of land within the boundaries of the foundation from construction debris and remove the top layer of soil to a depth of 200-300 mm. Compact the surface of the earth using manual tamper or vibrating plates.
- Make markings along the internal perimeter of the walls of the building, outlining the zero mark of the subfloor. Using a hydraulic level, check that the zero mark is at the same height in all rooms.
- Fill the compacted soil with sand and gravel, which consists of a layer of gravel, 50 mm thick and a layer of sand, 100-150 mm thick.
- Moisten the surface of the pillow generously with water., tamp, then pour thin layer crushed stone with a particle fraction of 40-60 mm.
- Sprinkle crushed stone lightly with sand, then moisten with water and compact again.
Note!
When filling a sand and gravel cushion, it is necessary to control using a building level so that all layers of backfill are strictly parallel to the horizon.
Stage 2: pouring a monolithic slab
The next stage of construction is the production of a monolithic reinforced concrete slab, which will perform load-bearing functions and take on the entire main load on the floor. For this reason, it must be reinforced steel mesh, and its thickness should be at least 80-100 mm.
- Waterproofing. Place waterproofing made of thick polyethylene film on the sand and gravel cushion so that it extends onto the walls to a height of at least 500 mm.
- Reinforcement harness. On low spacers, lay a metal reinforcing mesh on the floor so that at the joints it has an overlap of at least 100 mm.
- Fill concrete. Prepare a concrete solution and distribute it evenly over the entire area of the room in a layer at least 80 mm thick.
- Alignment surfaces. Using a level, by measuring the distance to the finished floor marks, check that the poured surface is strictly horizontal.
After the mortar has set, the surface must be left for at least one week until the concrete has completely hardened. Diamond drilling of holes in concrete using special power tools.

Note!
It is recommended to lay all engineering communications before pouring the slab, however, if this was not done in advance, it can be used laterA cutting reinforced concrete with diamond wheels after the monolith hardens.
Stage 3: insulation and waterproofing
The concrete floor, in contact with the ground, is a source of penetration of moisture and cold, therefore, to ensure a comfortable microclimate in the house, careful heating and waterproofing of the concrete floor along the ground is necessary.
Water-repellent materials and insulation are laid in several layers:
- Thick polyethylene film can be used as waterproofing, but it is best to cover the surface of the monolithic slab with a layer of liquid hot bitumen.
- Thermal insulation can be done in two ways: In the first case, a layer of blast furnace slag or expanded clay 100-200 mm thick is poured over the entire surface of the slab, but this material is hygroscopic and can absorb moisture.
- The second option is considered more acceptable and consists of laying slabs of extruded polystyrene foam (EPS) 50-100 mm thick on the floor.
- Expanded clay filling must be distributed in an even layer, and lay the EPS boards tightly, without gaps, on the floor and secure them with dowels and wide plastic washers.
- Another layer of waterproofing should be laid on top of the insulation. made of thick polyethylene film with a thickness of at least 200 microns, on top of which a reinforcing mesh is laid.

Note!
Pouringconcrete floor in the garage on the ground,You can do without thermal insulation, however high-quality waterproofing must be done in any case.
Stage 4: installation of concrete screed
The finishing screed serves to evenly distribute the load and lay the finishing floor covering ( ceramic tile, linoleum, laminate), so it must have the same thickness and a smooth, uniform surface. The quality of this stage of work should be given Special attention, because the cost of rework, in case of technology violation, may be too high.
How to pour a concrete screed:
- Installation of beacons. Using cement or gypsum mortar, install beacon guide rails throughout the entire area of the room at a distance of at least 1 meter from each other, defining the upper level of the subfloor level.
- Pouring the solution. Starting from the far corner of the room, fill each section of the floor, evenly distributing the cement-sand mortar over the entire surface of the filled area.
- Leveling the surface. To do this you need to use a metal or wooden rule, moving it with vibrating movements along the guide beacons.
- Floor screed. Thus, moving from one area to another, it is necessary to fill the entire room, which is recommended to be completed in one working day.
- Grouting cracks. After the mortar has set, it is necessary to remove the beacon guides and fill the resulting cracks with fresh cement-sand mortar.
Upon completion of this operation, the room must be left for several days until the cement mortar has completely hardened and dried. After 2-3 weeks, the floor surface must be primed. For this purpose it is best to use epoxy or polyurethane primer for concrete that must be applied using a roller.
- In paragraph 1 the manufacturing recipe is indicated cement-sand mortar for finishing screed.
- Clause 2 specifies the recipe for making concrete mortar for pouring a monolithic slab.
Conclusion
After reading this article, it becomes clear that self-production concrete floor in country house Almost any home craftsman can do it.
To obtain Additional information on this issue, you can watch the video in this article or read similar materials on our website. I am ready to answer all your questions in the comments.
There is an opinion that a concrete floor laid on the ground is unreliable and cold, and its main advantages are low price, environmental friendliness and fire resistance. However, in fact, the construction of such floors based on modern materials and technologies makes them much more durable and reliable than wood, and thermal insulation materials help provide heat.
What should be the conditions that will allow concrete floors to be installed on the ground? Let us note the most significant limitations:
- Naturally, you will have to give up the idea of a basement or ground floor, which for some is quite acceptable:
- large depth of groundwater - at least 4–5 m;
- complete absence of risk of flooding;
- the house must be heated during the cold period to avoid deformation of the structure due to the increased load on the foundation due to freezing of the ground in winter.
Backfilling the foundation
Initially, preliminary preparation of the base for pouring is required. First of all, this is a requirement for thorough compaction of the soil at the base, which will make it possible to avoid cracking of the floor in case of subsidence. Floors on the ground are most often installed in combination with strip foundations about one to one and a half meters deep, into which sand is poured.
This scheme, however, does not work for clay areas. As you know, clay does not allow water to pass through, so if sand is poured inside the foundation, the water will remain standing in it, forming a “lake” under the house.
To avoid such complications, drainage must be provided for clay materials.
We can also offer this option. Clay extracted when digging a foundation pit can be poured into its lower half. Next, insulate the house from the inside and the foundation from the outside. These measures will prevent soil heaving, even in an unheated house.
Tamping the foundation backfill is done in layers - 15–20 cm each, using a special tamping mechanism. This is a particularly important point during installation.
Poor backfill compaction ultimately leads to the formation of potentially dangerous voids.
The next step is to make a filter pad:
- gravel is poured onto the prepared soil and thoroughly compacted;
- The second layer is filled with sand, compacted and smoothed.
The thickness of the filter pad is calculated based on the characteristics and density of natural soil.
Technology for installing floors on the ground: key moments of laying screed
Determining the finished floor level
 This level is set to “0” by the level of the doorway and is drawn along the entire perimeter of the room in the form of a solid line - this is, in some way, a beacon of the finish line. From it downwards, the heights of the layers of the “pie” of the concrete floor should be marked in turn:
- finishing coating;
- screeds;
- heat and sound insulation (it should be at least 10 cm);
- underlying;
- and finally, the lowest point will become the subgrade level indicator.
All that remains is to assemble the “pie” in the reverse order, without exceeding the marked thickness of each layer.
Waterproofing device

The first layer from the ground is either a waterproofing or moisture-repellent layer. The best option is considered to be a waterproofing device made of PVC or bitumen-polymer membranes. Although if the moisture leakage for the structure is within normal limits, you can limit yourself to a simple plastic film.
The 250 micron film is laid in two layers.
Along the perimeter along the walls, the waterproofing is bent higher than the level of the finished floor. It must be laid especially carefully in the corners of the room. If the waterproofing is laid in strips, then their edges overlap each other and are secured with tape.
Laying thermal insulation
The next insulation after waterproofing is very important. The material chosen for it is durable, has low thermal conductivity, high fire resistance and is easy to use. The optimal thermal insulation materials that meet these requirements are considered to be polystyrene foam (density 150 or 200) and extruded polystyrene foam. The thickness of the material depends on the climatic characteristics of the area. For example, it is:
- 10 cm – in the middle zone of the country;
- up to 20 cm - in colder areas.
A polyethylene film is laid on top of the laid insulation. It solves two problems at once: it prevents concrete from flowing into the insulation layer between its sheets and serves as a vapor barrier.
Laying reinforcement

The next step is to perform the reinforcement, which is necessary to give the concrete strength and, accordingly, reliability. For ordinary concrete floors, a road mesh with rods with a diameter of 5–6 mm and cells with a side of 100 or 150 mm is often used for these purposes. Such reinforcement will completely prevent the floors from cracking as a result of shrinkage. It is advisable to raise the reinforcement a couple of centimeters above the level of thermal insulation, then it will be in the thickness of the concrete.
For floors experiencing increased loads, it is recommended to use a reinforced frame.
Floor screed device on the ground
Installation of formwork
Before pouring the main concrete layer, guides and formwork are installed, this makes it much easier to maintain the “0” level.
The room is marked out into equal sections up to 2 m wide and then divided by guides, say, from a board or block. In this case, their height should coincide with the “0” mark. They are fixed thick cement mortar with the addition of clay and sand.
The next step is to install formwork between the guides, forming rectangular sections, “cards,” which will subsequently be filled with concrete. The guides and formwork must be set to “0” and level with the horizon to ensure the floor is level after pouring.
To make it easier to remove the formwork boards and guides from the concrete solution, they are treated with special oil.
The junctions of the screed with vertical structures, for example, walls or columns, are cut off with material such as isolon.
Filling the screed

To create a durable monolithic design. Filling is carried out in a maximum of two passes. Filling begins from the corner opposite from the door. When several “cards” are poured, the mixture is leveled and stretched with a spatula.
Then proceed to rough alignment floor. Using the rules set on the guides, remove excess concrete with movements towards you, filling or empty “cards”. Having completed the leveling, the formwork is removed from these areas and the resulting voids are filled with concrete.
You can use a special vibrator; it will help compact the concrete and fill all the voids with it.
A completely screeded and leveled concrete floor is covered with film for 3-4 weeks to allow the solution to harden. During this time, the concrete surface is periodically moistened with water.

Then, using the resulting monolithic slab, a leveling screed with a height of 20 mm or more can be arranged using concrete grade 100 and higher.
When constructing private houses, two floors are often used different technologies. Typically, the floor is poured over the ground with a monolithic cement-sand screed or a joist system is laid on the primed base and a wooden flooring is installed. Which option is better? When do experts recommend making wood floors and when to lay concrete? More about all this.
Existing options

Making a concrete floor
Very often, when building a private house, the basis for the floor on the first floors and in the basements is ordinary earthen soils. Floors in this case can be made in two ways:
- Perform concreting.
- Install a joist system and lay a wooden base on them.
The first type of floor is usually used in technical rooms - bathrooms, bathrooms, basements and garages. IN living rooms make wooden flooring. Concreting the floor in them can only be done in warm regions. But in any case, for both options the beginning of the floor arrangement will be the same. For both concrete and wooden base it is necessary to build a special substrate - without it, the construction of the floor on the ground will be of poor quality.
Features of concreting technology
The construction of a concrete floor on the ground differs from other technologies in that the number of layers of bedding depends on the level of groundwater. Before starting its installation, experts recommend that you familiarize yourself with the following recommendations:
- Measuring the groundwater level is mandatory. It is carried out using spot drilling in several areas of the site.
- If groundwater is located closer than two meters from the bottom of the base, you will have to perform a multi-layer backfill and lay reliable waterproofing. If they are located below a two-meter level, there is no need to add crushed stone and river sand, which will be a big savings.
- If you plan to lay a warm water floor system on a concrete screed, you need to make a temperature gap of 2 cm between the walls of the house and the concrete screed. This will prevent cracking of the screed and its further damage.
- If, during the subsequent operation of the concrete base, a load on it is planned that exceeds 200 kilograms per square meter, it will be necessary to perform additional reinforcement of the screed. For this, experts recommend using metal wire with a diameter of 4 mm.
Concreting options
There are several schemes for concreting on the ground.
Scheme with waterproofing
- The soil is compacted.
- A pillow of river sand 30 cm thick is laid out.
- Crushed gravel is poured onto it.
- A polyethylene film no thinner than 30 microns is spread over the crushed stone.
- Then a rough concrete screed is performed.
- After it has completely dried, a layer of roofing material is laid on top.
- Next comes the thermal insulation material - mineral wool, extruded polystyrene foam or expanded clay.
- A finishing reinforcing cement-sand screed is performed.
- The final floor covering is being laid.
- The soil is compacted again.
- A cushion of purified sand is placed on top.
- Polyethylene is spread out.
- A reinforced concrete screed is being made.
- Insulation is being installed.
- A finishing floor covering is laid over it.
- The soil is compacted.
- Lined with polyethylene.
- The rough screed is laid.
- There is insulation on top of it.
- Reinforcing screed again.
- Flooring.
Scheme used for low groundwater levels

Foundation and floor construction
Scheme without bedding
When building houses in the harsh Russian climate, experts recommend using the following scheme. Compacting the soil -> constructing a cushion of sand, crushed stone and gravel -> waterproofing and insulation -> reinforcement -> concrete screed.
Installation stages
You can begin work and lay a concrete floor on the ground only when the walls are completely erected, the roof is already closed on top, and the weather conditions allow the screed to dry well. Work begins with measuring the base and setting markings. Using the building level, “0” is determined - the smallest point of the base. It is marked at the threshold from the bottom of the future doorway. From here you need to go deeper into the ground a meter. The base line will run from the found point.
Note! A simple device will help outline the perimeter of the zero mark. To do this, you need to use a level, drive nails into the corners of the perimeter and stretch the cord between them.
After marking, you can begin to build the foundation on which the monolithic floors will lie on the ground.
Preparing the base
Preparing the structure for pouring
First the whole thing is removed construction garbage and a layer of soil is removed to the zero mark. After 30–35 cm has been removed, the exposed surface is compacted. This can be done with a vibrating plate or a regular wooden post, on the side of which handles are attached. Experienced craftsmen advise watering the soil well to facilitate the process. After watering and compacting, the base should dry thoroughly. Therefore, it is better to carry out concreting the floor in the summer. A sand and gravel cushion is laid on top of the finished site. A layer of gravel 30 cm thick is poured onto the bottom of the base, carefully leveled and compacted again. Sand is laid on top of the gravel in a layer of 30 cm. It is also leveled, watered and compacted well.
Note! Wooden pegs of the required size help control the height of the backfill. They are placed at the corners of the perimeter. After filling the next level, the pegs are removed.
On top of the sand there is a 15 cm layer of crushed stone, and then a 15 cm layer of sand is poured on top again. When laying the layers, you must ensure that each one lies in a strictly horizontal plane. The building level helps to control this.
Waterproofing and insulation
The next stage is the installation of a protective layer and insulation. The film will prevent moisture loss from the cement-sand mortar. And the insulation will prevent heat from escaping from the room through the floor. So this stage must be approached with the utmost responsibility. As waterproofing, you can use ordinary polyethylene film, but its thickness should not be less than 30 microns. This roll material laid on the base with an overlap so that the polyethylene extends 15–20 cm onto the walls. The joints between the sheets of film are secured with construction tape. Insulation is laid on top of it. It can be completely different materials. The most commonly used are fine-grained expanded clay, basalt or mineral wool, and extruded polystyrene foam. Less commonly - cork, rolled isolon and perlite. And all because the last group of materials costs a little more than the first.
Reinforcement
Double reinforcement
Concrete floors in the house, laid on the ground, must be strong and rigid. Reinforcement helps to make a screed like this. If you lay a metal mesh woven from wire with a diameter of 4 mm on top of the insulation, it will remain inside after pouring and become a reliable reinforcing layer. The mesh is secured with pegs.
Installation of formwork
Before installing the screed, it is necessary to construct wooden formwork. It is made from ordinary timber and is installed between special guides, clearly aligned building level. From correct installation formwork depends on the quality of concrete pouring. If the wooden elements are treated with some kind of oil in advance, they can then be removed from the concrete pour without much difficulty.
Concrete recipe
After all preliminary work has been completed, the process of pouring concrete begins. The solution is prepared according to the following recipe:
- One part cement.
- Two parts of well cleaned sand.
- Four pieces of fine crushed stone.
- Half of water.
A homogeneous mixture is mixed from the listed ingredients. It is immediately poured onto the floor and leveled using the rule. The process of pouring the floor must be continuous, so it is advisable to carry it out with several hands using a concrete mixer. After pouring the floor, the mixture that has not yet hardened is compacted with a vibrator. It removes voids that may appear in the solution. After pouring, the floor must be properly dried and the concrete allowed to gain strength. Unlike the technology described, wooden floors are laid in a completely different way. Which one? Let's figure it out together.
Wood flooring
Correct installation of joists
It is necessary to lay wooden floors on the ground in such a way that a warm, ventilated underground remains between the base of the floor and them. Its height may vary, but should be no lower than 15 cm and no higher than 20 cm. At a lower height, floor ventilation worsens, and at a higher height, heat loss increases. The easiest and cheapest way is to install wooden flooring on brick supports. Their installation is carried out according to the following scheme:
- A substrate is created and a concrete screed is made. On loose soil, it is better to build a substrate from crushed stone impregnated with bitumen. It is filled to a depth of 5 cm and compacted tightly into the ground.
- Then markings are made indicating the location of the brick bedside tables, and a cement base is poured, on which it will then stand brickwork. After the final hardening of the screed, the construction of brick bedside tables begins.
Note! You cannot use them to create them. sand-lime brick and artificial stone.
- Two layers of roofing material are laid on top of the brick supports. They will provide the necessary waterproofing. Brick pedestals become supports for the logs. Wooden beam laid longitudinally, then fastened along the perimeter with transverse bars. Squares are attached between the magicians, which will become a support for the rough foundation.
- The subfloor is assembled from scrap materials, waste boards or plywood. A layer of vapor barrier membrane is spread on top. The entire underground is wrapped with it so that even niches are formed between the joists. They accommodate any roll insulation or expanded polystyrene or polystyrene foam boards. Expanded clay is often used as insulation. The insulation is covered again vapor barrier film.
- The next step is laying wood flooring or plywood. You can place anything on plywood - laminate, linoleum, carpet.
Generalization on the topic
As you can see, the floor in a private house can be laid in different ways. Wooden flooring is used when installing a concrete base is not recommended. In what cases should concreting not be done? When groundwater comes very close to the ground. It is impossible to concrete the floor in places of increased seismic danger; it is not recommended to make a cement-sand screed on loose soil and on soil with a large freezing depth. Concrete floor is good for technical rooms. Living rooms will be much warmer if you use wooden flooring. If all of the above restrictions are present, it is better to use the system wooden logs. We hope that such recommendations will help many people decide and choose the most suitable technology for laying floors on the ground.
Comments and reviews on the material
polmechty.ru
Concrete floor on the ground: features of do-it-yourself pouring technology
Most private houses, especially those built with your own hands, are built with minimal costs, and this directly affects the design of the house. In particular, this approach affects the lack of basements– simply poured into the ground strip foundation, along which the walls are erected. Such construction is associated with one feature - the floor in such houses has direct contact with the ground, which simply obliges builders to make it not from wood, but from concrete. In this article from the site stroisovety.org we will look at the question of how to pour a concrete floor on the ground - we will thoroughly understand this process and study all its intricacies.

How to make a concrete floor on the ground with your own hands
Concrete floor on the ground: how to prepare the base
Soil is such a thing that no matter how or what it is covered with, moisture will constantly seep through it, this is due to the laws of nature. It is for this reason that you need to start pouring the floor on the ground with the preparation of the base, and in particular with the manufacture drainage system. By the way, you need to think about it in advance and leave holes with a diameter of 100 mm in the foundation, through which moisture will be drained from the so-called underground. There should be holes in the foundation on each side of it - not only that, they also need to be made in the internal parts of the foundation. The height of these holes must match the level of the drainage layer.
Before its construction, the soil will have to be thoroughly compacted. Well, then everything is standard - first, sand is added, after which a layer of fine crushed stone is poured, the thickness of which is about 200 mm. It is this bedding that will play the role of a drainage system designed to remove moisture from the underground. The crushed stone must completely cover the holes in the foundation - moreover, it must rise above it by at least 50mm. You need to take care of this even before backfilling, and if necessary, add soil under the future floor or whatever else you have in abundance at the construction site. If you decide to fill in construction waste, remember that it must be solid, and wood, drywall, plastic and other rubbish will rot and form a hole, which has no place in the underground.

Installation of a concrete floor on the ground photo
Before starting concreting, most experts recommend laying a thick film under the base. In my opinion, it is not needed - the waterproofing should be between the concrete and the screed. Concrete itself will not suffer from moisture - the more it is exposed to it, the stronger it becomes. I will not insist on the absence of film - decide for yourself. As I said above, it won’t make it worse, but it won’t be better either.
Next, pouring a concrete floor on the ground involves constructing a metal frame from reinforcement - this step cannot be ignored. Reinforcement is made with reinforcement at least 10 mm thick - it is tied into a three-dimensional frame. From the outside, this process looks something like this: first, an ordinary flat grid with a 200x200mm cell is tied together, then small 100mm racks are tied to it. The next level of the flat lattice is tied to these racks.

Floor reinforcement photo
One thing to understand here is that the frame is not welded. Namely, it is knitted using soft steel wire. If you use welding for reinforcement, the finished concrete base will be very rigid - the slightest movement of the soil will lead to the appearance of cracks. And one more thing, if during the construction of the foundation you did not take care of its connection with the future floor, then you will need to drill into it and hammer reinforcement, which will be linked to the floor frame.
When the frame is ready, they begin to fill it with concrete - it is better to do this at once, since a monolith is much stronger than concrete poured in parts. In principle, you can independently calculate the cost of purchased concrete with delivery - believe me, it will not be much more expensive. But you will get rid of the problems associated with its preparation and, most importantly, you will get a truly monolithic and durable concrete base for the floor. Here you definitely won't miss the proportions. When you decide which is more profitable, take into account everything - the cost of the ingredients, the cost of their delivery, the work of making concrete, and even your wasted nerves.

Concrete floor on the ground with your own hands photo
The filling itself is a simple matter in which you only need to take two factors into account. Firstly, this is the shrinkage of concrete, which is carried out at the construction site using a deep vibrator (renting this device for a day will not be that expensive) and, secondly, it is control of the hardening process. The next day after pouring, the concrete should be thoroughly moistened with water and covered with polyethylene - the slower the drying, the stronger the surface.

Pouring a concrete floor on the ground photo
Also, do not forget about leveling - beacons are usually not used to construct a concrete pad. The screed makes the floor level. But if this is your first time encountering such concreting, then it is better to attach a level to the rule with which you will be removing the concrete - at least it will give you the opportunity to bring the level of the concrete pad as close as possible to the horizon. Yes, I completely forgot, the concrete pad should have a thickness of 200 to 250mm.
The technology for making a concrete floor on the ground requires complete drying of the poured base. Forget about it for a couple of weeks and do other things - there are plenty of them during construction, so you won’t be bored.
The final stage: how to waterproof and screed the floor
These are the final stages that are fully responsible for appearance and the service life of the decorative flooring. You need to start with waterproofing the concrete base - it is done as standard. First, the floor is cleaned of dust and dirt, primed and covered with a layer of bitumen mastic. After this, a roll of rubberized waterproofing is glued onto it. I want to warn you right away - waterproofing a concrete floor on the ground should not be done with plastic film. The film is used only in apartments when pouring screed, and then only to avoid flooding the neighbors below.
Having finished with the waterproofing device, it’s time to think about insulating the floor. At this stage, you need to lay polystyrene on top of the waterproofing; if you plan to install a heated floor, then a heat-reflecting screen will also be installed. Next is reinforcement - it’s cheaper to use a ready-made mesh with a cell of 100x100mm. If a heated floor is planned, then a pipe is laid on top of the mesh and beacons are installed after it, along which a cement-sand floor screed is poured. Don’t forget to install a damper tape around the perimeter of the room, which will allow the screed to expand during heating without the risk of cracking.

Laying a concrete floor on the ground photo
The thickness of the screed poured over the foam should not be less than 50mm - it must be allowed to settle well and gain strength. Just like a concrete base, the next day after pouring, the screed should be moistened generously and covered with polyethylene. After drying, when it turns white, you can even drive a tank on it.
That's all that can be said about the question of how to make a concrete floor on the ground? As you can see, this technology is not much more complicated than ordinary street concreting, and they are distinguished solely by the presence of waterproofing and a top layer cement-sand screed.
stroisovety.org
How to make a concrete floor on the ground in a country house?
When installing a concrete floor in a private house, the option of laying it on the ground with simultaneous insulation is most often chosen. This method allows you to obtain a durable monolithic screed, suitable for laying any floor covering, with average investment and labor costs and prevent heat loss through the bottom of the building. All stages of the work can be done with your own hands; the mandatory requirements of the technology include correct alternation and sufficient thickness of the layers of the cake.
Features of floors on the ground
The structure is a multi-layer cake laid on dry and stable layers of soil, taking into account a pre-measured level. TO mandatory conditions its construction includes a groundwater level below 4.5-5 m, the presence of an established foundation and constant heating. The standard scheme includes the following layers (from bottom to top):
1. Compacted soil, similar to monolithic slab accepting the main weight loads.
2. At least 10 cm of sand, which reduces the forces of frost heaving of the soil and performs drainage functions.
3. From 10 cm or more of compacted crushed stone and/or expanded clay, distributing weight loads and preventing subsidence and displacement of the remaining layers of the floor.
4. A layer of waterproofing materials that combines two protection functions: against capillary moisture and water loss when pouring the solution. In this case, it is the rolled varieties that have the optimal characteristics, laid with a mandatory overlap of 10 cm and above.
5. Rough base, which serves as a separation, load-bearing and protective functions.
6. Insulation layer made of polystyrene foam or stone wool.
7. Another waterproofing that protects against getting wet and extends the life of the cake.
8. Reinforced screed with a thickness of at least 5 cm, performing the main load-bearing functions and serving as the basis for the installation of floor building materials.
The above scheme is the only possible one; pouring a concrete base on top of the beams is extremely difficult due to its massiveness. The resulting screed can withstand significant loads, including its own weight, the weight of furniture and ceilings, and is suitable for any type of installation floor coverings: from self-leveling mixtures to light linoleum. You can find more information about pouring concrete floors here.

What to consider at the preparation stage?
The main requirement is the presence of a stable load-bearing layer; when conducting construction on sites with an unsuitable type, the feasibility of soil sampling and its replacement is considered. In other cases, the emphasis is on compaction and leveling. Work begins with markings - a zero level is marked along the entire perimeter of the premises of a private house and a cord is pulled, after which the soil is removed to the required depth (if necessary, on the contrary, it is added). It is recommended to select chernozem or soils with a high organic content until stable layers are reached; loams and sandy loams are simply leveled. High-quality compaction without the right tool It is difficult to do it yourself; at this stage it is advisable to use a vibrating plate; if it is not available, a log with a nailed handle is used.
Sand and crushed stone are poured in layers (from 10 cm each), ensuring the maximum possible shrinkage. On heaving and frozen soils, the thickness of the first layer is increased to 20 cm, under normal conditions 10-15 cm is enough. Sand is watered with water and compacted every 10 cm, its quality and grain size do not play a special role, but small and dusty varieties are not recommended to be used.

The next layer is filled with dense crushed stone or gravel with a coarse fraction (20-40 mm, from 1000 kg/m3). Dolomite rocks are not suitable for it due to their low grade strength. By analogy with sand, this layer is carefully compacted (but without watering). In order to increase waterproofing properties, it can be impregnated with liquid bitumen, and thermal insulation properties can be covered with expanded clay.
The preparation stage is completed by rough concreting - a thin layer of lean mortar with a strength grade within M100. There is no need to thoroughly smooth it out, but air must be forced out. The thickness of the layer in this case depends on the soil parameters and expected loads and varies from 3 to 10 cm; when construction is carried out on stable and dry soils, it can be replaced by pouring cement laitance on top of crushed stone; if there is a risk of frost heaving and there is a significant weight of the structures, the feasibility of reinforcing with metal is considered .

Nuances of thermal insulation and reinforcement
Taking into account the high thermal conductivity of concrete surfaces, the presence of an insulating layer between them and the ground is mandatory. Suitable characteristics They have moisture-resistant varieties: foam chips or foam slabs impregnated with hydrophobic compounds, stone wool, expanded clay or perlite granules. The thickness is determined by thermal engineering calculations; in the central zone of the Russian Federation, the recommended minimum is 50 mm of extruded polystyrene foam, in northern latitudes- at least 100. The insulation is placed over a flooring made of polyethylene film or roofing felt, protecting it on the sides from moisture. The second waterproofing layer is made of similar materials, with an upward bend of 15-20 cm and fixation. The stage is completed by placing damper tape or strips of polystyrene foam around the perimeter of the room and around support columns, if any.
Reinforcing products are placed on top of plastic supports at a distance of 3-5 cm from the top layer of waterproofing. Has suitable characteristics metal grid made of wire with a cross-section of about 3 mm and a cell spacing of 5x5. It is important to leave the plastic film or membranes intact; getting the insulation wet during the process is unacceptable. Simultaneously with the reinforcement, the beacons are installed: taking into account the future level and the recommended minimum thickness of the screed of 5 cm, on the mortar or welded to a fixed element.
T-shaped plaster or regular galvanized profiles or even rods are used as beacons; the placement step depends on the length of the rule (10-15 cm less) and the experience of the installers.

Instructions for concreting
To the very important stage begin after the composition has set under the leveling elements. Taking into account the high expected loads, a strength grade of at least M200 is required, which does not form cracks after hardening. The recommended ratio of binder and filler is 1:3 (PC M400 or M500 and sand) or 1:2:4 (PC, sand, fine crushed stone, respectively); if you doubt the quality of the components or the possibility of maintaining exact proportions, it is better to use ready-made dry mixtures, in particular – sand concrete.
An important requirement is a monolithic screed, when large volume prepare and level the work yourself required quantity extremely difficult, the forces of at least two people are involved. In any case, the mixture is stirred mechanized way(using a concrete mixer or mixer), and not with your own hands. Filling is carried out from the far corner, while simultaneously leveling and compacting the resulting area. The process is completed by removing the beacons and carefully filling the holes, then the surface is covered with a film and gains strength within 28 days with constant wetting in the first week.
Ideally, the thickness of each layer is justified by calculation; when choosing insulation, it is mandatory. The use of expanded clay when laying floors requires caution: if there is a risk of flooding or constant dampness, it is prone to moisture accumulation and increases the severity of frost heaving. The only problem-free insulation is polystyrene foam: taking into account the pouring of concrete on all sides, its poor flammability does not matter; minimum thickness The layer effectively retains heat. If there is any doubt about the water supply system, a drainage system is placed around a private house.
TO possible errors and technology violations include:
- Lack of compensatory materials around the perimeter of the room. Ignoring the laying of the damper tape leads to cracking of the screed when thermal expansion concrete.
- Filling when the groundwater level is less than 2 m on the surface, in this case it will not be possible to ensure reliable waterproofing; dampness will penetrate into the private house. The ideal occurrence is 4.5-5 m and below.
- Laying materials susceptible to rotting under the leveling beacons, this leads to subsidence of concrete floors during operation.
- Laying the insulating layer below the zero mark in the absence of a thermally insulated base, such a mistake is fraught with the formation of a freezing zone.
In order for a house to be cozy and comfortable to live in, it must have a high-quality, durable, wear-resistant, reliable and durable floor.
It is very popular when arranging the floor in a private home. concrete covering which they do on the ground. This solution has a multi-layer structure and fully meets all the requirements for it.
It’s not difficult to make such a floor with your own hands, but before you begin the work, you need to know the requirements that apply to a concrete surface made on the ground:
- the soil should be dry, dense and motionless;
- before creating a floor, it is necessary to determine the loads that it will withstand;
- the occurrence of groundwater should be no closer than 4-5 m to the surface;
- the floor must be waterproofed and insulated.
If groundwater lies closer than 2 m to the surface, in mandatory a pillow is made from crushed stone and sand.
If you plan to install a heated floor system, when arranging concrete covering, be sure to leave a gap between it and the wall, which should be 15-20 mm, otherwise during operation the concrete base will be damaged.
Experts recommend installing a concrete floor on the ground only if the house is permanently lived in and is heated. In an unheated room winter time the soil may freeze, heaving forces will begin to act on the structure, which can lead to its destruction.
Main advantages concrete floor on the ground:
- simple and easy to install;
- high levels of strength, reliability and wear resistance;
- high frost resistance;
- suitable for installing heated floors;
- low cost.
Fill it with your own hands
If you decide to create a concrete floor on the ground yourself, you must follow the technology for laying it and use high-quality materials.
Creating such a coating includes the following steps:
- surface preparation;
- floor filling;
- finishing;
- cutting seams and sealing.
Although creating a concrete floor on the ground does not require a lot of money, keep in mind that this is a rather labor-intensive process.
This coating has a multilayer structure, which usually consists of the following layers: soil, sand cushion, expanded clay, waterproofing layer, rough screed, vapor barrier layer, insulation, reinforcing layer, finishing screed.
Preparatory work
When marking the zero level, it should be flush with the bottom of the doorway; using a laser level, marks are made along the perimeter of the room. The soil must be cleared and well compacted.
 This coating turns out to be multi-layered and its thickness is usually within the range of 35-50 cm. This must be taken into account and the soil must be removed to the required depth from the zero level.
Soil compaction is convenient to achieve using a vibrating plate, but if you don’t have one, you can use a log or other heavy object.
Tamping is carried out until no traces remain on the soil while walking. To level the surface, you can lay a layer of sand, which also compacts well.
To ensure high waterproofing characteristics, you can cover the soil with a layer of clay. It is also compacted, and to make this process more efficient, the surface is slightly moistened.
A layer of clay will protect the floor from penetration of groundwater. The next step is laying a layer of gravel, its thickness is about 5-7 cm, which is also well compacted.
To make it easier for you to control the thickness of each layer, pegs are driven into the soil, leveled, and after backfilling is completed, they are removed.
On next stage make a sand cushion 8-10 cm thick to make the sand easier to compact; it is also recommended to water it with water. In order to make a high-quality floor in a private house, when making the substrate, its horizontalness is controlled using a level.
Waterproofing and pouring rough screed
To protect the concrete floor from moisture, it is necessary conduct waterproofing works
. Typically, plastic film is used for this, or you can take waterproofing membrane.
The selected material completely covers the entire surface of the room, with an overlap of at least 15-20 mm between the panels and an overlap of 20-30 mm on the walls. All joints of the canvases are sealed with high quality using adhesive tape.
Now you can lay the rough screed, since the requirements for it are low, they make it from not very durable concrete, the thickness of such a screed is about 40-50 mm.
Vapor barrier and floor insulation
After the rough screed has hardened, you can proceed to laying a vapor barrier layer, for this usually polymer-bitumen membranes are used, but there may be another option.
To ensure maximum thermal insulation characteristics of that gender, his needs to be insulated. For this purpose, thermal insulation materials such as mineral wool, expanded clay, isolon, perlite, polystyrene foam and others.
Reinforcement
 If it is expected that high loads will be placed on the floor, it is recommended to reinforce it. For this it can be used metal or plastic mesh, you can make it yourself from wire and fittings. The reinforcing layer is placed on supports so that it does not reach 2-3 cm from the insulation.
Installation of guide elements, formwork and pouring of finishing screed
To make the floor horizontal, it is necessary to install guide elements and make formwork. The entire area of the room is divided into equal sections and bars are laid on the markings, which will be level with the zero mark.
To fix the guides, you can use cement or clay mortar. The formwork is made of moisture-resistant plywood and creates honeycombs that will ensure filling exactly to the zero level.
To make the guides and formwork easier to remove later, before placing the beacons on the floor, it is recommended to pre-lubricate them with machine oil.
To make the floor monolithic, it must be poured at one time. You can purchase ready-made concrete or make it yourself. If you make concrete yourself, then you will need 1 part M 500 cement, 2 parts sand, 4 parts crushed stone and 0.5 parts water. All components are placed in a concrete mixer and mixed well to obtain a homogeneous mass.
Concreting the floor begins from the far corner, the concrete is leveled and compacted with a vibrator so that air is removed from it and no voids are formed. A rule is used to level the screed. After pouring, the guides and formwork are removed, and the resulting voids are filled with concrete. Thus, the entire room is filled.
After laying the screed, the floor is covered with polyethylene so that it hardens evenly, this will take about 28 days. During this period, it must be periodically moistened with water, otherwise it may crack.
Attention!
If small flaws were identified during the pouring of the finishing screed, they can be eliminated using a small layer of self-leveling mixture; it will take 3-5 days to harden.
Finishing work
After pouring the floor, 3-7 hours should pass and you can begin rough grouting using a trowel, after which final grouting of the concrete base is carried out. Since concrete is prone to cracking and to prevent this, it can be cut into expansion joints, which can be of several types:
- insulating, they are made near walls and in those places where the floor comes into contact with fixed elements, they prevent vibration;
- shrinkage, they allow you to relieve the stress that occurs during hardening and shrinkage of concrete;
- Construction joints are made at the junction of the new and old concrete floor.
Cutting the seams is carried out after the concrete has hardened sufficiently, markings are made and they are cut to a depth that is 1/3 of the thickness of the concrete layer. To strengthen the edges of the seams, they are filled with sealant and the floor is left until completely hardened.
To make it easier for you to perceive the zero level, you need to pull a special cord along the markings. All preparatory operations must be carried out carefully and efficiently.
To reliably protect the floor from penetration of groundwater, it is recommended to lay a layer of clay and compact it well.
During the work, after laying each layer, check its horizontalness, then it will be easier to obtain a high-quality and even finish coating.
conclusions
You can make a modern concrete floor in a house on the ground with your own hands, but for this you need to strictly follow the technology for its creation and carry out all stages of work carefully and efficiently.
If done correctly, you will get a strong and durable floor that will be the ideal base for any finishing coating.
Useful video
All stages of creating a floor on the ground
In contact with