It is very difficult to meet a child who does not like to play in the sand. To give the child the opportunity to fully enjoy his favorite activity, caring parents install sandboxes in the countryside or simply in the courtyard of their home. You can easily find ready-made designs on sale, but you will have to pay quite a lot of money. The best option- this is to make a sandbox with your own hands. In this case, all the needs and desires of your child will certainly be taken into account, and the price will be several times lower.
What can you make a sandbox out of?
Wood has always been considered the most popular material for creating a children's sandbox with your own hands. Boards, logs, beams or block houses are well suited for these purposes. They are the main materials for the production of sandboxes. To make the final result pleasing with its appearance, it is better to choose sanded wood. It costs a little more, but the result of the work is worth it. If the construction budget is small, you can save money and sand the existing material yourself.
You can also use moisture resistant plywood. But this type building material It is best used in extreme cases, since the presence of glue and formaldehyde in its composition does not have a very good effect on human health. But it is worth noting that plywood is the easiest to work with. It is easily cut with a jigsaw and assembled with a screwdriver. And after assembly, it’s enough to simply sand the ends of the structure and coat the sides with paint.

If you want to make a sandbox with your own hands at the dacha, you can use any available material. For example, empty ones can be used plastic bottles from under the water. To make a strong wall out of them, the lids are screwed in with self-tapping screws. wooden base, and then screw in the bottle. Also, using thick wire, additional strength is added to the walls of the sandbox. To do this, sharp wire is used to pierce the bottles through the top and bottom. The ends of the wire must be twisted well, and the dangerous ends are hidden.
The twist is located on one side only. When installing the side of the sandbox, try to make it inaccessible to the child. Ready design for sand, they are mounted in a shallow ditch and well sprinkled with sand and soil, and then compacted very carefully. Plywood is laid at the bottom of the sandbox and then filled with sand.

Another very popular material for making a children's sandbox with your own hands is car tires. They are great for this kind of thing. To quickly make a place for playing with pitch, one sidewall of the tire is removed. The result is quite high sides. Then you can go in two ways:
- cover the hole with plywood and screw it to the second side;
- cut off the second part and get just a side.
Attention ! Regardless of the choice, the cuts must be secured. If the reinforcing fiber is plastic, then it is enough to simply sand it, but if it is made of metal, it must be covered with something.

The main stages of making a sandbox
In order to understand how to make a sandbox with your own hands, we will consider in detail the main stages of its construction. Regardless of the type of construction, all steps will be repeated.
Choosing a location
It is better to choose a site for placing the structure so that part of it is located in the sun and part in the shade. If this is not possible, then it is better to make a sandbox in the sun and make a good awning. It is important to pay attention so that they do not grow near the place where children play. tall trees and bushes. Plants, of course, provide shade, but, firstly, branches sometimes fall from the trees, which can injure a child, and constantly dropping leaves in the fall add work for adults.
Never make a sandbox in hot sun or in a place where there is no air movement. Avoid drafts. There is also another important factor that needs to be remembered. Place the sandbox in a place that is very clearly visible from the window of the house, so you can be sure of the child’s safety.

Making the markings
If the design has rectangular shape, then for marking they use wooden pegs and threads stretched between them. The stakes are driven in after measuring the required parameters. Traditionally, the size of handmade children's sandboxes is 2*2m. A rope, twine or metal cord is pulled between the stakes. Check the corners. They should be exactly 90°C.
If the design provides for rounded edges or sides, then sand will help to make the arc correctly. You need to pour it into a bag, make a small hole in it and draw the desired shape.

Digging a pit
To do this, we first remove upper layer soil, and remove the soil. It is important to clear all roots, rocks and other debris. The foundation pit for a children's sandbox should be made about 30 cm deep. In the middle of the dug rectangle or square, make a hole smaller in size, but deeper. Pour crushed stone into it. This is how a system for draining melt or rain water is set up.
Advice ! If you provide a slight slope from the edges of the sandbox, the sand will always be dry.

Mounting the base
We fill the bottom of the resulting pit with a small layer of sand, no more than 5 cm, after which we compact it well. Only after this can the base be laid. The best option for these purposes is geotextiles. It represents a special non-woven material, which is characterized by increased strength and wear resistance. It does not allow grass to grow, and will not allow the soil and sand to combine. If, when laying, geotextiles are wrapped over the edges of the pit, then it will still hold the ground, preventing it from getting wet when heavy rain. In cases where geotextiles are not available, you can make a base from plywood or linoleum. Only then do you need to make several holes in the material so that water does not accumulate at the bottom of the sandbox.

Construction of a seasonal sandbox
The seasonal sandbox is a box with sides. The height of the box is approximately three boards (depending on their width). The frame is assembled by attaching boards with self-tapping screws to vertical beams mounted at the corners of the sandbox perimeter. If the board is about 10 cm wide, then two fastening points are required, in the case when the board is 15 cm wide - 3 points. If the sidewall is made of ordinary edged boards length over 1.8 m, then another additional vertical element is attached in the middle of the side.
The corners of the sandbox must be additionally strengthened. To do this, the corner posts are mounted outside, and the boards, which represent the walls of the sandbox, are connected together into half a tree.

We mount the sides
The sides of the sandbox are a frame made of boards. It serves for additional rigidity of the box and can look like a seat or shelf for toys. In order for the sides to connect securely, they need to be cut at an angle of 45°C. It is very important to ensure that the angles coincide clearly.
Important ! The outer edge of the corner is very sharp and grassy. Children very often scratch themselves on it and get splinters. To avoid injury, it is better to make the corners semicircular; to do this, you need to cut them down, and sand all kinds of flaws and edges.
During installation, the sides are laid on the box and secured with corner and intermediate posts. Attaching the sides to the edge of the box board is not very reliable. The backing block will also not save the situation, because children love to hide toys under the side. Most best method fastening the sides of the sandbox - pieces of plinth with a cross-section of at least 4 cm. A cut of 30 cm long will be quite sufficient for a meter of side. Self-tapping screws are attached in those places in increments of about 10 cm. Also, if the supports are mounted under the outer edge of the side, then its fasteners must be made hidden.

We arrange the roof
Since the sandbox is located on outdoors, then she simply needs a roof. The traditional roof model is a mushroom. But everyone who has ever played in a sandbox understands that such a roof will cover few people. It is better to make a fungus separately, for quiet, relaxing games in the yard. But it is better to equip the sandbox with a different type of roof.

The best, simplest and most reliable roof option is a surface on four pillars. The only disadvantage of such a roof is that it is very dangerous for restless children.
An equally good roof option for a sandbox would be a surface on two pillars. They are attached to the sides of the box. If the roof is heavy or complex in design, the pillars are reinforced with struts.

It is better to make the roof of the sandbox soft or tension. The latter option is very profitable, as it minimizes the cost of materials. Remember, whatever you choose for the sandbox roof, the materials must be safe for life and health.
Advice ! If polycarbonate remains from the construction of a greenhouse, gazebo or porch, then it may be the best option for covering the roof.

How to fill the sandbox
What kind of sand is best for children to play with? White and small will definitely not work. Such sand does not mold well, generates dust, gets into your eyes and ears, and is also an allergen. Even adults, when working with such sand, wear masks and respirators to protect themselves.
Also not suitable for white or gray quartz sand. It doesn't get dusty, but it doesn't stick either. But this sand injures the delicate skin of a child very quickly. The thing is that quartz is a very hard mineral and its particles cannot be polished to complete roundness.

Red or gully sand. Of course, it molds well, but it’s not at all suitable for children. This sand contains a lot of clay, in which bacteria and microorganisms multiply very quickly.
Most the best option for a children's sandbox - yellow sand of medium fraction. It is very suitable for good sculpting, and the special layer that envelops the grains of sand reliably protects the sand from the growth of bacteria.
If sand is reused up to 2-4 times, then it requires special handling:
- IN winter period You need to know how to store sand properly. The best way will be stored in bags, in dry unheated room. If sand is stored outside, it must be covered with film.
- As the weather warms up, the sandbox is filled with sand. If sand has been in it all winter, then it must be ventilated and sifted.
- The sandbox is filled in layers of 10 cm. Each layer of sand is dried in the sun for at least twenty-four hours.

Requirements for the playing area
After the sandbox is made, you need to pay special attention to its strength and safety. Therefore, it is very important to secure everything well and polish all the corners and roughness with a grinding machine.
After the sandbox is made, it is painted. On the one hand, the sandbox is painted bright colors It is very attractive to children, on the other hand, wood impregnated with paints significantly increases its service life.
I decided not to shelve the story with the sandbox that I mentioned and talk about the construction process. In addition, there are still warm days of Indian summer ahead of us and, perhaps, someone will even have time to do something similar. :)
My wife and daughters spent almost the entire summer at their grandparents’ dacha. There is freedom there for children. You can walk outside all day, pick raspberries and strawberries straight from the bushes, and generally enjoy your childhood and life. :)
But, no matter how good it is, without the main component of childhood (unless, of course, it takes place in permafrost conditions), the mood of any child will not be the most positive. I'm talking, of course, about the sandbox. So at some point my child remembered that in the city, they say, there is this same sandbox, but in the country, much to our chagrin, there is not.
As a result, after agreeing with my grandmother (our main dacha field marshal), at an emergency family meeting, a decision was made - there should be a sandbox! :)
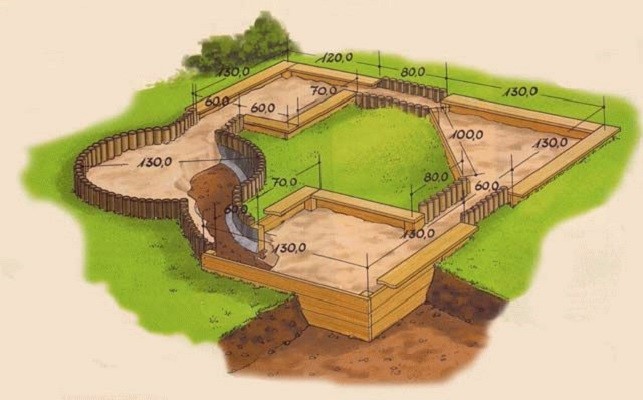
Having wandered around the Internet and reviewed a bunch of sandboxes of the most different forms and sizes, I decided to go with a fairly simple, but functional and convenient option. But since I couldn’t find any diagrams or drawings, I had to do it “approximately as in the picture” :) The photo below was found by me on the Internet and was taken as the basis for construction.
Having estimated the approximate dimensions of the future sandbox, I went to the construction market. I bought boards, timber, wicket hinges and paint.

After I filed required amount parts, all that remains is to polish everything and assemble it into a single structure. My faithful assistants helped me cope with these tasks :)

Grinding was done using a grinder and a grinding wheel, which is not entirely correct, since the process produces a lot of fine dust, which clogs literally everything. IN next year I want to buy grinder with a dust collector, otherwise cleaning takes almost as much time as construction itself.

After all the parts were processed, I began assembly.

I extended the timber to which the boards of the side walls of the sandbox were attached, since in the future I planned to dig it into the ground and these “tails” were supposed to serve as supports for the entire structure so that it would not fail.

Having collected everything together, I pulled this colossus out onto the street. It turned out impressive (the sides of the square were approximately one meter and twenty centimeters).

For strength and reliability, I reinforced the corners with the remains of timber.

I went through the first coat of paint. The “legs” of the sandbox were treated with used machine oil.

Well, more precisely, it wasn’t really me who painted the legs... :)

I estimated the location of the pre-painted boards of the future sandbox lid.

Using a grinder with coarse sandpaper, I removed the edges of the boards, giving them a more attractive look.

I fixed the first two boards firmly, screwing them with self-tapping screws. Then I began to assemble the first part of the movable sandbox lid, adding two more boards and attaching the gate hinges.

Something is already starting to work out... :)

Then I started on the second part of the lid. The fact is that this lid is not simple, but with a curious mechanism that turns it into a bench! To do this, I added two more boards and secured them with timber.


I attached two boards, fixed with bars to the previous two boards, using the same gate hinges. As a result, I got this design:

The bars are designed so that when the lid is opened, they rest against the wall of the sandbox and serve as support for the back of the bench.


Thus, our lid folds and turns into a convenient bench.

The fifth and sixth boards are held together by the bars I mentioned above. In the same way I strengthened the third and fourth boards, strengthening them with additional small blocks. Now the boards are not only held on hinges and are securely fastened to each other.

In addition, these short bars protect children’s bottoms from the possibility of being scratched on the hinges, and also serve as a back support for the back of the bench so that it does not fold and fall on the children’s arms and backs. Still, no matter what you say, safety comes first! :)
To prevent the bench from bending under the weight of those sitting, I screwed a small support plate in the center onto the first two boards.

After one side of the sandbox lid was completed, I began assembling the second side.

I decided to make the second half of the lid without a back, thus finalizing and improving the original design. :) The fact is that if an adult suddenly decides to play with a child, it is convenient to do this without climbing entirely into the sandbox, but sitting down on its edge. In the original version of the sandbox, from which I took an example, both sides of the lid had backs, which made it difficult for adults to sit on.

In my version there are no such problems. :)

I closed the corners with a wooden corner so that the ends of the boards would not absorb moisture, and in general it looks much neater this way.

Having completely assembled and painted the entire structure, I went to look for a shovel... :)

Having dug a pit around the perimeter, I lowered it into support legs sandboxes so that the side walls lie on the lawn.
The time of a happy childhood consists of many facets. Loving parents not only strive to provide their child with healthy food and beautiful clothes, but also worry about his development. This direction includes a physical and psychological component. Equipped playgrounds contribute to a child’s pleasant pastime, while at the same time developing in him many vital inclinations. A banal children's sandbox is no exception: patience, spatial thinking and the ability to communicate with peers are not the entire list of character traits developed during the game. Often children's holiday V summer period takes place outside the city limits, away from prepared sites. Therefore, you will have to make a convenient sandbox yourself. We will tell you in detail which version of the children's design scheme to choose and how to properly organize the whole process.
Determining the place
In addition to studying possible schemes and preparing your own drawing, you should wisely choose a place to install a children's sandbox. There are many factors to consider when considering this issue. The priority direction for placing a children's sandbox is the sector between the northern and southeastern parts of the site. The logical explanation is the influence ultraviolet rays. The first half of the day is characterized by clear air and soft UV radiation, after lunch the picture changes, the ultraviolet becomes harsher, so the formation of a shadow over the children's sandbox is mandatory. The diagram below clearly demonstrates the idea presented.
In addition to the reference point to the sun, there are several other factors that determine the location of the children's sandbox:
- Good visibility from the window of the house and the most visited points of the site. Children's unpredictability - common occurrence, so the sandbox should always be in the field of view of the older generation.
- Setting up a children's sandbox in the shade of trees is not recommended. IN best case scenario it will get dirty bird droppings and other debris; in the worst case, a caterpillar will fall on the child.
- It is also not recommended to draw up a drawing of a children's sandbox, focusing on the nearest location of sources of moisture; this could be an artificial pond or a regularly irrigated bed. Spiders may favor such places, and meeting them in a children's sandbox will not seem pleasant to a child.
- The northern side of housing construction will also have to be excluded - constant exposure to the shade prevents high-quality heating of the sand.
Note! In addition to installing the structure itself, the design should provide for the arrangement of the area around it. To avoid mass transfer of sand into the house or on garden path, there should be a lawn within a radius of one and a half meters. In its absence, it is recommended to make a blind area around the sandbox.
Having decided on the location, they proceed directly to drawing up a diagram of the children's sandbox.
Design stages
The work of drawing up a diagram includes several stages: designing the box, starting from its shape, the drawing is supplemented with a design for the lid and canopy. What the base of a children's sandbox will be depends on many factors:
- Is it planned to purchase new material or will remnants from previous construction be used?
- Your professional skills when working with wooden structures.
- How much time can you devote to creating a children's sandbox?
The most common version of the scheme is the standard square shape, with a side size from 1.2 to 3.0 m. The height of the children's sandbox varies between 25-30 cm, it can be equipped with a bottom. To fill a structure measuring 2x2 m you will need about 1 m 3 of sand. Having completed the drawing of the base, we move on to designing the lid.

Cap options
It is foolish to doubt the need to install a protective element for a children's sandbox. The reasons why the diagram should include a cover design are as follows:
- It is attractive for dogs and cats to set up a latrine there. To ensure that children's holiday does not end in treatment, hygiene standards should be observed at all times, and the sandbox is no exception. Purchasing expensive mixtures containing fragrances to repel animals does not always solve the problem a long period. Firstly, the substance quickly evaporates, and secondly, the harmlessness of its effect on the child’s body is questionable.
- During periods of heavy rain, the cover will protect the sand from excessive absorption of moisture, and as soon as the weather improves, the child will be able to start playing his favorite games in the children's sandbox.
- You can save money and not include the installation of a cover in the design, but protection in the form of polyethylene pressed down with pipes or bricks is not aesthetically pleasing. In addition, a child cannot independently remove such protection from a children's sandbox.
Let's leave the drawing options with complex structures in the form of a fan-opening lid or equipped lifting mechanism aside. The simplest option for a children's sandbox is an ordinary removable board made of boards, shown in the drawing below:

But that's not really good decision problems, due to possible child injuries if you want to remove it yourself. Very popular Lately They use models of children's sandboxes equipped with a folding lid that can easily be converted into a bench. A design option is shown in the following diagram:

For ease of opening, it is equipped with handles, as in the photo below:

For a children's sandbox, you can use a design with a sliding lid, which later plays the role of a shelf or bench without a back. Convenient lower stands provide ease of opening and contribute to the stability of the structure.

Canopy equipment
The canopy design also has many variations. Depending on the planned life of the children's sandbox, thick fabric, plywood or thin boards can be used as material. The mount is selected based on general sizes designs:
- For small children's structures, two poles with a crossbar and a stretched awning are sufficient.
- You can stick to an option familiar from childhood and create a drawing with a fungus. But it is better to leave such sun protection as a last resort, because a pillar in the middle of a children's sandbox often brings complete inconvenience, and the shadow moves to the side.
- For volumetric structures, it is recommended to install four supporting pillars. The canopy can be flat or in the form of a gable roof.
The drawings and photos presented below will help you decide on the canopy shape required for your children's sandbox design.


Preparing the site
It is extremely rare to use designs that are removed for the winter or equipped with rollers for movement around the site. In most cases, a children's sandbox is installed on a permanent basis, so care should be taken to prepare the site first. The process consists of the following steps:
- The area for the future children's sandbox is deepened by 20 cm.
- After leveling the soil, it is covered with sand to a depth of 5 cm and treated with a rake.
- It is optimal to use geotextiles or agrofibre as a drainage base for a children's sandbox. If you have a modest budget, thick polyethylene or propylene matting is suitable, which is spread with a margin of 30 cm along the border. This will prevent the germination of weeds and the penetration of pests, while at the same time speeding up the process of drying the sand.
- After installing the box, the unoccupied recess around the children's sandbox is filled with soil and compacted, and the excess edges of the film are trimmed.
See the photo below for an approximate work plan:

Nuances of the construction process
Having carefully double-checked the drawing of the children's design, according to the chosen scheme, they proceed to purchasing, cutting and preliminary preparation material.
Material
Wood is the most commonly used material for the manufacture of children's structures. At correct processing and timely preventive care wooden sandbox will last more than 10 years. Parts cut according to prepared drawings are coated twice with a water-polymer emulsion.
Note! Elements of the children's sandbox that will be in the soil are treated with bitumen mastic.
If you do not plan to use the children's sandbox for a long time, you can use aspen or alder to make it. Will help increase service life conifers trees. For construction it is convenient to use quarter or tongue and groove boards. How to assemble a box from them is clearly shown in the following diagram:
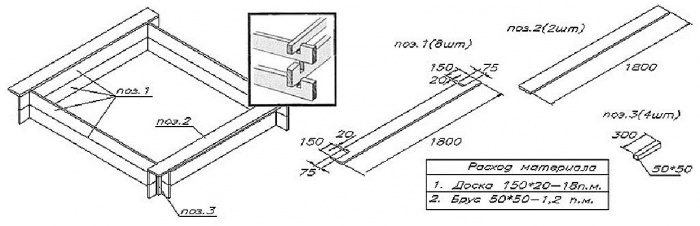
Box assembly
Based on the drawing, the children's sandbox box is assembled together. The boards are attached to 50x50 pieces of timber using self-tapping screws. If the side of the structure exceeds 1.8 m, the design must provide for additional fastening of the beam in the middle of the wall. The height of the beam for a permanent children's structure, according to the drawing, should be 30-40 cm. The corners of the children's sandbox need additional reinforcement. How to do this correctly, see the diagram below:

Advice ! All wooden parts should be sanded carefully to avoid injury to the child. Special attention Pay attention to the corners, which it is desirable to round off a little.
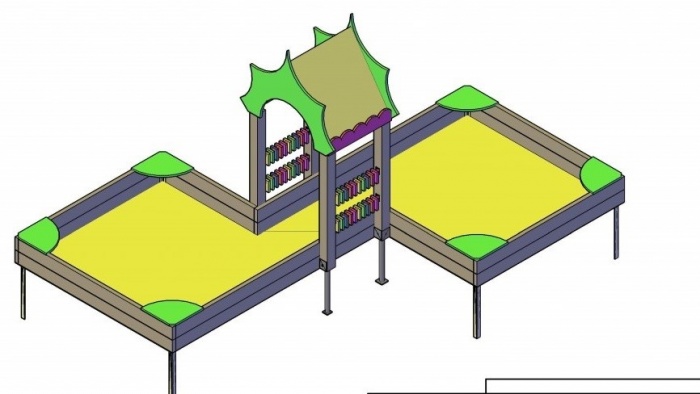
We looked at the simplest version of the sandbox box. Having experience and free time allows you to improve the design. After the base, they move on to equipping the cover and canopy according to the prepared drawing. The diagram below will allow you to set up a miniature sandbox house that your child will love:


The children's structure, where the sandbox is connected together with a slide, also looks interesting:
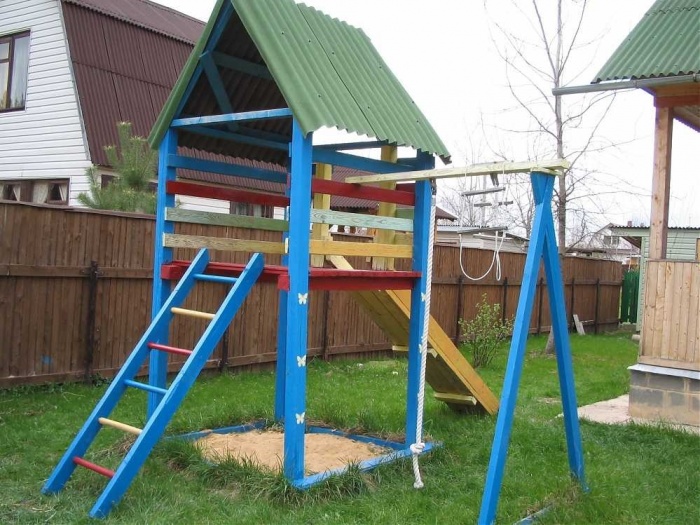
And finally, a few more interesting ideas, which will be useful when creating your own drawing:


Good luck in your work and creative inspiration!
Your baby is growing up, and it's time to think about childcare cozy corner on personal plot. What is your favorite pastime at this age? Of course, games fresh air. One of the main attributes of a children's playground is a sandbox, where children can play with sand from morning to evening. Installing such a structure in the yard is as easy as shelling pears, since they are sold in specialized stores already in finished form. However, their price often does not please caring parents. The best solution in this situation, a sandbox with a lid, made by yourself, will become. This does not require special skills, and you can use any available means as material.
Types of sandboxes for children
If you decide to make a sandbox for your beloved child with your own hands, so that you won’t be ashamed to show your friends a photo of the structure, then before you start work, you need to figure out what types of these structures exist.
By design features It is customary to distinguish between two types of sandboxes:
- open;
- closed.
Open structures
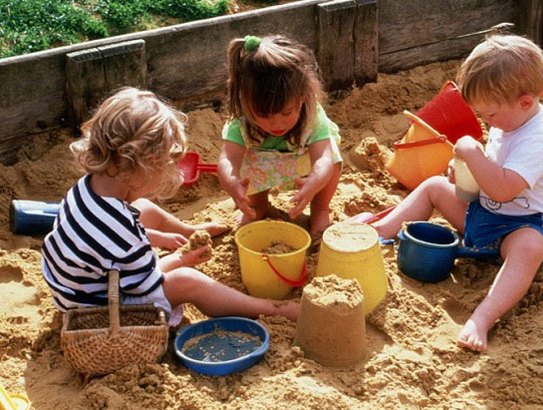
Perhaps the presented type can be called the most common and popular in playgrounds. It is made and installed quite simply. Although you can rarely find them in their “pure” form. Today, many masters complement them with a variety of decorative elements, giving them original shapes. Open sandboxes are often combined with houses, benches, slides and other elements. The most popular options are:
- Sandbox mushroom. In the center or on the side of such a structure they place wooden post with a roof so that children can play quietly without overheating in the sun.
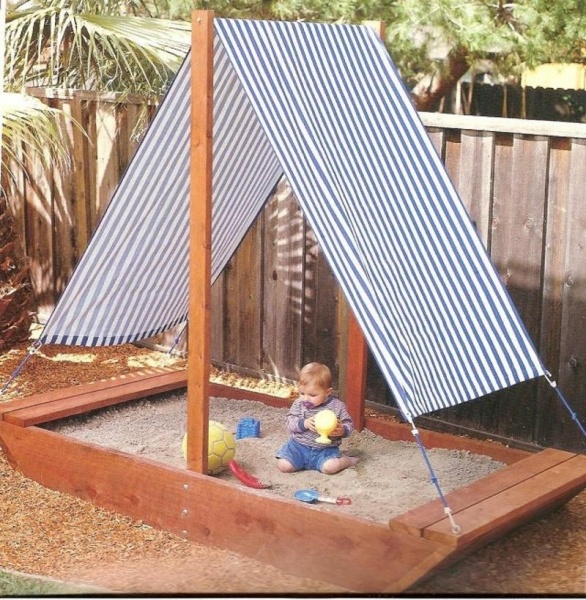
- Sandbox sailboat. An umbrella or a canopy acts as a roof, which serves as a protection for children from sun rays.
- Mobile sandbox (foldable). A special feature of this structure is the ability to move it to any place. Perhaps this is due to the presence of a collapsible frame.
Advantages:
- all materials for manufacturing are available and relatively inexpensive;
- installation does not require special skills;
- develops the child’s physical and mental skills;
- if a breakdown occurs, it is quite easy to repair it;
- simple and easy to use.
Flaws:
- Since the structure does not close, leaves, sediment, and debris get into it.
- while the sandbox is unattended, animals can “choose” it, turning the child’s favorite structure into a toilet;
- sand erodes over time.
Despite the fact that the open sandbox has few disadvantages, its functionality compared to closed design sharply decreases, in particular due to the need for constant cleaning of debris.
Photo gallery: open sandboxes
Mushroom - a classic design for a children's sandbox  The sandbox-sailboat perfectly protects the baby from exposure to sunlight
  A folding sandbox is perfect for those who like to travel a lot with children
  An open sandbox is the most popular option
  The canopy can also be placed near the sandbox
Indoor sandboxes for children
This type of sandbox appeared relatively recently, but thanks to many advantages it has already earned the sympathy of parents.
Closed sandboxes are divided into:
- Classic (covered with a lid). In this version, the structure is tightly covered with a board after the game.
- A sandbox that transforms into benches or a table. This structure differs from the others in that it allows you to turn the lid into an additional playground or into seats with backrests on both sides.
Advantages:
- the lid closes the sandbox from precipitation, debris and animals, and also prevents sand from weathering;
- you can store various children's equipment (spatulas, scoops and rakes) under the lid;
- there is an additional play area for children;
- prices for materials for manufacturing are low;
- reliable and durable design.
Flaws:
- in the event of a breakdown, repairing a closed sandbox will be more difficult than an open one;
- required a large number of materials for manufacturing.
Photo gallery: sandboxes with lid
 Appearance closed sandbox can be absolutely anything
  The lid protects the sand from moisture and debris
  The lid can be transformed into benches
Almost every parent has the opportunity to build a sandbox on their garden plot for their beloved child. However, in order for the structure to last a long time and not pose a danger to the child, it is worth following several recommendations during its manufacture and installation:
- The sandbox should be within sight of parents so that they can check what their child is doing at any time.
- In order to reduce the likelihood of infection through sand, it is recommended to choose an installation location away from trees.
- The dimensions of the structure must be chosen such that it can ultimately accommodate more than three children.
- The structure should be installed on an elevated area, since with this location it will not collect sedimentary moisture.
- It is necessary to install the sandbox so that one part of it is in the sun and the other in the shade. This will allow the sand to warm up evenly without burning the child.
- It is better to choose river sand because it is cleaner and contains a minimum amount of impurities.
- To prevent stray animals from trying to “take a fancy” to the sandbox, you can treat the outer perimeter with a special agent that repels cats and dogs.
- Before you start construction, you must check that all the boards are sanded.
- For manufacturing, use only high-quality materials.
- When choosing a location for installation, it is recommended to immediately check whether there are thorny bushes, allergens or other plants nearby that could harm the child.
- Ensure that there is no electrical wiring, various hoses and pipes.
- It is advisable to make a lawn around the sandbox, seeded with trampling-resistant grass.
- It is recommended to locate the structure on the south side - this way the sand will warm up faster.
Which material to choose
There are three classic version, which can also be combined with each other:
- wood;
- plastic;
- metal.
Each of them has its own advantages and disadvantages.
Tree
Wood structures are classic and popular.
Advantages:
- long service life with proper care;
- environmental friendliness;
- safety;
- availability;
- poor thermal conductivity.
Flaws:
- the need for periodic painting to maintain a neat appearance;
- susceptibility to rotting, since wood is easily susceptible to any influence (this can be avoided by processing by special means);
- increased risk of injury if the surface is untreated and there are gaps.
Plastic
Constructions made of plastic and resin can be safely called modern version sandboxes They are often purchased ready-made, because these materials are extremely inconvenient to process with your own hands.
Advantages:
- safe, harmless and high-quality plastic is used in production;
- there is no need for constant maintenance and periodic painting;
- He doesn’t care about any precipitation;
- the sandbox is easy to install and operate;
- has compact dimensions;
- pretty plastic lightweight material, which means the sandbox design will be mobile;
- There is a wide range of bright, colorful and rich design colors available.
Flaws:
- plastic fades and becomes faded over time;
- expensive;
- unstable to ultraviolet radiation, as a result of which the plastic is susceptible to deformation.
Metal
Metal structures, like wooden ones, are familiar to everyone since childhood. Quite often they could be found in the courtyards of the city. However, today they are purchased and built quite rarely, since their disadvantages are several times greater than their advantages.
Advantages:
- long service life;
- strength and reliability of the structure.
Flaws:
- manufacturing complexity, since without welding machine and you can’t build such a sandbox with special skills;
- high price;
- increased thermal conductivity;
- susceptibility to corrosion.
Preparing for work
Careful preparation will help make the work of making a sandbox with a lid with your own hands easier.
Drawing up a drawing with dimensions
It is customary to start any construction with a design diagram. Having decided on the type of design and material for manufacture, you must consider whether you will have a regular lid or a transforming one. Also carefully plan all stages of creating a sandbox.
The sandbox cover consists of:
- Door hinges.
- Back support.
- Basics for fastening.
- Sandbox side boards.
- The backs of the bench.
- Limiter.
This version of the lid is optimal, since it not only covers the sandbox from debris, but also transforms into benches.
Tools and materials
Due to the fact that the structure is square in shape, we will need boards of the same length and width. Materials you will need:
- 8 boards measuring 1500x150x30 mm (2 boards on each side of the side);
- 12 bars measuring 700x50x50 mm (for securing wooden elements sides);
- 4 boards measuring 1500x175x30 mm (for the bottom and base for fastening);
- 4 bars - 1500x200x30 mm (for the back of the bench);
- 4 limiters - 175x60x30 mm;
- 4 stops - 700x60x30 mm;
- 4 metal door hinges.
To cover the base you will need a special waterproofing coating. Great option It will be thick polyethylene. The area it will occupy is easy to calculate: you need to multiply the width of the structure by its length (1.5 m * 1.5 m = 2.25 m²). Since the sides will also need to be covered with polyethylene, it is recommended to leave a margin of 12 cm on each side.
For construction you will need a few more tools:
- bayonet and shovel shovels;
- hacksaw or jigsaw;
- hammer;
- screwdriver or screwdriver;
- building level;
- grinding machine or sandpaper;
- brushes and roller for painting;
- chisel;
- electric drill;
- square;
- set of wood drills;
- bolts with nuts;
- self-tapping screws;
- construction tape;
- wooden stakes and cord.
Photo gallery: tools for making structures
 A shovel will help make indentations for the base.
  A screwdriver will help speed up the process of tightening bolts
  Instead of a jigsaw, you can use a hacksaw
  The chisel will allow you to make indentations in the wood required sizes
  You can also take a professional angle
Step-by-step instructions for making a children's sandbox with a folding bench
- Once you have decided on the location, you need to mark the area. To make the calculations more accurate, it is recommended to install pegs around the perimeter and stretch a cord between them. Using a tape measure and a square you can make the corners even.
- Now you need to remove the top layer of soil with a shovel. It is advisable to make the depth a little more than 25 cm. This step will eliminate the rotting of plants and the appearance of various living creatures in the sandbox, and will also ensure the reliability and stability of the structure.
- Next, you need to level the bottom and fill it with gravel and sand in a 10 cm layer. Then the surface of the pit is compacted and leveled. Due to this, water will not accumulate under the sandbox.
- After preparing the bottom of the pit, you need to lay the base of the structure. Polyethylene is suitable for this. It needs to be laid at the bottom of the hole, after making several holes in it with a nail. This is necessary so that moisture does not linger in the sand for a long time, but goes into the ground.
- At this stage you need to make a frame for the sandbox. To do this, sides are constructed from two boards. For fastening it is customary to use self-tapping screws, bolts or metal plates. The connecting parts are bars - they fasten the sides with inside sandboxes.
- Before installing the sandbox in the soil, you need to dig 9 holes around the entire perimeter of the prepared hole, into which the supports will then go.
- Then the boards are secured with self-tapping screws to the upper edge of the side, serving as the basis for the lid.
- The boards you just installed need to be attached door hinges at a distance of 35 cm from the edge.
- Now you need to secure two more boards. The hinges are installed on the opposite side.
- Then you should install boards that will act as a backrest. The corresponding wooden parts are secured with self-tapping screws.
- Now you need to fix the stops to the base of the seat.
- In order for the back of the benches to have a stop, you need to install the bars and secure them with self-tapping screws.
- At the end, it is necessary to install the structure in specially prepared holes in the ground and secure it well.
Features of finishing of a wooden structure
Having completed the construction of the sandbox, it is necessary to treat it with special means that will make it look beautiful. It is important to choose the right paint. Cheap options can evaporate in the hot sun and emit harmful chemical substances, which can enter the child’s lungs. Also some paint and varnish products after drying, they begin to stick to your hands, and this is extremely undesirable. Therefore, you should contact a specialized store, where they will tell you the safest and most convenient option specifically for a children's sandbox.