Any personal plot is fenced with a fence and gates. Such designs ensure the safety of personal property. The selection and construction of gates can be done independently. Before work, you will need to create drawings, take into account the basics of installing poles and choose the right construction material. During the installation process, it is better to follow the advice experienced builders. When installing gates with your own hands, you will need drawings, photos and videos. ready-made structures.
Advantages of swing gates
Regardless of the design, the owner of the site can choose the method of opening the doors - outward or inward. Installation of swing gates is carried out without any particular difficulties. If all stages of construction are carried out correctly, the structure will serve for a long time and properly. Classic swing gates have a number of advantages:
- high functionality;
- compactness;
- no size restrictions;
- the ability to use any materials;
- ease of use.
Also, such gates are easy to install, they are undemanding to maintenance, quite durable and can be erected in a variety of design solutions. Swing structures also have a long service life. If the need arises, they can be equipped with an automatic control system.

The disadvantages of such gates include:
- the importance of taking into account wind loads relevant to a given region;
- the need to free up sufficient space for opening and closing the gate.
A simple consideration of these factors allows us to understand that swing gates have much more advantages than disadvantages.
Swing gate design
Regardless of size, finish, opening direction and materials, swing gates include:
- Support posts. The posts must match the type of gate.
- Frame. It is made of metal or wood. The main requirement for the frame is greater rigidity.
- Sheathing material. Metal profiles are very popular.
- Loops. They are selected according to the weight of the gate and its design features.
- Locks and constipations. They are devices that prevent intruders from entering the site. Also, such mechanisms have a variety of designs.
Every detail of a swing gate performs an important function. Correct installation of each of them is the key to long service life of the gate. When building a gate with your own hands, you need drawings, diagrams, and design sketches.
Gates made of corrugated sheets
Swing gates are the most popular among private developers. The doors can open in one or both directions. Corrugated sheeting is used as the material that is attached to the frame. You can also make a wicket in the door leaf.
The popularity of swing gates is achieved due to the long service life of such products. Metal structures do not require repairs compared to wooden ones. They are often supplemented with automation systems. In addition, the profiled sheet has a number of advantages:
- low cost of materials used;
- simple manufacturing process;
- sufficiently long service life;
- external attractiveness;
- excellent characteristics.
The disadvantage of gates made of corrugated sheets is their exposure to wind loads. Such sashes must be installed on reinforced hinges. It is also worth taking care in advance about the correct installation of the pillars. The disadvantages of such structures include the need to free up space for opening.

However, the advantages of metal profile gates significantly outweigh their disadvantages. Moreover, many problems are not so critical that you need to pay attention to them.
Installation of swing gates
If you plan to make swing gates from corrugated sheets, you will need to install fairly strong posts. For supports, it is better to choose pipes with a diameter of 80 mm or more. A square pipe will also cope well with loads.
The doors are welded from square pipes. It is better to choose products with dimensions of 10x25x3000 mm. To connect them you will need to use welding. The frame must be strengthened with diagonal tensioners. It is also necessary to provide space for constipation, a lock and limiters.
Work begins with the installation of supports. This stage requires some preparation. It is also important to use ready-made gate drawings and photos. You can also get a lot of information from videos showing the installation of swing gates step by step. Helpful information on the topic is in this material:
Pole installation methods
Support pillars can simply be buried in the ground or concreted. In the second case, the supports will be much stronger and more reliable. Also, do not forget about the need correct installation loops When driving, it is necessary to immerse the supports into the ground 130 cm.
Using this method of installing gate posts saves time. Almost immediately after hammering in the supports, you can attach the hinges and hang the sashes.
Another method is concreting. It is better to combine it with support reinforcement. The depth of the pits is 150-200 cm. The diameter of each pit depends on the cross-section of the pipe being buried. First, a cushion is prepared (from sand and crushed stone, and then concrete is poured).
Important! Before concreting, it is worth placing a waterproofing “glass” made of roofing felt into the hole. Thanks to this, the concrete milk will not go into the ground, which will make the solution more durable. Concrete must be compacted periodically to expel excess air.

Manufacturing and installation of sashes
After installing the pillars, you will need to make the sashes. Particularly time should be devoted to this process. The work is carried out in stages:
- First, you need to lay out a profile pipe or corners on a flat surface and weld the shape according to the drawing.
- To ensure high structural strength, it is important to strengthen the sashes with diagonals.
- When the frame is ready, you can begin covering it with profiled sheeting. The material should be 2 mm thick. You should not choose metal that is too thick - then you will have to think about strengthening the racks.
- After this, the hinges are installed. First, one half of them is welded to the gate frame, and then the other half is welded to the post.
- When all the work is completed, it is necessary to take care of security - a lock and bolt are installed on the gate.

The same principle underlies the installation of a wicket door. The painting of the sashes can be done either suspended or on the ground - even before installation on the supports. The difference is that already installed gates Drips may appear during the paint application process. For this reason, you need to treat the work with special care.
Sliding gates
Sliding gates are particularly functional. They do not take up much space, are silent, and open quickly enough. There are several types of sliding gates:
- recoil;
- hanging;
- console
Gates are least in demand hanging type. This is explained by the emergence of travel restrictions, the complexity of installation, and the many requirements of such structures.
If your region regularly experiences severe frosts, you should not install sliding gates on your property. The guides will become covered with ice, which will reduce the functionality of the structure. Such gates will require constant maintenance. Otherwise they are quite good.

Anyone can build sliding gates with their own hands. To do this, you need to have drawings and decide on the dimensions of the sash. Can also help various videos and photos of finished structures. The main installation condition sliding gates is the need to free up space along the fence.
A special profile is installed on the ground surface. The sash will move along it. Special rollers are also installed on top of the gate. So that the gate stops at in the right place, install special fixing elements. Useful information is in this video:
Installation of cantilever gates
Cantilever gates are considered one of the most complex. The advantage of such structures is that there is no need to equip a ground rail. The gate does not touch the ground surface while moving. Also during installation cantilever gates no height restrictions. In addition, only 1 support post needs to be installed. Such structures are used at any time and in any weather.
The folding is quite simple. It consists of a frame and casing. A guide is welded to the bottom of the sash, inside which roller carriages are placed. The gate can move along them in both directions.

Advice! Once the frame is welded, it is necessary to clean the welds. In addition, traces of corrosion should be removed from all surfaces.
The cantilever gate leaf is conventionally divided into two parts - the one that closes the opening, and the one that serves as a counterweight. The second part should have a length equal to 35-50% of the length of the first. A special foundation is installed under the cantilever part, capable of withstanding significant loads during operation of the gate.
To equip the foundation, you will need to prepare a channel that will equal to length cantilever part of the sash. It is also worth digging a pit into which it will be poured. concrete mortar. The length of the pit should be several tens of centimeters greater than the length of the channel. The foundation is poured to a depth below the freezing level of the soil. In addition, in order to securely fasten the channel to the foundation, you will need to make a special reinforcement cage.
Once the foundation has been poured, the sash can be installed. This work also has its own nuances and requires a special approach.
Necessary accessories
The elements necessary for installing cantilever gates are presented in hardware stores in a wide variety. To choose the right fittings, you will need to determine the weight of the sash and its dimensions. It is also important to know the width of the opening.
The standard set of elements for installing sliding cantilever gates includes:
- guide beam;
- plugs with which the beam is equipped;
- end rollers;
- additional device equipped with 2 rollers;
- roller bearings;
- roller catchers.
This set is necessary when installing cantilever gates. During the selection process, it is important to seek the opinion of a specialist.
Up and over gates
Such designs are perfect for a standard garage. It is not recommended to use them as gates on the site - they have a height limitation. The principle of operation of the structures is quite simple - the canvas moves upward, taking a horizontal position. These gates open and close quickly and are relatively easy to install.
When the sash opens, swing gates, it begins to protrude a little outward. This should be taken into account when driving the car to the garage. If you do not calculate the distance, the gate may hit the car.
These gates have become popular partly due to their compactness. When folded, they take up virtually no space. They also differ in accessibility. The frame is covered with wood, metal sheets or composite. If we compare such structures with swing ones, they clearly have more advantages for installation in a garage.

To make up and over gates you will need to draw a diagram. Features of installation of structures:
- When preparing to install a lift-and-turn structure, you will need to make 2 frames - for the gate and the one on which the gate will move.
- Inside the garage, the frame will be L-shaped.
- The canvas is equipped with sashes at the top and bottom.
- Also, levers are mounted to the frame to lift the blade during the opening process.
- Be sure to provide shock absorbers that will soften the impact of the blade during closing.
The support frame is attached to the opening using anchors. Installation of automation should be carried out only after all procedures for installing the gate. It is better to entrust the work to specialists who will help install the power supply.

Installation of overhead gates rotary type It won’t take much time if you prepare well for the job. The process will also speed up if you invite an experienced craftsman. In addition, it is necessary to use the design drawings to calculate in advance the dimensions of the sash and guide frame. How to install such gates can be found in the video:
Results
It is better to install gates of any type according to the drawings. Swing structures more often used in individual construction, sliding - both for closing entrances to private areas and for fencing industrial facilities. Lift-and-swivel the designs are ideal for garage entry equipment.
Each type of gate has certain advantages. They also have certain disadvantages. The simplest and affordable option- swing gates with two leaves. During the installation of such structures Special attention should be given attention to installation support pillars.
Getting to know country house starts from the entrance gate. Therefore this element personal plot must be beautiful and respectable. However, the main purpose of the gate is to provide convenient access for cars to the house and protect the territory from entry by strangers. How to combine these appointments? Let's consider what materials strong gates can be made from, and what types of structures are acceptable for a summer cottage. In addition, we will describe the sequence of creating the most popular entrance systems - swing and sliding.
Basic requirements for gates on a summer cottage
Gates for a summer residence are an integral element of arranging a suburban area. In most cases, gates are made of the same material as the fence. A number of requirements are put forward for the front part of the yard:

- possibility of unhindered check-in/check-out - optimal width gate - 2.2-2.4 m, height - 1.6-1.8 m;
- if people visit the dacha plot periodically trucks, then the gate must be made wider - 3.2-4 m;
- Gate leaves must open effectively and have locking elements;
- compliance of the design with the general style of the site and the facade of the house.
Naturally, important requirements- strength and resistance of the manufacturing material to natural influences.
Selecting material for making gates
Typically, metal, wooden or combined gates are installed at the dacha.
For the manufacture of metal gates use sheet metal, corrugated sheets, forged elements, profile pipes, corners and fittings. Structures made from corrugated sheets have gained particular popularity among summer residents due to a number of advantages:

- affordable cost of building materials;
- quick construction of the structure - you can install the gate yourself;
- long period of operation;
- provided that the protective layer is intact, the corrugated sheet does not corrode;
- attractive appearance- the material is available in different colors, interesting option- corrugated sheeting with imitation wood or masonry.
The disadvantages of metal country gates include:
- insufficient strength if corrugated sheets or sheet metal of small thickness are used;
- under mechanical stress the gate may become deformed;
- Small scratches provoke corrosion.
Wooden gates are less common today than before - when similar designs were used almost everywhere. Used for the manufacture of gates and wickets budget material(boards and beams) and elite lumber from expensive wood species.

You can assemble a simple gate with your own hands, having dry wooden beams on hand and standard set tools. The work of creating complex structures It is better to entrust it to cabinetmakers who have special equipment for wood processing in their arsenal.
TO combined gates These include those models in the production of which several materials were used simultaneously. In this case, the ratio of raw materials is taken in approximately the same proportions. Combined fencing is considered to be:

Country gate designs: features of manufacturing and operation
Depending on the type of structure, there are two main types of gates:
- swing;
- recoil.
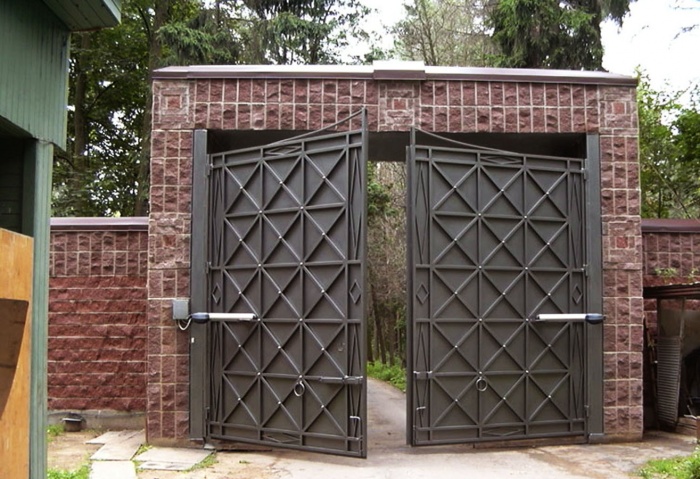
Swing gates - classics of the genre. Their popularity is explained by the simplicity of the design - a pair of vertical supports are equipped with hinges for attaching the sashes. The disadvantage of gates is associated with the difficulties of operation in winter time- snow within the opening/closing radius of the doors will have to be cleared regularly.
Important! The gate frame must have a large margin of rigidity and strength, since during opening it is subject to serious loads that can knock down the structure

To create a gate frame, a steel pipe or profile is usually used, fixing individual elements- bolts or welding. Frame cladding - galvanized steel sheets, corrugated boards, boards treated with an antiseptic, or metal grill. It is not recommended to use heavy facing materials - this increases the load on the supports and hinges. When closed, the gate is locked using a powerful bolt or padlock. You can install a latch at the bottom to fix the gate in the selected position.
Post supports can become loose over time, causing the gate to jam. To avoid this, at the installation stage it is important to lay a deep foundation under the supports.
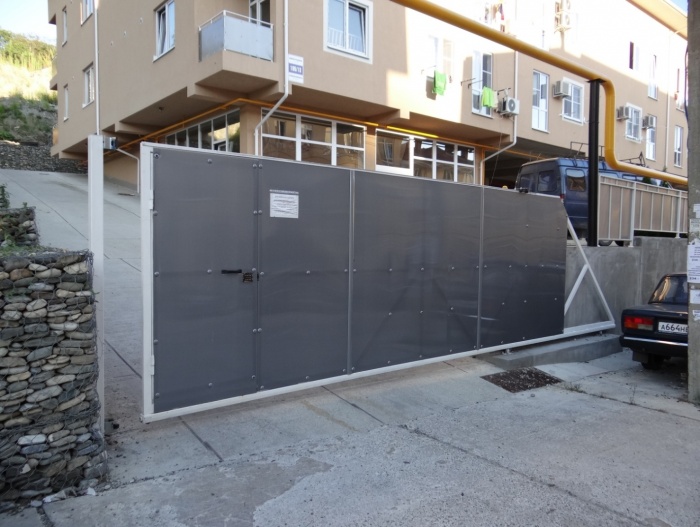
Country houses sliding gates There are two types: rail and console. Such structures were originally used in industrial facilities, and today they are often installed in local areas.

Positive features of sliding gates:
- Space saving. Sliding or sliding gates can be installed anywhere on the site. The gate leaves are moved parallel to the plane of the fence using a mechanism.
- Ease of use. It is possible to equip the structure with automation - the approaching driver just needs to press a button on the control panel and the gate will open.
- Even during snowfall, the “retractable” mechanism functions perfectly, since the gate leaves do not touch the ground.
- Attractive appearance.
- Resistance to external factors and durability.
The panel of sliding or sliding sashes is made of different materials. However, as practice shows, best option In terms of price-quality ratio, it is profiled sheet metal.
Important! You can make the gate leaf yourself, but the mechanism must be purchased from a trusted manufacturer

A separate group can be identified gate with built-in wicket. Such models are constructed using the same technology as swing gates made of wood or corrugated sheets. In the sash where the gate is planned to be placed, a frame of 4 vertical profiles(2 external frames define the boundaries, 2 internal ones define the entrance door opening).
Do-it-yourself swing country gates made of corrugated sheets
Site selection and project development
The first question that needs to be resolved is where to place entrance gate on summer cottage. If the house on the site is located in the center of the yard, then the gate is installed opposite the facade of the living space across the yard. For dachas located near the roadway, it is advisable to plan the entrance area away from the house in order to reduce exhaust gases to the yard.
If suburban area is located in a natural area with limited traffic, then the gate can be placed close to the facade.
To develop a drawing, you should decide on the dimensions of the gate - measure the width/height of the gate. When measuring the height, it is important to take into account the technical clearance at the bottom of the gate - the size of the gap depends on the type of coverage of the access roads. When laying tiles, asphalt or concrete, 5-7 cm is enough; for unstabilized soil with an uneven surface, a gap of about 10 cm should be left.
Advice. When calculating the drawing, you need to compare the dimensions of the frame and facing material. It is desirable that they coincide - then the installation process will be easier and it will be possible to avoid connecting seams with front side valves

The above drawing can be used as a basis for calculating the amount of material, parameters and mounting location of profile pipes.
Tools and materials
Mandatory and auxiliary tool for making frames, arranging posts and cladding for gates:
- grinder - for cutting and grinding metal workpieces;
- grinding and cutting discs;
- welding machine and electrodes;
- building level, tape measure, hammer, corner;
- trowel, shovel;
- spray gun or brushes for painting gates and posts;
- rivet and rivets.

Sample list of materials:
- profile pipe for the frame - optimally - 60*40*1.5, but 40*20*1.5 is also suitable;
- the pipe for making racks depends on the expected weight of the gate: up to 150 kg - 80*80*4, 150-300 kg - 10*100*5, more than 300 kg - 140*104*5;
- hinges (adjustable or non-adjustable);
- mechanical/electromechanical locks;
- dye;
- cladding - corrugated sheets.
Installation sequence
The first stage is the installation of support pillars. Metal supports are concreted to a depth of soil freezing - at least 1 meter. The order of installation of pillars:
- Support pipes with a cross-section of 100*100 mm should be cleaned of rust, degreased, primed and painted.
- Dig two holes along the edges of the proposed gate to a depth of 1-1.5 m.
- Place sand and crushed stone at the bottom of the holes - the layer thickness is 20-30 cm.
- Place the support in the hole and reinforce it with reinforcement. Check building level verticality of the pillar.
- Fill the hole with concrete consisting of: fine crushed stone, rack sand, cement.

Leave the foundation to harden for a week. If the door leaf is heavy with forging elements, then the concrete must “stand” for at least two weeks. At this time, you can begin making the sashes.
Sequence of creating a gate frame:

The final stage is covering with corrugated sheeting:
- Place the corrugated sheet on top of the frame and secure it with steel rivets or self-tapping screws.
- Fastening profiled metal in the areas of the “wave” depression.
- Calculation of the number of self-tapping screws is about 10 pieces per 1 sq.m.
The finished sashes of the structure are hung on hinges welded to the support posts.
DIY sliding country gates
For self-made sliding gates, you need to purchase components sliding system. Set includes:
- Guide beam. The length of the profile is equal to 1.6*the width of the opening for the gate.
- Roller carriages - 2 pcs.
- A board that keeps the structure from swinging while moving.
- Lower/upper limiter - reduces swinging of the gate during wind.
- End roller - ensures silent operation of the system and reduces the severity of the sash when open.

If the gate control is planned to be automatic, then you will need an automation kit consisting of the following elements:
- The gearbox is the “brain” of the working mechanism.
- Toothed rack (optimally galvanized). The size of the element depends on the length of the gate. For an opening with a width of 4.5 m, a batten with a thickness of at least 8 mm is suitable.
- Photocells.
- Signal lamp.
- Mounting base.
- Remote Control.
Start of work - drawing up a drawing indicating all dimensions. The width of the opening determines the location for the gate to be rolled back.
Important! The length of the gate is equal to the sum of the width of the opening and the rollback location. This value is calculated as the product of the gate opening and a coefficient of 1.6. The height of the sliding system is taken 10 cm less than the height of the fence

The main stages in the production of sliding country gates from corrugated sheets:

The last step is installation automatic system. Before installation, be sure to read technical documentation and instructions for the electric drive. Because different models differ from each other and have installation nuances.
Country gate design: original photo ideas


1. Gate trim:
The cladding can be made of wood, metal, polycarbonate, or a forged structure.
To ensure that the choice of material is correct, the following nuances should be taken into account:
- Gates made of corrugated sheets and others metal structures have a number of advantages, they are light and affordable, the material is available in a wide range of structures and shades, but in terms of aesthetic characteristics they will not suit everyone;
- Forged gates are chic, but they will cost a pretty penny, although they will undoubtedly last you the longest.
In summer cottages more often you can see the swing doors wooden gate . To extend their service life, the wood is pre-treated special compounds and placed in metal carcass. I propose to consider the option of making swing gates from lightweight material– profiled sheet.
2. Material options for the frame:
- Metal, welded construction- the most reliable and durable option, perfect for heavy cladding materials, not automatic gates I advise you to choose it.
- Metal frame with bolts- easier to build, unlike the previous one, but be prepared that this design is not as durable.
- Aluminum and other light metals- can be used Only for gates with light cladding! this is the very case when the use of such material can ONLY be caused by the choice of a professional (usually for automatic gates).
- Wooden gate frame- a classic, morally outdated, but a classic. Everything is simple here: if you want it yourself and quickly - wood, no - metal. It won't last long, you'll suffer!
3. Posts for swing gates:
- Wooden pillars - easy to use and inexpensive material. Disadvantage - fragility, and heavy metal gates It’s not normal to hang on them :)
- Brick pillars- about 10 years ago they were considered an indicator of status and were used where they were not needed. They look beautiful, but concrete ones are in no way inferior to them, and are even superior in durability. They can hold quite a lot of weight, I recommend inside brick pillars build around metal ones (cover them with bricks), welding hinges and other structural elements to the metal core post.
- Asbestos pillars- easy to use, ready product(sometimes they are mistaken for concrete), better than wooden ones, but in my opinion significantly inferior to metal ones.
- Concrete pillars- reinforced concrete, massive, noble and, unlike brick, easy to cosmetic repairs. If you want the pillars to be not only structural element, but also as part of the fence design, I advise you to go with this option.
- Metal poles- For light structures they are simply installed in the ground, but even for not the heaviest gates they should be used concrete foundation at least 20 centimeters away from the pillar and at least a meter deep (ideally one and a half, the depth of soil freezing in our climate zone), so that if the soil around the pillar gets wet, it will not lead.
- Metal poles on a concrete or brick base- a fairly common hybrid ( strip foundation 30 or more centimeters protruding above the ground and pillars protruding from it), both aesthetically and economically, and the upper part of the fence and gate can be quite “light”.
Every owner strives to ensure that his dacha is as comfortable and beautiful as possible. Of course, any dacha begins with a gate, so this element needs to be given no less attention than other objects. Therefore, in this article we will look at how to make beautiful and high-quality metal country gates with your own hands.
Types of country gate designs
Currently the most common are the following types gate designs:
- Hinged doors are two doors that swing open in one direction or the other. Making them will not take much time and effort. The inconvenience of this design is its bulkiness in the open position - often there are objects near the doors that interfere with their opening.
- Sliding - the undoubted advantage of this design is that the doors do not swing outward, but slide to the side. Another advantage is the ability to open both manually and automatically. True, the manufacture of such a design will require much high costs time and finances.
Recoil can also include lifting structures. Their peculiarity is that they rise up and do not roll away to the side.

It must be said that it is more advisable to make swing gates yourself, especially if you do not have such work experience, since this design more simple.
Gate manufacturing
Project
First of all, you need to make the drawings of the country gates yourself. All dimensions of the structure and its features should be marked on them. In addition, the diagram should show its relative location with other objects on the site.

Note!
In the drawings it is necessary to describe all the elements of the future product as accurately as possible, as this will subsequently facilitate its manufacture.
Therefore, the structure should be depicted from three sides.
Once the drawings are ready, you can proceed directly to the manufacture of the structure.
Materials
Before you begin, you should prepare the following materials:
- Corrugated sheets or metal sheets;
- Metal pipes;
- Metal corners or square pipes;
- Sand and cement;
- Four hinges (you can use garage door hinges).

Installation of supports
Should be used as supports for the sashes steel pipes with a diameter of at least 100 mm. You can replace the pipe steel profile, for example, an I-beam or channel with a flange width of at least 100 mm.
Note!
The stiffer and stronger the supports are, the longer the product will last.
Instructions for installing supports are as follows:
- First of all, it is necessary to apply markings to the soil, indicating the location of the gate and indicating the location of the supports.
- Next, you should cut the pipes to obtain supports of the required length, in accordance with the drawings.
- Then the supports are installed, for which it is necessary to dig holes. Since when opening and closing the doors, variable dynamic loads are placed on the axis, the supports must be installed more reliably than fence posts. The optimal depth of the pits is 0.8 meters.
- After installing the supports in the pits, they should be filled with concrete. In this case, the vertical position of the supports must be checked with a building level.
Note!
The width of the gate must be calculated carefully so that the gate is not too wide.
The wider they are, the more significant the wind will exert on them.
At the same time, the gate must be wide enough so that a car can drive into the yard.
It must be said that the racks do not have to be metal. For example, you can lay out pillars of brick or other material.

Manufacturing of sashes
While the concrete hardens, you can begin making the sashes in accordance with the drawings. The design of the doors consists of frames to which corrugated sheets or metal sheets are welded. It must be said that the price of corrugated sheets is usually lower than metal sheets, since the sheets of this material are much thinner.
To increase rigidity, several cross members are usually welded to each frame. For example, a common option is one horizontal and two vertical slats.
Thus, first of all, when making a gate, it is necessary to cut the corner or square pipes into pieces of the required length and weld a frame from them. It is extremely important to ensure the angles are accurate when doing this job.
Note!
When making frames, it should be taken into account that after installing the sashes, there should be a distance of at least 8-12 millimeters between them.
After making the frames, you should cut out sheets of metal of the required size and weld them to the frame. There should be a limiting strip on one of the sashes that will hide the gap between the sashes.

Pictured is a gate hinge
Loops
An important point in the manufacture of the structure is the installation of hinges. This work requires extreme precision, since the correct location of the gate and its performance depend on it.
As mentioned above, garage hinges can be used as awnings. For sashes standard sizes Four loops are enough, i.e. two hinges per sash. If the gate is large and powerful, 6 hinges should be used.
Before installation, metal plates are welded to each of the hinges, which in turn are welded to the supports. The second part of the hinges is welded to the sashes, after which the structure is installed on the support pillars.
After this, all that remains is to complete the bolt mechanism. Most often it consists of two L-shaped stopper pins, which are located at the bottom of the gate.