First you need to decide on the size and location of the future decor with butterflies on the wall. There can be a lot of options: a rapid whirlwind, a round dance or various figures made of moths. The composition can occupy the entire wall or only a small fragment of it, and can smoothly “flow” onto the ceiling or chandelier. In this case, you need to take into account several recommendations:
- The color of the decorations should not blend with the decoration of the room. Ideal if it becomes an addition to . For example, green or red elements will complement well the design in beige tones. Blacks are especially good with greys, whites and any pastel shades. If the wall decoration is too bright or colorful, it is better to avoid such decorations.
- The decor of butterflies should fit into the style of the interior. Thus, unassuming “calico” moths are suitable for decorating a room in rustic style, luxurious gold pieces would be appropriate in, etc.
- For decoration, you can select monochromatic figures or create complex multi-color compositions. They can use contrasting elements or various shades of the same color. To obtain a volume effect, backlighting is installed.
To make the work of choosing wall decor easier, it’s worth looking at the real implementations of such ideas. We specially selected photos for our gallery.
Surely many would like to modify or simply update the appearance of their home. Most often, transforming an apartment involves making repairs, at least cosmetically. However, with a creative approach you can give the room and apartment the new kind and without tedious and costly repairs. It is enough to remember such a magnificent method of decoration as creating panels. And not in last resort In this case, a completely simple option for decorating walls with butterflies can help.
With a little diligence and effort, you can easily give a stunning look to your usual walls. After familiarizing yourself with the main points of wall decoration and choosing a suitable application for yourself, you can attach the butterflies to the wall with your own hands.
What is a butterfly decoration?
This type of decor is an applique or, more correctly, a panel of butterflies made from various sheet material and fixed in elegant appliqués on all the walls or on just one. There are many ways to make and attach butterflies to walls, and the final result and the effect this decoration will produce will depend on how you do it.
Just imagine that on your wall, for example, from the center, a whole whirlwind of butterflies of various sizes and colors scatters. They circle in a round dance and flutter their colorful wings. All this will undoubtedly please the eye and attract the attention of others. Naturally, this does not mean real butterflies or even dried ones.
Video: examples of interior design with butterflies
For wall decoration, carved from suitable material butterflies of various sizes and shapes, as well as colors. A lot depends on how to approach the issue of implementing such an enchanting spectacle. If you choose hard cardboard for making butterflies, you can try and give them a wide variety of shapes and positions; they will be durable and will not lose their shape. If you choose light fibrous paper or film and secure the butterflies only in the middle, then they will flap their wings from any air movement, which will only improve the spectacle.
Where to begin?

Examples of butterfly stencils
First of all, it is worth deciding on the form of the future application. If own ideas do not seem to be as impressive as you would like, you can always scour the Internet and find suitable options for ready-made applications. After this, you can move on to choosing the colors and shapes of the butterflies. Each apartment is decorated differently. It is necessary to select the most suitable option colors of the future decoration so that it fits best into the existing interior. Do not forget that butterflies should be bright and noticeable against the background of the walls or ceiling, and not merge with them into one spot.
You should also think about the form separately. There is, of course, the opportunity to purchase ready-made stickers in the form of multi-colored butterflies of the desired palette, which are available to order on the Internet. Their form can be both the most intricate and primitively simple. However, now we are talking about the option of completely independent decoration. And this is precisely where the main advice for beginning masters lies. You need to use any image editing or drawing program you understand to create a sketch of future butterflies. Templates will then be made from the sketch. different sizes for cutting butterflies from the required material. In principle, you can even do this by hand on plain paper or tracing paper.

You should not chase grace by increasing the number of ruffles and bends on the wings of butterflies. Remember that later all this will have to be carefully cut out using scissors or a scalpel with a pattern.
Advice: It is best to get away from the strict symmetry of butterflies. So try not to mirror the right and left wings, but draw them in slightly different sizes, literally by a little. This will add some dynamism and volume to the final look of the applique, regardless of how they are attached to the wall.
You shouldn’t go too far with the last piece of advice either; after all, everything should be in moderation.
Once the sketch is ready, you can begin next stages. Once the format of the future decoration has been determined and it is known how and in what quantity the butterflies will be attached, the prepared butterfly drawing can be reproduced in several sizes and printed. After this, butterfly stencils are made. It is best to place the printout on a sheet of cardboard and cut out the inner part along the contour.
One of the options for decorating walls with butterflies is origami. In this case, there is no need to cut out butterflies, you just need to learn how to assemble origami. It's quite simple. There are many ready-made lessons on how to create a wide variety of origami, so this should not be a problem. Below we will consider the features of fastening and distribution of such figures on the wall.

An example of forming butterflies to decorate a wall using the origami technique
Forming an overall picture
As mentioned earlier, you can pick up the shape of the overall picture by looking at various options posted on the Internet, or come up with it yourself. This could be either an image of a whirlwind, or a scattering of butterflies in suitable places so that they match the existing design or pattern on the wallpaper, decorative plaster or other material with which the walls of your room are decorated. You can imagine everything in the form of a flock of butterflies that strive to fly from one end of the room to the other, or distribute them in small groups over the surface. Even a small cluster in the shape of a heart or flower will significantly decorate the decor.
As soon as the idea has matured, it is necessary to fix it first on paper, and then on the wall. To do this, use either a pencil or chalk, which thin lines Mark the main lines along which the butterflies will be attached. The main thing is not to draw the lines too much so that they do not catch your eye later and spoil the look.

Material selection
You can cut butterflies from a wide variety of materials:
- paper;
- cardboard;
- film;
- vinyl self-adhesive film;
- textile.
Paper
Each of the listed materials has its own advantages. Paper can be decorated in any way possible, and butterflies are the easiest to cut out of it. In addition, it is not so important how much paper is needed in the end, it is the cheapest. Can be used colored paper, which can be purchased at any office supply store. If you don’t want to make butterflies of the same color, you can completely turn your attention to the glossy magazines with pictures you’ve already read. The result is colorful and variegated butterflies. Alternatively, after this you can arrange them according to the predominant colors and use this when forming a picture on the wall.
The paper version can easily be mounted on the wall with any of possible ways. Fully glued paper butterflies will not protrude significantly above the wall level, and those that are attached at a distance and from the wall will be able to flutter their wings from air currents.
Cardboard
Butterflies cut out of cardboard will be much stronger and more reliable. Although it will be more difficult to cut them out, you can shape them however you want. Cardboard will easily take the required shape and retain it. You can not only bend the wings or parts thereof, but also make them rounded. To do this, just slightly wet the cardboard and bend it as required using a weight. After drying, it will remain exactly as it should be. Due to the fact that cardboard is much heavier, it will have to be secured somewhat more securely.

The original version is butterflies from vinyl records
Film
Fat polyethylene film various colors and special self-adhesive vinyl film are ideal for wall decoration. They can be glossy, which will make the butterflies not only delightful with their shape and color, but also sparkle and shimmer depending on the lighting in the room. Cutting butterflies from film is quite simple, just like cutting from thin cardboard. Regular colored film can be fixed in the same way as paper, but with vinyl film there will be no problems at all, just peel it off protective layer and glue the cut out butterfly into in the right place on the wall. In order for the butterfly to be able to twitch its wings, it is enough to remove the protective layer not from the entire butterfly, but only in the central part, in the form of a strip.
Textile
Fabric can be perfect if plain liquid wallpaper, drapery, or simply any base that is soft to the touch or look is used on the walls. Butterflies cut from fabric will also have a “warm” appearance, thereby not disturbing the originally created design, only improving it.
It is better, of course, to attach fabric blanks completely with glue. However, it is possible to form a three-dimensional picture. To do this, use PVA glue diluted with water or a soap solution. The second option is suitable only for very thin fabrics. As with cardboard, simply soak the template-cut fabric in the solution and let it dry in the desired shape.
We fix the decoration
To keep the prepared butterflies on the wall, you can use one of the options listed below:
Glue
Fully or partially glued butterflies will stick firmly to the wall. You can use either regular PVA or wallpaper glue. The main thing is not to overdo it so that it does not protrude beyond the edges of the butterflies. This is the easiest way to decorate a wall with butterflies.
Pins
You can use a wide variety of pins. As additional element For decorations, you can choose pins with beautiful heads in the form of various decorations or just small balls like pearls. In materials such as plastic or wooden lining, the pins will go in without problems, the same goes for cork covering and even drywall.
If the walls are covered with wallpaper, then you can do it differently. Using pliers or pliers, bend the tip of a pin approximately 1-2 cm long at an angle of 90 degrees. After this, the curved part is placed under the wallpaper, and thus the butterfly is secured. The easiest way to glue pins to the butterfly itself is with Momenta glue.

Styrofoam pieces
On one side of the piece stick to butterfly glue, and on the other side to the wall. The only bad option is that the foam itself is not a very durable material, and if it breaks, it will be difficult to remove the remaining part from the wall.
Hang on threads
This option is best suited when using origami. Using thin threads or colorless fishing line, butterflies are suspended from a cornice under the ceiling or directly to the ceiling. This method allows you to fully formulate volumetric solutions.
Finally
Although this method of decorating walls requires a lot of time to implement and perseverance, it will undoubtedly bring many new bright emotions into your life. Any interior design of an apartment can be decorated with variety using butterfly appliqué on the walls and ceiling. Choose the option that suits you and begin this exciting creative process.
Video: master class on decorating walls with butterflies
(No ratings yet)
Discussion:
Anna said:
Great idea for a children's room, I think so. Personally, I made this decoupage for my daughter in her room. There are a lot of templates on the Internet, choose any one. Then I picked up colored, thick paper and put it into the printer. That's all! It is important to properly attach the whole thing to the wall. It all depends on what the wall is covered with. Since I have simple wallpaper, the butterflies were glued perfectly with double-sided tape.
Svetlana said:
If you make decor, be sure to involve children in this process. Soon New Year, there is a reason to start cutting. When you work with children, do not be nervous under any circumstances, give them more independence.
Natalya90 said:
We already have little animals pasted on in our kitchen, now we’ll make butterflies in the nursery! The child is already at that age when he wants to do everything himself. And decorating a room with homemade butterflies is both interesting and useful!
Decorations for various rooms made with my own hands, can emphasize the individuality of the owners of the house. At the same time, you can add style and effectiveness to the interior. Various motives are used for this. Various decorative butterflies will fit harmoniously into the interior of a bedroom or children's room. Showing your imagination and creativity, you can create various decorations for walls with this motif.
To make butterfly decor yourself, you don’t need any special knowledge or skills. Therefore, almost everyone can bring delicate beauty to the design of the room.
General principles
There are many ways to transform an existing interior. We associate butterflies with summer and youth. They flutter carefree from flower to flower. These are light and beautiful creatures. No wonder they can be used to decorate different interior, adding style and grace to the design.
Decorative butterfly stickers sold in specialized stores. However, it is much more interesting to create compositions with such motifs yourself. In this case, you can show your imagination. Butterflies are painted on walls, ceilings and other interior elements or their three-dimensional figures are created.
You don't have to be able to draw beautifully. Templates can be found in various sources and print them on a printer. Create decorative panel Can be used on one or all walls, ceiling in the room. There are many approaches to creating butterflies from different materials.
Where to begin?
Any type of interior should fit into the overall style decorative ornaments. Butterflies can be made from various materials. Depends on their choice general impression from the panel. Moth figures can be made of hard, durable materials, for example cardboard. They will hold their shape well, allowing you to create clear pictures. These types of jewelry are considered the most durable.
If applied light paper or even film, corrugated paper, the butterfly figures will be light and delicate. If you attach them only in the center, this will allow the wings of the moths to flutter at the slightest breath of wind. This composition will be incredibly light and airy.
The color scheme of the room must be taken into account when choosing the colors of the decorative material. This will determine whether the butterflies will fit harmoniously into the existing interior. Each moth should be clearly visible. Therefore, it is better to give preference to contrasting shades.
Decor configuration
Making decorative butterflies on the wall, you should consider a number of tips from professional designers. First of all, they recommend making moth figures of different sizes. This will bring some dynamism to the created panel.
It is better if the wings are not mirror identical. When making figurines, you should be guided only by the technique of horizontal symmetry. It is better to make the upper and lower wings of different sizes.

When choosing a blank for a butterfly from various sources, you should not give preference to intricate figures that contain a large number of details. Cutting out ruffles will be extremely inconvenient, and decorative effect may not meet expectations. One composition will require many butterflies. Therefore, it is better to give preference to a simple configuration.
Formation of composition
Before you make a decorative butterfly or a whole group of them, you need to think about their location in the room. First you need to evaluate the pattern of wallpaper or other wall decoration. In places where the composition fits harmoniously into the interior, you can place several moths.
The composition may look like a flock of butterflies that smoothly moves from one corner of the room to another. Their concentration may be stronger in the center or at one edge. The random distribution of the figures creates a uniquely beautiful stylistic effect. It is initially recommended to draw it on a sheet of paper.

Also, a group of butterflies can form a certain form. For example, it could be a flower or a heart. There are no restrictions for imagination in this direction. The intended pattern should be marked on the wall surface light lines. They should be barely noticeable. It is best to use a thin, simple pencil. It can then be wiped off from the surface.
Paper and cardboard
Decorative butterflies, as mentioned above, can be created from various materials. Cardboard and paper are very popular. It will be very easy to cut out figures of moths from the latter. It will also be easy to color the wings of such butterflies. This is one of the most inexpensive ways interior decorations.

You can purchase white or colored paper. It is also possible to use the pages of glossy magazines or newspapers. It all depends on the style of the interior. They are arranged by color. Paper butterflies are easy to attach to the wall.
Butterflies made of cardboard are known to be more reliable. These are strong, dense figures. They are quite difficult to cut. However, it will be much easier to form different wing curves from them. The workpiece is dipped in water and then fixed in the required position. After drying, the material takes on the required shape. Such moths need a secure attachment.
Film and fabric
Can be created from film or fabric. In the first case, a special vinyl material or “self-adhesive”, available in a wide range. The moths will have a glossy texture. If you create the right lighting in the room, their wings will reflect the glare. The room will be elegant and bright.
The production of figures from film fully corresponds to the technology in which cardboard is used. If the material has a special adhesive layer on the back side, the butterfly can be easily fixed on the wall. To make the moth flutter, the wings are not glued to the base. Only in the center of the workpiece is the protective layer removed.
Butterflies made from fabric look original. The blanks are completely glued to the base of the wall. If you want to make the fabric dense and able to hold its shape, it is impregnated with a mixture of water and PVA glue. For very thin materials a soap solution is used. The composition is applied to the fabric, the workpiece is fixed in the required position. After drying, the butterfly will take the required shape.
Making paper butterflies
Creating decorative butterflies for interior, certain instructions must be followed. Before starting work, you must prepare the required materials and tools. First of all, you will need colored, white paper or wallpaper scraps. The template is printed on a printer. You will also need cardboard, a pencil, scissors and glue.

First, several butterfly templates of different sizes are printed on the printer. They are cut out and applied to a sheet of thick cardboard. The outline needs to be outlined with a simple pencil. Next you need to create a stencil. Inner material butterflies are cut out. The result is a blank for moth figurines.
On back side Using colored paper or wallpaper, you need to draw a lot of butterflies using a stencil. They are cut out and slightly bent in the center. This will create a fluttering effect.
Mounting type
DIY decorative butterflies on the wall can be fixed different ways. You can use glue for this. Paper and cardboard are firmly attached to the base using PVA. To do this, glue is applied to the center of the butterfly or over its entire surface. Next, the workpiece is pressed against the surface. You need to make sure that the glue does not protrude beyond the edges of the wings. When applying PVA to the back of the butterfly, you need to control its amount. Excess is immediately removed. If the glue is applied only in the center, in this place the butterfly is pressed tightly against the wall with your finger. This allows you to clearly fix it on the surface.
Pins can also quickly and efficiently secure moths in the places provided for them. This option is not suitable for painted or plastered walls. But for other types decorative finishing the pins will become the best solution. If desired, the butterfly can be moved. In this case, there are practically no traces left on the wallpaper.
Butterflies can be hung using threads from a cornice or ceiling. You can also use thin fishing line for this. Butterflies that will be hung in this way should be made of cardboard. Moths folded using the origami method will also look impressive with this method of fastening.
Vinyl record moths
Original decorative butterflies obtained from vinyl records. They are quite simple to make. In addition to the plates, you will need to prepare chalk or pencils in white and black, moth templates and scissors.

Using a template and crayons, you need to apply the shape to the center of the plate. On a black field apply white chalk, and on the label it is black. Next, you need to put a plate with a drawn butterfly on the foil. It is sent to a preheated oven (upper compartment) for 45 seconds. During this time the material will become soft.
Use sharp scissors to cut out the moth. In this case, the material will quickly cool and harden. It will need to be put into the oven several times. After the butterfly is ready, its wings need to be slightly bent.
Other decor options
They can decorate not only the wall. Showing your imagination, you can decorate the ceiling, chandelier, cornice, etc. with them. There is a technology for creating butterflies using origami. They will also look original in the interior.
From paper and cardboard blanks you can create beautiful chandelier. The moths seem to envelop the lampshade. In this case, you can choose any color for painting. It is correlated with the selected colors in the interior.
White paper butterflies can be painted acrylic paints. Additional finishing can be done on the fabric using beads and rhinestones. It all depends on the imagination of the master, as well as the availability of a lot of free time.
Having considered the main approaches to creating decorative moths, everyone will be able to decorate the interior of their home using these motifs.
As soon as they don’t decorate modern interior to achieve a unique comfortable environment in a residential building. For revitalization, decoration and decoration empty wall It is appropriate to place beautiful butterflies in the room. There is a situation when an expensive renovation has been completely completed in a room, pieces of furniture have been placed, attractive curtains have been hung, but there is still a lack of additional accessories - some kind of individual highlight.
A photo of butterflies on the wall shows how interesting this wall design option is, which will undoubtedly attract attention, perfectly completing the image of the room space.

Making your own decorations
It's no secret that winged beauties can be used to decorate not only walls, but also photo frames, paintings, chandeliers, mirrors, and ceiling surfaces. This design is by far the most popular as it embodies joy, love and tenderness.

To create this accessory You practically don’t have to spend a large amount of decor Money, no time, no material. Suitable paper sheets can probably be found in any home. But if this does not happen, the material can be purchased at any regular store stationery, and they are quite inexpensive.


Sometimes you don’t have the desire or time to draw and cut out the silhouettes of an image, then you can use special ready-made stickers with a sticky base.

Before you make butterflies on the wall, it is important to know that to make them it is not at all necessary to use only paper; you can also use any suitable available raw materials:
- colored paper;
- soft sheets of cardboard;
- vinyl record;
- textiles treated with starch;
- thin metal sheet (beer or lemonade iron can).

Absolutely allowed different size, color scheme, form, depending on the desires and preferences of household members. Naturally, you should take into account the quality and composition of the material at hand.

Please note that flying moths can be placed either in a dense flock (in the form of a vortex) or separate elements interior decoration.

Style ratio
Wall decoration in the form of floating butterflies is appropriate in absolutely any room style: Provence, minimalism, classic, modern, high-tech and more. It is important to achieve proper integration of the accessory into the overall style.

It’s not a good idea to decorate in the same shade as the wallpaper to avoid completely merging with the overall background. As an example: scarlet moths harmonize perfectly on a light beige wall covering, White background perfectly highlights black or other dark details.

If you further emphasize the decor with the help of artificial lighting, you can achieve the unique effect of butterflies taking off and fluttering. This option is especially relevant in the bedroom or children's room.


Main stages of work
Before you can make butterflies on the wall with your own hands, you need to prepare a special stencil. If you can’t make the form yourself, many options can be found on the Internet in huge quantities. Next, you need to select available materials for production, or buy them at a craft store.

Having decided on the base, using a stencil for decorating butterflies on the wall, we draw out the required shape and size of the moth. To make each butterfly unique, it is wise to use several stencils of different sizes.

When choosing a method for mounting the product, you need to take into account several simple nuances:
- When placing hovering insects for a relatively short period of time, it is better to secure them with pins or small buttons;
- If you intend to leave the product on the wall for a long time (until future repairs), you should securely secure them with glue.

Before mounting the composition, it is better to place a preliminary sketch on a sheet of paper, and mark the butterfly’s location points on the wall with a pencil. This tip helps you place your decor accurately the first time without ruining the wallpaper.

Colored elements
As a rule, the simplest and most popular method of decoration is multi-colored paper, which is quite cheap and significantly saves the family budget. You can create an initial sketch using a special computer program.


Paper sheet - pretty lightweight material, so it can be easily attached to the wall in any way without any problems. The paper wings will flutter in the slightest possible breeze, reviving the moths. Yes, and removing the decor from the wall will not be difficult and will not cause any damage to the repair.


Old color magazines that have been read for a long time are quite suitable for work. Having transferred the shape of the products from the Internet onto glossy sheets, they can be coated with glitter with acrylic varnish or fluorescent paint. You will get a beautiful iridescent glitter effect.

It is better if the insect is attached only to the middle, then the wings will be freely extended and create volume.

Panel of moths
A wall panel made of fluttering butterflies looks no less interesting and luxurious. A small set of materials and equipment will be useful for its construction:
- glitter paper magazine;
- regular scissors;
- scotch tape;
- different stencils;
- picture frame.


To cook moths you need bright magazine pages. Their number directly depends on the size of the frame. Please note that you should not attach too many figures at the same time in order to avoid the awkward appearance of the picture and not spoil the style.

The first stage is the background of the panel made of colored paper, or blank White list, covered with paint. The elements of the composition are mounted using PVA glue or double-sided glue. The completed panel is placed in a frame and mounted on the selected wall.


To completely decorate a certain room, it is recommended to combine several techniques that are in harmony with each other:
- one wall of the room is decorated with a composition;
- the opposite side includes a panel;
- Floating beauties hanging on a colorless thread or fishing line are attached to the chandelier.

The butterflies themselves look great when paired with birds, bees and ladybugs. It is appropriate to use beads and beads for decoration, and only decorative pins for fastening.

To secure them to the wallpaper, it is wise to bend the sharp ends and push them under the canvas, you get the effect of a moth fluttering in the air.

There are a lot of ideas for wall decoration, the main thing is to use your imagination and maximum patience! The result will not be long in coming - your room will become unique and inimitable!

Photo of butterflies on the wall


Each of us in childhood cut out butterflies from paper as crafts, but then we didn’t even think about the fact that they could become unusual element in interior design.
Butterflies on the wall - simple and original
The desire to update the interior often arises, and renovation is a very expensive and costly pleasure to do too often. In such cases, design elements come to the rescue, capable of not only changing the look of any room, but also creating a special atmosphere in it. This decor will cost mere pennies, but your family and guests will appreciate the original idea.
Decorating with paper butterflies - budget-friendly, but at the same time original version decorate any room, a little patience and imagination - and the room will be completely transformed!
Creating butterflies for interior decoration does not take much time, but it gives inspiration and is guaranteed to lift your spirits. It is worth noting the mobility of such decor, because if you wish, you can easily move or replace elements of the composition made of paper butterflies with others almost every day. With the right choice of shade, butterflies can either become the main color accent of the room or unobtrusively complement the interior.
Many designers evaluate this method of decorating space positively and use it to decorate not only residential areas, but also shop windows, restaurant interiors and offices.
With the help of butterflies you can attract the attention of visitors, be it your friends coming for tea or customers in the store.
For which room is decor with butterflies suitable?
Decor with paper butterflies can be called universal, but you still need to observe some nuances. Butterflies look harmonious in the bedroom, living room, corridors and halls; this design can be either permanent or seasonal. Professional designers claim that winged beauties are suitable for interiors of any style - high-tech, country, classic... making the right choice they will be appropriate everywhere. Paper butterflies on the wall will help give a boring room a festive or romantic look.
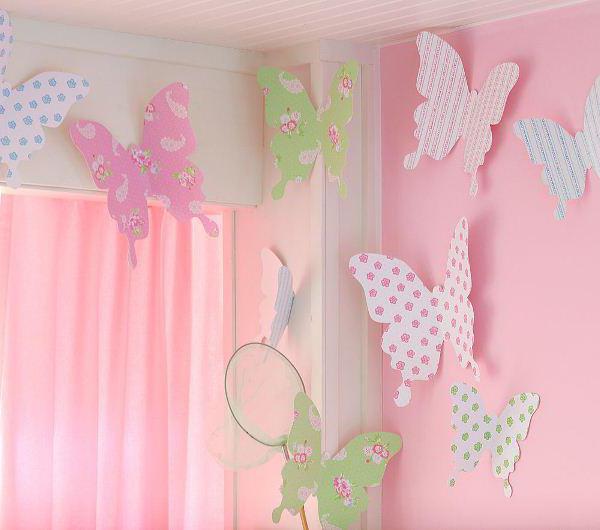
Designer butterflies in pastel colors blend harmoniously with the bedroom space. And by choosing bright shades that are not irritating to the eyes, and building a whirlwind of butterflies on the wall, you can create yourself a source of creative inspiration and cheerful mood. To create a romantic and relaxed atmosphere in the bedroom, you can choose laconic white butterflies, and if you want to add a little more magic, you should give preference to delicately cut models that will cast incredible whimsical shadows.
In the living room, butterfly decor can be created in different ways and serve different purposes. If the space is made in light colors, and you want to place bright accents in it - give preference to butterflies of rich colors, while for decoration you can choose elements of the same shade or create a rainbow swirl. In the living room, paper figures can replace boring paintings or complement large wall mirrors. If you put a butterfly on the mirror, its reflection will add volume to the space. Therefore, such decorative elements look harmonious on mirrored wardrobes And glass partitions. You can also place them above the sofa in the living room, on the windows, and even hang them on a lampshade.
Butterflies on the wall in the hallway will help create an atmosphere of hospitality. It will be interesting to see a whirlwind of them, as if flying through front door.
 With the help of paper figures you can not only decorate the wall, but also decorate various items interior, for example, a switch
 Of course, butterflies can be considered one of best options decorating a nursery, but not necessarily a girl’s room - by choosing figurines in dark shades, you can also decorate a boy’s room. Butterfly wall design will give you the feeling of a fairy tale.
 Butterflies in the nursery will certainly bring joy to the baby
 By placing such decor over a crib, you will give your child a magical awakening. And butterflies on the window will remind you of summer even in rainy autumn and cold winter.
Required tools and materials
So, you decided to diversify the interior with such elements. What do you need to create paper butterflies with your own hands? The set of tools and materials depends solely on your wishes and capabilities. Modern interior butterflies can be made not only from paper, but also from textiles, plastic and even leather or metal. But, since paper butterflies are the most versatile and budget-friendly, we will talk about them. On the market for creative materials you can find metallized cardboard, corrugated paper, cardboard with a mirror or velvet surface, and even paper with the texture of wood or leather.
Paper or cardboard
 When giving preference to cardboard, it is worth remembering that it should bend well without breaking
 To create interior butterflies, first of all we need sheets of paper or cardboard. It is worth choosing a material that matches the shade and texture of your interior style. The number and format of sheets also depends on the size of the desired butterflies and their number. Therefore, before purchasing paper, we recommend making one template butterfly the right size and, applying it to the sheet, understand how many figures can be cut out of it. To the received quantity you need to add a few more in case of marriage.
You will also need sheets of ordinary thick cardboard to create fastenings for butterflies to the wall.
Scissors
When choosing scissors, you should give preference to medium-sized models with thin tips; with these you can easily cut out all kinds of curls on the wings of butterflies. It is also recommended to have small ones in your arsenal nail scissors. And if you want to make the wings especially delicate, you can use curly scissors with special attachments, which, when cut in a straight line, already form a pattern along the edge of the paper.
To create butterflies you will also need a simple pencil and double-sided tape. It is recommended to buy adhesive tape highest quality, so that it not only firmly glues the surfaces, but also comes off easily, without leaving marks on the wall.
Stencils
You can create a stencil for paper butterflies yourself, either by hand or in a graphics editor. Can also be found on the Internet high quality image butterflies, and by printing it on photo paper using a high-quality color printer, you will get a blank that you just have to cut out and secure. If you still want to create a butterfly yourself to suit your taste, here are several stencils of various shapes and styles that need to be printed either directly on designer paper or on plain paper and transferred through glass or carbon paper on the selected material. You can find stencil options on the Internet or draw them yourself in various programs.
Four butterfly cutting templates Butterfly cutting template - dark Butterfly cutting template - simple outline Cutting templates openwork butterflies
Step-by-step manufacturing instructions
Butterflies for interior decoration can be made as follows: universal instructions, which, depending on your wishes, can be changed and supplemented with optional items:
- Come up with a sketch of the composition in advance, counting the approximate number of butterflies and the number of sheets of paper or cardboard.
- Print or draw stencils.
- Prepare all the materials necessary for creativity.
- Transfer the stencils onto paper if necessary.
- Cut out the shapes along the stencil lines.
- Bend each of the butterflies so that the wings on both sides are symmetrical, and there is space between them for fastening.
- Glue a small square of double-sided tape to the back of the butterfly's belly. If the figure is made of thin paper, it is recommended to first glue a small square of thick cardboard to the back side, and only then secure it with double-sided tape.
- After production required quantity figures, start placing them on the wall. Mark the extreme points of the composition with small butterflies so as not to move from desired zone, and then proceed to gradual design from the center.
If you want to change something in the composition, you can always re-glue the butterfly to a new place.
There are also more complex options for creating these decorative elements - butterflies using the origami technique or openwork butterflies. Butterflies using the origami technique are made according to patterns that can be found on the Internet.
 Various ways manufacturing decorative elements provide wide scope for imagination, because you can place them in the most in unusual ways in different places
 Creating openwork butterflies is practically no different from making classic interior models, only in addition to cutting out a stencil and folding in half, you need to cut various patterns on the wings.
 To cut out thin parts you will need special knife with a thin and sharp blade
 Such butterflies look great on the walls next to a sconce or floor lamp, and also cast magical shadows in diffused lighting.
 Creating elegant figures is very painstaking work, but the result looks very worthy
 Double or multi-layer interior butterflies are created by placing paper blanks of various sizes on top of each other - large on the bottom and small on top. This decor looks more voluminous and luxurious.
 Made from two layers different color and size, such butterflies look very alive and voluminous. Usually only the bodies of butterflies are glued together, while the wings remain free and bend under different angles
 A few ideas on how to decorate a wall with paper butterflies
Now let's talk about how to properly decorate a wall with butterflies so that they do not look pretentious, but only give the interior the necessary style and create the right positive mood.
White laconic butterflies
Such butterflies harmoniously combine with monochromatic interiors in dark or muted shades, and are also perfect for decorating a country-style room, as from a distance they look like lace. They will look good in an office or a crowded office, and are suitable for decorating a high-tech space using metal, glass or plastic.
 Moths made of white paper will look gentle and will refresh the interior
 Compositions of white butterflies can be made both in a strict style and in a more romantic one, it all depends on the purpose of the room for which it is created. White butterflies decorated in black frames look original. This design looks formal and is suitable for office decoration. You can place swirls of white butterflies in such a room and in the recreation area; in this case, preference should be given to more chaotic asymmetrical compositions.
In living rooms, compositions of white butterflies can have various shapes- they can be used to decorate round Wall Clock, placing them around the dial, or you can decorate the fireplace area by gluing moths above it. White butterflies in the bedroom look good in compositions where they fly apart or, conversely, twist into a spiral.
Black strict butterflies
 Black butterflies on a wall in a contrasting color look very advantageous
 Black butterflies look quite strict and graphic in the interior. That's why best zones for their use are office rooms, living areas and work rooms. The composition can have a strict shape, form a square or rhombus with grid filling. Black butterflies can also be framed in contrasting white frames.
Gradient butterflies
 They decorate anything with butterflies: walls and ceilings, pieces of furniture, pillows, lamps, they make paintings and panels with them
 Butterflies of several shades of the same color look extremely unusual and elegant - from the darkest to almost white. Compositions of such interior butterflies allow you to visually change the volume of space, creating new depth and unusual shadows. It is recommended to place them large mass in the form of a symmetric or asymmetric vortex, since the required gradient effect in this case looks most advantageous.
Variegated butterflies
 You can decorate any room with butterflies, because they bring positivity - it’s just important not to overdo it
 Compositions of colorful butterflies help improve your mood, so they are best placed in children's rooms, hallways or living rooms. Colored butterflies look most harmonious in asymmetrical compositions, for example, in the form of a flying swarm. Remember that decorating with colorful elements really attracts attention to the area in which they are located. Use this effect to add accents to your interior.
On a large plain wall, colored butterflies can be glued in the form of a circle, placing them quite close to each other. This way you can achieve the appearance of additional volume. Variegated butterflies in multi-storey building can be located along the stairs, for example, as signposts to the children's room. Compositions of butterflies that seem to fly out of vases or bottles standing on a fireplace or shelf look interesting. And also with the help of these decorative elements you can create messages for your family and loved ones, arranging them in the shape of a heart or composing whole romantic phrases from them.
Butterflies of various sizes
 Entering a room with moths, you want to take a deep breath; it seems that even the air here is unusual and saturated with the aroma of flowers.
 The combination of butterflies of different sizes allows you to make the composition dynamic and light. In this case, you can arrange the figures either in a chaotic order or in a “gradient” from large models to small ones.
Butterfly design is trendy and stylish decorative solution for residential and office areas, the traditional design of which is rather boring. Butterflies create an atmosphere of joy, cheerfulness and freshness. This decor is appropriate in any room, the main thing is to choose the right model according to style and shades.