Even today you can see elements of fences built by our ancestors centuries ago. Initially, the essence of building fences was only to protect one’s territory from outside encroachment. But a person is characterized by a sense of beauty, as well as concern about how others perceive him - he needs something more beautiful, more useful and more durable. Which natural material is best suited for constructing such a fence? Right! A natural stone.
How to build a stone fence on your property
Installing a fence on your plot of land is an old tradition. Originally intended for protection, now it has also become an element of decor and an indicator of the status of the owner.
One of the popular materials for constructing a fence is building stone of natural or artificial origin. The reason is its strength and durability, allowing stone buildings to serve many generations of people. Widest choice and the natural beauty of the material make it possible to fit such a fence into the exterior of any site.
Advantages and disadvantages of stone fencing
Talking about positive qualities and the disadvantages of stone fences, we will make a reservation that this implies qualified production of such buildings. The advantages include:
- Durability of fencing. They can last for many decades and even centuries.
- Environmental friendliness. Natural materials do not harm the environment.
- The ability to harmoniously fit a stone fence into the surrounding landscape.
- Resistant to any climatic conditions.
- Variety of stone types and ample opportunities when choosing masonry methods.
- Excellent compatibility with other materials such as wood, metal, profiled sheets and much more.
A fence made of such material can be inexpensive, especially when built with your own hands, but it can also emphasize the elitism of the site when beautiful, expensive stones are used.
Despite many positive qualities, stone fences have a significant drawback - the high complexity of manufacturing. Being a heavy structure, such a fence requires a strong foundation.
Types of stones for a fence
Building stone for a fence can be purchased at construction stores or markets. If possible, you can prepare it yourself. The following types of stone are usually used for masonry:
- Boulders or cobblestones. They are inexpensive and widely distributed in nature. The stone is durable and resistant to impact natural environment. It can be easily processed by chipping, which allows it to be adjusted in place when laying. The most common color is gray or brownish-reddish.
- Granite. Durable and durable material, difficult to process. In appearance it sometimes resembles marble.
- Dolomite. A stone of beautiful texture, usually flat in shape. It has high strength characteristics, but is easy to process. Happens different color, found in nature are white or gray.
Fences made of dolomite (flagstone) are technologically advanced, beautiful and durable
- Limestone, also called shell rock. The material is light in weight and very porous. It has a pleasant appearance that is used for finishing works. It has low thermal conductivity, therefore it is used for the construction of buildings. The mineral is easy to process, and at the same time exhibits enviable durability in mid-latitude climates. At high humidity the surface of this material must be additionally treated with water-repellent compounds.
- Sandstone. A very beautiful natural stone of a wide variety of colors. The strength is close to granite.
- Pebbles. It has a very beautiful appearance and is used in construction as auxiliary material for filling voids during the construction of stone fences.
- Booth. This term defines shapeless stones of various types.
Fences made of artificial building stone are also popular. Typically these are concrete-based materials with the addition of various dyes. With performance characteristics similar to natural stone, fences made of such material are built with much less labor.
Preparing to build a fence
To prepare for the construction of a fence, you need to calculate the need for materials and the costs for them in order to assess your financial capabilities. To do this you need:
- Calculate the area that the fence itself will occupy. This will allow you to correctly determine the amount of concrete and reinforcement to create the base slab. Its width depends on bearing capacity soil under the foundation. This is a strictly individual indicator for each site. It is determined by specialists based on the results of exploratory drilling at the construction site and laboratory analysis of samples. Such a service may cost 6–9 thousand rubles, but these costs can be offset by savings in materials.
- Determine the height of the foundation. The indicator depends on the presence and magnitude of the slope. Normal projection concrete foundation above the surface is 15–20 centimeters. Taking into account the slope, it may be higher.
- Calculate the width of the support base for the fence. It depends on the caliber of stones used for construction. From practice it has been established that it should be at least two maximum sizes. A fence thickness of 60–80 centimeters is considered a normal indicator.
- Based on the listed indicators, calculate the volume of concrete that will be needed to build the foundation of the fence.
This is the first stage of the calculation, the results of which may have to be adjusted.
- Determine the main material for the fencing. This means that the choice is to assign the desired type material in a certain fraction. Thus, the thickness of the fence span is determined.
- Using data on the span height assigned by the developer, it is possible to calculate the volume of material required for one section.
- Based on data about specific gravity material, the mass of material for the fence span is calculated.
- Knowing the weight of the material and the mass of the foundation, which was determined earlier, you can calculate the specific load on the soil of the foundation and the upper structure of the fence. If it exceeds permissible loads, are considering the option of using another material or a combined fence design with partial use of substitutes.
An example of calculating materials for a fence
First of all, we decide on the object of calculation. It is most convenient to calculate the need for one span, consisting of a pillar and a lintel between the individual sections.
The dimensions of the pillar are determined by the quality of the soil and the depth of soil freezing in the construction region. In any case, the base of the pillar should be below this point. To install it, you need to dig or drill a hole of the required depth plus 35–40 centimeters. This “plus” is needed to install drainage from gravel and sand in a layer of up to 30 centimeters, which must be thoroughly compacted and watered to compact it.
Drilling a hole for the base of a post can be done with an ordinary garden drill. After installing the drainage, a metal pillar base is installed vertically at the bottom, for which you can use:
- metal beam or channel from No. 12;
- round galvanized pipe with a diameter of 100–120 mm;
- square pipe 60x60 or 100x100 millimeters;
- corner 150x150 millimeters;
- square or round frame made of reinforcement or mesh.
The base of the pillar is lowered into a pit and it is concreted with a mortar of grade 200 to the level of the base of the foundation. Next, you need to install the formwork and pour the rest of the foundation with preliminary reinforcement in one step.
Photo gallery: phased construction of a foundation for a stone fence
 The rods give the pillars strength long years
  Installation of formwork is carried out carefully and strictly according to the rules to ensure the strength of the base
  Proper pouring and curing of the foundation gives it high durability
  Supporting base for a stone fence
The number of sections for a fence 36 meters long (approximately 10 acres for a square plot) is calculated as follows:
- We take into account the length of the gate and wicket space. For gates, the distance between the axes support pillars is 3.6–4.2 meters, for a gate 1.8–2.2 meters. The total length of the unfenced area will be (in average values) 3.9 + 2.0 = 5.9 meters.
- The length of the fence when fencing the remaining space will be equal to 36.0 - 5.9 = 30.1 meters.
- The distance between the axes of the fence posts should be 2.5–3.0 meters, we calculate the number of sections: 30.1: 2.75 = 10.95, we accept 11 pieces.
- Next, we multiply the volume of each component section by their number and obtain the need for each material separately.
Tools
When erecting a fence, a number of different operations are performed in turn, each of which requires a specific set various instruments. The main tools are listed in the table.
Table: basic tools for pouring a foundation
| Stage of work | Contents of operation | Tools | Notes |
| 1. Clearing the construction site | Removing vegetation and soil layer | Bayonet and shovel shovels | |
| 2. Marking the foundation | Taking measurements and stretching cords along the contour of the support base | Construction cord, wooden pegs, axe, hammer | |
| 3. Digging a trench | Excavation | Bayonet and shovel shovels | |
| 4. Tamping the bottom of the trench with a vibrating plate | Compacting the soil base along the bottom of the trench | Vibrating plate | Possible to rent |
| 5. Installation of drainage along the bottom of the trench | Pour a layer of gravel 30 centimeters thick and sand 15 centimeters thick, tamping by hand, watering | Bayonet and shovel shovels, garden wheelbarrow, tamper, garden hose | |
| 6. Installation of formwork | Installing timber foundation fencing and faceplates: sawing lumber and boards, sharpening stakes and dowels, assembling frame with nails, installing faceplates and spacers with screws | Hacksaw, axe, hammer, screwdriver | |
| 7. Installation of fittings | Cutting rods to the required length. Laying rods in a trench, knitting reinforcing mesh | Grinder, side cutters, pliers | |
| 8. Preparation of concrete solution | Dosing of components, mixing and mixing of the solution | Scoop shovel, concrete mixer, bucket | Concrete mixer rental possible |
| 9. Pouring the foundation | Supplying solution into the trench, tamping | Scoop shovel, manual rammer, vibrator | Vibrator rental possible |
| 10. Control of horizontal foundation | Checking the filling using an instrumental method | Construction laser level | |
| 11. Dismantling of formwork | Dismantling the foundation fence | Crowbar, crowbar with nail puller, hammer |
Construction of a stone fence step by step
One of the reasons for refusing to use natural building stone is the complexity of masonry. But if you look at it and understand the principle, there is nothing particularly complicated about it.
Methods of laying natural stones
Several methods of laying natural stone are used.
Masonry "wild"
The wall is formed from stones of indefinite shape and different sizes. The stone is laid on the base, the next one is carefully selected to be as close as possible to the previous one. The flat edge is oriented towards the front side of the fence. The stones are fastened with masonry mortar. Fill one span between the pillars, and work must be stopped when the first signs of hardening of the solution appear. Next, you need to cut the seams. For this purpose, durable plastic bag filled with solution. The solution is applied to the seam through the cut corner and distributed over the unfilled areas, then the seams are cut. A large stone is placed along the front and rear planes of the masonry, the middle is filled with debris and gravel, filled with mortar, and compacted. The best materials For such masonry, shale, rubble, dolomite and sandstone are used.
Board masonry
The principle is the same, but before laying the stones they are processed by chipping to give them a shape close to rectangular.
Flat horizontal masonry
It is made with oblong stones of layered minerals of natural origin, which are placed horizontally when laid.
Flat vertical masonry
The same materials are used, only they are oriented in the vertical direction.
Rubble masonry
Round stones are used for it, approximately same size. Masonry is done using formwork. The gaps between the stones are filled with medium-fraction gravel and filled with masonry mortar. As the space is filled, the formwork is expanded and work continues.
Laying walls made of natural stone requires experience and certain skills. However, starting from an irresponsible area, any House master able to quickly understand the principles of operation and perform high-quality work independently. However, we must remember that this work will require a considerable investment of time and effort.
Finishing work
Above, we have already discussed the procedure for performing preparatory work during the construction of a fence. Speaking of the final phases, you need to cut the seams. To do this you will need a tool:
- metal brush;
- guillemot;
- suture trowel;
- sponge.
We have already discussed above how to fill seams using a bag of mortar. Jointing is done 3–4 hours after filling. Otherwise, the mass will begin to harden and the formation of joints will be problematic.
First, the surface of the stones must be cleaned with a brush to remove traces of the solution. After this, you need to form the seams using a trowel or scraper.
To give the fence its final look, it must be washed. Hard-to-remove traces of masonry mortar can be eliminated using a solution of hydrochloric acid at a concentration of about 30% and a sponge. The operation must be performed with rubber gloves. Otherwise, chemical burns cannot be avoided.
The final operation in the construction of a fence is the installation of caps on the posts and tops on the fence spans. This will prevent water from getting inside the masonry. Otherwise, when it freezes, the entire structure may be destroyed.
- Starting construction on suburban area, you need to think about the harmony of the composition. Color solution The roof of the house should be in harmony with the tone of the fence. In this case, the exterior will look like a single whole.
- After installing the fence, it is advisable to coat it with a special varnish. It will highlight all the natural beauty of the stone. This operation is mandatory in case of high porosity of the material.
- If the site has a slope, at the stage of constructing the foundation, it is necessary to provide for the installation of drainage holes at the lowest points. This will avoid water accumulation in the area.
- The remains of stone from the construction of the fence can be used for paving sidewalks on the site.
Video: installing a fence made of natural stone
Every owner who dreams of making not only the house, but also all the buildings on the site truly exclusive, thinks about what kind of fence to use to enclose their site. A stone fence is perfect option give completeness to the appearance of the building. And costs can be greatly reduced if you build this structure with your own hands.
A fence can be built from different materials and using several technologies, but stone fencing is the most reliable. In addition, the stone makes the structure attractive in appearance. Most often, natural material is used in the construction of fences, but in last years Artificial substitutes are also gaining popularity.
What are the advantages of a stone fence:
- fire safety,
- immunity to any precipitation and natural phenomena,
- no rotting, corrosion, oxidation, etc.,
- environmental friendliness,
- the ability to select the desired shade,
- availability of material,
- durability.
It may seem to a beginner in the construction business that only a professional can make a stone fence on his own. In fact, this is not so and almost anyone can cope with the task. Before you start working directly, you need to decide on the type of future fencing. When building a fence the following is used:
Preparation
So, there is a goal to build a stone fence, it remains to find out what is required for this. First of all, you need to worry about the materials. Let's assume that the stone has already been purchased, then all that remains is to have a concrete mixer or a tank for mixing cement mortar. This mixture will also require crushed stone and sand, the volume of which depends on the length and height of the fence. It is better to choose cement marked 300, since it would be better suited for such construction. By the way, for dosing the components you will need a shovel (scoop), and for laying out ready mixture construction trowel.
Next, you definitely need boards and nails for constructing the formwork, as well as reinforcement to give the structure good rigidity. If the fence is high, you will also need a welding machine. With its help, steel rods can be lengthened to the required size. It is definitely worth purchasing a pipe with a diameter of 50 - 80 mm. It will be the “heart” of future pillars.
For marking work, you need a tape measure, small stakes and regular twine. Once the location of the fence is determined, you can move on to the next stage.
Attention ! Before starting any work, you need to take care of safety precautions. Perform all actions wearing gloves and boots. If the stone breaks right on the spot, it is better to wear safety glasses. Just in case, you can prepare a first aid kit with bandages and disinfectants.
Building a foundation for a fence
First you need to dig a trench the width and length of the stone fence. In this case it may be useful bayonet shovel or even a crowbar. The depth of the trench depends on specific conditions, but it makes no sense to make it more than 700 mm. Do not throw away the soil from the hole, as you will have to fill the edges of the foundation later.
The next step is to knock together the boards to the desired configuration. At the same time, the rods are welded in the same shape and laid in the trench. You need to drive stakes along the entire perimeter, and nail them on top after 1.5 - 2.0 meters cross beams. This is done so that the boards do not move apart when pouring.
The resulting structure can be filled with concrete mixture. If you have no experience in kneading it, then here are some instructions. You should always start from the volume binder and only after that add other components. So, for one part of cement you need two parts of sand and four parts of crushed stone. All ingredients are poured into a concrete mixer and mixed.
When the mixture is ready, it can be poured into a container and distributed around the perimeter of the fence in buckets. But you can be smarter and pour the mixture directly into the formwork using a gutter. Moreover, each new batch involves moving the concrete mixer!
Pre-mark the points for the pillars and weld a pipe to the fittings at each of them. It is better to make a reserve in height!
After completing all concrete works the structure should be left alone for 15 - 20 days. For better and uniform hardening, an insulator (film) is placed on top of the formwork. Otherwise, the upper part of the foundation will dry out quickly and the strength of the concrete will be reduced.
Inexperienced builders at this stage can make one fatal mistake. Filling the foundation level with the ground (or even lower) will not cause problems with water later. Rain, melted snow, etc. will accumulate along the fence, thereby eroding the soil and promoting the formation of slime and mold. It is better to make the foundation slightly above ground level, and then decorate the concrete or fill it up thin layer soil (decorative stone).
Making fence posts from stone
The construction of pillars begins with measuring the distance between them. If it is different, then you can tighten or stretch the pipes a little using a rope. Stone columns for a fence are made slightly wider than the spans, which visually divides the entire wall into sections.
Next, formwork is made in the form of a square with the required width of the column. In this case, the height of the formwork should not exceed 40 - 50 cm. When everything is done, a layer of cleaned stones is laid out and this is done as close as possible (parallel) to the plane of the boards! After this, all cavities are filled with a moderately thick solution. By the way, the solution for the stone fence itself is made like this: 1 part cement, 1.7 parts each gravel and sand! It is important to ensure that all the cracks between the stones are filled with the binding mixture, but the solution itself does not spread over the column.
Thus, this procedure must be done on each pillar and left to harden for one to two days. You can also cheat a little with the formwork for stone fence posts. In order not to assemble a new square each time, you can simply nail another one to the bottom row and so on! Gradually the height of the pillars will reach the desired level, and then you can start laying the walls!
Laying the fence walls
Making walls can be done in different ways. Experienced builders they simply pull a string, which becomes a guideline for the height and deviation of the fence. They lay one layer of stones along the entire perimeter of the fence, after which all voids are filled with mortar. After a day, a second layer is laid out, etc. But in this case, there is a high risk of getting too uneven wall, so it’s better to use formwork.
Tip: If large round stones are used for the fence, then formwork will not help. It’s better to lay them out “by eye”!
The formwork is done similarly to the pillars, but here it is no longer necessary to place the stones tightly against the boards. Some irregularities are acceptable; they give the fence an asymmetrical appearance. After laying out the first layer, the stones are covered with mortar and left for one or two days.
Important: It's better not to do too much high formwork, as this will lead to voids in the solution and poor quality of the entire structure. All seams must be hammered using a trowel!
In order for the fence spans to be the same in height, closer to completion they need to be measured with a tape measure. By varying the size of the stones, you can arrive at to a single level the entire wall. After completing the installation and dismantling of the formwork, it is important to carry out jointing in a timely manner, otherwise the mixture will harden greatly.
Joining the fence
After pouring, you need to wait about 5 hours and start undoing the seams. First, all remnants of the solution are cleaned with a coarse brush, after which a special tool is used - a scraper. It is a metal rectangle with a protrusion equal to the required seam width.
TIP: To give the fence volume, it is better to make the seams deep. If you want the effect of a single monolith, then the recesses of the seams should be minimal (no more than 2 cm)!
The jointing stage is quite simple, but it is important to maintain accuracy when deepening the tool. Experienced builders recommend treating the seams and stones with a solution of hydrochloric acid (no more than 30%) after jointing.
The same seam significantly improves the appearance of the fence and allows for better processing.
Fence parts
The natural stone fence is ready, the seams are embroidered, the formwork is removed. But at this stage the design still looks unfinished! The point is in the details that will refine the rough shape of the material and give the wall a well-groomed look.
Firstly, a so-called cap must be installed on each pillar. They are sold in stores or made to order in blacksmith shops.
Secondly, the seams of the pillars can be shaded with some waterproof paint, which will visually divide the fence into spans.
Conclusion
Making a fence is not easy, but, as the classic said, if you have the desire! This material clearly shows that all stages of construction can be completed even by a person far from manual labor. Just a few things are enough and you can start building!
Fences made of stone have been used by humans since time immemorial. Currently, natural materials, including stone, are at the peak of popularity. The huge variety of natural stone often leads the average person to confusion. Therefore, it is important to choose and make the right choice certain type stone suitable for constructing a fence, the intended design. 
Selection of materials (comparison table)
| Name of the stone | Price | physical characteristics | Material processing | Weather resistance |
| Cobblestone (boulder stone) | — fraction 70-100 mm -850 rub/m3; — fraction 105-300 mm – 2500 rub/m3; — cobblestones for gabions -70-130 mm – 300 rub/m3. |
durable, strong, available in only a few colors | with great effort | highly resistant |
| Gravel | From 800 RUR/tn | durable, strong | with effort | highly resistant |
| Dolomite stone | From 700 RUR/m2 | durable, strong | with little effort | highly resistant |
| Limestone | 750 rub/t | durable, strong | soft to handle | absorbs moisture, requires treatment with water repellents |
| Sandstone | Depending on color from 2200 to 9300 rub/m3 | durable, strong, a variety of colors | with effort | highly resistant |
| Crushed granite | 1800 rub/t | durable, strong | with effort | highly resistant |
| Booth | 1000 rub/ton | durable, strong | with great effort | highly resistant |
An equally popular building material for stone fencing is artificial stone. Its cost is much less than the cost of natural stone.
Preparatory activities

Before starting to build a stone fence with your own hands, you need to decide on its exact location, draw a diagram of the structure, a foundation plan, and also make approximate calculations of the required volume of building materials.
If the site and household are located in close proximity to neighbors, then their written consent to erect the building should be obtained. To avoid this, you should prepare and register a package of documents for construction at the technical inventory bureau. These activities will allow you to build a fence without complications and problems.
TO preparatory stages The construction of a fence made of natural stone can also include:
- clearing land plot from all kinds of garbage and its layout (leveling);
- markings for foundation construction in accordance with diagrams and drawings. Marking (fence lines, gate locations, gates) on the ground is carried out using cords attached to stakes;
- purchase of building materials - stone, sand, cement, reinforcement;
- purchasing the necessary tools - a welding machine, a shovel, a tank for preparing cement mortar or a small concrete mixer.
The next step in constructing a stone fence is laying out the foundation.
Foundation

Digging a trench for the foundation is carried out in accordance with the markings made. Considering that the stone is quite heavy and strong construction material, the foundation must easily withstand the proper load, ensuring the reliability and strength of the structure.
Fences made of stone material are being built exclusively on strip foundation based on reinforced concrete blocks or bricks. At the stage of arranging the foundation, it is necessary to adhere to the following requirements and rules:
- the width of the prepared foundation should be 15.0 cm greater than the thickness of the fence, the trench is dug up to 80.0 cm in depth. If the fence is erected to a height of more than 2 meters, then the depth of the trench increases by 10.0 cm for each meter of fence;
- first of all, a sand cushion with a thickness of at least 50.0 mm is made, which is spilled with water and compacted;
- then laying reinforced concrete blocks is carried out using mortar and additional connecting reinforcement from 30.0 to 40.0 mm in diameter;
- then a reinforced frame is mounted in the groove, around which formwork is arranged from edged boards, rising above ground level by approximately 20.0-30.0 centimeters, and the entire structure is filled with mortar;
- dismantling of the formwork is carried out several weeks (3-4 weeks), after the final hardening of the cement mortar;
- Gate and gate openings require the installation of support pillars, so the load-bearing parts are dug in and filled with reinforced concrete mortar.
At a time when the foundation gains strength (hardens), you can start sorting the purchased stones, which will help increase the speed of construction of the stone fence.
Pillars

In order to speed up construction work all pillars must be constructed at the same time. In the construction of stone fences, floating forms (formwork) are widely used. To do this, you will have to make the required number of sectional formwork from self-tapping screws and boards about 150 mm high. The internal parameters of which correspond to the dimensions of the foundation. One column requires 2 pieces of collapsible formwork.
After making the frames, you should proceed according to the following algorithm:
- The formwork is installed and the initial layer of stone is laid out. They are laid so that they fit as closely as possible to the collapsible form and to each other;
- then all cracks and voids are filled with a thick solution;
- then the next formwork is secured with self-tapping screws and filled with stone and mortar in the same way.
After a day or two, the lower parts of the collapsible forms can be removed and the construction of subsequent layers can begin. The voids found after dismantling the formwork must be immediately filled with mortar. In the places where the lags are attached, metal corners should be released, which are welded to the pipes.
Formed and constructed pillars must be protected from the effects of precipitation. An ideal option is to install plastic or metal caps.
According to rough estimates (in the case of simultaneous erection of pillars), it will take 20-25 days to erect supports for the stone fence.
Walls

The construction of fence walls begins with marking the foundation. The spans of stone fences are made narrower than the pillars by 100.0 mm, that is, the wall moves inward by 50.0 mm from the outer and inside. Using a level, symmetrical installation of stones is carried out along the edges of the wall. The optimal size of stones for laying a wall is up to 25.0 cm.
The threads stretched between the sections are used to guide the subsequent laying of the walls. For ease of use and structural strength, it is recommended to lay the stones with their flat side up, carefully filling the cracks and voids between them with cement-sand mortar.
The process of laying the wall is controlled by the level. The permissible deviation from the vertical position is no more than 10 mm per 2.0 m of wall height.
Joining the fence

Surface treatment and jointing are the final processes in the construction of fencing made of natural and artificial stone.
Masonry seams can be embroidered in three ways: deep, convex and shallow. The first option visually increases the volume of the masonry.
Joining is done using:
- scraper - a strip of metal (4 mm x 150 mm x 2.5 mm), at the end of which there is a protrusion (“tooth”) measuring 10.0 mm by 20.0 m;
- flat scrapers and brushes with metal bristles;
- pieces of rags and foam rubber.
3-4 hours after laying, they begin jointing, after which time the solution hardens and is difficult to process.
The step-by-step process for deep jointing looks like this:
- cleaning stones and seams with a wire brush;
- creating neat, rectangular recesses with a scraper up to 20.0 mm;
- washing seams and stones with foam.
If you ignore the jointing, the external attractiveness of the stone fence will significantly deteriorate.
Details
 The main decoration of natural stone is texture and color. Therefore, fences built from natural stone, are self-sufficient and do not require the use of decorative parts to improve appearance. However, if desired, the top of the support pillars can be equipped with elegant waterproof structures - caps with peaks.
Often, monumental stone fences are decorated with openwork forging, various lanterns and “living” decorative elements - vines (grapes, roses).
The canvases of blank fences can be enlivened with the help of glass mosaics, panels made from waste CDs. The use of certain decorative details depends on the preferences and wishes of the owners of the land plots on which stone fences are erected.
Cost of time and money
 Stone fencing has many positive advantages, but despite this, there are several disadvantages:
- erecting a stone fence is a rather long, painstaking construction procedure;
- for the construction of such objects a foundation is required;
- the high cost of some natural stone materials.
Construction of stone fences significantly more expensive than fencing or metal. Arrangement of the foundation, cost of natural material, costs of its transportation, payment of possible additional work force will require a considerable investment Money. You can reduce financial costs by performing construction work yourself.
Nowadays, getting master classes (video lessons) on the construction of stone structures, including fences, is not difficult; to do this, just go to YouTube and use a search engine to select a suitable video. An example of a shell rock fence with deep seams:
Below is a series of photographs in which you can see different designs of a stone fence:
"Mosaic" stone fence. 
A stone fence made of rubble is not susceptible to any mechanical, chemical or atmospheric influences. 
A fence made of wild stone, decorated with forging.

Sandstone fences are generally common and enjoy continued success. 
Combined fences are no less popular among homeowners. 
Rubble stone masonry
The video below shows how to properly lay rubble stone. The features of laying a corner are explained.
A fence can be built from a variety of materials, but a fence made of stone is considered the most reliable. In addition, this design looks very beautiful and original. Most often, natural raw materials are used for construction, but recently artificial varieties of materials have become very popular. It is possible to build a fence with your own hands.
Improve your yard with a stone fence
basic information
Stone is a very popular type of raw material for building fences. This material has many advantages:
- Reliability. It is impossible to break such a fence without professional equipment or special tools. The house will be perfectly protected.
- Long service life. Stone fencing is very durable. It easily endures adverse weather: cold, heat, wind and rain.
- Presentability. This fence looks very solid and beautiful.
- Compatibility with other elements. Often, when constructing a stone fence, metal or wooden fragments are used, as well as additional forged decorations.
- Fire resistance. Fences made of this material serve as a good barrier against the invasion of fire from the outside.
- Ecological cleanliness. Natural stone - natural material, which does not have any negative impact on human health.
- Freedom to choose the size. From stone you can build exactly the kind of fence that the owner wishes. There are no prohibitions or critical parameters.
In this video we will look at how to make a stone fence:
However, everything also has its downsides. The following disadvantages of the material are identified:
- High price. Stone is an expensive raw material. If the installation is carried out by workers, this will also cost a considerable amount. You can save money if you build a stone fence with your own hands.
- The need to comply with conditions. This material is quite finicky. The stone has a large mass, so the base must be very strong and reliable. Sites with closely located groundwater and areas with ground vibrations.
- Labor intensity. In order to build such a fence, you need to spend a lot of time and effort.
Types of materials
Before you make a stone fence with your own hands, you need to choose the material for the future fence. Suitable for construction the following types raw materials:
- Coarse gravel or pebbles. An inexpensive fence stone, but the construction process will be labor-intensive due to its small size.
- Sandstone. Tolerates any temperature perfectly. This material has good moisture resistance.
- Cobblestones and boulders. Very accessible and cheap materials. Cobblestones can even be found in nature and broken into suitable pieces.
- Limestone. Easy to process. A significant disadvantage is insufficient moisture tolerance. In order for limestone to serve reliably and for a long time, it is treated with a special compound - an insulator.
- Dolomite. Such samples are mined in the mountains, so they are not too cheap. At the same time, dolomite is a very popular material, famous for its durability and attractive appearance.
- Fake diamond. Competes effectively with natural samples. You can easily choose the material of the desired color and suitable structure. Therefore, a fence made from such specimens is no less popular than a fence made from natural stone.
- Booth. The material consists of parts from large stones and looks very interesting.
- River stone. This material is quite popular because it looks very original and has miniature sizes. You can make small neat fences from it.
Required Tools
Before proceeding directly to construction, you need to purchase material or extract wild stone and get the tools to do the job. You will need:
- container for mixing mortar or concrete mixer;
- sand and crushed stone for preparing the mixture;
- cement (marking 300);
- shovel;
- Master OK;
- fittings;
- nails and boards;
- welding machine (if a high fence is planned);
- pipe with a diameter of 50-80 mm;
- roulette;
- twine and stakes.
Construction process
Before you start laying a stone fence, you need to think about personal safety. Work should be done in protective boots and thick gloves. If you need to split a stone, you should wear special glasses. You can prepare antibacterial agents and bandages in advance.

A stone fence will serve you for many years
Creating a foundation
First you need to dig a trench. Its size should be equal to length and the breadth of the future stone fence. To do this, you may need a shovel, and in some cases even a crowbar. The depth of the trench is selected individually, but it makes no sense to do it more than 700 mm. There is no need to throw away the earth from the dug hole; it will be useful for filling the edges of the finished foundation.
Next, you need to put together the boards to fit the desired structure. The rods are welded in the same shape and placed in a trench. You need to drive stakes along the entire size. From above, after 1.5-2 meters, transverse beams should be nailed. This action is necessary to ensure that the boards do not diverge when pouring.
IN finished design concrete is poured. To prepare the solution, you need to follow this ratio: for 1 part cement you will need 2 parts sand and 4 parts crushed stone. The components are placed in a concrete mixer and mixed.
After the composition has already been prepared, you can pour it into a container and distribute it around the perimeter of the fence in buckets. But you can do it much simpler and pour the mixture into the formwork using a gutter. Each time you mix, you need to move the concrete mixer.
You also need to mark the points for the pillars. In each, a pipe should be welded to the fittings. It is worth paying attention to the fact that the height must be made “in reserve”.
After all work with concrete is completed, the finished structure should be left to dry for 15-20 days. In order for the hardening to take place efficiently and evenly, you need to place a film (insulator) on top of the formwork. If this is not done, the top will dry out too quickly and the foundation will be less effective.
Often, novice builders make the same mistake at this stage of construction. The foundation cannot be poured flush with the ground. Melted snow and rain will accumulate along the fence and erode the soil. Mold may form. The foundation should be made slightly higher than the ground level, after which the edges should be sprinkled with a small layer decorative crushed stone(ground) or decorate concrete.
Construction of pillars
Construction begins with determining the distance between the pillars. If it differs, you can carefully stretch or tighten the pipes using a rope. The pillars need to be made a little more spans so that the wall is externally divided into separate sections.
The formwork is made in the shape of a square with the required width of the column. Its height should not be more than 40-50 cm. When everything is ready, you should lay out a layer of stones parallel to the plane of the boards. Then the cavities need to be filled with a thick composition. The solution directly for fencing is made according to the following recipe: 1 part cement and 1.7 parts sand and gravel. It is important to ensure that all the holes between the stones are filled with the mixture, but the composition itself should not flow down the column.
This procedure must be performed with each pillar and the structure must be allowed to harden, leaving it for a day or two. With formwork you can significantly simplify your work. In order not to assemble a new square each time, you can simply nail another one to the bottom row. When the height reaches the desired level, you need to start laying the walls.
Laying fence walls
The wall can be erected according to different technologies. Many experts pull the string. It serves as a guide to the deflection and height of the fence. First, one layer of stones is laid along the entire perimeter of the fence, and all the cracks are filled with the composition. A day later, a second layer is made, etc. This is quite convenient, but there is a possibility of laying a crooked wall, so it is best to use formwork.
If large rounded stones are laid out, the use of formwork will not give the desired result. In this case, it is necessary to apply elements to the “eye”.
The formwork should be similar to the pillars, but you don’t have to put stones as close to the boards as possible. Small irregularities are acceptable - they give the fence a natural look. After the first layer is laid out, the stones need to be covered with the composition and left to dry for 1-2 days.
You should not make excessively high formwork, this will lead to the formation of voids. The design will not be durable and of high quality. The seams should be hammered using a trowel.
To ensure that the height of the spans is identical, closer to the end of the work they should be measured with a tape measure. If there is any inaccuracy, you need to vary the volume of stones. After completing the procedure for laying and dismantling the formwork, it is worth doing the jointing so that the composition does not harden more than necessary.
Joining the fence
After the filling has been done, you need to take a break for about 5 hours, and then start undoing the seams. Use a hard brush to remove all residue. Then you will need a scraper - a tool that looks like a rectangle and has a protrusion equal to the required width of the seam.
To make the fence look natural and voluminous, it is better to make deep seams. If the effect of an entire space is required, then the recesses should be made no more than 2 cm. The jointing is done simply, the most important thing is precise recesses. Professionals advise that after jointing, treat the stones and seams with a solution of hydrochloric acid (maximum 30%).
Final details
The stone fence is already ready. However, the result still looks unfinished. It's all about the small details that should decorate the fence. To make your wall look attractive and well-groomed, you should follow just two steps:
- A cap must be installed on each post. They can be purchased in a store or made to order from a blacksmith.
- The seams can be treated with a waterproof coating, then the fence will be visually divided into spans.
Building a fence is not easy, but it is absolutely possible. Even a person who has not previously engaged in manual labor can do such work.
If you lack finances, you can find stones on your own and lay the foundation together with your friends. The most important thing is to take your time. Then new fence will delight the eye for many years.
Currently, there is a huge variety of materials and technologies for the construction of fences. Stone is considered the most durable of all. It produces reliable, textured and durable fencing. You can hire craftsmen to build such a fence, but why overpay if you can easily build it yourself? Let's understand the intricacies of the process.
Pros and cons of stone fences (table)
| + | - |
| The service life of a stone fence is at least half a century. It all depends on how responsibly you approach the masonry process. | Some types of stones have a very high price. |
| Stone is an environmentally friendly and safe raw material, as it belongs to natural materials. | A stone fence is very heavy, so its construction will require a solid and powerful foundation. |
| Wide price range, which depends on the type of stones and their fractions. | |
| Fireproof material. | |
| It is easy to install. | |
| Thanks to the aesthetic properties of the stone, the fence will blend perfectly with any landscape. | |
| Stone can be combined with other materials. |
Types of stones
Fences made of stone began to be built a long time ago. Since ancient times, such fences have protected people's homes. Modern builders and landscape designers often take natural materials as the main raw materials.
There are a huge number of types of natural and artificial stones, from which you can get confused. Right choice stone - very important point. With its help you can emphasize the style of your site.
- Cobblestone. It is otherwise called boulder stone. Is the most common and affordable option thanks to different factions. Despite the fact that it is simple, its strength is higher than that of other types. The disadvantages include it grey colour, which is not to everyone's taste. The red-brown color of cobblestone is less common.
- Gravel. Also considered a popular option. Fences made from it can take any shape. The combination of coarse and fine gravel allows you to create original fences. Fine gravel can be filled with an iron frame. For creating strong fence, gravel is combined with brick.
- Dolomite stone. Is different flat shape, different sizes and thickness. The place of its extraction is mountain quarries. This is a natural stone High Quality. A fence constructed from it will be durable and attractive.
- Limestone. There are shell rock, marble-like limestone and bryozoan. It is soft, so it is easy to handle. This is an ideal option for beginners. Its disadvantages include the fact that it absorbs moisture. To prevent it from destroying the stone, it is necessary to pre-treat it with a water repellent.
- Sandstone. The use of this stone for the construction of fences has been going on for a considerable number of years. This is a durable, frost- and moisture-resistant stone.
- Booth. It is mined from sandstone, limestone and dolomite. Stone irregular shape. Its edge can be from 15 to 50 centimeters. They not only build fences from it, but also decorate them.
- Fake diamond. Recently, its popularity has been growing due to the fact that it is much cheaper than natural. Most often it is made from concrete with the addition of pigments. Finished copies are practically no different from their originals.
Combining stones with other materials
The original combination is a combination of wood and stone.
Thanks to these natural materials, the fence fits harmoniously into environment. True, making such a fence is quite difficult. Special skills and preliminary development are required.
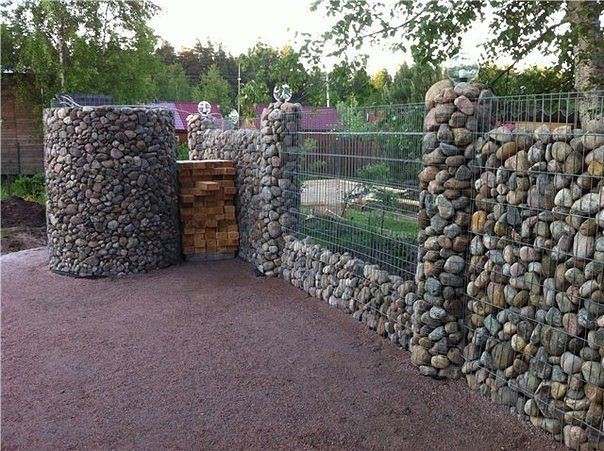
Gabions have been very popular lately.
Translated from French it means “stones in a net”. The basis for such a fence is a mesh of thick metal wire. Fine and medium gravel is poured into it. In addition, fragments of bricks, rubble and other stones are often poured into it. The fence can have any shape. The end result is an attractive and durable fence.
The combination of stone and brick is the most popular fencing option.
The fence turns out to be presentable, durable, resistant to temperature changes and weather conditions.
Preparatory work
TO preparatory work may include the design and acquisition of all necessary tools and materials. Fence project and all necessary calculations can be done using special online programs from open sources. The choice of material depends on your financial and taste preferences. Descriptions of the most popular ones are above. And the tools you will need are a concrete mixer, a tape measure, a shovel, a trowel, building level, pegs and rope.
Preparatory work also includes clearing the area, leveling the soil and marking. The latter is carried out by driving in pegs and stretching a rope between them along the perimeter of the future fence.
Foundation
As mentioned earlier, a stone fence has an impressive mass, so the arrangement of the base must be approached with all responsibility. A solid reinforced strip base is ideal.
The width of the foundation should be 150 millimeters greater than the width of the future fence. The height of the base is at your discretion. The main thing is that it should not be lower than 100–150 millimeters.
Support pillars
The “sliding formwork” method is used to construct the pillars. The optimal dimensions for supports are considered to be 30x30 or 40x40 centimeters. The formwork is assembled from boards and secured with self-tapping screws.

Ideally, give each tier a day to dry before laying the next one. This way the pillars will be more durable.
Laying out spans
After the base and pillars are built, you can begin to build the spans. Optimal size stones for them are usually considered to be 200–250 millimeters. Thanks not too much large mass they are easier and more convenient to work with. Large stones can be broken with a hammer or crushed with a hammer drill. The stones are held together using a thick mortar made from sand and cement in a ratio of 3:1, respectively. Adding dry dye to the mixture will allow you to get seams of a different color than the solution.
First you need to apply a cement solution to the foundation. Then lay out symmetrically stone elements on both edges of the span. To make it easier to navigate the masonry, the section is marked with a stretched thread.
Lay out the entire bottom row of the section. Fill all the gaps between the edges. The flat side of the stone should face up. Before you begin laying out each subsequent row, as in the case of building pillars, leave the masonry for a day to dry. Use a bandage when laying out rows.
Finishing work
To give the fence a more attractive appearance, it is necessary to unstitch the seams.
The seams are convex, shallow and deep. The latter option visually makes the masonry more voluminous.
To work on the seams, you will need a scraper, a wire brush and a piece of foam rubber.
It is easiest to unstitch the seams approximately 3-4 hours after the laying is completed. Later cement mortar becomes tight and difficult to joint.
- First you need to clean the stones and seams using a wire brush.
- Use a scraper to create neat grooves in the seams, the depth of which should not exceed 1–2 centimeters.
- Then the fence must be washed. This is done using foam rubber, a brush and 30 percent hydrochloric acid. At the same time, do not forget about safety measures - use protective gloves.
As additional decorative elements, you can use forging or let it grow along the fence climbing plants and so on. It all depends on your imagination.
How to make a gabion fence
Fences made of gabions (stones in a grid) are rapidly gaining popularity among others. There are a number of advantages that contribute to this:
- Such a fence reliably protects from wind and street noise.
- Hides your personal life from prying eyes.
- The fence is visually attractive.
- Withstands heavy loads.
- Easy and simple to install.
- Economical and durable.
- It tolerates temperature changes and any weather conditions well.
- Such a fence can be erected on any terrain.
- It can be filled with different materials.
How to choose a grid?
In order for such a fence to be as durable as possible, it is necessary Special attention pay attention to the selection of materials. There is a wide variety of mesh for constructing a fence, which have different shapes and mesh sizes. Most often, a chain-link mesh is used, which can be tensioned or sectional. The cells in it come with round, square and other cross-sections.
When choosing a grid, do not go wrong with the size of the cells. Stones should not fall out through them.
DIY construction stages
The foundation for a gabion fence is made according to the same principle as described above. Make the posts in the same way as for the previous fence. The distance between them should be no more than 5 meters. As soon as the base and supports have completely hardened, begin installing the gabions.
First you need to form a frame from the mesh. Place the rolls on the ground, unroll them and level them. Carefully secure the mesh to the supports and foundation.
The last step is to fill the grids with stones.
Video: building a fence from gabions
Video: the main points of laying rubble
A stone fence will become a reliable protector of your dacha. It will serve you very well for a long time. Its construction is a simple process. By following the recommendations and advice described above, you will not have to spend money on workers. You can handle this work quite independently. Good luck!