Such a play item as a children's kitchen has already become a full-fledged part of the children's interior. What child wouldn’t be happy to see a small copy of an adult kitchen in his room? This is not just a set of furniture and various kitchen utensils, it is, first of all, an opportunity to engage your child in play.

A play kitchen is interesting place which opens up a lot of opportunities for development creativity little person. Here you can cook lunches and dinners, invite household members for tea, and if adult relatives are full-time, they can always be replaced with dolls. And everything will be completely real!

A toy kitchen can be a great way to introduce a child, regardless of his gender, to food products and functions. kitchen appliances and furniture, as well as instill important social skills such as table manners.

However, if you have already been to children's stores in search of a play kitchen for your child, you have probably already seen these prices? Even such kits are quite expensive. We suggest you get acquainted with several ideas for self-creation game kitchen furniture. By the way, for this purpose, it is quite possible to use items from IKEA.

Shelving, chairs, bookcases, bedside tables and many other things can serve as a basis for your creativity. You can even find pieces of furniture that you won't have to repaint, because this chain offers furniture and various items a wide variety of shapes and colors.

So, to make a children's play kitchen, you can take an inexpensive bedside table, or a bedside table from a kitchen set (sometimes in the discount department you can find individual pieces of furniture from various sets at a bargain price). On top you need to make a sink with a tap and a stove, and below there are shelves under kitchen utensils and an oven.

To wash, you need to find a small sink and, after drilling a hole in the tabletop of the bedside table and sanding the edges, insert it into the prepared socket.

You can screw on a real faucet that has already been used, or be more creative and screw on a faucet instead English letter“J” made of plywood (you can cut it yourself with a jigsaw), for strength, place it on wood glue.

After that, we paint all this beauty in the chosen color, and paint the burners with silver or black paint. We screw on the handles, they can be bought at any store furniture fittings. And most importantly, don’t forget about kitchen accessories - dishes, towels, oven mitts, etc. Your play kitchen is ready!

Watch a video about the site
Categories
Label Selection Bath Accessories (79) Appliances and appliances (4) Bathroom (3) Design wine cellar(21) Interior design in loft style (82) Interior design of rooms (42) Interior design of a room for a girl (47) Interior design of a room for a boy (21) Interior design modern hallway(101) Interior design modern bedroom(261) Design of living rooms (25) House plants (1) Home textiles (10) Animal houses (27) Home economics (98) Famous interiors (5) Interior of billiard and game rooms (7) Interior of dressing room (63) Interior of home cinema (22) Interior home office(238) Interior of apartments in Australia (12) Interior of apartments in Asia (34) Interior of apartments in America (7) Interior of apartments in England (43) Interior of apartments in Africa (4) Interior of apartments in Brazil (30) Interior of apartments in Germany ( 10) Interior of apartments in Europe (67) Interior of apartments in Spain (15) Interior of apartments in Italy (25) Interior of apartments in Canada (9) Interior of apartments in Poland (28) Interior of apartments in Russia (44) Interior of apartments in Scandinavia (38 ) Interior of apartments in the USA (62) Interior of apartments in France (14) Interior of apartments in the Middle East (15) Interior of unusual apartments (22) Interior of a dining room (73) Interiors of an apartment (17) How to choose furniture (70) A collection of useful tips (34 ) Beds (5) Kitchen (4) Furniture and lamps (3) Wallpaper (2) Shoes (1) Balcony arrangement (196) Home gym arrangement (12) Basement arrangement (76) Clothing and wardrobe items (2) Windows (3) Original design two-level apartments (30) Original design of attics and attics (99) Apartment decoration (317) Room decoration (139) Laundry and storage room decoration (50) Useful tips Home Care (10) Flooring (9) Home Library Design Examples (24) Luxury Living Interiors (46) Modern design living room interior (118) Modern interior design for children's rooms (548) Washing and ironing (1) House cleaning (7) Removing stains and dirt (8) Unique design penthouse interior design (157) Exclusive bathroom interior design (279)Hello! Tell me, have you tried making them for your children yourself? game room? If you have experience in this matter, share it in the comments! I and all readers will be very grateful to you for this! And, continuing the topic, today I will tell you what needs to be done to make a kitchen made of cardboard for a child with your own hands. Of course, everyone can participate in the manufacturing process, both adults and our main assistants, children. After all, everything is done for them.
Kitchen from scrap materials
Before we start tinkering, it’s worth addressing a few questions:
- Where will the craft be placed?
- Based on the first point - what size will it be?
- What material will be used (perhaps some are already in stock, but others will have to be purchased)?
- What is the age of the baby for whom it is made. And also, right there, at this point: are we going to make crafts for a girl or a boy?
- Will this be a long-term design or a short-term one?
Of course, it wouldn’t hurt to make a layout or drawing on paper to at least roughly see what we will be aiming for.
If there appropriate place for a large structure in a children's room, this is wonderful. Then you can create a play area where the house will find its place (we talked about it in one of the articles), and the kitchen will also be located here.
Space allows, we can make a craft that will not be for our child’s toys, but for him. That is, according to its size, both tables and stoves.
The most suitable material for “furniture” there will be a simple box. We will also need pieces of wallpaper, colored and multi-colored paper, paints, and also children's dishes. And among the tools - scissors, a stationery knife, glue, tape, possibly a stapler (but only for fastening parts where the baby will not get caught and get hurt). For realism, you can take accessories from old furniture. The lids from under plastic bottles.


The size will depend on the age. The comfort of the baby is important, so that when playing, he does not hunched over, but also does not stretch. And yet, it will be more interesting for a boy if there are more “technical devices”, such as a toaster, microwave, etc. Perhaps your baby will enjoy fixing all these things more than fiddling around in the kitchen.
If you plan for your little one to regularly play in his kitchen, you will need to try and make the structure more durable. Perhaps then something from real kitchen can be transferred. For example, chairs or some dishes.
What can be made:
- Bake,
- Table,
- Sink,
- Fridge,
- Closet,
- Devices;
- Dishwasher, etc.
It seems that we have not forgotten all the main points. All that remains is to put everything into practice. Let's see how to make both a toy and a game for toddlers. A small master class.
Master class: Kitchen
Small comfortable kitchen
The kitchen is only 2 boxes, but it has everything you need: a stove, a refrigerator, a shelf and a small countertop. Project and implementation belongs to Alis from Spain.


Kitchen with sink, stove and slate board
My favorite thing about this kitchen was the slate board idea. After all, it is very easy to make and fits into the kitchen, and the baby will be delighted - 2 toys in one! The author of the idea shared master class on your personal blog.
How to do slate board? There are many recipes. The easiest one is to paint it with black acrylic paint. It will last a long time, the child will get tired of it faster than spoil it. There are more durable options: with the addition of grout for joints, putty.
How to make a slate-magnetic board? Magnetic soil or a special film is used as a basis for it.


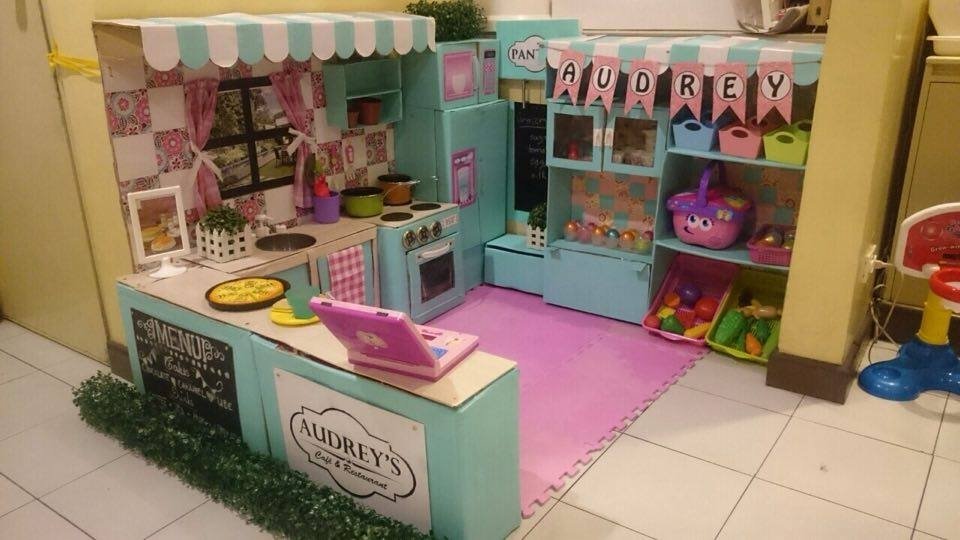
Large kitchen-cafe
If you have already drawn up a rough plan of work, and know what to do and how, if you have accumulated enough boxes, then go ahead! And also, think about what you will do and what you will entrust to the baby. Children's work doesn't have to be difficult; rather, creative.
And today I will tell you about a wonderful idea for such a kitchen that belongs to one young mother from the Philippines - Rodessa Villanueva-Reyes.
Here we go? What do we do:
- Let's put the boxes in their places. Our big ones will be a refrigerator and an oven. A table and cabinet can be made from several small ones.

- Don't forget that we want to keep everything as close to the real thing as possible. So, draw on top of the furniture, etc. doors and windows. The hole in the sink should be the size of the bowl that we will allocate for this. Cut out all these holes.

- Now let's give it all decorative look. Cover the cardboard with wallpaper and paper.
- Perhaps appliqués need to be made somewhere. For example, if there is a “window”, then we will glue curtains to it; or, “handles” to the doors, “burners” on the stove, or a program of operation on the microwave.


- All that remains is to arrange the flowers and dishes in their places.

- Do you want to call it a Restaurant or give it a name "restaurant". Then you need to make an elegant sign or even an advertising brochure.

Kitchen appliances made of cardboard
And today I propose to make a toaster.
While playing, the child will also learn time!
Found a wonderful master class on the blog estefimachado

What about the products?
Last time we did, but for this kitchen we need more ingredients. As you can see in the photo above, excellent toast and scrambled eggs are made from cardboard.
How do you like cardboard pizza?
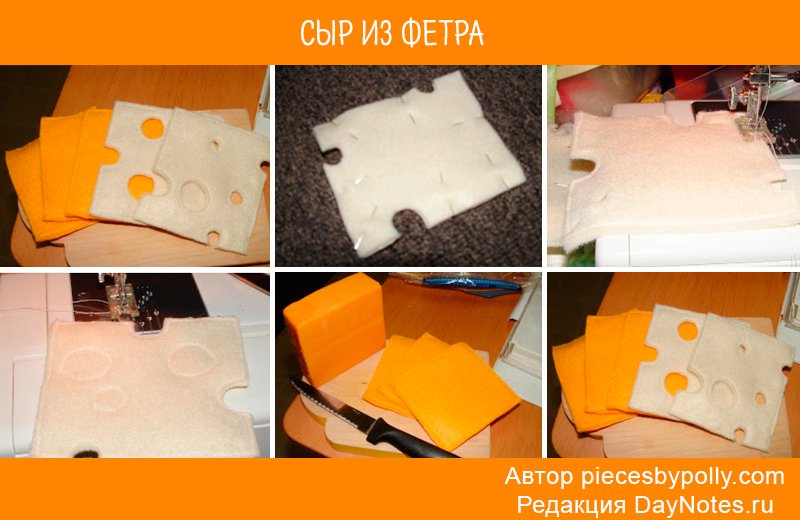
Another option is felt products. How delicious they are! You don't even need to sew them.

And the bones and veins can be drawn with wax crayons or felt-tip pens. If desired, of course, you can sew it together and stuff it with cotton wool for volume.


Several master classes on felt food
Look how easy it is to make bow pasta.

Which one then delicious sandwich can be made from felt. You need bread, tomatoes, cheese, salad. And your baby will be able to treat all guests with sandwiches or pizza. Pizza requires the same ingredients. Only instead of bread you need to make a circle or slices - triangles.


Liked? Create! I'm sure you will do even better! After all, you are trying for your kids! Share how it worked out for you?
You know, I'm with you enviable consistency I invite you to subscribe. This is no coincidence. I really want you to be able to share your talent for crafting, tell stories or share experiences. And there is no such thing as too much experience! Therefore, invite your friends to our warm company!
That's all! Bye bye!
In our Soviet childhood, we could not even imagine the range of toys that are available to modern children. Our parents made a lot of things with their own hands. Now there is ready-made solutions in different price ranges. But for some reason children very quickly cease to appreciate them and lose interest in them.
Therefore, I want to talk to you about creating a children's kitchen with your own hands. Of course, you can buy ready-made. But, firstly, this is an expensive thing, and secondly, a child can quickly play enough with it.
We will consider very economical options from cardboard boxes and more complex ideas made from plywood for dads. After all, it is their hands that create something more reliable than cardboard cabinets.
Children's kitchen for girls made of plywood (wood)
Before you start choosing the option that suits you. I propose to look into some of the nuances.
Firstly, what height should the kitchen have? I think that from this material you do not disposable toy, so measure your child. And focus on what else is in primary school children play with dishes. I consider the normal height of cabinets to be 50-60 centimeters.
The width is selected individually. It all depends on the free space in the nursery.
Secondly, choose plywood from 12 mm. It will support the weight of the child and will not sag under the weight of toy dishes.

Thirdly, for doors, choose real, but cheap fittings ( door hinges, latch).
Let's start with wood and plywood kitchens. First, let's look at the ideas, and then I will show you two drawings, from which you can already imagine the dimensions and amount of material.

All parts must be well sanded so that the child does not get a splinter.

The most simple options I think it’s a structure made of shelves without doors or drawers. This idea is for those who don't have enough material or don't have all the right tools.

Often wooden Toys made for the garden. They won't get soggy like cardboard and won't take up space in your home.

As source material Old benches or vegetable pallets are suitable.

If you have some imagination, a chair will also come in handy.

The idea of an open bright children's kitchen. All toy devices are stored underneath.

Another idea with a real tap. By the way, children can use water when playing in the garden. After all, you will make a sink from an enamel deep plate.

There are actually two shells here.

Another option, made from boards.

This kitchen was also created by a creative dad. I bring it to you for inspiration.

You can also assemble a children's composition from the remains of furniture. You can use doors from old cabinets or shelves.

To make it convenient for your child to play, complement your creativity with handles and door hinges.

If you don’t want to make doors, you can simply pull a curtain over a rope or wire.
Wood must be painted with safe paint. You can simply varnish it so that the structure of the wood remains visible.

And now it's already finished project with dimensions in the drawing. It is, of course, made schematically, but all the numbers are visible.
the entire kitchen will take 90 centimeters. We'll put 30 of them in the oven. The height of the entire structure will be 1 meter.

This drawing is suitable for girls from 1 year old. For 7-year-old children, this height of cabinets will be small. Therefore, I present another drawing.
The original kitchen looks like in the photo.

And now the sizes. By the way, they are indicated in millimeters.
Here, we see that the lower cabinets are 20 centimeters higher than those in the previous picture.

I also offer to your attention short video, where dad makes cabinets out of plywood and explains in detail what materials he used and why.
I think that if you wish, you can make any drawing yourself. The main thing is to ensure comfort and safety for the child.
Step-by-step instructions with your own hands from cardboard boxes
But, of course, the most affordable option boxes are considered. they will come in handy different sizes. Now let me describe a few steps on how to start making such a kitchen and then we’ll see different variations, which have already been created by parents.
For this design we need 3 boxes same size. It will be work zone with lower cabinets.
One flat box. It will stand in place of a kitchen apron. The dividers will be reinforced partitions.
All opening parts are sealed with tape.

In each stationery knife we cut through the doors. Then we combine all three boxes into one, wrapping them tightly with adhesive tape.
We place a long box on them and secure them with tape again.
Now it is important to strengthen the sides and vertical partitions. To do this, you need to glue two or three cardboard pieces of the same size.
in the countertop we cut a place for the sink and recesses where the dividers will fit.
Then we cover everything with self-adhesive wallpaper.

We install the sink in place, the role of which is a metal or plastic cup.

Now you need to think about how the doors will close.
To do this, I propose to make a cardboard version of the latch. Take two rectangles different lengths. they are connected by any solid object that will act as a handle. When you close the oven door, you turn the handle and the long rectangle moves to the side. And then you return it to its place and the door remains closed.

We will make the cooking surface from glass from a photo frame and circles of black and red colored paper.
We need three circles of red and two black for 1 burner. We take all five parts of different diameters, which decrease from the previous one by 1 centimeter.
We glue them on top of each other on the glass. This can be done using hot glue.

Cover the back side with a black sheet of paper.

This is the kind of slab you will get.

Here's another interesting idea.

All sides are reinforced with double cardboard. One long strip is laid, which will hide the unevenness from the joints.


Can be painted acrylic paints or spray in well-ventilated areas.

Or you can just cover the cardboard with wallpaper.


I found a very realistic kitchenette. I was captivated by the care with which they tried to create a semblance of household appliances. 
For example, a microwave oven. 
Or a hood. Like real right? 
Very detailed execution of the kitchen stove. 
Now let's see what cuisines some parents have already delighted their daughters with. 
This is probably the simplest option. It consists of just one box. 
Here's an idea with curtains. 
Also an option in preparatory form and in finished form. A very correct bright sunny color was chosen.
>
By the way, you can supplement ordinary shelves with drawers. There are a lot of these at fruit and vegetable sellers. 
The stove burners can be made from old disks. And the regulators are made of ordinary plastic covers. 
Compact idea: I played with it and immediately put everything away inside.

You don’t have to make a homemade kitchen big. 
Here's another compact version from an ordinary shoe box. 

Another option for preparatory stage. Here's an idea with hanging shelves inside. 
And a ready-made set with a covered countertop and a built-in sink. 

Another idea with just two boxes. 
How can you beat the railing? 
In this photo the burners are in the form of ordinary tin lids.

That's not all. Believe me, parents come up with fantastic toys for their beloved child.
Master class from old furniture
If you have a 1971 chest of drawers or any other Soviet furniture at your dacha. Know that its strength will withstand the daily play of more than one child. But, of course, their appearance is no longer modern at all.
For example, such a grandmother’s cabinet turns into a fast food outlet.

Add lots of lettering and color and your child will squeal with delight.

And here’s how a similar cabinet has been transformed.
When playing, children love to copy their parents. Watching their mother prepare food, they dream of their own toy kitchen. Ready-made play sets are expensive. Much cheaper and more interesting to do kitchen set to the nursery with your own hands.
Options for children's kitchen sets
Children's homemade kitchens can be simple, from cardboard boxes and stools, or assembled from decorated wood boards. Some craftsmen create real masterpieces for their kids. It all depends on your abilities, skills and preferences, as well as the availability of free space in the children's room.
Children's kitchens in the photo
DIY structures for the street or cottage
For games on fresh air can also be made Kitchen Area. Children love to play with water, so good decision- complement the design with a sink. You can wash dishes and toys in it without fear of spilling the contents or getting splashed.
It is better to make a kitchen for a summer residence from moisture-resistant materials. The design should be simple and functional. A small kitchen corner with shelves and a sink can be mounted directly on wooden wall country barn.
During construction play area With the kitchen you can use wooden chocks and remnants of boards that were not used for their intended purpose.
Suitable materials
The simplest option is a kitchen made from cardboard boxes. Even a mother can make it, armed with tape, a stationery knife, self-adhesive film, paints and, of course, imagination.
The next option, which mom can also handle on her own, is a kitchen in the form of a cover for a chair, table and other base. Sewing skills are required here.
If dad gets down to business, then the list building materials increases significantly:
- wooden boards, chocks;
- plywood;
- chipboard and fibreboard sheets;
- old furniture or parts thereof.
Be careful! The main thing when creating a kitchen is the safety of the child. The structure must be well secured, no sharp objects, exposed wires or small parts.
Making a kitchen out of cardboard boxes: step-by-step instructions
Creating such a kitchen will require a minimum amount of material and effort. Cardboard - pretty durable material, it is easy to assemble and model.
To do it yourself cardboard kitchen, you will need materials and tools:
- carton boxes;
- paper towel tubes;
- sheets of paper;
- disks;
- multifora;
- plastic bowl;
- towel hooks;
- stationery knife;
- crepe ribbon;
- double sided tape;
- hot glue gun;
- leg-split;
- self-adhesive film;
- oilcloth.
Stages of work.
- Outline all functional elements in advance. Place the boxes on top of each other according to the design you came up with and secure them with double-sided tape.
- Assemble the tabletop from four layers of cardboard taped with double-sided tape. Use paper towel tubes as legs. Glue them to the tabletop using a hot glue gun.
- To make it more interesting for your baby to play, add decorative and functional elements. Cover the inside of the boxes with white paper and the outside with colored self-adhesive film.
- Make four legs from rolled cardboard and secure them to the base with double-sided tape. Cover the legs and tabletop support with twine.
- For secure fixation, attach all legs to the floor with double-sided tape.
- Insert a suitable sized plastic basin into the sink hole.
- Make a frying panel from a sheet of white paper, disks and multifora.
- Cover the tabletop with oilcloth and secure it with tape on the sides.
- Fasten cabinets and towel hooks with self-tapping screws.
- A homemade kitchen made from cardboard boxes is ready to use.
Homemade cardboard set - video
Play corner made of chair and cover
The kitchen cover option is very relevant for small apartments. This design helps save space and money at the same time.
To create such a kitchen you will need:
- scissors;
- ruler;
- a sheet of thick paper or cardboard;
- cotton fabric for the base - 2 m;
- fabric for curtains - 50 cm;
- fabric for side pockets - 50 cm;
- scraps of colored material for functional elements (windows, handles, oven doors, burners);
- fabric for edging the cover - 8 m;
- hooks;
- strip of fabric with Velcro;
- large buttons - 4 pcs.;
- sewing machine;
- iron;
- pencil or felt-tip pen.
Stages of work.
- Measure the dimensions of the chair on which the cover will be placed (A - height from the floor to the seat, B - width of the chair in front, C - depth of the seat, D - width of the seat at the back, E - height of the back).
- Cut the fabric, remembering to leave some extra for the seams.
- Cut out a circle from paper and trace it on the wrong side of the material. These are stove burners. Cut out fabric blanks.
- Cut the handles for the stove from the same material as the burners, only with a smaller diameter. Sew them to the cover and glue a button in the middle.
- Sew the oven door from two pieces of fabric: white (the door itself) and black (the oven window). Sew the black piece to the white one, and on the sides make a border from a strip of fabric of a different color.
- Attach the door to the cover in the place where it will be placed. Trace around with a pencil to mark the edge to which you will later sew the lower part. Secure the sides of the door with adhesive tape.
- Make a window on a piece of fabric that will be on the back of the chair.
- If desired, sew small curtains.
- Sew a pocket for kitchen utensils to the side of the cover.
- Now all the pieces of the cover need to be fastened together. First sew the window with the stove and oven, then side elements and the back of the chair. Add a border with a different color ribbon.
- Sew fastening ribbons.
- Sew felt pies and cakes that will be baked in the oven. WITH reverse side attach the toy food with Velcro.
Homemade version from a wooden bedside table
For the manufacture of wooden kitchen male strength will be required. Use an old bedside table as a base.
To work you will need:
- wood paint;
- jigsaw;
- plastic bowl;
- switches for gas burners;
- assembly adhesive;
- faucet for washing;
- curtain fabric;
- wire for fastening.
Children's kitchen made of plywood
Creating a kitchen from plywood is the most labor-intensive method. Since the structure is assembled from scratch, a drawing and assembly diagram with the dimensions of the main parts are required.
Materials and tools that will be needed during the work:
- two sheets of plywood;
- self-tapping screws;
- tools: jigsaw, screwdriver, drill;
- PVA glue;
- two cans of varnish;
- accessories: magnets, hooks, handles.
And we, too, were caught up in the craze for dishes. Yes. Now five-year-old Egor prefers pots and spatulas to any machines or robots. And God forbid he sees some pink blender in a toy store: everything, write, is gone.
Not buying girly toys is threefold difficult for me: firstly, a young man can be desperately inspired in his requests. The cat from “Shrek” nervously tugs at the tip of his tail, remaining silent on the sidelines. Secondly, I have youngest daughter, that is, in principle, I can do this quite legally, without inventing cunning excuses. But. It is for her that I will have to come up with gifts for birthdays and new years for the next twenty years - and it would be better to leave myself not only room for maneuver of imagination, but also some physical free place in the house. And thirdly: any mother knows that it is tens, no, hundreds of times easier to resist buying any transforming cyborg than it is to resist a single fuchsia iron or a set of tiny cups. We are girls too!!!
In general, we decided to rob the neighboring supermarket again for clean cardboard and concoct no more, no less - a full-fledged kitchen for my mother’s helpers.
We will need (I give actual prices, i.e. what we personally actually spent):
Cardboard boxes (free, “hello, can we help you partially get rid of cardboard waste?”), 4 CD blanks (also free, but if suddenly there are no old scratched ones lying around the house, well... 8 rubles?), a lot of corks from plastic bottles and one bottle itself, ropes, plastic household hooks (10 rubles each), a stationery knife, scissors, glue gun(I highly recommend having this glue at home, because this glue does not stink, and if you follow safety precautions, you won’t get burned. But if not, then take any serious glue that does not dissolve plastic), paint, colored paper, stickers for decoration (everything that was in the house ), colored reinforced tape (80 rubles), a plastic spoon for bulk products (baby food, washing powder- anything), a simple pencil, a small metal bowl (hiking or dog bowl, for example, 38 rubles). A pair of nails - thick and thin, pliers, a gypsy needle. An enthusiastic big-eared five-year-old is one thing.
Time required – about two hours.
Let's get started!

We peel off the factory tape and labels from a box of a suitable size, and glue the “slab grid” on the top side with strong and bright reinforced tape, at the same time strengthening and covering the joints and corners.

Use a glue gun to glue the CD burner into place.
From colored paper or “foam” we cut out circles with a diameter slightly larger than bottle caps and glue them in place of future handles:

We also seal and cover any unevenness or unsightliness.

Now - work for mom. Use a thick nail to pierce holes in each circle:

We clamp a thin nail with pliers and heat it on the stove (if you don’t have gas, a candle will handle the heating quite well).

This requires two hands, so it was not possible to photograph the moment of the puncture. Physical strength and super-serious temperatures are not needed, everything is quick and simple. You should end up with cork “buttons” like this:

Which we “sew” into place using a gypsy needle and rope:

We pass the ends of the rope into one hole, previously pierced with a thick nail:

We put our hands inside the box and tie a lot of knots at the ends (we don’t worry about being pretty, the main thing is that it doesn’t come undone or jump out during the game):

Having made all five handles (4 burners and an oven), we tie the ends together - this is even more reliable.

We trace the outline of the A4 sheet to mark the future oven door:

Cut along the drawn line, the letter P: left, top and right sides. Bottom - do not touch:

The bottom edge of the door will often bend and unbend (it’s a door!), so you need to reinforce this bend with a strip of reinforced tape:

In the upper corners of the door, using a thick nail that has already been tested in such matters, we pierce holes for the future handle and pass a thick rope through them:

Using leftover cardboard, we haphazardly stick a shelf inside the oven. To be honest, we never managed to do this exactly - but no one will suffer because of it.

We also glue the edges of the door and oven with tape, in all places where the cardboard can get wet.
We adjust the second box in height to fit our freshly baked stove (any housewife knows that a working and hob, as well as the sink, must be at the same height!). We clean it of labels, glue all the corners and joints, apply a metal bowl to the top surface and trace it with a pencil:

Having retreated - INSIDE! - about 5 mm from the edge (or more/less, depending on the shape and width of the side of your bowl), use a stationery knife to cut out a circle of smaller diameter:

Using a glue gun we glue our sink into place:

We make a tap from a bottle neck, caps and a spoon. Due to the rotating plug to which the spoon is glued, it turns back and forth. In principle, this version of the mixer is completely optional, depending on ethnic composition broken toys and your imagination, you can come up with any other design that is more similar to the truth.

We make a kitchen “apron” from scraps of cardboard and glue hooks to it:

We place the kitchenette “on its back” and mark the doors in the front part by tracing two A4 sheets. This time we cut the top, bottom and center lines, the side ones will turn into folds, so don’t forget to glue them with tape according to the same principle as the oven.

We pierce holes for the handles, pass ropes through them, and glue the shelves inside:

We glue the edges of the doors, paint and decorate the kitchen to the best of our depravity, arrange all the utensils - and PLAY!!!


