They have long been used to decorate living rooms, hallways and bedrooms. They easily fit into almost every interior and are spectacular decor rooms. The vase can have a strict, laconic design or, on the contrary, be decorated with rich stucco and gilding, and have different shapes and heights. At the moment, the assortment of stores offers a huge number of vases from famous decorators and ordinary brands, so choose the desired model won't be difficult. But if you want something original with an unusual designer decor, then it’s better to do floor vase with your own hands. This way you can bring your own ideas to life and not waste precious time searching for the desired product in stores.
Making a floor vase with your own hands
The basis for the craft can be plastic and glass bottles, newspapers, metal pipes and old unnecessary vases. Here the method of using thick cardboard will be clearly demonstrated. So, to make a vase you will need the following tools and materials:
- cardboard tube, thick sheets;
- a piece of fiberboard;
- felt-tip pen or pencil;
- scissors and PVA glue;
- newspapers;
- sandpaper;
- putty.
A DIY floor vase will be made in several stages:
- Cut the cardboard tube to the required length and glue it to the fiberboard base.
- Make preparations. The shape of your future will depend on the shape of the blanks. Please note that the more parts there are, the easier it will be to work on the product in the future. The optimal number of blanks is 25-30 pieces.
- Glue the cut pieces around the perimeter of the pipe. For fastening you will need a special hot glue gun with silicone rods (“hot glue”).
- Using newspapers and PVA glue, glue the resulting base. Leave the product near the battery for several days so that the glue has time to dry.
- Primer. Dilute the putty with PVA glue and coat the product with the resulting mixture. Leave the fake for a day so that the papier-mâché has time to set. When the surface becomes hard, treat it sandpaper. Continue this procedure until the workpiece becomes smooth and even.
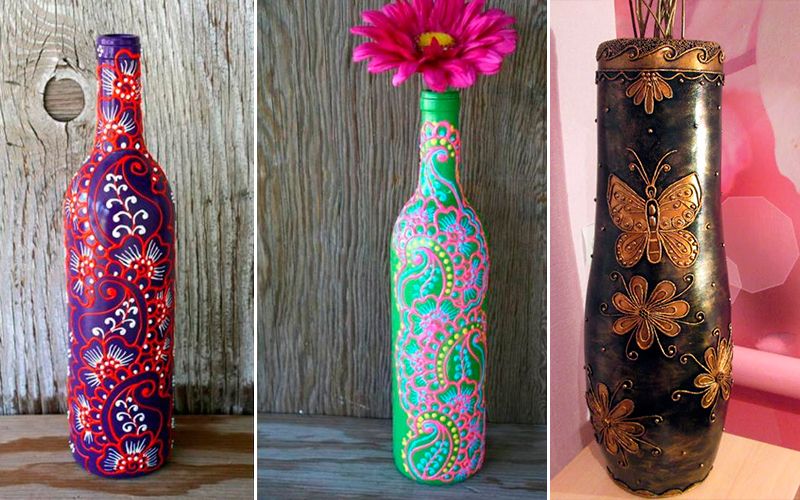
- Decor. Most interesting stage work. The patterns are molded from ceraplast, salt dough or plastic and glued to the surface of the vase with glue. To make small ornaments, you need to use paper napkins cut and rolled into threads. You can twist petals, spirals and wavy lines from damp tissue threads. After all decorative elements have dried, cover the surface with PVA glue diluted with water.
- Painting. Apply to the entire surface of the vase acrylic lacquer. Some elements can be shaded with gold (it can be sprayed from spray cans).

As a result, you will get a luxurious floor vase that will be difficult to distinguish from a store-bought one. To make its design even more interesting, you can use craquelure, bitumen or special designs for decoupage. If you want to get an unusual relief surface, then go over the selected area with glue and fill this area with small grains (millet, peas), decorative beads or seed beads.
Please note that you cannot pour liquid into such a vase or store fresh flowers. Better to use artificial plants or tree branches.
Beautiful DIY floor vases: manufacturing methods
Don't think that a vase can only be made from thick paper. Here you can use boxes, bottles, newspaper tubes, plastic jars. You can decorate the product with threads, wire, shells and even pistachio shells. Looks very elegant and creative!
Decorating a vase with your own hands is quite an exciting hobby. Copyright, unique vases V finished form are quite expensive, and a hand-decorated vase will definitely suit your interior, because you will select materials according to color and style to match the finished room. Another advantage of decorating a vase yourself is its uniqueness. You will never find exactly the same one, even if you use materials from a specific master class.
A vase in the interior is not just a vessel in which you can put a bouquet of flowers. This is a work of art, an interior item, and a thing that can be used to cover an empty space. And in combination with the bouquet itself, the vase will become an integral part of your interior.
To decorate a vase with your own hands, you may need available materials and various instruments, but also of course, your hands. Decorating a vase with your own hands is a creative process that can be a fun activity for the whole family. Well, we will give you ideas and tips on how to decorate a vase with your own hands in this article.
There are many ways to decorate, the most popular of which are:
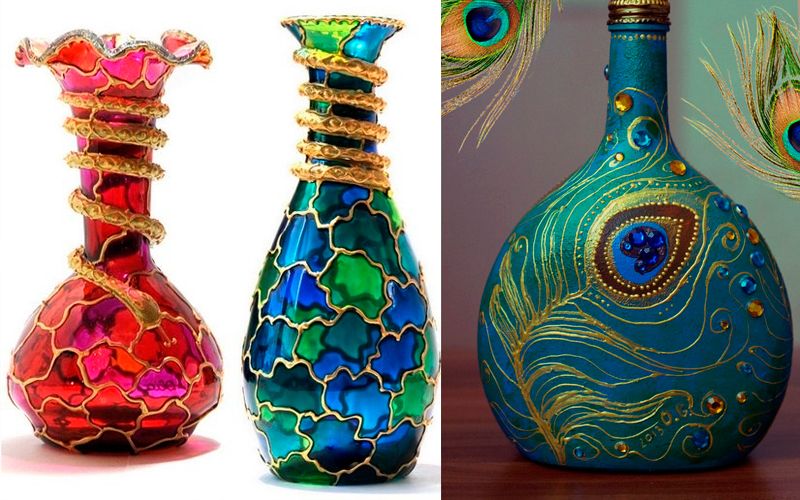
- glass painting;
- decoupage;
- decoration with fabric;
- using color or corrugated paper, newspapers, sheet music;
- design using pencils or brushes;
- decoration with twine, rope or colored threads;
- using artificial flowers;
- decorating with edible materials - pasta, seeds;
- using improvised materials, for example, buttons, coins, beads;
- decorating a vase with ribbons and lace.
Let's look at some of them - do-it-yourself vase decor with photos.
Twine is an excellent material for decorating bottles, glasses and vases. Its flexibility (literally) allows you to decorate even the most complex shapes. Along with twine, you can also use other materials: rhinestones, beads, buttons, threads, fabric, ribbons. Both regular PVA and hot melt glue or “moment” are suitable as glue.
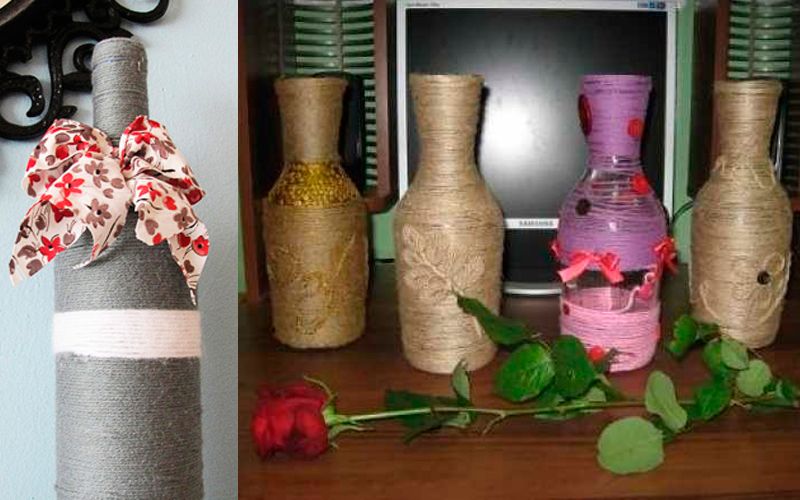
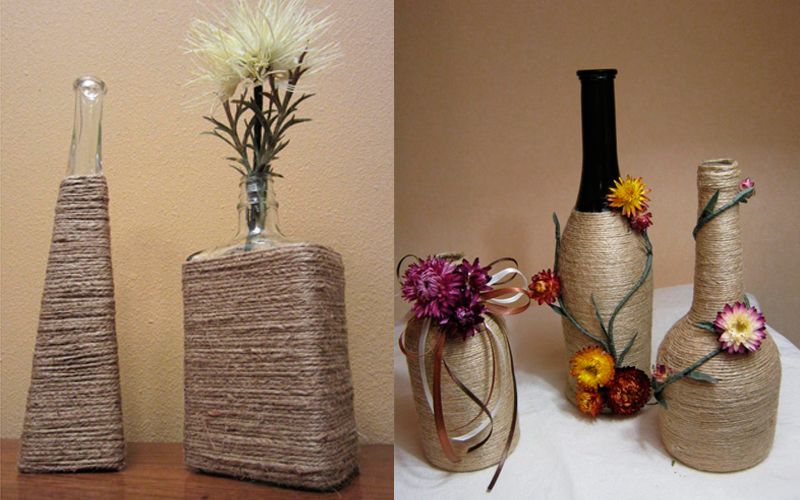
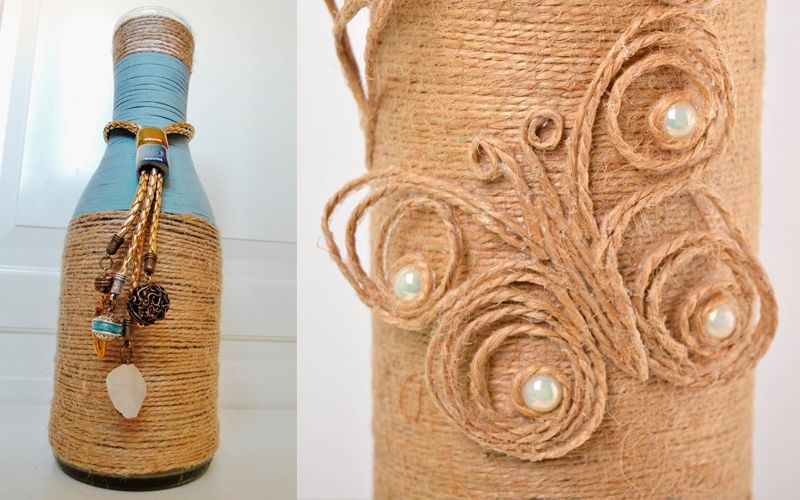
Natural materials can also complement twine or rope: pine cones, shells, dried leaves, small pebbles or other stones.


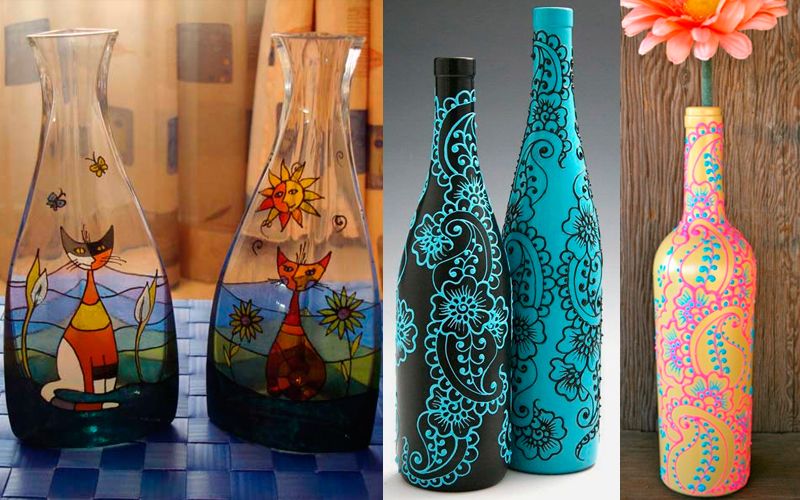
Certainly, art painting not for everyone. But a vase painted with your own hands will look expensive and unique. For painting on glass, use stained glass paints or special acrylic paints marked “for painting on glass.” You can go another, more economical way: first, the vase is coated in two layers with PVA glue, and then a drawing is applied to it using ordinary gouache.
Important! Before starting work, the vase must be thoroughly degreased - wiped with alcohol or an alcohol wipe.
So as not to spoil large vase If you have no painting experience, you can practice on an ordinary glass or bottle of wine or champagne.
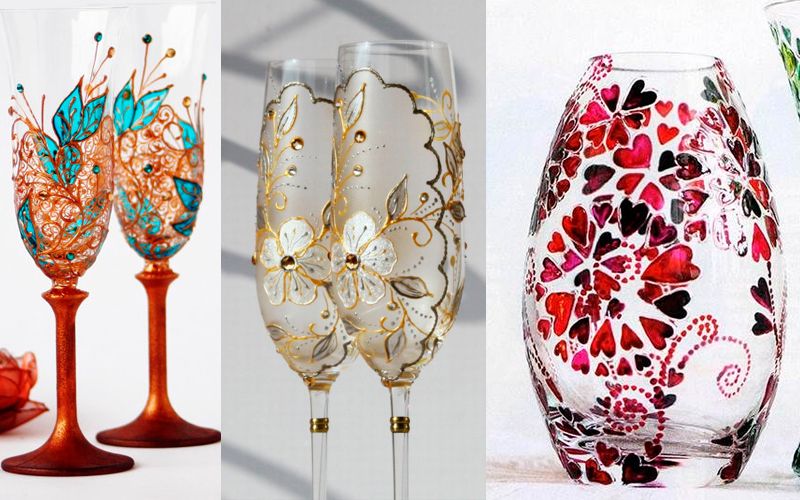
To create a relief contour, use a special acrylic contour on glass.
The fabric can be used not only for sewing clothes or home textiles. It is also an excellent material for decoration. various items interior
You can decorate a vase using fabric in different ways: sew a cover on it, paste it with pieces of multi-colored fabric, wrap or tie the vase.


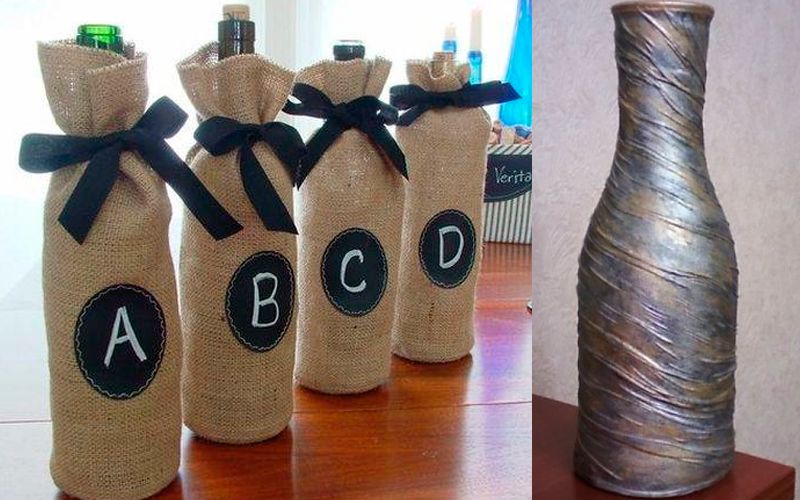

You can decorate with fabric not only a vase, but also any other container, for example, a bottle. For this you need following materials and tools:
- textile;
- bottle;
- glue;
- paints;
- decorative elements - beads, buttons, shells, ribbons.
The fabric should be soaked in glue and wrapped around the bottle. Then glue the decorative elements and paint.

A vase decorated with lace and ribbons is no less beautiful and elegant. To glue materials to the surface of the vase, you can use hot glue, moment, or PVA. Also combine with artificial flowers, buttons, rhinestones, beads and beads.


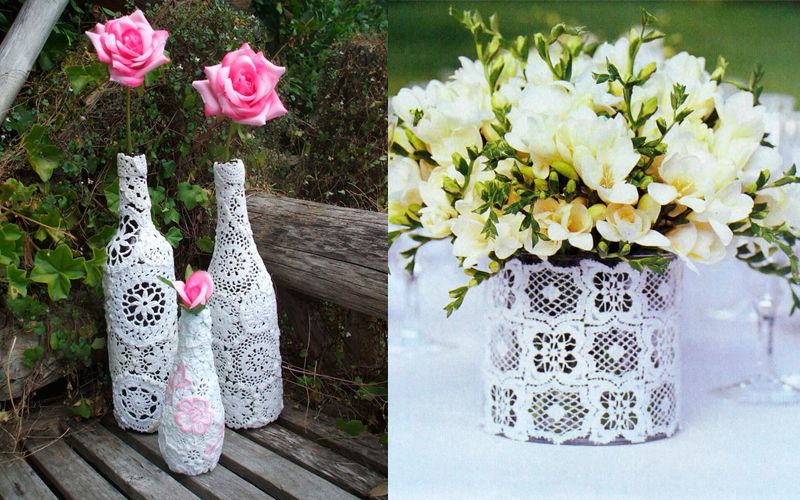
Decorating a vase with lace is quite easy, and you get a unique and original pattern.


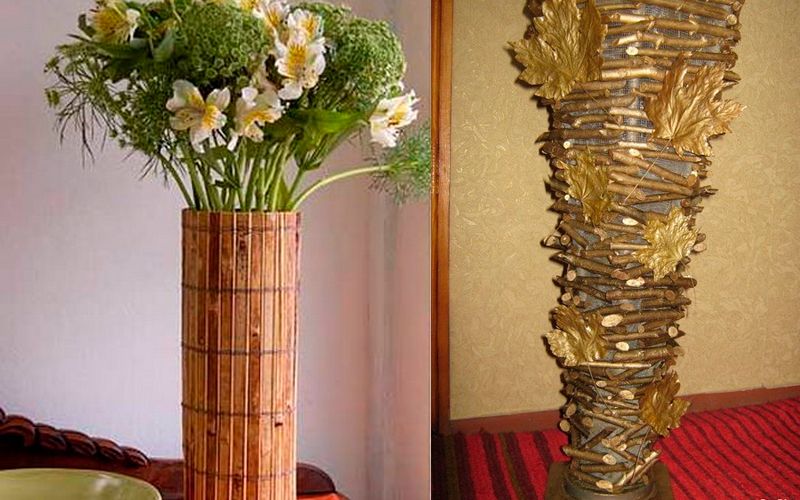
Any natural materials can be used as decoration for a vase with your own hands: wood, twigs, pine cones, shells, pebbles, dried leaves and flowers, straw.
How to decorate a vase with your own hands using natural materials? Just like other materials for gluing, you can use PVA, hot melt glue, and moment. Before applying glue, the vase must be degreased.


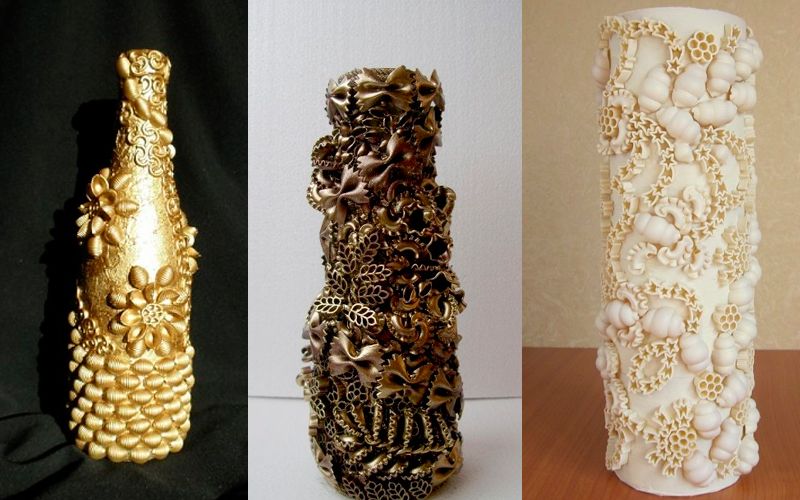
One of original ways decorate a vase with your own hands - cover it with pasta different shapes and size. Thanks to huge selection pasta products in modern supermarkets, the vases turn out to be unique and original. From above, the entire pattern is covered with paint and varnish for durability.


Old newspapers can be used to decorate a vintage style vase. Aged paper or sheet music are also suitable for this purpose. Simply cover the vase with pieces of newspaper and decorate with twine or thread.


When it comes to a vase, many people imagine the classic transparent option. Of course, it is considered the most versatile and suitable for any interior. But nevertheless, there are many alternative options, which allow you to make vases literally from scrap materials.


Fragrant vase
Registration flower arrangements always given Special attention. After all, you need to choose the ideal ratio of buds and decorative elements. As for the decor of the vase, unfortunately, attention is rarely paid to it. We suggest changing this and decorating it with cinnamon sticks.

We will need the following materials:
- glass jar or vase;
- glue;
- cinnamon sticks;
- leg-split;
- scissors;
- decorative flowers.

Glue cinnamon sticks to a small jar or vase. Leave until completely dry. 
For additional fixation, we tie the vase with twine several times and tie the ends with a bow.

If desired, you can glue additional decor in the form of a bud to the bow. The original vase is ready!

Miniature glass vase
Flowers look very beautiful in the decor of the room. IN in this case We suggest making a small vase for them.

Let's prepare the following:
- glass beaker;
- rope;
- glue gun;
- stationery knife;
- decorative flowers.

Apply a drop of glue to the end of the rope and attach it to the bottom of the glass.

Gradually wrap the rope around the glass and glue it.

When the entire glass is covered with rope, cut it off using a utility knife.

Carefully fix the end of the rope with glue.

We put decorative flowers in a miniature vase and decorate the dressing table with the composition.

Marble decor for a vase
A simple glass vase can also be transformed at home.

For this you will need:
- glass vase;
- acrylic paints of different shades in one color scheme;
- paper;
- towel.

Pour a small amount of paint in different shades into the bottom of the vase. We turn it, tilting its neck down. This must be done slowly enough so that the paint remains on the glass. Gradually add paint to completely color the vase.

We continue to turn the vase until all the glass is covered with paint.

Turn the vase over and place it on simple sheets paper or paper towels. This will allow excess paint to drip off. 
When the excess paint has drained, place the vase on its side on a towel. Leave it for two days until completely dry.

Original vase from a bottle
If your home has several glass bottles, don't throw them away. After all, they are great for creating original vases for flowers. Such products are great for room decoration and always attract attention.

We will prepare the following materials:
- bottle;
- scissors;
- threads in different shades;
- glue.

If there are labels on the bottle, clean it thoroughly. Be sure to wash and wipe with a lint-free cloth.

Apply glue immediately under the neck of the bottle.

Glue the end of the lightest thread, and then wrap it around the bottle.

We repeat the same until the thread runs out. Apply a little glue to the end and fix it on the bottle. 
Glue the end of a thread of a different color.

We wrap the thread tightly around the bottle until it runs out.

In the same way we add next color. Due to this, a kind of gradient is obtained on the vase.

Fix the tip of the thread and place it in stylish vase decorative flowers.


Multicolored vase
Perhaps this master class will be the simplest. Therefore, it is great for beginners and those who don't want to spend too much time decorating a vase.

We will need the following:
- jar or vase;
- acrylic paints in several shades;
- newspaper or paper.

On work surface Place newspaper or paper in a thick layer. Place a jar or vase upside down on top. Carefully pour the paint onto the bottom of the jar and wait until it begins to flow down the walls.

We alternately add paint of other shades, thus mixing them together.

Leave the vase for at least two days. This is necessary for the paint to dry.

The result is a stylish, cute vase. It is perfect for room decor. If you wish, you can please your loved ones with such an unusual gift. 
DIY shiny vase
Often, vases have a rather modest, laconic decor. But we still suggest making a more unusual option in the form of a vase with sparkles. It is perfect for holiday bouquets and will be a real decoration.

Necessary materials:
- vase or jar;
- black acrylic paint;
- brush;
- plastic cylinder;
- liquid glue;
- sparkles in different shades;
- paper towels.

Sequins can be different, but it is still best to use one color scheme.

Pour some glue into the bottom of the vase. Sprinkle glitter in one of the shades on top of it. Mix the glue and glitter together using a brush.

In the same way we cover the entire inner surface of the vase. This must be done quickly, before the glue dries. Leave the vase for several hours.

Apply glue to the bottom of the vase and sprinkle with glitter. Mix them together with a brush.

We repeat the same thing, covering the entire inner surface of the vase. Leave it until completely dry.

Carefully cover the inside of the vase with black acrylic paint and leave it to dry overnight.

This vase can be used as decorative element. But if you plan to put fresh flowers in it, then you need to use a plastic cylinder for this.

Stylish vases made from plastic bottles

We will prepare the following materials:
- plastic bottles different sizes and shapes;
- scissors;
- scotch;
- newspaper or paper;
- waterproof spray paint;
- sponge;
- sunflower oil.

To remove labels from plastic bottles as quickly and easily as possible, simply direct a stream of hot air at them. Apply the oil on top using a sponge and wash it off with water. 

Cut the tape into strips different thicknesses and glue it to the bottles.

Place newspaper or paper on the work surface to protect it. We put the bottle on top and paint it with paint. We repeat the same with the remaining bottles.

After the paint has dried, carefully remove the tape from the surface.

Original vases from plastic bottles ready!


As you can see, you can beautifully decorate a vase even at home. Moreover, you can even make it yourself from scrap materials. Be sure to try to implement at least one option and be sure that the result will pleasantly surprise you.
Tags:If you have just recently done renovations at home, then there is always a heap of unnecessary garbage left and our advice: do not rush to throw it into the garbage chute, in this heap you can always stumble upon items that will be useful in inventing fakes - these can be various design details and different decorations for your home. More often extra items are the remaining ones to no one necessary pipes, from which you can invent a wonderful designer vase. There are several methods for reproducing our vase.
So, first, let's look at the types of vases made from plastic pipes.
Installation
We will decorate with the help of unnecessary nylon stockings.

But before we use stockings, we'll take a look at creating a vase silhouette using plastic pipes. It would be great if these pipes were intended for sewerage. They are perfect in shape and material.

Now let's move on to the manual, which will describe the sequence of work and actions:

Composite decoration for a vase
The sequence of actions is practically no different from the first version of creating an invention, but there is still a slight difference and it lies in the fact that the decoration methods are different.

Now let's move on to the process of inventing a vase using this method:
- We put it on the pipes, which we prepare in the same way as in the first option, hosiery on both sides so that there is a small empty gap in the middle of the pipe.
- We apply a small amount of PVA glue to this empty gap so that it is spread over the entire area.
- Now we pour any type of cereal onto this smeared gap, depending on your imagination.
- Let's wait until the glue hardens, and attach the pipe sections to each other and paint them in various colors, depends on your wishes.

At this stage we finish making the vase using cereal.
Making a vase from a metal alloy pipe
In case you still have unnecessary metal pipe, whose edges are cut evenly, then it will be useful for creating our craft. If the pipe has an edge, then it is perfect for us because there is no need to create a stand for the vase, it will be ready immediately.

Using this type of pipe, we will become familiar with the technique of creating it using sequential steps:
- To begin with, we will take a roll of ordinary cheap toilet paper and glue our pipe in a circle so that there are no empty spaces left. The formation of small folds is allowed.
- Now we need black paint, and with its help we paint the pipe in two layers to give it a natural look.
- Next, take powder with a powder effect and apply it with gentle movements over the black paint.
- For special beauty, you can decorate the vase with beads or beads.
- Using installation foam we create the bottom of our product. We do it this way: we put the craft on a plastic stand and we put the stream of foam in a vertical position. After waiting until the foam dries, you can paint the bottom with spray paint of any color.

Take note! We can decorate the edges of our beautiful vase with welding device, having cooked them a little. The result will be beautiful metallic lace.
I hope you understand that you won’t be able to place fresh flowers in this type of vase as they require water, and you won’t be able to pour it into such a craft, but don’t be upset, it’s perfect for placing dried or dead flowers in it different varieties. In it they will look aesthetically pleasing and tasteful.

Making a vase from a cardboard product

If you ordered to your home during renovation required quantity linoleum, we note that a cardboard tube is placed inside each such roll so that it does not wrinkle or move apart. But for the end result,
you just need to show a little of your imagination. 

Today, only the lazy do not improve the design of their home. Fashion trends allow us to satisfy the most sophisticated tastes of demanding consumers. At the same time, the demand for decoration remained at all times. interior design tall floor vases. However, their price availability does not always coincide with what is desired. appearance. Like any other thing, you can make a floor vase with your own hands. Such a beauty will have the desired shape, and in the desired color scheme, and is much cheaper than its store-bought counterparts.
Materials for work:
Glass jar with a capacity of 3 liters – 2 pcs.;
Tea saucer – 1 pc.;
Plastic container for preserves – 1 pc.;
Silicone sealant – 1 bottle;
Liquid PVA glue (construction) – 1 liter;
Construction alabaster – 4 tbsp;
Potato starch – 100 g;
Egg racks – 4 pcs.;
Vegetable oil – 1 tbsp;
Vaseline – 1 tbsp;
Three-layer napkins – 2 pcs.;
Plasticine – 1 box;
Old tube of PVA glue with a narrow spout – 1 pc.;
Liquid nails glue, white and gold paints, blush, eye shadow, face powder, brush, colorless acrylic varnish, water.
Stages of work:
First stage: forming the basis.
We turn one jar upside down and glue “ liquid nails» a tea saucer turned upside down towards him.
We glue the bottom of the second can to the bottom of the same jar.

Cut off the bottom of the preserve container. We glue the inverted container to the neck of the second can.

Let the base dry for 1 day.

Second stage: give the vase the outline of a vessel.
Finely chop the egg racks.

Fill with water so that the entire torn mass is immersed in it. Leave it overnight.

Wring out the soaked grates.

We tear large pieces. Fill the entire mass with PVA glue.

Mix the soaked grates thoroughly until a homogeneous slurry is obtained.

Fill the space between the neck of the jar and the container with egg mixture.

Apply over the entire surface of the cans thin layer egg mass.

Let the base dry for 2 days.

We paint it white.

Third stage: apply a three-dimensional drawing.
Print out the stencil you like.

We make cuts along the contours, cutting out the necessary moments.


We place the drawing on the vessel in a checkerboard pattern, upright and inverted (2 times at the top, 2 times at the bottom; top and bottom facing each other).


Using a pencil we draw voids and slots.


Squeeze the silicone sealant into an empty PVA tube.

We put a sharp spout on the tube and squeeze out the sealant along the contour of the pattern.

If necessary, make adjustments with a toothpick.


Let the sealant dry for 1 day.

Apply blush tint to the drawing using superficial movements with a large brush.


Fourth stage: make a silicone mold.
Mix potato starch and silicone sealant.


Knead thoroughly until you obtain a dough-like mass.

We heavily coat the surface of the figurine blank (in this case, a magnet) with Vaseline.

Press the dough into the flattened dough front side down.


Carefully prying the knife out, remove the workpiece.

Fifth stage: casting the figures.
Grease the inside of the silicone mold vegetable oil(pour it in, then turn the mold over and pour out the oil).

Pour a tablespoon of alabaster (or plaster) into the container.

Add a spoonful of water there and mix. If the solution turns out thick, add water.

Fill the silicone mold with alabaster solution.


Leave the solution to harden (you can check readiness by pressing your nail on the figure - no mark should remain on the surface). We pry the figure with a knife and remove it from the mold.

Repeat preparing the solution and pouring 3 more times.

Stage six: painting the angels.
We paint the blanks with white gouache.

We matte the bodies of the angels with face powder.

We dye our hair.

Drawing sponges.

Using a pen we draw the eyelids and eyebrows.

Use white gouache to cover the extra layer of powder (next to the bodies of the angels).

We draw the wings in gold.

We apply “liquid nails” to the back surface of the figures and glue them to the vase.


Seventh stage: making roses.
Knead the plasticine, lay it on a hard surface with a thin plate, and cut it into squares. In each square we make cuts in a circle from the center.


Gently prying up the central core, twist the spiral, moving from the center to the edge. We bend the square corners like large leaves.


We paint roses white.

We tint them with blush to match the color of the three-dimensional pattern.

We apply gilding around the edges.

Using “liquid nails” we attach the roses to the vase.

