Each of us strives to arrange the interior of the room in such a way that it is not only cozy, but also comfortable. This is quite logical, since after hard days at work you want to relax in a comfortable environment, so that nothing disturbs you. A cocoon chair can become such a favorite place.
Previously, such structures were used only in suburban areas, but today it has become fashionable to hang them in city dwellings. And why not, if space allows?
A hanging cocoon chair is not cheap, so it is not available to every ordinary resident. What should I do? Everything is obvious: you can make a chair with your own hands, because it is not as difficult as it might seem at first glance.
Types of hanging chairs
- A chair with a rigid frame.
The frame is usually made of rattan and wicker, in some cases acrylic and plastic. Pillows and small mattresses are used as seats.
- Hammock chair.
The design of such a chair is similar to hammocks, the only difference is in size and fastenings.
- Cocoon chair.
The peculiarity of the model is that 3/4 of the chair is closed. Basically, the walls are made wicker in the macrame style.

- Drop chair.
The model is similar to a hanging house, especially suitable for installation in a children's room.
- Chair on the counter.
The main feature of the mounting is that due to the wide, stable leg, there is no need to attach it to the ceiling; the structure is placed on the floor. The advantage of such a chair is that it can be placed anywhere in the house.
Features of creating a hanging chair
Today, there are more and more craftsmen who have managed to make a master class on the manufacture of such a design and talk in detail about this process.

A distinctive feature of the chair is its resemblance to a spider cocoon. Such an element will decorate absolutely any interior and become a favorite relaxation spot. In terms of its structure, it is an unfinished ball braided with ropes.
The most simple technology creation looks like this:
- First of all, a frame is created. As a rule, 2-3 hoops are used for this same size, which are connected to each other to form a ball. In order for the ball to better hold its shape, several more half rings are installed inside.
- To make it comfortable to sit in a chair, you need to put a seat there. It can be a pillow, a board, or you can simply weave it.
- In order to be able to sit quietly in the ball and not fall through, it is necessary to cover it with mesh. Here, too, there are several options: you can buy a ready-made mesh, you can weave it yourself, or you can simply cover the chair with rope.
- The chair must be suspended from the ceiling. This will not be a problem if you initially provide hooks or brackets on the product, through which you can attach the chair. After all, the main thing in a hanging chair is the ability to swing from side to side. In some cases, a spring is used to allow it to swing up and down in addition.
How to make a chair using macrame technique
Anyone can make a cocoon chair with their own hands, a master class of the process itself, the main thing is to have it at hand.

You will need:
- two with a diameter of 90 and 110 cm, a cross-section of 35 mm;
- polyester cord with a diameter of 4.5-5 mm;
- crochet hook No. 8-9;
- slings - 12 m;
- 2 wooden rods 60-80 cm;
- tape measure, scissors.
The bottom of the chair can be crocheted or woven using the macrame technique.
First of all, you need to wrap the hoop with a cord, tying every tenth turn with a knot.
Starting from the center, tightly crochet a circle of air loops and single crochets. After 6-7 rounds, you can move on to making a seat with a tight knit, as well as a back, which can be made with a mesh.
Knitted product in finished form should not reach 10 cm to the edges of the circle. Knitting will require about 120-160 m of cord.
The seat should be secured to the hoop from the side of tight knitting; at this time, it is necessary to evenly stretch the napkin along the diameter of the hoop.

Making a hanging chair seat
A seat made using the macrame technique is much more economical; you will need the following parts of the cord:
- 8 pieces of 6 m;
- 4 to 5;
- 4 to 4.5;
- 2 to 4.
Now you need to place the blanks on the hoop. 8 threads are attached in pairs in the center at a distance of 6 cm from each other. All others are fixed with the same distance on the sides.
To secure the cable, it is necessary to make a knot on each thread. We knit with a knot at a distance of 6 cm, periodically doing a stretch.
In order for the cocoon chair to have fringe, it is necessary to extend each thread by a meter and not cut the end.
How to make the frame and back of a chair
To make a hanging cocoon chair with your own hands, you need to take care of a solid frame. Wooden rods should be wrapped with cord and inserted into the back; they should be secured before knitting the back.
The hoops on the opposite side must be secured with a cord. The frame is knitted in the same way as the seat - with a network of knots.
The next step is the placement of the straps on the seat and the suspension of the chair.

Making a hanging hammock chair
To make a frameless cocoon chair with your own hands, you will need to acquire the following materials:
- two meters of thick fabric;
- wooden stick;
- drill;
- carabiners for fastening the rope;
- climbing rope;
- sewing accessories.
It’s not difficult to make a cocoon chair with your own hands; this master class will help you with this.
So, fold the fabric in half, count 18 cm from the top corner, mark a triangle on the fabric to bottom corner, cut off.
Fold the sides 1.5 cm and hem the fabric.
We drill two holes on a wooden stick on both sides at the same distance, thread a rope into the nearest holes and secure with knots. The carabiner will be located in the center of the cable, so we mark this place with a knot.
Fabric is pulled into the threaded ropes on both sides, and the ends of the cable are inserted into other holes in the stick and secured with a knot.
To fix the chair to the ceiling, a hook and two carabiners are installed on it, and the rope of the chair is threaded through the lower one.
All you have to do is put a pillow on the seat and you can relax.
Hanging chair with cover
In order to make your own cocoon chair with a cover, you will need:
- 2 m of dense fabric;
- metal hoop with a diameter of 90 cm;
- zipper 1 m;
- carbine;
- 10 m of rope;
- sewing tools.
Fold the fabric in half and cut out a circle so that it is 25 cm larger than the hoop.
We sew in a zipper.
We cut out 4 holes along the edges of the product and grind it down.
We thread the hoop into the case, insert the rope into the holes and attach it to the carabiner.
Choosing a cocoon chair is a matter of taste
The manufacturing options described above are not the only and unique ones. Can be added already existing technologies your own ideas or even come up with something new. The main thing is to approach this process with imagination and desire.

You can especially often find hanging chairs made from wicker or wooden slats.
Instead of hoops for the frame, you can use anything that comes to your mind or comes to hand. You can also choose absolutely any option for weaving, be it ordinary ropes, fabric or a fishing net.
In any case, it’s up to you to decide whether to buy a cocoon chair or make it yourself. The variety of materials on the market allows you to create hanging chairs from whatever your heart desires. IN Lately more and more attention has been paid to products made from natural materials, they do not cause harm environment and owners and looks aesthetically pleasing. For example, excellent option there will be a rattan cocoon chair.
Earlier similar designs were usually installed in country houses and on personal plots, but in modern times they have become frequent guests in modern designs apartments
Having done hanging chair-do-it-yourself cocoon, you can create a master class after this event yourself. Then many people who were hesitant to make such a seemingly complex decorative element will follow your example.
Every person wants to furnish their home so that it is not only beautiful, but also functional and modern. In this case, it is worth installing a comfortable cocoon swing, which was designed by designers back in the last century.
People relax there after a hard day working day, spend leisure time with a book or a cup of coffee. You can install a cocoon in any room, or on the street, veranda or loggia.
The only drawback of this furniture is high price in shops. Therefore, it is better to do it yourself. And to do this, you need to understand its features, manufacturing materials, manufacturing technology and assembly of parts.
 The design of the cocoon swing is something between and. But thanks to improvements, this furniture is more comfortable, practical and functional.
Its distinctive features are high side walls that hide inner space . It has a lot of advantages.
In addition to aesthetic appearance, in the swing you can relax, wrapping your feet in a blanket on a cool evening. Some people like to work in a soft and cozy product, taking it with them. Since the features of its design allow you to retire and escape from the bustle of the city, getting into a working mood.
TO distinctive features cocoon chairs include:
- Exclusivity. Such a piece of furniture will harmoniously fit into the interior of a nursery, bedroom and even living room.
- Uniqueness. Custom production opens limitless possibilities in front of users. The products come in different sizes, designs and shapes.
- Ease of use. This furniture is suitable for evening relaxation and wonderful rest.
Attention: installation of a hanging product in a room with tension or plasterboard ceilings will be problematic. To install it, you will need to leave space in such a structure in advance.
Varieties
According to the types of swings, the cocoon is divided into:

Materials
Hanging chairs differ in:
- form;
- manufacturing materials;
- types of structures;
- method of fastening.
The following materials are suitable for the manufacture of models with a rigid frame:

The frame of this product is covered with thick fabric. It can be natural materials(linen, cotton) or synthetic (nylon). Products made from rattan or wicker are also popular.
Advice: You won’t be able to make a rattan chair yourself, since it goes on sale only in finished products. But you can weave a chair from a wicker yourself. Such designs look noble and elegant.
Product design for baby
 Before you start self-production cocoon swing, it is worth deciding on the materials and appearance.
Attention is also paid to the type of fastener. To do this, the expected load exerted on the product during operation is calculated.
For children's rooms, preference is given to environmental friendliness and naturalness.. Here it would be appropriate to make a chair from wicker or natural textiles. Furniture that will be used outdoors must have high technical characteristics. The materials used must cope with negative factors and have long term operation.
Important: upon completion summer season Furniture should be placed in a warm room.
As for the design:
- for classic motifs, furniture is made of wicker;
- Suitable for Provence and country styles hanging models from textiles;
- For Mediterranean interiors people prefer wicker structures.
Drawing with dimensions
Before manufacturing any piece of furniture, a drawing is made with all dimensions. Having a drawing will allow you to make quality chair without making mistakes. It will help you understand the type of installation, product design, materials of manufacture and exact dimensions.
You can make such a scheme either independently, showing personal skills, or using the Internet.

Tools
To make a cocoon chair you will need the following tools:
- hammer;
- tape measure and pencil;
- scissors;
- threads and needles;
- hacksaw;
- sewing machine.
Attention: the set of tools may vary depending on the type of chair design.
Master class on making a nest
Before you start making a cocoon swing yourself, you need to:

To install the chair, you will need special fastenings (carabiners, brackets and a spring for shock absorption).
How to make a hanging swing from a hoop and rope at home?
Among variety of options Making a cocoon swing with your own hands is in great demand, a hanging chair using the macrame technique. To make it you will need the following materials:
- 2 metal hoops with a diameter of 1.1 meters and 70 cm;
- 4 mm polyamide thread 900 m long;
- Crochet hook;
- twelve-meter slings;
- 2 tight ropes;
- 2 rods of 80 cm;
- tape measure and scissors.

That's all simple process making comfortable and stylish cocoon swings on a hoop. You can hang them in any corner of the house or outside..
Garden option - a textile egg on a rigid frame
To make such a product you will need the following materials:
- one hoop with a diameter of 70 cm and up to 1 meter;
- two thick pieces of fabric;
- padding polyester;
- lightning;
- two carabiners and rings for hanging.
The swing manufacturing process is as follows:

A hanging chair is a comfortable and unusual garden furniture designed for a relaxing time in the garden. fresh air. This device appeared in the 50s of the last century and in a short period of time became an integral part of the house, claiming to be a truly cozy home.
A beautiful “cocoon” can be used as a swing, a place to sleep or meditate. It is noteworthy that it is easy to make a hanging chair for your home or garden yourself from available materials.
Users often search:
Types of hanging chairs
Currently, there are several types of products:
- With a rigid frame made of rattan and plastic. The structure is covered with strong fabric. Also, vine is used as a base.
- With a soft frame (reminiscent of a hammock). The main difference is the size: the chair is smaller than a hammock and therefore takes up little space. This product adapts to the human body, which means it is comfortable to sit and lie in.
- Cocoon chair. Distinctive feature This modification is 75% hidden internal space. This effect is achieved thanks to wicker walls - macrame. “Cocoon” will appeal to those who love a secluded holiday, hidden from prying eyes.
- “Drop” – as a rule, used in a children’s room. The chair looks like little house, sometimes equipped with doors. An excellent rocking chair for a child.

Making your own hanging chair
Making a comfortable hammock for a comfortable time is not as difficult as it might seem at first glance. First you need to prepare the necessary parts:
- Metal hoop with a diameter of 90 cm.
- A piece of strong fabric 3 m long, 1.5 m wide.
- Braid, non-woven fabric or dublerin.
- Eight meter sling.
- Steel ring for mounting the structure to the ceiling.
- 4 iron buckles.
- Sewing supplies, measuring tape and scissors.
Let's take a closer look at choosing a hoop. As load-bearing structure You can use the following materials:
- Gymnastics hoops. Aluminum and plastic are not suitable for this purpose, as they will not withstand the load of an adult’s body. Only steel models can be considered. Maximum cross section such a hoop is 16 mm, while to make a durable product you need 32 mm, which is twice as much (for a wicker chair this figure should be 40 mm). However, the gymnastic ring is perfect for children's version. The small cross-section is compensated for by multilayer filler.
- Softwood. Such hoops are lightweight, but require careful processing, since moisture and heat contribute to the destruction of the wood.
- Metal-plastic water pipe. Perhaps, the best option to implement the idea. PVC is cheap and durable material. The hoop is made by rolling a cut piece of pipe into a ring. For fastening, parts made of wood or plastic are used.
The list of materials suitable for creating a hoop is not limited to the options listed. Everyone chooses the basis for the frame themselves - it all depends on their imagination.
Preparing the cover
Cutting the material for a hammock chair requires care and attention. When in doubt, it is better to leave a small supply of fabric; later it can be removed without any problems.
The principle is: measure seven times, cut once.
- To begin, let's take a 3-meter piece of fabric and cut out 2 squares from it - each 1.5 meters long and wide. We fold both 4 times. In the corner in the center we mark a circle with a diameter of 65 centimeters. Draw a line along the marked points. Cut out identical circles from each square. Move 4 centimeters from the edge of the circle and draw a dashed line segment.

Cutting out squares
- We put two holes on the first circle. They are designed for slings. Next, fold the fabric 4 times and iron it. We take the folds as guidelines. Two slings should have a slope of 45 degrees, the others - 30 degrees each. Having highlighted the corners, open the circle and iron it again. The result is axes indicating the slot points for the sling.
- Select on all axes required holes– rectangular shapes 10 cm wide and 15 cm high. Y is marked in the inner part. The cut will be made along its contour. We fold the circles together, but in such a way that the threads do not overlap each other. Because of this, the case will be able to better withstand the load. Place the circle on top. Cut the marks on two circles at once.
- We bend the ends of the cut holes onto reverse side. We attach braid around the perimeter of the figure or treat it with doublerin so that the material does not fall off. Next, cut through completely and sew along the edge, leaving 3 mm.

Bend and stitch the edges
- Leaving the marked 4 centimeters at the edges, we connect the circles to each other, marking a slot for inserting the hoop. We cut the gap left so that we get teeth along the entire edge. Turn the cover inside out front side and iron it.
- We cut out the filler into strips, then we cover the hoop (preferably in 2 layers). We insert the processed structure into the case. Moving the ring towards the edge, we sew all the circular parts at a distance of approximately 7 cm from the end.

Insert and sew up the hoop
- Turn the edges of the unstitched cut intended for inserting the hoop inside out. We carefully cut off the allowances on the front side so as not to damage the correctness of the circle. We connect the edges and sew on a machine, leaving a few millimeters. We move the frame to the stitched end, baste the fabric by 7 cm.

Sewing the edges
- The padding polyester mode is used through the slots and we move it inside the material, securing it with threads. We close the side holes with a hidden seam. Then we fix the cover on the hoop, stitching it along the verified 7-centimeter basting. After every 4 stitches we wrap a knot. Further rows are made at a distance of 7 cm from the previous one, so that the thick fabric can gather into soft folds.
- Sling mode for four 2-meter segments. It is better to burn the edges over a flame. We insert the end into the hoop through the prepared slot. It is necessary to fold it so that a loop is formed. Using a needle, we cut and stitch. The algorithm is the same for all slings.

Attaching the slings to the hoop
- We insert the end of each into the buckles, then into the ring and again into the buckle. Everything needs to be woven well to be able to change the height and tilt of the chair. The ring serves to collect the slings.

Pattern example
Hanging chairs are a kind of swing, cozy place for relaxation and privacy.
Making a wicker chair
The macrame technique allows you to create original products yourself.

Photo: egg-shaped wicker hanging chair - a comfortable place for reading books in the fresh air
This unusual structure consists of several circles woven together in macrame. For such an “egg” you will need the following parts:
- 2 metal-plastic rings with a cross-section of 35 mm. One for the backrest measuring 1.1 m, the other for the seat – 70 cm.
- Polyamide 4 mm thread 900 m long. In the store, ask about the option with a polypropylene base, which guarantees strong knots.
- Twelve meter slings.
- 2 thick ropes to connect the hoops.
It is worth mentioning that rings of a smaller diameter are suitable for the product, since the specified characteristics are the maximum for a chair. It is better to buy the thread of the required length immediately to avoid differences in color or quality. After preparing all the parts, you can safely begin work on creating the “egg”.

Any patterns are suitable for weaving the back. The cord is attached to the top. Work is carried out in a downward direction. On the lower hoop, the knots are tightened, and the remaining threads are collected into tassels. The design requires reinforcement with 2 wide cords connecting the seat to the back. TO finished product the slings are attached - and the hanging “egg” chair takes its well-deserved place in the summer cottage.
By making such a device, you will receive cozy corner for a secluded holiday and forget about problems and stress for a long time!
It is hardly possible to meet a person who would not feel the desire to settle down in comfortable chair and feel the smooth rocking movements of the suspended structure. Comfortable swings have always been very popular. Today, the range of hanging seats has been significantly expanded: hanging sofas and armchairs decorate many suburban areas, easily fitting into landscape design.
The basis for the manufacture of hanging seats was ordinary rocking chairs. Wicker structures made of rattan or wicker have become the most promising for furniture experiments, because they weigh quite little, but at the same time have excellent strength.
As a result of such furniture experiments, designers created hanging chairs resembling half a ball in shape.
Semicircular structures are attractive because they allow the entire load to be evenly distributed. In addition, they are convenient to hang, installing the device at the highest point.
The frame of hanging chairs can have several options.
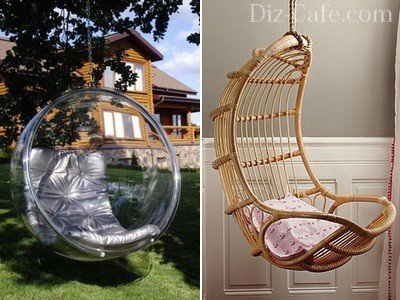
Wicker chairs made of wicker, rattan, transparent acrylic or plastic have a rigid body. For convenience, they are complemented with decorative pillows and soft mattresses.

The hammock chair is more soft version suspended structure. On the rocking soft pillows you can always pamper yourself in moments of relaxation

A cocoon chair covered on three sides with wicker walls is ideal for privacy and abstraction from the bustle of the outside world.
Instead of traditional rattan or wicker, hanging chairs are increasingly being used. synthetic materials, thanks to which structures become lighter, more flexible and quieter.
As you can see, there are many options. We will specifically look at 2 examples.
It is not difficult to build such a chair. You just need to own it basic technology macrame weaving.

Such a hanging chair will allow you to create on the site special atmosphere conducive to peace and tranquility
To make a chair we will need:
- Two metal hoops of different diameters (for seat D=70 cm, for back D=110 cm);
- 900 meters of cord for weaving;
- 12 meters of slings;
- 2 thick cords for connecting rings;
- 2 wooden rods;
- Scissors, tape measure;
- Work gloves.
To decorate the chair, it is better to use hoops made from metal-plastic pipes with a cross-section of 35 mm. Metal-plastic pipes of this thickness have a metal braid inside and are able to provide sufficient strength to the suspended structure.
To make a hoop from a pipe, first determine the length of the segment using the formula S = 3.14xD, where S is the length of the pipe, D is the required diameter of the hoop. For example: to make a hoop D = 110 cm, you need to measure 110x3.14 = 345 cm of pipe.

Wooden or plastic internal inserts of the appropriate diameter are ideal for connecting the ends of pipes; they can be secured with ordinary screws.
For weaving, a polyamide cord with a 4 mm thick polypropylene core, which can be purchased at a hardware store, is ideal. It is good because it has a soft surface, but unlike cotton fibers, when knitting it is able to create denser knots that will not “creep” during use. To avoid discrepancies in the color and texture of the material, it is advisable to purchase the entire volume of cord at once.
Stage #1 – creating a wrap for hoops
Our task is to completely cover metal surface hoops. To decorate 1 meter of hoop with tight turns it takes about 40 meters of cord. We make the turns slowly with good tension, laying the cord evenly and neatly.
To make the winding more dense, tighten it every 20 turns, twisting them forcefully in the direction of the winding until it stops. As a result, we should get a smooth and dense surface of the braid. And yes, to protect your hands from calluses, it is better to carry out this work with gloves.
Stage #2 – mesh weaving
When creating a grid, you can use any macrame pattern you like. The easiest way is to take a “chess” with flat knots as a basis.
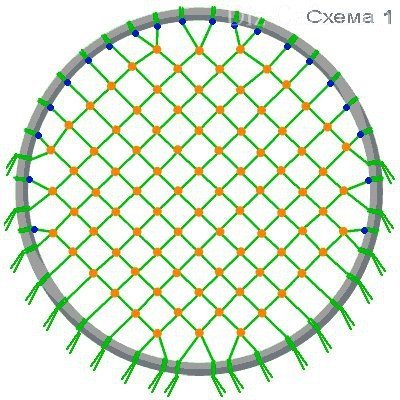
We weave the mesh with double polyamide cord, attaching it to the braided hoop with double knots
While weaving, monitor the tension of the cord. The elasticity of the finished mesh will depend on this. The free ends of the knots should not be cut off yet. You can use them to form a fringe.
Stage #3 – assembly of the structure
We assemble the braided hoops into a single structure. To do this, we fasten them at one edge, wrapping them together with one cord.
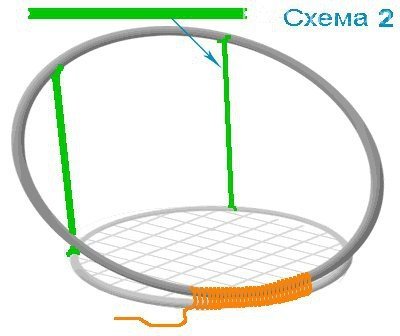
From the opposite edge of the winding we place two wooden rods vertically, which will serve as support for the back of the structure
The length of the support rods can be any and is determined only by the selected backrest height. To prevent the hoops from slipping, we make shallow cuts at the four ends of the wooden rods.
Stage #4 – design of the back of the chair
The weaving pattern for the back can also be any. Weaving begins from the upper part of the back. Gradually lowering yourself to a seat.

We tighten the free ends of the cords on the lower ring, collecting their hanging edges into loose tassels
When the pattern is braided, we fix the ends of the threads in the lower part of the back and decorate them with fringe. The structure will be strengthened by two thick cords that connect the backrest to the seat. An elegant hanging chair is ready. All that remains is to attach the slings and hang the chair in the chosen place.
Hanging chair with cover
If you don’t want to weave, or for some other reason the first option didn’t suit you, then this one might be suitable.

A cozy, gently rocking nest is an ideal place where you can relax, forget about your problems, or just take a nap
To make such a hanging chair, we will need:
- Hoop D=90 cm;
- Cut durable fabric 3-1.5 m;
- Non-woven fabric, double fabric or trouser tape;
- Metal buckles – 4 pcs.;
- Sling – 8 m;
- Metal ring (for hanging the chair);
- Sewing machine and essential tailoring supplies.
You can make a hoop from metal-plastic pipe, which is sold as a rolled coil, or from bent wood. But when using wood, you should be prepared for the fact that under the influence of temperature changes, the hoop can quickly dry out and become deformed.
Stage #1 – cutting out the cover
From a three-meter cut we cut two equal squares, each measuring 1.5 x 1.5 meters. We separately fold each of the squares four times. To make a circle out of it, draw a circle from the central corner with a radius of 65 cm and cut it out. Using the same principle, we make and cut out a circle from another square. On each of the resulting circles, stepping back from the edges by 4 cm, we outline the inner contour with a dashed line.
We mark the holes for the slings: fold the circle in four and iron it so that the folds are guidelines. The first pair of lines will be located relative to the bend at an angle of 45 0, the second - 30 0. Having marked the corners for the slots for the slings, we lay out both circles again and iron them.

We make rectangular slits measuring 15x10 cm along the designated four axes. We make the slits along the contour of the Y-shaped markings made inside the rectangles
To make identical slits on both circles, we connect the pieces of fabric and pin them together. Along the contour of the finished cuts of the first circle, we make slits on the second piece of fabric.

We bend the petals of the slots inside out, gluing the edges with non-woven material. Only after this we make a full slit, stitching it along the edge, retreating 3 cm
Stage #2 – connecting elements
Sew both circles together along the previously marked dashed line, leaving a hole for inserting the hoop. We cut out the free allowance using cloves. We turn the finished cover inside out and iron it.

From the filling material we cut out strips 6-8 cm wide, with which we cover the hoop. The sheathed frame is inserted into the case
Having retreated 5-7 cm from the edge, we sweep both sides together. Turn the edges of the hole left for inserting the hoop inside out.
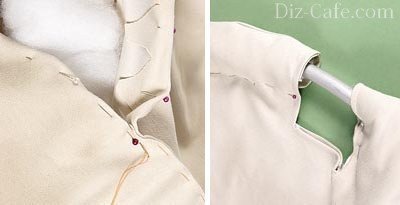
We pin off the unstitched allowances from the front side, and sew the edges, stepping back from the edge by 2-3 cm. Using the same technology, we process the entire edge of the cover
We fill the case with padding polyester, stretching strips of filler and fixing their edges with a hidden seam. To strengthen the cover on the hoop, we quilt the fabric in several places.
Sling mode for four sections 2 meters long. To prevent the threads from unraveling, we melt the edges of the slings.

We pull the melted ends of the slings through the slots, form loops from them and stitch them 2-3 times
To be able to adjust the height and angle of the hanging chair, we put buckles on the free ends of the slings. We collect all the slings into one suspension, securing them to a metal ring.
Methods for arranging a suspension system
This chair can be placed in the garden, hanging from a thick branch of a spreading tree. If you are planning to make a hanging chair functional decoration verandas or gazebos will need to be built suspended structure.
The suspension system must support not only the weight of the chair itself, but also the weight of the person sitting on it.

To secure a simple hanging chair, the weight of which, together with the person sitting in it, is no more than 100 kilograms, it is enough to install a simple anchor bolt
With this method of fastening, one should take into account maximum load on the ceiling, which is measured in kg/m2, because this area will be affected by the entire suspension system. If the permissible load is less than the weight obtained in the calculation, it is necessary to distribute the load across the ceiling by constructing a load-bearing frame combining several anchor bolts.
Make such a chair, and you will get an excellent opportunity to relax at any time, enjoying pleasant rocking movements, while gaining peace and a philosophical attitude towards all troubles.
A dacha is a place not only for intensive work, but also for have a nice rest, so it’s hard to imagine a garden area without a hammock or swing. In gardening stores today you can find designs for children and adults different shapes and dimensions. If you don't want to spend money, try making your own garden furniture. In this article we will tell you how to make a comfortable hanging chair with your own hands and decorate personal plot country house or dachas.

Materials:
— metal hoops;
— slings;
- cord;
- centimeter;
- wooden rods.

Master class on making a hanging chair for a summer house
Master class hanging chair for a summer house
If you haven't found the hoops different sizes, you can make them yourself from PVC pipes with a cross-section of 3.5 cm. Decide on the size of the chair and calculate the length of the pipe using the formula:
L=3.14*d, where L – length PVC pipes, and d is the diameter of the ring.

For example, if you need to make a hoop with a diameter of 100 cm, you need to measure 100 * 3.14 = 314 cm of pipe. To connect the ends of the pipe, you can use inserts made of wood or plastic.
It is better to braid hoops with polyamide rope 0.4 cm thick, as it is more durable and at the same time soft to the touch. It’s better to buy a lot of cord in advance so that there is enough for the entire product, at the rate of 400 cm of cord per 100 cm of hoop. The winding should be uniform, and to increase its strength, tighten it every 10-20 twists.

Now you can start weaving the mesh using the macrame technique. You can choose any pattern, for example, checkerboard with flat knots or any other. Monitor the tension of the rope during weaving, as the beauty of the product, as well as the strength of the finished cross, depends on this. You can turn the remaining ends into a fringe that will hang beautifully.

After the hoops are braided, they can be assembled into finished design. Start by braiding them together at one end with a cord. To make the back, wooden rods are inserted. It is best to make cuts at the ends of the rods so that they do not slip off.

You can also braid the back with any pattern, but it is better to start weaving from the top and go down. When the chair is ready, you need to attach the slings and hang the product in a convenient place.
Watch this useful video: Weaving with ropes for a chair
Master class garden chair with fabric cover
If you are not familiar with the macrame technique and do not want to weave, you can make a chair with a fabric cover. To make it you will need a hoop with a diameter of 0.9 m, 3.0 meters of durable fabric, metal rings and buckles, braid and slings.

From a piece of fabric you need to cut two squares measuring 150*150 cm. In order to make a circle, the squares need to be folded four times, measure 0.65 m and cut. At a distance of 40 mm, measure the outline with strokes.

Now you need to mark the cutouts for the slings, so the circle is folded four times and marks are made relative to the bend lines. The first two slings will be located at an angle of 45 degrees, and the second - 30. The slots should be 10*15 in size.

To make them on the second circle, connect the parts and make a mark. Two circles need to be sewn on a machine along the marked line so that there is a hole left for the hoop. Cut strips 6-8 cm wide from padding polyester and cover the hoop.

The case needs to be filled with padding polyester and secured to the hoop. All that remains is to attach the slings and secure them into one suspension on a metal ring.

Ideas for hanging furniture in the garden
Hanging seats have been popular for a long time. Most often they are made from rattan, as they are highly durable and lightweight.

Semicircular structures are very convenient for relaxation, and you can hang them on a tree or other support. The shape of hanging furniture can be completely different, so each owner of a country house chooses the most suitable options for himself.

On the market garden furniture You can find hanging furniture made of plastic, wicker, acrylic or rattan, each with its own advantages and disadvantages.

To make the seat soft, the kit includes decorative pillows or mattresses. There are many options for designing a sitting area, so you can either make garden furniture yourself or buy ready-made products.

A hanging chair can be hung not only on a tree branch, but also in a gazebo. To do this, you will have to build a suspended structure that will support not only the furniture itself, but also the weight of a person.
Watch the video: Hanging chairs - romance in the home
The advantage of a hand-made chair is that it will fully meet your needs and harmonize with the overall landscape design.

Now you can free time It's nice to sway and get satisfaction from relaxing in nature.