Repairing and decorating the walls of an apartment or house is often an unpredictable thing. Sometimes, during a DIY renovation, a lot of new ideas are introduced into the original plan that can change designer style home furnishings. This happens when after applying with your own hands decorative plaster Most of the walls are getting new wall design ideas.
Wide possibilities of decorative plaster - good and bad
Especially if you are lucky enough to see interesting and recent photos or videos about what is best to use and how to properly apply decorative plaster to a flat wall.
Before entering into the temptation to change the original idea in the design of the walls with your own hands and apply a new design, it is worth soberly assessing several main points:
- The cost of repairs, even if you do the basic wall decoration work yourself and strictly follow the original idea and estimate, always increases by at least 10-15%;
- Applying a new design to one room is not difficult, but such a move may require redoing much of the plaster finish. Apply it yourself in other rooms to preserve the style of wall decoration;
- The cost of repairs can double and lead to significant loss of time and effort.
Thanks to new materials and techniques for applying decorative plaster, you can achieve impressive results even with your own hands.
Advice ! With all the desire to make the most of the expressive possibilities of decorative plaster, it is worth stopping at one initial idea for decorating the walls and completing the renovation with minimal costs.
All interesting thoughts about decorating walls with your own hands can be collected and put aside until next time. Perhaps new money, new premises and new ideas will appear.
When and how to apply decorative plaster correctly
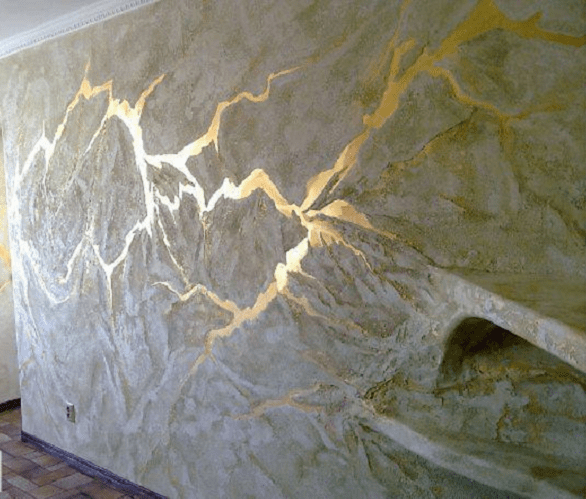
Modern wall design options allow you to create the most realistic simulations of various decorative surface, from stone fracture to bas-relief images. But the main advantage of decorative plaster is the incredible flexibility in choosing the surface texture with your own hands. In fact, the use of plaster decor made it possible to apply real artistic images and entire paintings to the walls. Just 15 years ago, individual painting of walls with one’s own hands was within the power of artist-designers, and such a pleasure would cost a lot of money.

Using the possibilities of decorative plaster
New decorative materials Finishing a wall with plaster can be called more of a decoration method than a means of leveling and protecting the masonry walls. Polymer binders, water-soluble paints and various fillers are used as components and bases of plastering materials, which, in fact, determine appearance decorative component of walls.
Among the many approaches to the process of applying decorative plaster, several main directions can be distinguished:
- If you have steady hand and good skills in decorative modeling or drawing; perhaps, after a little practice, you will be able to apply ornaments or abstract designs to the surface in a theme that matches the style and purpose of the room. It's expensive in practical implementation, and it’s even more expensive to then redo what’s been done into something new;
- With good taste and sufficient financial resources you can use a combination of specific shades and colors with a monotonous relief applied to the plane. This is easier than the previous option decorative finishing, but will require serious design skills to coordinate and combine all the rooms of the apartment into a single plan;
- Simpler and more practical compositions make it possible to apply plaster decors that are simple in structure with a restrained relief or even a simple imitation of natural stone, brick or classic options decor.
Advice ! If your time and finances do not allow you to apply decorative plaster in all rooms, you can, as an experiment, select the most crooked and inconspicuous plane in an apartment or house and try applying different types of plaster. This will allow you to understand and see with your own eyes the advantages of different techniques before general repairs.
Works with decorative plaster
The first two areas of working with decorative plaster will require you to accurately understand all the nuances of the colors and textures of the walls, so before applying a complex decorative pattern with relief images, it makes sense to first make sketches or select photos of the corresponding design solutions.

The more intricate the design, the more difficult it is to apply it to the walls. For example, without practice, not everyone can perform decorative plaster with a moire effect, as in the video
A decorative composition in the panel style will require good knowledge about the properties of plaster and considerable patience in working with it, but the resulting effect is worth it. The beauty and accuracy of the work can be appreciated in the video
In such cases, it is better to apply the decor by the hands of specialists; it is very difficult to achieve such quality on your own.
Important ! In addition to artistic taste and knowledge of the technological intricacies of working with decorative plaster, you should understand that applying the material to the surface is physically difficult, and the process will require considerable effort and endurance.

In your first experience of using decorative plaster, it is better to choose the simplest version of the design and try to apply it yourself.
The easiest way to apply decorative plaster
One of the most popular options for decorative plaster are lime composite compositions that imitate natural materials. Most often they use plasters that have been proven by practice and many years of use:
- “Venetian composition”, giving the texture of the wall in the form of an incredible number of intertwined relief elements;
- “Marmorino” and “Marseille”, similar to the surface of marble calcite, with a network of inclusions and cracks and polished surface transitions;
- Imitation of the surface of natural limestone using an uneven, deliberately rough and scratched surface, known as “Travertino”.
Important ! All of the above decorative plastering compositions are very easy to apply to the wall with your own hands, obtaining almost 100% surface quality.
Venetian pattern of decorative plaster
The secret of the recipe is to use ordinary ready-made plaster mixtures - starting and finishing - to produce decorative plaster. This reduces the cost by approximately half. The initial plaster mass is prepared by mixing both mixtures in a 50/50 ratio in the amount required to apply the composition to 1-1.5 m2 of surface.
Before applying the composition, the walls are primed acrylic primer, and the composition is carefully applied with a spatula and a trowel onto a slightly dried surface. The thickness of the layer of decorative plaster is on average from 3 to 6 mm. As you apply the decorative base with a trowel, a relief pattern must be applied to the wet material. Specifics similar work well understood from the video
Important ! Sometimes the problem arises of correctly connecting two sections of the wall on which a solution of decorative plaster is applied with a gap in time.
Most often this happens due to the need to prepare a new portion of the plaster mass. Therefore, the boundaries of the plots have to be “passed” by the tool several times.
After drying a little, the relief pattern is rolled special tool, making the drawing flatter and more expressive. As a finishing operation, which is the “highlight” of Venetian plaster, tinting paint is applied to the surface of the wall with a roller, giving the plaster the color of “old silver.” For this purpose in 250 gr. primers add approximately 50 grams of dye.
After the drawing has dried, it is necessary to apply acrylic varnish with a small addition of glitter. Decorative plaster takes quite a long time to dry - up to two days; after final drying it acquires a slightly lighter shade.
Travertino, what could be simpler?
This is a plaster composition based on lime and calibrated quartz sand. If it is important for you to combine a beautiful surface texture with the benefits lime plaster, then the choice is obvious. Among the advantages of the Italian recipe is the possibility of applying plaster even on cement soil, concrete or brickwork, subject to preliminary cleaning of the surface from dirt and deposits and application of a special primer mixture based on sandy quartz dust.

Such soil will allow you to level and hide the “flaws” of the wall and improve adhesion to decorative layer. On a prepared surface, for example, sheets of plasterboard or plastered walls, decorative plaster can be applied in one layer, but with pre-treatment with an acrylic primer.
The decorative composition is applied with a spatula and a wide trowel, achieving a uniform layer 3-4 mm thick. The plaster pattern must be applied with a roller with a porous surface; the process of forming the surface is well understood from the video

If you like “brick” patterns on the surface of the walls, with the help of Travertino you can get a brickwork pattern. To do this, strips of construction tape are glued onto the previously prepared wall surface, imitating the seams between brick blocks. Next, you need to apply plaster and separate the strips from the main layer, thereby creating a texture that imitates silicate or ceramic brick.
Conclusion
Simple compositions of decorative plasters do not mean that they are primitive in beauty or design. Most often, such options are used to apply a base for hand painting, painting or applying bas-reliefs from putty.
One of the leading positions among finishing materials has long been occupied by decorative plaster - an option for wall decoration that combines simple execution technology and excellent results. Initially, it vaguely resembles a paste that is applied to the walls and ceiling. This material can be used completely independently or as a basis for subsequent finishing stages.
Decorative plaster - a unique wall decoration
The easiest way to have a beautiful front lawn
Of course you saw perfect lawn in the cinema, on the alley, and perhaps on the neighbor’s lawn. Those who have ever tried to grow a green area on their site will no doubt say that it is a huge amount of work. The lawn requires careful planting, care, fertilization, and watering. However, only inexperienced gardeners think this way; professionals have long known about the innovative product - liquid lawn AquaGrazz.
Types of decorative plaster
Decorative plaster is divided into types depending on the components of the composition and the expected effect:
- structural plaster - a mixed composition with various inclusions such as small stone chips, colored pieces of quartz or wood fibers. It is produced on a cement-lime base. In this case, special synthetic latexes or potassium silicate are also used. The solvents in the mixtures are aqueous or organic, so plaster can be considered an environmentally friendly material and can be used for interior decoration without fear of unpleasant odors either during repair work or during freshly plastered premises upon their completion.

Types of decorative plaster - craquelure
Additional plus: structural plaster- a very plastic finishing material, and it is sold ready for use in packaging of various sizes.
- textured plaster makes it possible to create a smooth but textured surface;
- Venetian As a result, the plaster turns into a coating reminiscent of marble.
Application of structural plaster
When preparing the walls, there is no need to align them perfectly. Thanks to its heterogeneous, interspersed structure, the material will perfectly hide minor flaws in the rough finishing of walls. The main requirement is that the walls must be dry, clean, pre-primed and dried. The primer serves as a kind of obstacle to the penetration of moisture into the decorated layer.
To apply plaster, a trowel or spatula is most often used. After a few hours, this coating will already be quite durable, but it will take at least a week for it to dry completely.
In addition, similar compositions are produced for both internal and external work. Such compositions are not afraid of frost, do not support combustion and are resistant to humidity.

Textured plaster
The compositions of textured plaster may vary, but in the end they all make it possible to create an original relief pattern on the walls, the complexity of which largely depends on the components plaster mixture, and on how decorative plaster is applied to the walls in each specific case.
Walls with this finish are found quite often. This coating resembles wood, crumpled paper, stone or something like that. In the interior, the coating looks original, giving the room a special, unique style.

Painting on the wall using decorative plaster
It is also remarkable that the composition of textured plaster can be chosen to suit any room design, and using different application techniques can give it a complete, harmonious look.
The main component of textured plaster is lime flour, and the characteristics of each specific solution depend on the fillers used. Polymer materials as a base, they make it possible to obtain a durable surface without cracks or chips.
The walls for applying the plaster composition must be smooth, clean, primed and dried. After the primer has dried, a so-called substrate is applied to the walls - a layer of paint with sand. This helps strengthen adhesion (the bond between the plaster and the base).

If you carry out work without the involvement of specialists, then special compositions that combine the properties of all the materials listed above will help to significantly save time.
Plaster is applied in one or two or more layers. To work, you can use trowels, a spatula, a brush and other tools that will make it possible to obtain the desired expressive pattern on the surface. A more complex pattern is created by applying several thin layers of plaster composition.
Glazing compounds—special translucent paints—can serve as additional protection for the finished surface. They will add a noble pearlescent shine to the walls. In addition, special wax, paint or impregnation can be applied as a finishing coating.
Venetian plaster
Venetian plaster is a mixture of marble flour, slaked lime and water emulsion. Upon completion of the work, it seems that marble stone was used for finishing. Initially, Venetian plaster is a ready-to-use viscous composition, which is sold in large jars or buckets with a volume of 7 to 25 kg.
The only disadvantage of this coating is that it must be applied only to perfectly smooth walls. You can choose any color. The composition is easily tinted, so if desired, you can create entire “marble” paintings on the walls. In addition, Venetian plaster is environmentally friendly, waterproof, wear-resistant, does not support combustion and dries very quickly.
Before applying Venetian plaster, the walls or ceiling must be in perfect condition, otherwise any flaws will be visible. Then, as when preparing surfaces for applying other types of plaster, the base must be primed and allowed to dry. The plaster mixture is tinted and applied with a spatula in very thin layers. After the plaster has completely dried, the surface is carefully cleaned with very fine sandpaper, while leveling. In total, from 5 to 12 such layers can be applied and cleaned. At the end, a layer of wax is applied, which gives the surface a marble shine.
Despite the apparent complexity, even decorating walls with Venetian plaster is quite possible to handle on your own.
Antique compositions
IN Lately Many people pay attention to “antique” plaster. The coating received this name because it looks a little shabby on the walls, as if slightly faded with time. In addition, such a finish will not be smooth, but rough to the touch, as if the texture itself has changed during natural aging.

"Aged" plaster
The application technique and artificial latexes in the mixture give the coating a special property - it begins to lighten a little in places of greater friction.
In addition to finishing interior walls, such compositions can be successfully used for finishing facades.
You can also buy it in packaging buckets with a volume of 4-5 liters. When the coating is completely dry, a microporous film forms on its surface, which provides a roughness effect, and at the same time protects the surface from mechanical damage and high temperatures.
Decorative plaster for external work
In addition to plastering compounds for interior works, on modern market Construction materials also include facade decorative plaster, which is characterized by increased resistance to humidity, precipitation and temperature changes.
Ceiling application
Another pleasant point is that not only walls, but also ceilings are suitable for finishing with decorative plaster. Of course, it must be leveled and cleaned of the remnants of the old coating. Ideally, it should be leveled with plasterboard, but you can do without it.

The main difference from wall decoration is that a thick layer of plaster cannot be applied to the ceiling, a maximum of 5 mm. If it is more, there is too much chance that over time, part of the coating will simply fall off. Otherwise, the technique and all application conditions are identical to those for walls.
Tools and materials
In order for the plaster composition to lie evenly on the base, you need to stock up in advance necessary tools and materials. We have already talked about materials. In addition to the plaster mixture, you will need:
- acrylic putty;
- polymer primer;
- semi-matte wax;
- dense polyethylene;
- dye;
- masking tape.
The following tools will be needed: a metal spatula (size 80), a one-handed trowel (trowel), a cuvette (paint tray), a brush (40x140), a two-inch brush, a thread roller (size 150). In addition, you will need a regular bath sponge and cotton rags.
Plastering technology
Preparing the base

Preparing walls or ceilings for plastering
The start of plastering should be preceded by careful preparation of the walls or ceiling for the application of decorative plaster. The surface must be prepared in the same way as for painting. There should be no unevenness or cracks on it, because decorative plaster is not applied in a thick layer and will simply repeat all the surface irregularities. The base must be primed with latex primer deep penetration and let it dry. After the primer has dried, all places adjacent to the surface where the plaster will be applied ( ceiling plinth, wallpaper), sealed with masking tape.
Then the walls are puttied. The putty is applied to a trowel and carefully applied to the wall, trying to distribute it evenly over the surface. thin layer.
How to apply decorative plaster
On next stage using polyethylene on the surface of the putty that has not yet dried, it is created required invoice. To do this, crumpled polyethylene is placed on fresh putty. Moreover, the more “crumpled” it is, the better, the richer the texture will be. The area of polyethylene must be larger than the surface area to be treated. It is better if one piece is enough for the entire area.

This crumpled polyethylene must be glued to fresh putty so that all the folds are clearly imprinted in the still damp layer. In one day, in this way, you can seal several surfaces that are not adjacent to each other with polyethylene. In turn, adjacent surfaces must be treated after the previously treated ones have dried. Otherwise, chips may appear in the corners, or the surface may be accidentally damaged by a spatula.
The plastic film should be kept on the surface for about 15 hours, and then carefully removed along with the masking tape. You should not wait for the putty to dry completely, otherwise you will get unsightly chips on the surface instead of texture. However, after removing the film, the textured layer must be allowed to dry completely. This will take about another day. You should not use fan heaters or air heaters to speed up the process - this can cause cracks to appear on the surface of the putty and ruin the overall appearance.
After the putty has completely dried, use a spatula or trowel to carefully, but without undue caution, remove all excess chips. Then the entire surface of the wall is carefully swept with a dry duster - this will remove all the dust that has formed.
Now you again need to cover with masking tape all the places where it was glued before applying the putty.
Painting

Painting a plastered surface
For painting after decorating the walls you will need pigmented wax Add 20% warm water to it, then stir the mass, bringing it to a homogeneous consistency. Wax is most often applied to walls in one of two ways: with a sponge or with a thread roller. If preference is initially given to a roller (this is really faster), then a bath sponge will still come in handy - it is more convenient for it to evenly distribute the wax over the entire decorated surface. Soak the sponge in clean water and then lightly walk it over the entire decorated surface.
Painting a wall with decorated plaster
A coral sponge will be an excellent replacement for a regular bath sponge, but its price is much higher. After treatment with a sponge, the texture of the finish should clearly appear on the surface of the wall. The wax is rubbed until the pattern becomes uniform. There should be no visible wax stains. The putty should not show through the wax layer either. 15-20 minutes after rubbing the wax, the surface of the walls should be easily treated with a damp and soft cotton with a rag. After this procedure, the volumetric pattern on the walls will become more pronounced. Please note that the rags you use should be white or old, faded ones. Bright colors may fade and leave colorful spots on the surface.
In internal corners indoors, wax can accumulate, causing darkish stains to form there. To get rid of them, experts advise using a spatula with a rag wrapped around it. It easily removes dark spots in corners.
Walls made of dry plaster or plasterboard must be impregnated with a water-repellent primer, the joints must be glued with reinforcing tape, and the surface must be leveled with finishing putty.

All joints and cracks must be covered with mortar and taped with reinforcing tape.
If the walls are freshly plastered ordinary plaster, then they should be allowed to dry for 4-5 weeks, until the layer is completely formed. Next, it depends on the type of decorative plaster chosen for finishing. If it is coarse-grained, with a pronounced relief, then it is not necessary to putty the walls; if it has a fine fraction, it is better to apply thin putty to the walls.
General rule
Putty walls must be sanded with a fine abrasive, thoroughly sweeping away the dust formed after sanding. Next, a primer is applied to increase the adhesion of surfaces. After drying, for many types of plasters it is necessary to apply a base, opaque coat of primer, usually white or gray, sometimes tinted for finishing.
Watch a training lesson on how to properly prepare walls for decorative plaster; the video demonstrates in detail all stages of preliminary work.
The content of the article:
Decorative plaster of walls is one of the most sophisticated ways of decorating facades and interior decoration. It allows you to imitate skin, a natural stone, paper and other materials. At the same time, the coatings always look original and exclusive, since even with a great desire to repeat the applied relief it is impossible. Despite the many finishing materials available on the modern market, decorative plaster not only maintains its position, but is also gaining immense popularity due to its properties.
The main types of decorative plaster
Typically, decorative plaster comes to the market in the form of dry ready-made mixtures containing synthetic astringent components, fillers consisting of stone chips, sand, fibers, and useful additives - dyes, thickeners, antiseptics, which give the material additional properties. The grain size of fillers varies from 0.5 mm to 5 mm in diameter and affects the degree of relief, the finished appearance of the coating and material consumption.
Decorative plaster is classified according to many indicators. Its conditional division implies interior and façade options. Coverings made from facade plaster, have high frost resistance, moisture resistance, do not fade in the sun and retain their attractive appearance for a long time.
Interior plasters are intended for interior work and are divided according to the chemical composition of the base into mineral, acrylic, silicate and silicone materials:
- Mineral. Such plasters are not afraid of fungus; they prevent its appearance and spread over the surface of the walls. The material is not afraid of dampness, has a variety of shades, but is not elastic enough. At exterior decoration this reason can cause cracks on the surface of the facade.
- Acrylic. They are used quite often, they are durable and have good elasticity. The disadvantages include the easily soiled surface of the applied coating and its high price.
- Silicate. The coating made on the basis of this material is durable, elastic, does not require much maintenance and is easy to clean. His high price often justified.
- Silicone. Of all types of decorative plasters, this is the most durable, reliable and durable material. High price- its only drawback.
- Structural coating. It consists of several materials that differ in stability and properties: quartz, small stones, fibers or mica. A striking example of such a coating is the “bark beetle” structure. The coating can be made on a lime-cement or synthetic base; it is easy to apply and quite plastic.
- Mineral coating. Includes lime, marble granules, mineral components and cement. This composition gives the coating thermal insulation properties. The modifiers included in it, in contact with lime, make it resistant to moisture. Mineral coating is used for interior and exterior work. The main advantage of plaster is its low consumption.
- Stone plaster. Contains quartz or marble chips. Its particles are quite large, so the coating creates a play of light on the surface. Stone plaster is ideal for outdoor use; after polymerization it becomes moisture resistant.
- Venetian plaster. It has been known since the Middle Ages. Most often, the mixture includes ground marble, the dust of which creates the illusion of a natural mineral finish on the surface. Natural and synthetic substances are used here as binding components. Venetian plaster is an elite coating; it requires careful surface preparation, is applied in a thin layer and is used exclusively for finishing. interior walls or ceilings.
Advantages of decorative plasters

The use of decorative plaster when finishing walls has a number of advantages:
- The external characteristics are excellent and are manifested in the material by its rich range of colors, different textures, and allow you to create relief designs and patterns on the coatings.
- Water resistance. Thanks to its dense structure, the decorative coating prevents the penetration of moisture into the enclosing structures, thereby protecting their thermal insulation layer.
- The plaster does not corrode, it is frost-resistant and can be used for coatings operating in different temperature conditions.
- Price. It is almost the most important weapon in the fight against numerous competitors present on the market. Considering the price of the material, doing decorative plaster on walls with your own hands has become a widely available option.
- The material is easy to use. Its application does not require special skills or complex equipment. Simple tools and even improvised means are quite enough.
- The use of coarse-grained decorative plaster reduces the time for preparing the surface of the walls, since careful leveling and putty are not required in this case.
- After polymerization of the applied material, the walls have a finished look and a durable, durable coating.
- The appearance of walls decorated with plaster can be changed in a matter of hours: you just need to paint them in the color you like. The relief of the coating will be preserved, and its effectiveness will only increase.
Preparatory work before decorative plastering of walls

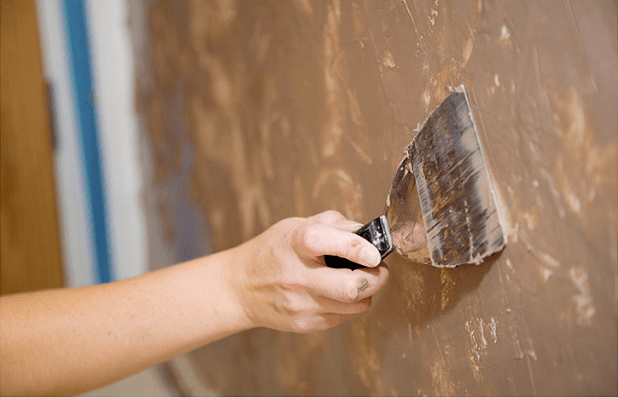
Before working with decorative plaster, preparing the walls is a top priority. This work is simple, but requires patience. The surface must be cleaned of paint, chalk coating, peeling plaster or old wallpaper. All these procedures should be carried out very carefully so that in a couple of years you do not have to do repairs again.
If there are cracks on the walls, they should be cut and puttied. For some types of coatings, for example, Venetian plaster, the walls need to be leveled to perfect condition. In other cases, such careful work is not required, but there should be no grooves or bumps on the surface. After leveling, the walls should be coated with a primer and wait until it dries.
When planning a combined finish, when one part of the wall is painted and the other is decorated with plaster, you can separate surfaces that have different textures masking tape or self-adhesive tape, depending on the straightness of the dividing lines.
Like any work, decorative plastering of walls requires the availability of the tools necessary to obtain the result. Despite the various techniques for applying the composition to the surface and the associated abundance of devices, the minimum set of tools is always the same - a trowel, a plastic grater, a set of spatulas of different widths, rollers, stamps, brushes and improvised means for applying patterns. In addition to tools, you will need a container for mixing the textured solution.
With these things on hand, you can move on to choosing plaster. If you are too lazy to experiment with its compositions, you can buy a ready-made mixture. Decorative plaster can be made independently from finishing gypsum putty.
In addition to this, you will need PVA glue and pure water. All these components are mixed in the following proportion: PVA glue - 200 g, gypsum putty - 6 kg, water - 2 liters or a little more. Mixing should be thorough until a homogeneous mass is obtained. After this, the decorative plaster will be ready for use.
Technology of applying decorative plaster to walls

The technology chosen for decorative plastering of walls is directly related to the type of coating desired. It can be very simple or quite complex to perform, requiring certain professional experience. This applies, for example, to Venetian plaster. It is applied in a special way in layers, and the top is covered with special wax. Each stage of working with this material requires strict adherence to the rules and great care.
Silicone materials are also not easy to apply to walls. Allowing the creation of relief and very beautiful images, they require the performer to have artistic taste, clear movements worked out with experience and the greatest patience.
For self-execution Decorative bark beetle plaster works well. It is easy to apply and can help create a beautiful textured surface without much effort. To work with this material you will need a grater, a spatula and skill in working with these tools: it is impossible to spoil the “bark beetle”.
The technology of work allows you to create a relief in its various variants. The depth of its grooves is determined by the size of the grains that make up the plaster. It should be taken into account that the large texture of the material increases its consumption. But there is also a positive factor: there is no need to carefully level the walls, since textured “bark beetle” plaster perfectly masks their minor defects.
Wall decoration textured plaster performed in this order:
- According to the instructions on the packaging of the material, you need to prepare a solution of a certain consistency. Its quantity should be such that the mixture can be worked out immediately, without taking breaks in the work, since when it hardens, it is not re-diluted. In addition, the joints between fresh and dried layers of plaster are always noticeable and look ugly.
- A regular grater and spatula become in capable hands universal tools. Before applying decorative plaster to the wall, small area on its surface, you first need to practice distributing the composition in a thin layer. As soon as it thickens slightly, you should lightly go over the plaster with a trowel to create a pattern.
- For beginners, there are several techniques available that allow you to get good decorative effect. This can be a wave, straight or oblique rain lines, various circles or crossed lines. Simple and interesting option is a horizontal relief. Movements during work should be soft and confident without unnecessary effort. You shouldn’t spend too much time decorating a certain area: you may lose the desired surface effect.
- The texture on a fresh plaster solution is also obtained using improvised means: sponges, brushes, crumpled paper and others. An interesting effect is achieved even without devices, but with the help own hands. Using a special roller to create a relief is the most simple method, guaranteeing a decent result. The drawing should be done as quickly as possible, since the coating also does not take long to dry. Otherwise, you can get a non-uniform texture on the plaster. Sharp boundaries and layers should be avoided in the joining areas of the coating.
- After applying the coating, after 15-20 minutes, its surface begins to lose its shine as it dries. At this time, it is necessary to slightly reduce the protrusions of the relief with a wet trowel. There is no need to press it with great force to avoid deformation of the pattern. During this procedure, the instrument must be periodically cleaned and moistened generously.
- When using tape to separate sections of a wall with different textures, it should be removed before the surface dries, otherwise the dividing lines may not be clear due to chipping of the contours.
- It takes about a day for the decorative plaster to dry completely. After its polymerization, the surface of the wall should be treated with fine sandpaper to polish and remove excess “hanging” particles of material.
Painting the wall surface

Since walls covered with decorative plaster have a generally finished look, many people stop there. However, not all. Fans of bright colors and those who want without special costs To quickly update the interior, people often resort to painting surfaces decorated with plaster.
For this purpose, it is recommended to use high-quality, sun-resistant paints. First of all, the textured part of the wall is painted to avoid particles of dry plaster getting on smooth surface. After a couple of hours, the remaining sections of the wall are painted. After the first layer has dried, you need to apply a second one. The decorative effect achieved is impressive, despite extra hassle. The paint is applied with a short-nap roller. The tool must be semi-dry when working. To highlight the pattern, you can use paint in lighter colors.
Adding color to decorative plaster can be done when selecting it or at the stage of preparing the mixture. The store usually offers a huge assortment of various shades of decorative plaster. For testing, you can apply a small amount of it to a piece of plywood and let it dry completely, since the shade of the sample will depend on its humidity. If you are not satisfied with the color, you can choose another one. This method has clear advantages: the tone is uniform, and if there is a shortage of material, you can easily order it with the desired shade.
If you have the desire, you can experiment with the color of the plaster yourself. There is nothing complicated about this: the pigment of the desired color needs to be added little by little to the mixture, mixed well, and be sure to do test applications on a sample.
How to apply decorative plaster on walls - watch the video:
If you follow these simple recommendations, you can easily carry out decorative plaster of internal walls with your own hands, thereby achieving good result. This type of decoration looks great in any interior, but you should remember that it needs to be done within one day. With some effort, you can create a cozy atmosphere in your home, and most importantly, forget about repairs for years. Good luck!

Among the many types of interior decoration that have become very popular lately are special meaning Decorative plaster is becoming more and more popular every year. It is relatively inexpensive, looks great and is very easy to use. Today we will tell you about how to apply decorative plaster.
The advantages of this type of coating
In order not to be unfounded, let's describe the main advantages that decorative plaster has. Firstly, special attention There is no need to devote any time to preparing the wall, but it will allow you to reliably mask almost all defects present on the surface.
In addition, this type of finishing will be appropriate not only on concrete, but even on wooden wall. There are no joints or other traces of connection, and the attractive appearance can last for years. Do not forget that plaster largely protects your home from fire, while simultaneously providing good sound insulation for the apartment.
Mixture composition
By the way, what does decorative plaster on walls consist of? It consists of several fairly simple components:
- a water base with a thickener added to it;
- fillers made of marble or granite chips;
- preservatives, antiseptics, anti-fungus and mold agents.
Where is it best to apply?

If a person who is far from the intricacies of renovation enters a room that is decorated in this way, he will almost never be able to determine how such an effect was achieved. Walls are best for decoration country houses, although no one prohibits the use of such plaster for finishing niches and arches in apartments. In the kitchen, this kind of plaster is generally ideal, if only because of its inability to absorb odors and grease.
Preparing the surface
Before that, at least basic surface preparation is needed. If there was wallpaper or paint on the wall, you will need to remove it as carefully as possible, trying not to leave traces of the old coating.
Carefully read the instructions printed on the packaging. As a rule, there is a recommendation to apply the composition only to a surface that has been pre-treated with a primer. This is especially true for walls made of foam blocks, which have increased absorbency. It is better to remove the nails completely or cover them with a thick layer of varnish. Otherwise, a large amount of space may appear on the wall after a while. rust stain. If decorative plaster of walls will be applied in a newly built or renovated building, then the fresh surface can simply be covered with liquid lime mortar.

What tools are needed?
You will need to purchase a relief roller, a spatula knife and brushes, as well as rubber trowels. In general, the set of tools depends on the texture that you prefer to see on the walls. The fact is that the patterns on this plaster appear when the roller moves: it moves the filler granules, and they form on the wall interesting pattern. When we apply decorative plaster, we can show off all our design skills!
Textured compositions can generally be applied to the surface using a sprayer with a large nozzle diameter. It is in this way that they are made that immediately attract attention due to their unique pattern. By the way, the composition retains its elasticity for a long time, and therefore it can be given virtually any shape that you might like. For this purpose, there are long-haired rollers, shaped spatulas or soft shaped knives.
Let's start work

It is carried out starting from the corners. Please note that the first time it will obviously not lie in an even and neat layer. Try working on it first experimental site, get used to it. In addition, under no circumstances leave the jar open for a long time, as the composition in this case quickly begins to dry out, becoming unusable.
Application method
We begin to apply the material to an area of no more than 0.5 square meters, since otherwise the solution dries out quickly. As a rule, the thickness of the applied layer should not exceed two millimeters. The greater the amount of mixture, the rougher the texture on the walls.
Having distributed the solution evenly over the surface, you can begin to create some artistic images. We thoroughly clean the spatula from the solution, and then begin to smooth the surface with it. Lightly press its bottom edge, then draw a straight (or winding) line down. From time to time, the spatula must be thoroughly cleaned of the solution and moistened with water. After all, decorative plaster for walls has excellent adhesive properties.

It is not uncommon to see beginners with a huge piece of material hanging on their spatula. Then it all comes off and falls, inevitably worsening the results of any work.
Your movements when distributing the plaster can be completely different, because as a result a completely unique and inimitable pattern will be formed. Important! As smoothly and carefully as possible, lift the spatula away from the surface being treated, trying not to leave any traces of it on the surface. If you don’t like the resulting pattern, you can lightly moisten the plaster with water at any time and rub it all over.
Before applying decorative plaster on the next area, overlap the already treated area, this way you can avoid the formation of joints that greatly spoil the flat surface. After application, you need to wait at least a day, after which you can begin further work(applying stencil designs on the wall, for example).
Other decoration methods

All decorative plaster, a photo of which is in the article, can be additionally decorated not only with fancy and unusual patterns, but even with real paintings. You don’t have to be an artist for this: just buy a stencil from the appropriate store and apply the picture on it. By the way, for this you can use not only paint, but also exactly the same plaster. This will make your walls look even more picturesque.
Here's how to apply decorative plaster.
How to make it “rain”?
To apply the material at an angle, you must first prepare the walls. First, lines are drawn on them with the appropriate slope. The width between them can be arbitrary, but it should be comfortable for you to work with a spatula. After that, glue masking tape to the lines.
Work should begin from the top corner of the room. We carefully spread plaster onto each strip, and the thickness of its layer should not exceed three millimeters. To create a “drip” structure, the trowel must be lightly pressed against the surface being treated, and then also carefully peeled away from it.
As a result, the wall will look a lot like a frightened hedgehog. This is easy to fix: take a moistened trowel, then carefully smooth out the “spines” with it, moving the tool strictly in one direction. The weaker you press, the more textured and rough the wall texture will remain.
All subsequent stripes must be applied with overlap. All of the above steps are repeated in a similar sequence. Allowing the edges to visually overlap each other will greatly improve the appearance of the finished surface. The joints should be smooth, but you should not specially smooth them.

This method is especially good if you are applying a decorative one. Instead, in this case, you need to use twine stretched diagonally.
In conclusion
In conclusion, we can advise you to take your time and approach your work consistently. We have already said that you should not take areas larger than 0.5 m for work. If you rush, the material will dry out, and with subsequent moistening and grouting, you will no longer be able to create such beautiful patterns.