You will need
- To mix cement or cement mortar you will need: cement, sand, clay, water, large metal container or a mechanical concrete mixer, shovel, garden hoe.
Instructions
Let's consider the most commonly used type of binding material - cement. It is the main element mortars and various concrete mixtures. Positive qualities cement are its strength and drying speed. Cement is divided into two types: aluminous and Portland cement. TO characteristic features aluminous cement are: heat resistance, quick drying and high water resistance. Mostly this group used in industrial construction. Used for private construction various brands Portland cement. Cement grades are classified according to their strength when hardening and can be: low-grade - below 300, so-called ordinary - 300-400. Brand 500 belongs to the category of increased strength, and 500-600 to high strength. It is not difficult to visually determine the strength of cement. The darker it is, the stronger it is. IN Everyday life all brands of cement are called cement, and high-grade cement (500-600) is called Portland cement. Peculiarities of cement marking: PC or M - Portland cement;
D 0 - cement without additives;
D 20 - cement containing 20% additives;
B - quick-hardening cement;
N - cement based on clinker of standardized composition (standardized cement);
ShPC - slag Portland cement;
PL - plasticization of cement.
To prepare cement, you need to find out for what purpose it will be used: for laying bricks, for pouring a path near a house, for plastering a wall. To lay bricks, you will need a solution in a ratio of 1 to 4, that is, you need to take and pour 1 bucket of cement and 4 buckets of sand into a container. Take a garden hoe and dry mix the ingredients in layers, stirring the mixture with the hoe every 5 centimeters. Stir until you get a homogeneous mixture. Then add a little water, stir, add water until the solution becomes viscous and sticky. Its consistency should be thick semolina. Now you can safely fasten bricks with it.
To prepare a solution for pouring garden path make a solution with a ratio of 1 to 3, that is, 1 bucket of cement and 3 buckets of sand. Stir dry with a hoe, then add water until the solution is as thin as cream. Pour this solution into the pre-prepared formwork, breaking it into squares thin boards. If you fill the path with one monolith, it will soon crack. After about 2 hours, prepare the laitance. To do this, take cement, add water to it until it becomes like milk. Pour this milk onto the path and spread it with a brush. This process is called "ironization" and the track will become grey-green and very hard on the surface. To plaster the walls, it is enough to make a solution of 1 to 5 with the consistency of liquid semolina porridge.
Due to their strength, durability, unpretentiousness and versatility, concrete floors are popular not only in rooms where large loads are expected on the floor surface, but also in private housing construction. For example, concrete floors in the kitchen, bathroom and toilet are a must. And in bedrooms, hallways, living rooms and other rooms, concrete pouring began to be used with the advent of the “warm floor” system, which solved the important problem that such a floor is very cold. Even in private houses, where previously they were furnished exclusively wooden floors on the joists, they began pouring concrete everywhere. And here questions began to arise about how to pour a concrete floor on the ground and what are the features of pouring on floors. In this article we will reveal general technology fills and indicate some nuances and differences.
Technology for laying concrete floors
Concrete floors can be installed on various surfaces: directly on the ground, on a floor slab, on an old concrete covering, even on the old one wooden floor. Concrete is a simple, undemanding material, accessible to everyone, and, importantly, relatively cheap.
In order for the floor to ultimately be strong and durable, all technological conditions and stages of work must be fulfilled. When pouring concrete on different surfaces exist distinctive features, but there is also general rules for all occasions.
Concrete floors - pouring technology and stages of work:
- Waterproofing the base.
- Thermal insulation.
- Reinforcement.
- Installation of guides (“beacons”).
- Pouring a rough concrete floor.
- Grinding the surface of a concrete floor.
- Filling the leveling screed.
Depending on the design features premises, some stages of work may be added. For example, when laying a concrete floor on the ground, bedding should be done on the base.
For guard concrete screed from cracking it is cut into expansion joints, of which there are three types:
- Insulating expansion joints are carried out in places where the concrete floor comes into contact with other structural elements buildings: walls, columns, ledges, etc. This is necessary so that vibrations are not transmitted from the floor to other structures. Otherwise, there may be a distortion or partial destruction of the foundation.
- Construction seams are carried out in places where concrete hardens unevenly, i.e. in the event that the filling did not take place in one go, but with breaks that lasted more than 4 hours.
- Shrink seams performed to relieve stress due to uneven shrinkage and drying.

Expansion joints must be cut before random cracks appear, but the concrete must already have gained the necessary strength. The depth of the joints should be 1/3 of the thickness of the concrete layer. Subsequently, the seams are filled with special sealants.

Considering the labor-intensive and dusty nature of the work on arranging a concrete floor, many hire construction crews to carry them out. For concrete floors, the price depends, first of all, on the labor intensity of the work ordered and the thickness of the layer. The cheapest option would be regular cement-sand screed. Covering with reinforcement will cost a little more. The cost of a concrete floor is influenced by the type of reinforcing mesh: if it is a regular road mesh, it will be cheaper, and if it is a frame welded from reinforcement, then it will be more expensive. The most expensive option is a concrete floor with a reinforced top layer; it will cost 30 - 40% more than a regular floor of the same thickness.
With minimal construction skills, knowing how to use a tool, and inviting one or two partners, you can easily pour a concrete floor with your own hands. It is enough to make calculations, stock up necessary tool, material and study the technology so that everyone performs their functions and the matter progresses. Then the price for pouring a concrete floor will depend only on the material that will be used and its quantity.
How to make a concrete floor on the ground correctly
Laying out a floor directly on the ground always involves a number of questions: what to use for the bedding, and what layer to use, how to waterproof it, and at what stage to insulate it, and so on. The concrete floor on the ground is a “layered cake”, which we will discuss below.
Pouring a concrete floor: “pie” diagram

Conditions under which laying a concrete floor on the ground is possible
Before going directly to technological process when arranging a concrete floor, I would like to note that not all soils can be used to pour a concrete floor. Firstly, the level groundwater should be no higher than 4 - 5 m to prevent the floor from flooding and moisture being sucked through the capillaries. Secondly, the soil should not be mobile, otherwise the concrete floor can quickly collapse, damaging the foundation. Thirdly, the house in which such a floor is planned must be residential and heated in winter time, since the soil freezes in winter, and with it the floor, which will put additional pressure on the foundation, deforming it. Well, the last limitation is that the soil must be dry.
Marking the level of a finished concrete floor: “zero” mark
We begin all work on arranging the floor only after all the walls have been completely erected and the building has been covered with a roof. This way we will be protected from the surprises of nature.
The first step is to outline finished floor level, i.e. the mark to which we will fill the floor. Since we do not plan to create a threshold, we will focus on the bottom of the doorway so that the floor is level and the same in all rooms.

We apply the “zero” level as follows: from the lowest point of the doorway we set aside exactly 1 m. We apply a mark to the wall, then transfer the mark to all the walls in the room, draw a line, the horizontal of which is constantly controlled using a level.
After the line has been drawn, we set aside 1 m downwards from this line along the entire perimeter of the room. We draw a line. This will be the finished floor level. For convenience, we hammer nails along the lines in the corners of the room and tighten the cord. This will make it easier to navigate.
Foundation preparation work
We remove all from the premises construction garbage. Then we remove upper layer soil and take it out for garden or landscape needs. To what depth should the soil be removed? The concrete floor on the ground is a multi-layer cake, about 30 - 35 cm thick. Focusing on the “zero” mark, we are trying to remove the soil to a depth of 35 cm.
Be sure to compact the surface of the soil. It is better to do this using a special vibrating plate or vibrating machine, but if you don’t have such equipment in your arsenal, you can make do with improvised means. We will need a log to which we will attach handles, and we will nail a flat board underneath. Using this log together, we compact the soil to such an extent that no traces of footsteps remain on its surface.
Important! In case of high strip foundations There are situations when the distance from the “zero” mark to the ground is more than 35 cm. In this case, we remove the top fertile layer, and instead pour sand and tamp it thoroughly.
Measures for additional waterproofing of the floor may include the installation of a clay bedding. Then clay is poured on top of the soil and thoroughly compacted. In the future, it will prevent moisture from penetrating into the floor.
Formation of bedding from gravel, sand and crushed stone

Before making a concrete floor on the ground, it is necessary to fill it.
First layer - gravel(5 - 10 cm). Add water and compact. To make it easier to control the thickness of the layer, we drive pegs of the required length into the soil, set them level, and after backfilling and compacting, remove them.
Second layer - sand(10 cm). We control the thickness and level with the same pegs. We spill the layer with water and compact it with a vibrating plate or a log with a board. For this backfill, you can use ravine sand with impurities.
Third layer - crushed stone(10 cm). Carefully level and compact. Our task is to make sure that there are no sharp edges of crushed stone on the surface. If there are any, you need to smooth them out by unrolling the stones or removing them. Crushed stone with a fraction of 40 - 50 mm should be used. After compaction, the crushed stone can be lightly sprinkled with sand or crushed stone chips and compacted again.
Important! Don't forget to control the horizontal using a level.
It should be noted that backfilling can be done only from two layers: sand and crushed stone. Also, to simplify control over the thickness of the layers, their level can be applied to the foundation walls.
Laying waterproofing and thermal insulation

If the crushed stone layer is compacted tightly and there are no sharp corners, then waterproofing material can be laid directly on it. For this you can use modern roll materials and membranes, roofing felt in several layers or simply plastic film with a density of at least 200 microns. We spread the material over the entire area of the room, bring the edges to the “zero” mark on the walls and secure it there, for example, with tape. If the canvas is not enough to cover the entire area, then the joints must be made with an overlap of 20 cm and taped with adhesive tape.
Thermal insulation can be done on top of the waterproofing using the following materials: expanded clay, perlite, extruded polystyrene foam, expanded polystyrene(Styrofoam), stone basalt wool(corresponding density), polyurethane foam.
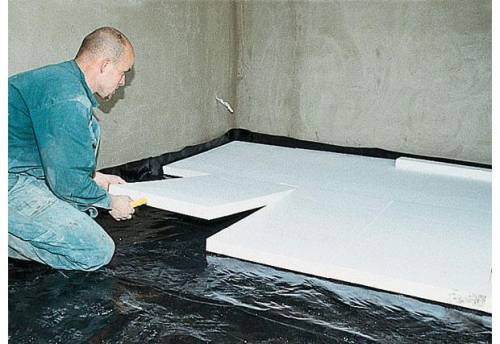
Consider the option of laying extruded polystyrene foam slabs. They are laid out in a checkerboard pattern, close to each other, the joints are glued using a special adhesive tape.
Important! There are cases when it is not possible to perform hydro- and thermal insulation directly on the bedding. Then a layer of so-called “skinny” concrete (liquid consistency) up to 40 mm thick is poured on top of the bedding. When it hardens, you can perform the above procedures on top. “Skinny” concrete firmly binds together a layer of crushed stone and is more a solid foundation which will not be able to break through or damage waterproofing materials.
The technology for pouring a concrete floor necessarily includes reinforcement in order to maximize the strength of the floor. A reinforced floor can withstand heavy loads, which are evenly distributed over the surface.
Can be used as a reinforcing material metal And plastic mesh with different cells, as well as rebar frame. Most often, welded reinforcing mesh with dimensions of 5x100x100 mm is used. Less commonly, for floors that will bear heavy loads, a frame welded in place from reinforcing rod 8 - 18 mm thick is used. In this case, more thorough vibration compaction of the concrete mixture will be required.

The reinforcing mesh or frame cannot be laid directly on the base, as it will not perform its functions and will even be redundant. It must be raised to 1/3 of the thickness of the future concrete pouring. Therefore, we install the mesh or frame on stands 2–3 cm high, which are called “chairs.”
Installation of “beacons” and formation of “maps”
Installing guides, or “beacons” as they are also called, allows you to pour the concrete mixture as smoothly as possible, at the same level.
Pipes can be used as guides round section or metal square profile, and wooden blocks, if their surface is smooth enough, you can lay special “beacons” made of aluminum.
We divide the room into segments 1.5 - 2 m wide.
We install the guides on the “buns” made of concrete mortar. By pressing them or adding mixtures, we control the location of the “beacons” so that their upper edge is strictly along the “zero” line. We lubricate the guides with special oil; in extreme cases, you can use oil to make them easier to remove in the future.

Important! We control the strictly horizontal position of the guides using a level and level. It will be possible to pour the floor with concrete after the “buns” have hardened enough so that when you press the “beacon” they will not press through.
The division of a room into “maps” is carried out if its area is large enough and it is not possible to fill it with concrete in one step. Then the room is divided into square or rectangular “cards”, the size of which is dictated by the productivity of the construction team.
We mark the area into sections. We knock down the frame formwork from freshly sawn wood or laminated plywood. Naturally, the height of the formwork must be strictly set to zero.
Preparation of mortar for pouring a concrete floor
To ensure that the concrete floor has the best possible thermal insulation properties, expanded sand or perlite should be added to the solution. And in order to have time to pour and mix the solution efficiently, you need to purchase or rent a concrete mixer.
The secret to preparing the solution is:
- Pour 2 buckets of perlite into a concrete mixer.
- Add 10 liters of water and mix. After adding water, the volume of perlite should decrease noticeably.
- When the sand is well mixed with water, add 5 liters of cement and continue kneading.
- Add 5 liters of water and continue kneading.
- When the mixture becomes homogeneous, add 10 liters of sand and 2 liters of water. Knead until the mixture becomes loose.
- We pause in the kneading for 10 minutes, and under no circumstances add water.
- After 10 minutes, continue kneading until the solution becomes plastic.
To fill the floor, it is best to use cement M400 and M500.
Pouring a concrete floor, leveling the mortar
We begin to fill the floor from the corner opposite to the door, trying to fill several “cards” in one or two steps.
Since the concrete should not fit tightly against the walls and protruding structures of the building, we isolate them by laying a damper tape along them.

Pour the resulting solution into a “card” in a 10 cm layer and level it with a shovel. Perform piercing movements to remove excess air and compact the solution. If possible, you can use a deep vibrator, which is immersed in concrete, and when concrete “milk” appears on the surface, it is transferred to another place.
We level the solution using the rule. We install it on the guides and pull it towards ourselves with light movements left and right. This way, excess concrete is removed and distributed into the voids of other “cards”.

After completing the leveling of the solution along the guides, remove them and fill the free space with fresh solution.
In the following days, constantly moisten the surface with water; you can additionally cover the concrete with film. We allow the concrete to gain maximum strength characteristics within 4 - 5 weeks.
Leveling screed for concrete floor
When pouring a concrete floor, it is rarely possible to make the surface perfectly flat; most often there are minor flaws and sagging. If you plan to install ceramic tiles, then perfect evenness is not needed, so you can immediately begin work. But if you want to make a floor from laminate or linoleum, then the surface must be perfectly flat.
Self-leveling mixtures allow you to make the floor surface mirror-smooth.

According to the instructions on the package, prepare a solution of self-leveling mixture, pour it onto the floor and level it with a special brush. Then roll with a needle roller to remove air bubbles from the solution. Leave to dry for at least 1 week. After which the concrete floor is ready for use.
How to properly pour a concrete floor over ceilings

The peculiarity of pouring a concrete floor over floors is that there is no need to backfill.
Checking concrete slab ceiling, whether there are cracks, cracks or chips on it. If we find it, we seal it with repair mortar. Wooden floor It should also be durable, without large gaps.
IN mandatory We waterproof the ceiling by laying a polyethylene film with a density of 200 - 300 microns.
We lay thermal insulation on top. This can be polystyrene foam, extruded polystyrene foam boards, basalt wool or spraying polyurethane foam.
We install the beacons and fill the solution with a thickness of 100 mm. We perform all other operations in the same way as in arranging a floor on the ground. If you don’t understand something in the pouring instructions, perhaps watching a video demonstrating a concrete floor will help you.
It is quite possible to do the pouring of a concrete floor yourself, the main thing is not to skimp on materials and follow the technological process. Then the floor can last for decades without requiring major repairs.
Pouring a concrete floor: video - example
The choice of concrete proportions used for the foundation is influenced by many factors: soil parameters, expected loads, type of foundation. The basis of cement mortar is cement, sand, crushed stone or gravel and water; its properties directly depend on the quality and uniformity of mixing of the components. Changing the regulated ratios is unacceptable; the slightest errors lead to a decrease in the strength of the foundation and, as a result, the risk of destruction load-bearing structures building.
- Required brand
- Proportions for preparing the solution
- What are the requirements for the components?
- Description of the concrete preparation process
Choosing a concrete grade
The main criteria include the geological conditions of the site (relief, level and partial pressure of groundwater on foundation elements, climate, freezing depth), type of foundation, presence or absence of a basement, height of the building and other weight loads. The limiting factor is the work budget; use high-quality types of concrete for the construction of lightweight buildings on summer cottages not economically feasible. The recommended minimum is:
- M400 – for houses over 3 floors.
- M200-M250 – for frame and panel buildings.
- M250-M300 – for buildings made of wooden beams.
- M300 - for low-rise buildings made of expanded clay, gas silicate or cellular blocks.
- M350-M300 – for brick construction or pouring load-bearing walls made of monolithic concrete.
The specified gradations are relevant when constructing one- or two-story houses, when adding another floor, it is advisable to choose a higher grade. The same applies to ready-made purchased solutions, especially if purchased from an unverified manufacturer. In general, the minimum permissible strength when concreting a foundation is residential buildings on slightly heaving soils it is M200; during construction on less stable soils it increases.
When preparing solutions, the working measure is the mass or volume fraction of the binder; the most common and convenient ratios include 1:3:5 (cement, sand, gravel, respectively). The regulated proportions, depending on the required strength of concrete, are:
The strength of concrete is primarily affected by the ratio of sand and cement, but in addition to strict control over the proportion of dry components, the amount of water introduced is monitored. When using Portland cement, the W/C proportions are:
| Binder grade | Concrete strength grade | ||||
| 150 | 200 | 250 | 300 | 400 | |
| M300 | 0,65 | 0,55 | 0,50 | 0,40 | |
| M400 | 0,75 | 0,63 | 0,56 | 0,50 | 0,40 |
| M500 | 0,85 | 0,71 | 0,64 | 0,60 | 0,46 |
| M600 | 0,95 | 0,75 | 0,68 | 0,63 | 0,50 |
When building a foundation on dry soils, it is allowed to introduce lime or clay into the cement mortar, these components increase its plasticity. The recommended proportions when using Portland cement M400 are:
In private construction, it is inconvenient to separately determine the mass of all poured ingredients; a bucket is usually used as a measuring tool. In this case, all fillers are pre-weighed in a dry state. The W/C ratio largely depends on the moisture content of the sand; experienced developers add no more than 80% of the recommended proportion of water during mixing and then, if necessary (the consistency is not sufficiently plastic), pour it in portions. Fiber, PAD and other plasticizers are added to concrete at the very end along with the liquid; their share usually does not exceed 75 g per 1 m3.
Component Requirements
To prepare cement mortar for pouring the foundation, the following is used:
- Fresh Portland cement, ideally the release date does not exceed 2 months before the start of concreting. The recommended brand is M400 or M500.
- River sand with particle sizes ranging from 1.2-3.5 mm with admixtures of silt or clay not exceeding 5%. It is recommended to check its cleanliness (fill with water and monitor the change in color and sediment), sift, and, if necessary, rinse and dry.
- Pure crushed stone or gravel with fraction sizes from 1 to 8 cm, with flakiness within 20%. When preparing concrete for the foundation, hard rock screenings are used; limestone is not suitable due to its low strength.
- Water: tap water, free of impurities and foreign particles.
- Additives: antifreeze, plasticizing, reinforcing fiber. The introduction of such impurities is carried out in strict compliance with proportions.
It is important to understand the principle: coarse filler is introduced into the solution not only to replace the more expensive binder, it is precisely this that imparts the necessary rigidity. Minimum compressive strength of gravel or granite screenings is 800 kgf/cm2; in its absence, concrete simply will not withstand the weight load. A mixture for a foundation without crushed stone is prepared only when constructing it from individual blocks or slabs, and sometimes for quickly pouring pile supports.
Recommended proportions of cement and sand for masonry mortars– 1:3 or 1:2. The first ratio is considered universal, the second is chosen when constructing foundations on unstable soils. In practice, this means that for one bucket of cement with a grade not lower than M400 (M500 for increased loads), take 2 or 3 sifted quartz sand and no more than 0.8 parts of water. A properly prepared mixture has a consistency similar to toothpaste, to increase workability per 1 m3, 75-100 g of plasticizers are introduced ( liquid soap or other PADs).
How to make cement mortar for the foundation?
The process begins with the preparation of components and a concrete mixer; the presence of the latter is mandatory when mixing concrete for underground structures. The amount of building materials is calculated in advance according to the volume of the foundation and is purchased with a small margin. It is extremely important to carry out the filling on the same day, when self-cooking solution, all components are washed and dried in advance. Next, they are poured into buckets into a concrete mixer in the following sequence: part of the water → sand and cement → dry additives and fiber (if necessary) → coarse filler → the remaining liquid in small portions. After adding the new ingredient, the drum is turned on for 2-3 minutes, and no more than 15 minutes later the finished solution is unloaded.
There is a time-tested method of selection correct proportions, selected in the absence of data on the size of crushed stone. In this case, the bucket is filled with coarse filler, shaken several times and completely covered with water. The resulting volume of water corresponds to the required proportion of sand in the solution. After that, sand is poured into the bucket and filled with water again to determine the proportion of cement. But some consider this approach complex and outdated; more correct ones include standard way recalculating the mass fraction into the volume fraction and pouring the components into the concrete mixer.
In order to independently prepare a cement mortar for pouring the foundation, it is important to select the right components, maintain the necessary proportions of materials and take into account some of the nuances of mixing and pouring.
Its quality and durability depend on how correctly and in what proportions the components for the foundation mortar are selected.
Materials for the mixture
In order to make concrete for the foundation, you will need:
- water;
- sand;
- cement;
- crushed stone;
- additives (if necessary).
Water for preparing cement mortar should, if possible, not contain chemical substances(fuel oil, gasoline and others). Ordinary running water is what you need.
The sand should not be silty or clayey. Fatty substances create films that prevent the components from adhering to each other. Ideally goes into solution washed sand The cleaner the better.
Cement is distinguished by its brand. The most common are M300, M400 and M500. The higher the grade of cement, the higher the quality of the resulting solution, that is, such specifications, such as compressive and fracture strength.
According to the construction goals and the size of the foundation, a specific brand of cement is selected.

In order to prepare a solution for the foundation, you will need water, sand, cement, crushed stone, and, if necessary, various additives.
Crushed stone should not be limestone. You should also not add gravel as a filler for cement mortar. It is better to take crushed stone. Its sharp corners and uneven edges cling to each other and thereby increase the strength of the concrete for the foundation. Cement-sand, as well as mortar based on gravel, expanded clay, and other fillers will be less durable and therefore not used in the manufacture of concrete for foundations.
Additives are needed if you want to make a solution in special conditions. For example, when you need to make a solution in frosty weather or ready foundation will be partially or entirely in water and exposed to an aggressive environment. Additives are mixed with water according to the instructions on the package. It is worth remembering that any additives lower the grade of concrete.
Cooking methods
There are 2 main methods of kneading: mechanical (using electric concrete mixer) and manual. Let's look at each separately.
Mechanical method
This method involves the purchase of a rather expensive tool - an electric concrete mixer. Since pouring the foundation is usually the very beginning of construction, purchasing a concrete mixer at this stage is economically justified. So, the object should have:

Device diagram monolithic foundation on a sand and gravel bed
- buckets;
- shovels;
- water barrel or hose;
- concrete mixer;
- extension cord (carrying).
Buckets are convenient for carrying sand and crushed stone and loading cement into a concrete mixer. In addition, buckets make it easy to measure the required amount of each component and maintain the correct proportions. Shovels are used to throw materials into buckets.
The capacity of the concrete mixer depends on the size of the building under construction and varies between 50-300 liters. To build a private house, a single-phase 220 volt concrete mixer will be sufficient. Larger projects, as well as industrial facilities, may require 380 volt three phase. To operate the concrete mixer itself, you may need an extension cord to supply electricity to it.
All prepared components (water, cement, sand, crushed stone) in required quantities load the concrete mixer into the bowl and turn on the apparatus. The mass is brought to a homogeneous creamy state. The solution for pouring the foundation is ready.
Manual method
To knead manually you will need:
- buckets;
- shovels and bayonets;
- capacity;
- water barrel or hose;
- hoe.
You need to pour water into the container for mixing the components (already with additives, if needed), then add sand and cement. It is convenient to mix the solution manually in a trough or old bath using a hoe or bayonet shovel. The mass needs to be made homogeneous, similar to sour cream. At the very end, all that remains is to add crushed gravel and mix everything again. The solution is ready.
It’s good if it is possible to pour the foundation directly from a concrete mixer or trough - this way you can save a huge amount of time and effort. If this is not possible, then the ready-made cement mortar is poured into buckets using a shovel and the foundation is poured from them.
Proportions
Cement and sand are mixed in a ratio of 1:3. The amount of crushed stone is not strictly standardized, but usually they take the same amount as sand. Thus, for 1 bucket of cement there are 3 buckets of sand and 3 buckets of crushed stone.
The amount of water is selected experimentally each time, as it depends on many factors. For example, from the humidity of sand and air. It is important to achieve the desired consistency (like sour cream) and not to overdo it with water. The thinner the solution, the lower the grade, and, accordingly, the worse the strength of the resulting concrete.
Fill
Concrete does not set well at temperatures below +8 degrees Celsius (unless frost-resistant additives were included in it), so it is better not to pour in cold weather. The quality of such concrete will be worse than that of ordinary concrete, and, alas, nothing can be done about it.
The process of concrete setting has nothing to do with drying! If pouring occurs in hot, sunny, dry weather, then there is no need to add additional water to the solution. In this case, the only the right decision The foundation will be watered for several days simply from a hose, from above, to prevent the concrete from drying out. If it dries out, it begins to burst and crack.
When building a house or gazebo on a summer cottage, every owner is faced with the need to lay a foundation. This process is complex and responsible, because you need to choose the right material and calculate the ratio of components. Therefore, before starting work, you should carefully study the stages of foundation construction.

Due to its low cost and exceptional durability, concrete is considered the most popular material for pouring foundations. In this article we will look in detail at the intricacies of working with it, so that even a novice master can build a base on his own.
The composition is prepared taking into account certain proportions of crushed stone (or gravel), sand and cement. What ratio of components is required depends on the result to be obtained. Crushed stone and sand serve as fillers, cement is needed as a binder that holds the components together into a single block. If too much is formed a large number of cavities between sand and crushed stone, then the need for cement increases. To keep them to a minimum, it is important to use crushed stone different sizes: small particles will fill the cavities between large ones, and sand will fill between small ones.
Concrete hardens within a month, but this process is most intense during the first week.
Types of concrete for pouring the base
To prepare a solution for the foundation, sand is suitable, the particle size of which varies from 1.2 to 3.5 mm. Use bulk material without foreign impurities. A five percent clay and silt content is allowed, but this makes the concrete less durable.

The following experiment will help determine the quality of the composition: pour sand into a container, dilute it with water and shake the resulting solution thoroughly. If the water remains clean or loses a little transparency, it means the raw material High Quality, and if it becomes very cloudy, it contains impurities. You can also leave the container to stand for a while. If clay sediment eventually appears above the sand, it is better not to use such bulk material for construction.
Thematic material:
- Proportions of concrete for the foundation in buckets
- Foundation concrete recipe
There should also be no impurities in the crushed stone composition. The particle size is 1-8 cm.
In the construction field there are following types cement:
- Portland cement (the most common option, which is used in the construction of various structures).
- Slag Portland cement (has high moisture resistance and frost resistance, but hardens more slowly).
- Pozzolanic Portland cement (used for the construction of structures under water and underground due to its exceptional moisture-resistant properties; in air conditions it shrinks strongly and loses strength).
- Fast-hardening cement (hardens in about 2 weeks; it is necessary to work with such material without delay, since it sets instantly, so it is not the most good option for beginner builders).
Thus, the most suitable material Portland cement is used to independently pour a monolithic foundation for a house or other structure.
The following grades of cement are distinguished: ... PTs 500, PTs 500 D20, PTs 400 D20, PTs 400, etc. In accordance with the brand, the value of its compressive strength changes, which is determined for a concrete cube with sides of 20 cm and is measured in kg/cm2 .
Preparing the right solution
To obtain the composition of the desired viscosity, certain proportions are observed during its preparation. The ratio is 1/3/5, where 1 is cement, 3 is sand, 5 is crushed stone.
The use of additives will allow you to get certain type cement mortar: quick-hardening, hydrophobic, pozzolanic, colored, sulfate-resistant, plasticized, etc. in this case apply different brands from M 100 to M 600. But to get, for example, a mixture of M 400, it is not necessary to use cement of the same brand.
Below is a table of ratios that will help in the calculations:

If you dilute cement M 400 with four buckets of water in a ratio of 1:4, you get a mixture of M 100, and to prepare a solution of M 100 from M 500, add five buckets, that is, 1:5.
To prepare concrete grades M 300 and M 400, the weight of the components must exceed the weight of water by half.
If you need to get 1 cube of concrete (this is V cube, each side of which is 1 m), then the ratio should be as follows: half a cube of sand, 0.8 crushed stone and filler. The amount of the latter depends on the purposes for which concrete is required. Please note that the less cement the solution contains, the more mobile it will be. It is important to know that you cannot put more than 350 kg of cement on one cube (that’s 7 bags), increasing the norm can provoke destruction.
The price per cubic meter of cement varies; the higher the grade, the higher the cost.
To make concrete, use a concrete mixer, a wooden box, an iron bath or wood flooring. It is important to ensure that no debris or other impurities get into the solution. To begin with, pour in the dry ingredients - sand, crushed stone, cement, mix them thoroughly to obtain a homogeneous composition. Then slowly add water, stirring until evenly moistened. And only after that they start pouring.

Keep in mind that cement does not store for long; over time, its grade decreases under the influence of moisture. After the first month, about 10% of strength is lost, after 3 – 20%, in six months this figure reaches 30-40%.
When pouring a foundation, the most popular unit of measurement is a bucket, so few people accurately observe the correct proportions. It is not recommended to stir the mixture with a shovel, as the concrete will be inhomogeneous. Thus, losses may occur and eventually the M 100 grade will be released. But this will be enough for construction small house or gazebos.
Even if you deviate greatly from the standards for pouring a foundation, it will still be durable and will withstand heavy loads, so it will be suitable for building a house. But, according to official standards, you should take cement M 300 or M 400 to get a grade of 200 or more.
Pour the foundation in warm weather, negative temperature provokes the emergence of some difficulties. For example, you will have to heat the water and the composition itself, since they may freeze before hardening begins. And when hardening begins, without heating the concrete will begin to freeze due to the water contained in it, and the resulting ice crystals will begin to destroy the foundation from the inside.

If you follow the proportions and prepare the composition according to standards, even at home the solution will be homogeneous and as close as possible to the correct option, so don't worry about its durability.
Now you know what ratio of components is needed to prepare 1 cube of concrete. The main thing is to accurately calculate the proportions and try to follow the technology. Concrete is an easy-to-prepare composition, so the knowledge gained will help even a novice builder to easily build a foundation for a house or gazebo.
Concrete path on personal plot or near a private house - a practical and convenient solution. And if you make it with creativity and taste, it will also become wonderful. decorative element. Moreover, in order to cope with similar work, you don’t have to be an experienced builder.
To each home handyman It’s quite possible to make a path, . And today we will tell you about the various intricacies of making paths, we will talk about what kind of solution to put the plaster on, how to fill the product with a mixture with a mesh, what proportions are used for concreting paths and much more.
Product Features
In order for the finished concrete path to serve for a long time and not be pressed underfoot, you should take care proper preparation grounds.
- Having previously drawn it on paper, mark the outline of the future path on the site using pegs and a stretched rope.
- Remove a layer of earth (twenty centimeters) and cover it with a layer of ten to fifteen centimeters.
- Then they lay a special polymer material– geotextiles. It will give strength and prevent weeds from growing.
- The last layer is placed, which must be moistened (so that moisture from the concrete does not go into the ground) and compacted. The sand layer is four to five centimeters.
- Then formwork made of boards is placed along the edges of the path.
The solution, as a rule, is poured into molds, which can be of different designs: rectangular, polygonal, round, imitating natural stone. Polypropylene molds are often found on sale, with which you can quickly make entire pieces of a path with a beautiful pattern.
The outer walls of this stencil, which can withstand at least a thousand pours, have a thickness of 6 millimeters, and the inner walls are 3 millimeters. Height – from 5 to 6 centimeters. It is equal to the thickness of the tile.
The resulting seams between individual tiles can be sealed with cement mortar of a contrasting color, filled with sand, or sown with decorative lawn grass in these places.
Read below to learn how to make a strong cement mortar (cement mortar) for a garden path and how to prepare concrete mortar for pouring.
Composition and structure
Ingredients
 So let's try to cook high-quality composition Do-it-yourself mortar for the garden path at the dacha. For solution use classic materials– , sand, crushed stone and water. They must be of appropriate quality:
- Sand– washed, dry, not too small (so as not to absorb too much water) and not too large (so as not to reduce the plasticity of the concrete solution).
- Crushed stone– also take pure, with a fraction from five to ten.
- Cement– preferably high grade (M400, M500). It must be crumbly and dry. By the way, the brand of cement can be visually determined by the color of the powder. The darker it is, the higher the brand.
- TO water There are no special requirements. Do not use only sea or very dirty water.
- Sometimes, to increase plasticity, a certain amount is added to the solution. clay.
Recipe
Now let's talk about the recipe. It may be different. You can, for example, make a solution only from sand and cement (without using crushed stone). Or vary the ratio of ingredients. By the way, buy ready solution undesirable. It may be of poor quality.
And here are the recipes:
- One part cement plus three parts sand plus water (you can add a little clay).
- One part cement plus three parts sand plus three parts crushed stone plus water.
- One part cement plus two parts sand plus two parts crushed stone plus water.
To give the desired shade You can add coloring pigments-additives to the solution for garden paths. For example, the HLV brand. This pigment, produced in four main natural colors (red, green, yellow, brown), will require about 250 grams per 25 kilograms of dry cement.
The following video will talk about popular mistakes when making garden paths:
Manufacturing
After measuring out the dry ingredients, mix them. You can do this in some clean container using a shovel or hoe. If you have a concrete mixer, then it is better, of course, to use its help. Water must be added little by little to ready mix It didn’t pour, but flowed slowly (like thick sour cream from a spoon).
Having prepared the base as described above (removing the turf from above, pouring crushed stone, sand, laying geotextiles and making formwork), you can begin to create a path. The easiest way to do this is using a ready-made plastic mold. It is placed on damp compacted sand and the solution is poured into it. After twenty minutes, the mold can be carefully removed and the process repeated.
While the mixture has not hardened, you can decorate the path. By pressing, for example, pieces into its surface tiles or cute pebbles, laying them out in a beautiful pattern. To strengthen it, within two hours after pouring the solution, you can cover it with cement laitance using a brush.
Do it yourself
Coloring composition

It looks elegant and beautiful on the path.
- For this purpose, you can buy ready-made pigment and introduce it at the time of preparing the solution.
- You can also add a little acrylic paint.
- Another option: rub wet concrete surface a mixture of cement (two parts) and dye (one part). This is called ironing:
- To make a path yellow, for example, ocher is added to cement.
- The red color comes from one portion of white cement, two portions of sand and half a portion of umber.
- A green tint is achieved by adding to sand and white cement glauconitic green.
- Black - taking one part of gray cement, one and a half parts of sand and 0.15 parts of ordinary soot.
If, when pouring a garden path, you need to trim it, the following video will help you with this:
Supplements
We have already told you how to make a standard solution.
- Now we should mention the additives that are introduced, in particular, to increase strength (for example, propylene-based fiber).
- Special components designed specifically for concrete garden paths (HLV-15) are also sold.
- If there is a desire to imitate, then stone chips and the appropriate dye are added to the solution for plausibility.
In addition, the surface of the finished path can also be treated with a hardening compound.
- Impregnation made on the basis of wax and synthetic resins gives a good result. It is applied with a brush or spray.
- The coating, in addition to significantly increasing strength, gives a very beautiful smooth surface.
Forms for paths
Ready plastic molds convenient, but they require certain costs. If you want to save money on this, then it is quite possible to make these elements yourself. For example, like this:
- Let's place thin boards on edge directly in the formwork, using them to create partitions in in the right places and getting your favorite pattern. We use a “half-tree” connection.
- Let's make it from wooden blocks rectangular frame. The bottom (which does not need to be secured) is a sheet of metal or plywood. placed on the table, with a frame placed on top. At the bottom (if there is such an idea) a mosaic of pebbles or tiles is laid. Then the solution is poured in two portions, between which a metal reinforcing mesh is placed.
- For getting round tiles Let's take a plastic basin. To make it easier to remove the mold, we put plastic film on the bottom.
- To make a template to imitate natural stone, you will need the stone itself (cobblestone, granite, etc.) and sculptural plasticine. The plasticine mass is softened (dropped in a bag in hot water) and press the stone into it. Then wooden formwork is made around it. Pour in the solution.
- You can make templates from hoops from old barrels. They are bent as needed. And some other craftsmen cans They are used by removing the bottom and connecting them like a honeycomb.
The following video talks about the advantages of a polypropylene mold for a garden path, and how to work with it:
The choice of concrete proportions used for the foundation is influenced by many factors: soil parameters, expected loads, type of foundation. The basis of cement mortar is cement, sand, crushed stone or gravel and water; its properties directly depend on the quality and uniformity of mixing of the components. Changing the regulated ratios is unacceptable; the slightest errors lead to a decrease in the strength of the foundation and, as a consequence, the risk of destruction of the load-bearing structures of the building.
The main criteria include the geological conditions of the site (relief, level and partial pressure of groundwater on foundation elements, climate, freezing depth), type of foundation, presence or absence of a basement, height of the building and other weight loads. The limiting factor is the work budget; using high-quality types of concrete for the construction of light buildings on summer cottages is not economically feasible. The recommended minimum is:
- M400 – for houses over 3 floors.
- M200-M250 – for frame and panel buildings.
- M250-M300 – for buildings made of wooden beams.
- M300 - for low-rise buildings made of expanded clay, gas silicate or cellular blocks.
- M350-M300 - when building with brick or pouring load-bearing walls made of monolithic concrete.
The specified gradations are relevant when constructing one- or two-story houses; when adding another floor, it is advisable to choose a higher grade. The same applies to ready-made purchased solutions, especially if purchased from an unverified manufacturer. In general, the minimum permissible strength when concreting the foundations of residential buildings on slightly heaving soils is M200; when building on less stable soils, it increases.
Basic proportions
When preparing solutions, the working measure is the mass or volume fraction of the binder; the most common and convenient ratios include 1:3:5 (cement, sand, gravel, respectively). The regulated proportions, depending on the required strength of concrete, are:
| Final brand of solution | Mass fraction, kg | ||
| Cement M400 | Sand | Crushed stone or gravel | |
| M100 | 1 | 4,6 | 7 |
| M150 | 3,5 | 5,7 | |
| M200 | 2,8 | 4,8 | |
| M250 | 2,1 | 3,9 | |
| M300 | 1,9 | 3,7 | |
| M350 | 1,2 | 2,7 | |
| M400 | 1,1 | 2,5 | |
The strength of concrete is primarily affected by the ratio of sand and cement, but in addition to strict control over the proportion of dry components, the amount of water introduced is monitored. When using Portland cement, the W/C proportions are:
| Binder grade | Concrete strength grade | ||||
| 150 | 200 | 250 | 300 | 400 | |
| M300 | 0,65 | 0,55 | 0,50 | 0,40 | |
| M400 | 0,75 | 0,63 | 0,56 | 0,50 | 0,40 |
| M500 | 0,85 | 0,71 | 0,64 | 0,60 | 0,46 |
| M600 | 0,95 | 0,75 | 0,68 | 0,63 | 0,50 |

When building a foundation on dry soils, it is allowed to add lime or clay to the cement mortar; these components increase its plasticity. The recommended proportions when using Portland cement M400 are:
In private construction, it is inconvenient to separately determine the mass of all poured ingredients; a bucket is usually used as a measuring tool. In this case, all fillers are pre-weighed in a dry state. The W/C ratio largely depends on the moisture content of the sand; experienced developers add no more than 80% of the recommended proportion of water during mixing and then, if necessary (the consistency is not sufficiently plastic), pour it in portions. Fiber, PAD and other plasticizers are added to concrete at the very end along with the liquid; their share usually does not exceed 75 g per 1 m3.

Component Requirements
To prepare cement mortar for pouring the foundation, the following is used:
- Fresh Portland cement, ideally the release date does not exceed 2 months before the start of concreting. The recommended brand is M400 or M500.
- River sand with particle sizes ranging from 1.2-3.5 mm with admixtures of silt or clay not exceeding 5%. It is recommended to check its cleanliness (fill with water and monitor the change in color and sediment), sift, and, if necessary, rinse and dry.
- Pure crushed stone or gravel with fraction sizes from 1 to 8 cm, with flakiness within 20%. When preparing concrete for the foundation, hard rock screenings are used; limestone is not suitable due to its low strength.
- Water: tap water, free of impurities and foreign particles.
- Additives: antifreeze, plasticizing, reinforcing fiber. The introduction of such impurities is carried out in strict compliance with proportions.
It is important to understand the principle: coarse filler is introduced into the solution not only to replace the more expensive binder, it is precisely this that imparts the necessary rigidity. The minimum compressive strength of gravel or granite screenings is 800 kgf/cm2; in its absence, concrete simply will not withstand the weight load. A mixture for a foundation without crushed stone is prepared only when constructing it from individual blocks or slabs, and sometimes for quickly pouring pile supports.
The recommended proportions of cement and sand for masonry mortars are 1:3 or 1:2. The first ratio is considered universal, the second is chosen when constructing foundations on unstable soils. In practice, this means that for one bucket of cement with a grade not lower than M400 (M500 for increased loads), take 2 or 3 sifted quartz sand and no more than 0.8 parts of water. A properly prepared mixture has a consistency similar to toothpaste; to increase workability, 75-100 g of plasticizers (liquid soap or other PADs) are added per 1 m3.

How to make cement mortar for the foundation?
The process begins with the preparation of components and a concrete mixer; the presence of the latter is mandatory when mixing concrete for underground structures. The amount of building materials is calculated in advance according to the volume of the foundation and is purchased with a small margin. It is extremely important to fill the solution on the same day; when preparing the solution yourself, all components are washed and dried in advance. Next, they are poured into buckets into a concrete mixer in the following sequence: part of the water → sand and cement → dry additives and fiber (if necessary) → coarse filler → the remaining liquid in small portions. After adding the new ingredient, the drum is turned on for 2-3 minutes, and no more than 15 minutes later the finished solution is unloaded.

There is a time-tested method for selecting the correct proportions, chosen in the absence of data on the size of crushed stone. In this case, the bucket is filled with coarse filler, shaken several times and completely covered with water. The resulting volume of water corresponds to the required proportion of sand in the solution. After that, sand is poured into the bucket and filled with water again to determine the proportion of cement. But some consider this approach to be complex and outdated; a more correct method is the standard method of recalculating the mass fraction into the volume fraction and pouring the components into a concrete mixer.