Working with dry gypsum plaster begins with the installation of profiles for drywall.
The frame is the basis on the evenness of which the entire result of the work depends, therefore at each stage of its construction you need to use a building level.
Overall, this job requires focus and attention.
The key to success in any repair is the selection of quality materials and the right tools.
When repairs are done with your own hands, many tools are already in the arsenal of craftsmen, but to install a frame from profiles for drywall, you will need some special devices.
The list is not small, but there are no unnecessary items.
Common weapons include:
- roulette;
- building level;
- hammer;
- stationery knife;
- metal knife;
- several spatulas.
Separately, it is worth purchasing a spatula for corners if you need to create three-dimensional structures.
You will also need a screwdriver and a hammer drill.

Installation of the frame and the drywall itself is impossible without:
- anchor wedges;
- dowel-nails;
- self-tapping screws
If the room has “cluttered” walls or a very skewed ceiling, then you will need to use some types of fastenings: direct hangers, crab connectors, profile extensions.
Well, of course - aluminum profiles and drywall in the required quantity.
To ensure that the applied marking lines, and subsequently constructed plasterboard planes, are perfectly level, you can use a laser or hydraulic level for the work.
These devices save time, since with a regular building level it is quite difficult to accurately determine how skewed the ceiling is or apply markings on the walls.
A cord release device may also be useful. For a kind of sound insulation, craftsmen use sealing tape when installing supporting profiles.
If sound insulation is to be done thoroughly, then the materials must be appropriate.
Finishing work requires availability acrylic primer, putty, reinforcing tape for seams may also have to be treated original surface antifungal solution.

The market now offers different kinds plasterboard, both for interior and exterior work.
To make repairs yourself, you need to pay attention to the following: regular and moisture-resistant.
For finishing rooms exposed to high humidity, it's better to use the latter.
It is also worth choosing reliable connecting elements and aluminum profiles from trusted manufacturers.
Wall finishing with plasterboard
Secrets are perfect smooth walls often consist of making the right choice finishing.
Unambiguously, having assessed the time, effort, money spent on the work, as well as the final result, we can confidently say that drywall is perfect solution for imperfect walls.
The work begins with marking. Lines are drawn on the floor along which the supporting profiles and markings for vertical elements will be located. These lines should be equally spaced from each other.
At standard width sheet one meter twenty centimeters, this distance is sixty centimeters. This is done so that the joints of the sheets fall exactly in the middle of the profile.
First vertical profiles should be at some distance from the corners. Other secrets of installing a frame under drywall are revealed in the following video.
The construction of the frame begins with a guide profile fixed to the floor. After this, vertical elements will be placed along the drawn lines.
Their length should correspond to the height of the room, but the standard length is usually greater than the height of the walls.
This is not a problem, because aluminum elements are easy to cut even with your own hands using metal scissors.
Before starting the installation of the vertical components of the frame, hangers are attached to the wall in increments of 50–60 centimeters, onto which profiles will subsequently be installed.
If the height of the walls exceeds the standard sheet length of two and a half meters, then the drywall must be installed staggered. In this case, there is a need for additional transverse jumpers.
They should also be installed taking into account the fact that they should have a joint. The remaining spaces are filled with pieces of drywall cut to size.
Installation is carried out using self-tapping screws in increments of up to 25 centimeters.
Construction of new plasterboard walls
If it is necessary to divide the space into several rooms, drywall can perform at its best.
A special advantage of this material is its Fire safety, without this quality it is impossible to even talk about conducting electrical wiring inside the wall.
Moreover, you can do all the work yourself.
Having drawn up a preliminary plan of the room, you can begin marking the design position of the future walls.
It is easier to draw design lines using a laser level and a cord breaker.
Secrets correct use These tools are presented in the video.
Walls, especially in older houses, almost never form perfectly right angles with each other.
There is always some kind of error, which leads to the fact that the distance between the opposite partitions at the beginning and end is different.
Taking this into account, the plasterboard structure should be placed at an equal distance from opposite walls. Then it will not be noticeable that the room does not have an ideal shape.
In addition, the construction plasterboard partition should be the last stage of repair, that is, the walls and ceiling should be puttied.
The lower supporting profiles are installed according to the marked marks. The distance between the attachment points should not be more than a meter, each element must have at least three dowels.
In the same way, guide profiles are attached to the ceiling. After measuring the height of the room, the rack profiles are cut and installed.
Those that are adjacent to the walls are mounted using sealing tape, those that form the doorway need to be strengthened.
The video above explains how to do this.
After installing the outer racks, the remaining space must be filled with vertical elements in increments of sixty centimeters and horizontal jumpers, as when covering walls.
After running the electrical wiring, you can attach drywall to one side of the aluminum frame and lay down insulating material.
Drywall on the second side of the frame is attached so that the joints of the sheets on both sides do not coincide.
Before finishing putty walls, the seams are primed and sealed using sickle tape, the recessed heads of the screws are also hidden under the putty.
Frame for plasterboard ceiling
Some types suspended ceilings And similar designs are built not only for aesthetic purposes, with the help plasterboard boxes communications or unsightly beams are hidden.
Also, if necessary, additional heat and sound insulation can be hidden in these structures.

Installing the ceiling yourself light hands cannot be named. But if necessary and enough practice, the result can be pleasantly surprising.
This will take a lot of time, but if you wish, you can even make a two-level structure with your own hands.
A plasterboard ceiling, like previous types of plasterboard structures, is attached at the stage when other surfaces (except the floor) are ready.
Installation also begins with marking the walls and ceiling.
If you don’t have a laser level and a cord breaker, you can do the markings yourself using a pencil and building level.
Along the marked lines, guide profiles are attached to the walls with dowels using sealing tape.
The frequency of attachment points should be at least fifty centimeters, at least three for each profile. After this, direct suspensions are attached to the ceiling.
The distance between the hangers is determined by the load subsequently applied. After installing the supporting profiles, transverse jumpers are installed.
The pitch of the transverse elements must be uniform, with standard sizes It is advisable to take the sheet step equal to 50 centimeters.
First load-bearing profile should be 10 centimeters from the wall. The crossbars are attached using a crab connector.
How to properly attach such clamps is clearly shown in the following video.
After installing the frame, you can begin covering it with plasterboard. Sheets are cut using stationery knife or special knife for drywall.
Sheets should be fastened at intervals. Place the self-tapping screws at intervals of 15-20 centimeters, leaving a centimeter “in reserve” from the edge.
Finishing
In order for the result of the work to be durable, you need to follow some rules for working with drywall.
When installing sheets on a frame, the heads of the screws need to be slightly recessed; the screws should be placed in a checkerboard pattern at a distance of ten millimeters from the edge of the sheet.
The cardboard at the attachment points should not be torn. Before installation, you need to cut the chamfer from the drywall at an angle - this will make it easier to seal the seams in the future.
When creating rounded structures, for example, on a multi-level ceiling, smooth lines from profiles and drywall can be achieved with your own hands by making frequent cuts on the profile or on one side of the sheet.
Finishing includes priming and sealing seams using serpyanka. Also, recessed screw heads are hidden under the putty.
After drying and sanding, apply finishing layer putties. The last stage is painting.
Today, with the help of plasterboard structures, you can quickly and efficiently level the surface of walls and ceilings, create smooth single-level or unusual multi-level suspended ceilings, non-standard curved or maximally even partitions. The basis of any such design is a reliable frame, which must be carried out in strict accordance with technology, in accordance with current standards and rules. Installation of a profile under drywall can be done by any craftsman or amateur who knows how to use a screwdriver and simple construction tools.
Preparatory work

Profiles for plasterboard structures are made of durable galvanized steel. They are easy to work with in any environment, even the most difficult conditions, with significant fluctuations in temperature and humidity. The main thing is to preparatory stage determine the type of structure, its design and drawings of all connecting elements on the basis of which you should purchase quality materials and prepare all the necessary tools.

Depending on the type of work planned, modern manufacturers offer several types of different profiles:
- Rack-mounted. They have a special central recess that strengthens the profile and helps, when installing the structure, to find the exact place for fixing the screws.
- Guides. They have durable corrugated walls of increased rigidity. Ordinary consumers call such profiles “P-shki” for their design features. They are used together with rack profiles, so their parameters when selecting and cutting must match.

- Ceiling. For arranging frame ceiling structures Special ceiling profiles are produced that simultaneously have three grooves, with the help of which the most accurate alignment of hangers and screws is performed.
In addition to profiles, you should purchase special components, without which it is impossible high-quality installation profile for plasterboard with your own hands.

Depending on the volume of work performed, you should buy hangers and rods, brackets, anchors, dowels and screws. The following tools and equipment should be prepared:
- Special scissors for cutting metal elements.
- A screwdriver or hammer drill (depending on the design of the walls to which the profile will be attached).
- Building level.
- Laser level or plumb line.

Having prepared required amount main and consumables in accordance with the chosen design and scope of work, installation work begins.
The procedure for installing a profile under plasterboard

Consumers have already appreciated the wall leveling frames, which can be used to quickly create smooth and structured surfaces with niches and columns. Based on pre-developed drawings, the surface is marked. Stepping away from the corner, draw on the adjacent wall using a construction ruler or level. straight line. This is the boundary of the entire structure, taking into account the thickness of the guide profile and gypsum board sheets. As a rule, this parameter is 40-50 mm. From the base line, transfer the markings to the ceiling using a laser level or plumb line.

After applying the markings, it begins step-by-step assembly frame. First, guide profiles are installed, which are initially fixed using self-tapping screws and dowels to the floor surface, and then to the ceiling.
Having mounted the guide elements, direct hangers are attached, with the help of which the rack profiles will be installed. The hangers are attached to the wall with dowels at a distance of no more than 800-1000 mm. Then all the vertical guides are installed, which are inserted into the cavities of the lower and upper profile.

When carrying out work, it is imperative to control the correct location of the structure in level using a vertical plumb line. After making sure that the frame structure is installed level, all elements should be secured completely. The frame structure can be additionally strengthened using jumpers, which should be cut from rack profiles.
Before fixing the plasterboard sheets, insulation, sound insulation, steam and waterproofing can be installed in the finished frame structure. View insulating materials and their thickness depends entirely on the type of wall and the task being performed.
Many craftsmen to increase sound insulation frame system use high strength plastic film, which is laid overlapping between the profiles.
Typically used as effective thermal insulation. roll materials or soft mats. They are easy to cut and lay, fixed with a special stapler or tape.
If you are interested in how to attach drywall to the ceiling, then you can find out.
Video
This video shows the process of installing profiles for drywall.
Today in repair- finishing works Oh Drywall and structures made from it are often used, since this material has a number of advantages over others.
Installing a profile under plasterboard with your own hands is easy, but it requires precise calculations and compliance with the rules.
There are two methods of laying plasterboard sheets - framed and frameless.
The latter involves gluing sheets onto smooth surface using gypsum glue. This is how the walls are leveled.
Wall cladding frameless way
The frame method is the creation of a base from profiles, which is then sheathed with plasterboard sheets.
There are many options for connecting parts, but it is best to use a cutter. The cutter pliers are a device that allows you to create notches without much difficulty.
Before starting work, correctly calculate the number and type of components.
Plasterboard sheets are classified by purpose and thickness. The same applies to metal profile– it is presented in four versions:
- ceiling (PP or CD);
- ceiling guide (PNP or UD);
- rackmount (PS or CW);
- guide (PN or UW).
The first symbol in the designation corresponds to the profile section, the second indicates the area of application: type W is used when finishing walls, and type D is used when working with ceilings.
 Installation of a three-dimensional structure for subsequent cladding
 Preliminary work
First, carefully examine the wall or ceiling on which the profile is to be mounted. Determine what material it is made of, what is the microclimate in the room.
Based on your observations, select the type of drywall and fasteners.
Suitable for rooms with a normal environment standard sheets. For the bathroom, kitchen or basement, choose one with moisture-resistant properties. When arranging technical or garage premises, warehouses, stokers, and places where high-temperature equipment is located, use fire-resistant sheets.
When installing ceilings, determine the height to which the surface will fall and select hangers accordingly.
 Types of frame elements for gypsum board
 In accordance with the fittings from which the walls are made, dowels and screws for metal and wood are used different sizes. The thicker and more difficult wall, the larger the size of the driven dowel or screwed screw.
Selection of tools
When installing a profile use:
- drill or hammer drill;
- metal scissors, hammer;
- different types of levels or plumb line;
- painting knife and thread, tape measure, pencil;
- screwdriver or cutter;
- square or crossbar;
- sealing tape;
- dowel-nails and anchor-wedges;
- suspensions, profiles, their connectors;
- self-tapping screws
The correct installation of guide profiles is checked using a building level of one type or another.
To ensure that the frame forms a single whole, self-tapping screws are used to connect the profiles. But now everything is much simpler - most builders have begun to use a cutter. It is easy to work with, no special skills are required. Cutter pliers help you effortlessly create a frame for drywall. In appearance, this tool resembles pliers.
 Types of plasterboard sheets
 Profile installation stages
Work to prepare a strong and durable base for drywall:
- Level and plaster the floor, adjacent walls or ceiling;
- Make markings for the frame on the floor, wall or ceiling. The thickness of the plasterboard sheet, trim and putty is added to the marks. At this stage, a laser or water level will be useful;
- Attach the profiles to the ceiling or walls, not forgetting to apply sealing tape. If you are working on installing a wall, then first install UW profiles on the floor and ceiling, using dowels and screws in half-meter increments.
- Along the edges of the guides and where door or window openings are planned, rack elements (CW) are placed facing the middle. Metal screws are used for this.
If you have a cutter at hand, follow these steps to connect the profile:
- correctly align the two profiles being connected relative to each other;
- move the handles of the device apart;
- insert the work element onto both sides of the parts;
- bring the handles together in one motion. You will hear a kind of click, which will indicate that the profiles are connected;
- spread the handles and carefully pull out the device.
 Cutter
 In practice, it turns out that this type of connection is not inferior to screws in strength and durability.
Another advantage of working with a cutter is that the self-tapping caps do not interfere with the tight fit of the drywall sheets to the installed frames and do not leave noticeable recesses on the outside. After all, there are no screws and screws there.
Choose a reinforced, that is, universal cutter for work. It fits all profile sizes. But if you plan to work only on the ceiling, you can purchase an inexpensive cutter designed for ceiling work.
So, first, the profiles are attached to the lower guides, then they are set vertically and attached to the upper guides. It is very important to leave space for covering the structure with plasterboard strips.
- Rack profiles are placed vertically along the entire length of the structure. To do this, first make an indent of 55 cm from the adjacent wall, then place the first profile, and the following after it in increments of 60 cm;
- Designate openings for windows and doors using guide profiles. The result is a frame of the desired shape.
 Openings for doors and windows in the structure
 At this stage, the installation of the profile is completed. Double-check everything carefully, because the profile for drywall is the load-bearing element of the system!
At each stage of work, different devices are used, they allow you to make the work process as convenient as possible.
Video advice from experts:
If you get down to business seriously and decisively, prepare in advance, find out necessary information and nuances, you can avoid the most common mistakes when installing a profile and in the end get a high-quality and durable result.
 Plasterboard structures in the nursery
 So, the article describes initial stages works on the creation of plasterboard structures. The surface of the plasterboard is smooth, so immediately after sheathing they begin the cladding process itself. creative mind works - painting, wallpapering or other finishing.
In contact with
Finishing a room with plasterboard solves many problems. In particular, you can short time level any surface. An integral part of the plasterboard structure is a frame made of galvanized profile. How to attach a profile under drywall will be discussed in our article.
Special works There is no need to carry out surface preparation. The only thing that needs to be taken care of in advance is the future location of sockets, switches and furniture. This greatly affects the amount of material purchased.
The profile itself for plasterboard is made of galvanized steel, which has sufficient strength. You can work with this material without any problems different temperatures and humidity.
Profiles are purchased based on the type of structure being created. There are such types of material:
- rack-mounted;
- guides;
- ceiling
Rack products have a special recess in the center, thanks to which maximum strength of the frame made from a profile for drywall is achieved and the exact location of the screws is determined.
The guide profiles have strong walls that have increased rigidity. At the time of buying of this material The dimensions of the rack profiles must be taken into account.
When finishing the ceiling, ceiling profiles are purchased. They have three grooves, which ensures the most precise fixation of the suspensions.
The fastening step and the dimensions of the profile for drywall are directly influenced by the load to which it will be subjected in the future. finishing material. Adjacent rack profiles are fixed at a distance of 0.6 m from each other. If you subsequently plan to cover the drywall ceramic tiles, then the step is reduced to 0.4 m.
It should also be taken into account that the presence of door and window openings will require the creation of a separate sheathing. When laying drywall, there should be no seams at the corners of the openings, and adjacent sheets should touch the edges above the window or door.
Particular attention is paid to the acquisition of self-tapping screws. They should be light (painted). Black screws will oxidize.
Surface marking
Before installing the profile under the drywall, you need to mark the surface. To carry out this process you should use:
- laser level;
- beating cord;
- tape measure;
- marker.
Lines are immediately drawn that serve as a guide for creating a new plasterboard wall. In the presence of uneven wall the most protruding surface is selected, from which a point is marked perpendicularly. The distance between it and the wall is equal to the width of the profile, to which 2-3 mm is added.
Another mark is made near one of the corners at a similar distance from the wall. Using a tapping cord, lines are made between two marks on the ceiling, floor and walls. This determines the location of the rack profiles.

Next, marks are applied for attaching direct hangers. They are located in increments of 0.4-0.5 m. The marked points are placed on the line where the rack profile is located. To prevent the outer hangers from coming into contact with the guide profiles, they should be installed at a distance of 15-20 cm from the ceiling and floor.
The quality of fastening the rack profiles will depend on the correct installation of the hangers. After marking work, you can safely begin installing profiles for drywall.
Installation of profiles
First, guide profiles are installed. They are laid on the floor along the walls. The outer part of the profiles is aligned with the marking line. The profiles are fastened to the floor. For this, dowels are used, which are screwed in increments of 20-25 cm.
A similar procedure is performed on the ceiling. The ends of the guide profiles are mounted end-to-end. Moreover, installing a profile under drywall does not require the use of special fasteners. Simply screw in the dowels along the edges of the guides.
After this, you can begin installing the rack profiles. This process begins with the creation of blanks of the required size. The length of the rack profiles is equal to the distance from the ceiling to the floor, reduced by 3-4 mm.

When installing a profile under plasterboard with your own hands, you should take into account that the first sheet of sheathing is attached to the wide side (back) of the galvanized material. That is, the installation of profiles is carried out in such a way that the backs are located exactly in the place where the installation of plasterboard sheets begins.
The installation procedure itself involves the following steps:
- the ends of the rack profiles are inserted into the guide profiles;
- they must be located in a vertical plane;
- Suspensions are attached along the profile line;
- the suspension strips are bent;
- using self-tapping screws, rack profiles are fixed to the hangers;
- the protruding part of the hangers is cut off or bent.
At the final stage of installing the profile under plasterboard on the walls, reinforcement is made frame structure in places where the load on the cladding material is expected to increase. For this purpose, transverse profiles are installed.
After measuring the distance between the rack profiles, the blanks of the transverse profiles are cut. When carrying out this process, pieces of the back material up to 10 cm long should be left on both sides of the profile. Only two narrow parts of the profile are cut off.
The remaining part of the backrest will be fixed directly to the rack profile. Fastening is done using self-tapping screws. The back of the profile should be directed in the direction where the first plasterboard sheet will be mounted.

With a standard width of plasterboard sheet of 1.2 m, the installation step of the transverse profiles is 0.3-0.4 m. When installing the frame under the plasterboard, there should be no cross-shaped joints.
After creating the frame, the space between the profiles is insulated (if necessary) and covered with plasterboard.
Other features of the frame structure
You can create from drywall various designs. One of the most common designs is a two-level ceiling.
When assembling the frame for such a ceiling, the second layer of guides and rack profiles is attached. They are connected to the main profiles in a cross-shaped manner. For this purpose, U-shaped fasteners are used (popularly called “pawns”).
When working with profiles, you may encounter such a problem as the arrangement of internal and external corners. At complete assembly metal frame the presence of an internal corner does not make it possible to install rack profiles on the adjacent wall.
To build a high-quality frame in inner corner, it is necessary to attach an additional rack to the main rack profiles. The step of its fastening with self-tapping screws is 25-30 cm. Both profiles must be located in the same plane.
For device external corner there is no need to connect two adjacent profiles. They are simply mounted on both sides of the corner. Rack profiles are fixed to the ceiling, wall and floor. This will significantly improve the reliability of the design.
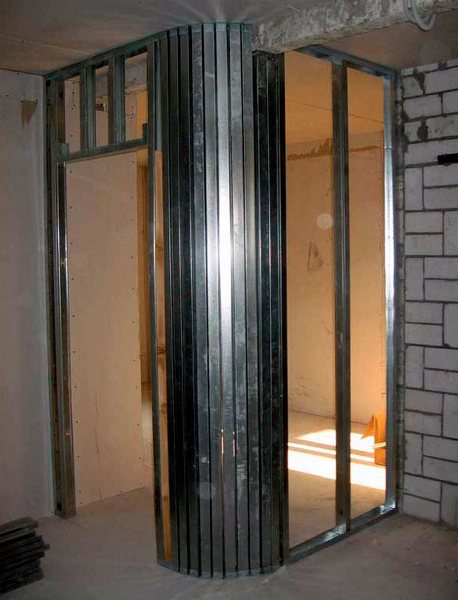
In some cases, when constructing complex architectural elements (arches, openings, niches), it is necessary to create a semicircular frame. This is done quite simply. Using metal scissors, small wedges are cut into the guide profiles, which are bent and folded around the circumference.
Video about installing profiles for drywall:
At the moment, such material as drywall is one of the best finishing materials. It combines ease of installation, high efficiency and low price. However, in order to work globally with plasterboard, which means the effectiveness of its use in a particular area of construction and finishing work, you need to know the basics of its installation. And this is exactly what we will talk about in our article today.
Of course, most people undertaking renovations prefer to use this finishing material without a profile, a kind of frameless installation, since an ordinary plasterboard sheet can be quite easily attached to a surface, for example, to a wall or ceiling, using simple self-tapping screws, and marks from holes can be easily repaired with ordinary putty. However, in this case, it is necessary to have a surface on which the plasterboard will be attached, and if you need, for example, to make a partition in a room, then it is simply impossible to do without using a profile, and this method of installing plasterboard is called frame.
 Profile frame can be covered with plasterboard
 The frame installation method implies the mandatory presence of four types of profiles, to which, in fact, the plasterboard sheet will be attached. The PS profile is rack profile, which is installed in a vertical position and acts as a kind of support for other types of profiles, and, in addition, also serves as a guide surface when attaching plasterboard sheets. This profile in its standard version has a length of three hundred centimeters and a square section with a side of five centimeters. In addition, there are other sizes of the rack profile, differing not only in their length, but also in the cross-sectional dimensions.
The second type of profile, which is necessary to create a complete frame for plasterboard construction, are the UV and UD profiles, which are horizontal guide profiles designed so that plasterboard sheets can be fixed to them. These profiles, as a rule, have the same cross-section, with dimensions of twenty-seven millimeters by twenty-eight millimeters, but the length, that is, the linear measurements of a given profile, can be different, but, as a rule, in the standard version, the length of such profiles is three hundred centimeters.
And finally, last type profile, which is required when creating frame installation plasterboard, is a PP profile - a horizontally positioned ceiling profile, which is often used to create structures suspended ceilings. The use of this profile is not mandatory, since you have the right to independently decide whether you will finish the ceiling with plasterboard or not, but it is worth noting that if you decide to do just that, then you will succeed perfect shape your premises, since all angles when placing future surfaces are strictly measured, and, therefore, the problem uneven ceiling will be resolved by itself. In addition to the fact that you will need a profile, you will also need connecting parts, without which normal and high-quality installation of a frame structure for plasterboard finishing simply not possible. You will need:
- U-shaped suspension for PP profile (ceiling profile);
- cross-shaped connector for connecting the PP profile at one constant level;
- U-shaped connector required for connecting the PP profile to various levels(if you want to create a multi-tiered ceiling);
- T-shaped bracket, used in practice to create suspended ceiling structures
 Types of profiles and connections for drywall
 It is perhaps worth noting that you should not regret purchasing these connecting parts, since they are all necessary in order to withstand drywall profile weight, and if this is neglected, then it is likely that these connections will experience high stresses and loads, which may result in the destruction of the entire structure.
Installation plasterboard profile does not start with anything, namely with markings, since if this is not done in the proper way, then it is likely that the surface will be uneven, meaning tilted vertically or horizontally. In order to make the correct markings for our future frame, we need to use a tool such as a level. Having such a tool, you must first go through it vertically and then horizontally, as a result of which it will be quite easy to identify whether the wall is “overwhelmed” by builders or not.
If the builders turned out to be professionals, and the wall is perfectly flat, then you can start installing the profile, but if the builders still lacked professionalism a little, and the wall is tilted or has significant protrusions, then you should proceed as follows: you need to determine the point of the wall that protrudes the most, visually project (imagine that the wall is not in a vertical position, but in a horizontal one) onto the floor, and add twenty-eight millimeters to the dimensions of this profile. The question may arise as to why exactly twenty-eight, because the size of the UD and HC profile has a thickness of twenty-seven millimeters, but the whole point is that the profile design does not take into account the thickness of the metal, which can be forty-five hundredths of a millimeter and six tenths millimeter, and it is quite likely that when measuring this protrusion you will be mistaken by at least a millimeter.
After you have done this, at a distance measured from the wall, you should attach the UD and UV profiles to the surface of the floor and ceiling, respectively, and then attach the vertical guides to this profile. It is worth noting that before you attach the rack profile, you must again make markings so that when installing the frame for finishing plasterboard sheet no distortions have arisen, and only then install the hangers and attach the rack profile to them, which should be repeated on the wall every seventy centimeters, which will be the answer to the question that has arisen: how to set up a profile for drywall.
 First of all, you need to mark the ceiling
 Well, now the time has come to deal with the PP ceiling profile, since the question of covering the ceiling with sheets of plasterboard is very actual question to date. First stage of creation ceiling frame is almost identical to how we marked the walls, after which, every one and a half meters, control hangers are placed for the ceiling profile. It is worth noting that if the dimensions of your room do not exceed a length of five meters, then it will be quite enough to install pendants on opposite sides of your ceiling, and place one in the center. If the room is large in size, then it is necessary to install intermediate suspensions to give the frame greater reliability, strength and stability.
After you have attached the hangers at the points you marked, you can start attaching the ceiling profile, installing it approximately every fifty centimeters, that is, two additional hangers are installed between the two control hangers. After the brackets are installed and the surface location is properly checked, you can begin installing the PP profile. It is worth noting that connection of profiles for plasterboard is no different from a similar process carried out on the wall, and the same self-tapping screws are used as connecting units. It should be noted that it is imperative to check the set dimensions for the profile, since even with an error of just half a centimeter, this will be negatively reflected on the surface of your ceiling, and it is quite easy to make such a mistake, and if you have the opportunity to use laser level(borrow from a neighbor, borrow from friends or acquaintances), then be sure to do this, if of course you want to get a high-quality surface.
 Fastening the profile for drywall
 And finally, I would like to talk about how to install the frame for multi-level ceilings from plasterboard. In fact, there is nothing special about this, since the same profile is used as when installing a regular ceiling. As always, it all starts with the markup. To do this, you need to “draw” a sketch of your multi-level ceiling on your ceiling, then level it and install brackets (U-shaped suspension) at the mounting points. Since our ceiling must be multi-level, therefore, some of the brackets are set at one height, and some at another. After you have done this, you only need to install the ceiling profile and fix the plasterboard sheets on it.
But what if you want, say, to make not a straight multi-level ceiling, but with various kinds of circles, smooth transitions, curves, and so on? There is no point in guessing, since again the familiar PP profile is used, with the only difference, perhaps, that on it, as the roundness and smooth transitions, using metal scissors or wire cutters, small cuts are made along which the profile is bent to the required radius. In this case, it is also necessary to take into account the fact that cuts that are too close can lead to instability of the entire frame structure, so they should be made as necessary. In addition, such ceilings can only be created in fairly spacious rooms - from twenty square meters, and therefore residents of small apartments can simply forget about their ideas, or at least do it themselves. In all other respects, the design of the frame of a curved multi-level ceiling, in terms of its installation method, is naturally similar to the installation of a frame for rectilinear multi-level ceilings, although it should also be noted that it is necessary to use U-shaped suspensions much more often, since, nevertheless, this design is more unstable and complex.
 Installation of profiles for multi-level plasterboard ceilings
 Conclusion!
That's basically all we wanted to tell you. Now you can independently install a frame for sheathing wall or ceiling surfaces using plasterboard, with minimal necessary equipment, profile, fasteners and, of course, the stock of knowledge obtained in our article.