IN Lately plastic euro-windows have almost completely replaced their wooden counterparts. However, the latter are still in demand, since they “breathe”, and besides, wood is an inexpensive material. Make a window for a summer house or country house It won't be difficult, you just need to follow the instructions. The product can be made to your taste: sliding, with shutters, with an unusual window sill.
Required Tools
The following tools and materials are required:

- Hammer.
- Drill.
- Screwdriver.
- Chisel.
- Glass cutter
- Wood glue.
- Grinding machine.
- Hacksaw.
- Milling machine.
Using these tools, you can carry out basic work and calculate the amount of material needed. Next, you can begin building the window box.
Wooden box
For the manufacture of boxes, pine is often used, which is characterized by its availability, reliability and low price.

Of course, this is not the only wood from which a structure can be built; there is also oak. It is more reliable and lasts longer than pine, but is more expensive. If the master is inexperienced, then it is better for him not to experiment with expensive material.
It is worth remembering that the box must be as strong as possible, because it bears the main load. Pine boards must be cleaned and dried, they must not have cracks, scars or protruding knots. It is worth considering only the first grade of wood; the rest are definitely not suitable.
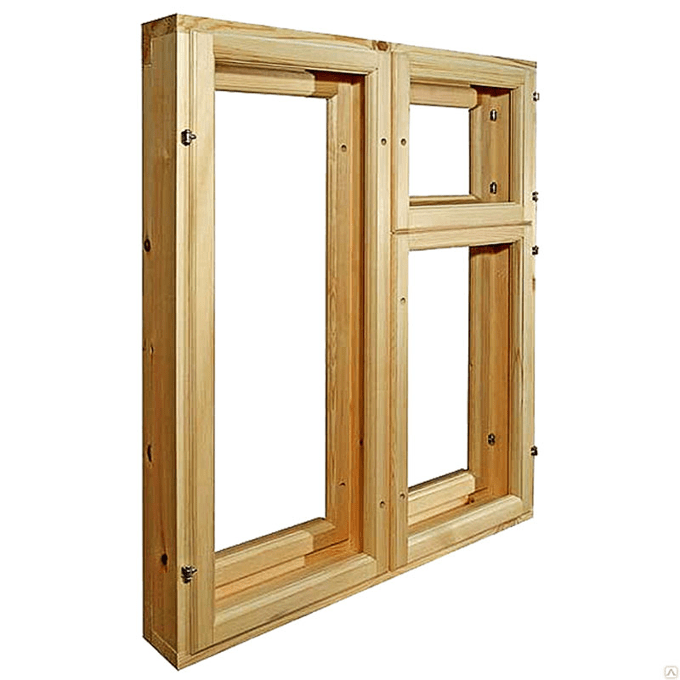
To make a block you need to follow the instructions:

- Take a board with a section of 15x5 centimeters.
- Select a groove in the workpiece in the shape of the letter G, the depth of the groove is 1.5 centimeters.
- All parts are connected using wood glue.
- Then you need to drill holes in all corners, the depth of which should not exceed 3 centimeters. You need to insert wooden pins into them.
The box must be inserted into the wall in such a way that there are no gaps. The first step is to make holes, where you then insert anchors or dowels and screw the box. The cracks can be filled polyurethane foam.
Window frame
Making a window frame that is not inferior in quality to factory products is sometimes beyond the power of even good craftsmen. The whole point is that the design should not have deviations, and even a slight distortion can disrupt the thermal insulation. Despite this, you can create a window frame from wood with your own hands, but in a simpler way.

Wooden frames produced on an industrial scale are not much different from plastic options. Here and there complex design, which allows you to open sashes and vents in several planes. Homemade window includes the following steps:
- Preparation of materials and selection of profile.
- Frame installation.
- Glazing of a window block.
The choice of profile comes down to the fact that you have to choose which glass to install, regular or double-glazed windows. Each option has own advantages: in the first case it is low cost, in the second it is low thermal conductivity.

An interesting feature of double-glazed windows is the inert gas pumped by the manufacturer between the sheets. Its concentration decreases slightly over time, but this is not scary, since the difference in heat retention will not be visible. There is also a hybrid option, when both are installed regular windows, and double-glazed windows. This homemade wooden window is called Finnish. It retains heat as much as possible. Of course, the most simple option There will be a pair of glasses installed, between which there is a layer of several centimeters wide.
The main nuance in the manufacture of wooden frames is the preservation of shape and geometry during installation. Pre-prepared drawings will help you cope with this. The timber must be selected based on the thickness of the glazing of the future window. The minimum permitted cross-section of timber is 60X40 mm. The grooves in the bars are made using an electric planer or a milling cutter. Professionals advise beginners to practice creating grooves on small pieces: make cuts in different directions. DIY wooden window drawing:

Before starting all procedures, you need to carefully take measurements. If it is possible to entrust this work to a more experienced person, then it is better to do so, because a deviation of a couple of millimeters can lead to bad consequences. The ends should be filed at an angle of 45 degrees.
The elements of the wooden frame are assembled using wood glue. You can add additional strength by drilling holes in the corners and inserting wooden rods there. They are also lubricated with glue. To add strength, you can knock out a groove on the connecting elements and install a key. The result should be an almost monolithic structure.

There is another option for connecting elements - tongue and groove. However, this work is quite labor-intensive, so the first option is most often used.
Glass installation
At this stage, it is important to accurately calculate the dimensions of the glass, since it must fit snugly to the frame. This will reduce the thermal conductivity of the window. You need to measure to the nearest millimeter. The glass is cut with a glass cutter, after which the sharp edges are treated with sandpaper.
When carrying out this procedure, it is important to take care of your safety:

- Work must be carried out in rubber gloves to protect your hands from cuts.
- Eyes need to be protected with glasses, as there is a risk of chips or splinters getting in.
- You can protect your face with a mask.
Carrying out the actions of a glass cutter also has its own subtleties. So, the movement of the device should be smooth, with a moderate degree of pressure. If the pressure on the glass is too low, the cut will be of poor quality and chips may form. Excessive pressure is also harmful: you can push through the glass and get injured by fragments. For an even cut, it is best to use a ruler. The material from which it is made makes no difference. If it is not there, then you can simply use a flat strip.

After the work with the glass cutter is completed, the glass is moved to the edge of the table and broken. If everything was done correctly, it will break exactly along the trajectory of the glass cutter. This is how the glass for the entire frame is cut out. Then you can start measuring the glass: simply place it in the frame and check if it fits.
The next step glass will be installed in the frame. To do this on wooden parts sealant is applied. It is best to choose a colorless one so that the window looks perfect. Next, the glass is applied to the frame and time is given for the sealant to dry. After some time, the canvas is secured with a glazing bead. The bead is a triangular strip that presses the glass. It not only fixes the glass, but also hides the seam. It is best to mount the rail with thin nails.
Window sill preparation
One of the stages of window installation is the installation of a window sill. You can choose any material. However the best option it will still be natural material- tree. Here are its main advantages:

- The material is environmentally friendly and absolutely safe.
- Heating devices practically do not harm it, which cannot be said about plastic.
- When using a non-standard coating, you can achieve exclusive colors that will please the eye.
The main condition: the board for the window sill must be intact, without cracks or knots. It needs to be pre-processed, a selection of molds and teardrops must be made. Tears are small grooves with a width of 8-10 mm, the sampling depth reaches 8 mm. Such a gutter is made along the bottom of the board, at a distance equal to 2 cm from the front part.

After this, you need to cut the board to the required length. Calculating everything is simple: take the width of the window opening plus 4 cm on each side. You can add a few centimeters if you need to give additional reinforcement.
It is also worth paying attention to the protrusion into the room. Of course, you can make the window sill flush with the wall, but this is not very convenient. You shouldn't make a protrusion that is too big either. Optimal distance 6-8 centimeters. The exception is, perhaps, the case of making a window for the kitchen, where a wide projection will come in handy.
Product Installation
The next stage is installing the window sill. To do this, you will first have to clean the installation site, cover it with shingles and felt. This will avoid heat loss. The installation itself is carried out using a solution of lime and gypsum. Wooden wedges are used for installation, then everything is filled with mortar.

After the solution has dried, you can lay the board. It is mounted from the bottom of the opening. 4 cm at each end of the board will be enough. This is necessary for laying the structure into wall slopes. If the wall is stone, then it is necessary to clean the grooves and then adjust the board. With help building level It is necessary to level the product, avoiding distortions. Once the board is installed, all gaps must be filled with gypsum mortar. All damaged areas of the wall should be carefully plastered according to the general finish.
The final step is painting the product. Painting a window is not difficult at all. You just need to remember the following:

- If the window was not painted before assembly, the frame must be treated with an antiseptic. You especially need to pay attention to the processing of the ends, because this is where the pest usually enters.
- It is better to prime the surface before painting. Firstly, the primer reduces paint consumption, and secondly, it helps to increase the service life of the window, playing the role of an antiseptic.
- It is recommended to paint in several layers.
- The outside of the window is painted with special paint for exterior use, but on the inside you can use any paint.
It is quite possible to make a wooden window with your own hands. Its quality will not be like that of a factory model, but it will cost much less.
Four years ago I published an article “Profile drawings of a window block (wooden double-glazed window)”, where I attached photos and drawings of wooden window profiles. Over the years I have received several letters asking to see drawings corner connections or send more detailed drawings. A week ago I received another such letter and today I will try to clarify the situation with this review article.
Letter from a reader of ModelMen.ru
Writes: Daniel
Hello Dmitry. I am from Sevastopol (Crimea, Ukraine). I was very interested in the drawings of a wooden window with double glazing. (). Now I’m renovating a house and didn’t want to install plastic windows, but wooden windows are very expensive, so I decided to make them myself, I started looking for drawings on the Internet and many search engines indicate yours. You write that you developed the drawings yourself, so I wanted to ask you a question as a developer. How much smaller should the window be than the frame, i.e. if you assemble the frame, how should the frame be calculated (height width) so that they fit each other exactly and do not create gaps when closing (or do not catch each other). Is it possible to make such a window without a milling machine? How to connect corners (at the butt or at 45 degrees)? What fittings was the window designed for? I promise that if I manage to make such a window, I will post photos of the step-by-step creation of such a window. Thank you in advance. Best regards, Daniil.
= = = = = = = = = = = = = = = = = = = = = = = = = = = = = = = = = = = = = = = = = = =
So, let's go!
Is it possible to make such a window without a milling machine?
Yes, it's possible! Moreover, such a window can be made with only a circular saw on hand. In my arsenal there is a modern saw blade for aluminum, although when selling it it was written that it also saws wood, naturally. My disk looks something like this:
Specifications:
Disc diameter 255 mm.
Number of teeth 80 pcs.
The diameter of the mounting hole is 30 mm.
Mine is true mounting hole 32 mm and a larger diameter, but the point is not that, but the number of teeth! Thanks to the large number of teeth on the blade, it cuts wood exceptionally cleanly. I often asked friends to compare planed wood and sawn wood with this disk; sawn wood always won in quality. Homemade jointers often they do not produce a high-quality planed surface; it turns out wavy, especially at the ends of the workpiece, and not everyone can afford industrial equipment.
Why am I all this, you can make a wooden window if you have it on hand circular saw and a good saw blade with a lot of teeth (tips).
How to connect corners?
Most interest Ask:) because most make a simple tenon connection into one tenon.

Such single-tenon frames have already proven themselves to be extremely short-lived. If you want the window to serve for a long time and withstand a large number of cycles of opening and closing the sashes, then make a tenon joint with two tenons. You can, of course, make it with three tenons, if the thickness of the frame allows. 
The more spikes, the longer the gluing area for the parts and, accordingly, such a spike connection is several times stronger.
How to make a tenon joint?
This is not as difficult as it seems at first glance; first you need to cut four blanks to size, two vertical and two horizontal. It might just be rectangular section bars or already bars with the selected profile. The length of the blanks depends on the size of the window block box; it is better, of course, to calculate this on the drawing.
You can even cut the blanks to length by eye, attaching them to the finished box, but keeping in mind that the frame should overlap the box. Of course, in this case, a profile must already be selected in the blanks for the frame.
Tenons and eyes are usually cut on a milling machine, but in our circumstances we don’t have a machine, so the same can be done on circular saw with the help of simple devices or without them at all.
It should be immediately noted that the vertical parts of a wooden window or door are always eyelets, and the horizontal parts must be tenons.
For example, I will show you a video of how the guy does it tenon joints on a circular machine using your own device.
Here's a trickier device:
In both videos, box tenons are made, they are small, there are a lot of them and it is difficult to make them without tools. If you are making one or two windows, then you can get by with a simple device like in the first video, but without a pin, then all the work will need to be done by marking with a pencil on the workpiece.
What fittings was the window designed for?
To be honest, I took the fittings and profile of a plastic window as a basis. I don’t know if there are differences between the fittings for wooden and plastic windows, but I think that having any of them you can adapt.
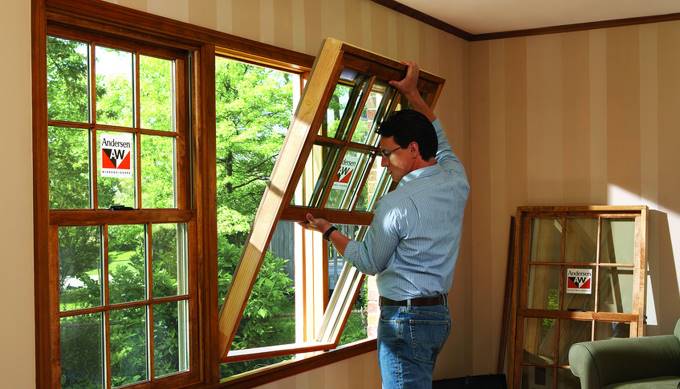
At the beginning of this winter, I installed a factory-made wooden window in my kitchen on my own. Below, look at the photo of the window, which elements can be taken from there when developing a drawing.


Today I would depict my profile a little differently than four years ago: 
As you can see, I increased the size of the bars to 80 mm, after all, we have harsh winters, and I would like the warmth to remain in the house, besides, a more massive frame will be stronger and look better.
In this article, I again do not give you ready-made drawings and window sizes because in order to develop them, you need to have them in your hands window fittings and understand how it is attached and works. Unfortunately, I have no experience working with such accessories, so I’ll develop finished drawing I can't yet. Below I tried to visually depict what a corner tenon joint should look like.


I found several more photographs on the Internet that show elements of the tenon joints of a wooden window. I hope the information I provide will help you develop your own drawing. wooden double glazing and bring it to life. Good luck!


It is common to see double-glazed windows in windows that are assembled from a metal-plastic profile. But not everyone has the desire to install just such structures in their home. Some people prefer wooden windows due to large quantity the advantages they have.
In fact, there is a way to combine the two technologies and build wooden windows with double-glazed windows. How this can be done will be discussed in the article.

Preparatory stage
Making a wooden window yourself will require not only basic carpentry tools, but also the skills to work with them, since high precision will be required. From the basics you will need:
- roulette;
- square;
- screwdriver;
- drill;
- plane;
- chisel.

You can also use machines if they are available. The direct manufacturing process is preceded by a preparatory process, which includes the creation of a drawing of future structures. To compose them, you must first determine what exactly the window design will be:
- deaf;
- with two doors;
- with one leaf.

Depending on the installed fittings there may be various ways interaction with the sash. Wooden windows with double-glazed windows do not exclude the presence of vents, so it is also worth thinking about them. Measurements for the window are made directly at the place where it will be installed. Even with visually identical dimensions, there may be differences in the size of the openings, which will create problems during installation.

If the work will be done independently, then the drawing can be done in free form. It is better if the scale is respected, and this is easier to do on a checkered piece of paper. This approach will make it possible to more accurately calculate the required material, which includes not only wood, but also fittings in the form of hinges, latches and bolts.
Advice! Accessories for your window can be purchased at a specialized store or from those who assemble metal-plastic structures.

Any wood can be used as a base for a window; the only question will be the ease of processing and service life. Due to its cheapness and availability, many people choose pine. There is also an option to assemble the window frame from oak. You shouldn't do this if this is your first window project, as handling oak can be a real hassle.

Drying wood yourself should be done if you have enough experience. Otherwise, it is better to purchase ready-made dried boards. This is due to the fact that if the drying technology is violated, cracks may appear in the wood or the boards may become deformed. It is also worth paying attention to the presence of knots. It’s good if there are none at all, because during operation it is from them that the process of rotting can begin.

The next step is the preparation of blanks, which are cut out according to the drawn up window drawing. During the sawing process, you can leave gaps of a few millimeters, which will be processed later milling machine. If it is not possible to use a solid board, then laminated veneer lumber is also suitable. It will be quite easy to work with a board with a section of 15 by 5 cm.
Build process
After finishing preparatory process, you can proceed to window assembly, which begins with the frame.
Box

The frame serves as the basis for the window structure. Since the blanks for it are already ready, you can start connecting them. To do this, it is best to use a proven tongue-and-groove joint. To implement it, tenons are cut out at the end of one of the parts, the width of which must correspond to the width of the board. In the counter part, in place of the tenons of the previous one, recesses are made into which they must fit. In the illustration you can see an example of such a connection. After the window frame parts are adjusted, you can fix them. To do this, PVA glue or other suitable wood glue is applied to the joint. You need to wait a few minutes for it to absorb a little. After this, the window frame parts are fixed.

If you leave everything in this form, it is easy to loosen the frame and it will become deformed. To prevent this from happening, you will need to further strengthen the joint. To do this you need to use a dowel. A hole is drilled exactly in the center of the junction unit. A wooden cylinder is inserted into it according to the diameter of the hole. It must also be pre-impregnated with glue. To prevent window frames from losing their configuration during the drying process, they can be clamped with clamps.
Frame

Using a finished window frame, it is easier to make a frame for it, since measurements are already taken after the fact. It is better to entrust the measurement process to someone who has experience in manufacturing windows, since there is significant amount nuances that are difficult to take into account during the first experience. Minimum size The timber that will be easiest to process when making a window frame has a cross-section of 60 by 40 mm. Under the windows into which the double-glazed windows will be inserted, the moisture content of the wood should not exceed 12 percent. If we talk about the species, it is better if it is beech, oak or hornbeam.

Pay attention! It is better to assemble the window frame from solid timber or from one that was glued not in length, but in thickness. This is necessary for greater rigidity of the window, which is especially important for sashes that will open.

In the case of installing a double-glazed window, a groove will be required as for a single-glazed structure, but in this case it is made deeper, and its size is determined by the thickness of the double-glazed window. To ensure that the groove for the glass unit is smooth and meets the required characteristics, it is better to process it with a router rather than with a chisel. It is also worth understanding that the double-glazed window will be secured with glazing beads, so it is also worth providing a gap for it. Once all the blanks for the frame are ready, you can begin to connect them. But it will not be performed in the same way as for the box. In this case, you will need to cut the ends at an angle of 45 degrees, making a tongue and groove. The joints are glued and set aside until completely dry.
After the frame has dried, all fittings are installed. In this case, you need to be careful, because you will need to make cuts in the appropriate places and select the necessary recesses in the box into which the window frame will be installed. A video of the assembly of the accessible window structure is below.
Window installation
The process of installing a manufactured structure begins with preparing the opening. If there is a need, it can be expanded or, conversely, made smaller. All surfaces are cleaned of debris and made as smooth as possible. Cracks can be repaired with tile adhesive, which will subsequently be covered with putty. The next step is to fix the manufactured box. It must be placed in the opening vertically and horizontally. To level it, you can make linings from wooden pegs. Next, markings are made and holes are drilled both in the wood and in the wall. It is better to fix the box with a frame anchor; the screw head needs to be countersunk so that the window frame fits without any hitches.

A frame is installed on the box. It must be well fitted so that air does not enter through the cracks. For additional fixation and sealing, you can use special compounds. The next step is to hang the sash, if provided. Loops are pre-hung if this has not been done previously. IN last resort Double-glazed windows are being installed. They are fixed in place using glazing beads. Typically, the design of a double-glazed window provides for the presence of a sealing tape that closes the space between the glass and the frame. Next, you can install the handles in their place.

The last step is to eliminate the gaps between the frame and the window opening. This is done with polyurethane foam. In this case, the frames should be closed, and you should not apply a lot of foam, because when it expands, it can deform the wooden structure of the window. When the foam dries, it must be cut off. The next step is to install the window sill. The part that will protrude above the radiator should not have a protrusion of more than 5 cm, as it will be easily damaged. The window sill sits on the mounting foam, after which it must be pressed down well. The final stage of window installation is decorative finishing slopes. This can be done with plasterboard or putty.
Manufacturing of double-glazed windows
You can also assemble a double-glazed window for a wooden window yourself. All components can be purchased at a specialized store. To work you will need the following:
- glass;
- remote profile;
- desiccant;
- butyl tape;
- corners.

The first step is to cut the glass for the future window. You can order cutting from craftsmen or do it yourself if you have a good glass cutter. The number of glasses will depend on the desired number of chambers in the double-glazed window. If there are two cameras, then there should be three glasses. Next, the spacer profile for the double-glazed window is prepared. The size of the frame that will separate the glass should be 5 mm smaller on each side. This is required to attach the seal. Before assembling the spacer frame, it is necessary to fill it with desiccant. To do this, one side is closed with a connecting corner, and backfill is made through the other end. Occupancy should be 40%. A dehumidifier is needed to eliminate moisture between the glass panes, which can lead to mold.

Now you can begin assembling the glass unit for the window. The glass surface on which the spacer will be mounted is degreased. Butyl tape is glued to the spacer frame for the double-glazed window. After which the frame is placed on the glass. The top of the frame is once again covered with butyl tape and covered with another glass. The operation must be repeated if the glass unit for the window is double-chamber. Now all that remains is to fill the space between the ends of the glass and the spacer frame. For this, a polyurethane or polysulfide composition is used. They can be applied with a spatula. You need to be careful not to leave any bubbles. The drying process may take up to 12 hours. You can see the sequence of assembling a double-glazed window for a window in the video below.
Summary

As you can see, it is possible to make a wooden window with double-glazed windows with your own hands. For greater window tightness, it is better to use a factory-made double-glazed window. This is due to the fact that some of them are produced filled with inert gas, which reduces heat loss. When assembling a window frame, it is worth practicing on blanks, which will allow you to acquire the necessary skill before assembling the final structure. The work of making a window cannot be rushed, which often leads to mistakes.
Of course, plastic windows have long won our hearts. However, for a budget-friendly way to replace windows, a wooden frame is suitable. And if you decide to conduct such renovation work in your dacha or on your veranda, you can make wooden windows with your own hands. When I added a veranda to my house, I immediately decided to glaze it and the option with plastic windows Didn't suit me. Of course, production machines assemble window frames much better and faster, but you always want to do something with your own hands. But if you follow all the rules for processing wooden material and the technology for connecting parts, then it is quite possible to achieve good results. Today we will look at step by step instructions for the production of wooden windows.
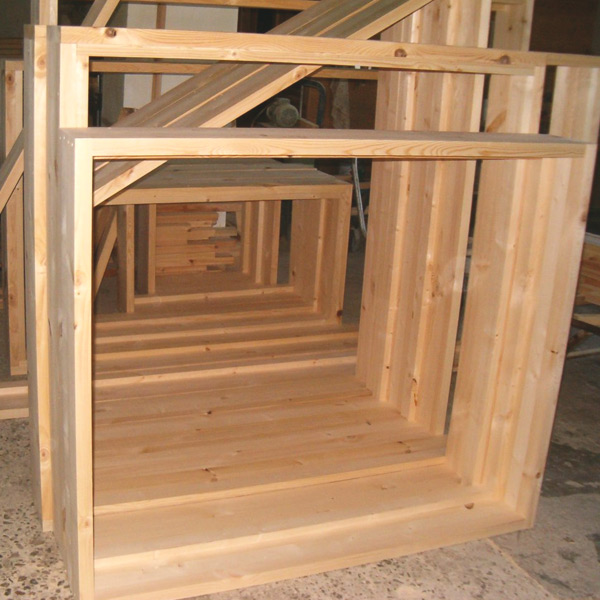
Making a wooden box

Wooden box
When I decided to make a wooden window with my own hands, I wondered what type of wood would be best to use. On my own behalf, I would like to recommend using pine - it is quite affordable due to its cost. If you, like me, decide to try wooden frame for windows yourself, then give preference to this material. Oak can be considered a good alternative, but it is more expensive than pine and I was afraid to use it for the first time.
Important! If you decide to experiment, then you should not immediately purchase expensive materials. It is quite possible that you will not succeed and the wood elements will be damaged.
Stock up necessary tools in advance, although many home craftsmen have all these items in constant use:
- Drill and screwdriver – mechanized method tightening the screws will speed up the assembly process
- Glass cutter
- Electric planer
- Chisel and hammer
Always check the condition of the boards before purchasing. They should not have cracks or chips, protruding knots or any deformations. They must also be completely dry. Step-by-step technology:
- For my window I chose a board measuring 150x50 mm
- In all wooden blanks made a groove resembling the letter “G”. The groove depth was 15 mm
- After that I connected the 4 parts together. Wood glue is used for joints, and the corners should be 90 degrees each. After the box is glued, drill holes in it for a wooden rod, the length of which is 3 cm. This is an additional fastening and ensures the presence of angles of 90 degrees
- The box is inserted into an already prepared opening for the window. Everything is simple here: you drill holes into which you insert dowels, and then secure the box with self-tapping screws. I did not perform such actions - my goal was to make a window with my own hands
Important! All cracks must be filled with foam. With such fastening, the mobility of the tree during temperature changes is not taken into account.

DIY wooden windows
A wooden box stands - we make a frame
DIY wooden windows
Step-by-step instructions for making a window frame with your own hands depend on what kind of window you want to make. I made a single-glass profile with 2 grooves:
- The window frame is made of wooden beams, the size of which depends on the design of the windows. I used wooden beam 6x4 cm, but you can take larger sizes
- If window profile will be double-glazed, then the design will have 1 more groove - 2 grooves for glass and 1 for fixing in a box
- The profile is made using a router or electric planer - I chose 4 mm glass, and 10 mm glazing bead
- In order to assemble the parts, they need to be cut. To get 90 degrees, cut the edges obliquely, that is, 45 degrees. Self-tapping screws should be used for high-quality fastening and immobility
As a newcomer to this business, it was not immediately clear to me how the whole process happened. The instructions for making wooden windows seemed to me to be written on incomprehensible language, but having bought everything necessary materials and tools, I started work. Having examined all the drawings and photos that can be easily found on the Internet, it turned out that making a wooden window with your own hands is not such a difficult task.
Important! More recently, cashing was used to hide defects in the installation of wooden windows or their thermal insulation. Now cashing plays not only a practical, but also a decorative role. Cashing is suitable for wooden houses and is used only for them. It can be carved or resemble images of animals - it all depends on the imagination of the master.
There is only a little left - we insert the glass

Making wooden windows with your own hands
The most important thing in this process is the accurate selection of glass sizes. Thanks to this, cold bridges are not created, and the glass adheres well to the wooden window frame. Deviations of 1 mm may already have Negative consequences– but we don’t need it.
Important! Don't forget about safety precautions when cutting glass. You must have gloves to protect your hands and glasses - protection from glass chips is a must.
You need to cut the glass with a diamond glass cutter, and fine-grained sandpaper is suitable for polishing the edge. The cutting technique is very simple. It is enough to stock up on a ruler that will be longer than the glass and guide it along it with a glass cutter. Before coating the edges with sealant, you need to attach the glass for fitting. If everything is successful, then sealant is applied to the grooves, after which the glass is finally inserted into the frame. After this, we use a glazing bead - it should hook both the frame and the glass, and then fix it with thin nails. If the ties are wider, then fix them with self-tapping screws - choose thin fasteners.
At this point, making wooden windows with your own hands is completely completed and only one thing remains: placing wooden windows in prepared boxes. I didn’t need this action, but if you still decide to install, then:
- We insert the structure into the block and fix it in the grooves
- We fix the frame using self-tapping screws - the elements should pass through it directly into the wall
- All cracks are blown in using foam and wait for it to dry completely.
- In the future, you can design the slopes with your own hands in the most convenient way for you. But for wooden structures everyone is used to using plaster because plastic slopes will not look harmonious
Renewing an old wooden structure

We restore old windows with our own hands
I would like to raise another important question: how to update old wooden windows with your own hands? Despite all the defects that appear on wooden structures later long years, they remain very strong and durable. Therefore, there is not always a desire to change old window structures and spend a lot of money on it.
Typically, do-it-yourself restoration of wooden windows involves installing seals and painting the frames, but in some cases more is required. labor-intensive process. When gaps appear between wooden frame and the box should use seals. You can use rubber, foam rubber or polyvinyl chloride. But if a misalignment has formed, then closing or opening the sash on the windows becomes a real problem. In order to correct the situation, you can try 2 methods: first, check the hinges - perhaps they have settled and it’s enough to just find a new place for them or plan off the excess using a plane. The fact is that wood tends to swell and therefore there may be places that need to be corrected over time.
Very often, windows do not close due to a simply thick layer of paint applied. To do this you need to use sandpaper remove excess layers of paint and varnish from wooden structures. However, the worst problem may seem to be rot in certain areas. Oddly enough, this has usual solution: using a chisel you need to cut out the damaged area; it will be better if you also grab some suitable material. Coat the recess that appears with epoxy or wood glue, then insert new material and secure it. When the adhesive solution dries, the entire surface is processed using a sander. The final solution will be to open the frame with varnish or paint it with paint and varnish.
Results

As you can see, there is nothing wrong with making new wooden structures or updating old wooden windows. In order to carry out all the work yourself, it is enough to study the technology, as well as stock up on the necessary tools and wooden materials. By selecting suitable wood, you can build it yourself window design and in the future glazing your dacha or veranda, and possibly the summer kitchen.
IN last years plastic double glazed windows are confidently replacing their wooden counterparts. However, their reliability and technical performance are firmly established, time-tested. Besides - this budget method change the window, especially if you decide to make a new one yourself.
Wooden structures are environmentally friendly and reliable construction materials. Everyone knows about their advantages: firstly, wooden windows “breathe”, secondly, wood - available material, thirdly, they can be made with your own hands, without the use of complex equipment.
You can make windows for a dacha, outbuildings or veranda yourself, having studied the technology a little. When manufacturing, you need to pay attention to correct calculations window sizes and geometry. Not only the aesthetic factors of operation, but also the functionality of the structure depend on this.
How to make a wooden window with your own hands
The main point in assembling the parts of a new wooden window is jeweler's precision. If you are unsure of your abilities, then it is better to turn to a professional or order a ready-made window made in production.
Required tools:
- screwdriver;
- drill;
- glass cutter;
- electric plane;
- hammer;
- chisel.
Stage No. 1. Preparatory work
In order to make a window, you need to create a sketch. To do this, you must clearly know the size of the future window and its functionality, for example, whether it will open or not, the number of sashes and vents.
The sketch is drawn in accordance with the scale. This is important in order to correctly calculate the amount of material, the location of bolts and hinges, handles and latches. The presented video contains examples of window drawings, maybe you will find what you need here:
In addition, the calculation of the material for this window is carried out. It is better to do the calculation with a reserve, in case the part, due to lack of experience, can be damaged
Important! Decide in advance on the type of window to purchase the necessary fittings.
Stage No. 2. Making blanks for the window
An important point is the choice of wood type. The most popular windows are made of solid pine; in addition, oak can be an alternative.
The board must be prepared for processing, namely dried, free from deformation and damage.
According to the drawing, they cut out necessary details, which will later be connected to each other.
Working with a milling machine requires skill, so it would be more advisable to use an electric planer and a jigsaw.
In addition to solid wood, you can use laminated veneer lumber as a working material. It has a durable texture and is also resistant to deformation.
For work you will need a board 150x50 mm.
Stage No. 3. Making a box or frame
A groove or groove is made in the blank boards, the depth of which is 15 mm; the groove is a recess in the shape of the letter G. We will need to make four identical parts of this kind.
Connect the box parts together using wood glue or PVA glue. In the finished rectangle, holes are drilled in the corners and a 3-4 cm rod is hammered in. This wedge provides reliable connection parts at right angles.
The box is ready. It is placed in the window opening and secured with dowels. The gaps around the perimeter are foamed with polyurethane foam.
Stage No. 4. Making a window
The frame requires a 6x4 cm beam. The shape and design depend on the number of compartments, glass and the size of the glazing beads.

There are two types of profile:
- single glass;
- double-glazed.
The single-glass design includes two grooves: one for installation in the box, and the other for mounting the glass.
A double-glass profile is a more complex design, having three grooves for two glasses and a frame.
Typically, glass with a section thickness of 4 mm is used, while the bead size will be 10 mm.
The base of the frame is assembled from blanks. To make assembly convenient, the ends of the workpieces are cut at an angle of 45 degrees. And the pre-prepared profile is joined using the tongue-and-groove method, which ensures reliable adhesion of the parts and immobility of the structure.
You can also consider another amplification option - metal corner. This part is sold at any hardware store. The corners are attached to each corner of the structure using self-tapping screws. Currently, builders have begun to abandon this method, believing that it is not aesthetically pleasing. However, if the window will be painted later, this option may be considered.
Stage No. 5. Installation of glass
Importance correct calculation The size of the glass is due to the fact that this factor determines the tight fit of the glass to the frame, which is responsible for the thermal conductivity of the window. If cracks are formed during the installation process, then there will be blowing through such windows.
Important! Glass measurements before cutting are made with millimeter precision.
Glass is cut with a glass cutter, after which the sharp edges are treated with sandpaper.

When carrying out this process, you must follow the safety rules:
- work must be carried out in gloves with tight rubber coating to protect the palms of your hands from cuts;
- a mask is put on the face;
- Protect your eyes with glasses, as there is a risk of glass shards and shavings.
Working with a glass cutter also has its own subtleties. So, how to cut glass. The glass cutter's movements on the glass surface should be smooth with a moderate degree of pressure. If you did not apply enough pressure, the cut will be of poor quality and with further actions, you will get a jagged chip. On the contrary, excessive pressure can push through the glass, and you risk being injured by glass shards.
A ruler is used to cut glass. The material from which it will be made is not of fundamental importance. If you don't have a ruler, you can use a straight edge.
Important! The length of the ruler must exceed the size of the glass.
After processing with a glass cutter, the canvas is moved to the edge of the table and lightly pressed with your hand. If you did everything correctly, the glass will break at the cutting line. This way we cut out all the glass for the window.
For final installation, apply sealant to the wooden parts. It is better to take a colorless product so that the window looks aesthetically flawless. Next, apply the glass and let the sealant dry. The fabric is secured on top with a glazing bead. The bead is a triangular strip that simultaneously presses against the glass and frame. Its task is to fix the glass and hide the seam.
The lath is mounted using thin nails, less often with self-tapping screws if the bead is wide.
Stage No. 6. Window installation
The finished window is mounted in the frame using self-tapping screws. The gaps between the frame and the box are sealed with mounting foam or sealant. Next, the window sill is installed in place. You can learn more about the process of making a wooden window by watching the video:
Making a two-piece frame
When you need a window that will open, the technology changes a little and becomes more complicated. This window is made a little differently. A beam is mounted in the center in a vertical position, which has grooves similar to the frame. The second half of the window is made separately and has a frame several centimeters thinner. It is attached to the main structure and represents a “door”.
Making a wooden window is a fascinating and rewarding process. Besides, how nice it is to look out of a window created with your own hands, which keeps your warmth and a piece of your soul.